Tag Archives: Tasteful Labels Dies

Sunshine & Rainbows Brighten Your Day Card

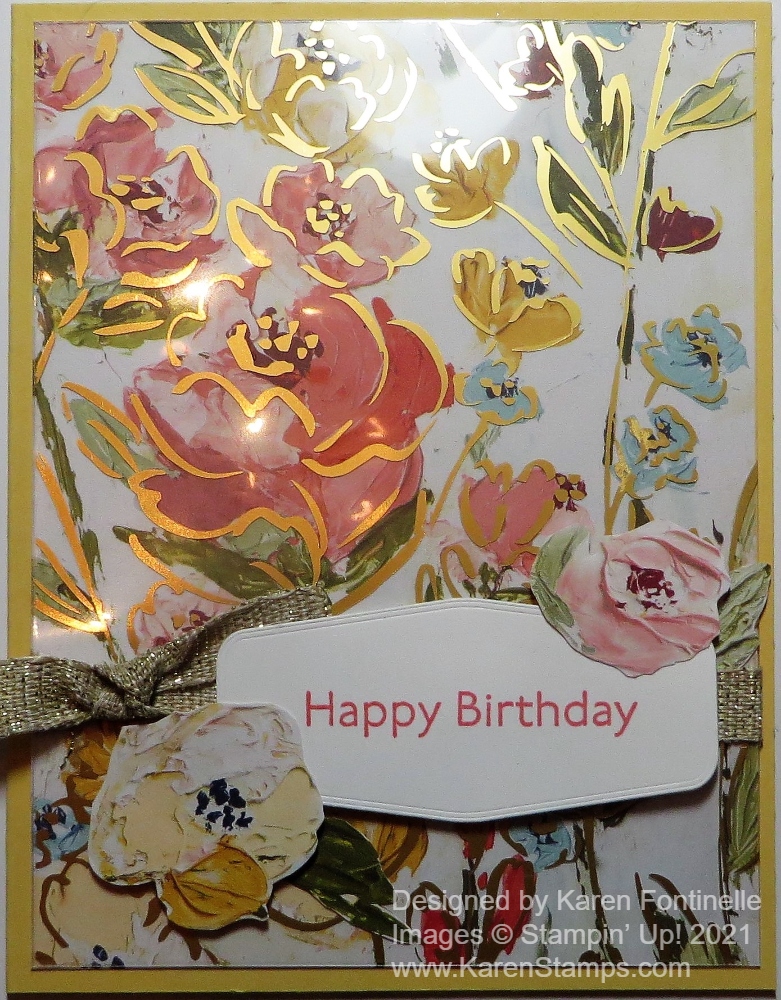
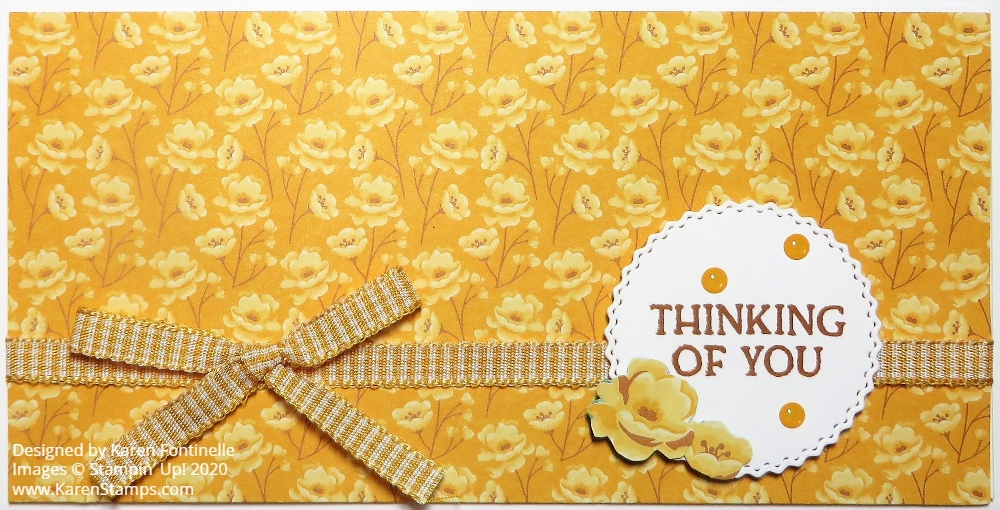
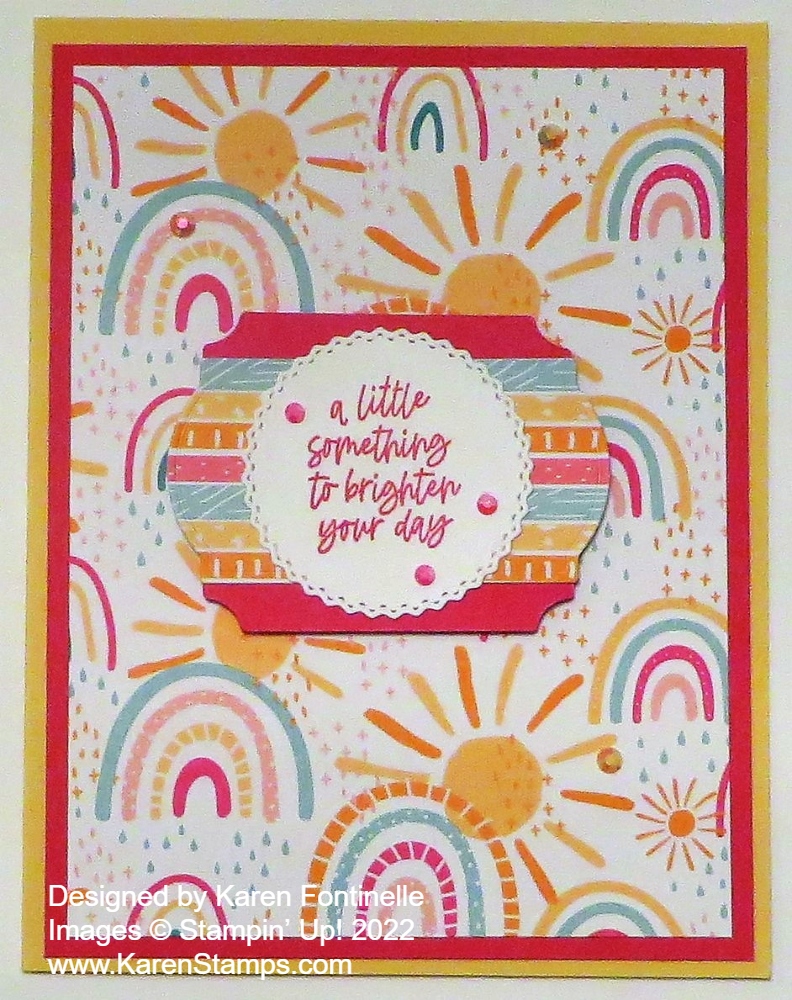
I thought I would make just a simple, bright, and happy card using this cute designer paper available during Sale-A-Bration, and here is my Sunshine & Rainbows Brighten Your Day Card! Now I did make it a little more complicated than it needed to be by layering the greeting the way I did, but I often make things more complicated!

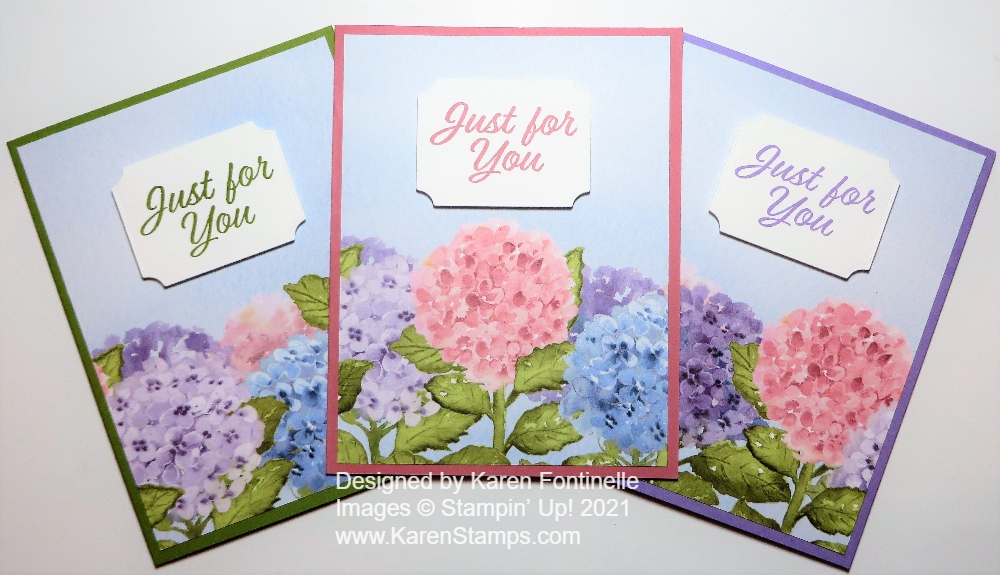
Today I wanted to showcase something you can get FREE during Sale-A-Bration which is one of Stampin’ Up!’s biggest promotions of the year! (And now we even have two Sale-A-Brations each year!) It’s the Sunshine and Rainbows 6″ x 6″ Designer Series Paper on page 8 of the Sale-A-Bration Brochure. It coordinates with the Rainbow of Happiness Bundle in the Spring Mini Catalog on page 18. Buy the Bundle and save 10% over buying the Rainbow of Happiness Stamp Set and the Brilliant Rainbow Dies separately. Even if you don’t have the stamp set and dies, you can use this very cheery rainbow paper to make lovely cards and projects!

As I said, I wanted this card to be bright and happy so I checked the colors that coordinate with the paper. I chose So Saffron cardstock for the card base and layered it with Melon Mambo for a little extra pizzazz in color on which to layer the designer paper. I love this sheet with the sunshine and the rainbows just jumping right out at you! How could you not feel good making this card for someone and think about how happy they will be to find it in their mailbox! Especially these days, we know we could all use some extra pick-me-ups, and certainly, a card in the mail is one of the best!

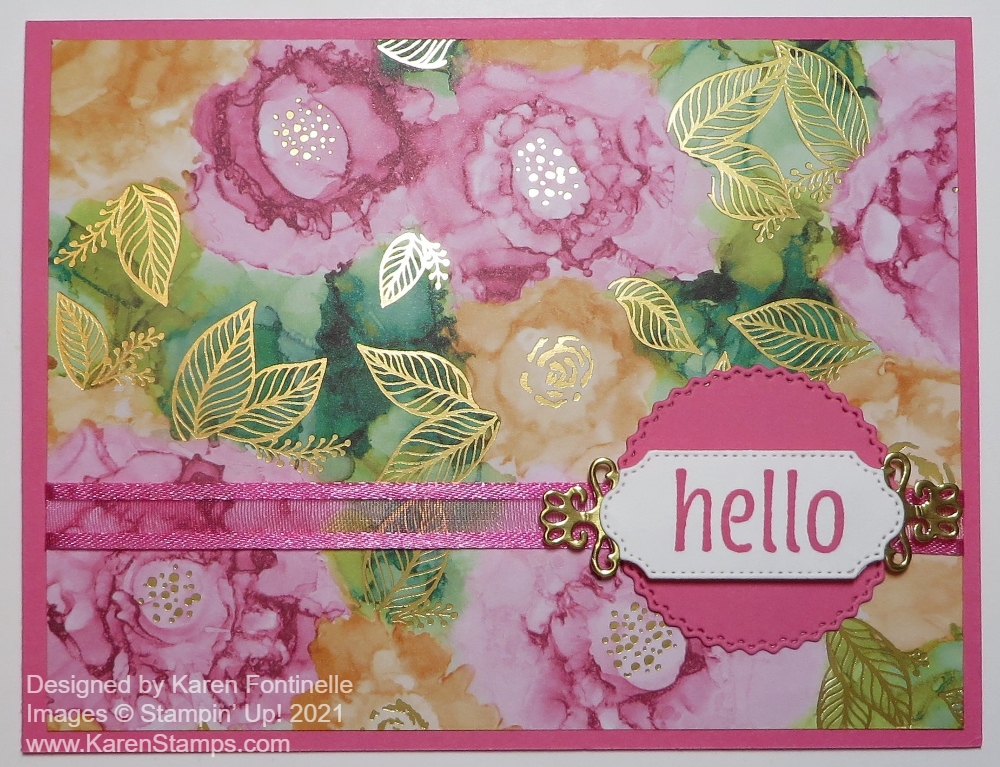
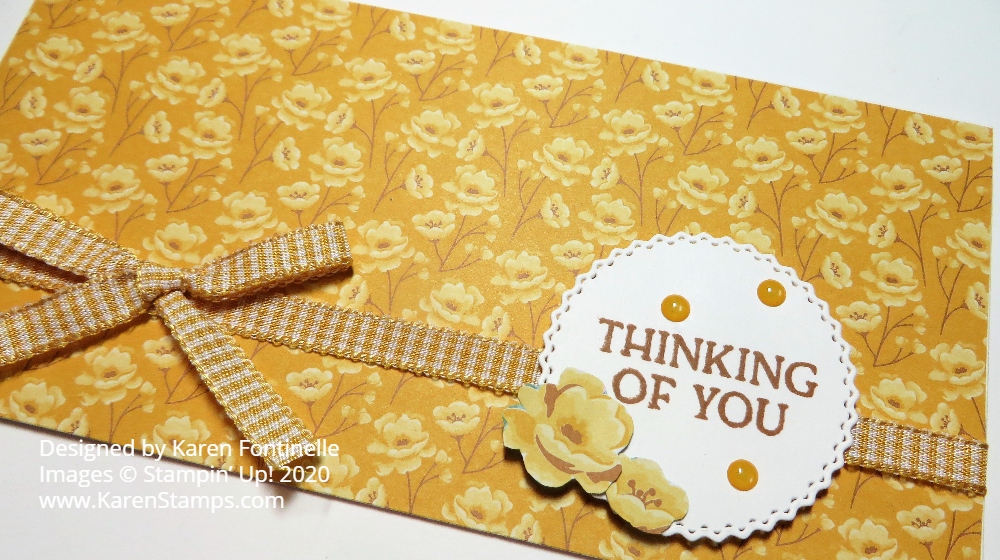
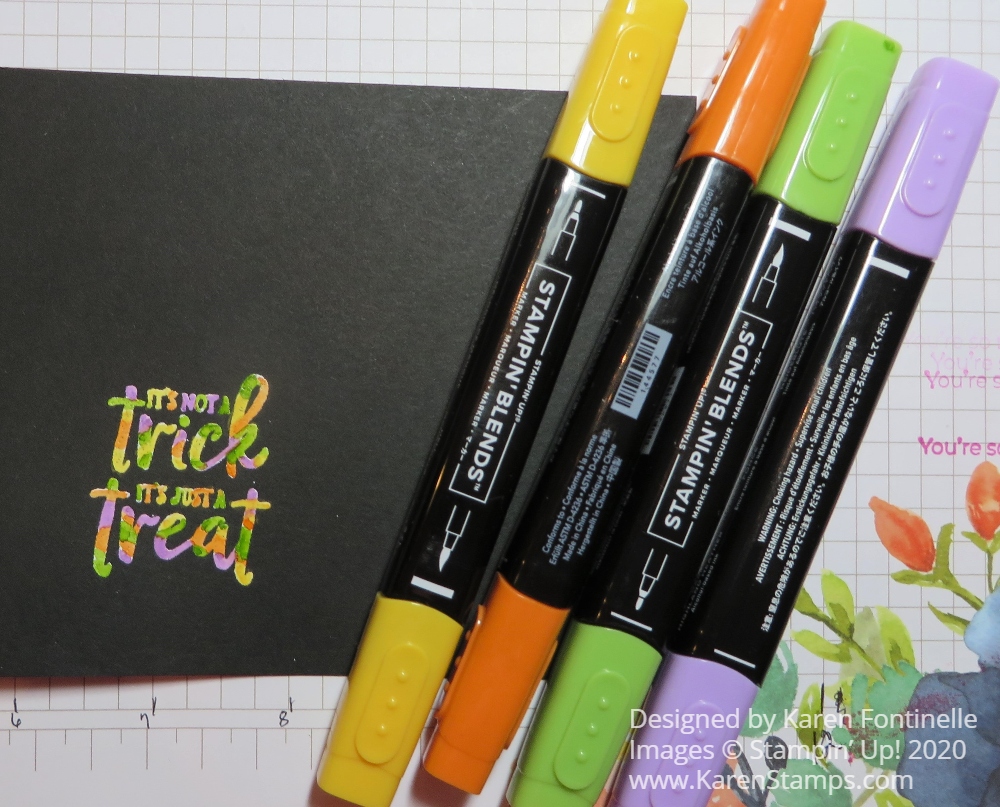
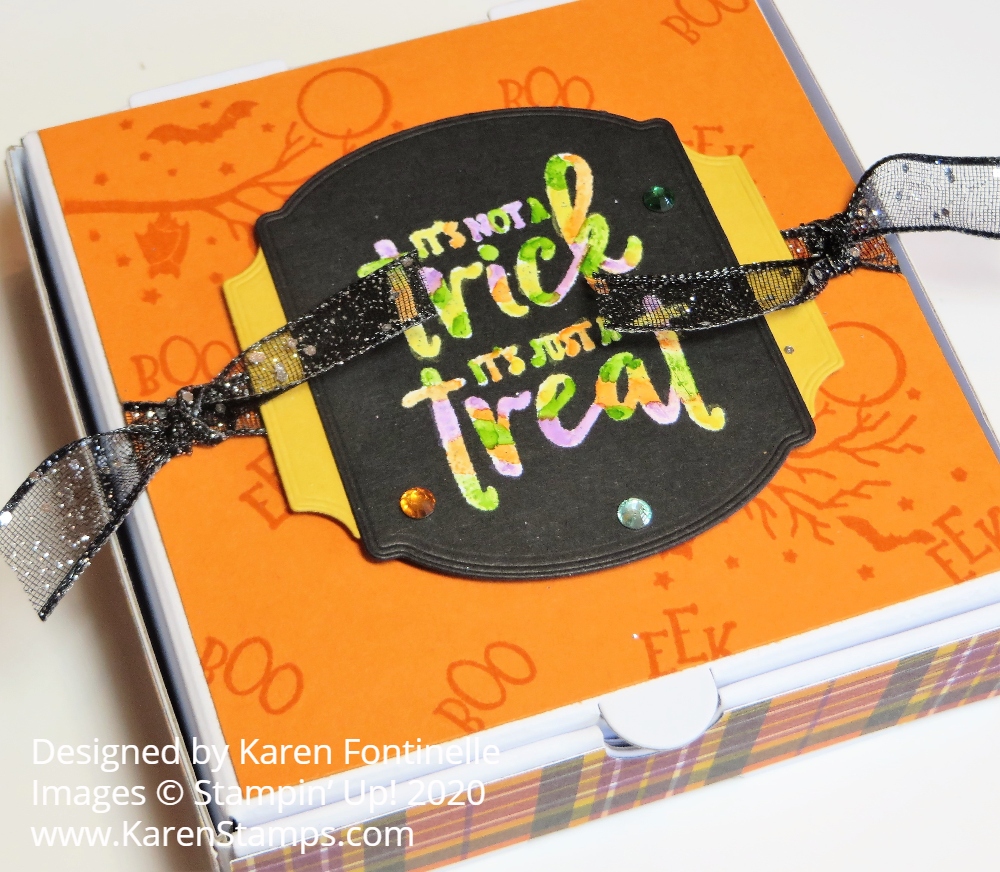
The greeting is in the Rainbow of Happiness Stamp Set and I stamped that in Melon Mambo ink. Then I die cut it with that cute frilly circle in the Tasteful Labels Dies. Then came my dilemma that made this more complicated! What did I want to layer the greeting on to make it stand out better from the bold background? I made several different die cuts and wasn’t totally happy with any one of them. Plus I felt a little adventurous, wanting to use the striped side of one of the papers in the pack. But then would that stand out from the background or add more busy-ness? Finally, I die cut a piece of Melon Mambo cardstock, cut it in half, and then adhered it so it would just peek out at the top and bottom of the layer under the greeting. This is the die in the Painted Labels Dies. But the striped paper is also cut with a different die in the same Painted Labels Dies set!

Of course, since this was to be a bright and happy card, I had to add some sparkle to the card. I added three pink jewels to the greeting from the 2021-2023 In Color Jewels. Even if the colors are not an exact match, these jewels seem to suit the purpose many times because the colors still seem to match or coordinate with even different colors! And I couldn’t stop, I had to add some of the yellow ones to the background of the card!

In the photo below you can see a closeup of the greeting and see how the pieces are layered. As I always say, just keep playing and you will come up with a combination that works!

Enjoy these two months of Sale-A-Bration! With every $50 you spend, you get to choose a FREE Sale-A-Bration product in the brochure! No limits! Spend $100 and have the choice of a special $100 Level product or go ahead and get two $50 Level products! Your choice! Happy Shopping!

SHOP STAMPIN’ UP! HERE!

Expressions In Ink Floral Hello Card

Expressions In Ink Floral Hello Card

As I was cleaning up my stamping supplies from making another card, I spied this paper that just looked beautiful (because it IS beautiful!!) and I got everything out again and made this Expressions In Ink Floral Hello Card! I knew I could just make a very simple card because the paper is so pretty and you really don’t need too much else.

I have loved this Expressions in Ink Specialty Designer Series Paper since it came out in the Stampin’ Up! Annual Catalog. The artistic designs on the paper plus the gold foiling make it exceptionally beautiful. I started with a card base of Polished Pink, one of the new In Colors this year. You could choose from several other colors for this same card since there are so many colors in the designer paper, like Pale Papaya or one of the many greens we have. Before adhering the designer paper to the card base, I wrapped a piece of Polished Pink 3/8″ Open Weave Ribbon around. I love this ribbon in all the In Colors.

The greeting is in the Artistically Inked Stamp Set. It is stamped in Polished Pink on Basic White and die-cut with a small die in the Ornate Frames Dies. I adhered it to a die-cut Gold Foil piece with the fancy ends, also a die in the Ornate Frames Dies. And to help all that to stand out, I die cut a fancy circle in the Tasteful Labels Dies in Polished Pink. The pink die-cut circle is adhered right to the card and then the greeting is popped up on Stampin’ Dimensionals. You could add a jewel or two to the greeting if you wanted to.

This is an easy card with a simple card design, maybe only the greeting is a little fancier. It’s all about the fancy paper! Here is a similar card I made back in July with some added die-cut leaves and the Expressions in Ink Ephemera Pack. Get out your Expressions Ink Designer Paper and make a card like my Expressions In Ink Floral Hello Card.

SHOP STAMPIN’ UP! ONLINE HERE!

Love You Always Happy Easter Card

Love You Always Happy Easter Card

Can you use Valentine paper to make an Easter card? Sure, with the Love You Always Specialty Designer Series Paper with its beautiful foil floral design on three different colors of papers. Of course, it is not officially Valentine paper. It is just presented in the January – June 2021 Mini Catalog in “sort of” the Valentine section of the catalog, in the Love You Always Suite. It is actually beautiful paper that you can use for many occasions. Since two of the three sheets of paper are pink (Blushing Bride and Rococo Rose) and since the suite contains hearts, we perceive it as Valentine’s Day paper. But if it would have been added to a floral suite, we wouldn’t consider it Valentine paper! All this to say, you can use this Love You Always Paper to make almost any pretty cards that you want!

This easy Easter card starts with a Blushing Bride Cardstock card base. The layer is the Love You Always Paper in Blushing Bride. I wanted to keep the card simple so I didn’t try for anything fancy. I stamped the greeting with stamps from two different stamp sets. First, stamped the Easter greeting from the Arrange a Wreath Stamp Set (retiring from the Annual Catalog!) and then for a little extra, I remembered the tulip in the Springtime Joy Stamp Set which I thought would sort of match the designer paper. I stamped just one tulip but decided on one on each side of the greeting.

Next, to cut out the greeting, I looked through my dies and finally decided on a large one in the Tasteful Labels Dies. Then I tried various things to make a layer of Blushing Bride Cardstock under the greeting, usually by cutting another die in half so it would just show out to the sides of the greeting. Nothing seemed to add anything to the card.

I thought I would try ribbon, so I used the Blushing Bride 3/8″ Metallic Ribbon. I’ve been using this ribbon pretty often. It’s very pretty with its one satin side and one metallic side. I wrapped this ribbon horizontally around the designer paper and added a bow separately. This seemed to enhance the card without interfering with the large die-cut greeting.

The greeting is popped up with Stampin’ Dimensionals®. For a little bling, I added a few of the smallest Champagne Rhinestone Basic Jewels, which I really liked on this card!

If you were to copy this card, you would find it very quick and easy to make because you wouldn’t have to figure out which elements to use! So if you need a quick and easy Easter card, try this card design! You can change it up however you like, but at least you will have a quick and easy idea to go by if you need to make some Easter cards and get them in the mail today! This Love You Always Happy Easter Card is really a basic card design so you can make a card like this for Easter.

SHOP STAMPIN’ UP! ONLINE HERE!

Ice Cream Corner Valentine Card

Ice Cream Corner Valentine Card

While it is time to be making Valentines and mailing them, this ice cream paper just stole my heart and I had to use it! But with the greeting, I think this Ice Cream Corner Valentine Card could be used as a Valentine! Why not?!

I hadn’t made anything yet with the cute Ice Cream Corner Designer Series Paper and some of the patterns in the package I don’t really care for. But the ice cream patterns are adorable, and then they can be paired with the generic designs as I did here on this card.

There are lots of coordinating colors with this paper so you have a wide choice of colors to use making cards and projects! I chose Bermuda Bay for the card base and a layer of Petal Pink. Once I cut the ice cream cone paper to layer on the card front, the card looked plenty finished and cute as it was! So you could make a very simple card just like that and add a greeting

I also liked the underside of the ice cream cone pattern, which is this cross-hatch paper that looks like an ice cream cone. I cut a narrow strip of it and adhered it over the bottom of the ice cream cone paper, then added some Cinnamon Cider Ribbon and bow over the seam of the two papers.

I originally thought I would have to make this cute card a birthday card, but when I looked at the Sweet Ice Cream Stamp Set and saw the “You Melt My Heart” greeting, I knew that was the one I had to use! I didn’t want it to be too large and take away from the cute ice cream cones in the background, so these dies seemed to work well.

The greeting is stamped in Bermuda Bay Ink on Basic White (the new replacement for Whisper White) and die cut with one of the smaller Layering Circles Dies. This was layered on a Bermuda Bay die-cut (one of my favorite ones!) from the Tasteful Labels Dies and popped up on Stampin’ Dimensionals®.

For a final touch, I die cut some hearts with the Many Hearts Dies. I chose a small one to add just below the greeting to convey a little bit of a valentine feeling or at least “love”. So I think you can use this Ice Cream Corner Paper for a Valentine like this Ice Cream Corner Valentine Card.

SHOP STAMPIN’ UP! ONLINE HERE!

Hydrangea Hill Designer Paper Just For You Cards

Hydrangea Hill Designer Paper Trio of Just For You Cards

You can’t beat the beauty of the Hydrangea Hill Designer Series Paper as you can see here on these Hydrangea Hill Designer Paper Trio of Just For You Cards, with the designer paper behind them! Besides these three cards, I made something else with the rest of the designer paper that I will show you tomorrow!

This one sheet alone in the package of Hydrangea Hill Designer Series Paper makes the purchase worthwhile! If you are a scrapbooker, just think what a beautiful page you could make by just adding your photos to this already beautiful paper. And if you take a deep breath, shut your eyes, and cut into it, you can make all kinds of beautiful cards and projects with this unusual sheet with the flowers at the top and bottom.

To make these cards, I knew the dimensions of designer paper as a layer on a card base is 5 1/4″ x 4″. I just cut across the DSP at 5 1/4″ with one of the flower edges at the bottom. Make sure you pay attention which way you are placing your paper before you cut! Basically, you will cut off the bottom edge of the paper with the flowers at 5 1/4″ Then cut this 12″ x 5 1/4″ panel into three pieces at 4″ wide each.

For these cards, I used card bases of coordinating colors, such as Highland Heather, Rococo Rose, and Old Olive. Then I stamped the greeting in the matching ink color. The greeting is from the Meant To Be Stamp Set, which is in the Annual Catalog. Next, I used the die in the Tasteful Labels Dies to cut out the greeting and popped it up with Stampin’ Dimensionals. That’s all there is to these cards! You could add some little jewels or embellishments, but basically, I wanted to keep the cards simple with such pretty paper.

The Hydrangea Hill Paper is so pretty you can just use it and a greeting to make a card! It will be hard to cut into your designer paper, but after you do, you will make something even more beautiful than the paper itself. Then send your lovely card off to someone who will certainly appreciate hearing from you!

SHOP STAMPIN’ UP! ONLINE HERE!

Trio of Hydrangea Hill Just For You Cards

True Love Red Floral Card

True Love Red Floral Card

Would you believe this True Love Red Floral Card is made from the True Love Designer Series Paper except for the vellum and the greeting? This black and white designer paper with all sorts of designs give you all sorts of opportunities to be creative!

To make this card, I decided to copy a sample card in the January-June 2021 Mini Catalog on page 10 in the Love You Always Suite. I changed the colors of the flowers and how I arranged them and I put a different greeting on my card. My greeting took up a little extended space since it was longer and narrower than the sample card, so that caused me to move the flowers around a little.

The card base is Thick Whisper White and the striped pattern of the True Love Designer Series Paper covers the whole front of the card base. I didn’t leave any margin. The piece of vellum is 5 1/2″ x 3 1/4″. You could make yours any size. Just don’t glue it down yet because glue and other adhesives show through vellum.

Then I chose another of the patterns in the designer series with these flowers. I decided which ones I wanted as close to the edge of the paper as I could get and cut those out of the sheet. I colored them in with Stampin’ Blends Markers, the Light and Dark Real Red. I wanted my card to be black, white and Real Red! The flower center is just colored with Dark Daffodil Delight. The leaves are Granny Apple Green, Light and Dark, along with a touch of Daffodil Delight. An artist friend I know always said to mix some yellow in with green, so I do!

You can leave the flowers in the group in which they appear on the designer paper or if you need to cut them apart to make them fit on your card you can do that. Some I popped up on Stampin’ Dimensionals and one flower and one leaf is adhered right on the vellum.

The greeting is stamped in Real Red Ink on Whisper White from the Lots of Heart Stamp Set. It is die-cut with a die in the Tasteful Labels Dies as is the Real Red piece behind it.

If you place and adhere everything on to the vellum before you attach it to the card, you can turn the vellum over and apply adhesive on areas that are covered by the greeting and flowers on the front. That will hold it on to the card front without showing the adhesive through the vellum. I used Stampin’ Seal.

When you are looking for card ideas, if you don’t already have one in your head, think about looking at any of your Stampin’ Up! catalogs! You can copy any of the ideas, and most likely you will come up with your own version once you start creating!

Remember, Sale-A-Bration is going on so with every $50 you spend, you earn a free product in the Sale-A-Bration Brochure! No limit!

Be sure to check out the black and white True Love Designer Series Paper so you can have fun either designing with it as is or using different methods of coloring it like on this True Love Red Floral Card.

True Love Red Floral Card Closeup

Fine Art Floral Golden Garden Birthday Card

Fine Art Floral Golden Garden Birthday Card

I thought I would make an easy but beautiful card for this blog post and of course that meant using the Fine Art Floral Suite to make this Fine Art Floral Golden Garden Birthday Card. I know the title is a little weird, but it’s because I used the Golden Garden Designer Specialty Acetate Sheets. I didn’t even know what they were called, just that they were in the new spring mini catalog and I had them! If you place them just right, some parts match this designer paper!

First I made the card. I wanted to use the Fine Art Floral Designer Series Paper. I chose the sheet that has one top corner bare of flowers. Actually, there is another sheet with a blue background and yellow flowers, but this one has the white background with pinkish flowers. You’ll see it in your package. You could also just frame this sheet of paper, kind of like some other designer paper we had one time! Or use it for a scrapbook page. I chose So Saffron for the card base, one of the paper’s coordinating colors….and there are a lot of coordinating colors with this paper!

Next, I got out the Golden Garden Acetate Sheets and found the portion that matched the flowers on the paper and cut it out. I just put tiny dots of Multipurpose Liquid Glue on the back of the acetate on the widest parts of the printed design in hopes of hiding the glue. Actually, when you turn the acetate over, you could use that side instead! Then I carefully overlaid the acetate on the floral paper. Be sure to adhere the ribbon around the designer paper and acetate before you adhere to the card base. I added a piece of the 3/8″ Fine Art Ribbon which is soft, pliable, and has gold in it!

The greeting is stamped in Flirty Flamingo Ink from the Art Gallery Stamp Set in the Suite. I die cut the piece with one of the Tasteful Labels Dies. Next, I cut out two flowers from a scrap of the designer paper and popped them up on the corners of the greeting. I’m not sure if I like them or not, but they are there.

That’s all there is to this card! Once again, the beautiful designer paper does most of the work to give you a lovely card! The acetate overlay is a bonus. HERE is another card I made recently with both sides of the same designer paper.

You’ll find all of these supplies in the January-June 2021 Mini Catalog. And while you are ordering, be sure to keep Sale-A-Bration in mind and order in $50 increments so you earn FREE Sale-A-Bration products! No limits!

If you want EVERYTHING, order the Fine Art Floral Suite Collection (155982) and get it all by just putting in one item number. It has been on backorder but as I write this it should be available next week. Or just order the individual products that you want, or the Bundle. I’m sure you will want these beautiful products to make a card like this Fine Art Floral Golden Garden Birthday Card!

Paper Pumpkin Halloween Card & Tag

Paper Pumpkin Halloween Card & Tag

I still have pieces from my September Paper Pumpkin Kit so I used stamps and pieces to make this Paper Pumpkin Halloween Card & Tag. I actually started with the tag because I have this Halloween sweater tree I bought from someone on Instagram and I thought it would be fun to hang a tag on it for Halloween.

And after I made the tag, I thought I should copy myself and make a Halloween card as long as I had extra pieces I had die cut and everything still out on the table!

I used a lot of varied things! To start with, I used the Stitched So Sweetly Dies for the Pumpkin Pie and Basic Black pieces to make the tag and then the focal point on the card. The pumpkin on the tag is stamped with the stamp set in the Paper Pumpkin Kit and then colored with Stampin’ Blends. The greeting is from the Paper Pumpkin stamp set also and stamped on Granny Apple Green, then die cut with a die in the Tasteful Labels Dies. For some tiny little stems of leaves in various colors, I used the dies in the Forever Flourishing Dies. And I found some tiny little flowers in the Budding Blooms Dies. Sometimes you should just look through all your dies and see what you can use! It doesn’t always have to be in a coordinating set. I added a Gilded Gem on top of each flower on the tag. The ribbon on the tag is the beautiful Black 3/8″ Glittered Organdy Ribbon.

The Halloween card is very similar. The card base is Cajun Craze with a layer of Pumpkin Pie. To get the wood background, I used a pattern in the In Good Taste Designer Series Paper. This large pack of designer paper is on sale in the Stampin’ Up! Designer Series Paper Sale until October 31 so don’t miss it! Instead of the stamped pumpkin, I used one of the pumpkin diecuts in the September Paper Pumpkin Kit, as well as a couple swirly vines plus some colored stems I already die-cut like on the tag. For a couple of embellishments I used two of the Gold Glitter Enamel Dots and tied a bow with the Black Glittered Ribbon.

Here is a photo of what I did with the tag! I bought this sweater tree from @thelittlegreenbean on Instagram, also the two little embroidered mushrooms on the right. After Halloween, I could make a fall or Thanksgiving tag to hang on the tree. (If you recognize the Witches Candy Shoppe sign in the background, that was some designer paper from several years ago that was perfect for framing for home decor!

Halloween Tree With Tag

Hope you have fun stamping during the last week before Halloween and the last week of the Stampin’ Up! Designer Series Paper Sale!

Arrange a Wreath Floral Wreath Give Thanks Card

Arrange a Wreath Floral Wreath Give Thanks Card

After seeing a lot of cute samples of wreath cards and receiving a birthday card from my friend using the wreath die cut, I decided I had to have this set! Finally, I got around to trying it out, and here is my fallish Arrange a Wreath Floral Wreath Give Thanks Card.

I didn’t even realize how much is included in both the Arrange a Wreath Stamp Set and Wreath Builder Dies. Of course, you can get the Arrange a Wreath Bundle and save 10% off the price of both. There are two different dies for wreaths, giving you two different looks or just two different wreaths to use separately. You get all kinds of different little items for decorating the wreaths to cover several occasions or just any occasion. The stamp set has five different greetings to use. So you are covered for just about anything with this Bundle!

For my card I chose Terracotta Tile for the card base. I seldom use these In Colors from last year but I thought Terracotta Tile might be a nice color for a fall card.

The Whisper White embossed layer I found on the table that I had made a while back just testing my new Stampin’ Cut & Emboss Machine with embossing folders! I thought it would work just fine as a background behind my wreath. The background is made with the Ornate Floral 3D Embossing Folder. It just adds a little bit of subtle prettiness I think!

I die cut both wreaths using two different greens – Granny Apple Green and Old Olive. I played around with which one looked better on top and finally settled on this combination. Then I stamped some flowers from the stamp set and cut them out with the dies. I chose Terracotta Tile, Pumpkin Pie, and Crushed Curry ink for the flowers. There is a die to cut a ribbon for the wreath but I decided to use a real ribbon, the Terracotta ribbon in the Ornate Garden Ribbon Combo Pack. For a little bit more embellishment I used some Holiday Rhinestones for each flower center.

The greeting is in the Arrange a Wreath Stamp Set and I stamped it in Terra Cotta Ink on Whisper White. It was die cut with a small Stitched So Sweetly Die and layered on a die-cut piece of Terracotta Cardstock in the Tasteful Labels Dies.

That’s all there is to this card! Take a peek again at the card my friend sent to me for my birthday. It’s really pretty easy and simple, but lots to play with in this stamp set and dies as I said! You will get a lot of use out of this Bundle because you can use a card with a wreath for lots of occasions.

SHOP STAMPIN’ UP! ONLINE!

Stamping With Forever Fern

Stamping With Forever Fern

I realized I hadn’t really used the Forever Fern Stamp Set very much yet, but when I opened the stamp case to start making a card, I realized I hadn’t even used these stamps yet! How did that happen?! I have used the Forever Greenery Designer Series Paper to make cards, but I hadn’t actually stamped with the stamp set! But now that I have, on this Stamping With Forever Fern card, I am in love!

I chose Just Jade, one of the new 2020-22 In Colors, for the card base since it is one of the coordinating colors with the designer paper. Not that I used the designer paper. The card front is Shimmery White Cardstock, a beautiful paper to use for a nice card.

Of course I wasn’t quite sure how this card would turn out if I just stamped the various ferns in the stamp set, but I just started stamping with various colors of green ink. There is something so relaxing and satisfying with stamping, applying that inked up stamp to the paper! It just feels good every time! I used Just Jade, Shady Spruce, Pear Pizzazz, Garden Green, and Soft Sea Foam. Just chose a group of greens! You can stamp over ones you have already stamped, it all looks good in the end!

The greeting is also in the stamp set. I stamped it on Shimmery White with Just Jade Ink and die cut it with the pretty circle die in the Tasteful Labels Dies. It actually looked good just like that if I would have put it on the card without layering it on something, but I did die cut a scalloped circle in the Layering Circles Dies and layered it on that. I adhered it flat on the card for a change. No embellishments either! I was so taken with how the stamping turned out, I didn’t even think about embellishments.

 This is a Distinktive stamp set (Patent pending); it has a special texture that gives added depth and dimension in a single step, creating photo-realistic images. It’s something special that Stampin’ Up! has created in some of the stamp sets. It’s really pretty!

There are also dies you can purchase to cut out the stamped images. If you want to get the Forever Flourishing Dies along with the Forever Fern Stamp Set, you can buy the Forever Fern Bundle with both and save 10%!

I do have to play more with this stamp set and Bundle. I was really pleased with this card I made with almost only stamping! Check it out if you haven’t ordered it yet. Lots of people have!

Shop Stampin’ Up! Online!

Flowers For Every Season Thinking of You Slimline Card

Flowers For Every Season Thinking of You Slimline Card

Have you tried this “slimline” type of card yet? I’ve made several recently just for something a little different. It’s actually a card idea that was around years ago and just came back! You can make them of various lengths and widths.

t seems I have made all my slimline cards using the Flowers For Every Season Designer Series Paper! I think it is because I hadn’t used it in a while and the 6″ x 6″ size was perfect to use. Because of the paper size, I decided to just make my card 6″ x 6″, folded in half so I could use a piece of designer paper 3″ x 6″.

I chose the yellowish paper with little flowers all over for this card. Before adhering the paper to the Whisper White card base, I adhered a strip of Bumblebee 1/4″ Gingham Ribbon to the paper, wrapping the ends around to the back and then adhering the designer paper to the card base. Then I made a separate bow out of the gingham ribbon and adhered it to the ribbon using Mini Glue Dots.

The greeting is stamped in Cinnamon Cider Ink with the Blossoms In Bloom Stamp Set. There are some good greetings in that stamp set. Then I die cut the greeting with a die in the Tasteful Labels Dies. It is popped up over the ribbon with Stampin’ Dimensionals®.

To decorate the greeting I had already cut out various flowers from some of the other papers, so I adhered two cut-out yellow flowers to the greeting. And since I can’t leave those In Color Enamel Dots alone, I had to add three dots to the greeting as well!

I think these slimline cards are a nice change up to send people. After being used to the size we normally send, this size will be a pleasant surprise! This size will fit in that medium size envelope we probably all have in a box from the office supply store. If you make it longer, you can use the longer style envelope that lots of our mail comes in.

Here is the first slimline card I tried with a blue pattern in the Flowers For Every Season Designer Paper. (Gee, I added some Enamel Dots on that card, too!)

You can use any designer paper you like, or simply stamp, but try one of these slimline cards just for fun like this Flowers For Every Season Thinking of You Slimline Card.

SHOP STAMPIN’ UP! ONLINE HERE!

Flowers For Every Season Thinking of You Slimline Card closeup

Halloween Mini Pizza Box Colored Embossing

Here’s a technique you can try if you want to make a Halloween treat box like this Halloween Mini Pizza Box Colored Embossing treat box. It’s a fun way to color the greeting on the box to make it look a little more interesting or spookier for Halloween!

The technique involved is easy. You can use it for greetings or other images. Just emboss with Versamark Ink and White Stampin’ Emboss Powder the way you normally would, using your Heat Tool to melt the powder.

After embossing, let cool for a second and then color right over the white embossed areas with Stampin’ Blends markers. Try not to get off the embossing or it will show on the paper, even black. If you do get some marker ink on the paper, use the Color Lifter to “move” the color back over very lightly. For this Halloween project, I used multiple colors on the Halloween sentiment.

I had a similar project on my recent newsletter, so if you would like to get ideas like this and more delivered every Tuesday to your Inbox, just sign up for my Mailing List in the red box in the right sidebar or scroll all the way down on your phone to get to it.

This project is made with the Mini Pizza Box. These are handy to have on hand. They are unassembled and store flat. You get 8 food-safe boxes, 3 1/2″ x 3 1/2″ in size. You can easily put the box together, the decorate for whatever occasion. Put some cookies inside, 3″ x 3″ notecards, or some other small gift or treat.

For this box, I stamped a piece of Pumpkin Pie Cardstock for the lid with images from the Ghoulish Goodies Stamp Set. Around the sides of the box, I used pieces of the Plaid Tidings Designer Paper. Since the paper is only 6″ wide, I cut four individual strips of paper. I was even fastidious enough to match the plaid lines before cutting, but you wouldn’t have to be so perfect.

The embossed sentiment is cut out with one of the Tasteful Labels Dies. For a little layer behind the sentiment I die cut another shape from the same dies and cut it in half so a little bit would show under the side of the sentiment. Before adhering the Pumpkin Pie paper to the top of the box, I adhered ends of the Black 3/8″ Glittered Organdy Ribbon to the underside and popped up the greeting with Dimensionals. Then I tied on a little knot on each side of the greeting with the ribbon. Love this Glittered Ribbon! For a little bling, I added three Holiday Rhinestones that I thought kind of matched the Halloween colors.

Who knows what kind of treats we will be able to give out this Halloween or if there will be trick-or-treating or Halloween parties, but these Mini Pizza Boxes are one of those good things to always have in your stash for when the need arises when you want to give a little treat or gift. Or order more if you have a certain occasion or gathering.

Here is another example of how to use these Mini Pizza Boxes for just a gift, not necessarily a certain occasion. I used the Peaceful Poppies Designer Series Paper (retired) to decorate this box and the Poppy Moments Dies.

These Mini Pizza Boxes are fun to decorate for many occasions. Try this fun technique of heat embossing white powder and then coloring with Stampin’ Blends markers right over the embossing to make this fun project, Halloween Mini Pizza Box Colored Embossing.

Gather Together Fall Leaves Card

I used several products on this Gather Together Fall Leaves Card, as I thought about them while making the card. I probably started out with a simpler version in my head of making this fall card, and then I came up with more ideas as I worked on it. That’s probably the way a lot of us do our cardmaking!

The beginning of the card was simply the stamping and coloring of the leaves in the Gather Together Stamp Set. You may already have this set if you purchased it last year. Happily, it was carried over into this August-December 2020 Mini Catalog as a favorite from last year! I stamped a few leaves in Memento Ink first but I thought the black outline was too stark. Then I stamped some in Soft Suede Ink. In the end, after they were colored, I’m not sure it made much difference so I think you can do either.

To color the leaves, I used Sponge Daubers and various ink pads. Just choose whatever colors you like for fall. I used Old Olive, Crushed Curry, Pumpkin Pie, Cajun Craze, and Granny Apple Green. I intended to leave parts of the leaves uncolored, but it didn’t so much turn out that way! I was sort of using a card on page 47 in the Mini as inspiration with the leaves. I didn’t try to be precise, especially as far as coloring “outside the lines” because I knew I would be cutting out the leaves anyway. I don’t own the dies but I don’t mind doing some “fussy-cutting” with my Paper Snips.

Gather Together Fall Leaves Card Coloring

The card base is Early Espresso Cardstock with a layer of Very Vanilla to offset the layer of Gilded Autumn Specialty Designer Series Paper. This paper is so beautiful, it was difficult choosing which pattern to use. But I didn’t want to take too much away from the leaves so I chose a plainer pattern, not one with the gold and copper foil accents which are so pretty.

Next, I used a piece of Garden Green Cardstock to make a banner and embossed it with one of the Greenery Embossing Folders. These are narrower folders for smaller pieces you want to emboss. I also stamped the greeting in the Gather Together Stamp Set in Early Espresso Ink and die-cut it with a die in the Tasteful Labels Dies.

After adhering the layers together plus the banner on the card, I adhered two fall leaves with Stampin’ Dimensionals and added some of the gold foil pieces in the Forever Gold Laser-Cut Specialty Paper. I think they really add a little pop of pizzazz! The greeting was centered over everything, also popped up on Dimensionals. For a final touch, I added a bow made with the 3/16″ Braided Linen Trim.

Gather Together Fall Leaves Card Closeup

It’s time to start making some fall or autumn cards, maybe just to send to friends and family and maybe to save for Thanksgiving. Who knows if we will be able to “Gather Together” this Thanksgiving so we might want to have cards ready to send to those people we want to remember on the holiday. This Gather Together Fall Leaves Card would suit the purpose just fine!

SHOP STAMPIN’ UP! ONLINE HERE!

Remember to use your Bonus Coupons before August 31 if you have them from July!

Ghoulish Goodies Halloween Clear Tiny Treat Box

Ghoulish Goodies Halloween Clear Tiny Treat Box

For my first, of probably many, Halloween posts for this year, here is a Ghoulish Goodies Halloween Clear Tiny Treat Box. Who knows what Halloween will look like in this pandemic year, but you can still make Halloween treats for your family or even yourself! Thank goodness the grocery stores are still able to deliver craft supplies, such as chocolate candy for treats!

As always, I love and highly recommend keeping a package or two of the Clear Tiny Treat Boxes on hand! They are only 2″ x 2″ x 2″ but food safe and have enough room for a decent treat without being too big. Or add some other small gift inside for any occasion. These boxes come flat, protected by a piece of plastic you remove, then assemble and decorate. Couldn’t be easier!

For this Halloween treat box I wrapped around a piece of the Plaid Tidings 6″ x 6″ Designer Series Paper. Now you may have figured out that a 6″ long strip will not wrap all the way around the box. I cut two strips, then realized I needed the plaid design to march up if I wanted to be picky about it (and of course most of us do!). Actually my strips were only about 1/8″ off so I matched them up, adhered the ends together then trimmed off the excess on each side. It worked fine. Or you can wrap the 6″ strip around from the front to each side and add another piece for the back. Make it longer so you can adhere the ends inside the side pieces to make it look neater.

The tag is stamped in Pumpkin Pie ink on Whisper White with a stamp in the Ghoulish Goodies Stamp Set. What a perfect saying for Halloween treat packages! I die-cut it with a die in the Tasteful Labels set of dies. Then I wanted some kind of layer, so I cut another label which was too small, but I cut it in half lengthwise and added it to each side of the treat tag. This is the Pumpkin Pie piece. To cover up the back, I adhered the whole thing onto a rectangle of Basic Black with just a small margin and simply cut those corner curves by hand. Doesn’t have to be perfect! The tag is already almost too big for the treat box so I couldn’t keep adding larger layers.

To attach the tag and further decorate the box, I used the beautiful Black 3/8″ Glittered Organdy Ribbon. It’s almost too pretty to use on a treat box but it does look great! I punched a small hole in the top of the tag, put a piece of Linen Threat (or whatever twine I had laying around here) through the tag and tied it on to the ribbon, then finished tying the ribbon in a know. You could do a bow instead.

To decorate the front of the box (and to use another new stamp!), I stamped the black cat from Ghoulish Goodies. Then I colored in its eyes with a Granny Apple Green Stampin’ Blend marker and the collar with Pumpkin Pie. I just punched out the cat with my 1 1/2″ Circle Punch and then layered it on a die-cut from the Tasteful Labels Dies again. Love those scalloped circles in that set!!

Put your treat or gift in the box before you tie it up! Luckily I had fresh chocolate kisses wrapped in purple (dark chocolate), perfect for Halloween! These candies are meant for crafting, of course! (Or for after lunch or dinner as a digestive, of course!).

Here’s a super-simple treat I made with the Clear Tiny Treat Boxes recently.

Yes, it’s time to start having fun with Halloween because now that it is August, it is really almost September and you know Halloween isn’t far behind! Check out the Ghoulish Goodies Stamp Set and others in the new holiday mini, August-December 2020 Mini Catalog. If you need a copy, send me your contact information at Karen@Karenstamps.com Then you can start making your own Ghoulish Goodies Halloween Clear Tiny Treat Box or something similar!

Gilded Autumn Fall Thanks Card

Gilded Autumn Fall Thanks Card

I was anxious to play with this gorgeous designer paper in the new August-December 2020 Mini Catalog from Stampin’ Up! The designs are so pretty, the colors beautiful, and all of it accented with copper and gold foil. How can you resist?

This beautiful paper is the Gilded Autumn Specialty Designer Series Paper in the new Holiday Catalog. You’ll find the whole Gilded Autumn Suite on pages 44-46. All Suites in this catalog get a three-page spread! The Suite contains the Beautiful Autumn Bundle with stamp set and three punches, ribbon, Brushed Metallic Cardstock, and Acorn Trinkets. You can order the whole thing with one Suite number or order any of the products individually.

I loved the sample in the catalog on page 44 with the three panels of designer paper on it, center of page. I changed mine a little bit and figured out my own measurements. The card base is Whisper White, although you could also use Very Vanilla. The Copper Foil layer underneath the designer paper is cut at 5″ x 3 3/4″. The strips of designer paper are cut at 1 1/2″ x 3 1/2″ so there is a tiny margin around the edges and in between the pieces. You can vary this and have the papers side by side or even a little larger with a larger foil layer underneath. When I finished gluing these pieces with my new Stampin’ Seal+ I ended up trimming just a slight bit off the side of the copper foil just to even things up.

The greeting is stamped from the Gather Together Stamp Set, a “returning fave” it says in the catalog, from last year in Mint Macaron Ink! We all did love that stamp set and cards we made with that set last year so I’m glad it is back! I die cut it with one of the Tasteful Labels Dies and used another longer one to cut out a strip of Copper Foil to go behind it. This is a great die set!

The catalog sample card has some greenery sticking out from the side of the greeting. I don’t know how they did theirs, but I just cut some greenery out from one of the sheets of the Gilded Autumn Paper. It wasn’t so easy, but it worked! And I put it on both sides of my greeting.

And then, just because I loved the paper with pumpkins and gourds, I had to cut out a pumpkin and add it to the card. I wasn’t sure! What do you think? I popped it up with a Dimensional to match the greeting that was also popped up, but I put the Dimensional only in one spot to it would be even with the greeting. I meant to add some sequins or some little bling but I forgot!

Here is a card I made last year with the Gather Together Stamp Set. I think I could use this same basic layout and make something with the new Gilded Autumn Paper! I might try that!

I think it is a fairly easy card to make, especially if you use my measurements and don’t have to figure it out. Maybe you could die cut some other greenery for a similar look without cutting by hand if you didn’t want to do that. You could die cut the greeting in a different shape. Lots of possibilities with this Gilded Autumn Fall Thanks Card.

Remember, we have a new look to the Online Store! If you haven’t used it yet, you need to either KNOW your password to get into your account if you want to order (you can look around without logging in) so you can type it in manually OR you need to click on the “Forgot Your Password” Button to reset it. After that you can have the site remember the password….and maybe a good idea to write it down!

SHOP STAMPIN’ UP! ONLINE!