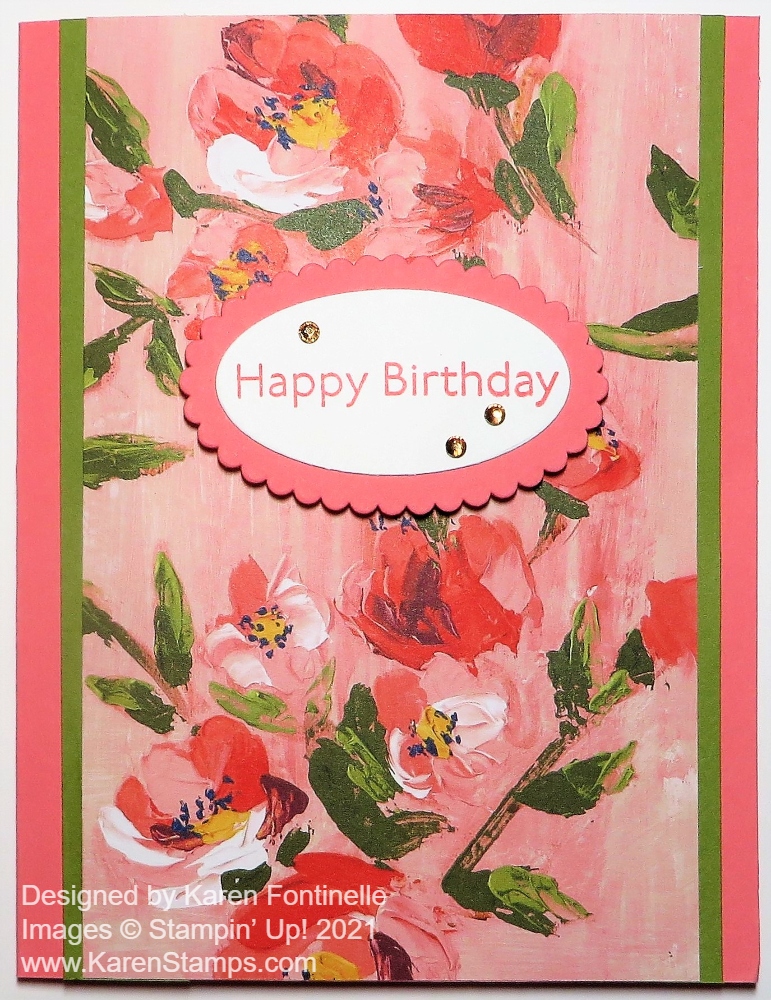
If you want to make a very quick and easy card, this Fine Art Floral Birthday Card is it! After hours of designing this card….I mean, when I pulled out the package of designer paper and saw this already cut strip of floral paper, I thought it would make a beautiful card! That’s how easy it is sometimes! Maybe sometimes you can spend hours working on one card, but it really isn’t necessary!
One of the many coordinating colors of the Fine Art Floral Designer Series Paper is Flirty Flamingo so I chose that color for the card base. I almost just glued on the designer paper, but I decided to try some strips of another color on each side. Old Olive won.
And as luck would have it, there was already a die-cut scalloped oval in the bag of cardstock so I just used that for the greeting. I stamped the birthday greeting from the Art Gallery Stamp Set on Basic White and die cut that with a plain oval in the Layering Oval Dies. I popped up the greeting with Stampin’ Dimensionals. As usual, I couldn’t resist adding a few Champagne Rhinestone Basic Jewels for some bling!
You could put an Easter greeting on this card and it would be beautiful to send, also! You just can’t go wrong with this beautiful Fine Art Floral Designer Series Paper for birthday cards or any other cards as well.
It was another cold day in Houston yesterday (although 40 degrees!) and a hard freeze during the night. At least our power has stayed on except for one evening. But instead of winter, I felt the need for a colorful, bright, springtime card! We will soon be back to warmer temperatures here.
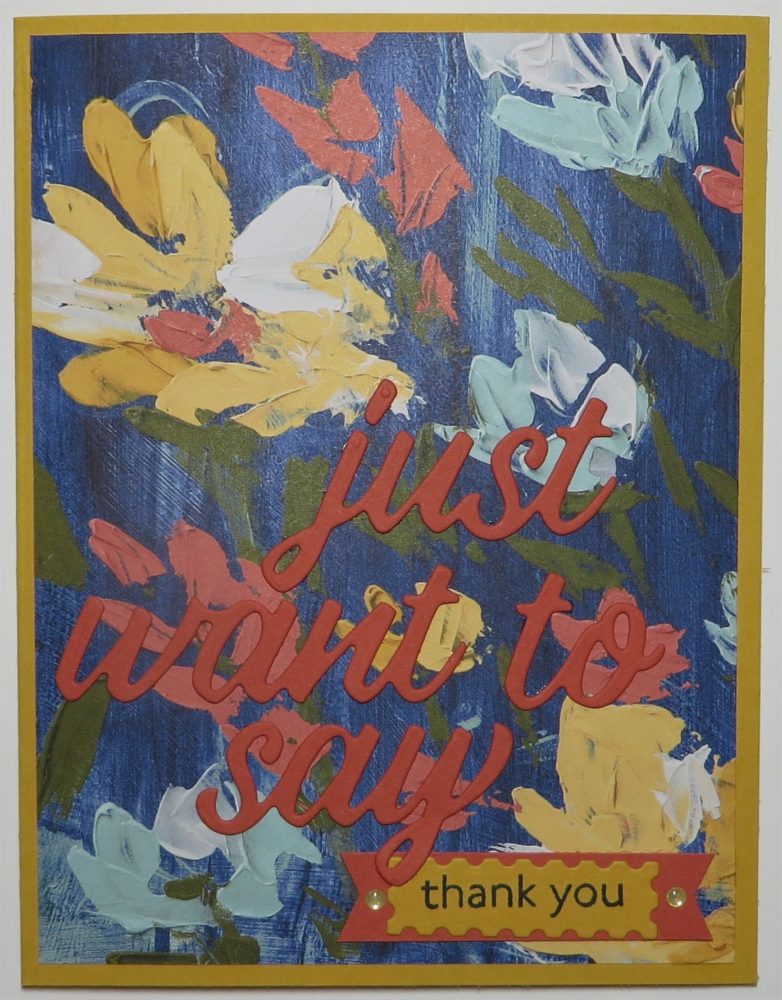
This was actually an easy card to make even though with the die-cut greeting you might think it was harder than it is! The greeting is part of the Floral Gallery Dies. It is all one die but cuts out all the words separately. It would be handy to remember to use the Adhesive Sheets on the piece of cardstock so that when the words were die-cut, they would already have adhesive on the back. I never remember to do that, so I just put teeny tiny drops of the Multipurpose Liquid Glue on the back of the words. The good part of using this liquid glue is there is a little wiggle room to get the piece placed exactly where you want it. Be sure to save the little piece that is the dot above the letter “j” when you die cut. If you lose it, as I did, just put a tiny scrap under that part of the letter and die cut it again or just punch a dot.
The card base is Bumblebee Cardstock with a layer of the dark blue pattern in the Fine Art Floral Designer Series Paper. The die-cut words are Terracotta Tile in the previous In Color collection.
Here is another way to use just one of the die-cut words on a card along with a stamped greeting on this Fine Art Floral Thinking of You Card I made previously.
To finish the greeting, I stamped the words “thank you” in Night of Navy Ink from the Art Gallery Stamp Set on a scrap of Bumblebee Cardstock and cut out with a die in the same Floral Gallery Dies. Then I layered it on a strip of Terracotta Tile Cardstock and just flagged the ends. For a little pizzazz, I added two of the smallest Gold Glitter Enamel Dots.
Get the Art Gallery Stamp Set and Floral Gallery Dies together in the Art Gallery Bundle and save 10%!
All in all a very easy card to make and yet looks impressive! Just think of putting adhesive sheets on the FRONT of the words and then using the Gilded Leafing on the die-cut words! That would be impressive! I may try that! You can’t go wrong using this Fine Art Floral Paper on quick and easy cards like this Fine Art Floral Thank You Card.
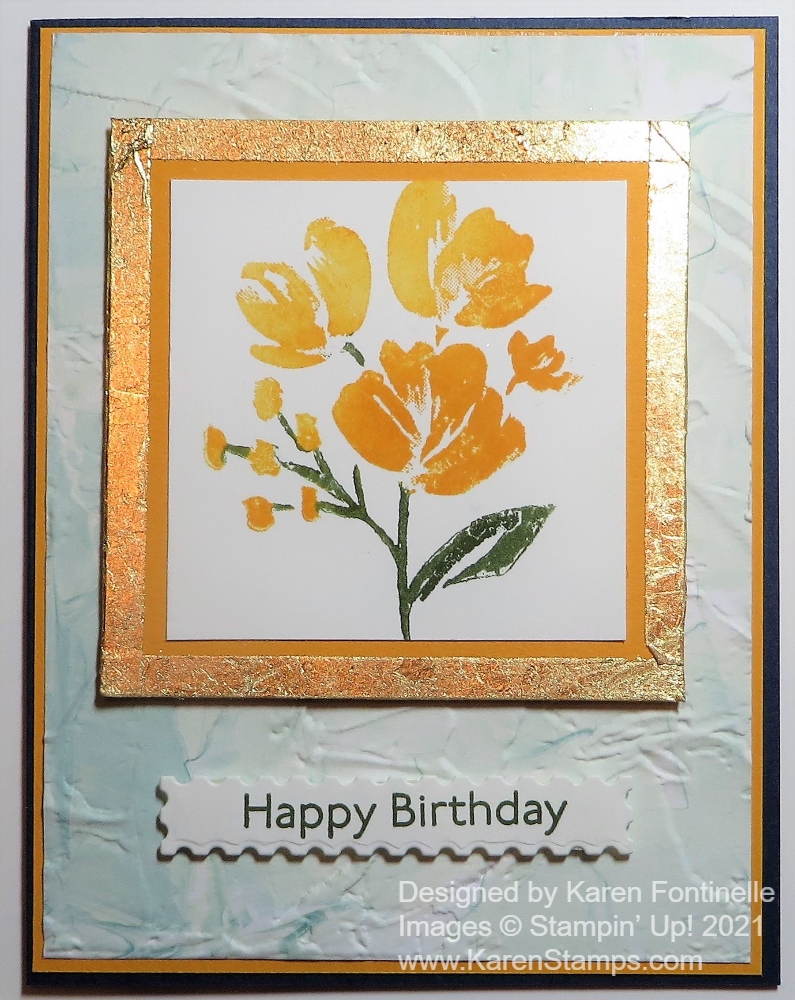
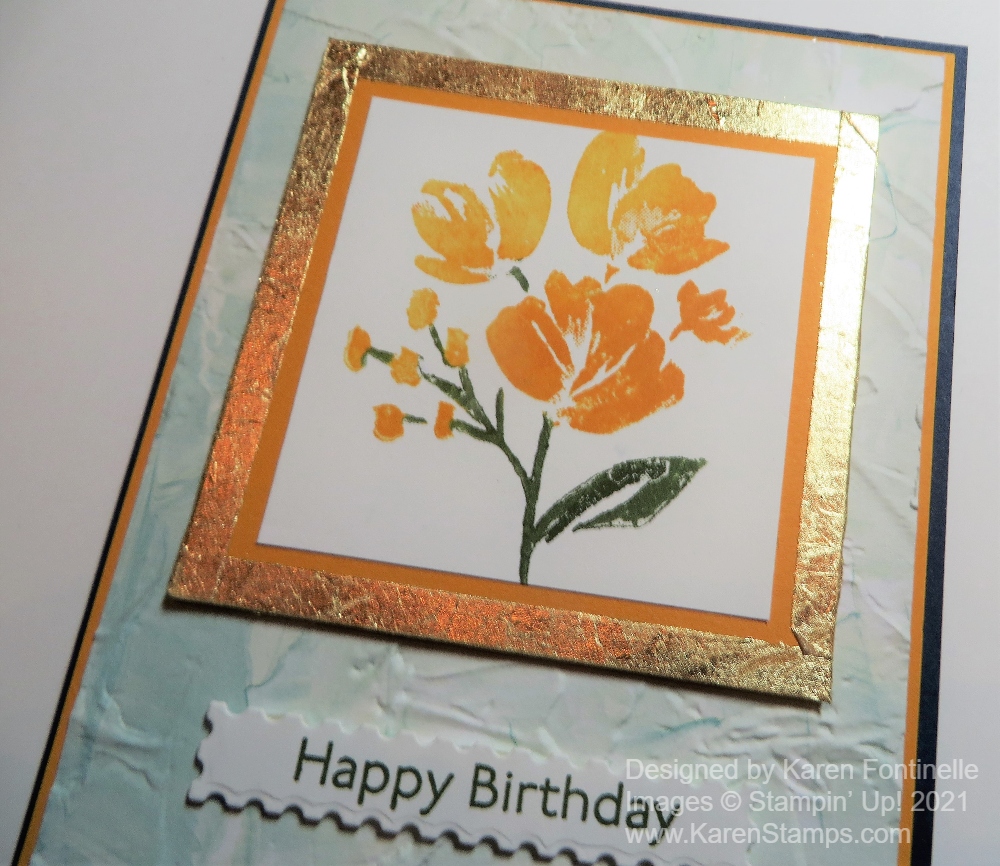
I couldn’t wait to play with the new Gilded Leafing again but I wanted to try something different and I came up with this Art Gallery Floral With Gilded Frame Card.
I’ve loved the little floral stamp in the Art Gallery Stamp Set in the Fine Art Floral Suite. I got the idea to stamp the flower and then make a gilded frame around it. Instead of using Versamark Ink and Heat & Stick Powder before applying the Gilded Leafing, as I did on this card, I simply made the frame with strips of Tear & Tape Adhesive! You can either pick up pieces of the gold leaf and stick it onto the adhesive, which I started doing. But then I just plunged the piece into my container, pulled it out but still held it over the container, and simply rubbed most of the excess off with my fingers. The Gilded Leafing is so soft, you almost want to stick your hands in it! When I had most of it off, I used a soft brush I had from years ago to brush off the last little bits. You can also use one of theStamping Sponges.
The card base is Night of Navy, and I chose that because on another card I made with the Dandy Garden DSP I really liked the yellow flowers and dark blue background of that paper. I started off coloring the stamp with Stampin’ Write Markers but since it was new and I hadn’t prepared the stamp first, the ink from the markers just beaded up. I decided to just skip to a regular ink pad, Mango Melody. I tried to mostly get it on the flowers but I knew that even if I got it on the leaves, that’s okay because they would be covered with green ink. On these I did use the Mossy Meadow Stampin’ Write Marker because it was the darkest green and it would look lighter stamped. What you see on the card is my first attempt, so it worked out great! I layered this on a piece of Mango Melody Cardstock and then added the Gilded Leafing around the sides.
Since I had used the Mango Melody under the flower piece, I decided to use it as a thin layer on top of the Night of Navy card base. The top layer is a piece of the Fine Art Floral Designer Series Paper. Instead of using the floral side, of course, I turned it over and used this light blue with a pattern on it that looks like it was painted with a paint brush! To add to that texture, I embossed the paper with the Painted Texture 3D Embossing Folder.
I adhered the floral piece to the card front with Stampin’ Dimensionals®. For the greeting, I stamped a birthday sentiment from the Art Gallery Stamp Set in Mossy Meadow Ink and then die-cut it with a die in the Floral Gallery dies. I think all of these main products are in the Fine Art Floral Suite! I’m sure it will be one of the most popular Suites in the Spring Mini Catalog! Everything in that Suite is lovely!
If it isn’t on your shopping list yet, be sure to put it on there, at least if you like florals. The paper is gorgeous. The Gilded Leafing is fun and elegant. The Fine Art Ribbon is beautiful and soft. You will want everything!
Remember, with every $50 increment you purchase, you earn a free Sale-A-Bration product! If you spend $100 or more, you can choose one of the special Level 2 products, unless you want two Level 1 products at the $50 level.
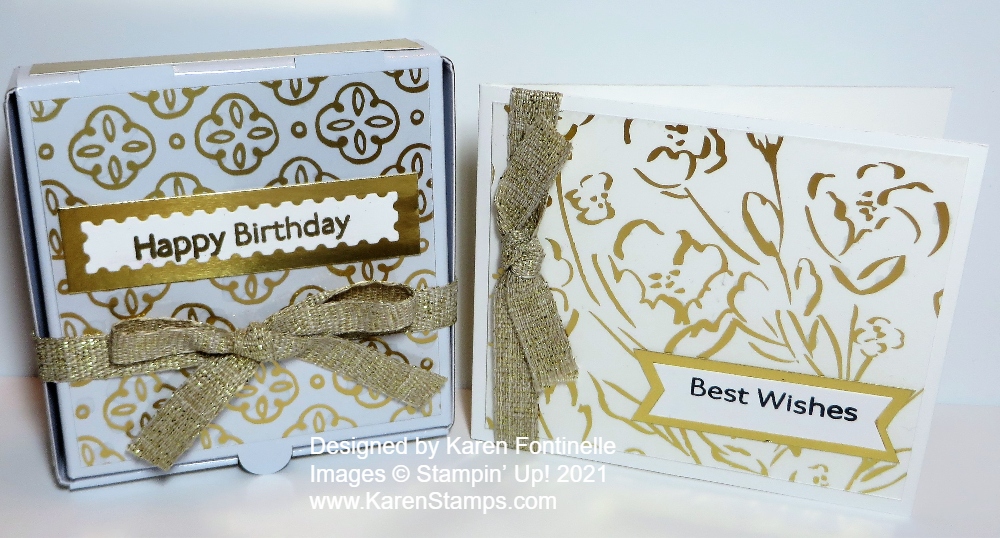
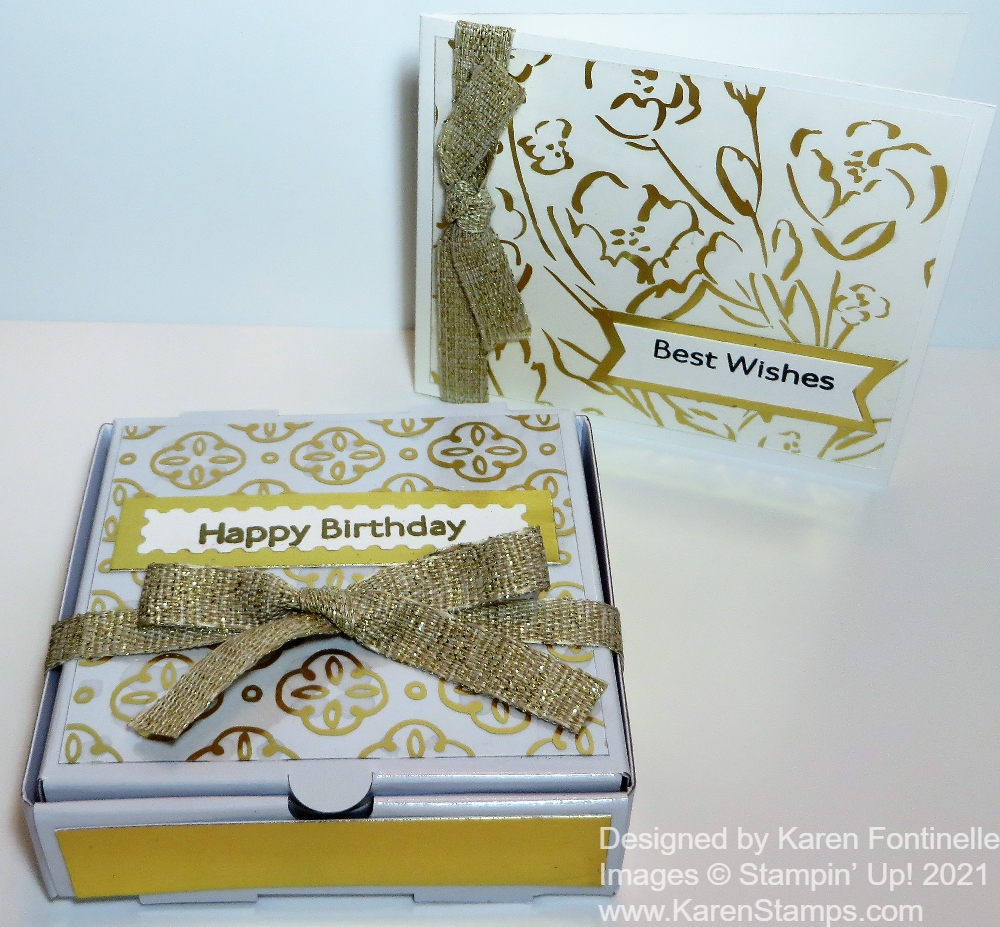
You can play around with the new Acetate Sheets in different ways for a different look to your cards and projects like on this Mini Pizza Box and Card With Golden Garden Acetate. These acetate sheets are in the Fine Art Floral Suite.
After making this card the other day, I used a scrap piece of the Golden Garden Specialty Designer Acetate Sheetson this small gift card. You don’t have to only use it with the Fine Art Floral Designer Series Paper. You can use it on its own over a piece of cardstock. For this card, I just used a piece of Basic White Cardstock for the card base and adhered the acetate sheet on the front. The greeting is in the Art Gallery Stamp Set in the Suite. It is just stamped on white and layered on a piece of Gold Foil. The ribbon tied around the side is the 3/8″ Fine Art Ribbon.
Here are some things to know about the acetate sheets! On the backside of sheet, the backside of the gold design is silver! So you can use whichever color you like. There is also a protective plastic sheet on the backside of the acetate, on the silver side, so be sure to remove that before using. As for how to adhere the sheets to your card or project, you may be able to hide the adhesive underneath some other element on your card, such as under the greeting or under the ribbon. Some people are using Mini Glue Dots and hiding them under whatever they can. I chose to use teeny tiny dots of the Multipurpose Liquid Glue. Have a piece of scrap nearby so you can squeeze out a bit of glue to make sure it won’t pour out when you are trying to use really small dots! I just put the tiny dots under the widest parts of the gold design to try to hide it.
For something different I put together a Mini Pizza Box and added a piece of the Golden Garden Acetate to the top of the box. I used the shiny side for the outside this time. As I was assembling the box, I thought it felt a lot thicker and harder to fold for some reason! Well, the reason was revealed when a second box fell apart from the one box I thought I was working with. I was trying to crease two boxes stuck together and thought I only had one!!
For the pizza box, after adhering the acetate to the top of the box with teeny tiny dots of Multipurpose Liquid Glue. I actually can see the glue that oozed out from under the spot when I placed it, but honestly, no one else will even notice it. I can see it because I’m looking for it, but it doesn’t really show. I also added strips of Gold Foil around all four sides. The greeting is also in the Art Gallery Stamp Set and is die-cut with a die in theFloral Gallery Dies, layered on a piece of Gold Foil. Then I just tied a piece of the 3/8″ Fine Art Ribbon around the box, which holds the lid closed and also is an embellishment. This is an easy way to make a little box for a gift, treat, or maybe some notecards or a cookie inside!
The Fine Art Floral Suite is a beautiful group of products for you to make lots of pretty things! Check them out in the Stampin’ Up! Online Store along with the other January-June 2021 Mini Catalog products.
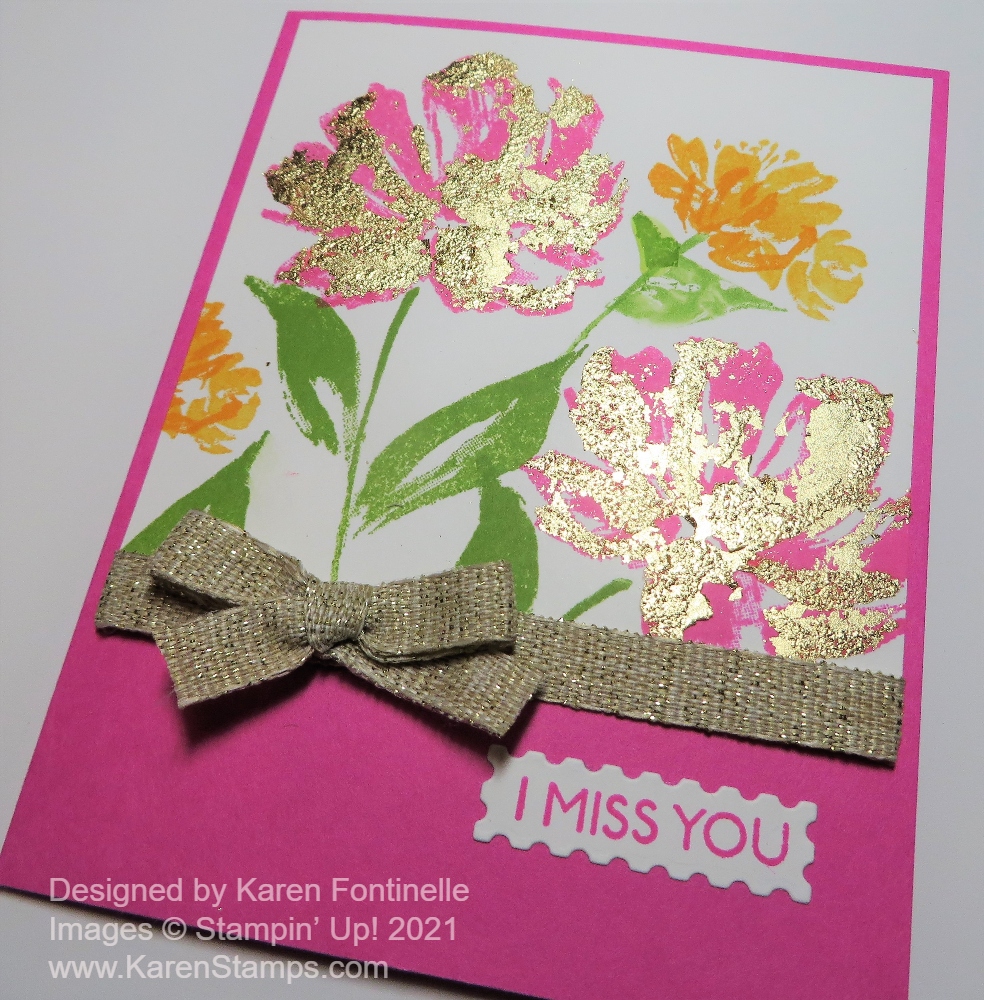
I finally got a chance to play with some of the new products in the Fine Art Floral Suite in the January-June 2021 Mini Catalog! I almost made a giant mess but I think the card turned out pretty well for my first try!
I started with a card base of Magenta Madness, one of the current In Colors. When I looked for a piece of white cardstock for the layer, I had a shorter piece and decided to just cut it down to 4″ x 4″ instead of covering the whole front of the card.
One of the new products I have been dying to try was the Gilded Leafing! If you get this, it’s a REAL GOOD IDEA to put the whole jar in a large enough container that a card will fit into. That way you can stick the whole card into the gold leafing to apply it. I found a perfect size container in the closet but I still nearly spilled it while making this card when the attached lid pulled it backward! Yikes! What a mess that would have been! The gold leafing is very thin, light, and will go ANYWHERE if you let it! Some pieces are big, some are tiny.
I stamped two flowers with Magenta Madness Ink and then used the two-step stamping smaller image to stamp over the original flower with Versamark Ink. Then I dumped on the Heat & Stick Powder (it’s back!) and embossed it with my Heat Tool. You don’t want to overheat the Heat & Stick Powder. After I heated it, I just plunged the card face down into the Gilded Leafing! It came up looking like a mess like a kindergartner would have made. But I just rubbed off some of the big pieces of leafing and then used a retired stencil brush I had from Stampin’ Up! from many years ago I think. I just brushed and brushed the gold leafing until all the excess came off.
You should really do all your stamping before you add the gold leaf. I added two Mango Melody flowers and got the gold on my stamp where it overlapped. Luckily it did wash off my stamp at the sink.
I adhered a strip of the 3/8″ Fine Art Ribbon that has gold threads in it along the bottom of the stamped panel. I tied a separate small bow and adhered it with several Mini Glue Dots.
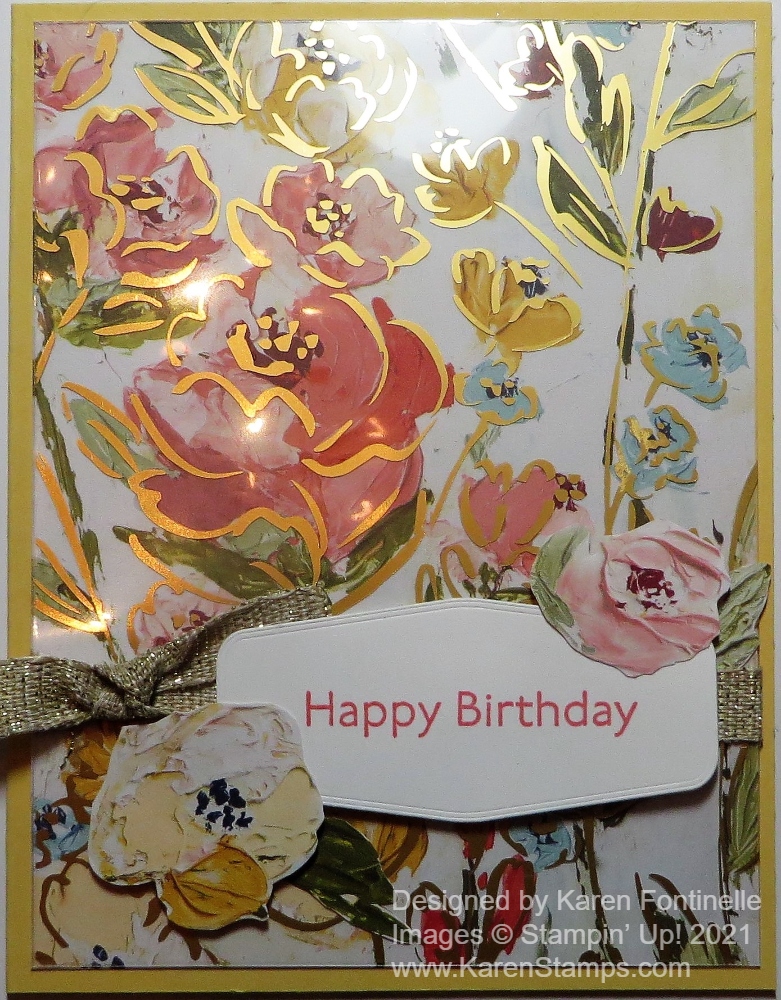
I thought I would make an easy but beautiful card for this blog post and of course that meant using the Fine Art Floral Suite to make this Fine Art Floral Golden Garden Birthday Card. I know the title is a little weird, but it’s because I used the Golden Garden Designer Specialty Acetate Sheets. I didn’t even know what they were called, just that they were in the new spring mini catalog and I had them! If you place them just right, some parts match this designer paper!
First I made the card. I wanted to use the Fine Art Floral Designer Series Paper. I chose the sheet that has one top corner bare of flowers. Actually, there is another sheet with a blue background and yellow flowers, but this one has the white background with pinkish flowers. You’ll see it in your package. You could also just frame this sheet of paper, kind of like some other designer paper we had one time! Or use it for a scrapbook page. I chose So Saffron for the card base, one of the paper’s coordinating colors….and there are a lot of coordinating colors with this paper!
Next, I got out the Golden Garden Acetate Sheets and found the portion that matched the flowers on the paper and cut it out. I just put tiny dots of Multipurpose Liquid Glue on the back of the acetate on the widest parts of the printed design in hopes of hiding the glue. Actually, when you turn the acetate over, you could use that side instead! Then I carefully overlaid the acetate on the floral paper. Be sure to adhere the ribbon around the designer paper and acetate before you adhere to the card base. I added a piece of the 3/8″ Fine Art Ribbon which is soft, pliable, and has gold in it!
The greeting is stamped in Flirty Flamingo Ink from the Art Gallery Stamp Set in the Suite. I die cut the piece with one of the Tasteful Labels Dies. Next, I cut out two flowers from a scrap of the designer paper and popped them up on the corners of the greeting. I’m not sure if I like them or not, but they are there.
That’s all there is to this card! Once again, the beautiful designer paper does most of the work to give you a lovely card! The acetate overlay is a bonus. HERE is another card I made recently with both sides of the same designer paper.
You’ll find all of these supplies in the January-June 2021 Mini Catalog. And while you are ordering, be sure to keep Sale-A-Bration in mind and order in $50 increments so you earn FREE Sale-A-Bration products! No limits!
If you want EVERYTHING, order the Fine Art Floral Suite Collection (155982) and get it all by just putting in one item number. It has been on backorder but as I write this it should be available next week. Or just order the individual products that you want, or the Bundle. I’m sure you will want these beautiful products to make a card like this Fine Art Floral Golden Garden Birthday Card!
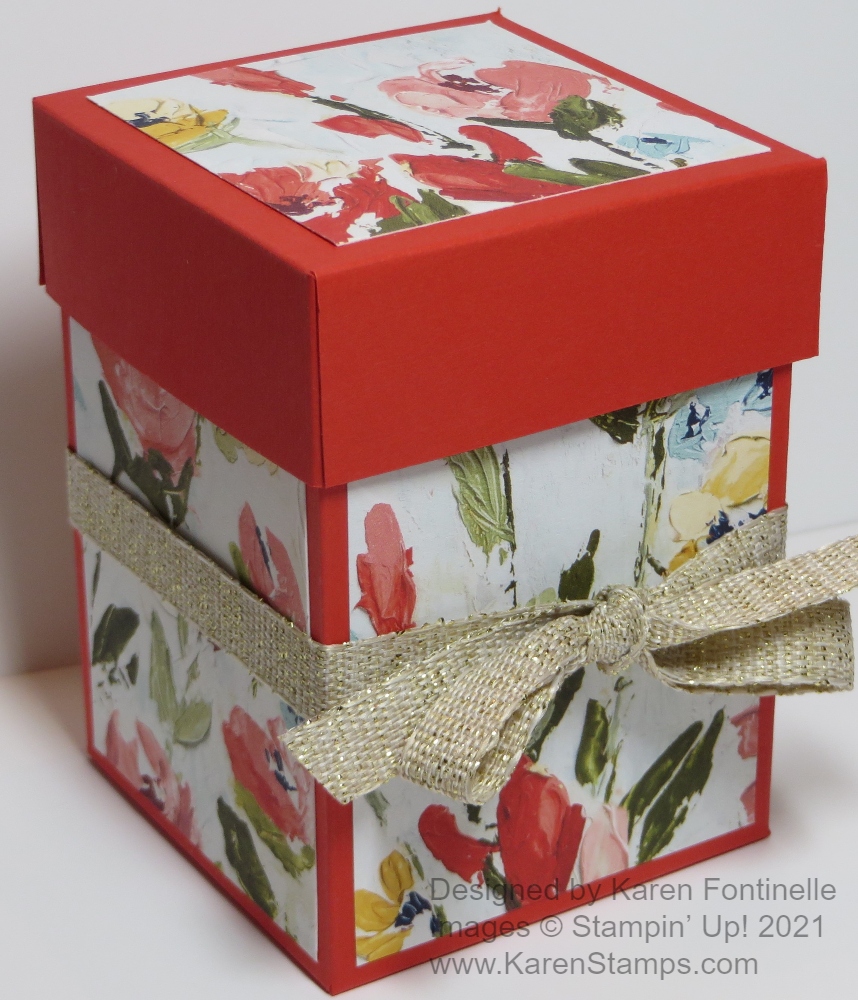
Doesn’t this Fine Art Floral Small Gift Box make you want to find a reason to give someone a gift? It’s a basic pattern to make the box and the new Fine Art Floral Designer Series Paper will make any project look gorgeous! You will be able to purchase this paper tomorrow, January 5th from the new January-June 2021 Mini Catalog with all kinds of new products for spring. Although we enjoyed the Holiday Catalog, it feels good to have a fresh start with this new Spring Mini!
This box is easy to make and you can modify it for a shorter size or just adjust the measurements if you want it a little narrower or wider.
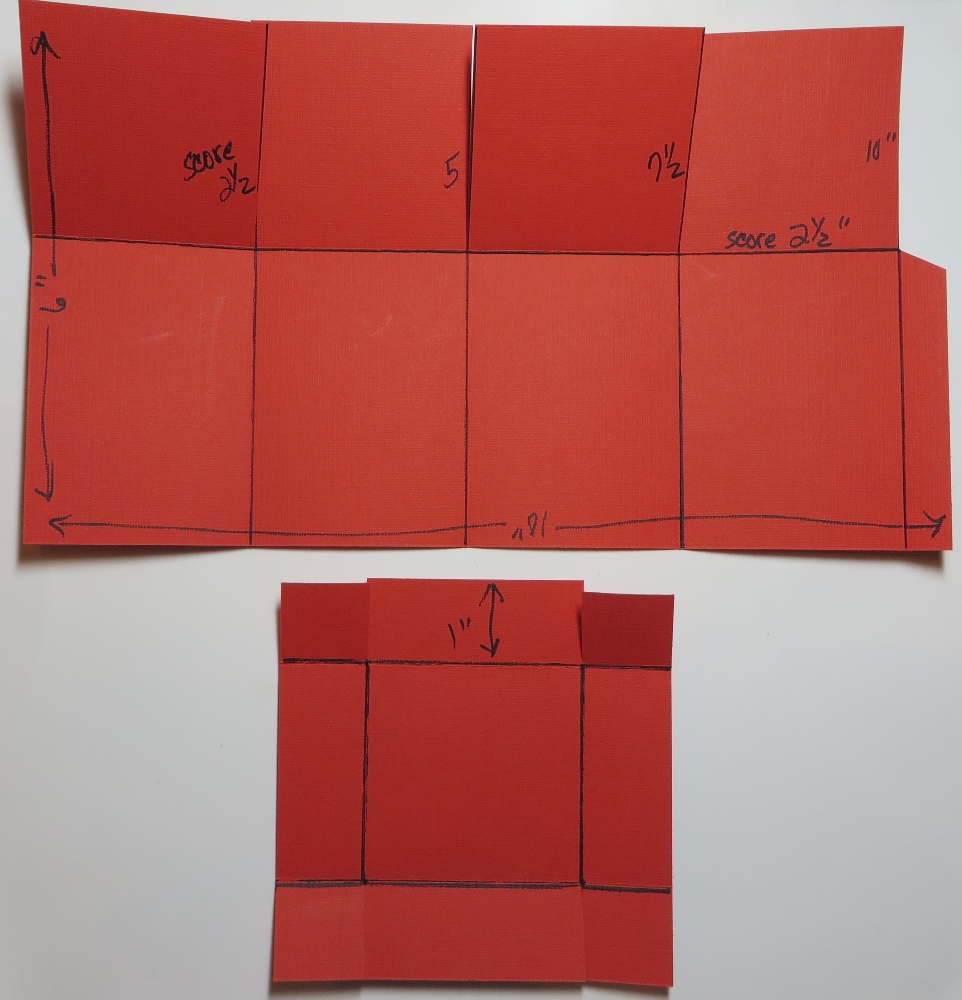
My drawing isn’t perfect but along with the measurements I think you can follow along.
Box piece: 10 1/2″ x 6″ (on my diagram above I wrote 10″ going all the way across the paper but it is 10 1/2″.)
Scoring across the paper in landscape position, score at 2 1/2″, 5″, 7 1/2″ and 10″. Turn the paper to portrait position (narrow edge, up and down), score at 2 1/2″ to form the bottom flaps of the box.
I used Poppy Parade Cardstock but if you happen to use designer paper to make the box itself, make sure you check if there is a pattern than needs to go a certain direction.
Cut up on all those score lines in landscape position from the bottom up to the 2 1/2″ score line going across. This makes the bottom flaps for the box. On my diagram, those are the flaps at the top of the picture. Cut off that little 1/2″ piece at the end.
For the box lid, cut a piece of cardstock 4 1/2″ x 4 1/2″. Now if you score at 1″ on all sides, you may find that the lid will be too tight to fit on the box without squishing the box inward. So what I did is I scored just a “smidge” outside the 1″ mark. So actually I scored at 15/16″ instead of exactly 1″. That gave me the tiniest bit of extra space for the lid to fit properly. Cut up to the score line as you see in the diagram.
To decorate the box, I used the new Fine Art Floral Designer Series Paper. You can modify these measurements if you want less of a margin on the box. For the sides of the box, I cut 4 pieces of designer paper at 3 1/4″ x 2 1/4″. For the lid, cut a piece at 2 1/4″ x 2 1/4″. You could also put the paper on the sides of the lid, but I wanted to let the Poppy Parade show. Remember to pay attention to the direction of the pattern.
Poppy Parade is one of the colors that coordinates with the designer paper but there are many others! Usually there are just a few colors that coordinate with the designer paper but this one has many colors! I chose this particular pattern of the paper because the flowers were a little smaller and would fit better on the box.
To finish my box, I tied a piece of the new Fine Art 3/8″ Ribbon around the middle of the box. This ribbon is gold in color and very soft. I could also have tied it up around the box so the bow would be on the top of the lid. Or I could have stamped a greeting and added it to the front of the box. Whatever you want to do to embellish your box, although with this beautiful paper, it doesn’t need much!
This paper and ribbon will be available tomorrow, Tuesday January 5 but don’t forget to check the retiring holiday products in the Year-End Giant Closeout in the Stampin’ Up! Online Store. And there are just a few things left on the Clearance Rack! Today is the LAST DAY for the Closeout!!
Make a few gift boxes here at the beginning of the year and you will have some handy for those gift-giving occasions coming up in the new year! Try this Fine Art Floral Small Gift Box just to get the idea and then you can modify it for whatever you need!
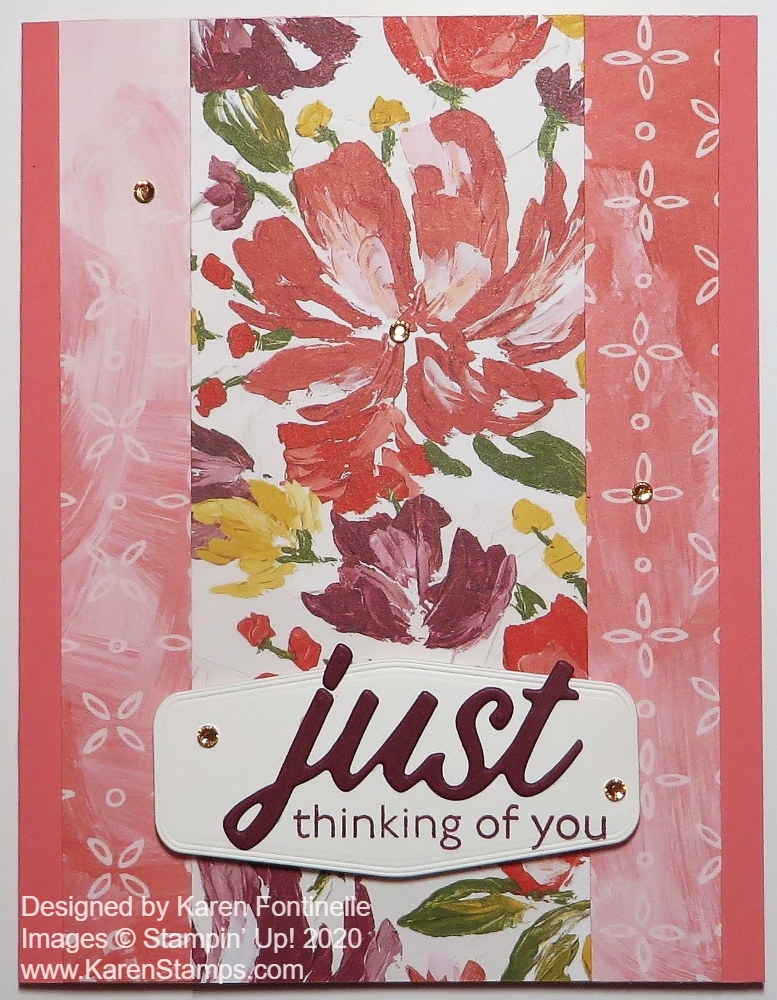
I’m finally getting a chance to play with some new things in the upcoming January – June 2021 Mini Catalog, coming January 5th and the result was this Fine Art Floral Thinking of You Card.
As you can imagine, this Fine Art Floral Designer Series Paper is gorgeous! When you get your catalog or look at it online next week, look at the back cover because you will see how the artists created the designs for this paper. One side of every sheet is a floral design and the other side is a more generic, plainer watercolor washed design.
And when you look at the back of the designer paper package, you will be amazed at how many coordinating colors go with this paper! I think there were twelve colors plus white. I always write all the colors with a marker on the back cardboard so I can read them easier than trying to squint and read Stampin’ Up!’s tiny print!
The card base is Flirty Flamingo. I cut a strip of the designer paper thinking I would put it on the side of the card, but as I turned over the floral side, I really liked the other side, too, and ended up with this design I adhered two strips of the “other side” to the sides of the card but leaving 1/4″ of Flirty Flamingo showing, and then adhered the floral side over the top and down the middle. That panel is 2 1/4″ wide. Not what I had planned at all, but it’s what it turned out to be!
For the greeting, I sort of copied a sample in the catalog. I die-cut only the word “just” from a die in the Floral Gallery Dies. The die says “just want to say” but I just laid the Merry Merlot Cardstock over the word “just” and die cut that. Don’t forget to save the dot over the J!
I die cut the label for the greeting from the Tasteful Labels Dies in the Annual Catalog. Then I stamped the “thinking of you” in the new Art Gallery Stamp Set on the label in Merry Merlot ink but did not ink up the “I’m”. I got lucky and did not mess it up! Then the die-cut word “just” is adhered to the label also. I popped this greeting up with Stampin’ Dimensionals. You can purchase the Art Gallery Stamp Set and the Floral Gallery Dies in the Art Gallery Bundle and save 10%.
I thought I was finished and was ready to photograph the card but I thought it still needed “something”. Of course that something was a little bling from the Champagne Rhinestone Jewels.
Once I had the design figured out, it was a pretty easy card to make. This is a beautiful suite that you will be attracted to when you see the new catalog!
The new January-June 2021 Mini Catalog starts Tuesday, January 5th….next week!! That will also be the first day of the biggest promotion of the year, Sale-A-Bration! What a week to look forward to!