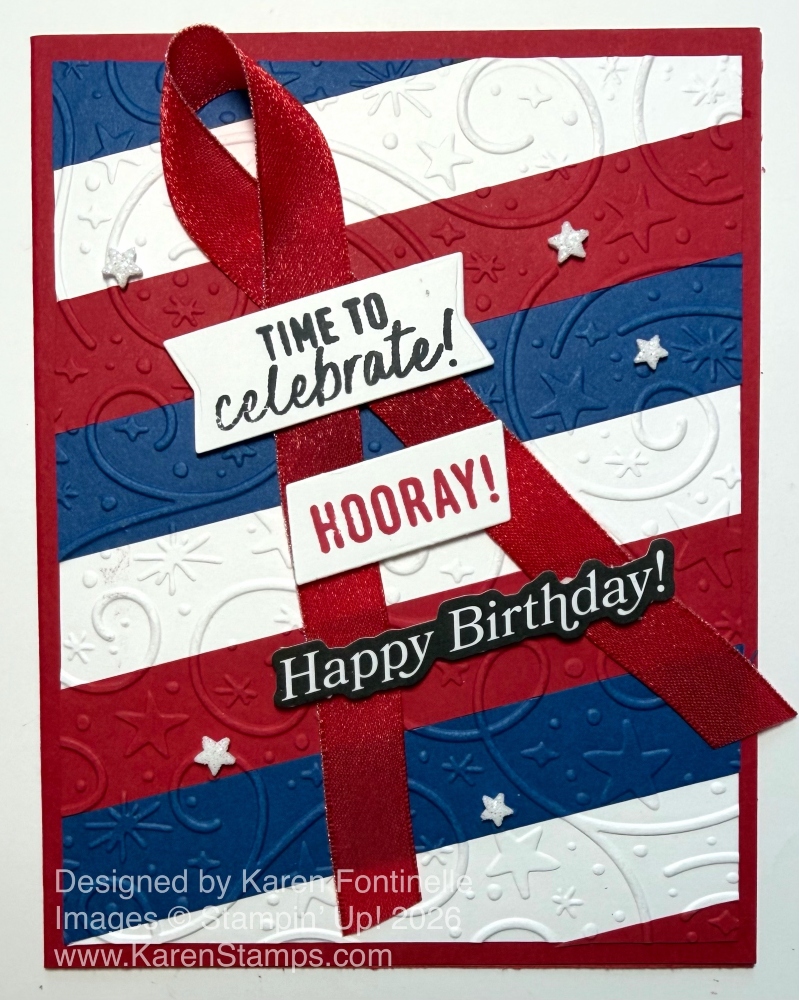
Tag Archives: birthday card

Zoo Crew Musical Birthday Card

Zoo Crew Musical Birthday Card

As I looked for a card idea to make with a stamp set that was retiring from the Stampin’ Up! Annual Catalog, I had a difficult time finding a set I had that wasn’t already sold out! This is the one I came up with and made this fun Zoo Crew Musical Birthday Card with this retiring designer series paper that I love! I wish this whole stamp set, dies, and designer series paper were sticking around another year! These little animals, doing various things from camping to crafting to playing instruments are just so cute and fun! It may be Tax Day, but these little guys will put a smile on your face!

For this card, I started with the Zoo Crew Designer Series Paper in the Zoo Crew Suite Collection. It was tough deciding which characters to use, but I decided on the musical guys. I used my Paper Trimmer to cut out each animal without getting too much other background. You could use a punch or rectangle die or whatever you like but I find just using the Paper Trimmer to be the easiest. Then I layered each animal on colored cardstock and then onto a narrow piece of black. You could do just one layer. I won’t put all the exact measurements because your cut-out animal might be a different size than mine.

The frog was already colored in, but I did decide to color in the bear and the first animal, whatever he is. Maybe he is a wild boar. I used Stampin’ Blends. Their instruments were already colored, I just colored the animal body. You could use Watercolor Pencils or some ink and a Blender Pen or even leave them blank. I didn’t think about how they weren’t colored at first.

The card base is Basic Black with a layer of Lemon Lime Twist. The background designer paper is in the Zoo Crew paper. You could choose from several different patterns.

Fitting these three musicians on the card was a little tricky, but I finally was satisfied with how I have them placed. I decided to pop all three of them up with Stampin’ Dimensionals. Where the corners overlapped, I did not put a Dimensional.

For the greeting, I chose one in the Zany Zoo Stamp Set and stamped it on a scrap strip of Basic White. I have a lot of these scrap strips of cardstock, and they are often handy for a narrow greeting. Rather than making banner ends on my greeting, I added some Iridescent Adhesive-Backed Discs to each end. These are great because they are flat and didn’t add any more bulkiness to the card.

As I am writing this, you can still get the retiring Zany Crew Suite Collection or the individual products in the Stampin’ Up! Online Store! Let me know if you have any questions about what is available or not available during this Last Chance retirement time!

SHOP STAMPIN’ UP! ONLINE HERE!

Cheerful Daisies Birthday Card

Cheerful Daisy Birthday Card

It’s been quite a while since I have used this daisy set, but I got the idea to make this Cheerful Daisies Birthday Card since it looked so springlike! I love the background paper in any case and putting a daisy on the front seemed like the right thing to do!

The card base is Basic White Cardstock with a layer of Daffodil Delight and then the layer of the Bee Mine Designer Series Paper in the Spring Mini Catalog. This paper will be retiring April 30. This pattern, with the Sweet Sorbet background with tiny little white daisies, is nice because there are no hearts or bees so it is easy to use. And I love the color, Sweet Sorbet, which is also retiring. Sad to see that one go! You wouldn’t have to add the Daffodil Delight layer under the designer paper. I just thought it brightened everything up even more by bringing in the yellow in the daisy centers on the paper.

I used the Cheerful Daisies Dies to cut out two pieces to layer to make up the one large daisy with a Daffodil Delight center. The leaves are Granny Apple Green Cardstock and are attached to a collection of different daisies. I just used a portion of that die on the Granny Apple Green Cardstock to cut out the leaves and stems. I decided to leave in the cutout veins of the leaves since I didn’t want the background paper to show through.

There was another die, too, that cut out that very fine foliage piece. It would be good to think ahead and use Adhesive Sheets before die-cutting very delicate pieces like that foliage. Then you wouldn’t have to try to put the tiniest drops of glue on the back of the stems.

After gluing the two layers of daisies together, I popped that daisy up with Stampin’ Dimensionals in the bottom corner of the card and adhered the leaves and foliage underneath.

The greeting is in the Cheerful Daisies Stamp Set. I stamped it in Sweet Sorbet ink and used the label die in the Cheerful Daisies Dies to cut it out. I think it fits perfectly in the space on my card. Sometimes you design a card and then don’t quite know where to put the greeting! I also added three of the Iridescent Foil Gems, two to the greeting and one farther down on the card. I love adding those little embellishments and had to stop myself from adding a couple more!

I’m happy to see that this Cheerful Daisies Bundle of stamp set and dies is in the new Annual Catalog, but not as a Bundle any more. Stampin’ Up! retires Bundles although the pieces of the Bundle may still appear separately. What this means is, in the new Stampin’ Up! Annual Catalog you will still be able to buy the stamp set and you will be able to buy the dies, but you will not save 10% buying the Bundle unless you purchase the Bundle by April 30 when the current Annual Catalog retires!

Also, even though the cute Bee Mine Designer Series Paper that I used is retiring, the Bee Mine Stamp Set and Bee Builder Punch are carrying over into the new Annual Catalog, but again, not as a Bundle. I’m happy we can continue to use that fun punch!

Remember, the 2022-2024 In Colors and all their papers and accessories are retiring so if you need any of those colors, be sure to stock up. I wish they weren’t retiring as I like those better than the ones we got last year! But we will be excited for the next new In Colors!

Check my blog post HERE for the retiring lists of products in the Spring Mini and the outgoing Annual Catalog!

SHOP STAMPIN’ UP!

Biggest Wish Watercolor Birthday Card

Biggest Wish Watercolor Birthday Card Complete

I’ve recently been captivated by a lot of watercolor videos on Instagram, nothing complicated, just some super-easy ideas that I could try with my Stampin’ Up! products! Here is one idea I saw online somewhere made into this Biggest Wish Watercolor Birthday Card.

Here is how I did the watercoloring on this card with my Stampin’ Up! ink pads and Water Painters. I started by stamping the two words in the Biggest Wish Stamp Set with Stazon ink (which is waterproof) on the Fluid 100 Watercolor Paper. The watercolor paper started out larger than you see on the finished card. Make sure the Stazon ink pad is well-inked before stamping on this textured watercolor paper.

After stamping the words I covered “Happy” with a piece of 1″ wide cover up tape. There are probably different brands you can use or washi tape might work if it is wide enough and not so sticky that it tears the paper when you remove it. This tape worked well for me. I placed it with a space above the word “Birthday” so the color had space to go above the word. Then I placed another strip of tape below the word leaving a space for the color.

I used several colors of ink in the Brights family and my Water Painter to pick up some ink in the ink pad lid and painted over the word “Birthday”. The tape kept the ink from going anywhere else except in that open space. When you finish with the watercoloring in the lid of the ink pad, be sure to use a paper towel to clean up the excess water in the lid so it doesn’t get into the ink pad. You can also use reinkers in the lid if you need more color. See the photo below.

Biggest Wish Watercolor Birthday Card Painting

The colors I used were Melon Mambo, Daffodil Delight, Granny Apple Green, Pumpkin Pie, and Coastal Cabana. You can use whatever colors you like!

When I removed the tape, you can see that I had straight lines of watercoloring across the top and bottom of the word “Birthday”. You wouldn’t have to do it this way if you wanted the color to be free-flowing. See the photo below.

Biggest Wish Watercolor Birthday Card Painted

I might even try making a similar card, but using a different watercoloring technique with my inks and Water Painters. It’s just something fun and different. You could also use Watercolor Pencils! Or use Stampin’ Blends markers for the same effect. Don’t you love all the creative possibilities with stamps, ink, and paper?!

To make the card, I played around with the colors before deciding on this design. The card base is Daffodil Delight with a layer of Melon Mambo cut at 5″ x 3 3/4″. The next layer is Coastal Cabana, 4 3/4″ x 3 1/2″, but I felt it needed a little “something”. I decided to use the Cane Weave Embossing Folder. However, I didn’t exactly like the “cane weave” look with this particular card so I turned it over to the other side and I think it gave a textured look without looking like a cane weave so obviously. I also trimmed down the watercolor paper to 3 7/8″ x 3″ so some of the embossed texture of the Coastal Cabana would show around the margin.

Since it is a birthday card I wanted it to look festive so I added quite a few Iridescent Adhesive-Backed Discs in three different colors. That didn’t seem like quite enough, so I stamped the little group of “plus marks” in the Biggest Wish Stamp Set in the corners.

Once you have the design idea for this card, it’s pretty easy to make. Get out some ink pads or reinkers and an acrylic block plus a small paintbrush or Water Painter and have some fun with watercoloring!

SHOP STAMPIN’ UP! ONLINE HERE!

Bright & Beautiful Gate Fold Birthday Card

Bright & Beautiful Gatefold Birthday Card

It has been a while since I have thought of using this Bright & Beautiful 6″ x 6″ Designer Series Paper! But when I got the idea of this Bright & Beautiful Gate Fold Birthday Card I was so happy to get this paper back out and pick which papers I wanted to use on this card! We get so caught up in the newest products that we sometimes forget what we already have!

This birthday card is easy and can be for many other occasions with just a change of greeting and maybe colors or papers. To make this gatefold card, start with a card base of 11″ x 4″. Cut a sheet of cardstock lengthwise instead of horizontally the way we usually do it. I used Blueberry Bushel for this card.

Score the card at 2 3/4″ from each end. Or you can score at 2 3/4″ and then 8 1/4″. Crease and fold the score lines, making sure the flaps meet evenly in the center.

To decorate, cut two panels of designer paper for the front that are 2 1/2″ x 4″. Adhere to each of the two front panels. Or you can stamp on the panels.

On the inside, you could just put a Basic White layer of cardstock to stamp or write a greeting or message, but I decided to use another pattern in the same designer paper that has yellow stripes. I also stamped the circle greeting and cupcake in the Circle Sayings Bundle. I colored in the cupcake with Stampin’ Blends and stamped “Celebrate” in Blueberry Bushel ink and then punched it out with the circle punch. On the cupcake, I added some Adhesive-Backed Glitter Sequins in Old Olive. I also added some punched stars to the inside after I finally found my little retired star punch!

On the front of the card, I die-cut a Blueberry Bushel rectangle with the Radiating Stitches Die. For the center, I just measured and cut out a rectangle to fit inside out of Basic White cardstock with my Paper Trimmer. The birthday greeting is from the Biggest Wish Stamp Set and is stamped in Berry Burst ink.

To go along with the star paper, I dug out some retired dies, So Many Stars to diecut some interesting stars to use on this card. There is also a star die in the Merriest Trees Dies that I used. Use whatever you have!

When you adhere this greeting piece to the front of the gatefold card, find the midpoint and make sure you only apply adhesive to the side that attaches to the left side of the card. It, of course, does not get glued down all the way across so make sure you don’t have any glue in the wrong place that is going to make something else sticky!

This is the kind of easy card that you can change up in different ways and make something that looks completely new!

SHOP STAMPIN’ UP! ONLINE HERE!

Zoo Crew Fun Birthday Card

Zoo Crew Fun Birthday Card

I was in the mood for an easy and fun card and when you want that, you just might turn to the Zoo Crew Designer Series Paper! What turned out was this Zoo Crew Fun Birthday Card. There is no denying how cute and fun this designer paper is along with the stamp set and all the whimsical characters you can create with!

The card base is Basic White with a layer of Soft Sea Foam cardstock. I felt it needed something so I looked through my embossing folders. I chose the Painted Texture 3D Embossing Folder because it has that texture but nothing that competes with the rest of the card.

In my package of Basic White, I found one of these Radiating Stitches die-cuts in the bag so I tried that out to see if it would work on this card and I liked it! It provided a backdrop for my characters to help them show up better but wasn’t distracting. When I saw a narrow strip of a black and white scallop pattern in the designer paper, I stuck that underneath the die-cut just for a little interest there.

The characters on the card front are simply cut out of the Zoo Crew Designer Series Paper. This is just some of the cutest paper that Stampin’ Up! has carried. What is fun about it is all the different characters doing all sorts of different things – knitting, camping, singing, playing musical instruments, dancing, even doing yoga! The characters are partially colored in and look fine as is, but if you want to, you can add more color with whatever coloring technique you like. I chose three characters who were celebratory – one singing, one juggling cupcakes, and one bringing a gift. I did add some extra color with my Stampin’ Blends because I like doing that! There are some dies that fit with some of the characters, but I just cut them out with Paper Snips.

The greeting is in the Zany Zoo Stamp Set. I stamped it with Memento Ink and die-cut it with one of the center dies in the Countryside Corners Dies. It was a good fit! I layered it on a strip of Pool Party cardstock and flagged each end. It is popped up on Stampin’ Dimensionals, as are the three characters. Remember, we have Mini Dimensionals for those little spaces.

For a final touch, I added a bunch of Pastel Adhesive-Backed Sequins in pink, gold, and blue all around the card. Can you ever have too many sequins??!

Here’s another card, sort of a similar design, except with three dancers, that I made previously with the Zoo Crew Designer Series Paper.

The holidays and Holiday Mini are approaching, but don’t forget to enjoy the other great products we have in the Annual Catalog!

Be sure to redeem your July coupons if you have them!

Redeem Bonus Coupons

Zany Zoo Brights Z-Fold Birthday Card

Zany Zoo Brights Z-Fold Birthday Card

Sometimes you have an idea for a card but it doesn’t work out. Instead, something else “calls to you” and you come up with a completely different card than you imagined you would make. In this case, this Brights 6″ x 6″ Designer Series Paper caught my eye and I couldn’t resist! I already had some Poppy Parade cardstock out for my original idea, and I found a Z-Fold card base ready to be used in that package! Poppy Parade is one of the many colors in that designer paper pack so I had my card idea in my head! At least, the basics.

To make a Z-Fold card, you will fold the right half of the front of the card back toward the fold on the left. You’re folding the card front back on itself. Start with a piece of cardstock 5 1/2″ x 8 1/2″. Score at 2 1/8″ and 4 1/4″. Fold and crease in half, then fold at the 2 1/8″ score line so when you view the card from the top it looks like a “Z”.

To decorate the card, I cut a Poppy Parade diagonally striped piece of designer paper at 2″ x 5 3/8″ or you can make the measurements 1/8″ smaller at the width and length if you want more of the cardstock to show in the margins. On the inside, I cut a piece of the heart pattern at 4 1/8″ x 5 3/8″. It’s optional to add designer paper to the inside panel on the left of the card. It would be the same measurements as the striped pattern on the front panel.

For the card’s focal point, I thought it would be fun to use the Zany Zoo Stamp Set to go with the bright colors! I picked this cute little guy holding the balloons for a birthday! He is stamped with Memento Ink on a piece of Basic White that is diecut with one of the Countryside Corners Dies. I hadn’t done any coloring in a little while, so I got out my Stampin’ Blends alcohol markers and colored him in with Light and Dark Pecan Pie Stampin’ Blends and a little gray on his front. The balloons are colored with Poppy Parade, Tahitian Tide, and Parakeet Party Blends. The greeting is in the Zany Zoo Stamp Set and I got it to just fit on the piece!

I thought I would like layers of the colors I used for the balloons so I diecut a piece of Parakeet Party, Tahitian Tide, and Poppy Parade. But I didn’t want to make it all TOO big. I cheated a little and used my Paper Trimmer to try to, as evenly as possible, trim off a little of the Poppy Parade layer so I could use the regular-size die for the Tahitian Tide layer. Otherwise, the Poppy Parade would have been the same size as the Tahitian Tide and then the Tahitian Tide layer would have had to be the next largest die up (which might have been the largest one) and that was going to take up a lot of room on the card front.

When whatever your focal point is on the front of the card, you only want to glue half of it to that folded-back front section. So carefully figure out which side the glue will go on and try to center that part as best you can.

If you want a panel on the inside of the card, over a print as I have on this card, cut a shape the same size as the largest layer on the front so it doesn’t stick out and show when the card is closed. Then lay it face down on the back side of the focal piece, apply glue, and make sure it stays in place lined up with the front of the card, then close the back of the card over to the inside panel gets adhere to the inside of the card but stays hidden behind the front piece. You’ll understand when you do it!

For the inside of my card, I stamped a birthday greeting from the Cheerful Daisies Stamp Set and also some confetti with the stamp in the Zany Zoo Stamp Set in the same colors of ink I had already used on the front of the card – Poppy Parade, Parakeet Party, and Tahitian Tide. On the front of the card, I added some Iridescent Rhinestone Jewels for some sparkle.

Z-Fold cards are easy to make and for sure should be in everyone’s repertoire!

Unfortunately, this Brights 6″ x 6″ paper is backordered until the week of September 25 at this time, but many of you may already own it and of course, you can use whatever designer paper you have for the card that you want to make!

Here is a view of the card when opened.

Zany Zoo Brights Z-Fold Birthday Card open

I hope you will be inspired to try a Z-Fold card. Make it as simple or fancy as you like! Keep checking, maybe this Brights DSP will come back in stock sooner! Don’t forget to use your Bonus Coupons if you earned some in July. Use your Bonus Coupons by August 31.

SHOP STAMPIN’ UP! ONLINE HERE!

Textured Floral Happy Birthday Card

Textured Floral Happy Birthday Card

I just got this Textured Floral Bundle the other day, and wow, am I happy with this first card I just made! This Textured Floral Happy Birthday Card came together really easily! It reminded me a lot of a stamp set that just retired from the previous annual catalog, but then I saw samples online and couldn’t resist any longer! No matter how many floral stamp sets we have, we still need more!

These stamps have that “Distinktive” style which gives you some texture and makes the image look very artistic. They look good stamped right on the card or you can use the dies to cut them out.

I wanted this card to look bright and summery so I started with a card base of Lemon Lime Twist and a layer of Daffodil Delight cardstock. I stamped the three flowers in Flirty Flamingo, Daffodil Delight, and Highland Heather on a separate piece of Basic White cardstock and then die-cut them with the Textured Floral Dies. One set of leaves was stamped with Garden Green ink on Basic White and the other was stamped on Lemon Lime Twist cardstock with Lemon Lime Twist ink. The stem with the tiny leaves was die-cut from Lemon Lime Twist. I thought it was so pretty I had to use it on this card!

When I first stamped one of the smallest flowers with Highland Heather ink, I thought the flower was so beautiful that I got the idea to stamp those flowers directly on the card and the others would be fine to be diecut and popped up on the card. I think the beautiful Highland Heather flowers really make a pretty backdrop for the other flowers.

After stamping the Highland Heather flowers around where I planned to place the other flowers, I could fill in some empty spaces so it turned out I stamped more purple flowers than I first thought. But I really like them! Then I adhered the Flirty Flamingo large flower with a couple of Stampin’ Dimensionals and then the Daffodil Delight flower off to the side, and finally had to add a diecut purple flower, also popped up. When you know you are going to slip some leaves underneath, be sure not to have too much adhesive right on the edges of the flowers. I used Multipurpose Liquid Glue to adhere all the different leaves and the stem.

The greetings in the Textured Floral Stamp Set were too large for the space I had left, so I used a small “Happy Birthday” stamp in the Go To Greetings Stamp Set. I was going to stamp it on some small label, but took a chance and stamped it directly on the card. If I had messed it up, I still could have covered it with a large stamped greeting label. It’s pretty risky to stamp directly on a card that you have just spent time making!

For a little sparkle, I splattered some Wink of Stella around the front of the card. I could have used Iridescent Rhinestones or sequins instead for a little bling.

On the inside of the card, I did stamp a greeting from the Textured Floral Stamp Set and adhered an extra Highland Heather diecut flower to the corner. Now the card is all set to mail to a friend for her birthday!

Remember, tomorrow is the last day for the Bonus Days at Stampin’ Up! to earn your $5 coupons with every $50 purchase at Stampin’ Up! Then spend your coupons in August!

SHOP STAMPIN’ UP! TODAY!

Bright & Beautiful Diagonal Birthday Card

Bright & Beautiful Diagonal Birthday Card

Make this Bright & Beautiful Diagonal Birthday Card for anyone’s birthday! The paper makes it festive and bright and of course, who doesn’t love a cupcake?

This Bright & Beautiful 6″ x 6″ Designer Series Paper is a great package to own. You can purchase it at a 15% discount right now through June 30th! It has bright and beautiful colors and designs, just like the name says! So many coordinating colors with this paper, also. Some papers are like ombre-dipped shades, then there are stars, dots, diagonal stripes, circles, confetti, and more. Use it for cards or scrapbooking. For sure, the papers go well for making birthday cards.

The card base is Bubble Bath cardstock. If you want to have some stamped images on the side without designer paper, be sure to do that before you add the designer paper. I just stamped the cupcake from the Circle Sayings Stamp Set in Bubble Bath ink on the Bubble Bath cardstock. That gives a watermarked look, the same as if you used Versamark ink instead. It just adds a little interest rather than the blank cardstock on that side.

To cut the designer paper on the diagonal, first decide what size you want it to be. If you want it to fit corner to corner, completely against the fold of the card and all the way to the bottom of the card, then cut a piece of designer paper 4 1/4″ x 5 1/2″, the exact size of the card. Then cut it diagonally from corner to corner with your Paper Trimmer. Put the top left corner of the designer paper even with the Paper Trimmer cutting track while also putting the lower right corner of the paper also even with the cutting track. That puts your paper on the diagonal. To avoid tearing the corners when you start cutting, place the cutting blade up into the paper, then back down to the corner, and then go up to the top, or vice versa. That takes some of the pressure off that pointy corner of the paper with the cutting blade jamming into it.

If you want the card to have the usual margin, cut the paper at 4″ x 5 1/4″, then adhere it 1/8″ off the fold and from the bottom as you would normally do. Either way is fine, or even smaller, depending on your design.

For the center greeting, I stamped the words and the cupcake from the Circle Sayings Stamp Set on Basic White with Bubble Bath ink. I punched it out, which was very close, with the 2″ Circle Punch. I wanted to use the 2 3/8″ Circle Punch for a layer of Bubble Bath so I had to use the 2″ Circle Punch. It worked fine!

I added Stampin’ Seal to the back of the greeting circle so that I could wind the Gold & Vanilla 3/8″ Satin Edged Ribbon back and forth behind it, and then I added Stampin’ Dimensionals to hold down the ribbon and to pop up the greeting in the center of the card. I liked the touch of gold on a festive birthday card!

And what birthday card would be complete without some bling? I used the Pastel Adhesive-Backed Sequins here and there on the cupcake and card to some sparkle. I have used these sequins a lot, maybe because the colors go with a lot and because they already have adhesive on them, unlike sequins we used to have that we had to glue down ourselves.

You can use this same card design with the other images in the Circle Sayings Stamp Set or even use some other greetings and dies. Here is another card I made recently using the same paper and stamp set, but with a few differences.

Check out the Stampin’ Up! Designer Series Paper Sale!

Melon Mambo Daisies Birthday Card

Melon Mambo Daisies Birthday Card

Sometimes it’s fun to stamp your own images on a card instead of using die cuts or designer paper! It’s like getting back to basics and it feels so good to have that stamp in your hand and stamp over and over!

This card is very simple. I chose a Melon Mambo cardstock card base with a Basic White layer. Of course, stamp the white layer before adhering!

I used the Cheerful Daisies Stamp Set to stamp three of the largest daisies and then filled in the rest of the space with the smaller outline daisy stamp. For the flower centers, I used Daffodil Delight ink. There is a smaller flower center stamp and a larger one. Of course, flowers need leaves, so I inked up the leaf stamp with Granny Apple Green ink and filled in wherever I could.

The ribbon tied around the card is the Lemon Lime in the Ribbon Duo Combo Pack. To make the bow a little more substantial, I used two strands of ribbon and tied a bow.

The greeting is in the Cheerful Daisies Stamp Set and is stamped in Melon Mambo ink. It is diecut with the small banner die in the Countryside Corners Dies. For a final touch, I added several pink Pastel Adhesive-Backed Sequins.

This is just a fun, simple card to make and good to have on hand for birthdays or other occasions!

SHOP STAMPIN’ UP! ONLINE HERE!

Hello, Irresistible Floral Birthday Card

Hello, Irresistible Floral Birthday Card

I seem to be quite taken with this paper lately, even though it’s not one of the brand-new products, but there is something about it! I made this Hello, Irresistible Floral Birthday Card mostly with die-cutting the elements on the card.

This is the Hello, Irresistible 6″ x 6″ Designer Series Paper, available as an Online Exclusive in the Stampin’ Up! Online Store. This means you won’t find the paper in the catalog, but it can be purchased online for as long as it is available. If you like this paper, you can purchase it at a 15% discount during the month of June on the Designer Series Paper Sale! The patterns are all so soft and pretty!

In making this card, I chose a card base of Flirty Flamingo, but I also added a layer of Petal Pink. I couldn’t decide which color to use so I used both! Next, there is a layer of designer paper. There are so many pretty patterns to choose from. I liked this color-washed linear design to be the background for the flowers.

What really inspired this card was the die-cut vertical piece on the left side of the card. I already had it in my pile of scraps that I didn’t use one other time, so I carefully adhered it to the card on those dots. You might not notice, but I decided to punch out some Vellum Cardstock circles, one with the 2 3/8″ Circle Punch and two with the 2″ Circle Punch. I put the largest circle near the bottom of the card and the other two above.

You can stamp flowers and leaves if you like from the Irresistible Blooms Stamp Set or you can die cut them right out of the designer paper! There are large and small outline flower dies plus a couple of different leaf dies. It is so fun when you can cut out the designs from the paper. Then I just played around with the flowers and leaves until I was happy with the placement and glued them down. The bottom flower is popped up on Stampin’ Dimensionals.

The greeting is stamped on a piece of designer paper in a Soft Sea Foam color in Soft Sea Foam ink. The greeting is in the Go-To Greetings Stamp Set. I used a narrow banner die in the Stylish Shapes Dies to make a thin banner for the sentiment without covering up too much of the flowers.

For a finishing touch, I adhered several of the Petal Pink sequins randomly on the card in the Pastel Adhesive-Backed Sequins. I really like these sequins, three different colors, and different sizes.

Here is another card I made using the Hello, Irresistible Paper.

Take advantage of the Stampin’ Up! Designer Series Paper Sale while you can!

Hello, Irresistible Floral Birthday Card Closeup

Bright & Beautiful Circle Sayings Birthday Card

Bright & Beautiful Circle Sayings Birthday Card

Here’s a quick and easy birthday card to make, the Bright & Beautiful Circle Sayings Birthday Card. I just chose a soft, ombre designer paper for the card layer and added one of the Circle Sayings.

The card base is one of the new colors, Bubble Bath. The designer paper is the Bright & Beautiful 6″ x 6″ Designer Series Paper. This pack of paper has all kinds of colors and patterns that will make lovely and bright & happy cards and projects for you. This particular pattern I chose has ombre shades of Bubble Bath. You almost can’t tell it very well in the photo. It’s like a dip-dye where each dip gets lighter and lighter at the top and darker at the bottom.

For the greeting, I used the Circle Sayings Stamp Set and the 2 3/8″ Circle Punch. You can purchase both together in the Circle Sayings Bundle and save 10%. I simply stamped the circular greeting in Bubble Bath ink on Basic White cardstock and then the cupcake in the center also in Bubble Bath. At first I wished the circle punch was a bit smaller so I could make a layer with the 2 3/8″ Punch, but the 2″ Circle Punch seemed a bit too small. I think it turned out okay the way it is.

To jazz it up a bit, I put some ribbon, back and forth behind the circle. This is the White 3/8″ Glittered Organdy Ribbon, which is still available in the Online Exclusives. Just put “organdy ribbon” in the Search box and it will come up. It is soft enough to go along with the soft colors of the card, but you can see the bits of glitter embedded in the ribbon for a little sparkle. As I got out some Iridescent Rhinestone Basic Jewels, I decided to color one with the Dark Bubble Bath Stampin’ Blend Marker and put it on top of the cupcake! I was going to put more rhinestones on the card but changed my mind to the Pastel Adhesive-Backed Sequins. I just chose three of them and placed them on the card. It adds a little bling but not too much.

This Bright & Beautiful Designer Paper will be on the Designer Series Paper Sale on June 1st at 15% off, so put it on your list if you don’t own it already!

Shop Stampin’ Up! Online!

Zany Zoo Foxy Birthday Card

Zany Zoo Foxy Birthday Card

When I started working on this Zany Zoo Foxy Birthday Card, I had no idea what I was going to make. I only thought I would use the Zoo Crew Designer Series Paper because I hadn’t used it too much yet. I looked through the papers, this little fox on a Pool Party scooter caught my eye and as I played around, this card came about!

The little fox on the designer paper was already partially colored and you can leave the characters that way or you can color in some of the uncolored parts. I used Stampin’ Blends on the scooter seat, light, tires, and the fox’s scarf.

For the balloons, I stamped the raccoon holding balloons in the Zany Zoo Stamp Set on Basic White cardstock. I die-cut the raccoon and then cut off the balloons so I could use them with the fox! I colored them in with several Stampin’ Blends colors.

The card base is Pool Party cardstock with a layer of the black and white side of the Zoo Crew Designer Paper. I diecut two circles in the Stylish Shapes Dies, one in Basic White and one for the layer in Pool Party and adhered them together. To break up the background, I added a narrow strip of another black and white pattern, to go underneath the circles.

After adhering the circles to the card front, I cut out the fox on the scooter with my Paper Snips and popped him up over the circles with Stampin’ Dimensionals, plus stuck on the balloons, too.

For the greeting, I stamped the sentiment from the Zany Zoo Stamp Set and die-cut it with the banner die in the Zany Zoo Dies. For the Pool Party layer, I held the greeting banner on the Pool Party cardstock and just cut around it by hand! It turned out fine. It would have been nice to have a layering die for that, though!

For embellishments, I tied a little bow with the Black & White 1/4″ Gingham Ribbon and adhered it with a Glue Dot. For a little sparkle, I used the Pastel Adhesive-Backed Sequins around the fox and on the birthday banner.

For not knowing WHAT I was going to make this time, I was quite happy with my card when I was finished! So even if you don’t have any creative ideas in the moment, just get out some designer paper you like and see what you end up with!

SHOP STAMPIN’ UP! ONLINE HERE!

Abigail Rose Floral Birthday Card

Abigail Rose Floral Birthday Card

I’m maybe having a difficult time letting go of some of the retiring products, now that it is getting down to the wire! The Stampin’ Up! Annual Catalog ends on May 1st, which is right around the corner! I was a late-comer to this Abigail Rose Suite so I’m not quite ready to give it up! I was in the mood for some coloring, so I chose on of the designer paper patterns, colored with Stampin’ Blends, and made this Abigail Rose Floral Birthday Card.

This card starts with an Early Espresso card base with a layer of the pretty Petal Pink striped paper in the Abigail Rose Designer Series Paper. This paper is discounted a little bit in the Last Chance Sale so grab it while you can and use it or hoard it, whichever you like!

The colored flowers are from another sheet of the designer paper. I cut out this bunch of flowers, just roughly off the whole sheet of designer paper so it would be easier to color. I used several different Stampin’ Blends. The Petal Pink Combo for the large flowers, Light Pumpkin Pie for the smaller flowers, Light Highland Heather for the tiny flowers, and the Granny Apple Green Combo for the leaves with a bit of Daffodil Delight on some of them.

After coloring all the flowers how I liked, I cut out around the flowers with Paper Snips, not following the lines perfectly, but leaving a tiny white margin around the edge everywhere. Then I adhered it flat to the card with Multipurpose Liquid Glue. It could also have been popped up on Stampin’ Dimensionals.

The greeting is stamped from the Go To Greetings Stamp Set. It was then diecut with one of the banner dies in the Stylish Shapes Dies. Since there was little space, I trimmed off the right end of the banner and adhered it flat against the edge of the striped designer paper, slightly overlapping one of the leaves. For some sparkle, I added several Iridescent Rhinestone Basic Jewels randomly on the card.

Here is a very similar card I made a while back using the striped paper and part of the flower grouping. I used vellum die cuts for some texture behind the main flower image. One of the dies cuts out this flower and its leaves.

This Abigail Rose Designer Series Paper is still available in the Last Chance Sale as are the Cottage Flower Dies. Don’t miss out if you want these products!

SHOP THE LAST CHANCE SALE!

Framed Florets Pale Papaya Birthday Card

Framed Florets Pale Papaya Birthday Card

This Framed Florets Pale Papaya Birthday Card uses retiring stamps, dies, and colors. Gotta eke out all the uses I can before these lovely things retire and we move on to all the exciting new things! I really wish this stamp set and dies were staying.

The card base is Soft Succulent, one of the outgoing In Colors of 2021-2023. Then I have a layer of Pale Papaya, another outgoing In Color in that group. That layer is cut with the die in the Framed Florets Dies (I think they are sold out.) I also diecut a Basic White oval to put in the center with the greeting stamped in Soft Succulent Ink with the Framed Florets Stamp Set. I love that particular greeting and font.

The flowers are all stamped in Memento Ink and colored with Stampin’ Blends. Then they were die cut as were some foliage to add behind the flowers. I used Soft Succulent cardstock and some Fresh Freesia for the single leaves.

I added some 2021-2023 In Color Opal Rounds for a bit of sparkle. These are retiring along with their In Colors and are discounted a little. So if you like collecting embellishments, get these pretty dots! You could use them with lots of subtle colors.

Check out the Last Chance List and get what you want before any more sells out!

SHOP STAMPIN’ UP! ONLINE HERE!

Glitter Washi Tape Birthday Card

Glitter Washi Tape Birthday Card

I saw this idea of using our Glitter Washi Tape this way on the @Stampinupofficial Instagram account the other day and I loved the idea! Because of the colors, I assumed they were suggesting this was a way to make a Halloween card. While that would be very cute, I thought I could make a Glitter Washi Tape Birthday Card with three of the four washi tape colors! And I did! But I’m also dying to make a Halloween card using this technique, too!

The main idea is to use the Black & White Designs Designer Series Paper and add strips of the Glitter Washi Tape in the Holiday Mini Catalog on page 57. You have to look up in the upper left corner of the page to find it! I did make THIS CARD for Halloween using some Glitter Washi Tape but not in this way. I think this is such a clever idea to use this washi tape with this designer series paper!

The colors of the Glitter Washi Tape are Old Olive, Black, Highland Heather, and Pumpkin Pie. I left out the Pumpkin Pie so it wouldn’t look like Halloween. The card base is Highland Heather and I embossed the front with the Hive 3D Embossing Folder. I would normally use a separate layer to emboss, but since this card base was already cut and folded in the cardstock package I just went with it this way. I had to run the folder through my Stampin’ Cut & Emboss Machine sideways which isn’t the best but it worked. Since I had a slightly smaller layer for the card front I thought a little texture around the edges of the card was in order.

The card front is a polka dot pattern in the Black & White Designs Designer Series Paper in the Holiday Catalog. I ran the washi tape diagonally in between the polka dots. There are also striped designs and others so you can choose other ways to apply the washi tape. Just let the strips of washi tape extend over the edges of the cardstock and then fold them all under instead of cutting or tearing them off at the ends. You could do that though. I used Stampin’ Seal+ adhesive to adhere the striped card front to the card base.

Glitter Washi Tape Card Front
Glitter Washi Tape Card Front2

I used the Biggest Wish Stamp Set for the greeting and focal point of the card. I stamped the words separately in Highland Heather ink and cut them very closely to the words with the Paper Trimmer. I also added a narrow layer of Highland Heather behind the stamped words. This stamp set is a fun one to own and perfect for a card like this.

Just in case the Glitter Washi Tape wasn’t enough “bling” on this card, I added a few 2021-2023 In Color Jewels even though they are retired now. (Such a shame!) I thought the Fresh Freesia jewels could be a close enough match to work on the card and applied a few to the greeting.

You might want to add this 4-pack of Glitter Washi Tape to your next order. It’s not just for Halloween and you can use the tape in so many ways in cardmaking and scrapbooking. You could just use little touches of it or actually make stripes or designs with it on cards. Just one of the fun embellishments we have for our papercrafting!

SHOP STAMPIN’ UP! ONLINE HERE!