Tag Archives: Easter card

Slimline Easter Joy Easter Eggs and Bunny Card

Easter Joy Easter Eggs and Bunny Card

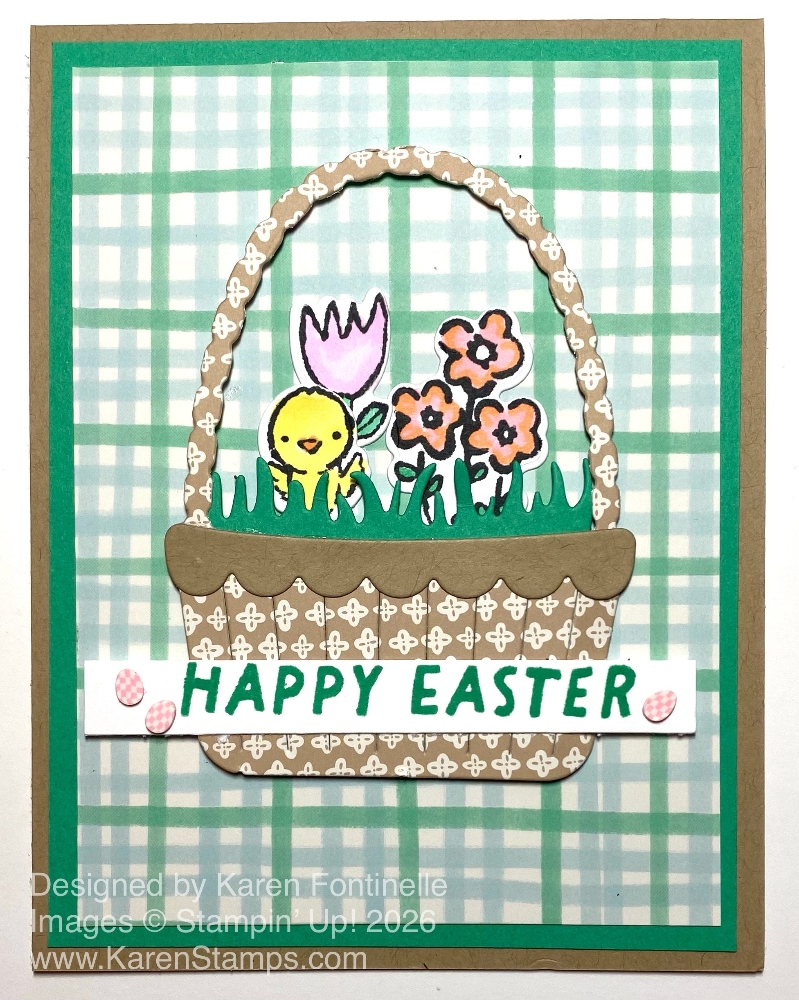
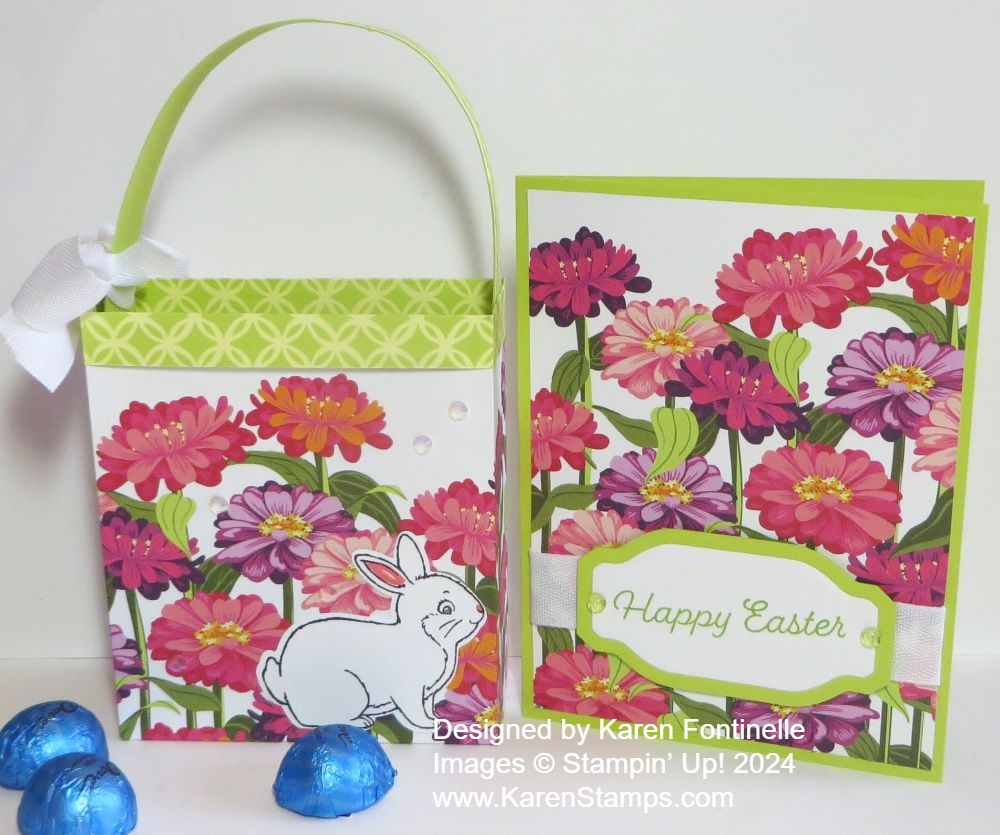
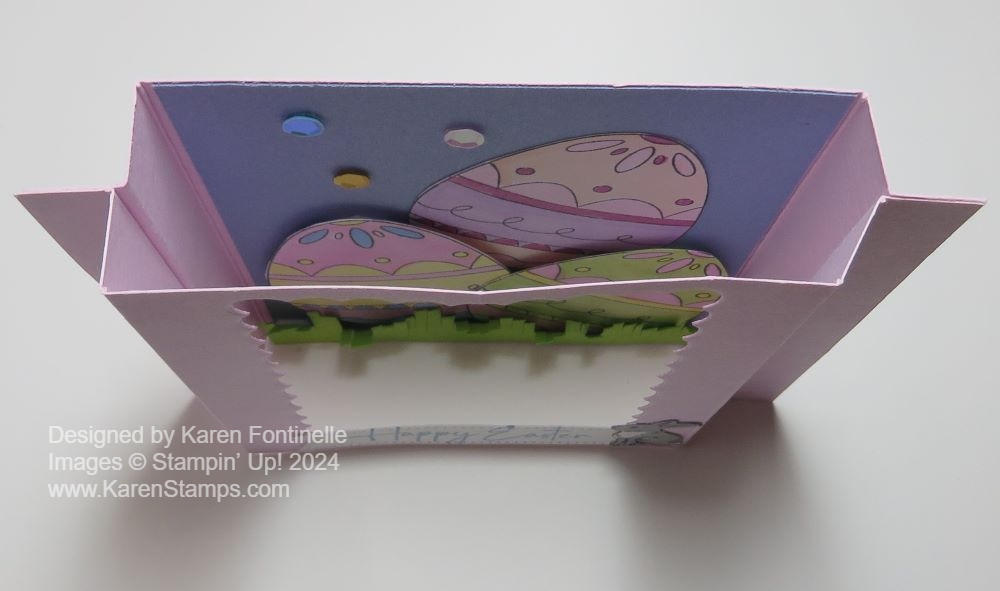
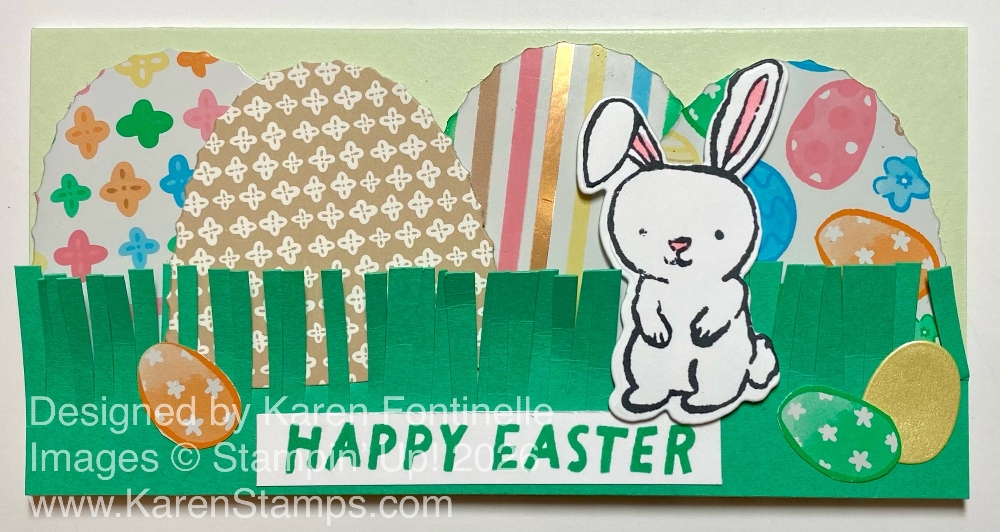
Here’s another Easter card, the Slimline Easter Joy Easter Eggs and Bunny Card, made with scraps! Scraps of what? When you diecut the basket in the Easter Basket Dies, the part that pops out inside the handle is a scrap. But you can use it for an Easter egg! Especially when you use the Easter Joy Specialty Designer Series Paper, which has such pretty colors and designs. If I wanted to be perfect, I could have trimmed the edges of the “eggs” to remove the slight scalloped edges, but they are barely noticeable.

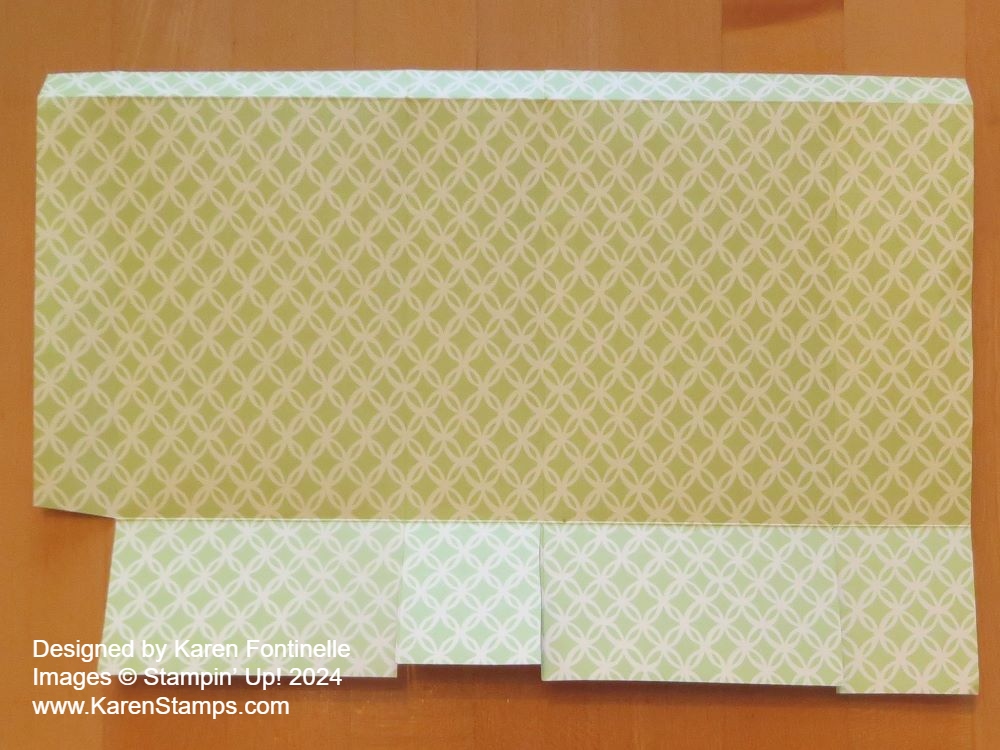
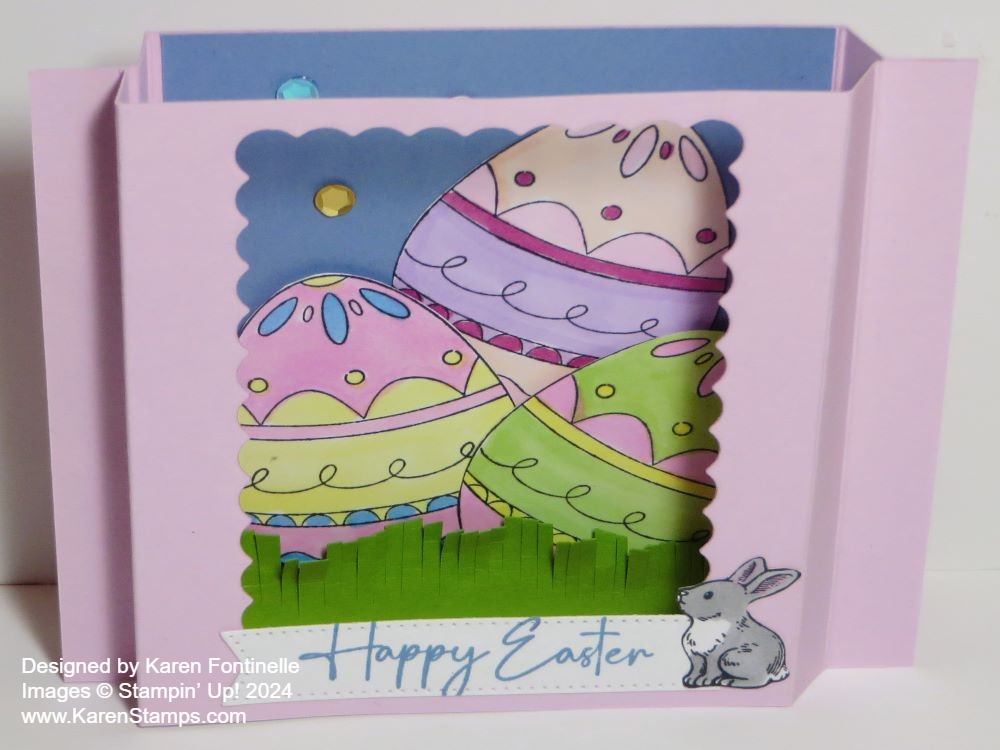
This is a slimline card which means it is long and narrow compared to what we usually make. I like to make slimline cards 3″ x 6″ so that they fit into regular small envelopes (not the business size) that you probably have around the house. I started with a 6″ x 6″ piece of Soft Sea Foam cardstock, scored and folded at 3″.

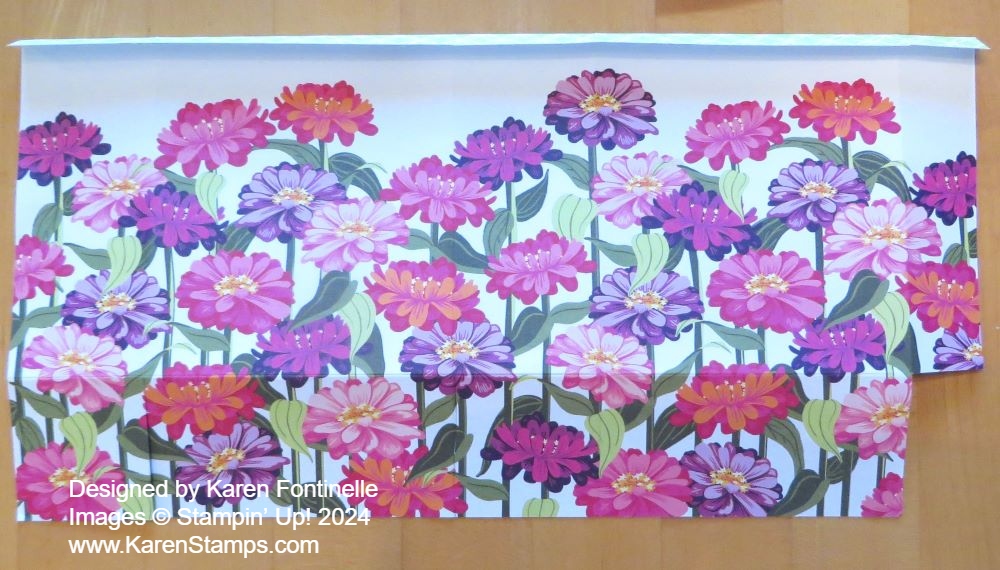
I cut a strip of Shy Shamrock cardstock for the grass and snipped it from the top to make it 3D grass. You can make it as high or short as you like. The diecut “eggs” from the basket are “hidden” in the grass. I fit in four, made with the Easter Joy DSP. You can use either side of the paper, or you can use plain or stamped cardstock, whatever you like.

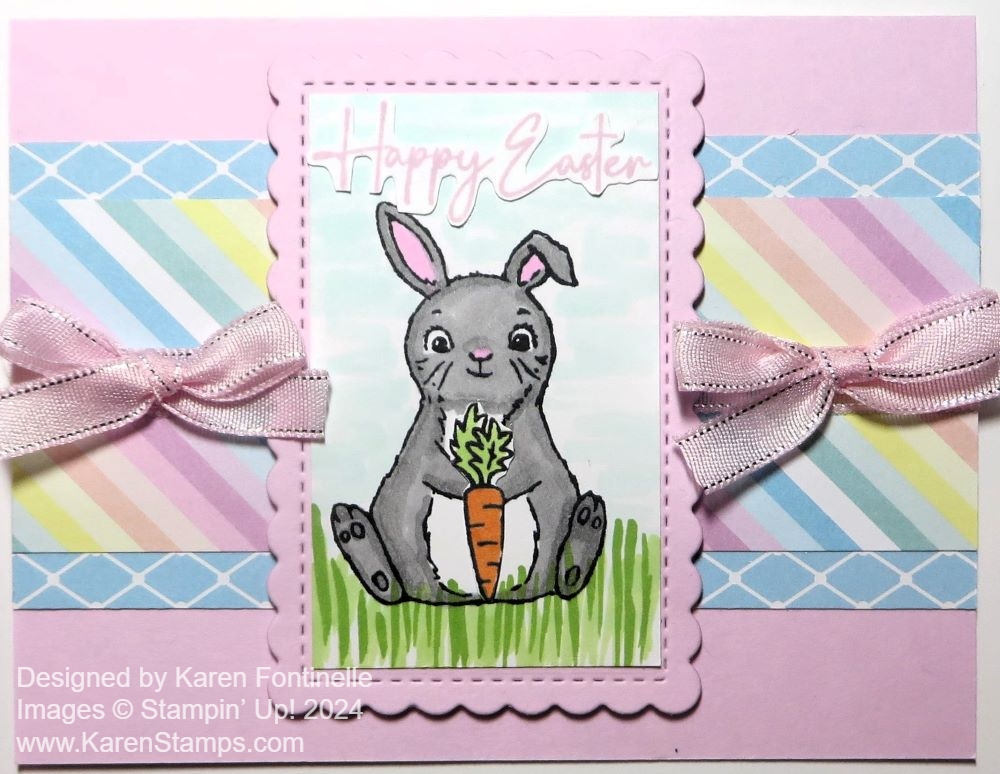
The greeting is stamped on a strip of Basic White with Shy Shamrock ink. The Easter bunny is stamped in Memento ink with a little light pink inside the ears and nose. The little Easter eggs scattered on the front of the grass are cut out from the Easter Joy DSP except for the yellow one, which is diecut from the Pastels Shimmer Paper. When you are cutting or die-cutting certain things, if you make extras and save them, then they are handy to add to future cards or projects when you just want a little something more.

If you look in the Online Store at the Easter Joy Designer Series Paper and scroll through the photos of the paper and sample ideas, if you go to the very end, you will see the idea with an egg carton and these Easter eggs along the back in the “grass” and an Easter tag greeting with a bunny. It’s very cute! Save your egg carton, and you can make one too!

Easter Card With Basket of Eggs

Easter Card With Basket of Eggs

This Easter Card With Basket of Eggs was fun to make and has a slightly different design just to make life interesting! You may notice that the top flap of the card does not come all the way to the bottom of the card. That just makes it a little more fun to open up this card for Easter!

The card base is Pretty In Pink (although in the photo it almost looks like Melon Mambo or some darker pink). Cut the full sheet of cardstock in half vertically at 4 1/4″, then score at 5 1/2″. That will give you either a side fold or a top fold. This card design will have the fold at the top, although you could really do the same type of design with a side fold.

On the front flap of the card, cut off whatever measurement you would like to shorten it. I cut off 1 1/4″ from the bottom of just the front of the card. That leaves space showing from the inside of the card on the outside on which you can add decorative paper, stamping, or a greeting. Stamp the greeting either right in that empty space or stamp it on another paper and adhere it, as I did.

The background layer for the card front is just a whimsical design in the Easter Joy Specialty Designer Series Paper. It has many colors, so you can choose any for your card base. I chose Pretty In Pink. This is a retiring In Color soon, so if you need more, perhaps you should stock up! This piece of DSP is cut at 4″ x 4″.

The Easter basket is cut from one of the papers with a basket weave look and color to it. Then I added a Crumb Cake scalloped edge to the basket. The Shy Shamrock green grass in the basket is also diecut. All of these dies are part of the Easter Basket Dies, which are currently unavailable. Hopefully, you have these dies already. I also diecut some Easter eggs out of the Pastels Shimmer Paper and put those in the Easter basket! At the top of the basket handle, I added a double bow tied with the Bubble Bath 1/8″ Faux Linen Ribbon. I love this ribbon even though it is not an exact color match. It is often just the right size to use when you don’t have space for wider ribbon.

On the inside of the card, I added a 4″ x 4″ Basic White cardstock piece. To the bottom of that, I added a piece of the Easter Joy designer paper in green, added a stamped, diecut, and colored tulip plus stamped a bunny right on the paper. He has a little color and shading with Stampin’ Blends.

Easter Card With Basket of Eggs Inside

At the bottom of the card, I added a “Happy Easter” greeting on a scrap strip of Basic White, which is adhered in that space. This is stamped with the Easter Basket Stamp Set in Pretty In Pink ink. It would also be pretty to stamp the greeting directly on the Pretty In Pink with Pretty In Pink ink plus some little image, too.

This is an example of how just one simple thing, making the front flap of the card shorter, makes for an unexpected, extra-special card design!

Easter Bunny Card

Easter Joy Bunny

Here is just a quick and simple card, the Easter Bunny Card. It is mostly made with pieces I already had handy on my table. Sometimes when I am stamping, diecutting, or coloring, I either change my mind about what I am going to use or I make extras at the time. Either way, I save those pieces and if they are lucky, I come across them again and use them on another project!

This card comes from one of the cut-apart panels in the Easter Joy Specialty Designer Series Paper. I love this paper for its spring colors and images. If you thought about spring and/or Easter, you would likely think of bunnies, flowers, baskets, Easter eggs, and soft pretty colors, and you would be imagining this paper. This paper is thicker than regular designer paper so it’s great for 3D projects, and it has a metallic shine to many of the pages. In other words, if you think about Easter paper, this is it! One feature is a couple of sheets have panels to cut apart and use separately, many of which are great for starting cards or using on scrapbook pages. Just build a little scene for a card on these panels. There are all different ones.

This card has a Shy Shamrock card base, one of the coordinating colors. The layer on that is one of those panels in the Easter Joy Designer Series Paper. The panel just has a green grass hill and pink flowers all in the background. It wasn’t my favorite, but I wanted to use it. I had an extra stamped and die-cut bunny so I added him to the hill with Stampin’ Dimensionals.

I had been diecutting Easter Eggs with the Easter Basket Dies (wish they added more than one egg die!) out of the Pastels Shimmer Specialty Paper. I also fussy-cut some Easter eggs from the Easter Joy paper that is totally full of Easter eggs. Some I cut a little inside their border to make them a bit smaller. I glued an assortment of all these eggs on the grassy hill with the bunny, as if he is the “King of the Hill” with all the Easter eggs!

The greeting is stamped in Memento ink on Basic White cardstock from the Easter Basket Stamp Set. Rather than adhering the whole greeting in one piece on the card, I cut around each word to make it a little whimsical to go with the card.

With the card background already made with the Easter Joy Designer Series Paper with these panels, finishing it off as a card is pretty easy! Especially with these cut bunnies to stamp in the Easter Basket Stamp Set! I really love everything about this Easter Joy DSP! And there are patterns that you can use any time of year, not just for Easter. The colorful stripes would be good for a birthday card, the plaids and other generic designs are great for lots of cards or scrapbook pages. The bunnies cute for baby cards!

Easter is coming soon on April 5th so it is time to be making Easter cards, decorations, treats, whatever you like!

SHOP STAMPIN’ UP! ONLINE HERE!

Easter Bunny in a Basket Easter Card

Easter Bunny In a Basket Easter Card

There are so many opportunities for making nice Easter and Spring cards using some of the products in the Easter Joy Suite Collection. For this card, however, I used the Pastels Shimmer Specialty Designer Series Paper for the background. You’ll find this paper in the Stampin’ Up! Online Exclusives, but the Easter Joy Suite is in the Spring Mini Catalog.

Since I wanted to use the Pastels Shimmer paper, I used Pool Party cardstock for the card base after trying out a few other colors. The three colors of the Pastels Shimmer Papers are Bubble Bath (which I chose for this card), Lemon Lolly, and Pool Party. These pastels would be so pretty on cards or projects for other occasions. The paper has shimmer on both sides. I used the Forever Plaid 3D Embossing Folder to add some texture to the background. (Right now this embossing folder is unavailable with no date given yet of when it might be expected back in stock. If you are interested, fill in your email on that page to be notified when it is back in stock, or you can check with me, and I’ll see when a date becomes available.)

The basket is diecut with die in the Easter Basket Dies, along with the scallop edge and bow. I used the pink shimmer paper for the bow and scallops. The grass is diecut from Shy Shamrock cardstock. The little tag on the basket is stamped from the Banner Sayings Stamp Set, stamped in Bubble Bath ink. The little pink twine bow is from the current Paper Pumpkin Kit.

The bunny in the basket, the little brown bunny, and the Easter eggs are all stamped with the Easter Basket Stamp Set in Memento ink on Basic White and then colored with Stampin’ Blends. They are diecut with the Easter Basket Dies. For this card, since I was coloring several eggs (I made extras), I just cut those out by hand with my Paper Snips. I thought it was quicker than positioning each egg die over each stamped egg and running it through the machine, since the eggs are so easy to cut out!

The basket is popped up with Dimensionals, and then the white bunny and the eggs are stuck in behind it, but glued flat on the card. I love how the handle is diecut attached to the basket, so we don’t have to deal with a separate piece that has to be attached. If you don’t want the handle, just cut it off.

Easter Sunday will be here in just a little over a month!

Shop Stampin’ Up! Online Here!

Easter Bunny in a Basket Closeup

Easter Joy Easter Basket With Flowers Card

Easter Joy Easter Basket With Flowers Card

This Easter Joy Suite Collection is one that I think is really worthwhile if you like Easter, Spring, or baskets! I am so thrilled with this basket on the Easter Joy Easter Basket With Flowers Card, and I only did the easy version! The die in the Easter Basket Dies cuts out the basket with the handle and it makes slits through which you can really weave other pieces, but if you don’t do that, the lines just look like a decoration on the basket so you can leave it plain. Such possibilities!

This card starts with a base of Crumb Cake cardstock. I put the fold at the top for a change. The green plaid paper is in the Easter Joy Specialty Designer Series Paper. The designer paper is slightly thicker than usual and some of it is slightly shiny and some has some metallic foil for extra shine! I love the designs of stripes and other generic designs, bunnies, flowers, chicks, Easter eggs, and baskets. There are also some cut-apart panels on which you can make your own scene for a card or scrapbook item. I layered the plaid designer paper on Shy Shamrock cardstock to help it stand out.

The basket is diecut from a piece of the designer paper with the stripes, but I used the Crumb Cake colored side. That made the basic basket and attached handle. (Save the diecut piece from inside the handle. I think you could use it as a hidden Easter egg in the grass on another project!) I diecut the scalloped piece out of Crumb Cake card stock for the front of the basket and a grassy piece out of Shy Shamrock. The basket itself is popped up with Stampin’ Dimensionals, with a teeny tiny one at the top of the basket handle.

I had already stamped, colored, and diecut the little chick and flowers in the Easter Basket Stamp Set. While you have your stamps and ink out, go ahead and stamp a bunch of these images on Basic White cardstock, then they’ll be ready to use on more projects! They are glued flat on the card behind the grass in the basket.

The greeting is also in the Easter Basket Stamp Set. It is stamped with Shy Shamrock ink just on a scrap strip of Basic White. Since the basket is popped up, I added a Dimensional under each end of the greeting and put a little glue under the middle that will go across the basket. For some fun embellishments, I used some teeny tiny pink eggs in the Easter Assortment. This package has 100 adhesive-backed pieces, dots and eggs. The dots are Lemon Lolly and Balmy Blue and the eggs are Pretty In Pink.

You will have fun making cards and scrapbook pages with this Easter Joy Suite Collection or even just the designer paper and Easter Basket Bundle. This is a good time to order any of the products while it is in stock before everyone starts rushing to buy Easter things.

Old Easter Bunny Joke!

Chocolate Bunny Easter Joke

This old bunny stamp and this old Easter Bunny joke made into a card still makes me laugh! It wasn’t my original idea. I got it from someone else online at least six years ago if not longer! And I still have the stamp! And this card was made long ago, too!

It goes along with the talking point, do you bit off the chocolate bunny’s ears first or his butt? The ears would be the easiest, but if you want to keep the main shape of the bunny I guess you would go for the bottom!

In either case, I hope the Easter Bunny leaves you a BIG chocolate bunny to munch on whichever way you like!

PS: If you need last-minute Easter ideas (cards or treats!) just click on the drop down box under Categories on the right side of my blog, under the Annual Catalog, and choose Easter. You’ll find lots of things that I hope will give you some inspiration!

Storybook Moments Circles Easter Card

Storybook Moments Circles Easter Card

This Storybook Moments Circles Easter Card is one I came up with all by myself and I like it! I absolutely love this Storybook Moments Specialty Designer Series Paper, especially for Easter coming up with the bunnies, but for lots of other occasions as well!

When I was looking at the sheet of the paper with lots of bunnies on it, I decided to diecut several with circle dies and make a card somehow with those circles. Of course, you have to cut up the paper to be able to diecut particular portions with the Stampin’ Cut & Emboss Machine. As I’m sure we all understand, It’s almost illegal to cut up your paper in that way, maybe just digging in to some center area of the whole sheet of paper! I tried to find the images I liked as close to the edges of the paper. Then I chose which circle die in the Stylish Shapes Dies I would use and placed it over the image I wanted to diecut and carefully trimmed with my Paper Snips to cut up the least amount of the paper that I needed to. It worked out!

To make the card, I chose Boho Blue cardstock for the card base. I wasn’t sure exactly how to do the circles, with no room for layers, but with the darker background paper they stand out well enough. I chose this paper with the strawberries because it is so pretty and different. Somehow I thought to place it in the center of the card base with margins on each side. It is cut at 4″ x 5 1/2″. For a little something with the circles, I used the Timeless Plaid 6″ x 6″ Designer Series Paper. I looked at my little scraps and decided to just add a strip of the plaid under each circle. These are cut at 2 3/4″ x 3/4″. I centered the circles on the strips and placed them so one end was up against the edge of the card on the left or right. The center one goes to the right. The plaid paper matches the Storybook Moments DSP pretty well!

The greeting is in the Greetings For All Ephemera Pack in the Spring Mini. To make it smaller, I cut the two words apart and cut close to the letters. This is a good technique to use! I couldn’t resist using some embellishments if I had something that worked. I decided on the retired Adhesive Backed Hearts & Flowers because I had some left. I just used the smallest flowers for a little something, but you barely see them on the circles.

We never know for sure what we will create when we start making a card! Even if we have a design in mind, it could change at any moment, so just play! See what turns up!

SHOP STAMPIN’ UP! ONLINE HERE!

Be sure to check out the Last Chance List of retiring products!

Storybook Moments Diecuts Easter Card

Storybook Moments Diecuts Easter Card

Easter is coming so here is a card I made, the Storybook Moments Diecuts Easter Card. This is an easy card to make because it is mostly made with diecuts. The only stamping is the greeting.

The card base is Calypso Coral cardstock with a layer of Basic White cardstock. The Basic White is cut at 4 3/4″ x 3 1/2″ because I wanted a wider margin around the outside of it than usual. But I did a little artistic creativity on the Basic White for the background! At least I did it after I planned out what the card would look like.

What makes this card so easy are the diecuts! You will find them in the Storybook Moments 12″ x 12″ Specialty Designer Series Paper. This paper has the perfect name because the designs on the papers are what you would find in a children’s storybook, something on the order of Peter Rabbit stories by Beatrix Potter. The images are perfect for Easter, spring, baby cards, children’s cards and more! The whole package of Storybook Moments paper is interesting because the 12 sheets of patterned paper include 2 each of 5 double-sided designs and 2 each of 1 single-sided die-cut design. So you can use the regular designer paper or punch out the diecuts and use those. That’s what I did with this card.

On the front of this card you see perhaps a mother goose (or duck?) and her baby, a fence, and three foliage diecuts. I was using a sample in the Spring Mini Catalog on page 26 for my inspiration. Most of these diecuts are all popped up on Stampin’ Dimensionals. Even though I was copying the sample in the catalog, I wanted more of a background for the little scene. I colored in the sky by just scribbling back and forth with a Light Pool Party Stampin’ Blend and Light Pecan Pie down at the bottom for the ground, with some sprigs of grass or greenery with a Dark Granny Apple Green Stampin’ Blend. Don’t try to get fancy with this coloring, I just lightly scribbled my Stampin’ Blend across the cardstock.

The greeting is in the Choose Happy Stamp Set and stamped in Calypso Coral ink. I just stamped it on a narrow scrap strip of Basic White cardstock. I cut a little banner on the one end and popped it up with Stampin’ Dimensionals. I think the little hearts are from a Paper Pumpkin Kit and were just extras on my table that I used. You could embellish with most any other gems or sequins that you have if you wanted a little sparkle or bling.

I just love playing with diecuts that come with designer paper as it provides another fun way to make cards besides stamping. Another thing is to diecut some of the images in the paper with the Storybook Garden Patch Dies or simply cut some out with. sharp scissors like our Paper Snips. If you would also like a Sticker Sheet to use on your projects, purchase the Storybook Moments Specialty Designer Series Paper & Sticker Sheet.

These papers have been out-of-stock but it looks like they should be available sometime next week! You’ll still have time to make Easter cards and scrapbook pages or other projects. Easter is April 20th.

SHOP STAMPIN’ UP! ONLINE HERE!

Easy Easter and Spring Treat Bag

Easter Treat Bag and Card

Here’s one last Easter project for you if you need something last minute, maybe to put some candy or a small gift inside! Or make it and keep it for your own Easter decor! You can even leave it out for Spring and really, summer. Leave off the Easter Bunny! To make this Easy Easter and Spring Treat Bag, I used the Flowering Zinnias Designer Series Paper. I used the sheet that has flowers at the top and bottom with a white space in between. You can vary the height of this project if you want to make it a little shorter or cut the paper in half at 6″, right in the middle of the white portion.

I cut the designer paper at 12″ x 6 3/4″. Of course, you can use any kind of designer paper or even cardstock. I like the idea of the beautiful flowers right there on all sides of the bag. The piece of designer series paper is scored at 1 3/4″, 5 1/2″, 7 1/4″ and 11″. Make sure your pattern is going the correct direction, then score the bottom flaps at 1 3/4″. Optional: If you like the pattern on the other side of the bag, score at the top of the paper about 1/2″ so you can fold that down for a nice pattern on the front of the bag at the top. Or, you can glue an extra strip around the outside of the top of the bag if you prefer.

Cut the score lines for the flaps, up to the horizontal score line. Cut off that little corner piece as you see in the photo. Then crease and fold on all the score lines and see how your bag will go together.

Easter Treat Bag Scoring and Cutting

Here’s what the other side of the paper looks like which will be the front of the bag.

Easter Treat Bag Scoring and Cutting Front

Pay attention to what will be the front of the bag. If possible, keep the side seam that you glue together to form the bag in the back and also fold in the flaps so the last flap you fold and adhere will have the fold line on the front of the bag and not the edge of the back flap. That doesn’t sound very clear, but if you look as you make your bag you will see what I mean. You want the front to look as smooth and professional as possible.

If you want to, cut a strip of cardstock or designer paper for a handle. You don’t need to do this. I used a strip of Lemon Lime Twist cardstock that was about 3/4″ wide and I covered it with a narrower strip of the “other side” of the paper I used for the bag. That way it matches the front lip that I folded over on the bag. I just adhered it to the inside sides of the bag with Stampin’ Seal but you could use brads or staples if you wanted to.

I wanted my treat bag to have an Easter look so I stamped a bunny in the Easter Bunny Stamp Set and cut him out with the Easter Bunny Punch. I colored in his ear and his nose with a Flirty Flamingo Stampin’ Write Marker just for a little color. For a little sparkle, I added some Iridescent Rhinestones Basic Jewels. These will be retiring so make sure you stock up because I use them all the time!

Just in case you would also need one last Easter card to go with this treat bag if you were giving it as a gift, I used another piece of the Flowering Zinnias DSP for a card front, layered on Lemon Lime Twist Cardstock to match the bag. I wanted to keep it simple so I just added a ribbon about the Zinnia paper and adhered it to the card base. This is the 3/4″ Herringbone Ribbon, retiring soon! I also tied a bow with it around the handle of the gift bag!

For a greeting, I stamped “Happy Easter” in Lemon Lime Twist ink on Basic White and cut out with a label die in the Something Fancy Dies. These were a good choice for the size and opportunity to cut out a layering die in Lemon Lime Twist. I popped up the greeting with Stampin’ Dimensionals. I added two Lemon Lime Twist gems on each side of the greeting in the Tinsel Gems Four Pack.

Now all you have left to do is maybe put a little tissue paper or shred in the bottom of the bag and add some Easter candy or a small gift! You are all set with a card and gift! Or put some candy in the bag and set it out for your own Easter decoration or maybe at your Easter place setting!

Happy Easter! Happy Spring!

Diorama Excellent Eggs Easter Card

Diorama Excellent Eggs Easter Card

This diorama card is one that I have made for many years. It looks pretty dramatic, right, being a 3D kind of display for a card? Of course, with most projects in stamping, it is pretty easy once you know the basics! The basis of this Diorama Excellent Eggs Easter Card is that you score the ends of two pieces of cardstock that are the same size, cut some kind of hole in the top piece of cardstock, make some kind of scene on the back piece of cardstock that will show through the opening on the front, then crease the score lines and adhere the end sections together. This type of card can be folded flat for mailing so that is not a problem!

This card base is Bubble Bath cardstock. Cut two pieces of cardstock at 5 1/2″ x 4 1/4″. Of course, you can vary your measurements if you want a similar card in a larger or smaller size. Score each end of each piece of cardstock at 1/2″ and 1″. See the photo below for the side score lines and then whatever type of opening you want in the center.

Diorama Easter card diagram

Score those ends first and then you can more easily place the opening on just the top piece of cardstock so that it is centered. Crease and fold those score lines back and forth so that when you hold them together they will make the card into the diorama shape. You can see from the top view on this photo below. Don’t glue them together yet so you can more easily make the scene in the center of the back piece.

Diorama Excellent Eggs Easter Card Top

Decide if you want another piece of cardstock or designer paper for the background. I chose Boho Blue. Measure your space and see what size you want to cut the background paper. You may have to trim tiny bits off the sides to accommodate the score lines. Mine is 4 1/4″ tall and just a “smidge” less than 3 1/2″ wide.

I stamped three of the Excellent Eggs with Memento ink and colored in with Stampin’ Blends markers. They are easy to cut out by hand if you don’t have the dies, which is what I did. The one farthest back is glued flat to the card, the other two are popped up on Stampin’ Dimensionals.

The front opening for the diorama card is cut out with one of the Scalloped Contours Dies. You can use any shape or size.

The greeting is stamped in Boho Blue ink from the Excellent Eggs Stamp Set and then diecut with one of the banner shapes in the Stylish Shapes Dies. Since that cute little bunny was also in the Excellent Eggs Stamp Set, I stamped, colored, and cut him out also in hopes I could use him somehow. Luckily, he seemed to fit just fine at the end of the banner in the corner of the card!

For some sparkle and to fill in the empty space in the background, I added three Pastel Adhesive-Backed Sequins in gold, Balmy Blue, and Petal Pink. Remember, a lot of these embellishments can be used even if the colors are not exactly the same. My background is Boho Blue but the one sequin I used is Balmy Blue. The recipient is never going to notice or be critical of that! We are often too hard on ourselves trying to make everything perfect when we make a card!

Here’s another Diorama card I made for Easter a few years ago.

This Diorama card will fold flat to mail and fits in a regular size Stampin’ Up! envelope, but you may want to make one and use it for your Easter decor!

SHOP STAMPIN’ UP! ONLINE HERE!

Diorama Excellent Eggs Easter Card Full View

Easter Bunny Happy Easter Card

Easter Bunny Happy Easter Card

I’ve been into Bubble Bath the last few days and I can’t say I was before now, but I guess it is a good color for Easter! I didn’t even have a grand plan for making this Easter Bunny Happy Easter Card but it just came together when I already had the package of Bubble Bath cardstock out along with the Lighter Than Air 6″ xx 6″ Designer Series Paper. Since this paper got lost in my stash for a while, I have missed out on using it on other spring cards. The colors are so pretty and it’s not all about hot air balloons!

The card base is Bubble Bath, a very soft pretty pink. At times it looks like it has a purple tone to it. I simply took a strip of the diagonally striped designer series paper and laid it across the card. Then I saw that the Balmy Blue pattern would look good with the stripes at the top and bottom. The striped pattern is cut at 5 1/2″ x 2″. The blue strips are about 3/4″ inches wide and 5 1/2″ long. That gives you space for glue to adhere the blue pattern to the top and bottom of the striped paper with about 3/8″ showing. If you remember to tie some ribbon around the striped pattern before adhering to the card base, then you won’t have to adhere it down and cut off the ends on the edge of the card! On the other hand, now that I look at it, once I adhered the two bows to each side of the bunny, you can’t see the ribbon anyway! If you copy this and put bows on each side, you don’t need a ribbon going across the center of the card! The ribbon is the Bubble Bath color in the 3/8″ Sheer Ribbon Combo Pack.

For the focal point of the card, I cut a scalloped rectangle in Bubble Bath pink with the Scalloped Contour Dies. By hand, I cut a Basic White rectangle to ft inside the scalloped rectangle. It’s a “smidge” less than 2″ wide and 3 1/4″ long.

On this Basic White piece, I stamped one of the bunnies in the Easter Bunny Stamp Set and colored him in with gray Stampin’ Blends (I think I used Smoky Slate.) and Bubble Bath pink for the inside of his ears. For the background, I just used a Pool Party Stampin’ Blend marker to just scribble in some blue-like sky. The carrot is stamped, colored, and cut out. I thought the bunny needed to be sitting in the grass, so I just lightly drew in blades of grass with the Light and Dark Granny Apple Green Stampin’ Blend Markers. This piece is popped up with Stampin’ Dimensionals.

There wasn’t much room for the greeting but I solved that problem! I stamped “Happy Easter” from the Excellent Eggs Stamp Set in Bubble Bath ink on Basic White. Then I just fussy-cut around the letters without trying to be perfect and adhered it to the card with tiny dots of Multipurpose Liquid Glue.

If you’d like to see another card I made last spring with the bunny and LOTS of carrots from the Easter Bunny Stamp Set, click HERE.

Both of those Easter/Spring stamp sets will be retiring in April. The Easter Bunny Stamp set will be discounted at 50% off starting April 9th. The pretty ribbon combo will also be discounted at 30% off. Be sure to check out the bargains on April 9th, but if there are products you really really want, it might be best to buy them right now lest they sell out!

SHOP STAMPIN’ UP! ONLINE HERE!

Easter Bunny Z-Fold Easter Card

Easter Bunny Z-Fold Easter Card

I often say Z-Fold cards are so easy to make yet look exceptional and special to the recipient! This Easter Bunny Z-Fold Easter Card was fun and easy to make with the Easter Bunny Stamp Set and Lighter Than Air 6″ x 6″ Designer Series Paper. My package of paper had gotten lost, and pushed to the back, and I often forget to use the 6″ x 6″ paper. However, when I found it and looked at it, I saw that the colors and patterns were perfect for Easter and spring cards! This paper will retire April 30 along with other Spring Mini Catalog products.

The card base is Crumb Cake and was cut at 4 1/4″ x 11″. Instead of cutting horizontally across a sheet of cardstock, it was cut vertically. I decided to put the fold on the side of the card and make it into a Z-Fold card. To make a Z-Fold card just fold the front of the card back on itself. Score the front of the card in the center vertically, then fold the right half back, essentially making a Z shape if you look down on the upright card.

To decorate the card I used the Lighter Than Air Designer Paper. The panel on the left is 4 1/4″ x 5 1/2″so I cut the designer paper at 4″ x 2 3/4″. The striped paper was also cute, so I cut that for the inside of the card at 4″ x 5 1/4″. I also added to the inside left panel the same designer paper that you see on the circle under the bunny.

Easter Bunny Z-Fold Easter Card Open

For the focal point of the card, I stamped a bunny from the Easter Bunny Stamp Set. This stamp set is so cute and useful for springtime cards, Easter, baby, and maybe animal cards for little children. It will be retiring from the Stampin’ Up! Annual Catalog by the end of April and beginning April 9th will be discounted 50%! There is also a coordinating Easter Bunny Punch, also retiring and will be discounted by 20%. The bunny was colored with Stampin’ Blends alcohol markers (Light and Dark Crumb Cake plus Bubble Bath pink for the ear) as well as the little carrot in the stamp set.

The diecut circles are the largest and the next smaller circle dies in the Stylish Shapes Dies. The smaller one is the Lighter Than Air DSP and the background circle is Balmy Blue cardstock. When you adhere a shape to the front of a Z-Fold card, be sure to only put adhesive on the half that attaches to the card front on the fold and not to the inside of the card.

On the inside, I diecut a Basic White circle with the largest Stylish Shapes circle die so that it would fit perfectly underneath the front Balmy Blue circle. You want it hidden underneath the front of the card so it is a little tricky to get it positioned perfectly. To do this, put adhesive on the back of the inside piece, and with the card open, place it face down over that front piece. Then carefully close the card so the inside piece will adhere to the inside of the card, lined up with the front of the card so it will not be seen.

The inside of the card is stamped with “Happy Easter” in Memento ink. I had already stamped and cut out the three Easter eggs to possibly use on the front of the card, but instead, I used them inside the card. It would have been easier to stamp them on the inside rather than cut them out!

For an embellishment, I tied a Bubble Bath pink ribbon and bow just around the front folded panel. This ribbon is part of the 3/8″ Sheer Ribbon Combo Pack. The other two colors are Azure Afternoon and Lemon Lolly. This ribbon will be retiring and will be discounted at 30%. I could have added a greeting on the front of the card also, but there wasn’t very much room for one and I had the main one on the inside. You could also add some sequins or gems to the card.

Check out this Easter Bunny Stamp Set, Easter Bunny Punch, and ribbon when they go on sale on April 9th plus the other retiring products from the Annual Catalog and the Spring Mini. Here are the lists of Last Chance Products. Also, if you need any Stampin’ Blend markers (check yours for any brush tips that don’t work very well anymore if you use them a lot and you might want to replace them) the price will be going up $1.00 per Combo in the new Annual Catalog.

Last Chance Products Spring Mini Catalog 2024

Last Chance Products Annual Catalog 2023-2024

Excellent Eggs Easter Treat Card

Excellent Eggs Easter Treat Card

This Excellent Eggs Easter Treat Card is one of those cards that I came up with so easily and I like it! The egg was already colored in and cut out from another stamping session where I must have made extras to use another time. Since it would be by itself, I thought it needed a smaller card. First I thought of 3″ x 3″ but if I were to mail it, 4″ x 4″ would fit in a regular-size envelope.

The card base is a 4″ x 8″ piece of Fresh Freesia cardstock to match the egg folded in half to make a 4″ x 4″ card. You can have the fold at the top or the side, as with any card. Mine is at the top. After I decided on Basic White for the background behind the Easter egg, it looked too blah so I embossed it! I used the Cane Weave 3D Embossing Folder for this 3″ x 3″ square of Basic White. After some deliberation, I layered a Bubble Bath piece of cardstock, cut at 3 1/4″ x 3 1/4″ underneath the embossed cardstock. That color of pink goes well with the Fresh Freesia since the Bubble Bath had purple tones in it.

After seeing where the egg would go, and finding that I did have some Bubble Bath ribbon in the 3/8″ Sheer Ribbon Combo Pack (which is retiring in April and will be 30% off!), I wrapped and adhered the ribbon around the white embossed layer to go behind the egg. After that I could adhere the white piece to the Bubble Bath layer and then onto the Fresh Freesia card base.

The Easter egg is stamped with Memento Ink from the Excellent Eggs Stamp Set in the Spring Mini. This stamp set will be retiring in April. I colored in the background of the egg with Fresh Freesia Stampin’ Blends, left the bunnies white, colored in the stones gray, and colored in a few pink flowers with green leaves. Use whatever color of Blends or markers to color your egg. The egg is popped up with Stampin’ Dimensionals over the ribbon. I also added two knots on each side of the egg with the ribbon. The little silver thread along the sides of the ribbon really adds a little sparkle to the card!

For the greeting, I stamped this one in Fresh Freesia ink from the Easter Bunny Stamp Set in the Annual Catalog. This stamp set is going to retire at 50% off in April which is a fantastic deal if you need some bunnies in your collection! Three different bunnies, a carrot, a butterfly, Easter eggs, flowers…everything you could need for cards even other than Easter. Bunnies always make cute baby cards! I stamped the greeting on a narrow scrap of Basic White, then flagged the ends and it fit perfectly on this small card!

You still have a little time to make a few Easter cards, especially if you aren’t going to mail them or if the recipient doesn’t live too far away! Who knows with the post office these days?

Excellent Eggs Happy Easter Card

Excellent Eggs Happy Easter Card

This Excellent Eggs Happy Easter Card is the first Easter card of the season for me! Believe it or not, Easter is less than a month away! Time to get out your bunnies and eggs and make some cards to send, too!

For this card, I used the Excellent Eggs Stamp Set in the Spring Mini Catalog. You’ll find it on page 27. You can also get the Dies that go with the stamp set to step up your egg-making! Get both together in the Excellent Eggs Bundle and save 10%.

I started just stamping both egg designs on Basic White in Memento ink so I’d have lots of eggs to choose from as I designed my card. Then I colored in with various Stampin’ Blends Markers. I didn’t so much use the Dark and Light to blend but just chose whatever colors I wanted to use. The two eggs that are the same design I colored a little differently.

The center egg looks as if it would be tough to color, but truthfully, it is easier than it looks! I colored in the bunnies with a couple of different browns, including the skin tones of Stampin’ Blends. Just choose whatever you like! After coloring the stones and the little flowers, it was easy to color the background grass! Don’t color super-carefully, just scritch-scratch around with that marker and before you know it you will have it all colored!

The card base is Petal Pink with the largest Scalloped Contours Die for the layer behind the Easter eggs. I glued the two outer eggs down flat on the card, but the center egg is popped up on Stampin’ Dimensionals.

The greeting is also in the Excellent Eggs Stamp Set. I stamped that in Petal Pink in on Basic White and die cut with a banner die in the Stylish Shapes Dies. It needed a layer so I adhered it to a strip of Petal Pink and flagged the ends to make a layer that fit right. This is adhered with a Dimensional on each end and a strip from the outer edge of the sheet of the Dimensionals placed at the bottom of the greeting so that it would go underneath the popped-up greeting and everything would fit.

For some bling, I added a few colored sequins in the Pastel Adhesive-Backed Sequins. It’s always fun to add some embellishments if you can. At the same time, sometimes you have to know when to stop!

SHOP STAMPIN’ UP! ONLINE HERE!

Regency Park Easter Eggs and Bunny Card

Regency Park Easter Eggs and Bunny

Here’s one last Easter card for the year, the Regency Park Easter Eggs and Bunny Card! I saw a card that used the Framed Florets Dies to make Easter eggs! In past years we’ve had oval punches or oval dies to use to make Easter eggs, but I hadn’t thought of using these dies. Naturally, I couldn’t find the exact card again but it was easy enough to make up my own design.

This card has a Basic White cardstock card base with a layer of Petal Pink. The Easter eggs are die cut with the smallest oval die in the Framed Florets Dies. I used the Regency Park 6″ x 6″ Designer Series Paper. This paper is on the Last Chance List and is very pretty! It has all kinds of floral patterns plus more generic patterns on the “back”.

The bunny is also made by punching out the Regency Park DSP using the Easter Bunny Punch. The Bunny Punch was so popular it sold out pretty early but more are due back in stock the middle of May. The Easter Bunny Stamp Set and Punch are both in the upcoming Stampin’ Up! Annual Catalog which is great! Besides Easter, you can make cute baby cards with the stamp set and/or punch.

The background piece is Basic White but I added a little bit of Pool Party ink with a Blender Brush just so it wasn’t so plain. To make it look like the eggs and bunny are in the grass, I die cut some grass pieces from dies in the Playing in the Rain Dies.

The greeting is stamped with Flirty Flamingo ink from the Easter Bunny Stamp Set and die cut with a small Stitched Rectangle Die. These dies are retiring which makes me very sad! I used them a lot so if you don’t already own them you might want to pick them up on the Last Chance List AND they are discounted! For a finishing touch, I added a bow to the bunny with the White 1/4″ Crinkled Seam Binding Ribbon.

SHOP THE LAST CHANCE LIST AND SALE!

Happy Easter!