Tag Archives: Fall card

Layering Leaves October Fall Card

Layering Leaves October Fall Card

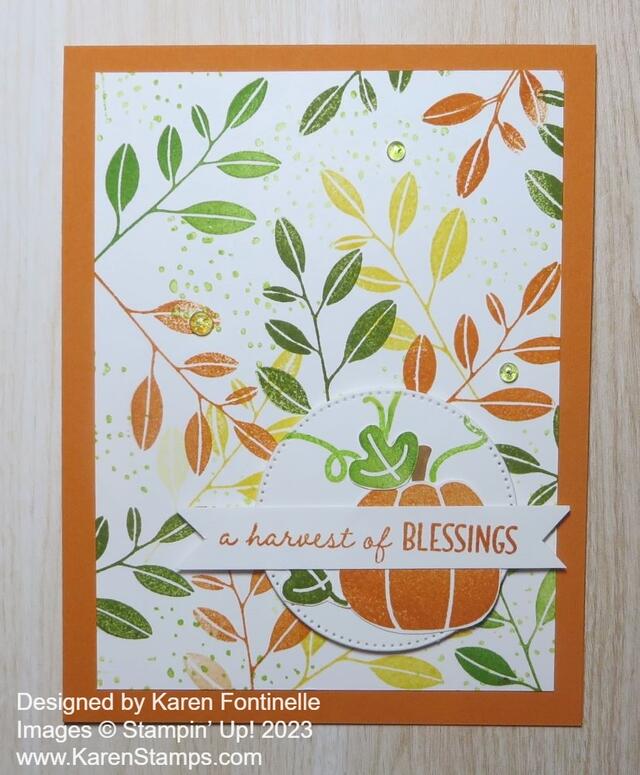
Happy October!! Now that it is officially October, it feels much more like the fall season, even if it still doesn’t feel like fall here in Houston! This Layering Leaves October Fall Card commemorates the beginning of October which really makes us think of fall, colored leaves, and all the upcoming holidays and seasons! Once the fall and Halloween decorations go up in my house and my regular home decor is put away, it won’t get pulled out again until January! Halloween decorations are starting to go up in the neighborhood. While I absolutely love all my Halloween decorations, I’m not quite ready for full-blown Halloween decorating quite yet. Maybe in another week or two for sure!

This card base is Pumpkin Pie and is cut at 11″ x 4 1/4″, scored at 5 1/2″ and the fold is at the top. I could have put the fold on the left and the card would be in a landscape position rather than our usual cards at 5 1/2″ x 8 1/2″.

I made my own designer paper, so to speak, by stamping the leaves from the Layering Leaves Stamp Set. I used these inks: Pumpkin Pie, Daffodil Delight, Granny Apple Green, and a little bit of Old Olive. I love to do this random stamping all over the paper! To fill in the empty spaces I used a stamp in the set with just little dots. Those kinds of stamps just add a little something lots of times! Those dots are stamped with Lemon Lime Twist.

Next, I used the Pick of the Patch Stamp Set to stamp and cut out a pumpkin, some leaves, and a stem. I also stamped some vines on the die-cut circle on which I adhered the pumpkin and leaves. It is from the Stylish Shapes Dies. This circle is popped up on Stampin’ Dimensionals.

The greeting is also from the Pick of the Patch Stamp Set and is stamped in Pumpkin Pie. I always have a bunch of narrow strips of Basic White so it makes it easy when you want to stamp a narrow greeting. I just stamped the greeting on the scrap strip and then flagged the ends to make it look like a banner.

For a finishing touch, I added a few Lemon Lime Twist gems from the Tinsel Gems Four-Pack. Sometimes it is hard to stop at adding only three gems! I would have liked more by the pumpkin and/or the greeting…..but sometimes you have to know when to stop!

Get out your fall colors and do some fall stamping!

SHOP STAMPIN’ UP! ONLINE HERE!

Hello First Day of Fall Card

Hello First Day of Fall Card

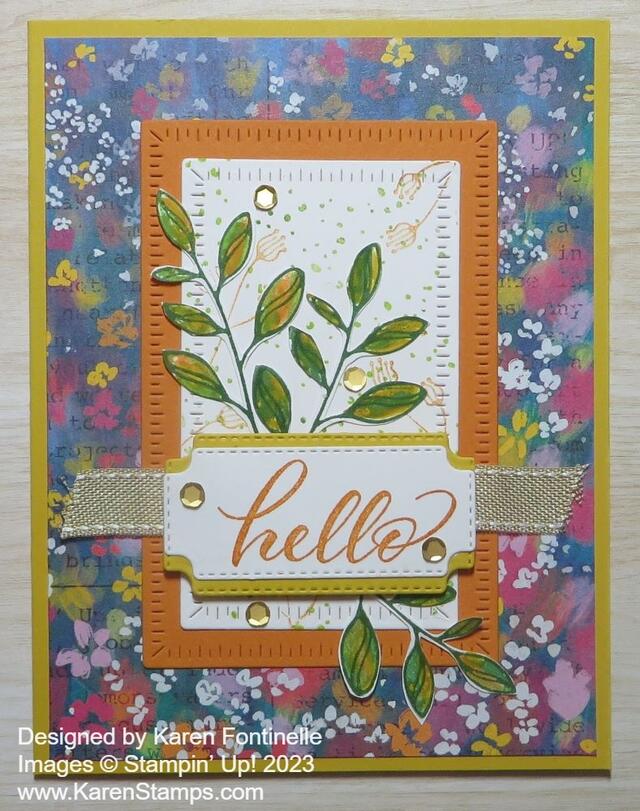
Today, September 23, is the first day of fall! Thank goodness!! We had such a hot, hot, hot summer here in Houston and most of Texas I think that we are SO ready for a break in this heat! I’m hoping this Hello First Day of Fall Card will help usher in more comfortable weather! It will be a while before the heat goes away, though.

In thinking about fall, I naturally thought about the Layering Leaves Stamp Set. In kind of looking for ideas online, I saw someone had made a card using the Masterfully Made Designer Series Paper. That made me look through my package to see if an idea popped into my head using one of the paper patterns. This one that I used seemed to have some fall colors in the flowers so I chose it! It’s a different look for a fall leaves card, I admit, but this whole package of paper is a little daring so it’s okay to do something a little different with it!

In the Layering Leaves Stamp Set, there are two stamps you can use for two-step stamping. I stamped the outline stamp of the leafy stem with Garden Green. Then I colored on the stamp that was just the fill-in leaves using two or three different colors of Stampin’ Write Markers. I wanted each leaf to have several colors on it as if it were turning colors for fall. I used Crushed Curry, Garden Green, Pumpkin Pie, and Granny Apple Green. Just play and see what you come up with! Everyone will be different. On a few leaves, I added a little marker color to fill in some empty spaces. Then I cut out each stem with my Paper Snips. The Bough Punch has been out of stock for a while but you can order it now, earlier than expected!

The card base is Crushed Curry. I used the Radiating Stitches Dies to diecut a piece of Pumpkin Pie for a layer for the focal point of the card, and the next smaller piece of Basic White. To fill in the white background a little bit, I stamped lightly with the dotted stamp using Granny Apple Green and Lemon Lime Twist. Not one to leave well enough alone, I also stamped the little flower image in Pumpkin Pie.

The greeting is in the Layering Leaves Stamp Set. I thought “Hello” was appropriate for saying “Hello” to the first day of fall! I love the font of the greetings in this stamp set. I stamped it in Pumpkin Pie ink and die cut it with a label die in the Cheerful Daisies Dies. I also cut a piece of Crushed Curry with the same die and cut it in half horizontally to make a layer under the greeting. I just adhered one half of the Crushed Curry to peek out from the top of the greeting and the other half for the bottom. Just line the two pieces up evenly and they look like a full layer underneath the greeting!

Before adhering the greeting, see where you want the leaves placed and glue those down. I decided to add a piece of ribbon underneath the popped-up greeting. It is the Burlap Ribbon in the Combo Pack with Real Red Ribbon. I also added some gold Pastel Adhesive-Backed Sequins around on the card.

You can make a similar card to this one with the Layering Leaves Stamp Set. You can change the background designer paper and change the colors of paper and ink that I used. The best part of the Layering Leaves set, I believe, is the beautiful fonts and words you can use a lot.

Fall and fall decorating is just around the corner now! It is fall and it is almost October! Make a few cards to send to celebrate fall!

SHOP STAMPIN’ UP! HERE!

Beauty of the Earth Thinking of You Card For Fall

Beauty of the Earth Thinking of You Card For Fall

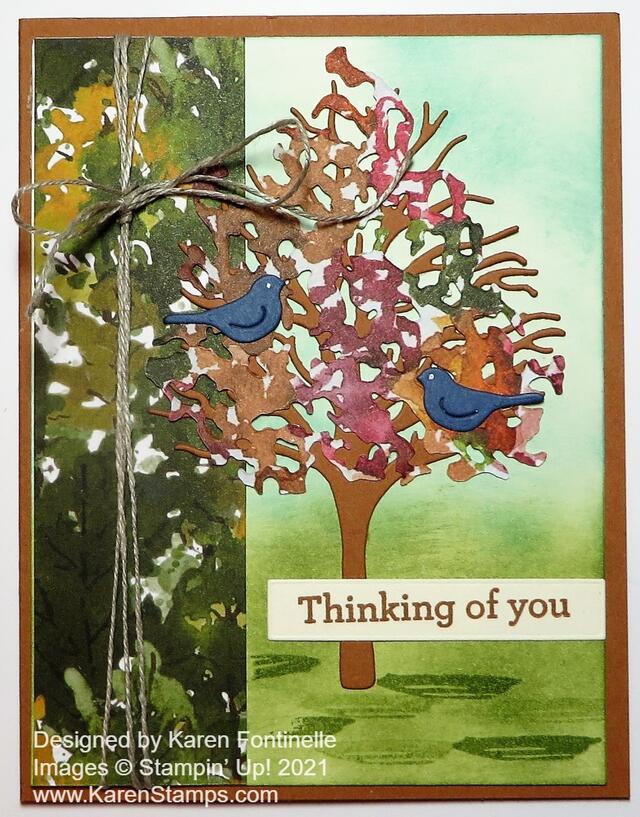
Somehow I didn’t get around to acknowledging the first day of fall last week, so now I have made a card for the glorious fall season! We were even lucky enough here in Houston to experience some fall weather with cooler temperatures, but not colored leaves yet like this Beauty of the Earth Thinking of You Card For Fall. I actually had a physical reaction the other day when I walked out the back door and my body was stunned to not feel like I had just opened the oven door! It was cool outside!! We won’t get colored leaves here until probably December, but I’m amazed to see photos on the internet of places way north that do have colored leaves already!

This card uses the Beauty of the Earth Designer Series Paper to make a fall card. This paper is really quite interesting, different than what Stampin’ Up! usually has. You can use the paper as is in many ways, or you can even die-cut it to look like the leaves on the trees that you stamp or diecut. You can be very creative with this paper. This Suite also has the Beautiful Trees Dies which I think you really need to get the most use out of this set.

The card base is Cinnamon Cider, one of the In Colors. The layer on the card is Very Vanilla but since I actually covered it with ink it could have been Basic White! My idea was to have a strip of the Beauty of the Earth Designer Paper along the side and a fall tree on the Vanilla overlapping the designer paper. I thought the background needed to be colored in so I used Granny Apple Green ink (I think!) for the grass and Pool Party for the sky. The Beauty of Friendship Stamp Set had a little stamp in it that I used for some splotches of grass or shadows or whatever at the bottom of the card to give it a little texture and look more like a grassy area. I stamped that with Pear Pizzazz I think that I had out.

I adhered a strip of the more greenish designer paper sheet to the inked Very Vanilla piece and wrapped a piece of Linen Thread around the strip. Then I adhered the diecut tree in Cinnamon Cider covered with a diecut piece of the designer paper in the reds and golds. Again, it would have been handy to remember to use Adhesive Sheets before cutting out the tree especially but since the tree was getting mostly covered up anyway, I didn’t have to be super careful with the Multipurpose Liquid Glue because it was going to get covered with the designer paper. The leafy piece was easier to glue down because there were some larger areas to apply the glue.

The greeting is in the Beauty of Friendship Stamp Set. It is stamped in Cinnamon Cider Ink and die cut with the rectangle dies in the Beautiful Trees Dies. And because we have seen some blue jays around here (not to mention hawks!) I added two bluebirds in the tree. I love that little die that cuts out two birds at once! I added just a tiny dot of white for each bird’s eye with a white gel pen that we used to sell. Here’s another card I made in July that is very similar.

With the dies and the designer paper, this is a pretty easy card to make and it looks much more complicated. I don’t think it is going to stay cool here but at least we had a much needed cool break for a few days and will look forward to the next one! In the meantime, I’ll pretend it’s really fall here by making cards like this Beauty of the Earth Thinking of You Card For Fall.

SHOP STAMPIN’ UP! ONLINE HERE!

Don’t forget! Sale-A-Bration ends Thursday, September 30!! Don’t miss it!

Beauty of the Earth Fall Trees

Beauty of the Earth Fall Trees

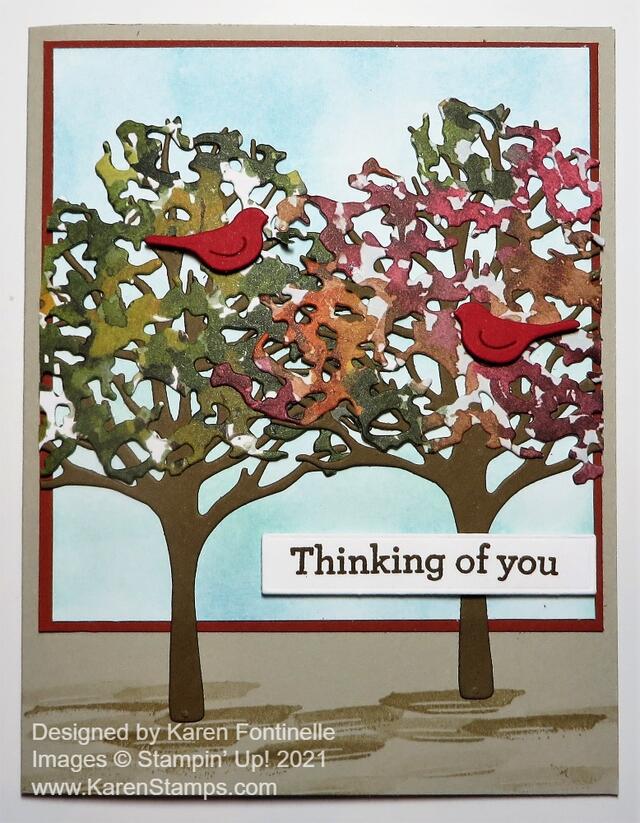
It is SO hot here in Houston today, I thought if I made a card with the look of fall, like this Beauty of the Earth Fall Trees card, it would cool me off! No such luck, but I still like the card! This is actually pretty much a copy of a card sample in the Stampin’ Up! Annual Catalog on page 10, showing off the Beauty of the Earth Suite of products.

Another reason for using this beautiful paper on this card was to remind you that the Stampin’ Up! Designer Series Paper Sale is going on just for this week, until August 2. If you want to stock up on papers you love or get some you don’t have yet, be sure to take advantage of the nine select papers discounted 15%. Don’t miss the Christmas paper, the Tidings of Christmas 6″ x 6″ Designer Series Paper if you would like a good Christmas paper pretty quick!

I chose Sahara Sand for the card base just because I don’t use it very much! It’s a great neutral color to use. I just have to think of it more often! The catalog sample probably uses Crumb Cake Cardstock. It’s a little darker. I cut a piece of Basic White at 4 1/4″ x 4″ for the background, although after I decided to use a piece of Cajun Craze underneath as a narrow border, I cut the Cajun Craze at 4 1/4″ x 4″ and cut the White down 1/8″ on two sides.

For the sky background on the Basic White, I used my Blending Brush with Pool Party Ink and also Balmy Blue Ink. I wanted the sky to look a little varied in color and I’m happy with the way it turned out. I didn’t want it too dark. Be sure to blend a little on scrap paper or your Grid Paper just before you apply it to the cardstock.

The two trees are diecut out of Soft Suede Cardstock with the Beautiful Trees Dies. The “leaves” on the trees are cut from two different sheets of the Beauty of the Earth Designer Series Paper. I wanted to use one that was colored leaves and one that was mostly green as if the leaves hadn’t all turned color yet. The die was great for cutting these out!

Since these trees are actually pretty large, I could see on the catalog sample that they would each hang off the side of the card. It’s a little tricky because you want to adhere the tree trunks to the sky background piece but it will also hang off that onto the bottom Sahara Sand card base. So I just saw where I wanted the tree trunk placed on the sky piece and so it would be properly placed on the Sahara Sand and glued it down only to the sky piece (which wasn’t adhered to the card base yet). Then I cut off the overhanging branches on the side. Then I added the leafy piece. Decide which tree you want overlapping the other one so you get them placed properly! This was another time I should have used the Adhesive Sheets so I didn’t have to use teeny tiny drops of Multipurpose Glue carefully on the trees! However, the leafy part has larger areas for applying glue!

I also added a stamped image of dirt or a shadow along the bottom of the card. It’s best to stamp this under each tree before you glue them down, as long as you know where you want the stamping to go. I stamped more than the catalog sample because I liked the look. I used Crumb Cake Ink.

The greeting is in the Beauty of Friendship Stamp Set and was die cut with a die in the Beautiful Trees Dies. It is popped up with Mini Stampin’ Dimensionals. You can purchase the Beauty of Friendship Bundle at a 10% discount if you want the stamp set and dies together!

And to finish off the card, I die cut the two red birds. One die cuts both birds at one time which is great! I think they are the perfect finishing touch for this card! We have some cardinals flying in our backyard. I think they have a nest in the tree in the yard behind us. One was caught in the netting around our tomato plants in the backyard, which is supposed to keep birds and squirrels away from our homegrown tomatoes! My husband lifted up the net and he eventually found his way out!

Remember to check out the Stampin’ Up! Designer Series Paper sale! You may want this paper when fall arrives so you may as well save some money while you can! The sale ends on August 2.

SHOP STAMPIN’ UP! ONLINE!

Gilded Autumn Fall Acorn Card

Gilded Autumn Fall Acorn Card

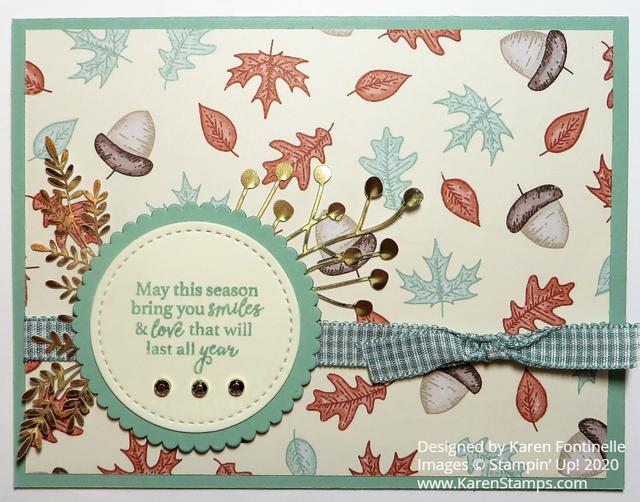
I absolutely love the Gilded Autumn Designer Paper for fall cards and I noticed there was one pretty, but kind of odd patterned paper that I hadn’t used. It is actually the opposite side of this acorn and leaf paper and I had planned to use both sides on this card. But then I didn’t! I liked just the acorn and leaf print on this paper so I only used this one side on my Gilded Autumn Fall Acorn Card.

This card is just a simple, basic design we can all make very easily. You can keep it very simple or add some embellishments. It’s just a layer of designer paper on top of the card base and a greeting. That’s really all you would have to do.

The card base is Mint Macaron, one of the coordinating colors with the Gilded Autumn Specialty Designer Series Paper. This paper with its fall colors also has some papers with Gold Foil or Copper Foil accents. That’s what makes it so beautiful. It’s one of my favorites this season!

The greeting is stamped on Very Vanilla from the Gather Together Stamp Set. Then it was die cut with a circle in the Stitched Shapes Dies and layered on a Mint Macaron scalloped circle that I already had in my package of paper! I popped up the greeting on Stampin’ Dimensionals.

Running underneath the greeting is a Just Jade ribbon in the Flowers For Every Season Ribbon Combo Pack. It’s not a perfect match but I think it is close enough and I like the gingham ribbon.

I couldn’t finish the card without doing a little more embellishing! I had a piece of the Forever Gold Laser-Cut Specialty Paper laying out on my desk and thought I’d see if some gold leaves would look okay behind the greeting. Then on the bottom of the greeting, I added three of the smallest Gilded Gems.

So if you are looking for an easy card to make for fall, just follow this simple design!

SHOP STAMPIN’ UP! ONLINE!

Gilded Autumn Pumpkins Fall Friendship Card

Gilded Autumn Pumpkins Fall Friendship Card

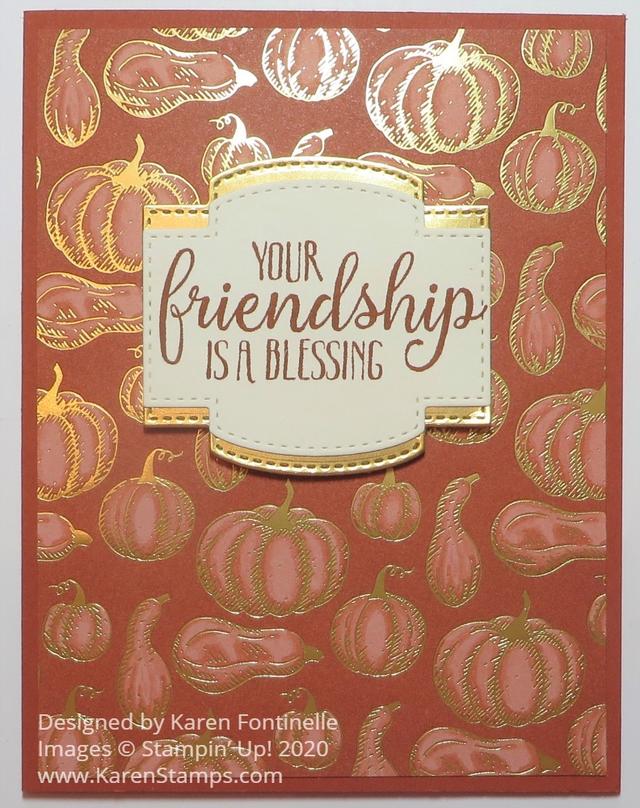
This fall paper in the Stampin’ Up! August-December Mini Catalog 2020 is some of the prettiest designer paper we have had (or do I say that about almost every paper?!) so I had to make this Gilded Autumn Pumpkins Fall Friendship Card with this pretty paper with gold embossed pumpkins.

It’s really a very simple card and I wanted to keep it that way. Sometimes we get carried away with all our pretty embellishments and die cuts, but we can make simple, easy cards too that are just as nice.

This card has a Cajun Craze card base to match the Gilded Autumn Specialty Designer Series Paper. I don’t really use Cajun Craze very often but it is lovely on this pumpkin paper! I was going to use another piece of the paper as a side strip but after placing the full layer of the pumpkin paper on the card base, I liked that look just fine and didn’t want to add anything else except a greeting.

The greeting is from So Sentimental, one of the good greetings stamp sets we have in the Annual Catalog. I stamped it in Cajun Craze ink to match on Very Vanilla Cardstock. Then I die-cut it with one of the Stitched So Sweetly Dies. Actually, the greeting looked fine on the card against that paper just as is, but I did want to add some Gold Foil to the card. I cut the same die cut out of the Gold Foil and then cut it in half so I could have it extend above and below the Very Vanilla greeting. That is something you can do when you want a layer of some kind but the dies don’t fit or extend beyond the greeting. It usually works pretty well!

The inside of the card will need a layer of Very Vanilla on which to stamp a greeting or write a personal note because of the dark Cajun Craze card base.

That’s really all there is to this Gilded Autumn Pumpkins Fall Friendship Card with just adhering a designer paper layer and a greeting for a very nice card to send to someone during this fall season or even looking ahead to Thanksgiving cards you might want to send.

SHOP STAMPIN’ UP! ONLINE HERE!

Gilded Autumn Fall Thanks Card

Gilded Autumn Fall Thanks Card

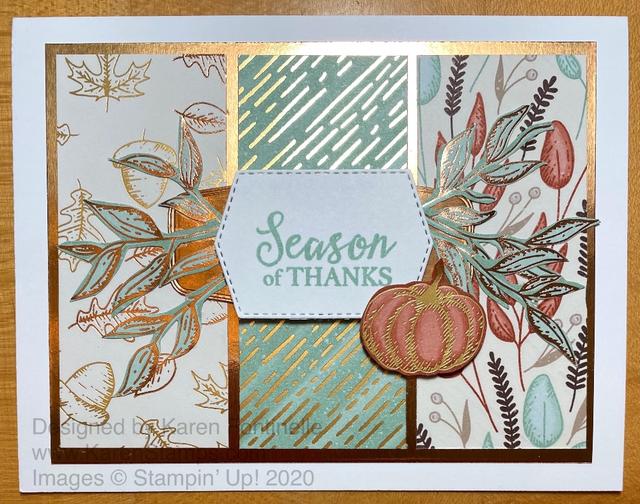
I was anxious to play with this gorgeous designer paper in the new August-December 2020 Mini Catalog from Stampin’ Up! The designs are so pretty, the colors beautiful, and all of it accented with copper and gold foil. How can you resist?

This beautiful paper is the Gilded Autumn Specialty Designer Series Paper in the new Holiday Catalog. You’ll find the whole Gilded Autumn Suite on pages 44-46. All Suites in this catalog get a three-page spread! The Suite contains the Beautiful Autumn Bundle with stamp set and three punches, ribbon, Brushed Metallic Cardstock, and Acorn Trinkets. You can order the whole thing with one Suite number or order any of the products individually.

I loved the sample in the catalog on page 44 with the three panels of designer paper on it, center of page. I changed mine a little bit and figured out my own measurements. The card base is Whisper White, although you could also use Very Vanilla. The Copper Foil layer underneath the designer paper is cut at 5″ x 3 3/4″. The strips of designer paper are cut at 1 1/2″ x 3 1/2″ so there is a tiny margin around the edges and in between the pieces. You can vary this and have the papers side by side or even a little larger with a larger foil layer underneath. When I finished gluing these pieces with my new Stampin’ Seal+ I ended up trimming just a slight bit off the side of the copper foil just to even things up.

The greeting is stamped from the Gather Together Stamp Set, a “returning fave” it says in the catalog, from last year in Mint Macaron Ink! We all did love that stamp set and cards we made with that set last year so I’m glad it is back! I die cut it with one of the Tasteful Labels Dies and used another longer one to cut out a strip of Copper Foil to go behind it. This is a great die set!

The catalog sample card has some greenery sticking out from the side of the greeting. I don’t know how they did theirs, but I just cut some greenery out from one of the sheets of the Gilded Autumn Paper. It wasn’t so easy, but it worked! And I put it on both sides of my greeting.

And then, just because I loved the paper with pumpkins and gourds, I had to cut out a pumpkin and add it to the card. I wasn’t sure! What do you think? I popped it up with a Dimensional to match the greeting that was also popped up, but I put the Dimensional only in one spot to it would be even with the greeting. I meant to add some sequins or some little bling but I forgot!

Here is a card I made last year with the Gather Together Stamp Set. I think I could use this same basic layout and make something with the new Gilded Autumn Paper! I might try that!

I think it is a fairly easy card to make, especially if you use my measurements and don’t have to figure it out. Maybe you could die cut some other greenery for a similar look without cutting by hand if you didn’t want to do that. You could die cut the greeting in a different shape. Lots of possibilities with this Gilded Autumn Fall Thanks Card.

Remember, we have a new look to the Online Store! If you haven’t used it yet, you need to either KNOW your password to get into your account if you want to order (you can look around without logging in) so you can type it in manually OR you need to click on the “Forgot Your Password” Button to reset it. After that you can have the site remember the password….and maybe a good idea to write it down!

SHOP STAMPIN’ UP! ONLINE!

Nature’s Beauty Deer in the Fall

Nature's Beauty Deer in the Fall

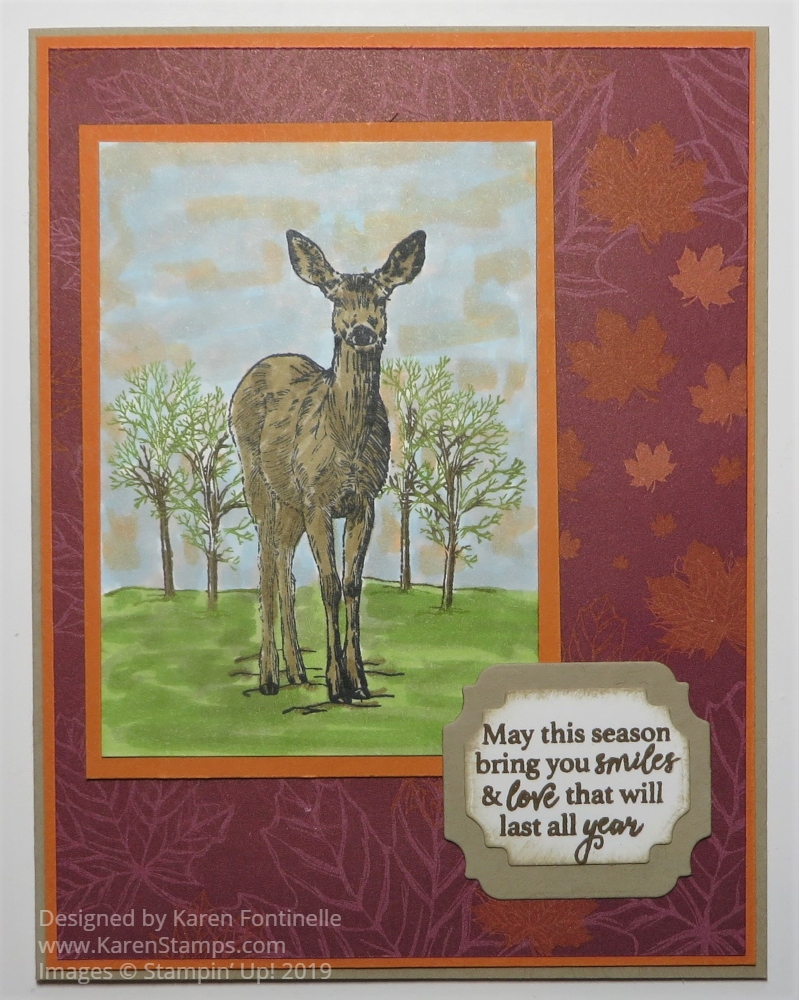
Sometimes you feel a little bit pleased with yourself when you make a card that turns out better than you expected and this card is one of those! I wasn’t really exactly sure what I was going to do with this stamp and probably expected to make a less colorful card. When I saw this paper I decided it would be a card for fall with the autumn colors.

This stamp is from the Nature’s Beauty Stamp Set, found on the inside of the last page of the Holiday Catalog. You might not have even noticed it way back there, but there is something important about this stamp set! Stampin’ Up! is donating $3 of every sale to mental health organizations. So while you can have fun stamping and using this set, you will know you are making a difference in the lives of others.

I stamped the deer in Memento Black Ink because I knew I would color him in with my Stampin’ Blends markers. That led to coloring in the sky a little bit with about three different colors. When you do this, when you start out it looks like you are making a scribbly mess! But just keep going and as the colors blend together it will likely turn out fine. I started with just kind of scribbling in with Balmy Blue Light, then some Pumpkin Pie Light, and some Gray Granite Light. As I said, it looks like the sky is going to not turn out, but then it does. I really like the way it looks now! You can experiment with whatever colors you have or you like.

The deer is colored with the Crumb Cake markers and maybe I added a bit of Soft Suede. After I stamped the deer on the Whisper White piece of cardstock, I stamped again on a piece of scrap paper, then cut it out just inside the stamped lines. This gave me a “mask” to place directly over the deer to I could stamp the trees on each side of him without stamping over the deer. To stamp the trees, I used my Stampin’ Write Markers, two colors of green on the leaves and then a dark brown for the trunk and a few branches. I colored directly on the stamp so I could have the greens on the leaves and the brown on the tree trunk. The grass I colored the same way as the sky with just a couple of green shades.

The designer paper is from the Come To Gather Designer Series Paper. When I saw this orangish paper with the colored and outlined leaves I knew it would be perfect with the deer. The greeting is stamped in Early Espresso Ink on Whisper White that is sponged a little bit around the edges with Crumb Cake Ink and layered on a piece of Crumb Cake Cardstock. Both the die-cut shapes are from the Ornate Frames Dies. The greeting is in the Gather Together Stamp Set.

The card base is Crumb Cake with layers of Pumpkin Pie Cardstock. Even though Pumpkin Pie is not one of the coordinating colors with this designer paper, I thought it looked good on the card and brought out some of the lighter orange colors.

You could send this card to someone any time from now on through Thanksgiving. It would make a great masculine birthday card or just a card with a note inside, also.

Consider putting this stamp set, Nature’s Beauty, on your order and know that you and your stamping may be a part of helping someone.

SHOP STAMPIN’ UP!

A Geometric Card For Fall With the Tailored Tag Punch

A Geometric Card For Fall With the Tailored Tag Punch

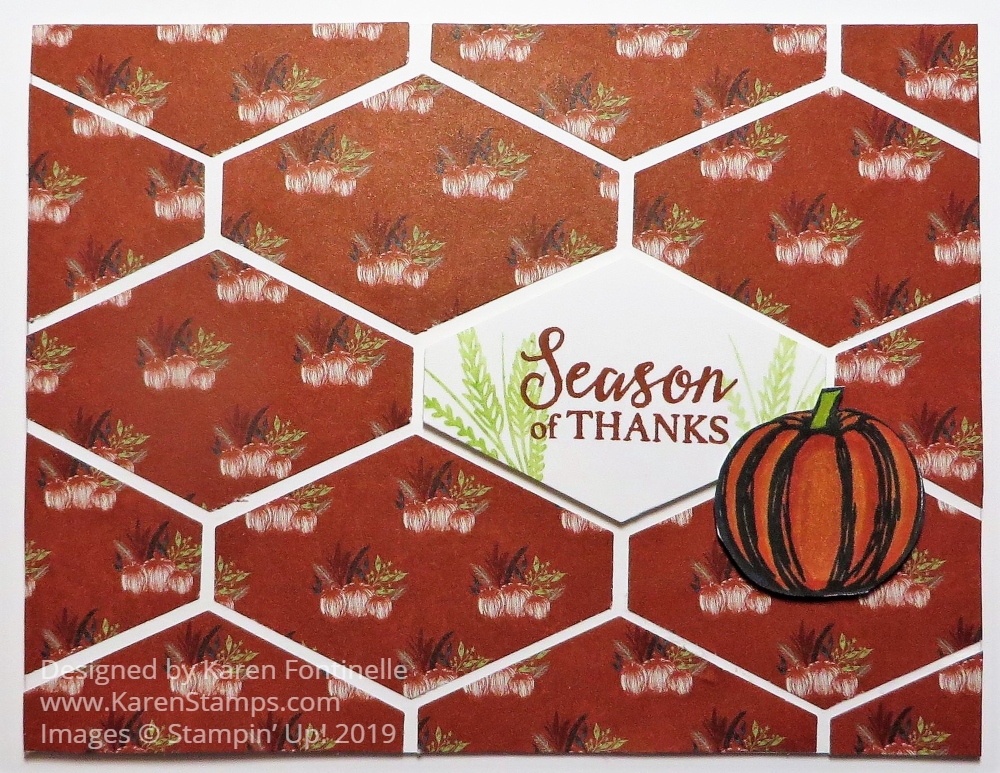
I’ve made and seen cards like this Geometric Card For Fall With the Tailored Tag Punch and saw one recently online. I changed the kind of paper to make it look like fall, added the greeting, a little stamping and of course, a pumpkin! What says fall more than a pumpkin?! You could make and send this card now just for fall, a card for someone who doesn’t celebrate Halloween, or save it for closer to Thanksgiving. You can also make this same card with different paper and a different greeting for a birthday or lots of other occasions.

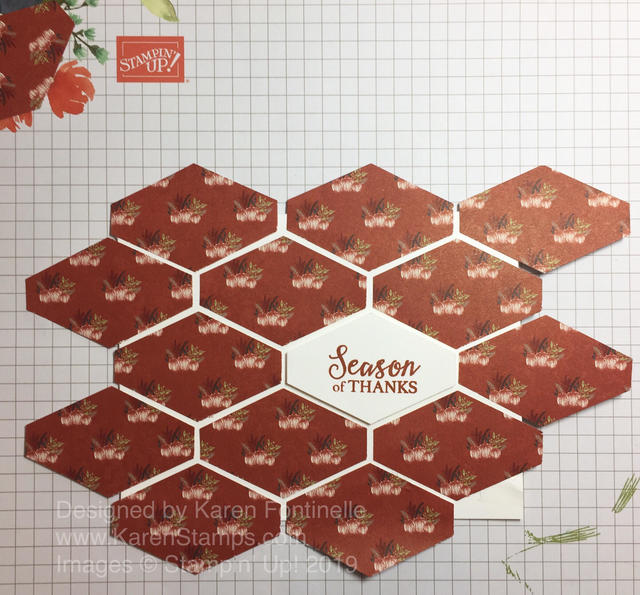
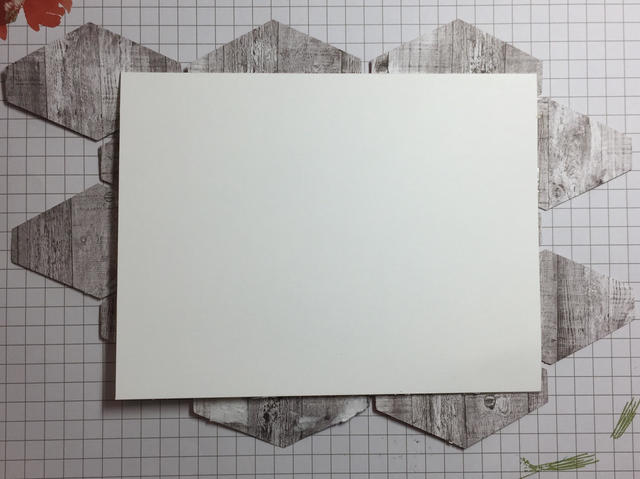
The card base is Whisper White Thick Cardstock to give it a little heft. The paper is the Come To Gather Designer Series Paper, the pattern with little groupings of pumpkins. You might think this card would be difficult to make, fitting in all those pieces like a puzzle! But no, you just start somewhere and space out the punched pieces, allowing them to hang out over the edge of the cardstock underneath. After you have them placed how you like, glue them down. Turn the paper over and trim off the excess hanging off the edges. Check out the photos below to see how I did this layout and then trimmed off the pieces hanging over on the other side.

A Geometric Card For Fall With the Tailored Tag Punch Layout
A Geometric Card For Fall With the Tailored Tag Punch Back

The greeting is stamped with the Gather Together Stamp Set in Cajun Craze Ink and then punched out with the Tailored Tag Punch. I thought it looked a little too stark so I stamped the wheat stamp in Granny Apple Green Ink, stamped off once or twice. I just wanted it fairly light.

I also stamped and colored in a pumpkin from the Gather Together Stamp Set. It is colored with Stampin’ Blends Markers in various colors. You can choose whatever look you want for your pumpkin. I started with a bit of Daffodil Delight with Pumpkin Pie and then added some Cajun Craze to match the paper better with the darker shade.

The designer paper pieces are all adhered directly to the card front, but the greeting is popped up on Stampin’ Dimensionals®, as is the pumpkin. Here is a similar card made with the Wood Textures Designer Paper last year so you can see a different idea and occasion.

There are infinite possibilities for making a card like this using different papers and greetings! Try it and see what you think!

SHOP ONLINE FOR STAMPIN’ UP!

Gather Together Pumpkin Card For Fall

Gather Together Pumpkin Card For Fall

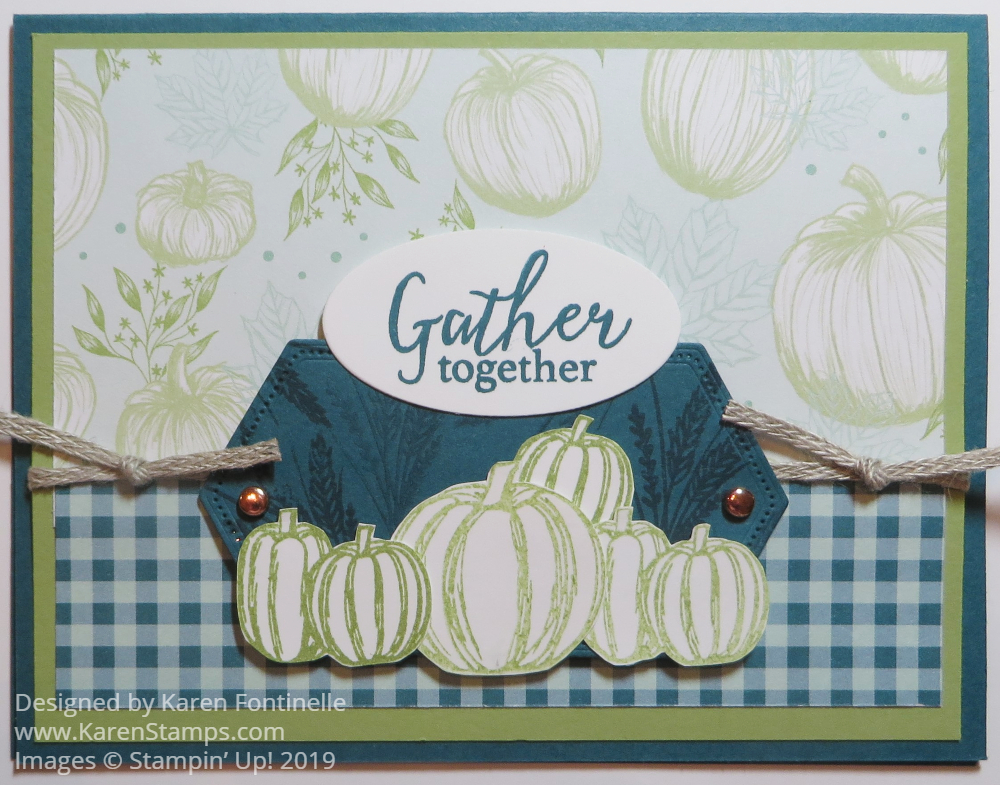
I thought if I made this Gather Together Pumpkin Card For Fall it would cool me off from the very hot summer temperatures in Houston, Texas. It did bring a rainstorm which knocked a few degrees off the temperature! I love these new colors for fall, something modern and different!

This card uses the very pretty Come To Gather Designer Series Paper. I can’t wait to use all of the other designs in the package, especially the bright, modern plaid. For this card, I began with a card base of Pretty Peacock Cardstock and a layer of Pear Pizzazz. Then I chose the designer paper with the whitish pumpkins. On the opposite side was the Pretty Peacock gingham check design which I also liked so I cut a strip, turned it over and used it at the bottom of the card. To cover up the seam from the two papers, I just placed some 3/16″ Braided Linen Trim around the card.

I didn’t purchase the Gathered Leaves Dies in the Suite (because even Demonstrators can’t buy everything!) so I just stamped the pumpkins on Whisper White Cardstock with Pear Pizzazz Ink. Some I stamped with full ink and some I stamped off first and then stamped for a lighter shade with less ink. After stamping the pumpkins, I just cut them out with my Paper Snips, which as easy enough.

To make the pumpkins stand out on the card, I wanted some kind of background. I decided to try this piece die cut from the Stitched Nested Labels Dies in Pretty Peacock. To add a little interest I stamped in Pretty Peacock ink the wheat image from the Gather Together Stamp Set. Then I added two small copper brads from the Metallic Brads. It seems like years ago brads were a really big deal for embellishments, but I don’t think they are used or talked about as much these days. But I thought they seemed like the perfect little bling to add on this card! I poked a hole first with the sharp pointy end of the Take Your Pick Tool with the paper on the Stampin’ Pierce Mat, then inserted the brad into each hole. You can flatten the brads well by pushing down on the top of the brad with something heavier, like an acrylic block or the wide part of your scissors or whatever is handy.

This label piece is placed a little lower on the card because I didn’t want to cover up all the pumpkins printed on the designer paper! Then the cut out pumpkins are placed a little lower on the label so as not to cover up the stamping on the label! This whole piece is then popped up on Stampin’ Dimensionals.

The next dilemma was how to add a greeting without covering up too much of the card! I used the greeting from the Gather Together Stamp Set, stamped in Pretty Peacock and die cut with a Layering Oval Die. I ended up, as you can see, adding it right to the top of the die-cut label, overlapping a bit. It is a little different, but I think it turned out okay. In order to make it even with the Pretty Peacock label, I put dimensionals just under the top part of the greeting so it would be the same height as the label.

It was fun making a fall card even though I didn’t get to put on a sweater! It is still plenty hot, but at least this card gives the promise of fall! I just love the thought of fall colors and pumpkins and everything that goes with that theme! When you receive your Stampin’ Up! Holiday Catalog and begin to place your order(s)….and believe me, there will be orderS, plural!…..you will want to choose some of the fall-themed stamp sets and papers for a change of seasons or Thanksgiving or use some of the generic colors just for a switch in colors for your cards and projects.

Pumpkins, these days, seem to come in all colors and textures so you can be very creative! Here is a post from last year with traditional orange pumpkins but with a bright green polka dot background, but you could use the same design to make a card with these new 2019 colors! I saw some beautiful fabric pumpkins on Instagram the other day, some even embroidered, all different kinds of fabrics, not just orange. Yet they all look appropriate for fall and into Thanksgiving. So don’t be afraid to try some non-traditional colors in your pumpkins and fall cards like this Gather Together Pumpkin Card For Fall.

Use Your Bonus Coupons During August in the Stampin’ Up! Online Store!