Tag Archives: Gilded Autumn Specialty Designer Series Paper

Gilded Autumn Fall Acorn Card

Gilded Autumn Fall Acorn Card

I absolutely love the Gilded Autumn Designer Paper for fall cards and I noticed there was one pretty, but kind of odd patterned paper that I hadn’t used. It is actually the opposite side of this acorn and leaf paper and I had planned to use both sides on this card. But then I didn’t! I liked just the acorn and leaf print on this paper so I only used this one side on my Gilded Autumn Fall Acorn Card.

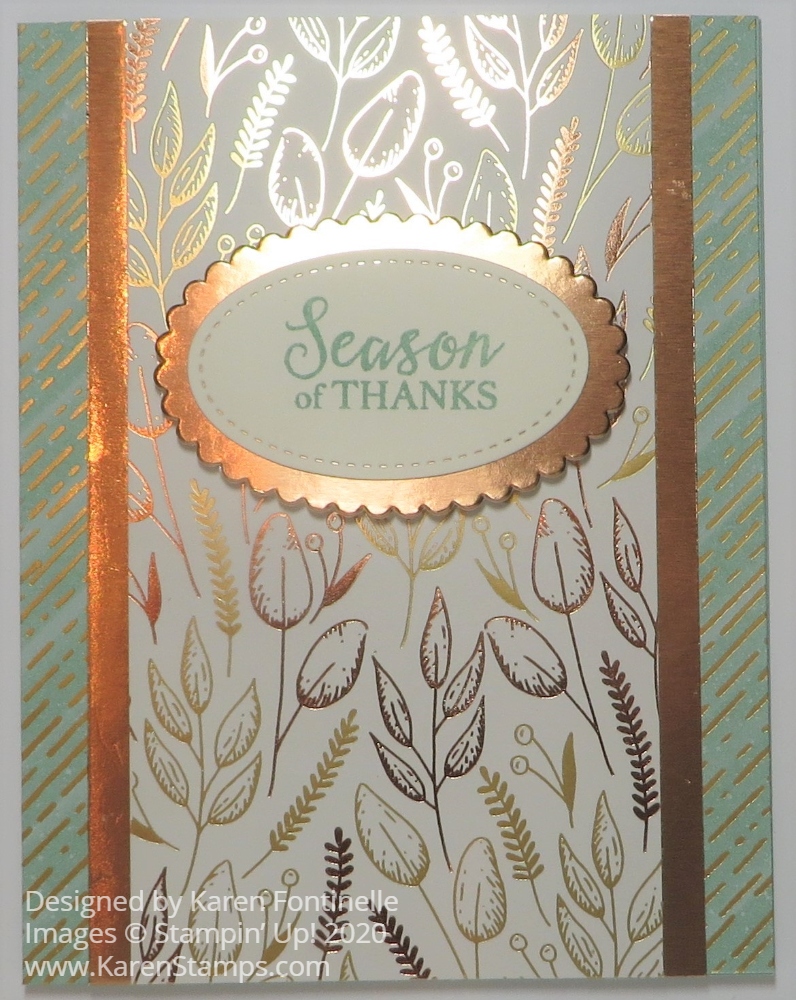
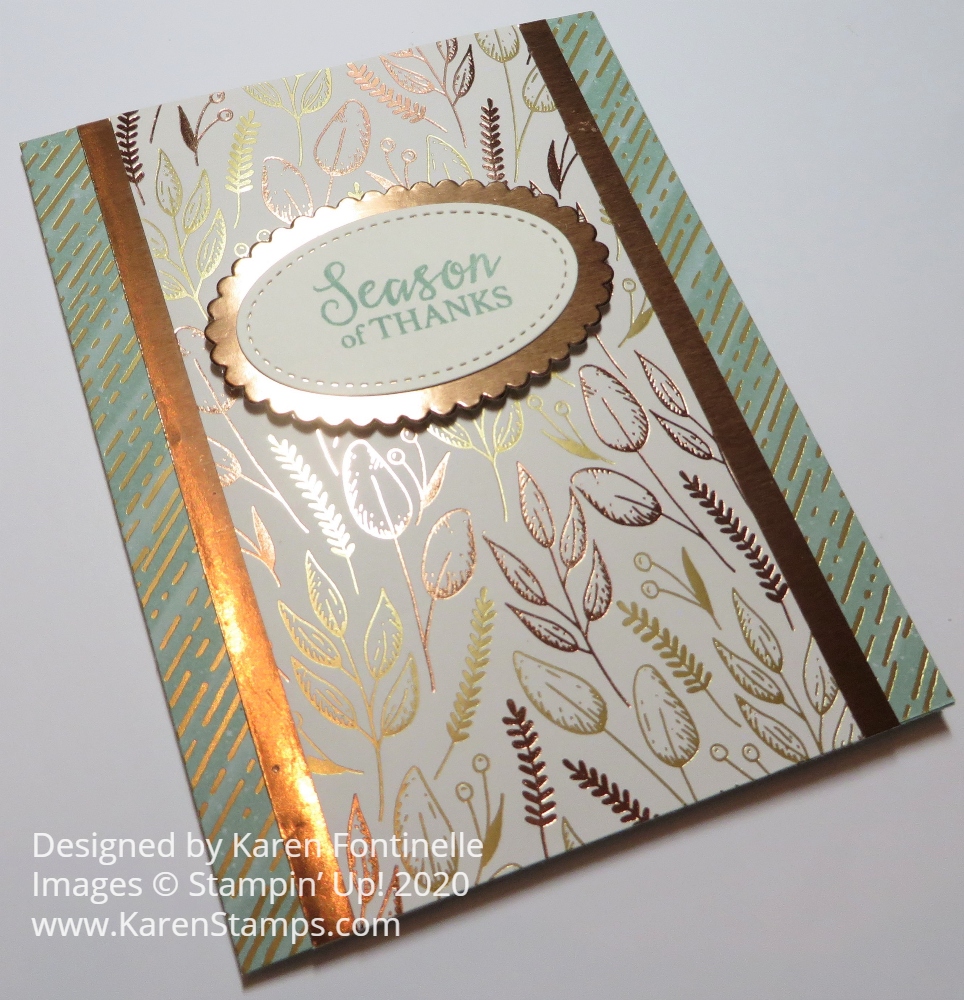
This card is just a simple, basic design we can all make very easily. You can keep it very simple or add some embellishments. It’s just a layer of designer paper on top of the card base and a greeting. That’s really all you would have to do.

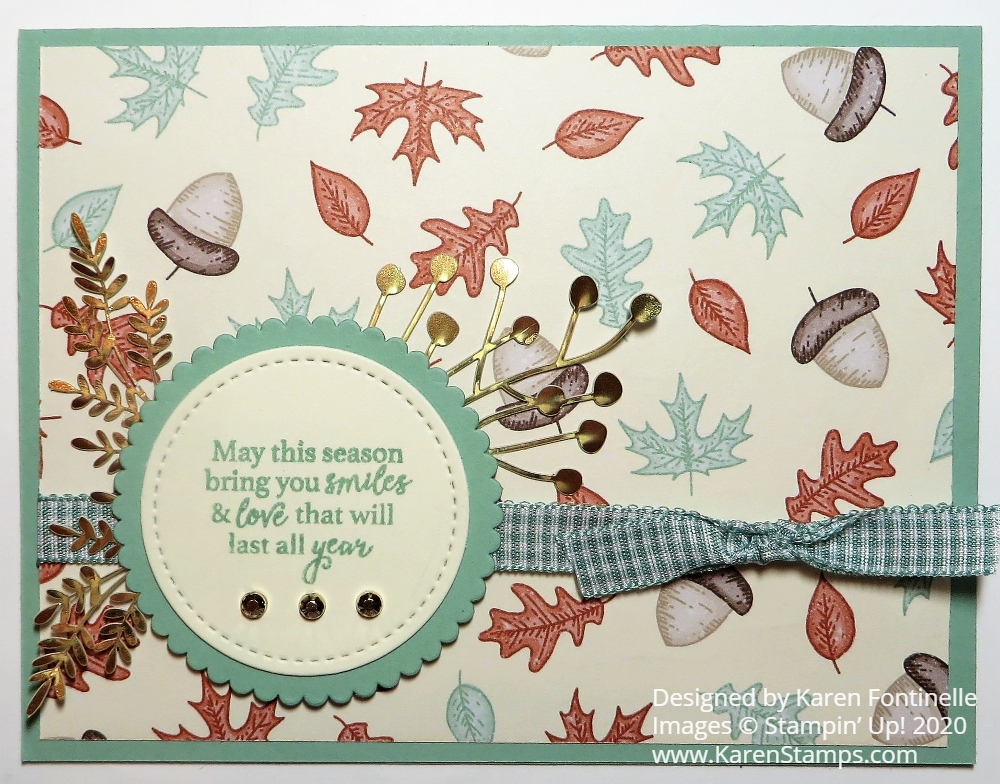
The card base is Mint Macaron, one of the coordinating colors with the Gilded Autumn Specialty Designer Series Paper. This paper with its fall colors also has some papers with Gold Foil or Copper Foil accents. That’s what makes it so beautiful. It’s one of my favorites this season!

The greeting is stamped on Very Vanilla from the Gather Together Stamp Set. Then it was die cut with a circle in the Stitched Shapes Dies and layered on a Mint Macaron scalloped circle that I already had in my package of paper! I popped up the greeting on Stampin’ Dimensionals.

Running underneath the greeting is a Just Jade ribbon in the Flowers For Every Season Ribbon Combo Pack. It’s not a perfect match but I think it is close enough and I like the gingham ribbon.

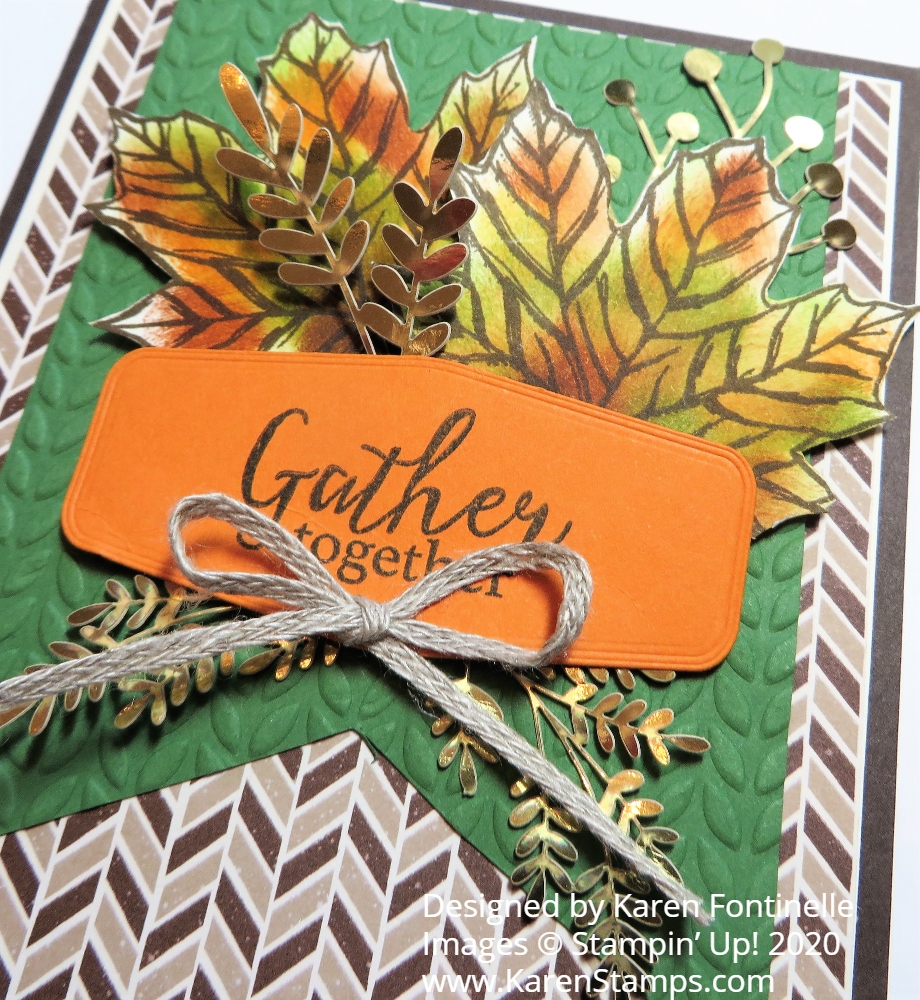
I couldn’t finish the card without doing a little more embellishing! I had a piece of the Forever Gold Laser-Cut Specialty Paper laying out on my desk and thought I’d see if some gold leaves would look okay behind the greeting. Then on the bottom of the greeting, I added three of the smallest Gilded Gems.

So if you are looking for an easy card to make for fall, just follow this simple design!

SHOP STAMPIN’ UP! ONLINE!

Gilded Autumn 2-4-6-8 Fall Treat Bag

Gilded Autumn 2-4-6-8 Fall Treat Bag

If you want a little autumn treat for someone or maybe for Thanksgiving dinner favors, this little Gilded Autumn 2-4-6-8 Fall Treat Bag would meet your needs! These little 2-4-6-8 bags, as we like to call them, are really easy to make out of cardstock or designer paper and then you can decorate them for any occasion. You can make them taller too with a larger piece of paper.

For this treat bag, you just need half a sheet of paper, 5 1/2″ x 8 1/2″ if using cardstock or cut designer paper to this size. I used the pretty Gilded Autumn Specialty Designer Series Paper with gold and copper foil accents, which makes it extra special. If you want a taller bag, then cut it more than 5 1/2″.

Score at 2″, 4″, 6″ and 8″. Turn and score at 1 1/2″ (or 2″). These will be the bottom flaps so pay attention to the pattern on your paper, watching which way it is going so it doesn’t end up upside down. Cut the bottom flaps up to the score line. Cut off that very small 1/2″ piece on the end. See the photo below. (This isn’t the paper I used, and it is taller, but you can get the scoring and cutting idea.)

2 4 6 8 Box Inside Scoring

Assemble the box, putting adhesive on that 1/2″ piece on the side. Then pay attention to where the seam is and try to have that face the back. Fold in the bottom flaps, trying to make the front of the bag look nice with a flap fold, not the edge.

Now all you have to do is decorate the front of the bag. You can even leave it open at the top if you prefer or if you want to put maybe a cello bag of treats inside. But if you want to close the top, just pinch in the sides of the bag and push the top together. Punch holes for ribbon or add a clip of some kind to keep it closed. Be sure to put the treat in first!

For this little Gilded Autumn bag, I die cut a piece of Gold Foil using the Tasteful Labels Dies. Out of the designer paper with pumpkins and gourds all over it, I cut out a pumpkin, a gourd, and a teeny tiny pumpkin! I love that paper! I adhered the large pumpkin and gourd onto the Gold Foil circle with Stampin’ Seal+. After stamping and cutting out the greeting, from the Itty Bitty Greetings Stamp Set, I adhered that at the bottom of the pumpkin and gourd, then popped up the tiny pumpkin with a Mini Dimensional just at the very top so that it would partially layer over the greeting.

To finish off the treat bag, I used my old Cropodile to punch two small holes in the top of the bag and I tied a piece of Braided Linen Trim at the top. You could use some other ribbon as well.

This 2-4-6-8 pattern is so versatile and so easy to make! Try it for whatever occasion you want. Halloween is coming up so that would be fun!

SHOP STAMPIN’ UP! ONLINE HERE!

Gilded Autumn Pumpkins Fall Friendship Card

Gilded Autumn Pumpkins Fall Friendship Card

This fall paper in the Stampin’ Up! August-December Mini Catalog 2020 is some of the prettiest designer paper we have had (or do I say that about almost every paper?!) so I had to make this Gilded Autumn Pumpkins Fall Friendship Card with this pretty paper with gold embossed pumpkins.

It’s really a very simple card and I wanted to keep it that way. Sometimes we get carried away with all our pretty embellishments and die cuts, but we can make simple, easy cards too that are just as nice.

This card has a Cajun Craze card base to match the Gilded Autumn Specialty Designer Series Paper. I don’t really use Cajun Craze very often but it is lovely on this pumpkin paper! I was going to use another piece of the paper as a side strip but after placing the full layer of the pumpkin paper on the card base, I liked that look just fine and didn’t want to add anything else except a greeting.

The greeting is from So Sentimental, one of the good greetings stamp sets we have in the Annual Catalog. I stamped it in Cajun Craze ink to match on Very Vanilla Cardstock. Then I die-cut it with one of the Stitched So Sweetly Dies. Actually, the greeting looked fine on the card against that paper just as is, but I did want to add some Gold Foil to the card. I cut the same die cut out of the Gold Foil and then cut it in half so I could have it extend above and below the Very Vanilla greeting. That is something you can do when you want a layer of some kind but the dies don’t fit or extend beyond the greeting. It usually works pretty well!

The inside of the card will need a layer of Very Vanilla on which to stamp a greeting or write a personal note because of the dark Cajun Craze card base.

That’s really all there is to this Gilded Autumn Pumpkins Fall Friendship Card with just adhering a designer paper layer and a greeting for a very nice card to send to someone during this fall season or even looking ahead to Thanksgiving cards you might want to send.

SHOP STAMPIN’ UP! ONLINE HERE!

Gilded Autumn Season of Thanks Fall Card

Gilded Autumn Season of Thanks Fall Card

You will absolutely love this fall designer paper in the Stampin’ Up! holiday catalog that I used on this Gilded Autumn Season of Thanks Fall Card. I had to resist the urge to try to decorate it any further. Sometimes you just have to tell yourself to stop! The card already has a lot going on just in the papers so no need for more bling!

The card base is Mint Macaron which matches the Mint Macaron diagonally striped pattern of the Gilded Autumn Specialty Designer Series Paper. This paper has gold and copper foil accents so it is very pretty but very difficult to photograph for a blog! All the shiny-ness of the foil makes for a lot of glare for a photograph, but in person is very pretty!

It looks like I covered the entire front of the card with the Mint Macaron striped paper, but in reality I just cut two 1″ strips and adhered them to each side of the card. The center panel with the leaf designs in gold and copper accents is cut at 3″ wide so that I could add Copper Foil strips along each side. The foil is cut at about 1/2″ x 5 1/2″. I luckily already had a strip of the foil that I only needed to cut the two lengths of. I lined everything up on my Grid Paper and adhered each copper foil strip to the side of the leaf paper, then adhered that directly to the card.

The greeting is from the Gather Together Stamp Set on page 47 in the holiday catalog. This was a favorite from last year and was carried over this year! It is stamped on Very Vanilla Cardstock in Mint Macaron Ink and then die-cut with an oval Stitched Shapes Die. This was then layered on a scalloped Layering Ovals Die cut out of Copper Foil.

For the inside of the card, I stamped a greeting from the same stamp set in Mint Macaron ink on a piece of Very Vanilla. I happened to have a tiny scrap of the same leaf design paper I have on the front of the card and the opposite side has these colored stripes. So I used that to adhere to the bottom of the card for a little interest when someone opens the card.

Gilded Autumn Season of Thanks Fall Card Inside

All in all, a pretty easy card to make. The paper makes it look very fancy and special! You could make it even easier with just one of the papers as a layer on the front of the card plus the greeting. Here’s another card I made recently with the Gilded Autumn paper. These cards will be so nice to have for Thanksgiving or any time in the fall season.

Gilded Autumn Season of Thanks Fall Card (1)

Try this Gilded Autumn Season of Thanks Fall Card or even change up the designer papers and make something with a different look.

SHOP STAMPIN’ UP! ONLINE!

Gather Together Fall Leaves Card

I used several products on this Gather Together Fall Leaves Card, as I thought about them while making the card. I probably started out with a simpler version in my head of making this fall card, and then I came up with more ideas as I worked on it. That’s probably the way a lot of us do our cardmaking!

The beginning of the card was simply the stamping and coloring of the leaves in the Gather Together Stamp Set. You may already have this set if you purchased it last year. Happily, it was carried over into this August-December 2020 Mini Catalog as a favorite from last year! I stamped a few leaves in Memento Ink first but I thought the black outline was too stark. Then I stamped some in Soft Suede Ink. In the end, after they were colored, I’m not sure it made much difference so I think you can do either.

To color the leaves, I used Sponge Daubers and various ink pads. Just choose whatever colors you like for fall. I used Old Olive, Crushed Curry, Pumpkin Pie, Cajun Craze, and Granny Apple Green. I intended to leave parts of the leaves uncolored, but it didn’t so much turn out that way! I was sort of using a card on page 47 in the Mini as inspiration with the leaves. I didn’t try to be precise, especially as far as coloring “outside the lines” because I knew I would be cutting out the leaves anyway. I don’t own the dies but I don’t mind doing some “fussy-cutting” with my Paper Snips.

Gather Together Fall Leaves Card Coloring

The card base is Early Espresso Cardstock with a layer of Very Vanilla to offset the layer of Gilded Autumn Specialty Designer Series Paper. This paper is so beautiful, it was difficult choosing which pattern to use. But I didn’t want to take too much away from the leaves so I chose a plainer pattern, not one with the gold and copper foil accents which are so pretty.

Next, I used a piece of Garden Green Cardstock to make a banner and embossed it with one of the Greenery Embossing Folders. These are narrower folders for smaller pieces you want to emboss. I also stamped the greeting in the Gather Together Stamp Set in Early Espresso Ink and die-cut it with a die in the Tasteful Labels Dies.

After adhering the layers together plus the banner on the card, I adhered two fall leaves with Stampin’ Dimensionals and added some of the gold foil pieces in the Forever Gold Laser-Cut Specialty Paper. I think they really add a little pop of pizzazz! The greeting was centered over everything, also popped up on Dimensionals. For a final touch, I added a bow made with the 3/16″ Braided Linen Trim.

Gather Together Fall Leaves Card Closeup

It’s time to start making some fall or autumn cards, maybe just to send to friends and family and maybe to save for Thanksgiving. Who knows if we will be able to “Gather Together” this Thanksgiving so we might want to have cards ready to send to those people we want to remember on the holiday. This Gather Together Fall Leaves Card would suit the purpose just fine!

SHOP STAMPIN’ UP! ONLINE HERE!

Remember to use your Bonus Coupons before August 31 if you have them from July!

Gilded Autumn Gather Together Card For Fall

This Gilded Autumn Gather Together Card For Fall is one I created by copying a fall card I made last year with the same stamp set but using this year’s new designer paper! You can take any card or project you’ve made in the past and update it with a new greeting, new colors, new paper, new embellishments.

Here is the card I was copying from last year. Click the card to see the blog post.

Gather Together Fall Card on the First Day of Fall

The new Gilded Autumn Specialty Designer Series Paper in the Holiday August-December 2020 Mini Catalog is just beautiful this year with its earth tone colors and some copper and gold foil accents. I really like this paper! For the card base, I used Mint Macaron Cardstock because it goes with the pattern I wanted to use. This leafy pattern is what I used to cut out some leaves as embellishments.

Under the leafy pattern designer paper, I put a layer of Copper Foil. If you want to cheat, you can die-cut a piece out of the center of the foil, which will be hidden underneath the designer paper, if you want to use every bit of the foil sheets!

For the center of the card, to match the one from last year, I cut out a Copper Foil piece from the Stitched Nested Labels Dies. You can choose whichever size works best for your card.

The greeting, from the Gather Together Stamp Set, is stamped on Whisper White Cardstock in Mint Macaron Ink and die cut with a smaller Stitched Nested Labels Die. I added a little Gold Metallic Pearl on each side. The pumpkins and one gourd are cut out with Paper Snips by hand from the paper in the Gilded Autumn selection. I love the pattern with all the pumpkins and gourds! I just cut out three of them and a few leaves and adhered them to the front around the greeting. That’s all there is to it! Seems pretty simple, right?!

What is it about fall that makes us all so excited to expect it and to make fall projects like colored leaves and pumpkins and more?!

Be sure to check out the Gilded Autumn Specialty Designer Series Paper in the new Stampin’ Up! Online Store because the photos of the paper are really great! Next best thing to seeing them in person!

The Gilded Autumn Paper and the Foil Sheets are so pretty that’s almost all you need on this Gilded Autumn Gather Together Card For Fall.

Gilded Autumn Fall Thanks Card

Gilded Autumn Fall Thanks Card

I was anxious to play with this gorgeous designer paper in the new August-December 2020 Mini Catalog from Stampin’ Up! The designs are so pretty, the colors beautiful, and all of it accented with copper and gold foil. How can you resist?

This beautiful paper is the Gilded Autumn Specialty Designer Series Paper in the new Holiday Catalog. You’ll find the whole Gilded Autumn Suite on pages 44-46. All Suites in this catalog get a three-page spread! The Suite contains the Beautiful Autumn Bundle with stamp set and three punches, ribbon, Brushed Metallic Cardstock, and Acorn Trinkets. You can order the whole thing with one Suite number or order any of the products individually.

I loved the sample in the catalog on page 44 with the three panels of designer paper on it, center of page. I changed mine a little bit and figured out my own measurements. The card base is Whisper White, although you could also use Very Vanilla. The Copper Foil layer underneath the designer paper is cut at 5″ x 3 3/4″. The strips of designer paper are cut at 1 1/2″ x 3 1/2″ so there is a tiny margin around the edges and in between the pieces. You can vary this and have the papers side by side or even a little larger with a larger foil layer underneath. When I finished gluing these pieces with my new Stampin’ Seal+ I ended up trimming just a slight bit off the side of the copper foil just to even things up.

The greeting is stamped from the Gather Together Stamp Set, a “returning fave” it says in the catalog, from last year in Mint Macaron Ink! We all did love that stamp set and cards we made with that set last year so I’m glad it is back! I die cut it with one of the Tasteful Labels Dies and used another longer one to cut out a strip of Copper Foil to go behind it. This is a great die set!

The catalog sample card has some greenery sticking out from the side of the greeting. I don’t know how they did theirs, but I just cut some greenery out from one of the sheets of the Gilded Autumn Paper. It wasn’t so easy, but it worked! And I put it on both sides of my greeting.

And then, just because I loved the paper with pumpkins and gourds, I had to cut out a pumpkin and add it to the card. I wasn’t sure! What do you think? I popped it up with a Dimensional to match the greeting that was also popped up, but I put the Dimensional only in one spot to it would be even with the greeting. I meant to add some sequins or some little bling but I forgot!

Here is a card I made last year with the Gather Together Stamp Set. I think I could use this same basic layout and make something with the new Gilded Autumn Paper! I might try that!

I think it is a fairly easy card to make, especially if you use my measurements and don’t have to figure it out. Maybe you could die cut some other greenery for a similar look without cutting by hand if you didn’t want to do that. You could die cut the greeting in a different shape. Lots of possibilities with this Gilded Autumn Fall Thanks Card.

Remember, we have a new look to the Online Store! If you haven’t used it yet, you need to either KNOW your password to get into your account if you want to order (you can look around without logging in) so you can type it in manually OR you need to click on the “Forgot Your Password” Button to reset it. After that you can have the site remember the password….and maybe a good idea to write it down!

SHOP STAMPIN’ UP! ONLINE!