Tag Archives: Ornate Frames Dies

Expressions In Ink Floral Hello Card

Expressions In Ink Floral Hello Card

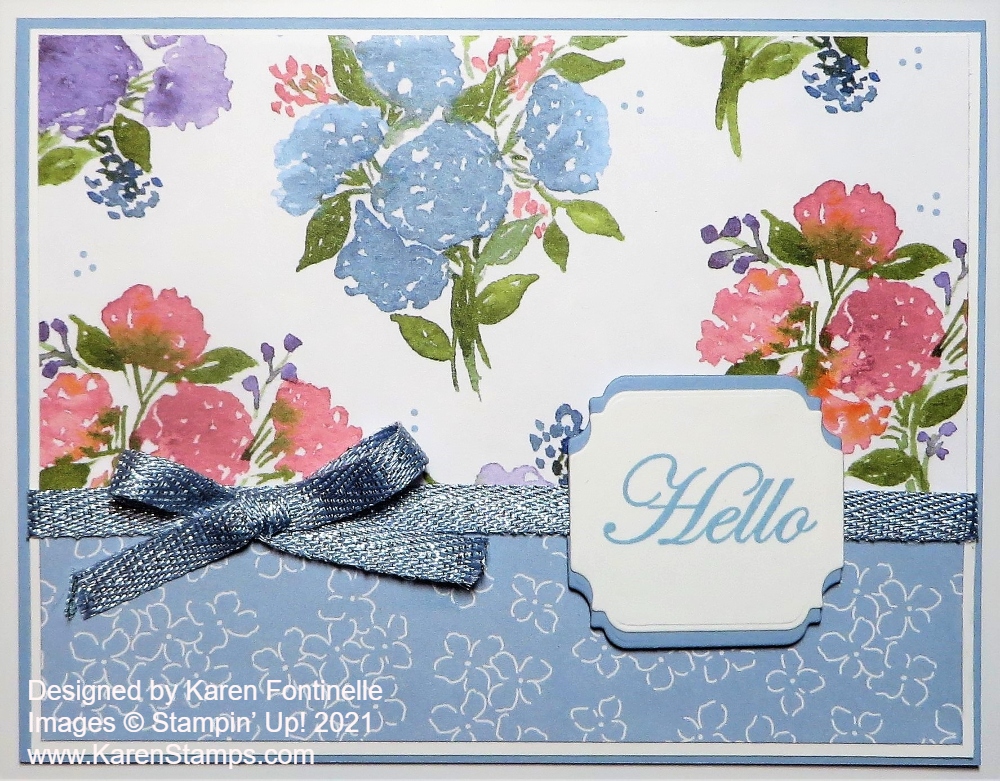
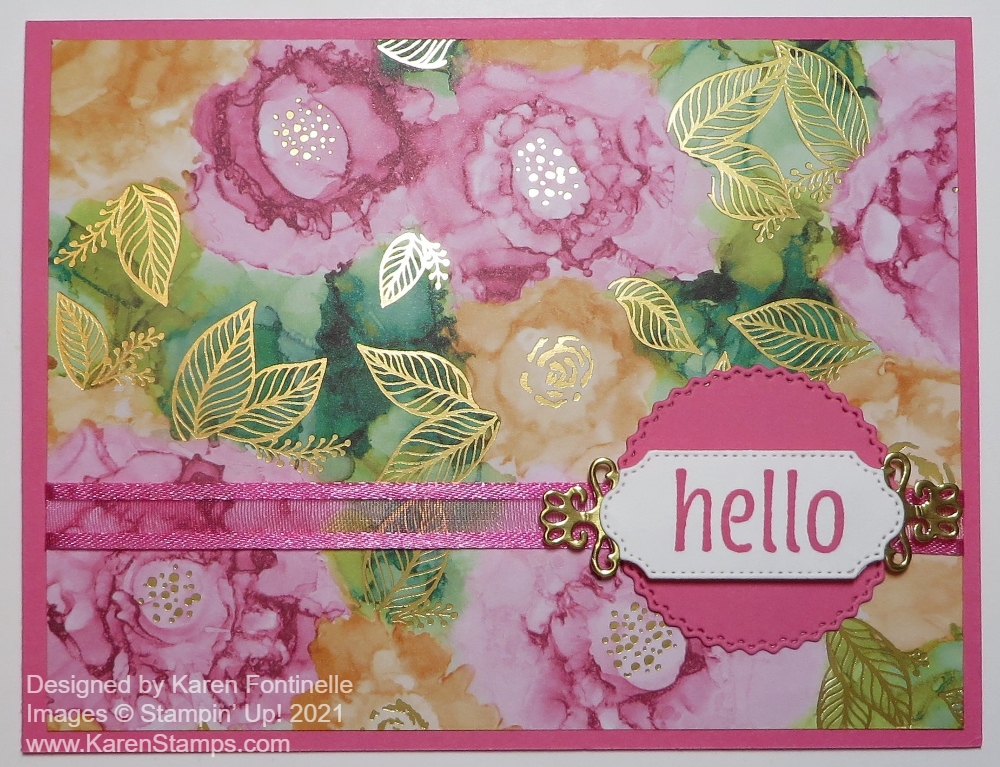
As I was cleaning up my stamping supplies from making another card, I spied this paper that just looked beautiful (because it IS beautiful!!) and I got everything out again and made this Expressions In Ink Floral Hello Card! I knew I could just make a very simple card because the paper is so pretty and you really don’t need too much else.

I have loved this Expressions in Ink Specialty Designer Series Paper since it came out in the Stampin’ Up! Annual Catalog. The artistic designs on the paper plus the gold foiling make it exceptionally beautiful. I started with a card base of Polished Pink, one of the new In Colors this year. You could choose from several other colors for this same card since there are so many colors in the designer paper, like Pale Papaya or one of the many greens we have. Before adhering the designer paper to the card base, I wrapped a piece of Polished Pink 3/8″ Open Weave Ribbon around. I love this ribbon in all the In Colors.

The greeting is in the Artistically Inked Stamp Set. It is stamped in Polished Pink on Basic White and die-cut with a small die in the Ornate Frames Dies. I adhered it to a die-cut Gold Foil piece with the fancy ends, also a die in the Ornate Frames Dies. And to help all that to stand out, I die cut a fancy circle in the Tasteful Labels Dies in Polished Pink. The pink die-cut circle is adhered right to the card and then the greeting is popped up on Stampin’ Dimensionals. You could add a jewel or two to the greeting if you wanted to.

This is an easy card with a simple card design, maybe only the greeting is a little fancier. It’s all about the fancy paper! Here is a similar card I made back in July with some added die-cut leaves and the Expressions in Ink Ephemera Pack. Get out your Expressions Ink Designer Paper and make a card like my Expressions In Ink Floral Hello Card.

SHOP STAMPIN’ UP! ONLINE HERE!

Cute Halloween Trick or Treat Ghosts Card

Cute Halloween Trick or Treat Ghosts Card

I just had to make another fun Halloween card, this Cute Halloween Trick or Treat Ghosts Card. I started by picking out the designer paper and played around from there! I have a trick for how I made one ghost go in a different direction from the one stamp!

This card base is Old Olive Cardstock with a layer of basic black. I chose the designer paper with the little houses and tiny moons and ghosts! This is the Cute Halloween 6″ x 6″ Designer Series Paper. So many cute patterns to choose from! I decided to make the designer paper narrower than the card front and have the ghosts floating along the edge. Then I decided to cut a decorative edge with a scallop die in the Penned Flowers Dies. Next, I selected another designer paper, the one with black dots, to go along the edge, after considering several options. This card opens from the top but it would be the same if it opened from the side.

The greeting is stamped from the Cutest Halloween Stamp Set on Basic White and then die cut with a die that fits inside the Basic Black die-cut, both of which are in the Ornate Frames Dies. I popped up the greeting on Stampin’ Dimensionals® and added two Elegant Faceted Gems.

For the ghosts, I stamped two ghost shapes in the Cutest Halloween Stamp Set on Basic White and then turned over the cardstock and stamped one ghost on the back where it didn’t overlap the ghosts stamped on the front. I also added the faces and little arms just on the ones on the front of the cardstock! So cute!! I cute out the ghosts by hand with my Paper Snips. Now you can purchase the Halloween Punch and get both the stamp set and punch in the Cutest Halloween Bundle and save 10%. So I cut out the two ghosts on the front of the white cardstock who were both facing the same direction. I cut them out with a bit of the black ink outline showing as it would if I had used the punch. Then I turned the paper over and cut out the ghost outline. But here’s the trick… after cutting out the ghost shape, I turned it over so it would be facing the opposite direction from the other two ghosts and stamped the face on it. Now, this ghost doesn’t have the black ink outline on it since I am using the unstamped side. But if you want that black ink outline, just take a black marker and run it around the ghost along the edge to get some black marking along the outline. Or, maybe it doesn’t really matter to you and you can skip that step! Out of the three ghosts, I wanted one facing the other direction.

I originally planned to adhere the ghosts right along the edge of the green designer paper, but in the end, I liked the placement you see better. I also turned the Ornate Frame die in portrait position and stamped the greeting in that direction which I think fits better than landscape position. Either way would be fine, though! Just play and see what looks good to your eye! Here is another Halloween card using the Cute Halloween DSP except with the sheet with ghosts! Order the Cute Halloween Paper on your next order so you have plenty of time to create “cute” Halloween cards and projects to send out, like this Cute Halloween Trick or Treat Ghosts Card.

Terracotta Tile Fine Art Floral Thank You Card

Terracotta Tile Fine Art Floral Thank You Card

I’ve discovered that sometimes we don’t fully appreciate the Stampin’ Up! In Colors until they are going to retire, such as when I made this Terracotta Tile Fine Art Floral Thank You Card and realized that Terracotta Tile was one of the colors in one of my favorite papers. Honestly, I haven’t been a fan of the outgoing In Colors (although I think I am really going to like the new In Colors!) but when I wanted to use some of this ribbon, I discovered it goes with this paper!

This card is made with a card base of Terracotta Tile Cardstock. When I noticed that Terracotta Tile was one of the coordinating colors of the Fine Art Floral Designer Series Paper, I really was surprised because I hadn’t thought about it before, even though I wrote a list of all the colors on the back cardboard of designer papers because the Stampin’ Up! printing is too small to read easily. You can even see the beauty of this paper in my photos, the image of the texture of the paint that the Stampin’ Up! artist used in designing this paper! It almost looks like the front of this card is the actual painted canvas! So I was surprised to find that some of the patterns of paper in this Fine Art Floral pack had Terracotta Tile in them.

I used the Terracotta Tile 1/2″ Scalloped Linen Ribbon (retiring soon!) to embellish the card. I just adhered a strip of the ribbon around on the back of the designer paper and made a separate bow out of the ribbon and adhered it with Mini Glue Dots. Then the designer paper is adhered to the Terracotta Tile card base.

The greeting is stamped from the Many Mates Stamp Set (retiring soon!) and then die cut with a die in the Ornate Frames Dies. While I had everything out, I cut more of the designer paper trying to get the most Terracotta Tile color into the layer and stamped some more greetings, and die cut them with various dies. I popped up this greeting with Stampin’ Dimensionals. If you think of it, particularly when you are making rather easy, basic card designs, it is a good idea to make several cards while you have everything out and then you have extras to grab when you need a card!

Although the Spring Mini Catalog is not retiring until the end of June, you might consider that most, if not all, designer papers usually retire so that they can bring in new papers, so I would imagine that the Fine Art Flora Designer Series Paper will retire at that time, but not now!

The Terracotta Tile ribbon that I used is retiring May 3 so if you haven’t paid too much attention to the In Colors even after two years, maybe you want to take another look!

SHOP STAMPIN’ UP! ONLINE HERE!

Hydrangea Hill Floral Hello Card

Hydrangea Hill Floral Hello Card

I needed a “happy” card and when I looked through the Hydrangea Hill paper, this sheet of small bouquets and this other sheet with a more generic pattern of little white flowers caught my eye. Even my husband commented as he walked by that those were pretty colors! And that’s how this Hydrangea Hill Floral Hello Card was born!

The card base is Seaside Spray, one of the 2019-2021 In Colors. Not a color I have used much, I don’t think, but it’s pretty with this Hydrangea Hill Designer Series Paper.

Sometimes when I am using two designer papers together, I like to adhere them to another piece of cardstock just to make it easier for me to get them glued together and then be able to tie a piece of ribbon across the seam where the two papers meet. In this case, I adhered them to a piece of Basic White Cardstock with a 1/16″ margin on all sides rather than 1/8″. Then I added a piece of Seaside Spray 1/4″ Metallic Ribbon across the seam. I tied a separate bow and adhered it with Mini Glue Dots. You could also tie it right onto the base ribbon if you wanted or tie on a knot.

The greeting is stamped in Seaside Spray Ink on Basic White Cardstock. The greeting is from the Good Morning Magnolia Stamp Set. I didn’t want something too big to cover the flower bouquets so I chose a small greeting. It is die-cut from the Ornate Frames Dies. I cut another one in Seaside Spray for a little layer. It’s the same size so I just cut it in half horizontally and then let each half layer underneath a little bit at the top and bottom.

Here’s another card I made with the Hydrangea Hill DSP in much the same design. Put this paper on your Stampin’ Up! order along with some other things total $50 or more and take advantage of Sale-A-Bration before it ends Feb. 28!

This Hydrangea Hill Floral Hello Card is an easy one to make to showcase the pretty Hydrangea Hill Designer Series Paper!

SHOP STAMPIN’ UP! ONLINE HERE!

Trimming the Town Wreath Christmas Card

Trimming the Town Wreath Christmas Card

Make this Trimming the Town Wreath Christmas Card for a pretty quick and easy Christmas card. In fact, you can make it even easier than mine if you only use one die cut or no die cuts!

This is just a card with a piece of designer paper and a greeting plus a little ribbon. It’s a very simple design. The card base is Poppy Parade with a layer of designer paper from the Trimming the Town Designer Series Paper. You will find this cute wreath print on the back of the paper with all the holiday phrases. It’s often tough to know which side of the paper to use and tough to cut into it, especially when you like both sides!

Before adhering the designer paper to the card base, I adhered the strip of ribbon around the designer paper (just adhere the ends on the back, no need to go all the way around and waste a couple of inches of ribbon!). This ribbon is in the Ornate Garden Combo Pack.

The greeting is stamped in Poppy Parade Ink on Whisper White and die cut. The greeting is in the Perfectly Plaid Stamp Set. The die cut is part of the Ornate Frames Dies. To layer it on something, I cut out the narrow die with the fancy ends in the same set, but cut it in half so that I could place each piece at each end of the greeting. That die cut in Poppy Parade was adhered to the greeting and then popped up on Stampin’ Dimensionals. I also added two knots of ribbon on each side.

That’s all there is to this card. You could simply cut a rectangle out of Whisper White and a larger rectangle out of Poppy Parade with your Paper Trimmer and not do the die-cutting is you were making a lot of Christmas cards like this one.

Have fun trying out new card designs with different designer papers and greetings!

SHOP STAMPIN’ UP! ONLINE HERE!

Flowers For Every Season You Are The Best Card

Flowers For Every Season You Are The Best Card

It’s possible to go from not liking a card so much to liking it a lot as I did with this Flowers For Every Season You Are The Best Card. Sometimes you just have to keep playing with making a card and sometimes the paper just wins you over after awhile!

This card features the Flowers For Every Season 6″ x 6″ Designer Series Paper. It has beautiful floral designs plus generic designs on the backs of some of the floral sheets so you have a lot to choose from. I wasn’t too crazy about the floral design on this card at first but once I layered it on a piece of cardstock and tied the ribbon and bow around it, I really liked it!

The card base is Whisper White. You can always use the regular Whisper White Cardstock, but if you would like a heavier card base, try the Whisper White Thick Cardstock. I added this Just Jade designer paper layer on the card base. The focal point, the pinkish floral sheet, is cut at 3″ x 4 1/4″ and the Magenta Madness In Color layer underneath it at 3 1/4″ x 4 1/2″. Before adhering the floral paper, I adhered a piece of the Magenta Madness 1/4″ In Color Ribbon around it. I tied the bow separately and adhered to the ribbon with Mini Glue Dots.

For the greeting, I stamped “You Are The Best” from the Tasteful Touches Stamp Set. I used the Ornate Frames Dies to cut out the greeting and also the fancy frame on which to layer it. This is popped up on Stampin’ Dimensionals®. And I couldn’t resist using two of the Magenta Madness In Color Enamel Dots.

This card has the center layers a smaller size than usual so you have wider margins and can see more of the Just Jade paper underneath. If you like florals, you have to get the Flowers For Every Season 6″ x 6″ Designer Paper and make all kinds of pretty cards!

SHOP STAMPIN’ UP! ONLINE HERE!

Monster Bash Halloween Card

Monster Bash Halloween Card

A Monster Bash Halloween Card for my first Halloween card of the holiday crafting season! The Monster Bash Suite in the upcoming Holiday Catalog from Stampin’ Up! will get your creative juices flowing if you are into Halloween! And I am!!

It doesn’t take long to come up with a multitude of ideas for cards and projects using the Monster Bash Designer Series Paper. There are so many things you can do with this paper! Use a piece of the paper as-is for a layer on a card or cut out some of the images and use those on cards and projects. Of course with Halloween, we always think about treat boxes and you can have lots of fun making those for kids or parties with products in this suite!

To make this card I started with a card base of Basic Black with a layer of Crushed Curry. I thought it looked too plain so I used the Subtle Embossing Folder to just give the Crushed Curry Cardstock a little texture. Then there is the strip of Monster Bash Designer Series Paper.

Here is the secret of the bit of ribbon along the edge of the designer paper! It is the Terracotta Tile 1/2″ Scalloped Linen Ribbon, but I cut it in half lengthwise so I could use just that one side of the scallop for a bit of color along the designer paper!

The greeting is stamped from the Spooktacular Bash Stamp Set in Memento Ink and die cut with a shape from the Ornate Frames Dies. I also die cut one of the frames in Basic Black to frame the greeting. These dies are great because they are not just for Halloween! Even if you aren’t a fan of Halloween, these frames would be fun to have for die-cutting on non-Halloween projects!

For a little extra, I stamped the jars in the Spooktacular Bash Stamp Set and colored them with Stampin’ Blends. Then I just cut them out with Paper Snips and adhered them to the bottom of the card.

It won’t be long now! Just a couple weeks until you can begin ordering from the Holiday Catalog on September 4th! I am warning you now, your Wish List will be a difficult one because you will want almost everything in the catalog! And you know how seeing samples goes…..once you see something cute, then you will want to make that and will have to order that product(s)! You won’t be able to help yourself!

If you like Halloween, you may want to start with the Halloween stamping products like the Monster Bash Suite so you can make a fun card like my Monster Bash Halloween Card!

SHOP STAMPIN’ UP! ONLINE HERE!