Tag Archives: Springtime Joy Stamp Set

Springtime Joy Spring Card

Springtime Joy Spring Card

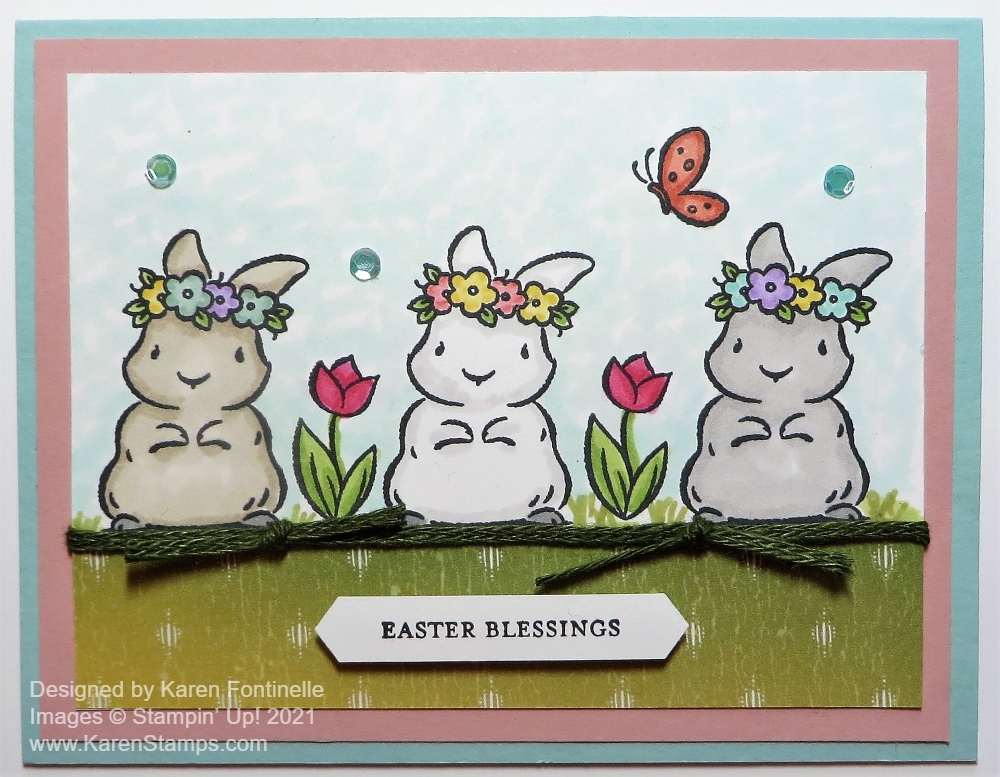
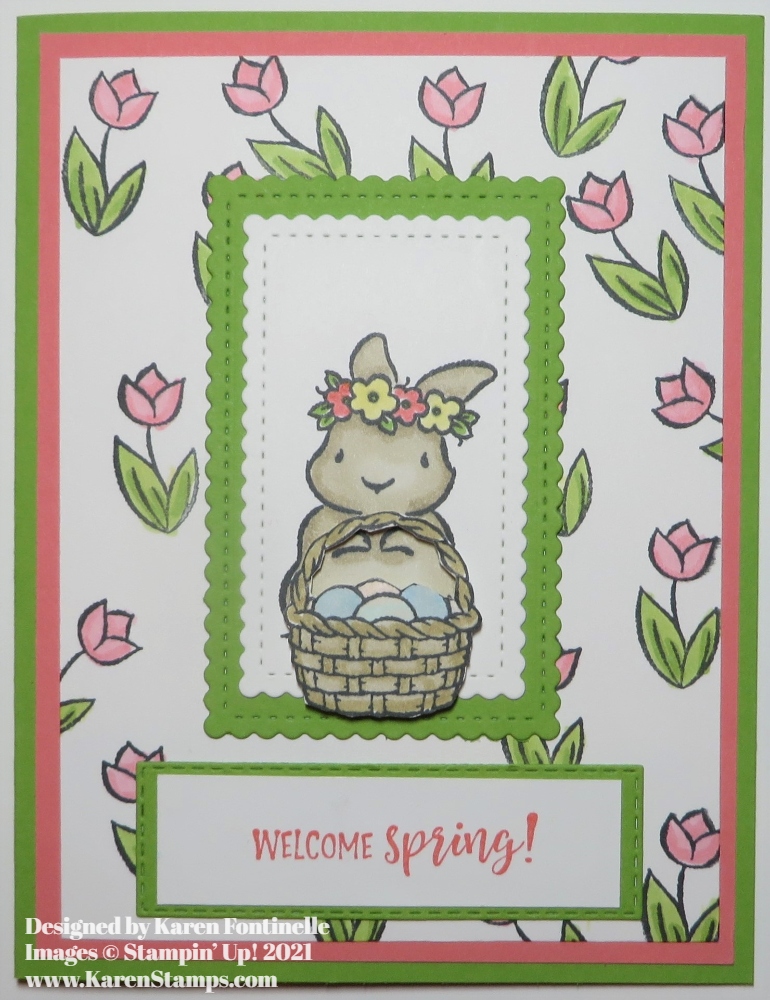
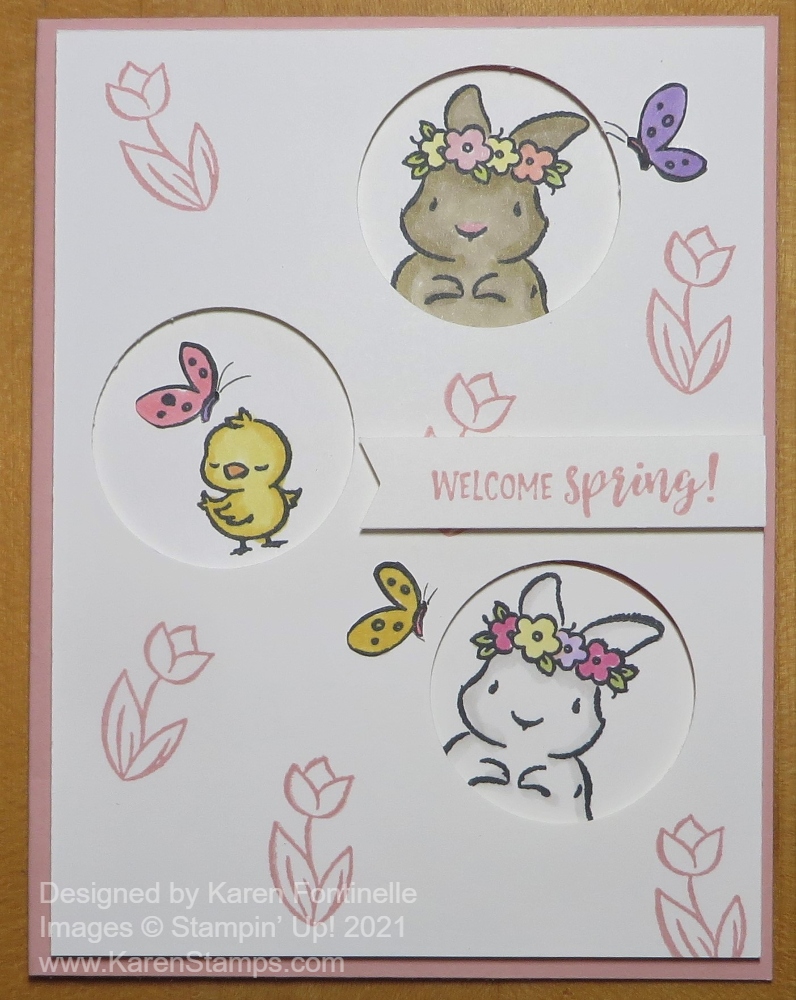
I can’t resist playing with this bunny and other cute stamps in this set so the result is this Springtime Joy Spring Card. This card has a “Welcome Spring!” greeting, but it could also be an Easter card, of course, or it could be a “Welcome Baby!” card! Bunnies and little chicks are perfect for baby cards as well.

This card uses the Springtime Joy Stamp Set in the January-June 2021 Mini Catalog (Spring Mini). This Spring Mini Catalog goes through June, but eventually it will end and many products in it will retire so you might want to get this stamp set and any others before the rush sets in during June! Just in case!

To make this card a little different and a little more fun, I punched three holes for the bunnies and chick to peek out of! I made the card base of Blushing Bride Cardstock with a layer of Basic White. I randomly used the 1 1/2″ Circle Punch (retiring!). (I had a hard time finding this punch by searching for the name, so just look under “Punches” under Products and scroll through until you find it.) I just punched three holes in the card for the two bunnies and the chick.

On scrap paper I had stamped the bunnies and chick and colored them in with Stampin’ Blends. Then you can punch or cut out the images with plenty of space around them and see how you can place them on the card base with the punched white layer over the top. It is just a matter of a little fiddling to get them placed correctly. I lifted up the white layer leaving the stamped images in place. While holding those in place, I carefully lifted up one side and then the other, sneaking some adhesive underneath so I wasn’t moving the images out of place. I got lucky and it went well!

Before adhering the white layer, I stamped some tulips from the same Spring Joy Stamp Set in Blushing Bride Ink. I wish I would have also stamped the butterflies, but that was an afterthought! I stamped the butterflies later on scraps, colored them in and cut out. I could have popped those up but just adhered them flat t the card and drew in their antennae with a black pen.

The Basic White layer is popped up on Stampin’ Dimensionals®. I used pretty many on the underside of the white since I had the punched holes and wanted the card front to be sturdy. The greeting is in the stamp set and I just stamped it on a scrap strip of Basic White, made one end flat against the right side since there wasn’t a lot of space for a greeting on this card and made a flagged end on the other side.

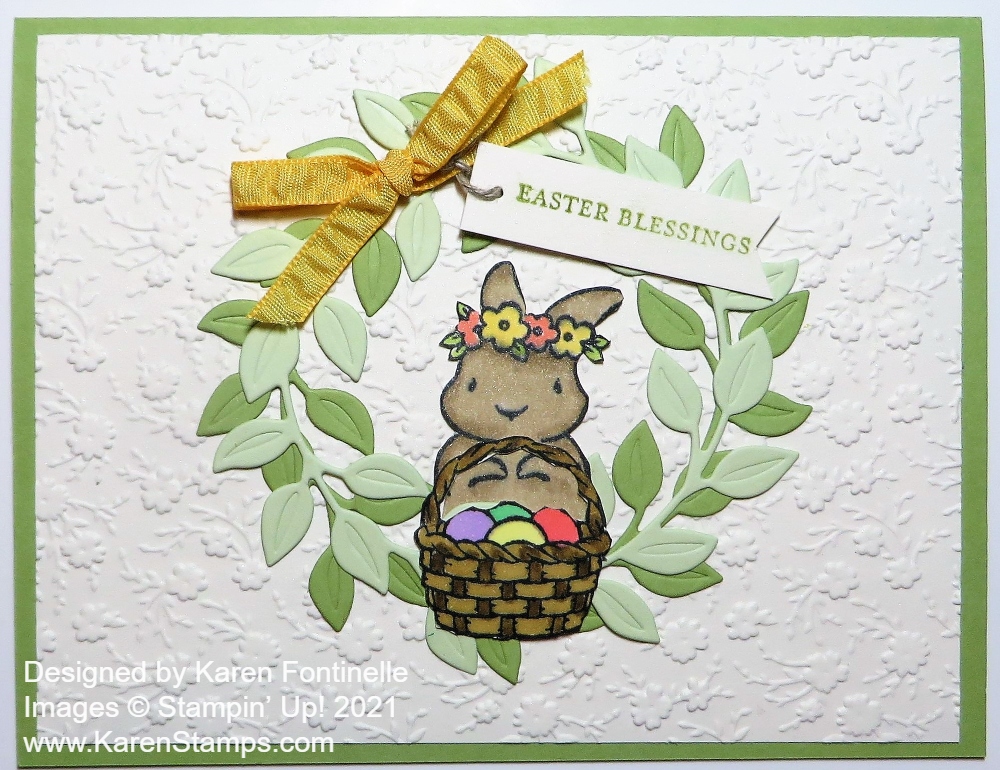
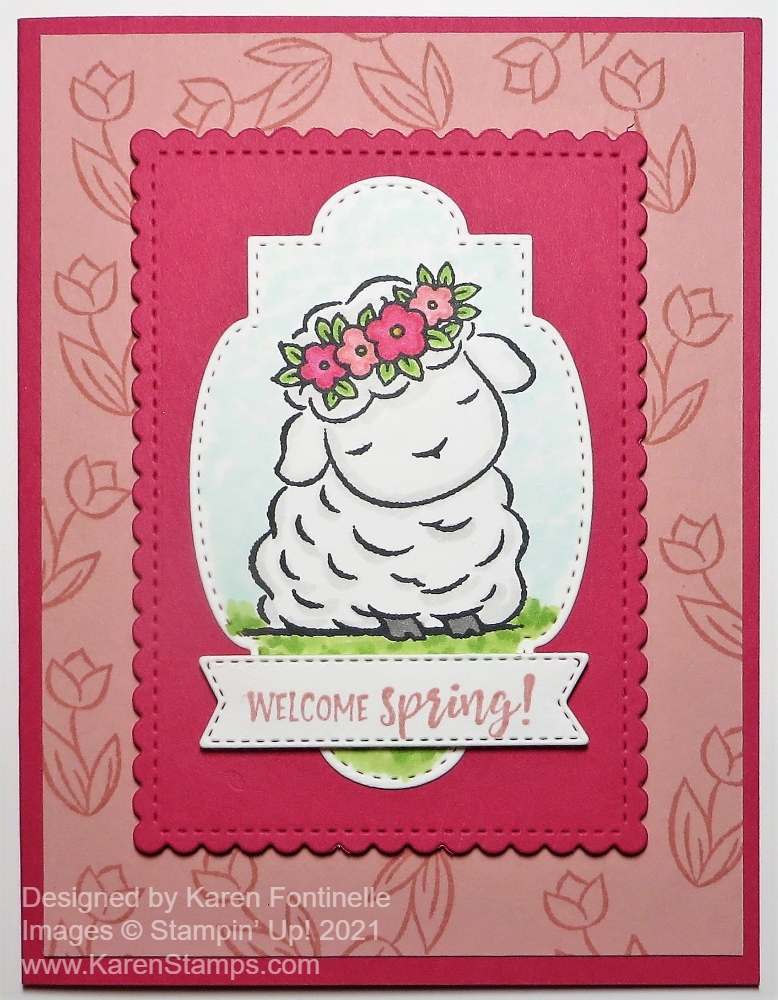
If you aren’t convinced at how adorable the Springtime Joy Stamp Set is, take a look at the cute lamb, also in this set, as you see on THIS CARD.

This Springtime Joy Spring Card is sweet for this Easter weekend or just as a spring card or add another greeting for birthday or thinking of you!

Love You Always Happy Easter Card

Love You Always Happy Easter Card

Can you use Valentine paper to make an Easter card? Sure, with the Love You Always Specialty Designer Series Paper with its beautiful foil floral design on three different colors of papers. Of course, it is not officially Valentine paper. It is just presented in the January – June 2021 Mini Catalog in “sort of” the Valentine section of the catalog, in the Love You Always Suite. It is actually beautiful paper that you can use for many occasions. Since two of the three sheets of paper are pink (Blushing Bride and Rococo Rose) and since the suite contains hearts, we perceive it as Valentine’s Day paper. But if it would have been added to a floral suite, we wouldn’t consider it Valentine paper! All this to say, you can use this Love You Always Paper to make almost any pretty cards that you want!

This easy Easter card starts with a Blushing Bride Cardstock card base. The layer is the Love You Always Paper in Blushing Bride. I wanted to keep the card simple so I didn’t try for anything fancy. I stamped the greeting with stamps from two different stamp sets. First, stamped the Easter greeting from the Arrange a Wreath Stamp Set (retiring from the Annual Catalog!) and then for a little extra, I remembered the tulip in the Springtime Joy Stamp Set which I thought would sort of match the designer paper. I stamped just one tulip but decided on one on each side of the greeting.

Next, to cut out the greeting, I looked through my dies and finally decided on a large one in the Tasteful Labels Dies. Then I tried various things to make a layer of Blushing Bride Cardstock under the greeting, usually by cutting another die in half so it would just show out to the sides of the greeting. Nothing seemed to add anything to the card.

I thought I would try ribbon, so I used the Blushing Bride 3/8″ Metallic Ribbon. I’ve been using this ribbon pretty often. It’s very pretty with its one satin side and one metallic side. I wrapped this ribbon horizontally around the designer paper and added a bow separately. This seemed to enhance the card without interfering with the large die-cut greeting.

The greeting is popped up with Stampin’ Dimensionals®. For a little bling, I added a few of the smallest Champagne Rhinestone Basic Jewels, which I really liked on this card!

If you were to copy this card, you would find it very quick and easy to make because you wouldn’t have to figure out which elements to use! So if you need a quick and easy Easter card, try this card design! You can change it up however you like, but at least you will have a quick and easy idea to go by if you need to make some Easter cards and get them in the mail today! This Love You Always Happy Easter Card is really a basic card design so you can make a card like this for Easter.

SHOP STAMPIN’ UP! ONLINE HERE!

Springtime Joy Bunny and Easter Basket

Springtime Joy Bunny and Easter Basket

This Springtime Joy Bunny and Easter Basket Easter card came out of planning to make a monochromatic or almost monochromatic card like one I made a previous year that turned out cute! Only the background turned out to be monochromatic! But it is fun to make a stamped background! Just some good old stamping that feels good in your hand!

The card base is Crumb Cake Cardstock with a layer of Petal Pink. The top layer is Shimmery White Cardstock. I stamped the Easter basket in the Springtime Joy Stamp Set randomly on the piece of Shimmery White with Crumb Cake ink. The Shimmery White has just a very subtle shimmer to it which makes it so elegant and beautiful (but difficult to photograph!).

The bunny and the Easter basket in the Springtime Joy Stamp Set are both stamped on Shimmery White and then cut out with Paper Snips scissors by hand! Then they were adhered to a die-cut piece of Shimmery White, cut out with the Stitched Shapes Dies. These dies are on the Last-Chance List which makes me sad because they have been some of my favorite and most used dies. They are just basic shapes you can use over and over but the little stitching around the edge really adds a nice touch. Plus they can be layered on other die-cuts. In this case the Stitched Shapes circle is layered on a Layering Circles scalloped die-cut. (The Layering Ovals and Layering Squares Dies are both retiring!)

The bunny and basket are both popped up on Stampin’ Dimensionals®. They are colored in with Stampin’ Blends alcohol markers. Some Stampin’ Blends colors are retiring as well! Crazy! The bow is tied with the Blushing Bride 3/8″ Metallic Ribbon.

If you really wanted to make a monochromatic Easter card, here is one I made last year all in Highland Heather Ink.

On the inside of the card, I added a Shimmery White piece of cardstock with the Easter greeting stamped in Crumb Cake from the stamp set, plus the Easter basket in the bottom corner.

Be sure to check out the list of retiring Stampin’ Up! Annual Catalog products. Some are discounted but not everything. Bundles are not carried over at the Bundle price with the 10% off price, but some Bundle items are carried over to the new catalog separately. There will be new Bundles in the new catalog! A few products are not really going away, such as the Tear & Tape Adhesive, but are being “reconfigured”. The embossing powders are not going away but will be packaged in sets of three colors.

It’s time to make Easter cards so I hope this Springtime Joy Bunny and Easter Basket card will give you some inspiration.

Last-Chance Products Sale HERE!

Last-Chance List PDF

Easter Bunny Wreath Easter Card

Easter Bunny Wreath Easter Card

There are so many pretty cards you can make with this die-cut wreath including a card like this Easter Bunny Wreath Easter Card. You can use this wreath and the other design that comes in the set as well to make all kinds of cards for many occasions. I love adding the Easter bunny and his basket of eggs to the wreath!

The die-cut wreath is made with the Wreath Builder Dies. I die cut two wreaths, one out of Pear Pizzazz and one out of Soft Sea Foam for a lighter color. You can use just one wreath but I think two look more interesting. Just glue one on top of the other, however you would like to place it, and then adhere to the card front.

The card base is Pear Pizzazz with a layer of Shimmery White Cardstock. I thought the background needed a little something, so I embossed it with the Ornate 3D Floral Embossing Folder. I think it adds a nice background without being too much.

The Easter bunny and basket, from the Springtime Joy Stamp Set, are stamped on Shimmery White with Memento Ink and colored in with Stampin’ Blends. I then cut out each by hand. To get your scissors inside the handle of the basket, you can punch a hole or maybe a couple of holes carefully which might work better than trying to stab the point of your scissors into the cardstock! I just used Multipurpose Liquid Glue for everything, although you could pop some things up with Stampin’ Dimensionals if you wanted to.

I also added a bow with the Daffodil Delight 1/4″ Ruched Ribbon and adhered it with Mini Glue Dots. There is also a die for a bow to hang on the wreath, but I preferred a real bow. For the greeting, I stamped one in the Itty Bitty Greetings Stamp Set and made a tiny tag out of it to tie on behind the bow. You can even cheat and add Glue Dots behind a little tag like this to hold it in exactly the position you want it or even behind ribbon tails or bow loops to keep them where you want them!

Here is another card I made for fall die-cutting one each of both the wreath designs on one card!

Easter is in two weeks from yesterday so it’s time to make Easter and Spring cards if you want to send them.

Shop the Last-Chance Products Sale March 24 – May 3 on select, retiring Annual Catalog products! Be ready!

(Sale probably begins at 1:00 PM Mountain Time, 2:00 PM Central Time when the Retiring List is released. Stay tuned!)

Altered Spring Lamb Gift Bag

Altered Spring Lamb Gift Bag

Something I think is fun to do is to take a shopping bag you got at a store and turn it into a gift bag, like this Altered Spring Lamb Gift Bag. The other day when I was cleaning out my “bag of bags”, I came across this small kraft shopping bag I got at one of my favorite gift shops. This bag is about 6″ x 7″ which was perfect for adding this stamped panel to the front of the bag! Even if the bag has printing, such as the name of the store or company, just cover it up with your stamping elements.

This bag already had the white border line around the bag with the store name printed in the middle. This was the perfect size to add my stamped decoration for the front of the bag and turn it into a spring gift bag, maybe for Easter

It was really like making a card, I just made the piece to fit the front area of the bag. The lamb is from the Springtime Joy Stamp Set, very popular right now with Easter coming up soon! The lamb is stamped in Memento Black Ink so I could color him with Stampin’ Blends Markers.

When I looked at the greetings in the stamp set, it seemed I should place the lamb off to the side and put the greeting, layered, right there on the other side. I wanted the lamb to be white, but I used the Light Smoky Slate Stampin’ Blend to just add a bit of color by the fluffs of wool and here and there. Then I also colored the flowers and leaves.

The greeting is stamped and then die-cut with a die in the Stitched So Sweetly Dies. For the layers underneath I just cut out rectangles with my Paper Trimmer.

For embellishments, I stamped a butterfly off to the side of the lamb and colored it with Stampin’ Blends. I also stamped the basket of eggs, colored it, and then cut out with Paper Snips. I decided not to pop it up with Dimensionals and just glued it down flat next to the lamb. Also, that little chick is so cute, I stamped, colored and cut him out and glued him down at the corner of the greeting. Now after all this, if you get a smudge of ink on your work, just add another butterfly to cover it up!

The whole decorative piece is layered on Blushing Bride and then Pear Pizzazz Cardstock. It is centered inside that white border line and looks perfect on this shopping bag turned into a gift bag! You can do this for any occasion! If you don’t have a cute little shopping bag, you can purchase plain bags at the craft store and decorate those. This is especially fun (and useful!) to do before Christmas so you have plenty of gift bags ready for gift wrapping like this Christmas bag.

Look through your bags and see if you have some shopping bags you can alter for whatever occasion you need like this Altered Spring Lamb Gift Bag I did using the Springtime Joy Stamp Set, perfect for a small Easter treat or gift!

Trio of Bunnies Easter Card

Trio of Bunnies Easter Card

Here’s a Trio of Bunnies Easter Card, three little bunnies just waiting for Easter! They are just waiting in the grass, next to some tulips, thinking about spring!

The card base is Pool Party Cardstock with a layer of Blushing Bride Cardstock. I like these two colors together for spring, for softness, and for prettiness! The top layer is Basic White Cardstock, stamped with the bunnies from the Springtime Joy Stamp Set, a couple of tulips, and a small butterfly all in Memento Black Ink.

The bunnies, tulips, and butterfly were colored in with Stampin’ Blends alcohol markers. I had colored in some grass and even some sprigs of grass, but then I got the idea to cut a piece of green designer paper of some sort for the bottom border of the card to look like grass. I looked through my designer papers and ended up choosing this pattern from the Artistry Blooms Designer Series Paper. There are several you could choose from. I also colored in the background of the sky behind the bunnies with the Light Pool Party Stampin’ Blend.

I usually like to cover a “seam” or where a piece of designer paper ends on a piece of cardstock with a piece of ribbon or another strip of paper. On this card, I used a piece of Mossy Meadow 3/16″ Braided Linen Trim across the top of the designer paper and tied two knots along the trim.

The greeting is from the Itty Bitty Greetings Stamp Set. You can find almost anything you need in all of the “Itty Bitty” stamp sets! I love them! I punched it out with the Classic Label Punch. It was a good size for this card! It is popped up with a small Foam Adhesive Strip. These are just like Stampin’ Dimensionals except they are strips. Sometimes you use them in the same way as Dimensionals and sometimes they are used for special projects like shaker cards.

For one more little touch, I added some Artistry Blooms Adhesive-Backed Sequins in the background. I could have added an Easter Basket for at least one bunny to hold, but I wasn’t thinking about that when I made the card so I think it is fine the way it is. I could have also used the “Welcome Spring” greeting in the stamp set.

You will find a lot of uses for this cute Springtime Joy Stamp Set!

PS: Today is the last day to subscribe to Paper Pumpkin to get the March 2021 Kit!

CLICK HERE TO JOIN PAPER PUMPKIN!

Springtime Joy Lamb Easter Card

Springtime Joy Lamb Easter Card

I am really falling in love with this spring stamp set and enjoyed this making this Springtime Joy Lamb Easter Card. Yes, Easter is right around the corner so it’s time to make cards!

Be sure to check out this Springtime Joy Stamp Set in the January-June 2021 Mini Catalog (Spring Mini)! You might miss it because it’s “just” a stamp set! No Suite, no Bundle, no dies, no embellishments, just a stamp set! Like in the olden days! You’ll find it on page 22.

I wanted to make a card with the lamb in the stamp set and this is what I came up with! The card base is Melon Mambo, a color I haven’t used in awhile somehow. It has a layer of Blushing Bride Cardstock on which I stamped tulips in the same color ink, Blushing Bride.

The lamb is stamped with Memento Ink on Basic White Cardstock. I die-cut the lamb with this die in the Stitched So Sweetly Dies. I started off just coloring the lamb image with Stampin’ Blends, using the lightest gray just around the lamb for a little definition around the flowers, around her face, and around the fluffs of wool on the body. The crown of flowers is colored with Melon Mambo and Flirty Flamingo and the leaves with Granny Apple Green. But I couldn’t stop! I added some grass under the lamb and then, of course, I had to have some sky with Pool Party! Just kind of scribble little scribbles if you are coloring in a larger area.

This lamb piece is layered on a scalloped rectangle of Melon Mambo, also die-cut from the Stitched So Sweetly Dies. I popped this up with Stampin’ Dimensionals.

The greeting is also in the Springtime Joy Stamp Set. It is stamped in Blushing Bride Ink and die-cut with a banner in the Tasteful Labels Dies. It is popped up on Dimensionals, too.

For the inside of the card, I adhered a layer of Basic White since the Melon Mambo is a little dark. It is stamped with the Easter greeting in the stamp set and a little tulip in the lower right corner.

For another idea, here is a card I made with the cute bunny in the Springtime Joy Stamp Set. Oddly enough, I also stamped the tulips in the background on that card, too! I was almost copying myself and didn’t know it!

If you plan to make spring and Easter cards, consider the Springtime Joy Stamp Set and make a card like my Springtime Joy Lamb Easter Card.

SHOP STAMPIN’ UP! ONLINE HERE!

Welcome Spring Bunny Card

Welcome Spring Bunny Card

With all the snow, ice, and cold weather, not just in Texas but all over the country, I thought it was time to think about spring! Tulips, bunnies, and a basket of eggs – that says spring quite well, I think!

I pulled out the Springtime Joy Stamp Set which is in the Spring Mini Catalog. It’s not part of a Bundle or anything, just a simple stamp set, so don’t miss it! It’s perfect for spring and Easter and other occasions.

I often like to stamp randomly on the cardstock to make a background myself rather than use designer paper so I stamped all over the background with the tulip stamp in Memento Ink and then colored in the tulips with Stampin’ Blends. I used Flirty Flamingo and Granny Apple Green for the tulips with a bit of Daffodil Delight on the green leaves.

The card base is Granny Apple Green with a Flirty Flamingo layer. The way I made this big color decision was when I pulled out the cardstock, these two colors were right next to each other! I thought it looked springy and bright so used them!

The bunny and the basket were stamped on a piece of Basic White Cardstock. I played around with various dies until I found something that fit around the bunny and could have a layer behind it. I chose these rectangles in the Stitched So Sweetly Dies to cut out the bunny and then to make a Granny Apple Green layer. I cut the basket of eggs out separately with my Paper Snips and popped it up like the bunny is holding the basket. The eggs were colored with Pool Party, Balmy Blue, and a bit of light pink.

The greeting is stamped with the spring sentiment in the Springtime Joy Stamp Set and then layered on a die-cut piece of Granny Apple Green. Here is another way I used the bunny in this stamp set by placing it on a gift bag.

If you purchase this stamp set early, you will have time to use it for spring and Easter, but the darling bunny and lamb could be used for baby cards and projects, also.

Although I found the winter weather we finally had in Houston after several years to be a little exciting and I’m always happy to see snow as long as my family and I are at home, I think we are all reaching our limit with this winter storm with power outages and such low water pressure you barely have water! Usually winter in Houston lasts one day but this one is something else! Time to think about spring! If you are snowed in, maybe it is time to make something for spring similar to this Welcome Spring Bunny Card.

SHOP STAMPIN’ UP! ONLINE HERE!

Springtime Joy Gift Bag

Springtime Joy Gift Bag

Spring will be coming even though many places are in the midst of a very cold winter right now, so I combined hydrangeas and a bunny for spring in this Springtime Joy Gift Bag. This would be cute for Easter treats or a gift or for Mother’s Day in May or any other time!

I started off wanting to make this gift bag with the Hydrangea Hill Designer Series Paper just as you see, with the border of hydrangeas at the bottom of the bag with room in the plain area for a greeting or whatever I would come up with. I wanted to use that sheet that has the borders of hydrangeas at the top and bottom. Shortly, I realized that if i scored the paper like normal, most of the hydrangea images would end up at flaps at the bottom of the gift bag! So I had to engineer an extra piece of cardstock at the bottom to make the bottom flaps without cutting into the hydrangeas!

I did a little math and added on a 12″ strip of Old Olive cardstock to the bottom of the hydrangea piece.

Springtime Joy Gift Bag Inside Scoring

To make this gift bag, I cut the designer paper at 6 3/4″ x 12″. Make sure your hydrangeas are where you want them before you cut! The Old Olive piece is 2 1/4″ x 12″. I adhered just 1/2″ of the Old Olive to the designer paper because I wanted 1 3/4″ to be the bottom of the gift bag.

Score the bag and Old Olive piece at 1 3/4″, 5 1/2″, 7 1/4″, and 11″. Then turn the paper and score the Old Olive portion at 1 3/4″ and 8″. This gives a 1/2″ lip at the top of the bag I folded over to show the inside color of the bag for contrast.

Springtime Joy Gift Bag Outside Scoring

Cut up from the bottom on all the scored lines up to the edge of the designer paper. Normally this would all be the same paper, of course! Then cut off just the little narrow piece of the Old Olive as shown in the photos above.

Next, crease all the score lines, fold and assemble. Put some adhesive on that narrow side about the cut-off piece and fold the other side over to make the seam. Form into a box shape and fold in the flaps at the bottom, applying as much adhesive as you think necessary to close the bottom of the bag. Reach in from the top of the bag with a ruler or bone folder to press down from the inside on those bottom tabs to make sure everything is stuck together well.

Once you have the bag made, you can embellish however you like. You can even punch some holes in the top and tie ribbon through to hold the bag closed. Just pinch in the sides a little to get the top to close. But on my bag, I just tied a separate bow and adhered it with a couple of Mini Glue Dots.

The little bunny is from the cute spring stamp set, Springtime Joy. You’ll find it in the Spring Mini Catalog on page 22. I stamped the little bunny (the lamb was too big!) in Memento Ink and colored in with several Stampin’ Blends markers. For the bunny, I just used the light and dark Smokey Slate plus a little Crumb Cake and then pink and purple flowers for the little crown. I die cut the bunny with a die in the Tasteful Labels Dies. I wanted a layer underneath it so I just cut a Rococo Rose rectangle to fit underneath and with my Paper Snips, cut those curved corners after I adhered the two pieces together. I popped up the bunny with Stampin’ Dimensionals. The greeting is from the same Springtime Joy Stamp Set and stamped in Rococo Rose Ink to match the paper.

I think it’s a cute little bag, a relatively easy gift bag to make. You’ve probably made one just the same way. With the rest of that same sheet of hydrangea paper, check out the cards I made in this post. It would have been nice if the cards fit in the bag, and I could have made them smaller, but I just made regular size cards as a separate project! I can use this little bag as a decoration around Easter time or as a gift! Just think of this Springtime Joy Gift Bag filled with chocolate Easter eggs or a chocolate bunny!

SHOP STAMPIN’ UP! ONLINE!