Tag Archives: Hydrangea Hill Designer Series Paper

Hydrangea Hill Butterflies

Hydrangea Hill Butterflies

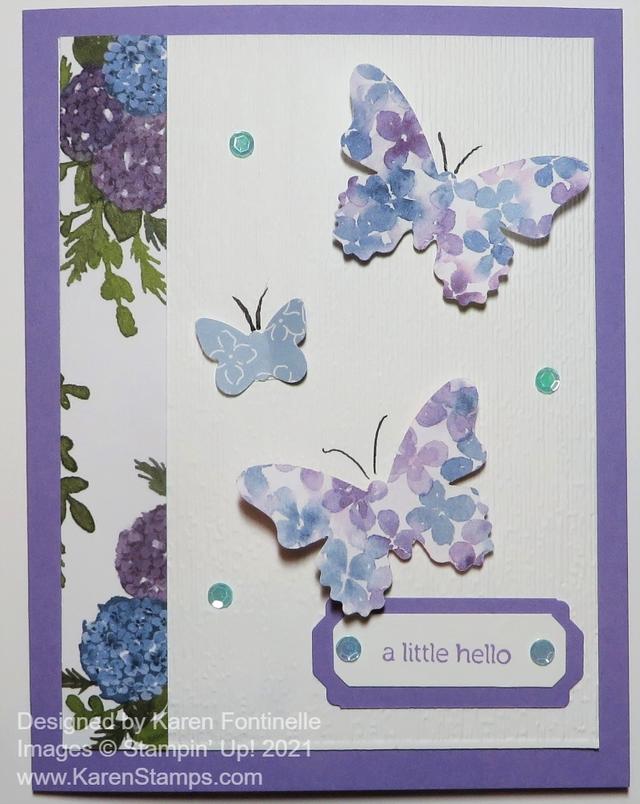
Make some pretty butterflies using pretty designer paper and a punch, like these Hydrangea Hill Butterflies on this card. It’s springtime so it’s time for butterflies and Stampin’ Up! has an assortment of butterflies to choose from. Some are retiring soon and some are new. But paper and a punch help you make a pretty simple, elegant card.

The card base is Highland Heather Cardstock. I started off planning to make a white on white card, but I changed my mind! It’s allowed! The top layer has wider margins than normal. Instead of cutting the layer 5 1/4″ x 4″, I cut it at 5″ x 3 3/4″. I ran the Basic White paper through the Stampin’ Cut & Emboss Machine embossing it with the Subtles Embossing Folder. This folder is difficult to see in a photo but it just puts a “subtle” pattern of lines on the paper so you have some texture but just barely. It’s perfect for when you want something but not a lot. This embossing folder is retiring soon so check it out if you are interested!

I added a narrow strip of Hydrangea Hill Designer Series Paper along the side of the Basic White embossed layer. I used the Butterfly Duet Punch to punch out several butterflies out of another pattern of the same paper. I chose a pattern that had the little floral pattern all over the paper so it would definitely show up inside the punch. Otherwise, you might have to be careful to get a colorful enough pattern inside the punch area. This punch punches out a small and large butterfly so it is very handy. But it is retiring by May 3, so if you don’t have it yet, you might want to see if you need it in your stash! I just drew on the little antennae on each butterfly with a fine tip black marker.

The greeting is from another retiring item, the Itty Bitty Greetings Stamp Set. All the “Itty Bitty” stamp sets are retiring which really makes me sad. I have used all of them a lot. On some cards, you don’t necessarily want the greeting to be the focal point or there just isn’t enough room for larger greetings, so the Itty Bitty series always came in handy! These Itty Bitty Sets are all retiring – Itty Bitty Greetings. Itty Bitty Christmas, and Itty Bitty Birthdays. Check them out. I used the Lovely You Punch for both the Highland Heather layer and the greeting.

The two large butterflies are popped up with Mini Stampin’ Dimensionals and the wings are folded up a little bit to add some dimension. For a little bling, I added some Artistry Blooms Adhesive-Backed Sequins scattered around and on the greeting. These are Coastal Cabana in color but go fine with the blues in the designer paper.

This is an easy card to make and easy to change up according to what supplies and punches you have. You could also punch out flowers and make the card in the same design. Try making a card with what you have today similar to this Hydrangea Hill Butterflies card and see what you come up with!

Hydrangea Hill Happy Easter Card

Hydrangea Hill Happy Easter Card

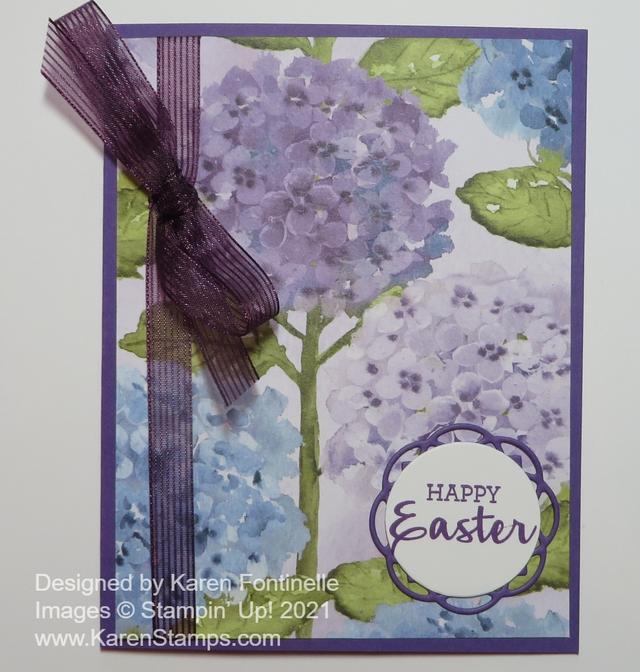
Easter is coming in just a few days, so if you wanted to have a few Easter cards to mail or hand out, this Hydrangea Hill Happy Easter Card is a super simple one to make! You can see it is just a basic, easy card design and one you can change up with different paper and greeting.

The Hydrangea Hill Designer Series Paper is a beautiful paper on it’s own so it works well with a simple card like this one. You wouldn’t want a lot of other embellishments or fancy greetings and die cuts that would take away from the beauty of the paper as it is.

The card base of Gorgeous Grape Cardstock is one of the coordinating colors with the Hydrangea Hill Paper. A lighter shade of purple would be Highland Heather. I just cut a piece of the designer paper to the usual layer size of 4″ x 5 1/4″. When you have a design like this, with the larger hydrangea flowers, you might want to try to strategically cut the paper to get the best view of the flowers. On this particular paper, you can see how there is one hydrangea that is kind of the focal point because all of it is on the card. You might not have a choice depending on if you have already cut up your paper for other projects, but I still had enough of this paper to cut a 4″ wide strip the length of the paper. Then I could go back in and cut out just the portion that showed off the flower well. You might end up with not one full flower on your card front but it would likely still be pretty because that would just be a different look of all the colors of the various flowers.

Before adhering the designer paper to the card front, I added some Blackberry Bliss 3/8″ Striped Ribbon. Actually, I originally thought it was Gorgeous Grape but it still matches just fine! The sheerness and the pretty stripes of this ribbon are beautiful on this card. I tied the bow on separately.

The greeting is from the Arrange A Wreath Stamp Set and is stamped in Gorgeous Grape. I cut it out with one of the Layering Circles Dies and layered it on a pretty decorative circle in the Painted Labels Dies. You can see that you could put a birthday greeting, anniversary, thinking of you, sympathy, even a wedding sentiment on this same card and it would be perfect. I could have added some pretty sequins or rhinestones around on the card as well. But as I said, the paper is so pretty, you almost don’t want to add much because you want the recipient to focus on the beautiful paper design.

This Hydrangea Hill Designer Series Paper is in the January-June 2021 Mini Catalog so is not in danger of retiring right away as the Annual Catalog products are. However, usually all designer paper retires eventually to bring in new, so enjoy your hydrangea paper while we have it! The Arrange a Wreath Stamp Set is retiring from the Annual Catalog along with the Wreath Dies by May 3.

Here is another basic card design using the Hydrangea Hill Designer Paper, with a less busy design, but you could change it out using this floral pattern.

Finish up your Easter cards and projects, but you can also make this Hydrangea Hill Happy Easter Card card for any other occasion.

SHOP STAMPIN’ UP! ONLINE HERE!

Hydrangea Hill Z-Fold Thank You Card

Hydrangea Hill Z-Fold Thank You Card

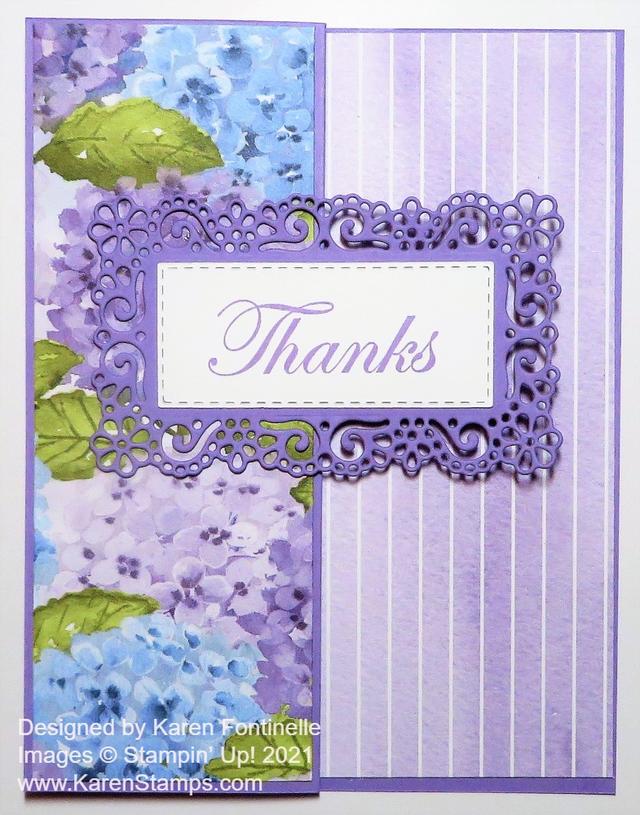
You can’t really get enough of this gorgeous designer paper that I used on this Hydrangea Hill Z-Fold Thank You Card. I decided to make a Z-fold card because that makes the card a little extra-special anyway, plus I could show off two patterns of the paper on the front of the card.

As you have seen on several of my other z-fold cards, it really just means the card front is folded back on itself in half. So after you make the card base, just score the card front at 2 1/8″ (half of 4 1/4″) and then fold that edge back to the card fold. Here is a card and photos where you can see exactly how the z-fold looks.

On the folded back part of the card, I chose the very full hydrangea print pattern in the Hydrangea Hill Designer Series Paper. I cut it so there would be a very narrow margin around the edge so the paper is cut at 2″ x 5 3/8″. The inside striped piece is cut at 5 3/8″ x 4 1/8″.

The greeting is stamped with the word “Thanks” from the Good Morning Magnolia Stamp Set. I used Highland Heather Ink to match the Highland Heather Cardstock. This greeting was die cut with a rectangle die from the Rectangle Stitched Dies and adhered to an Ornate Frames Diecut.

When you adhere the greeting on to the front of a z-fold card be careful that you only put adhesive on that area that will adhere to the folded front of the card. Otherwise, it may stick to the other side of the card as well! You can kind of eyeball it or maybe you would want to make a pencil mark to indicate exactly where you want the glue to go (and not go!). If you are putting a smaller greeting inside the card, make sure the front section covers the inside greeting. That can be a little tricky but it is something to think about as you assemble your card.

You will find the Hydrangea Hill Designer Series Paper in the January-June 2021 Mini Catalog. If you like hydrangeas, you must have this paper! They are beautiful flowers and so is this paper on this Hydrangea Hill Z-Fold Thank You Card.

Hydrangea Hill Floral Hello Card

Hydrangea Hill Floral Hello Card

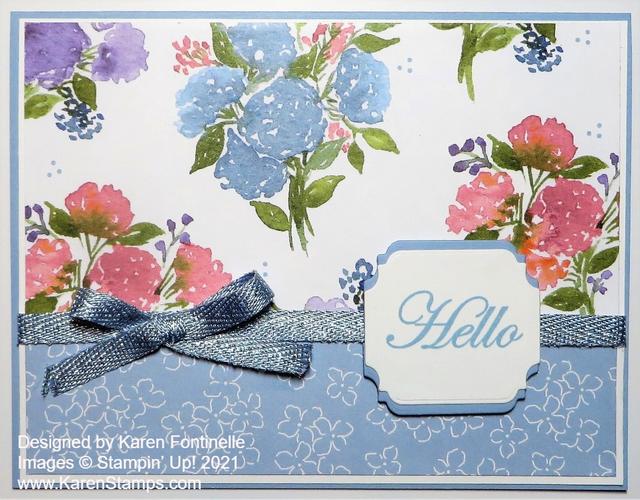
I needed a “happy” card and when I looked through the Hydrangea Hill paper, this sheet of small bouquets and this other sheet with a more generic pattern of little white flowers caught my eye. Even my husband commented as he walked by that those were pretty colors! And that’s how this Hydrangea Hill Floral Hello Card was born!

The card base is Seaside Spray, one of the 2019-2021 In Colors. Not a color I have used much, I don’t think, but it’s pretty with this Hydrangea Hill Designer Series Paper.

Sometimes when I am using two designer papers together, I like to adhere them to another piece of cardstock just to make it easier for me to get them glued together and then be able to tie a piece of ribbon across the seam where the two papers meet. In this case, I adhered them to a piece of Basic White Cardstock with a 1/16″ margin on all sides rather than 1/8″. Then I added a piece of Seaside Spray 1/4″ Metallic Ribbon across the seam. I tied a separate bow and adhered it with Mini Glue Dots. You could also tie it right onto the base ribbon if you wanted or tie on a knot.

The greeting is stamped in Seaside Spray Ink on Basic White Cardstock. The greeting is from the Good Morning Magnolia Stamp Set. I didn’t want something too big to cover the flower bouquets so I chose a small greeting. It is die-cut from the Ornate Frames Dies. I cut another one in Seaside Spray for a little layer. It’s the same size so I just cut it in half horizontally and then let each half layer underneath a little bit at the top and bottom.

Here’s another card I made with the Hydrangea Hill DSP in much the same design. Put this paper on your Stampin’ Up! order along with some other things total $50 or more and take advantage of Sale-A-Bration before it ends Feb. 28!

This Hydrangea Hill Floral Hello Card is an easy one to make to showcase the pretty Hydrangea Hill Designer Series Paper!

SHOP STAMPIN’ UP! ONLINE HERE!

Springtime Joy Gift Bag

Springtime Joy Gift Bag

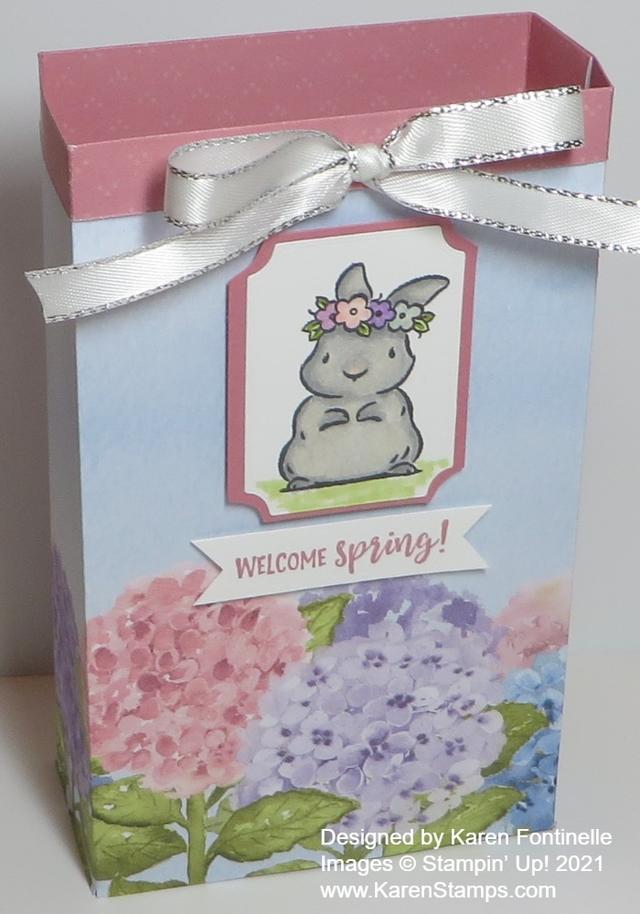
Spring will be coming even though many places are in the midst of a very cold winter right now, so I combined hydrangeas and a bunny for spring in this Springtime Joy Gift Bag. This would be cute for Easter treats or a gift or for Mother’s Day in May or any other time!

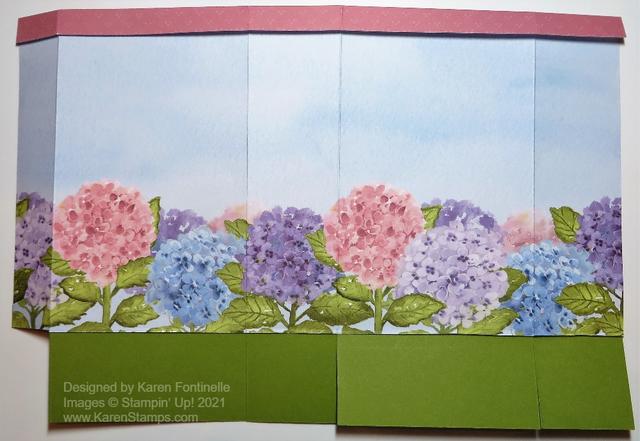
I started off wanting to make this gift bag with the Hydrangea Hill Designer Series Paper just as you see, with the border of hydrangeas at the bottom of the bag with room in the plain area for a greeting or whatever I would come up with. I wanted to use that sheet that has the borders of hydrangeas at the top and bottom. Shortly, I realized that if i scored the paper like normal, most of the hydrangea images would end up at flaps at the bottom of the gift bag! So I had to engineer an extra piece of cardstock at the bottom to make the bottom flaps without cutting into the hydrangeas!

I did a little math and added on a 12″ strip of Old Olive cardstock to the bottom of the hydrangea piece.

Springtime Joy Gift Bag Inside Scoring

To make this gift bag, I cut the designer paper at 6 3/4″ x 12″. Make sure your hydrangeas are where you want them before you cut! The Old Olive piece is 2 1/4″ x 12″. I adhered just 1/2″ of the Old Olive to the designer paper because I wanted 1 3/4″ to be the bottom of the gift bag.

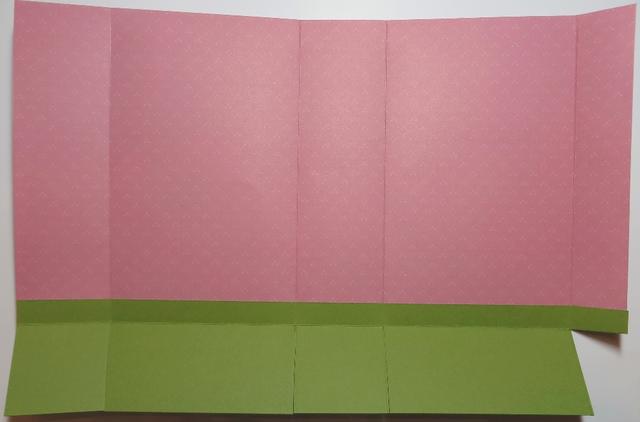
Score the bag and Old Olive piece at 1 3/4″, 5 1/2″, 7 1/4″, and 11″. Then turn the paper and score the Old Olive portion at 1 3/4″ and 8″. This gives a 1/2″ lip at the top of the bag I folded over to show the inside color of the bag for contrast.

Springtime Joy Gift Bag Outside Scoring

Cut up from the bottom on all the scored lines up to the edge of the designer paper. Normally this would all be the same paper, of course! Then cut off just the little narrow piece of the Old Olive as shown in the photos above.

Next, crease all the score lines, fold and assemble. Put some adhesive on that narrow side about the cut-off piece and fold the other side over to make the seam. Form into a box shape and fold in the flaps at the bottom, applying as much adhesive as you think necessary to close the bottom of the bag. Reach in from the top of the bag with a ruler or bone folder to press down from the inside on those bottom tabs to make sure everything is stuck together well.

Once you have the bag made, you can embellish however you like. You can even punch some holes in the top and tie ribbon through to hold the bag closed. Just pinch in the sides a little to get the top to close. But on my bag, I just tied a separate bow and adhered it with a couple of Mini Glue Dots.

The little bunny is from the cute spring stamp set, Springtime Joy. You’ll find it in the Spring Mini Catalog on page 22. I stamped the little bunny (the lamb was too big!) in Memento Ink and colored in with several Stampin’ Blends markers. For the bunny, I just used the light and dark Smokey Slate plus a little Crumb Cake and then pink and purple flowers for the little crown. I die cut the bunny with a die in the Tasteful Labels Dies. I wanted a layer underneath it so I just cut a Rococo Rose rectangle to fit underneath and with my Paper Snips, cut those curved corners after I adhered the two pieces together. I popped up the bunny with Stampin’ Dimensionals. The greeting is from the same Springtime Joy Stamp Set and stamped in Rococo Rose Ink to match the paper.

I think it’s a cute little bag, a relatively easy gift bag to make. You’ve probably made one just the same way. With the rest of that same sheet of hydrangea paper, check out the cards I made in this post. It would have been nice if the cards fit in the bag, and I could have made them smaller, but I just made regular size cards as a separate project! I can use this little bag as a decoration around Easter time or as a gift! Just think of this Springtime Joy Gift Bag filled with chocolate Easter eggs or a chocolate bunny!

SHOP STAMPIN’ UP! ONLINE!

Hydrangea Hill Designer Paper Just For You Cards

Hydrangea Hill Designer Paper Trio of Just For You Cards

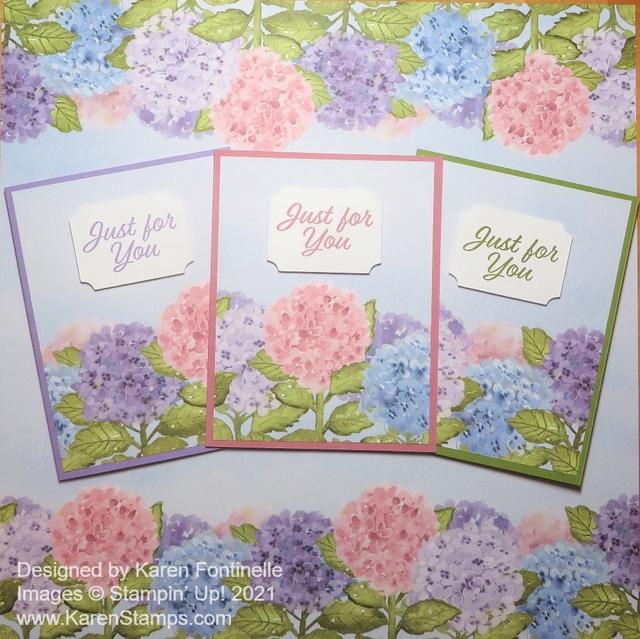
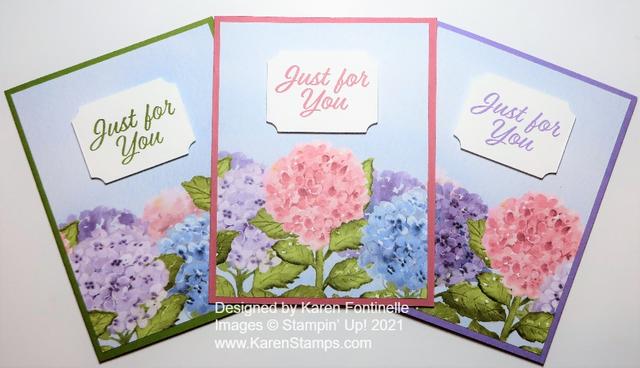
You can’t beat the beauty of the Hydrangea Hill Designer Series Paper as you can see here on these Hydrangea Hill Designer Paper Trio of Just For You Cards, with the designer paper behind them! Besides these three cards, I made something else with the rest of the designer paper that I will show you tomorrow!

This one sheet alone in the package of Hydrangea Hill Designer Series Paper makes the purchase worthwhile! If you are a scrapbooker, just think what a beautiful page you could make by just adding your photos to this already beautiful paper. And if you take a deep breath, shut your eyes, and cut into it, you can make all kinds of beautiful cards and projects with this unusual sheet with the flowers at the top and bottom.

To make these cards, I knew the dimensions of designer paper as a layer on a card base is 5 1/4″ x 4″. I just cut across the DSP at 5 1/4″ with one of the flower edges at the bottom. Make sure you pay attention which way you are placing your paper before you cut! Basically, you will cut off the bottom edge of the paper with the flowers at 5 1/4″ Then cut this 12″ x 5 1/4″ panel into three pieces at 4″ wide each.

For these cards, I used card bases of coordinating colors, such as Highland Heather, Rococo Rose, and Old Olive. Then I stamped the greeting in the matching ink color. The greeting is from the Meant To Be Stamp Set, which is in the Annual Catalog. Next, I used the die in the Tasteful Labels Dies to cut out the greeting and popped it up with Stampin’ Dimensionals. That’s all there is to these cards! You could add some little jewels or embellishments, but basically, I wanted to keep the cards simple with such pretty paper.

The Hydrangea Hill Paper is so pretty you can just use it and a greeting to make a card! It will be hard to cut into your designer paper, but after you do, you will make something even more beautiful than the paper itself. Then send your lovely card off to someone who will certainly appreciate hearing from you!

SHOP STAMPIN’ UP! ONLINE HERE!

Trio of Hydrangea Hill Just For You Cards

Hydrangea Hills Thank You Card

Hydrangea Hills Thank You Card

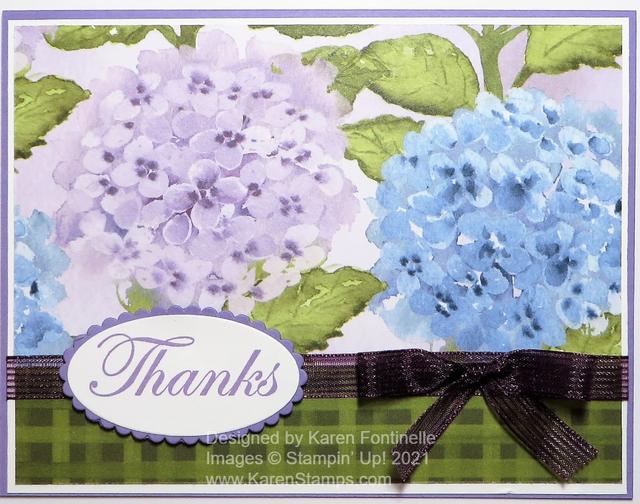
Do you love the look of this Hydrangea Hills Thank You Card as much as I do? I’m not bragging about my own work….it’s the PAPER!! Oh my gosh! I just got it, opened the package, didn’t even look at ALL the paper, just grabbed the top sheet, and went to work!

It was late and I just wanted to make an easy card and this card was certainly it! When I flipped the hydrangea side of the Hydrangea Hill Designer Series Paper over, I saw this green plaid on the other side and thought it would work perfectly with this card design. With the way the hydrangeas are printed on the paper, I knew a horizontal layout on the card would show the hydrangeas the best.

The mistake I made was cutting the designer paper exactly the size for a layer on the front of the card. Since I wanted to wrap some ribbon around the layer, I needed to overlap the flower part of the paper and the green plaid portion. (I could have cut out another strip of paper but I didn’t). The way to get around this is to glue the two designer paper pieces to another piece of cardstock, either covering it entirely or leaving just a tiny margin around the edge (1/8″) like I did on the white cardstock. Sometimes an extra layer like this under the designer paper helps the colors in the designer paper stand out.

Once I had the two pieces of the Hydrangea Hill DSP adhered to a piece of white cardstock, I wrapped a piece of ribbon across the front. While this Blackberry Bliss 3/8″ Striped Ribbon is a little dark, since it’s sheer I think it still works fine on this card. I tied a bow separately and adhered it with a Mini Glue Dot or two.

This whole card front is then adhered to a card base of Highland Heather. There are a lot of colors that coordinate with this designer paper so you can have lots of different looks depending on which colors you use with which papers.

For the greeting, I chose the “Thanks” from the Good Morning Magnolia Stamp Set. The font is so elegant in that set and I thought worked well on this card. The greeting is stamped in Highland Heather Ink, die-cut with the Layering Oval Dies as is the Highland Heather layer. I popped it up over the ribbon with Stampin’ Dimensionals®.

Actually, I only ordered the designer paper in the Hydrangea Hill Suite (because I can’t have everything I want!), but now that I see how pretty the Hydrangea Hill Paper is, I don’t know if I have the will power not to order more things!

I have to say just this one sheet of designer paper I have looked at is SO pretty, so be sure to check out the Hydrangea Hill Suite of products starting on page 18 of the January-June 2021 Mini Catalog. While you might want everything, you can make cards with just the paper and maybe some matching ribbon as I did with this Hydrangea Hill Thank You Card.