Tag Archives: Forever Fern Stamp Set

Forever Fern Hello Card

I think that Forever Fern was the most popular stamp set in the current Stampin’ Up! Catalog and fortunately, it is carrying over to the next catalog coming out May 4th! The dies are also carrying over, but will be sold separately. Therefore, if you don’t have the stamp set and dies, be sure to purchase them by May 3rd so you can get the Forever Fern Bundle Price and save 10%!

Sadly, the beautiful Forever Greenery Designer Series Paper is retiring on May 3rd along with the Gold Hoops. I have loved this paper and hate to see it go, but most designer paper is only around for one season in the catalog. I haven’t even gotten enough use out of the Gold Hoops and hate to see them go, too!

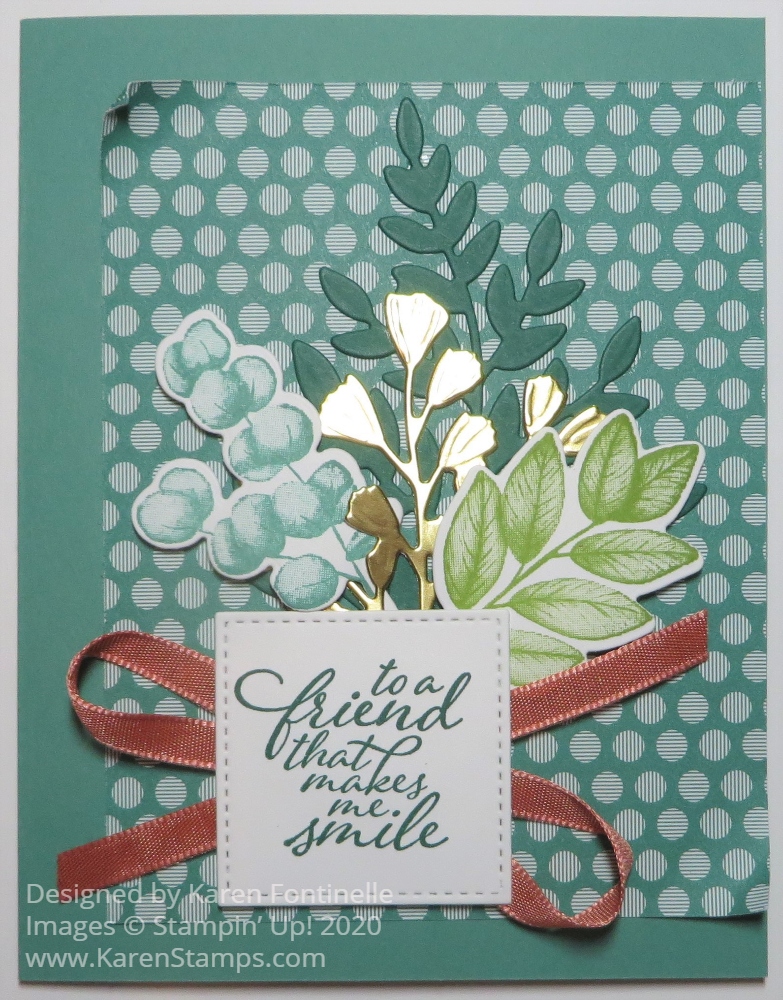
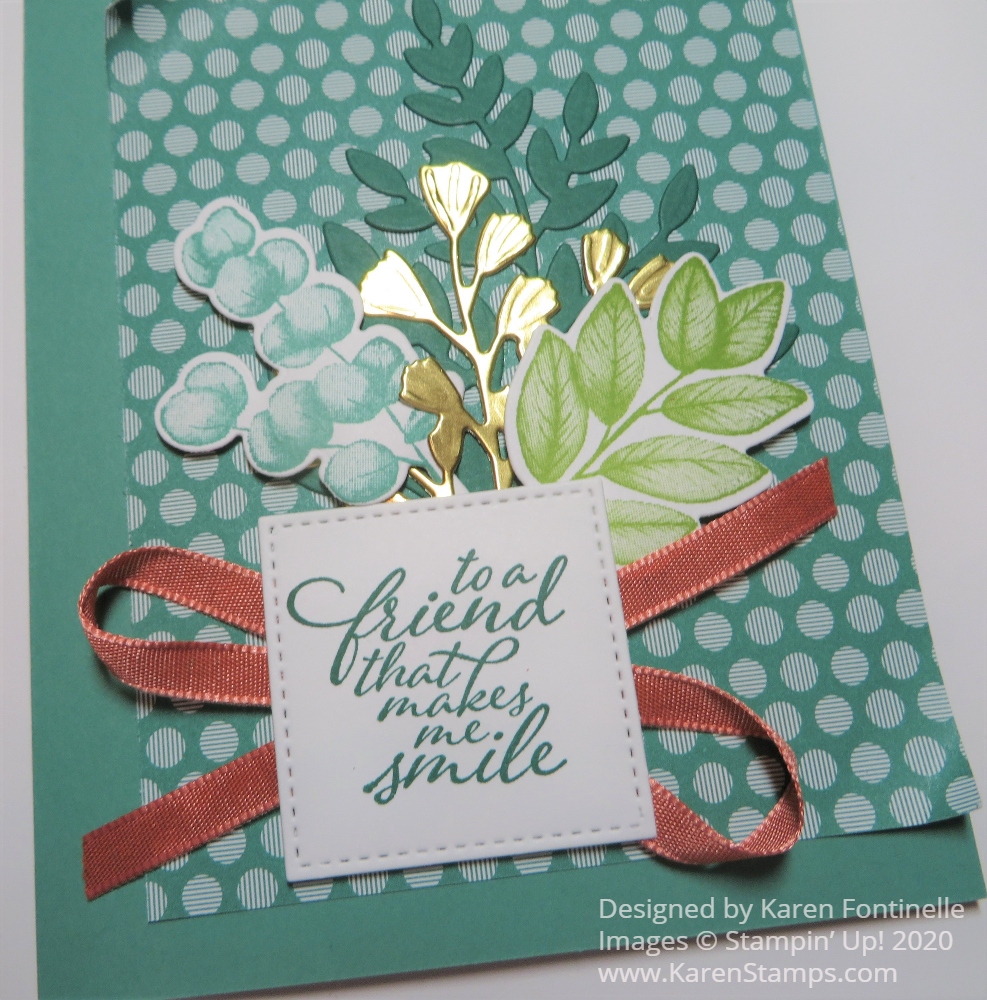
To make this card, I began with a card base of Just Jade, one of the “new” In Colors from last year! We’ll have to stop calling those colors “new” as soon as we have the “really new” In Colors, coming in the next catalog! Out of all the pretty paper in the Forever Greenery package, I chose this striped pattern for my card. I stamped all these images from the Forever Fern Stamp Set on Basic White Cardstock and die-cut with the Forever Flourishing Dies.

To design the card, I placed the Gold Hoop where I thought I wanted it and placed the fern pieces around it. You kind of want to plan where you want to put your die-cut pieces, yet, then you usually have to move them to put adhesive on them so it gets messed up anyway! To adhere the Gold Hoop, I used Mini Glue Dots but placed them where I thought they would be covered by the die-cut pieces. Then I just placed the fern pieces where I thought they looked good and either used Stampin’ Dimensionals to pop them up or just Stampin’ Snail to adhere directly to the card.

For some extra embellishment and to hide the stems a little bit, I tied a bow with Just Jade Ribbon and adhered it to the card with a Mini Glue Dot. The greeting is in the stamp set and I stamped it in Just Jade Ink. Overall a pretty easy card and the colors in the designer paper give you lots of design options. And I’m not even a big fan of “green”!

You will still be able to find this stamp set and paper in the next catalog but if you want the Forever Greenery Designer Series Paper or Gold Hoops, you need to purchase those in the Last Chance Sale! Don’t forget to check the Clearance Rack too!

SHOP STAMPIN’ UP! ONLINE HERE!

Forever Fern Christmas Card

Forever Fern Christmas Card

This Forever Fern Stamp Set is so beautiful, more beautiful than you can really imagine until you stamp with it, so I wondered if I could make it into a Christmas card. Another stamper online had wondered the same thing and came up with a card that I copied as far as the layers she used.

The card base for this card is Mossy Meadow, one of the coordinating colors for the Heartwarming Hugs Designer Series Paper that I used for one of the layers. I think this paper is so pretty and so Christmas-y but the patterns can also be used as generic patterns on non-holiday cards.

Over Mossy Meadow is a thin layer of Whisper White to help the designer paper stand out. The front layer of the card is layered on Gold Foil to add some pizzazz to this happy Christmas card.

On the front layer, I stamped the larger ferns in Mossy Meadow Ink in the Forever Fern Stamp Set on the card, with the stems being hidden underneath the greeting, otherwise, those large ferns would not fit very well. Then I stamped some smaller ferns in Old Olive Ink and the berries in Real Red Ink and die cut them with the Forever Flourishing Dies. If you are stamping and die-cutting several images, I think it’s a good idea to stamp a couple extras as long as you are stamping, so in case your die slips or doesn’t come out right, maybe you will then have an extra die-cut to use, or you can save the extra one if they all come out fine.

The greeting is stamped in Real Red Ink and die cut with one of the Ornate Frames Dies. It is popped up on three Mini Dimensionals so I could get it placed in the center but so there was space to slip wonder the die-cut ferns and berries under the greeting. Some of those I popped up on regular-size Dimensionals and some I adhered flat on the card. I resisted the urge to use some Real Red Rhinestones for some bling!

The way these Forever Fern Stamps are designed, the images come out rich and beautiful looking. “This is a Distinktive** stamp set; it has a special texture that gives added depth and dimension in a single step, creating photo-realistic images. **Patent pending” When you first use this type of stamp, you may think it didn’t pick up the ink properly, but that is the way it is designed and as you look at it, you will see the texture and the beauty of the stamping.

If you want to make a card like this Forever Fern Christmas Card, you can make it simpler if you just use basic layers and not these multiple ones. Anything you make with this Forever Fern Stamp Set and dies in the Forever Fern Bundle will be a beautiful card!

Forever Fern Fall Leaves Thank You Card

Forever Fern Fall Leaves Thank You Card

While we mostly think about “green” when we think about the Forever Fern Bundle, I wondered if I could use fall colors instead, and I ended up with this Forever Fern Fall Leaves Thank You Card. I really like it!

The card base is Garden Green with what was going to be a full Whisper White stamped layer. There is nothing difficult about the technique I used, but placing the stamps resulted in too much of a hodgepodge at the bottom of the Whisper White that I did not like. Luckily I thought of just cutting off that bottom portion and using a piece of Forever Greenery Designer Series Paper instead. I wanted a rather plain piece of designer paper so it wouldn’t look distracting and busy against my stamped leaves.

After I cut off the bottom mess of leaves, there were a few sticking up, but there seemed to be too much white space in the middle, even with the greeting stamped in Cajun Craze. The greeting didn’t look right stamped lower. So, what to do? I chose one of the long tamps in the Forever Fern Stamp Set and stamped it so it went up into the center of the card a little bit. I got lucky and really liked how it turned out!

After adhering the two papers, I wrapped the Whisper White Faux Linen Ribbon in the Flowers For Every Season Combo Pack (you get 3 ribbons!) around the seam. I tied the bow separately and adhered it with Mini Glue Dots. One tip I could have done would have been to tie a piece of white twine around the ribbon where I would place the bow to cinch that ribbon going across the card just to make it look more like I tied the bow on that ribbon going across!

Let’s talk about the stamping technique! I just used my Stampin’ Write Markers (not Stampin’ Blends) to color directly on the stamp. I pulled out various green markers, yellow, orange, darker yellow, even Cherry Cobbler for a dark reddish. It’s best if you start with the lightest colors, but even if you don’t, just scribble the darker color off your marker on scrap paper. You don’t have to be precise, just use the side of the brush tip of the marker to randomly color on the leaves all around, then use another color and another, whatever look you are going for. Don’t forget to “huff” (breathe) on the stamp to moisten the ink that might be drying, and then stamp. Each time you stamp it’s a surprise!

You can see on my card that the top bunch of leaves have a little more Cherry Cobbler ink on them, which I loved. The other ones have more green with a little yellow and orange. Each time you use this technique and stamp it will be different because while you can see the wet marker ink on the stamp, you can’t really see the colors until you stamp! In the end, I loved how this card turned out!

If you haven’t done this technique before, you can practice a few times, but it is plenty easy and I’m sure you will be happy with your efforts! Remember that the Forever Greenery Designer Series Paper is on the Stampin’ Up! Designer Series Paper Sale during the month of October.

SHOP STAMPIN’ UP! ONLINE HERE!

Forever Fern Card For a Friend

This Forever Fern Card For a Friend is one that I copied from a sample in the Stampin’ Up! Annual Catalog on page 5. The other day I was browsing through the catalog and it was one of those times that samples in the catalog were jumping out at me right and left! Some days you can’t think of any idea for a card and nothing inspires you and then other times everything you see you want to make!

Since I haven’t used this Forever Fern Bundle as much as I would have liked yet, I decided to just use a sample in the catalog to get more of a feel for the stamp set and dies. This Forever Fern Stamp Set is a Distinktive** stamp set; it has a special texture that gives added depth and dimension in a single step, creating photo-realistic images. **Patent pending. To me, that means that when I stamp with it, I am impressed and marvel at the beautiful image!

This card sample is beautiful and looks pretty fancy and involved to me, but really, when I made it, it is pretty basic. There are only two stamped ferns and the greeting. The other two ferns are die cuts.

The card base is Just Jade, one of the new In Colors, and the layered designer paper is the 2020-2022 In Color 6″ x 6″ Designer Series Paper. The catalog sample uses one of the other patterns of the paper. I made several cards at once so I used different paper patterns. This one has the small circles or polka dots. When you copy a sample, you can still change some of the elements. In fact, a lot of time when I think I am going to copy something, I end up with something completely different.

The designer paper is cut smaller than usual. I cut mine at 3 3/4″ x 4 3/4″ and it is pushed over to the edge of the card rather than centered. I used my Bone Folder to curl up the opposite corners a little bit. You could do that or not do that. You could center the designer paper if you chose to.

The large fern in the background is die cut from Shaded Spruce Cardstock. If you have the Adhesive Sheets and think ahead to use them, this would be a good time on this large fern with small leaves. I used Multipurpose Liquid Glue to put small dots of glue onto the back of the large fern. The next die-cut fern I changed up a bit. In the catalog sample, it is Smoky Gray I think. I didn’t want to use gray so I used Gold Foil. I also adhered this piece with the Multipurpose Liquid Glue. You could also pop it up with Stampin’ Dimensionals®.

The two other pieces are stamped, one in Just Jade ink (stamped off once) and one in Granny Apple Green. Then they are die cut with the new Stampin’ Emboss & Cut Machine and the Magnetic Plate using the Forever Flourishing Dies. The greeting, in the stamp set, is stamped in Shaded Spruce Ink and die cut with the second smallest square in the Stitched Shapes Dies. I popped up the two stamped ferns with Stampin’ Dimensionals.

As to the greeting, the ribbon is layered back and forth behind it before being adhered to the card with Stampin’ Dimensionals. The ribbon is in the Ornate Garden Ribbon Combo Pack. The color is Terracotta Tile. If you don’t have this particular ribbon, you could use white or whatever color you have that you think will work. I ended up using two pieces of ribbon – one straight just laid across the back on a diagonal and the second piece looped on each side. I first added some Stampin’ Seal to the back of the greeting to hold the ribbon in place and then placed Dimensionals to adhere it to the card.

All in all, like I said, this is a simple card to make. Here is a card I previously made with just stamping. You can get a better idea of the look of the Distinktive stamps.

Look through the Stampin’ Up! catalogs and see what samples jump out at you. Either try your hand at copying directly, or just use them as a starting point and see where your creativity takes you. I made a few simple changes to my Forever Fern Card For a Friend so see what you choose to do!

SHOP STAMPIN’ UP! ONLINE HERE!

Forever Fern Card For a Friend Closeup

Stamping With Forever Fern

Stamping With Forever Fern

I realized I hadn’t really used the Forever Fern Stamp Set very much yet, but when I opened the stamp case to start making a card, I realized I hadn’t even used these stamps yet! How did that happen?! I have used the Forever Greenery Designer Series Paper to make cards, but I hadn’t actually stamped with the stamp set! But now that I have, on this Stamping With Forever Fern card, I am in love!

I chose Just Jade, one of the new 2020-22 In Colors, for the card base since it is one of the coordinating colors with the designer paper. Not that I used the designer paper. The card front is Shimmery White Cardstock, a beautiful paper to use for a nice card.

Of course I wasn’t quite sure how this card would turn out if I just stamped the various ferns in the stamp set, but I just started stamping with various colors of green ink. There is something so relaxing and satisfying with stamping, applying that inked up stamp to the paper! It just feels good every time! I used Just Jade, Shady Spruce, Pear Pizzazz, Garden Green, and Soft Sea Foam. Just chose a group of greens! You can stamp over ones you have already stamped, it all looks good in the end!

The greeting is also in the stamp set. I stamped it on Shimmery White with Just Jade Ink and die cut it with the pretty circle die in the Tasteful Labels Dies. It actually looked good just like that if I would have put it on the card without layering it on something, but I did die cut a scalloped circle in the Layering Circles Dies and layered it on that. I adhered it flat on the card for a change. No embellishments either! I was so taken with how the stamping turned out, I didn’t even think about embellishments.

 This is a Distinktive stamp set (Patent pending); it has a special texture that gives added depth and dimension in a single step, creating photo-realistic images. It’s something special that Stampin’ Up! has created in some of the stamp sets. It’s really pretty!

There are also dies you can purchase to cut out the stamped images. If you want to get the Forever Flourishing Dies along with the Forever Fern Stamp Set, you can buy the Forever Fern Bundle with both and save 10%!

I do have to play more with this stamp set and Bundle. I was really pleased with this card I made with almost only stamping! Check it out if you haven’t ordered it yet. Lots of people have!

Shop Stampin’ Up! Online!