Tag Archives: Rainbow of Happiness Bundle

In Color Rainbow Card

In Color Rainbow Card

Here’s an easy card to make if you don’t mind diecutting some rainbows and little clouds! I saw some other card that kind of gave me the idea for this card plus I realized I hadn’t used this stamp set and dies enough. It will retire on June 30th which is surprising to me. It seems like we could use rainbows for a longer period of time. But that’s how it goes!

If you don’t want to miss out on making rainbows, be sure to check out the stamp set and dies before June 30, while supplies last. You might even have the rainbow designer paper you could have earned during the previous Sale-A-Bration. Or if you don’t want the stamp set, Rainbow of Happiness, you can just get the Brilliant Rainbow Dies. Here’s a tip: The Brilliant Rainbow Dies are on sale at 50% off so buy the stamp set and dies separately which is cheaper than buying the Bundle since the dies are discounted so much!!

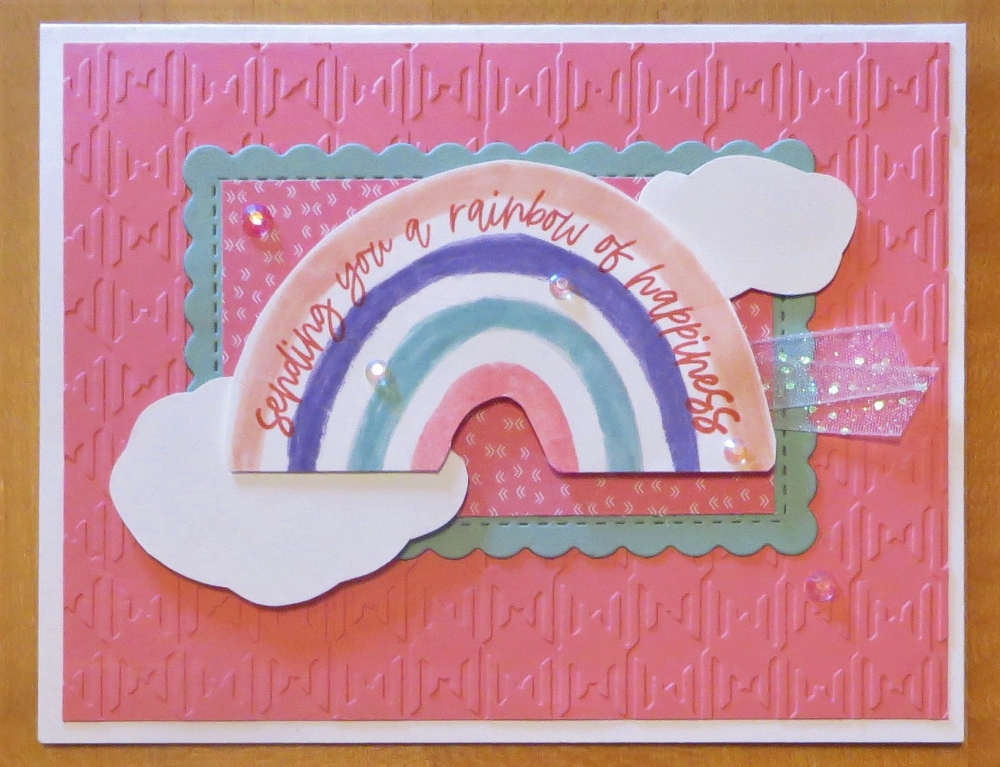
To make this card, I made a card base of just Tahitian Tide, one of the new 2022-24 In Colors. I could have made a Basic White card base with a layer of the Tahitian Tide but I like the way this turned out. I wanted to use the 2022-2024 In Color 6″ x 6″ Glimmer Paper. These papers are so pretty using the new In Colors because they have ombre shading over the whole paper. You get 4 sheets of each of the 5 colors.

I die cut the rainbows out of the Sweet Sorbet, Parakeet Party, an Orchid Oasis Glimmer Paper. Then I just adhered those three pieces to the front of the card. There are small little cloud dies in the set also, so I used the lightest area of the Tahitian Tide Glimmer Paper to die cut several clouds. I adhered five clouds on the card. For the greeting, I chose this one in the Rainbow of Happiness Stamp Set because these glimmer rainbows would absolutely brighten someone’s day! I stamped it on Basic White and die-cut it with the oval shape in the All That Dies. When I went to adhere it, I realized part of the greeting would overlap the rainbow and therefore be a little uneven. To remedy this, I glued on part of another cloud to the side that wouldn’t be overlapping the rainbow. It barely makes a difference, but I thought it would keep it even this way. It’s the same idea as when you put a Dimensional under only one part of a stamped or paper piece that is overlapping another piece that is popped up with a Stampin’ Dimensional.

On the inside of the card, I added a Basic White layer and diecut from the Tahitian Tide glimmer paper the long die with lots of little rainbow designs. It makes a really pretty edge.

I really like these new In Colors in the Annual Catalog and I really liked using the Glimmer Paper with those colors on this card with the Rainbow dies. Check out the Rainbow of Happiness products on the Last Chance List soon!

SHOP THE LAST CHANCE LIST!

Sunshine & Rainbows Brighten Your Day Card

I thought I would make just a simple, bright, and happy card using this cute designer paper available during Sale-A-Bration, and here is my Sunshine & Rainbows Brighten Your Day Card! Now I did make it a little more complicated than it needed to be by layering the greeting the way I did, but I often make things more complicated!

Today I wanted to showcase something you can get FREE during Sale-A-Bration which is one of Stampin’ Up!’s biggest promotions of the year! (And now we even have two Sale-A-Brations each year!) It’s the Sunshine and Rainbows 6″ x 6″ Designer Series Paper on page 8 of the Sale-A-Bration Brochure. It coordinates with the Rainbow of Happiness Bundle in the Spring Mini Catalog on page 18. Buy the Bundle and save 10% over buying the Rainbow of Happiness Stamp Set and the Brilliant Rainbow Dies separately. Even if you don’t have the stamp set and dies, you can use this very cheery rainbow paper to make lovely cards and projects!

As I said, I wanted this card to be bright and happy so I checked the colors that coordinate with the paper. I chose So Saffron cardstock for the card base and layered it with Melon Mambo for a little extra pizzazz in color on which to layer the designer paper. I love this sheet with the sunshine and the rainbows just jumping right out at you! How could you not feel good making this card for someone and think about how happy they will be to find it in their mailbox! Especially these days, we know we could all use some extra pick-me-ups, and certainly, a card in the mail is one of the best!

The greeting is in the Rainbow of Happiness Stamp Set and I stamped that in Melon Mambo ink. Then I die cut it with that cute frilly circle in the Tasteful Labels Dies. Then came my dilemma that made this more complicated! What did I want to layer the greeting on to make it stand out better from the bold background? I made several different die cuts and wasn’t totally happy with any one of them. Plus I felt a little adventurous, wanting to use the striped side of one of the papers in the pack. But then would that stand out from the background or add more busy-ness? Finally, I die cut a piece of Melon Mambo cardstock, cut it in half, and then adhered it so it would just peek out at the top and bottom of the layer under the greeting. This is the die in the Painted Labels Dies. But the striped paper is also cut with a different die in the same Painted Labels Dies set!

Of course, since this was to be a bright and happy card, I had to add some sparkle to the card. I added three pink jewels to the greeting from the 2021-2023 In Color Jewels. Even if the colors are not an exact match, these jewels seem to suit the purpose many times because the colors still seem to match or coordinate with even different colors! And I couldn’t stop, I had to add some of the yellow ones to the background of the card!

In the photo below you can see a closeup of the greeting and see how the pieces are layered. As I always say, just keep playing and you will come up with a combination that works!

Enjoy these two months of Sale-A-Bration! With every $50 you spend, you get to choose a FREE Sale-A-Bration product in the brochure! No limits! Spend $100 and have the choice of a special $100 Level product or go ahead and get two $50 Level products! Your choice! Happy Shopping!

SHOP STAMPIN’ UP! HERE!

Rainbow of Happiness Card

Rainbow of Happiness Card

This Rainbow of Happiness Card is sure to brighten someone’s day and probably even yours as you make it! This Rainbow of Happiness Bundle is sure to be a popular item in the Spring Mini Catalog. There are so many different ways you can use the coordinating products.

I didn’t think this was going to be one of my best cards because I still don’t have my mojo back since Christmas and everything is still out of place since decorating! Plus the light I use for photographing my cards has konked out so I see some weird orange shadows underneath the popped-up clouds on this card! Even my coffee maker has broken, so what can you do?!

Even though this isn’t one of my best cards, I ended up thinking it was okay. This was my first try with this card and dies and I found out things didn’t match up the way I envisioned! But it proves you can kind of do your own thing with these stamps since they are photopolymer. They can be stretched a bit into the size or shape you want. You still want to be careful and not overdo it, but these stamps in particular can be maneuvered a little bit!

The card base is Basic White with a Flirty Flamingo cardstock layer. I decided to emboss this layer with the new Gingham Embossing Folder mainly to try it out and see how it looked.

The rainbow is stamped with the Rainbow of Happiness Stamp Set. I was slightly trying to copy the card sample on page 18 in the Spring Mini. I haven’t watched any videos yet on how people use these stamps and dies so I was just winging it! I used the four individual rainbow arcs on one large block (the largest one!) expecting to cut out the rainbow with the dies, but the dies were small, much to my surprise! But it was okay, I just cut out the rainbow with my scissors! To ink up the rainbow, I used my Stampin’ Write markers in Highland Heather, Petal Pink, Pool Party and Flirty Flamingo. (Flirty Flamingo is one of the Brights colors.) I just colored each marker on the parts of the rainbow and breathed on the stamps before stamping. Even though I tried to “prime” the new photopolymer stamps a few times first, using the markers, which are usually lighter anyway using this technique, the stamped rainbow came out a little sketchy! So I just used the markers themselves to lightly color over the rainbow. I intended to color over the rainbow with my Wink of Stella Brush, but that is old and not working right either! A new one is on my next order!

I used the sentiment in the stamp set to stamp the greeting right on the rainbow using Calypso Coral Ink. I like the way that looks! I wanted something that would coordinate well but not blend into the same colors of the rainbow.

To add some layers behind the rainbow, I die cut a piece of Mint Macaron cardstock with one of the Scalloped Contours Dies. Then I liked the look of a certain paper in the Sunshine and Rainbows 6″ x 6″ Designer Series Paper. You can earn this paper FREE during Sale-A-Bration with a $50 purchase. It’s very cute! Be sure you get it soon so you can use it with this Rainbow of Happiness Bundle. I die cut the paper with the same size Scalloped Contours Die but then I trimmed off the scallops so it would fit inside the stitching on the Mint Macaron die cut piece. I adhered those two layers together and adhered that piece to the card.

I don’t own the Cloud Punch yet (unless it is hidden under some other messes!) so I just cut out my own clouds so my card would look somewhat like the sample in the catalog I was copying. There are also cloud dies in the Brillliant Rainbow Dies in the Bundle.

The rainbow is popped up on Stampin’ Dimensionals® but you need to think about where the clouds are going to go underneath the rainbow if you are copying this idea and place the Dimensionals so they are out of the way if you are going to stick a cloud underneath! Both of my clouds are also popped up on Dimensionals. I also used a piece of the Glittered White Organdy Ribbon to tuck underneath.

For a finishing touch, I had to use the new Iridescent Rhinestones Basic Jewels. I placed three of the smallest jewels right on the rainbow and then two larger ones outside the rainbow. These are really pretty!

So there you have my first rainbow card! I’m looking forward to making more, hopefully, a little better, but as I said, I ended up being happy with this card! Sometimes you just have to keep working and the right design will eventually magically appear!

Have fun shopping the new Spring Mini!