Tag Archives: copper foil

Brightly Gleaming Square Christmas Cards

Brightly Gleaming Square Christmas Cards

We’re down to the wire but you may still need some easy Christmas cards to make to put with a gift (or even mail late!) so take a look at these Brightly Gleaming Square Christmas Cards that you can make!

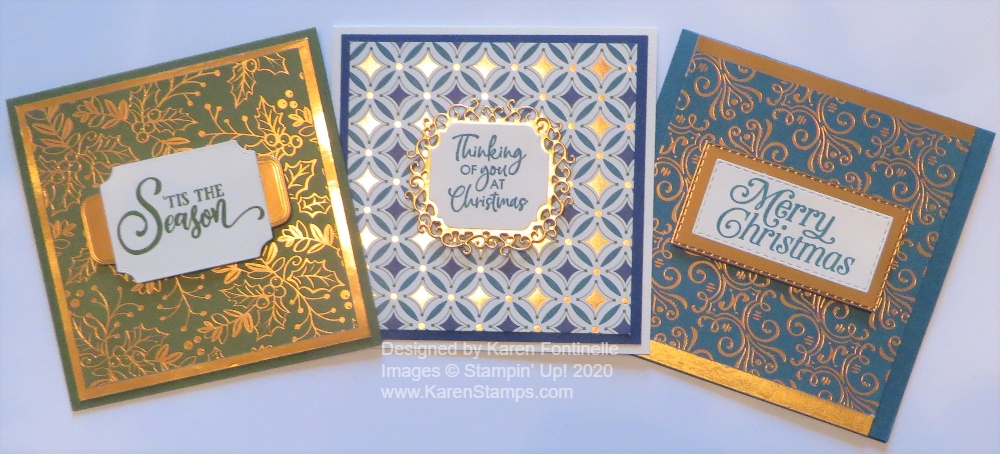
You can make square cards any size you like. I made these 4 1/4″ x 4 1/4″ by just cutting across a full sheet of cardstock horizontally at 4 1/4″. Since the paper is 8 1/2″ wide, when you fold it in half you have 4 1/4″ so that works out perfectly! You could also do 3″ x 3″ for a gift enclosure. Just trim your paper at 3″ x 6″.

You can make it super simple and just add a layer of designer paper, but I added some Copper Foil behind the designer paper on two of the cards. The first card has a base of Mossy Meadow Cardstock, then foil under the Mossy Meadow pattern of the paper, all just regular margins like we make on our cards.

The card on the right has a card base of Pretty Peacock Cardstock. When I went to make the foil layer underneath the Pretty Peacock pattern, all I had were scraps of the Copper Foil so I just cut two strips of foil and put them on two sides of the designer paper. It looks like I designed the card that way, not that I ran out of paper!

For the middle card, I used a card base of Very Vanilla with a layer of Night of Navy underneath the designer paper.

Each card just has a stamped greeting that is die-cut and then layered on another die-cut. You could use punches or simply cut squares or rectangles for the greetings and layers. I won’t even list the dies I used, just use what you have!

These cards I made are difficult to photograph because of the pretty foil accents on the Brightly Gleaming Specialty Designer Series Paper. This paper is, as I write this, on the Giant Year-End Closeout sale, discounted 50%! It’s very pretty so you might want to grab some if it is still available.

Square cards are quite the thing these days. The only thing is that if you mail a square card in a square envelope you are supposed to pay a surcharge. But these square cards will fit in our regular Medium Envelopes so no worries. But if you are just enclosing one with a gift or handing one to someone, you can use or make a square envelope with no issues.

These cards with just a card base, layer, and greeting are simple to make. Change up the designer paper or colors and greetings and you can make a card for a birthday or congratulations or whatever you need. Remember to check out this pretty paper in the Stampin’ Up! Online Store. It is well-worth 50% off for sure! If you need last-minute cards, try these Brightly Gleaming Square Christmas Cards!

Gilded Autumn Fall Thanks Card

Gilded Autumn Fall Thanks Card

I was anxious to play with this gorgeous designer paper in the new August-December 2020 Mini Catalog from Stampin’ Up! The designs are so pretty, the colors beautiful, and all of it accented with copper and gold foil. How can you resist?

This beautiful paper is the Gilded Autumn Specialty Designer Series Paper in the new Holiday Catalog. You’ll find the whole Gilded Autumn Suite on pages 44-46. All Suites in this catalog get a three-page spread! The Suite contains the Beautiful Autumn Bundle with stamp set and three punches, ribbon, Brushed Metallic Cardstock, and Acorn Trinkets. You can order the whole thing with one Suite number or order any of the products individually.

I loved the sample in the catalog on page 44 with the three panels of designer paper on it, center of page. I changed mine a little bit and figured out my own measurements. The card base is Whisper White, although you could also use Very Vanilla. The Copper Foil layer underneath the designer paper is cut at 5″ x 3 3/4″. The strips of designer paper are cut at 1 1/2″ x 3 1/2″ so there is a tiny margin around the edges and in between the pieces. You can vary this and have the papers side by side or even a little larger with a larger foil layer underneath. When I finished gluing these pieces with my new Stampin’ Seal+ I ended up trimming just a slight bit off the side of the copper foil just to even things up.

The greeting is stamped from the Gather Together Stamp Set, a “returning fave” it says in the catalog, from last year in Mint Macaron Ink! We all did love that stamp set and cards we made with that set last year so I’m glad it is back! I die cut it with one of the Tasteful Labels Dies and used another longer one to cut out a strip of Copper Foil to go behind it. This is a great die set!

The catalog sample card has some greenery sticking out from the side of the greeting. I don’t know how they did theirs, but I just cut some greenery out from one of the sheets of the Gilded Autumn Paper. It wasn’t so easy, but it worked! And I put it on both sides of my greeting.

And then, just because I loved the paper with pumpkins and gourds, I had to cut out a pumpkin and add it to the card. I wasn’t sure! What do you think? I popped it up with a Dimensional to match the greeting that was also popped up, but I put the Dimensional only in one spot to it would be even with the greeting. I meant to add some sequins or some little bling but I forgot!

Here is a card I made last year with the Gather Together Stamp Set. I think I could use this same basic layout and make something with the new Gilded Autumn Paper! I might try that!

I think it is a fairly easy card to make, especially if you use my measurements and don’t have to figure it out. Maybe you could die cut some other greenery for a similar look without cutting by hand if you didn’t want to do that. You could die cut the greeting in a different shape. Lots of possibilities with this Gilded Autumn Fall Thanks Card.

Remember, we have a new look to the Online Store! If you haven’t used it yet, you need to either KNOW your password to get into your account if you want to order (you can look around without logging in) so you can type it in manually OR you need to click on the “Forgot Your Password” Button to reset it. After that you can have the site remember the password….and maybe a good idea to write it down!

SHOP STAMPIN’ UP! ONLINE!

Brightly Gleaming Ornament Gift Bag

Brightly Gleaming Ornament Gift Bag

This Brightly Gleaming Ornament Gift Bag is perfect for a small gift and looks prettier than anything you would buy in a store! And instead of driving to a store for a little bag, use the time and stay home and make your own! It’s much more fun! Even better, sit down and make more than one bag and you’ll have a collection ready to go!

This gift bag is much like the 2-4-6-8 bag we often make but has a wider dimension. I used the beautiful Brightly Gleaming Specialty Designer Series Paper to make the bag.

Start with a 6″ x 12″ piece of paper. Score at 4″, 5 3/4″, 9 3/4″, and 11 1/2″. Turn the paper so the short edge is at the top and score at 1 3/4″. This will make the bottom flaps of the bag. Cut those short bottom tabs up to the 1 3/4″ score line. Cut off the little 1/2″ tab on the bottom

Fold on all the score lines and crease well with the Bone Folder.  Adhere the tab on the end to the other side to assemble the bag.  Then adhere the flaps on the bottom. The Tear & Tape Adhesive works great as far as strength but does not allow for any “wiggle room” like the Multipurpose Liquid Glue. So use whichever works best for you. You will be able to see how the bag goes together as you start to assemble it.

This little Brightly Gleaming gift bag doesn’t need too much in the way of decoration, but of course, I had to put a little more into it than I needed to! I punched the three ornaments with the Gleaming Ornaments Punch Pack. The copper foil ornament is embossed first with the Swirls & Curls Embossing Folder and then punched, but you could punch it out first.

I thought the ornaments needed a little bit of a background and I happened to have a scrap piece of Pretty Peacock Cardstock handy so I just used that, cutting it down as small as I could. Then I also saw a die cut Copper Foil piece and cut that in half lengthwise to be a top and bottom layer under the Pretty Peacock.

I used some copper foil branches in the Brightly Gleaming Foil Elements to look like the branches the ornaments were hanging from. I used some scrap white ribbon to “hang” the ornaments and then tied small bows.

That’s more embellishing than I needed to do on a little gift bag but it was fun! You could even put a cookie or two inside, tea bags, some jewelry, even a gift card. Make this basic gift bag with half a sheet of 12″ x 12″ paper for any occasion!

SHOP STAMPIN’ UP! ONLINE!