Tag Archives: Sponge Daubers

Rustic Harvest Colored Leaves Card

Rustic Harvest Colored Leaves Card

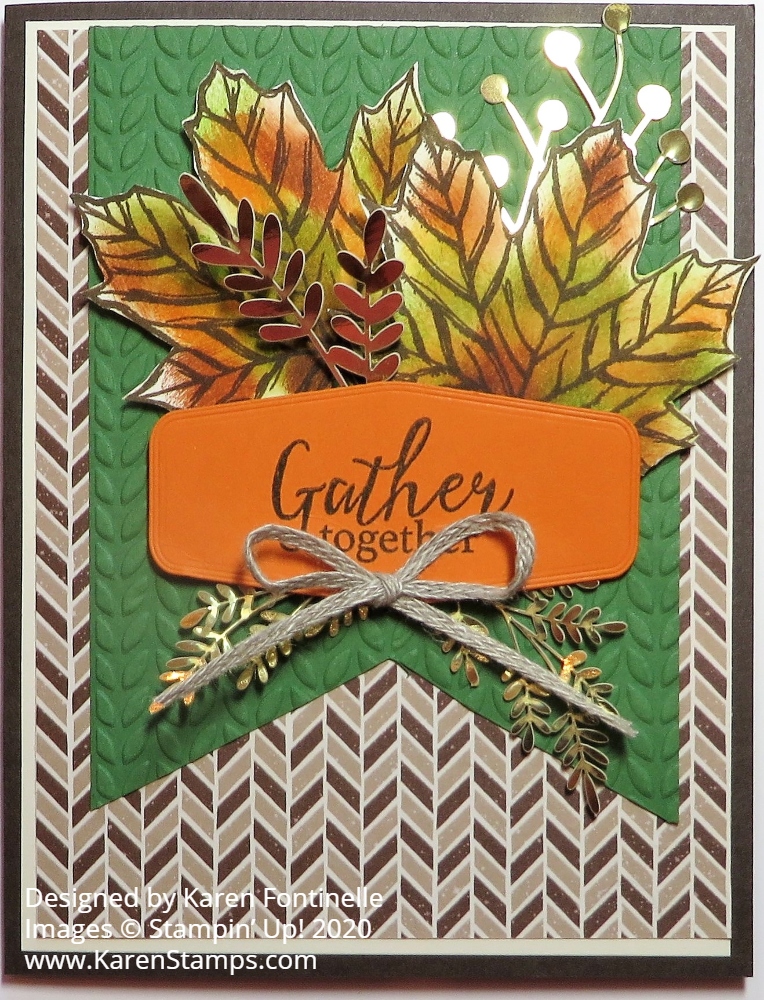
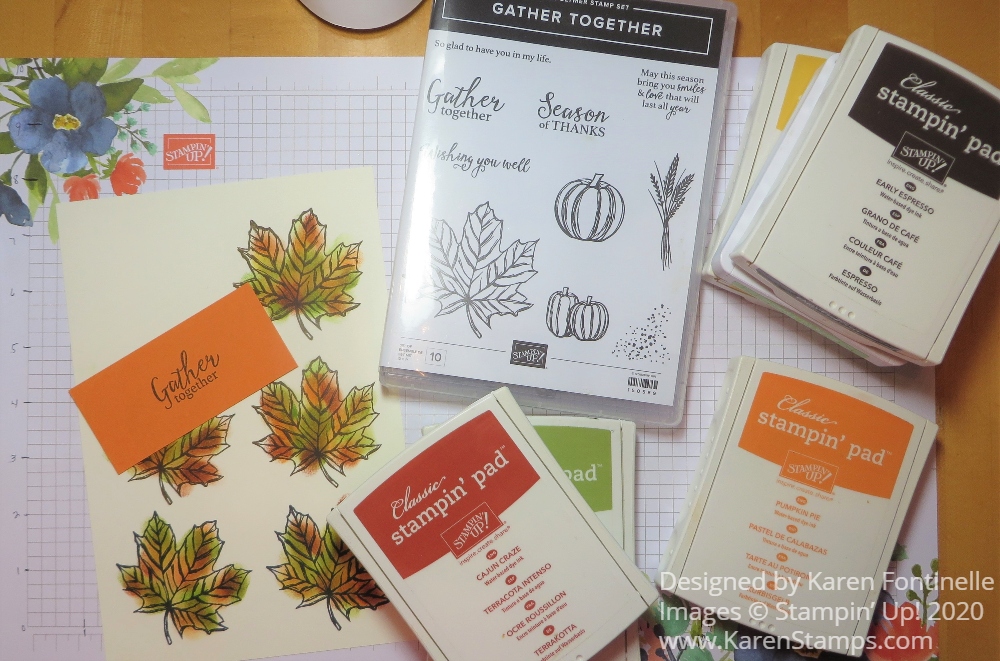
I was thinking I saw this black and white leaves designer paper in the Perfectly Penciled Designer Series Paper in the Annual Catalog but it turns out it is in the Rustic Harvest beautiful pack of designer paper! When I found it I colored in the leaves and made this Rustic Harvest Colored Leaves Card! If you don’t really like coloring in papers like this, this is the technique for you! I should have timed myself but I know it probably only took me two minutes at most to color in all these leaves, even with multiple colors! So fun!

The card base is Mossy Meadow cardstock with a layer of Crushed Curry. Those are coordinating colors for the Rustic Harvest DSP. I simply used the Sponge Daubers to apply ink to the leaves…and with no worry about staying in the lines since the background is black. It would be impossible to stay within the lines with Sponge Daubers anyway, unless you were really careful. And I didn’t worry if every single area was colored. You can see some tiny white areas or places where not as much ink got applied.

Rustic Harvest Colored Leaves Card Coloring Technique

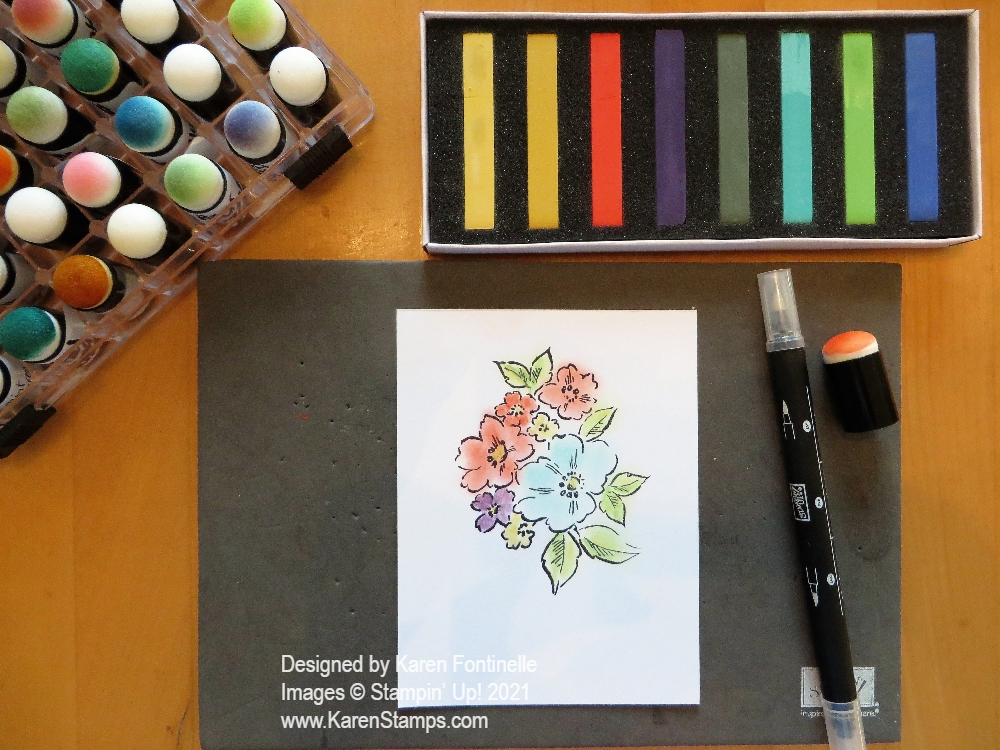
I just chose several ink colors for fall leaves and I think they worked well together. I used Mossy Meadow, Granny Apple Green, Crushed Curry, Pumpkin Pie, and a touch of Mint Macaron. I wanted some yellow and orange for my fall leaves. Sponge Daubers are easy to use. Either just hold them or stick your finger inside to use them. You can just wash out the ink after rubbing off the excess on scrap or Grid Paper. I labeled a lot of mine but you wouldn’t have to have one for each color as long as you get off as much ink (or pastels) as you can.

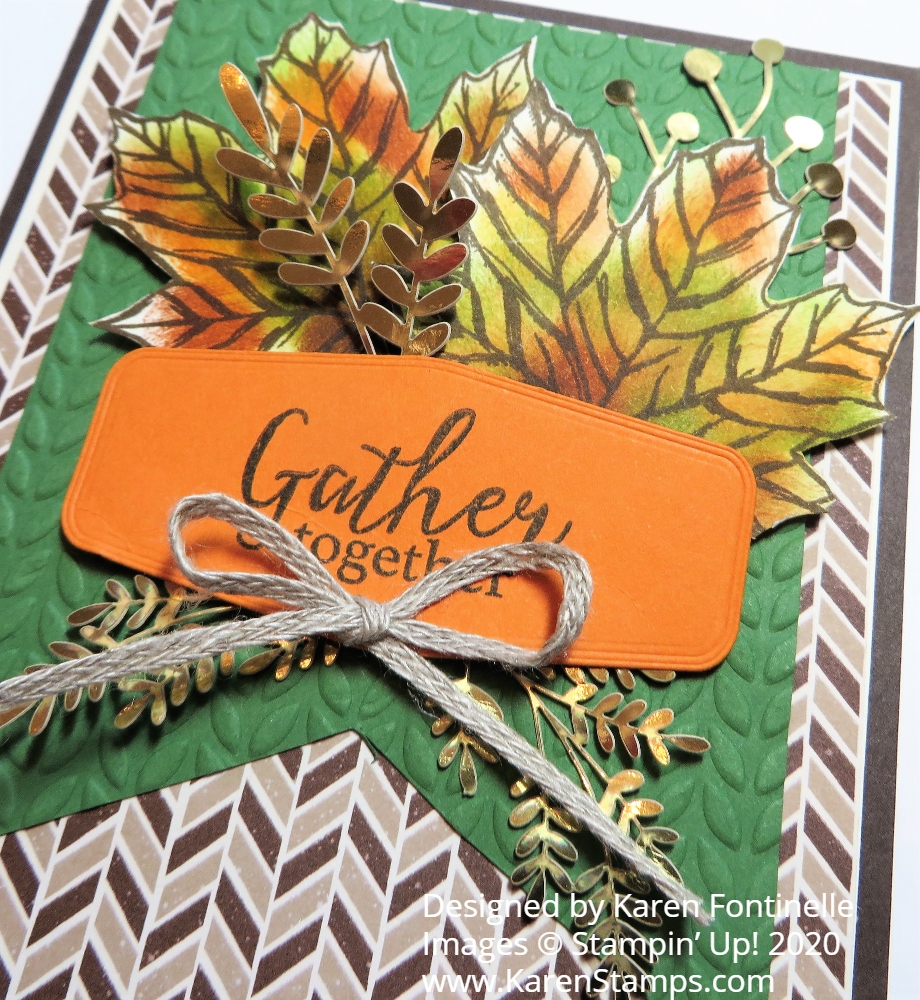
I used the green ribbon in the Real Red & Garden Green 3/8″ Ribbon Combo Pack. Even though it wasn’t one of the greens I used, I liked it just fine on this card. I wrapped a piece around to the back and adhered it, then used another piece of ribbon to tie on the bow. You can use a Mini Glue Dot to hold the ribbon and bow in place. After the ribbon was adhered, I adhered that piece to the card.

The greeting is stamped in Mossy Meadow on Basic White and originally cut out with the label die in the Meadow Dies. I love that scalloped label die! Since I wanted to layer it on a colored piece, I cut it by hand to make it fit on the die-cut Crushed Curry. Then as I looked through my embellishments, I chose two of the small black dots in the Classic Matte Dots to go with the black background. But I think I wish I’d picked something else! But these are fine!

I have to say after I colored the leaves on this card, I was thrilled with how they turned out!! Try it and see how it goes! Or use your Stampin’ Blends, Watercolor Pencils, ink and Blender Pen, whatever you like! So many ways to color!

Shop Stampin’ Up! Online HERE!

Hand-Penned Petals With Soft Pastels

Hand-Penned Petals With Soft Pastels

This Hand-Penned Petals With Soft Pastels was nearly the death of me! The idea was easy enough but the execution was a mess. This wasn’t even going to be a card! I was just trying out the new coloring technique we have, but I thought it turned out okay so I went ahead and made it into a card! That was the easy part.

In the new Stampin’ Up! Annual Catalog we have the Soft Pastels Assortment! You will find these new chalk pastels on page 126 in the catalog at the bottom. You get eight colors in the box: Coastal Cabana, Daffodil Delight, Gorgeous Grape, Granny Apple Green, Mango Melody, Mossy Meadow, Night of Navy, and Poppy Parade. You can use these pastels in a variety of ways for cards and projects. Years ago Stampin’ Up! had a tin of a bunch of colors, little squares that we would pick up the chalk color with little applicators or a cotton ball. I need to refresh my memory of all the things we used to do with pastels!

To begin, I stamped this bouquet with Stazon Ink. First I tried picking up color from the end of the chalk using a Blender Pen. That worked, but on Basic White Cardstock you have to be careful not to rub too hard with any tool with water. Blender Pens barely have any moisture, but you still have to be careful. I colored in the small Daffodil Delight small flowers. Next, I used other colors and Sponge Daubers on some other flowers. I scraped some chalk dust off the side of the chalk using my open Paper Snips to get a little dab of chalk dust on an acrylic block to pick up with the Sponge Dauber. Of course you can’t color precisely with Sponge Daubers but that’s okay. With the soft look of the pastels, it gives a watercolor look to the flowers. In the end, the Basic White looked a little bare around the flowers, so I grabbed a Blending Brush and applied some Mango Melody chalk very lightly around the edges.

Hand-Penned Petals With Soft Pastels Coloring

Since Poppy Parade is one of the chalk colors, I used Poppy Parade and Granny Apple Green for the card base and the layer. But since the chalk doesn’t turn out as strong as the real colors, I think I should have chosen something different for the card base. The greeting is from the Celebrate Sunflowers Stamp Set, stamped in Poppy Parade Ink. I did cut it with a Stitched Rectangle die, but then I trimmed off the stitched edges to make it smaller to fit into the same size die cut in Poppy Parade. Otherwise, the next larger size of die cut seemed too big for this card.

Hand-Penned Petals With Soft Pastels Closeup

Of course for a final embellishment, I adhered some Genial Gems in both colors around on the card. It was fun playing with the pastels, I just had trouble assembling the card. I stuck the layers down crooked and had to redo. Then the torn paper with adhesive on it was really sticky and I couldn’t get it off my fingers easily nor pick up the other pieces off the table! Just a lot of little things were a pain making this simple card, but at least I got to play with the Soft Pastels Assortment.

Check out the Soft Pastels Assortment in the Stampin’ Up! Online Store!

Gather Together Fall Leaves Card

I used several products on this Gather Together Fall Leaves Card, as I thought about them while making the card. I probably started out with a simpler version in my head of making this fall card, and then I came up with more ideas as I worked on it. That’s probably the way a lot of us do our cardmaking!

The beginning of the card was simply the stamping and coloring of the leaves in the Gather Together Stamp Set. You may already have this set if you purchased it last year. Happily, it was carried over into this August-December 2020 Mini Catalog as a favorite from last year! I stamped a few leaves in Memento Ink first but I thought the black outline was too stark. Then I stamped some in Soft Suede Ink. In the end, after they were colored, I’m not sure it made much difference so I think you can do either.

To color the leaves, I used Sponge Daubers and various ink pads. Just choose whatever colors you like for fall. I used Old Olive, Crushed Curry, Pumpkin Pie, Cajun Craze, and Granny Apple Green. I intended to leave parts of the leaves uncolored, but it didn’t so much turn out that way! I was sort of using a card on page 47 in the Mini as inspiration with the leaves. I didn’t try to be precise, especially as far as coloring “outside the lines” because I knew I would be cutting out the leaves anyway. I don’t own the dies but I don’t mind doing some “fussy-cutting” with my Paper Snips.

Gather Together Fall Leaves Card Coloring

The card base is Early Espresso Cardstock with a layer of Very Vanilla to offset the layer of Gilded Autumn Specialty Designer Series Paper. This paper is so beautiful, it was difficult choosing which pattern to use. But I didn’t want to take too much away from the leaves so I chose a plainer pattern, not one with the gold and copper foil accents which are so pretty.

Next, I used a piece of Garden Green Cardstock to make a banner and embossed it with one of the Greenery Embossing Folders. These are narrower folders for smaller pieces you want to emboss. I also stamped the greeting in the Gather Together Stamp Set in Early Espresso Ink and die-cut it with a die in the Tasteful Labels Dies.

After adhering the layers together plus the banner on the card, I adhered two fall leaves with Stampin’ Dimensionals and added some of the gold foil pieces in the Forever Gold Laser-Cut Specialty Paper. I think they really add a little pop of pizzazz! The greeting was centered over everything, also popped up on Dimensionals. For a final touch, I added a bow made with the 3/16″ Braided Linen Trim.

Gather Together Fall Leaves Card Closeup

It’s time to start making some fall or autumn cards, maybe just to send to friends and family and maybe to save for Thanksgiving. Who knows if we will be able to “Gather Together” this Thanksgiving so we might want to have cards ready to send to those people we want to remember on the holiday. This Gather Together Fall Leaves Card would suit the purpose just fine!

SHOP STAMPIN’ UP! ONLINE HERE!

Remember to use your Bonus Coupons before August 31 if you have them from July!

Banner Year Halloween Card

Banner Year Halloween Card

This Banner Year Halloween Card is one that I created simply by “playing around”! I won’t say it’s my best work or anywhere close, but I wanted to try out the stamp set and see what I could make!

The Banner Year Stamp Set has lots of smaller images and greetings for lots of occasions so it is a good stamp set to own. There is fall, Halloween, Christmas, and even Valentine’s Day. Of course, some of those can even be used any time of year. So I just decided I wanted to see if I could make a Halloween card with the appropriate images. That’s why I said I was playing around with the stamp set.

The card is a smaller square card, 4 1/4″ x 4 1/4″, which I thought would help with the smaller images. The card base is Basic Black with a layer of Pumpkin Pie and stamping on Whisper White. Without knowing how I would place things, I stamped the little spider web up in the corner and the three bats in the sky. I was thinking of putting a strip of designer paper, maybe the new Plaid Tidings with the greeting on some kind of label across the designer paper. But then I saw the pumpkin stamps and thought why not put some green cardstock for grass across the bottom. I went back to one of our favorite old techniques of tearing the strip of cardstock to make a rougher edge. Hold the strip vertically in front of you and tear down toward yourself. That’s how you get the edge torn the way you want it.

The pumpkins are stamped in Pumpkin Pie and the little stems and leaves (one stamp) stamped in Old Olive. There is even a little jack-o-lantern face stamp in the set so I stamped one pumpkin with that!

Then I wondered what to do about the sky, since I wasn’t necessarily planning on a “scene” when I started! I grabbed my Sponge Daubers and used various colors of ink to scrub in for the sky. I used Night of Navy, Granny Apple Green, a little bit of some color of purple (Maybe Highland Heather) and some Balmy Blue over all of it. Just play with whatever colors you like because it’s Halloween after all, anything goes for a spooky sky!

I had wanted to use the “Happy Haunting” sentiment in the Banner Year Stamp Set but once I got the card stamped it looked a little large. After I stamped it, I decided to cut the words apart and adhere them in the sky. (That would also cover up part of the sky that looked less blended than I would have liked!)

For a finishing touch, I added several Gold Glitter Enamel Dots scattered around to look like stars in the sky or just for a little bling! Sometimes just added a little something to your card, like sequins or dots or glitter just finishes it off perfectly! I made some other cards recently that were cute enough as they were but when I added some sequins, it was a Wow!

Here is another Halloween card I made several years ago with smaller images and then filled up space with washi tape! You could also use strips of designer paper.

If you are looking for a stamp set that has small, but images for lots of occasions, this Banner Year Stamp Set just might appeal to you. It actually comes in a Bundle, the Banner Year Bundle. You get the stamp set and the Banners Pick A Punch together for a 10% savings. And certainly, the punch is handy to use in many cardmaking sessions! It won’t be long until we are making Halloween cards so use this Banner Year Halloween Card to help you get some ideas!

Shop Stampin’ Up! Online HERE!

Blossoms In Bloom Watercolor Stamping Cards

Blossoms In Bloom Watercolor Stamping Cards

I thought I would try some watercoloring with this stamp set and dies and ended up with these Blossoms In Bloom Watercolor Stamping Cards. I’m calling it watercoloring stamping. I used watercolor paper, moistened it and also spritzed water on the stamp before stamping.

Blossoms In Bloom Watercolor Stamping Card Front

I used my Stamparatus to stamp since the Blossoms in Bloom stamp is so large. I used my Aqua Painter (now Water Painters in the new catalog) to moisten the Fluid 100 Watercolor Paper and I also spritzed the stamp with water after coloring with Stampin’ Write Markers. On the other card, I applied the ink to each flower with Sponge Daubers. When I stamped with the Stamparatus on the wet watercolor paper with the wet stamp, it looked like a mess! But all I had to do was dab with a paper towel to pick up the excess water and it was fine! I really just wanted a bit of color underneath the die cut I would later put on.

After letting the watercolor paper dry, I adhered the thin Whisper White die cut of the Many Layered Blossoms Dies with teeny tiny drops of Multipurpose Liquid Glue. Then this piece was layered on the card front of Melon Mambo Cardstock.

The die cut didn’t quite cut all of the flower centers but I don’t think anyone will mind. I could have even colored them perhaps with yellow to make them look like they were supposed to be there. I like how I didn’t have to place the die cut perfectly, if the color extended beyond, it looked fine because it was watercolor.

Blossoms In Bloom Watercolor Stamping Card

And then I did another one to see if I could get it less watery, but I didn’t, although using a Melon Mambo die cut on Coastal Cabana Cardstock gives this card a different look anyway.

Blossoms In Bloom Watercolor Stamping Coastal Cabana Card

I like the way some of the colors bled into each other which gives it a good watercolor look. I even accidentally got some splatters on the watercolor paper.

If you’d like to watercolor, but don’t know “how”, just use this stamping method on watercolor paper, spritzing before or after. Just experiment! There are lots of ways to do this. If you don’t have official watercolor paper, Shimmery White Cardstock is the next best thing.

Try your hand at some watercoloring with whatever you have! And you can get some other ideas of how to use the Many Layered Dies on these cards in THIS POST.

I think you will find these Blossoms In Bloom Watercolor Stamping Cards fun to make!

SHOP THE NEW CATALOG AT STAMPIN’ UP!