Tag Archives: True Love Designer Series Paper

True Love Colored Daisies Card

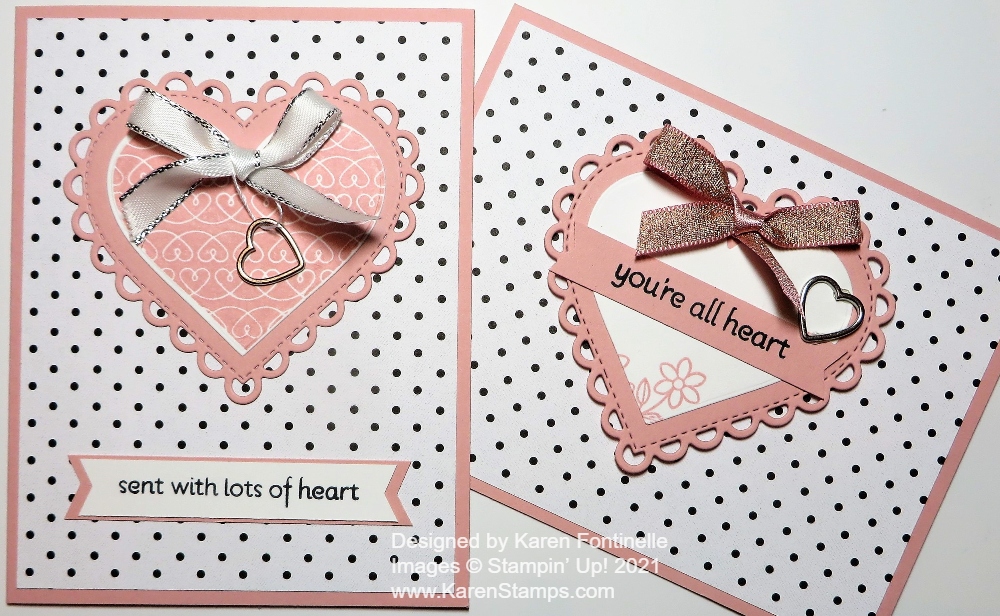
One of the products I hate to see retire in the January-June 2021 Mini Catalog is this black and white paper which is so fun to play with! You can leave it as is for a black and white card or you can color in the designs as I did on this True Love Colored Daisies Card. Just do whatever strikes your fancy!

This is the True Love Designer Series Paper on page 11 in the Love You Always Suite. There are large flowers in the designs which are fun to color in with Blends or color in the space around the flowers. This time I came across this paper with these tiny daisies and decided to do something with this.

I thought it would be fun to make the paper colorful, but of course, I didn’t want to color each flower! I got out my Sponge Daubers and some ink pads and just picked up some ink, rubbed the Dauber over several areas of the paper, and then added another color. I used Flirty Flamingo, Daffodil Delight, Gorgeous Grape, and Granny Apple Green. I felt like I should add a touch of green in there for the leaves, not that I could color in the leaves themselves. Gorgeous Grape was too dark unless I rubbed some off on scrap paper before. I ruined my first attempt with dark blobs of purple on my card!

When I was finished coloring the flowers with my Sponge Daubers, I chose a greeting stamped and die-cut with the Messages Die. I almost adhered the greeting to the card without any ribbon as an embellishment. It was pretty enough, the white greeting with black ink on the busy background. But I did add some Whisper White 1/4″ Crinkled Seam Binding Ribbon just for a little something and also adhered a bow I tied with Glue Dots.

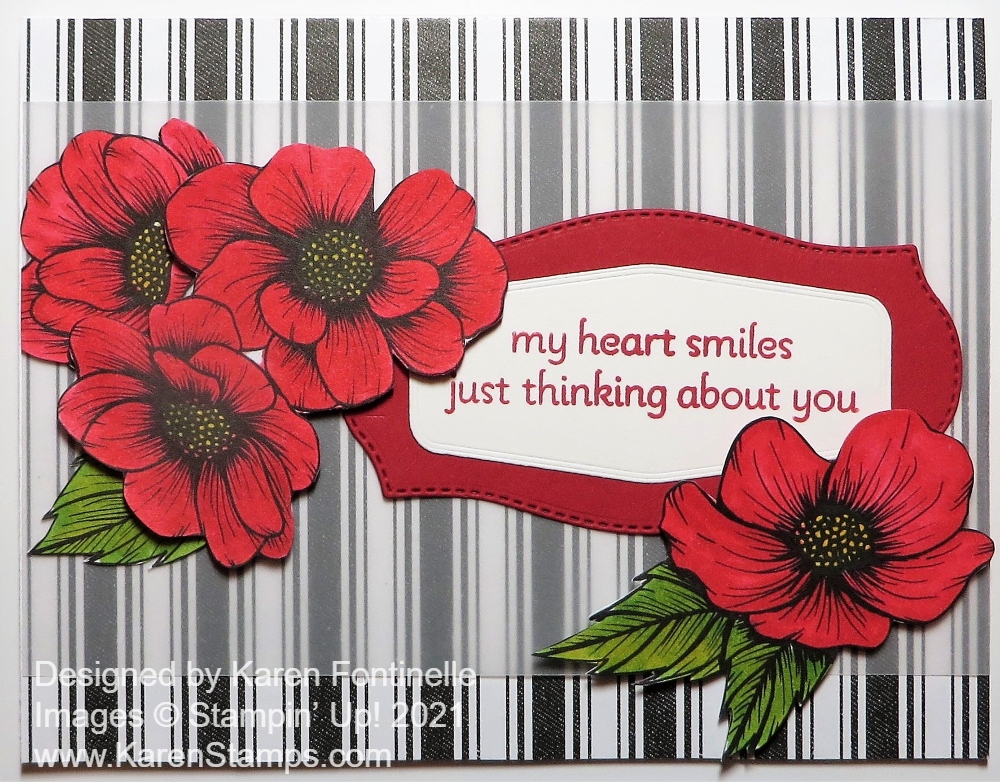
Here is another card I made with the larger flowers in the True Love Designer Series Paper, colored with Stampin’ Blends, and then cut out and added to a card. It’s one of my favorites because I love red and I loved the red with the black and white.

Before this paper is gone, be sure to check it out, especially if you like to color! Some of the pages are generic designs like dots or stripes so you can use those as backgrounds on cards or other ways.

The January-June Mini Catalog will end on June 30. Some products are discounted. Last Chance products are only available while supplies last!

SHOP STAMPIN’ UP! ONLINE HERE!

True Love Sympathy Card

True Love Sympathy Card

If there is one card we all hate to make, it is a sympathy card such as this True Love Sympathy Card although at the same time we hope it expresses our feelings and sends comfort to the family. I’m pretty sure I got the idea for this card from someone else but I don’t remember where I found it and haven’t been able to find it again. I do think I changed it up at least a little bit. I didn’t originally plan to post it but I came across it in my photos and I think it is a pretty card. Just change the greeting and you can use the same card design for almost anything else.

The card base is Blushing Bride with several layers on top. Let’s start with the flowers. The flowers are from the True Love Designer Series Paper in the Spring Mini Catalog. All the papers are black and white, but if you want to, you can color in the flowers and cut them out. That’s what I did here with the Stampin’ Blends, my favorite way to color. Behind the flowers for an embellishment is a loop of the 3/8″ Fine Art Ribbon, which is a natural-colored ribbon with gold in it. It’s very pretty!

The flowers are layered on a diecut from the Ornate Layers Dies to make a frame. Underneath the frame is another Basic White layer that is edged in the new Gilded Leafing. I applied Tear & Tape on all four sides of the white cardstock and then applied the Gilded Leafing. That stuff is so fun! Then this piece is layered on Basic Black Cardstock to help the gold leafing stand out plus to go with the black and white of the True Love Flowers. And finally all this is on a layer of Basic White adhered to the Blushing Bride pink card base.

The greeting is in the Prized Peony Stamp Set. It is die cut with a circle in the Tasteful Labels Dies. It really didn’t need any layer underneath it on this card.

I think just the True Love Designer Series Paper will be retiring when the Spring Mini retires as usually most designer papers retire, but I think most of the rest of the supplies I used will be sticking around in the new catalog.

SHOP STAMPIN’ UP! ONLINE HERE!

True Love Many Hearts Valentines and Cards

True Love Many Hearts Valentines and Cards

These True Love Many Hearts Valentines and Cards were really going to be two identical cards. I often have suggested while you are making one card, make two, three or four of the same card while you have decided on the design and have all your supplies out. So after I cut my cardstock in half to make a card, I thought why not go ahead and use the other half right now to make two cards. And I was going to make both cards the same!

After looking through the January-June 2021 Mini Catalog for ideas, I took my inspiration from the small square card on page 10 with the polka dot paper. Our Stampin’ Up! catalogs are great places for ideas, by the way! My two cards don’t resemble the actual sample in the catalog, but the sample gave me the idea of how I wanted to proceed.

The card base is Blushing Bride and the polka dot paper is in the black and white True Love Designer Series Paper. (As I write this, this paper has been backordered but should be back in stock this week.) This True Love paper has really been interesting because you can use it as is or color it like a coloring book (maybe not the whole 12″ x 12″ page!), or just add shades of color to some of the images without really staying in the lines. Here is another card I made with a stripe pattern in this package.

I used the Many Hearts Dies for these cards to die cut the large scalloped heart out of Blushing Bride cardstock and a plain heart out of white cardstock. I wasn’t exactly sure how I was going to do the greeting or what I was going to do with the white heart, but what I really wanted to do for sure was use the silver Heart Charms. I was thinking in terms of having one dangling on the card from the top of the heart.

I decided to stamp a greeting on the heart and then also stamp the little flower in the Lots of Heart Stamp Set. With one swipe of my finger across the greeting moments later, I smeared the ink so for sure I had to go to Plan B. I stamped the greeting on a strip of Blushing Bride and adhered it over the smeary greeting!

The ribbon at the top of the heart is the Blushing Bride 3/8″ Metallic Ribbon. (As I write this, this ribbon is backordered until March!) It doesn’t photograph too well but it has one sparkling side and one satin side. I tried slipping the heart charm onto the ribbon while I was tying it but I couldn’t get it how I wanted it and I didn’t want to take a lot of time to figure it out! I just adhered the bow to the top of the heart with Mini Glue Dots and adhered the heart charm separately.

When adhering the Heart Charms you can roll up a Mini Glue Dot very small to fit on the very narrow backside of the charm and even then work with it to make it fit. I put them on two places on this heart charm. The scalloped heart is popped up with Stampin’ Dimensionals®.

As I said, I started off planning to make the two cards identical, but on the second one, I changed it up! My white heart was already die cut but I took a chance and stamped it with Blushing Bride using the Lots of Heart Stamp Set. I got it a little off, that’s why you see a white edge, especially on the left side, but that just proves it is handmade! You can get this stamp set and the Many Hearts Dies together in the Lots of Heart Bundle and save 10% (plus be on your way to spending $50 and earning a FREE Sale-A-Bration product!) (And, it’s not backordered as I write this!!)

I turned the card to a vertical position and put a greeting at the bottom. This time I tied a little piece of white twine around the heart charm and placed it around the Silver 3/8″ Metallic Edge Ribbon already tied in a bow and adhered both to the top of the heart with Mini Glue Dots. I like the way it just hangs, not even perfectly.

I really liked the black and white polka dot paper with the pink of the Blushing Bride Cardstock. While it is now February and you might want to make cards like these for Valentine’s Day, I think you could send both of these cards with the exact same design any time during the year. They don’t “scream” Valentine! They could be for a birthday, a thank you, a thinking of you-type of card. Use the catalogs for inspiration and if your creativity takes you elsewhere after you get started, like it did me with these True Love Many Hearts Valentines and Cards, just go with it!

True Love Red Floral Card

True Love Red Floral Card

Would you believe this True Love Red Floral Card is made from the True Love Designer Series Paper except for the vellum and the greeting? This black and white designer paper with all sorts of designs give you all sorts of opportunities to be creative!

To make this card, I decided to copy a sample card in the January-June 2021 Mini Catalog on page 10 in the Love You Always Suite. I changed the colors of the flowers and how I arranged them and I put a different greeting on my card. My greeting took up a little extended space since it was longer and narrower than the sample card, so that caused me to move the flowers around a little.

The card base is Thick Whisper White and the striped pattern of the True Love Designer Series Paper covers the whole front of the card base. I didn’t leave any margin. The piece of vellum is 5 1/2″ x 3 1/4″. You could make yours any size. Just don’t glue it down yet because glue and other adhesives show through vellum.

Then I chose another of the patterns in the designer series with these flowers. I decided which ones I wanted as close to the edge of the paper as I could get and cut those out of the sheet. I colored them in with Stampin’ Blends Markers, the Light and Dark Real Red. I wanted my card to be black, white and Real Red! The flower center is just colored with Dark Daffodil Delight. The leaves are Granny Apple Green, Light and Dark, along with a touch of Daffodil Delight. An artist friend I know always said to mix some yellow in with green, so I do!

You can leave the flowers in the group in which they appear on the designer paper or if you need to cut them apart to make them fit on your card you can do that. Some I popped up on Stampin’ Dimensionals and one flower and one leaf is adhered right on the vellum.

The greeting is stamped in Real Red Ink on Whisper White from the Lots of Heart Stamp Set. It is die-cut with a die in the Tasteful Labels Dies as is the Real Red piece behind it.

If you place and adhere everything on to the vellum before you attach it to the card, you can turn the vellum over and apply adhesive on areas that are covered by the greeting and flowers on the front. That will hold it on to the card front without showing the adhesive through the vellum. I used Stampin’ Seal.

When you are looking for card ideas, if you don’t already have one in your head, think about looking at any of your Stampin’ Up! catalogs! You can copy any of the ideas, and most likely you will come up with your own version once you start creating!

Remember, Sale-A-Bration is going on so with every $50 you spend, you earn a free product in the Sale-A-Bration Brochure! No limit!

Be sure to check out the black and white True Love Designer Series Paper so you can have fun either designing with it as is or using different methods of coloring it like on this True Love Red Floral Card.

True Love Red Floral Card Closeup