Tag Archives: Art Gallery Stamp Set

Art Gallery Linen Flower Birthday Card

Art Gallery Linen Flower Birthday Card

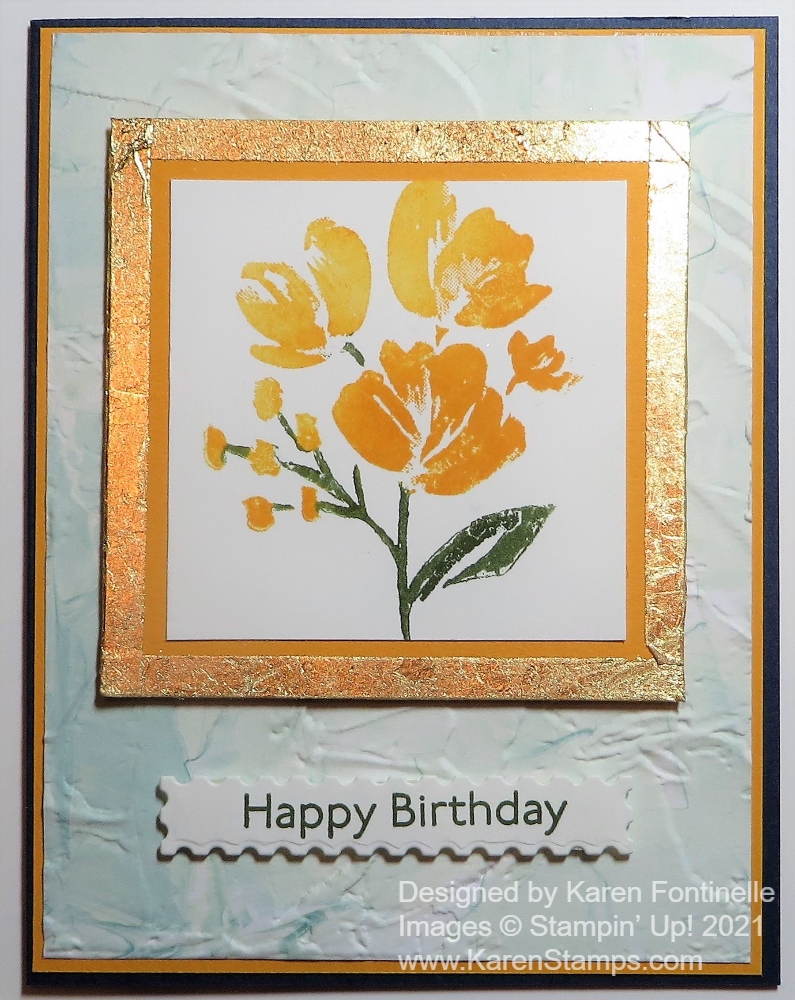
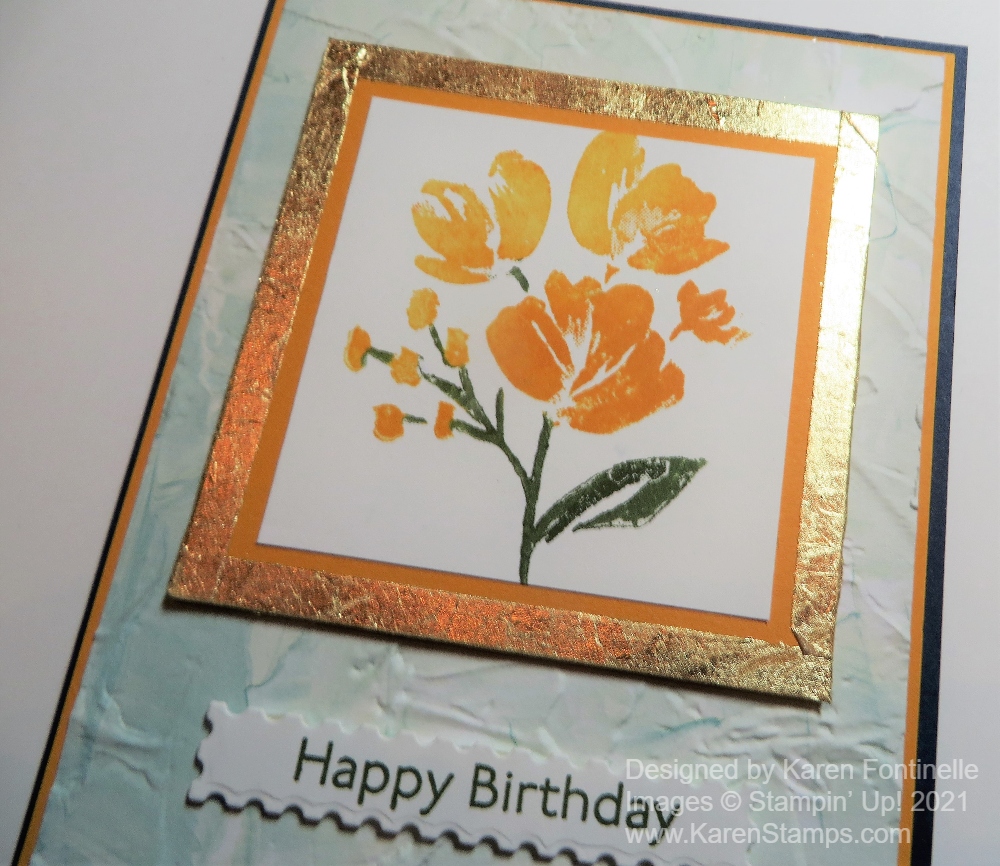
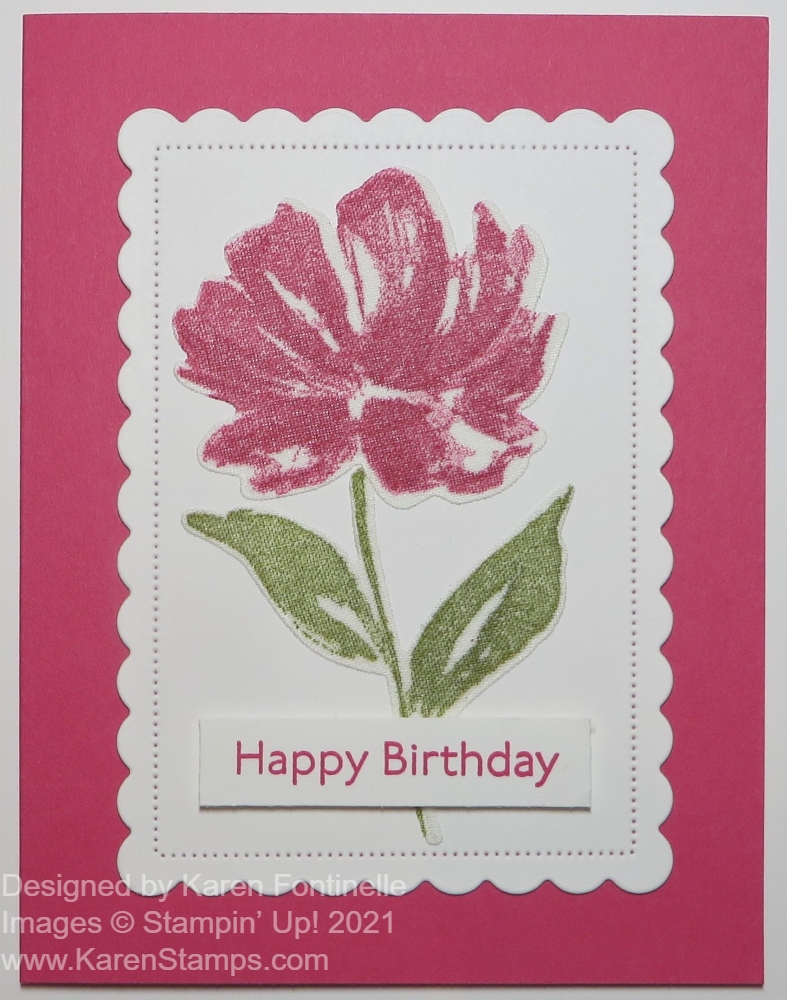
Something new in the Stampin’ Up! Annual Catalog 2021-22 is the Linen Paper that I used on this Art Gallery Linen Flower Birthday Card. Does this card have a different look to it than regular stamping? I think we all have lots of experimenting to do with this new product! I didn’t know such a think existed! And wait until you hear one of the features of this special paper!

The Linen Specialty Paper (155681) is on page 136, the first of the photos of products on that page. It’s easy to miss! So far I know you can stamp on it, die cut it, and blend ink on it. We will have to experiment with different colors, maybe using the Stamparatus so you can repeat the stamping to make it darker maybe, see what colors look good on the linen or not and more!

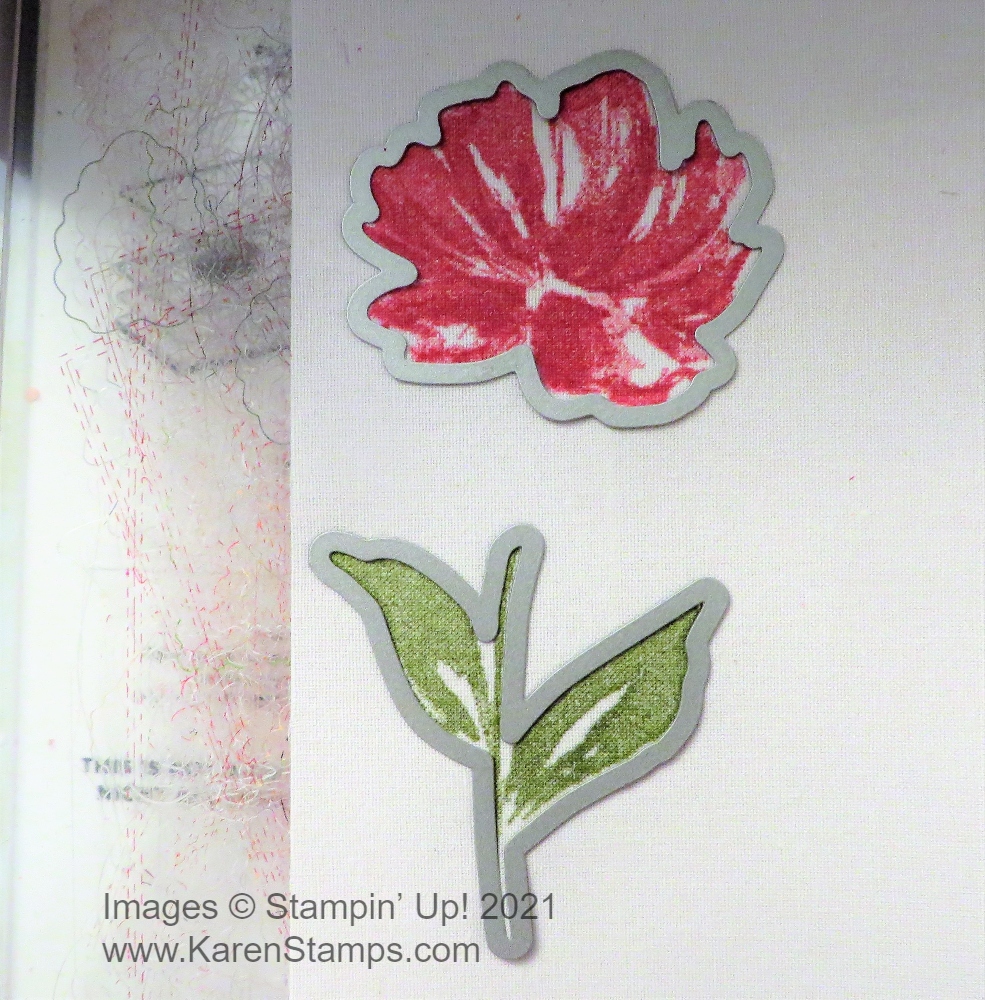
To make this card, I was pretty sure the ink color was going to turn out lighter than on regular paper. It doesn’t stamp quite as heavily as on paper, because this is fabric paper! The texture is going to keep the ink from being really smooth. I used Melon Mambo ink for the flower in the Art Gallery Stamp Set and Old Olive for the stem and leaves thinking these would be dark enough to show up well. I think the Melon Mambo stamped a little shade darker than it would have on paper. Just a different look! Then just die-cut it with the coordinating Floral Gallery Dies. The Linen Paper die-cuts just as nicely as paper, at least this first time!

Art Gallery Linen Flower Die Cut

The background I chose to put the flower on is Basic White die-cut with the Scalloped Contours Dies. These new dies will be very popular. And I didn’t even have to glue down the linen flower! The Linen Specialty Paper comes with adhesive on the back! After die-cutting, just carefully peel off the backing and you can adhere your die-cut linen piece wherever you want it! You probably should lay it out it out first to see exactly where you want to adhere it. If parts of your pieces are very thin, like this flower stem, just handle it carefully and try to place the larger parts where you want them first and then the skinnier areas.

The card base is Melon Mambo to match the flower, although, as I said, the stamped color looks slightly different than the cardstock. But it’s very close. Maybe it looked darker when I first stamped it than later on. The greeting is in the Art Gallery Stamp Set. In the end I decided to just keep the whole card simple, to focus on the linen flower. I tried all kinds and colors of designer paper as a layer under the die-cut scalloped piece and nothing looked right. I thought about added some jewels or embellishments and that didn’t seem right either! So in the end, I just left the card simple! Sometimes you have to know when to stop!

Here is a close-up of my card so you can see the Linen Specialty Paper better.

Art Gallery Linen Flower Birthday Card Closeup

How many more days until the new Stampin’ Up! Annual Catalog goes live? One!!! Tomorrow, May 4th is the day! Supposedly there will be no down time so if you want to order in the middle of the night you may be able to. However, on a new launch like this, LOTS of people like to order right away and the website will probably be a little wonky! If it crashes on you or the little thing just spins and spins, just keep trying until you catch it at the right moment….or come back a little later! It will likely be a busy day!

Today is the last day for the Last-Chance Products that are retiring! Check those out today!!

Tomorrow is the big day! Shop the NEW catalog!

SHOP STAMPIN’ UP! ONLINE HERE EVERYDAY!

Art Gallery Floral Card For Spring

Art Gallery Floral Card For Spring

I may have missed the first day of Spring, but this Art Gallery Floral Card For Spring is for the second day of Spring! I was pleased with how this card turned out with “just stamping”. The large flower stamps in the Art Gallery Stamp Set can be used with two-step stamping which adds extra interest, texture, and dimension with the possibility of different colors on the same flower.

For this card, I used pretty bright colors, like Melon Mambo for the card base and for the first top flower. I think with the holidays and winter, I hadn’t used Melon Mambo for a long time and it’s one of my favorites. For the other flowers, I used Daffodil Delight and Highland Heather, plus Mango Melody and Melon Mambo for the smaller flowers.

When you do two-step stamping, one way to do it is to ink up your stamp and then stamp lightly on scrap paper first, then stamp the image on your cardstock. This gives a light image, over which you can then stamp the second stamp, usually a little more detailed, which then shows up darker over the light image but doesn’t fully cover it at all. Or you can do it in reverse…..stamp the detailed image first and then the lighter image. Depending on the stamp, you might even be able to stamp full strength both times if the detail shows up well enough.

With two-step stamping, you can also use two different colors on the stamp. For example, you could stamp the lighter color in yellow and then use an orange shade for the second stamp. It might produce a colorful, shaded version of a flower like you might see in nature.

In order to stamp the large stem and leaf stamp in the set now on my card with not much space in between flowers, I stamped the large flower on scrap paper and then cut it out to use as a mask. After inking up the leaf stamp, I placed the cut out mask over the flower that would get the green ink on it if not covered. Then I stamped the stem and leaf. That way, the extension of the leaf and stem gets stamped over the mask instead of ruining your stamped flower. Then remove the mask and place it on another flower. Maybe don’t ink you the whole leaf image if that works so you don’t get ink where you don’t want it.

For the greeting, I simply stamped it right on the card. I could have made it a layer, but I ended up with that small empty space at the top of the card and it seemed perfect to just put the greeting there. This greeting is also in the Art Gallery Stamp Set as are many other choices in sentiments.

While you can use Basic White or Very Vanilla for the top card layer, for a change I used Shimmery White Cardstock. This is my favorite paper because it has a subtle shimmer. It’s just beautiful! It usually doesn’t photograph because it is so subtle, but in person, you can see it. You can stamp well on it and you can watercolor on it better than Basic White. Use Shimmery White when you just want something a little more special! It’s very nice paper!

Hopefully you are feeling spring where you live! We have certainly had some beautiful spring days to be outside in Houston lately, although it has been a little chilly in the mornings. In spite of our winter storm, our grass is turning green again (maybe a lot of weeds!) and the azaleas are blooming! The bugs are back out (yuck!), especially the mosquito hawks, that like to hang around doors and fly in the house. This is the perfect weather which we have to enjoy until the very hot, humid summer arrives.

Celebrate spring by making a few light, bright, and colorful cards after the doldrums of winter! It will lift your spirits and those to whom you send the cards!

SHOP STAMPIN’ UP! ONLINE HERE!

Fine Art Floral Birthday Card

Fine Art Floral Birthday Card

If you want to make a very quick and easy card, this Fine Art Floral Birthday Card is it! After hours of designing this card….I mean, when I pulled out the package of designer paper and saw this already cut strip of floral paper, I thought it would make a beautiful card! That’s how easy it is sometimes! Maybe sometimes you can spend hours working on one card, but it really isn’t necessary!

One of the many coordinating colors of the Fine Art Floral Designer Series Paper is Flirty Flamingo so I chose that color for the card base. I almost just glued on the designer paper, but I decided to try some strips of another color on each side. Old Olive won.

And as luck would have it, there was already a die-cut scalloped oval in the bag of cardstock so I just used that for the greeting. I stamped the birthday greeting from the Art Gallery Stamp Set on Basic White and die cut that with a plain oval in the Layering Oval Dies. I popped up the greeting with Stampin’ Dimensionals. As usual, I couldn’t resist adding a few Champagne Rhinestone Basic Jewels for some bling!

You could put an Easter greeting on this card and it would be beautiful to send, also! You just can’t go wrong with this beautiful Fine Art Floral Designer Series Paper for birthday cards or any other cards as well.

Fine Art Floral Thank You Card

Fine Art Floral Thank You Card

It was another cold day in Houston yesterday (although 40 degrees!) and a hard freeze during the night. At least our power has stayed on except for one evening. But instead of winter, I felt the need for a colorful, bright, springtime card! We will soon be back to warmer temperatures here.

This was actually an easy card to make even though with the die-cut greeting you might think it was harder than it is! The greeting is part of the Floral Gallery Dies. It is all one die but cuts out all the words separately. It would be handy to remember to use the Adhesive Sheets on the piece of cardstock so that when the words were die-cut, they would already have adhesive on the back. I never remember to do that, so I just put teeny tiny drops of the Multipurpose Liquid Glue on the back of the words. The good part of using this liquid glue is there is a little wiggle room to get the piece placed exactly where you want it. Be sure to save the little piece that is the dot above the letter “j” when you die cut. If you lose it, as I did, just put a tiny scrap under that part of the letter and die cut it again or just punch a dot.

The card base is Bumblebee Cardstock with a layer of the dark blue pattern in the Fine Art Floral Designer Series Paper. The die-cut words are Terracotta Tile in the previous In Color collection.

Here is another way to use just one of the die-cut words on a card along with a stamped greeting on this Fine Art Floral Thinking of You Card I made previously.

To finish the greeting, I stamped the words “thank you” in Night of Navy Ink from the Art Gallery Stamp Set on a scrap of Bumblebee Cardstock and cut out with a die in the same Floral Gallery Dies. Then I layered it on a strip of Terracotta Tile Cardstock and just flagged the ends. For a little pizzazz, I added two of the smallest Gold Glitter Enamel Dots.

Get the Art Gallery Stamp Set and Floral Gallery Dies together in the Art Gallery Bundle and save 10%!

All in all a very easy card to make and yet looks impressive! Just think of putting adhesive sheets on the FRONT of the words and then using the Gilded Leafing on the die-cut words! That would be impressive! I may try that! You can’t go wrong using this Fine Art Floral Paper on quick and easy cards like this Fine Art Floral Thank You Card.

SHOP STAMPIN’ UP! ONLINE HERE!

Art Gallery Floral With Gilded Frame Card

Art Gallery Floral With Gilded Frame Card

I couldn’t wait to play with the new Gilded Leafing again but I wanted to try something different and I came up with this Art Gallery Floral With Gilded Frame Card.

I’ve loved the little floral stamp in the Art Gallery Stamp Set in the Fine Art Floral Suite. I got the idea to stamp the flower and then make a gilded frame around it. Instead of using Versamark Ink and Heat & Stick Powder before applying the Gilded Leafing, as I did on this card, I simply made the frame with strips of Tear & Tape Adhesive! You can either pick up pieces of the gold leaf and stick it onto the adhesive, which I started doing. But then I just plunged the piece into my container, pulled it out but still held it over the container, and simply rubbed most of the excess off with my fingers. The Gilded Leafing is so soft, you almost want to stick your hands in it! When I had most of it off, I used a soft brush I had from years ago to brush off the last little bits. You can also use one of the Stamping Sponges.

The card base is Night of Navy, and I chose that because on another card I made with the Dandy Garden DSP I really liked the yellow flowers and dark blue background of that paper. I started off coloring the stamp with Stampin’ Write Markers but since it was new and I hadn’t prepared the stamp first, the ink from the markers just beaded up. I decided to just skip to a regular ink pad, Mango Melody. I tried to mostly get it on the flowers but I knew that even if I got it on the leaves, that’s okay because they would be covered with green ink. On these I did use the Mossy Meadow Stampin’ Write Marker because it was the darkest green and it would look lighter stamped. What you see on the card is my first attempt, so it worked out great! I layered this on a piece of Mango Melody Cardstock and then added the Gilded Leafing around the sides.

Since I had used the Mango Melody under the flower piece, I decided to use it as a thin layer on top of the Night of Navy card base. The top layer is a piece of the Fine Art Floral Designer Series Paper. Instead of using the floral side, of course, I turned it over and used this light blue with a pattern on it that looks like it was painted with a paint brush! To add to that texture, I embossed the paper with the Painted Texture 3D Embossing Folder.

I adhered the floral piece to the card front with Stampin’ Dimensionals®. For the greeting, I stamped a birthday sentiment from the Art Gallery Stamp Set in Mossy Meadow Ink and then die-cut it with a die in the Floral Gallery dies. I think all of these main products are in the Fine Art Floral Suite! I’m sure it will be one of the most popular Suites in the Spring Mini Catalog! Everything in that Suite is lovely!

If it isn’t on your shopping list yet, be sure to put it on there, at least if you like florals. The paper is gorgeous. The Gilded Leafing is fun and elegant. The Fine Art Ribbon is beautiful and soft. You will want everything!

Remember, with every $50 increment you purchase, you earn a free Sale-A-Bration product! If you spend $100 or more, you can choose one of the special Level 2 products, unless you want two Level 1 products at the $50 level.

Art Gallery Floral With Gilded Frame Closeup

SHOP STAMPIN’ UP! ONLINE HERE!

Mini Pizza Box and Card With Golden Garden Acetate

Golden Garden Acetate Sheet Pizza Box and Card

You can play around with the new Acetate Sheets in different ways for a different look to your cards and projects like on this Mini Pizza Box and Card With Golden Garden Acetate. These acetate sheets are in the Fine Art Floral Suite.

After making this card the other day, I used a scrap piece of the Golden Garden Specialty Designer Acetate Sheets on this small gift card. You don’t have to only use it with the Fine Art Floral Designer Series Paper. You can use it on its own over a piece of cardstock. For this card, I just used a piece of Basic White Cardstock for the card base and adhered the acetate sheet on the front. The greeting is in the Art Gallery Stamp Set in the Suite. It is just stamped on white and layered on a piece of Gold Foil. The ribbon tied around the side is the 3/8″ Fine Art Ribbon.

Here are some things to know about the acetate sheets! On the backside of sheet, the backside of the gold design is silver! So you can use whichever color you like. There is also a protective plastic sheet on the backside of the acetate, on the silver side, so be sure to remove that before using. As for how to adhere the sheets to your card or project, you may be able to hide the adhesive underneath some other element on your card, such as under the greeting or under the ribbon. Some people are using Mini Glue Dots and hiding them under whatever they can. I chose to use teeny tiny dots of the Multipurpose Liquid Glue. Have a piece of scrap nearby so you can squeeze out a bit of glue to make sure it won’t pour out when you are trying to use really small dots! I just put the tiny dots under the widest parts of the gold design to try to hide it.

For something different I put together a Mini Pizza Box and added a piece of the Golden Garden Acetate to the top of the box. I used the shiny side for the outside this time. As I was assembling the box, I thought it felt a lot thicker and harder to fold for some reason! Well, the reason was revealed when a second box fell apart from the one box I thought I was working with. I was trying to crease two boxes stuck together and thought I only had one!!

For the pizza box, after adhering the acetate to the top of the box with teeny tiny dots of Multipurpose Liquid Glue. I actually can see the glue that oozed out from under the spot when I placed it, but honestly, no one else will even notice it. I can see it because I’m looking for it, but it doesn’t really show. I also added strips of Gold Foil around all four sides. The greeting is also in the Art Gallery Stamp Set and is die-cut with a die in the Floral Gallery Dies, layered on a piece of Gold Foil. Then I just tied a piece of the 3/8″ Fine Art Ribbon around the box, which holds the lid closed and also is an embellishment. This is an easy way to make a little box for a gift, treat, or maybe some notecards or a cookie inside!

Mini Pizza Box and Card With Golden Garden Acetate

The Fine Art Floral Suite is a beautiful group of products for you to make lots of pretty things! Check them out in the Stampin’ Up! Online Store along with the other January-June 2021 Mini Catalog products.

Art Gallery Flowers With Gilded Leafing

Art Gallery Flowers With Gilded Leafing

I finally got a chance to play with some of the new products in the Fine Art Floral Suite in the January-June 2021 Mini Catalog! I almost made a giant mess but I think the card turned out pretty well for my first try!

I started with a card base of Magenta Madness, one of the current In Colors. When I looked for a piece of white cardstock for the layer, I had a shorter piece and decided to just cut it down to 4″ x 4″ instead of covering the whole front of the card.

One of the new products I have been dying to try was the Gilded Leafing! If you get this, it’s a REAL GOOD IDEA to put the whole jar in a large enough container that a card will fit into. That way you can stick the whole card into the gold leafing to apply it. I found a perfect size container in the closet but I still nearly spilled it while making this card when the attached lid pulled it backward! Yikes! What a mess that would have been! The gold leafing is very thin, light, and will go ANYWHERE if you let it! Some pieces are big, some are tiny.

I stamped two flowers with Magenta Madness Ink and then used the two-step stamping smaller image to stamp over the original flower with Versamark Ink. Then I dumped on the Heat & Stick Powder (it’s back!) and embossed it with my Heat Tool. You don’t want to overheat the Heat & Stick Powder. After I heated it, I just plunged the card face down into the Gilded Leafing! It came up looking like a mess like a kindergartner would have made. But I just rubbed off some of the big pieces of leafing and then used a retired stencil brush I had from Stampin’ Up! from many years ago I think. I just brushed and brushed the gold leafing until all the excess came off.

You should really do all your stamping before you add the gold leaf. I added two Mango Melody flowers and got the gold on my stamp where it overlapped. Luckily it did wash off my stamp at the sink.

I adhered a strip of the 3/8″ Fine Art Ribbon that has gold threads in it along the bottom of the stamped panel. I tied a separate small bow and adhered it with several Mini Glue Dots.

For the greeting I stamped the sentiment on a scrap of white cardstock and die cut with the die in the Floral Gallery Dies. You can buy the dies and the Art Gallery Stamp Set together in the Art Gallery Bundle.

To check out all these new products, especially the Gilded Leafing, check out pages 32-34 in the spring Mini and also in the Online Store!

Art Gallery Floral You Are Lovely Card

Art Gallery Floral You Are Lovely Card

Here is a quick and easy card for you to make, my Art Gallery Floral You Are Lovely Card, with new products in the Stampin’ Up! January-June 2021 Mini Catalog. This is from the Fine Art Floral Suite of products on pages 32-34.

This Suite has a lot of products in it allowing you to make the fanciest of cards and projects if you would like to. You can do two-step stamping, you can add gold leafing with the Gilded Leafing Embellishment, you can add gold foiling with the Golden Garden Designer Specialty Acetate, you can die-cut images, add texture with a dramatic embossing folder, Painted Texture. You can use all those things, but if you want a simple card you can make one like my card today. This is an easy card design all of us use a lot in various ways.

The card base is Bumblebee, one of our new In Colors, and one of the MANY coordinating colors with this designer paper. First, I randomly stamped one of the flower images from the Art Gallery Stamp Set on the card front in Versamark Ink. I also could have used Bumblebee Ink for the same type of watermark look. After using the Versamark Ink I could have used Clear Embossing Powder on the flowers if I wanted, but I was keeping this card simple.

The beautiful designer paper is the Fine Art Floral Designer Series Paper. I cut a narrow strip of it to adhere along the side of the card. My strip is 5 1/2″ x 1 1/2″. You could make the strip a little wider if you wanted to or even allowed a slight margin along the fold showing the card base rather than right up against the fold. Before adhering the designer paper to the card front, I added a bit of Mossy Meadow 3/16″ Braided Linen Trim on page 59 of the Spring catalog. I tied a separate bow and adhered it with Mini Glue Dots.

The greeting is stamped in Bumblebee Ink from the same stamp set and then die cut with the small banner die in the Tasteful Labels Dies. It is then popped up with Stampin’ Dimensionals.

That’s all there is to making this card. Randomly stamp the flowers on the card front, add a strip of designer paper along the side with some linen trim for embellishment, stamp and die-cut a greeting and you are done. You could even skip the dee-cutting, just cut a small rectangle for the greeting.

It’s fine and it’s fun to make more involved, fancier cards and projects, but if you are in a hurry or you are a beginner with not as many supplies, it is perfectly fine to go simple with a card design like this Art Gallery Floral You Are Lovely Card.

SHOP STAMPIN’ UP! ONLINE HERE!

Fine Art Floral Golden Garden Birthday Card

Fine Art Floral Golden Garden Birthday Card

I thought I would make an easy but beautiful card for this blog post and of course that meant using the Fine Art Floral Suite to make this Fine Art Floral Golden Garden Birthday Card. I know the title is a little weird, but it’s because I used the Golden Garden Designer Specialty Acetate Sheets. I didn’t even know what they were called, just that they were in the new spring mini catalog and I had them! If you place them just right, some parts match this designer paper!

First I made the card. I wanted to use the Fine Art Floral Designer Series Paper. I chose the sheet that has one top corner bare of flowers. Actually, there is another sheet with a blue background and yellow flowers, but this one has the white background with pinkish flowers. You’ll see it in your package. You could also just frame this sheet of paper, kind of like some other designer paper we had one time! Or use it for a scrapbook page. I chose So Saffron for the card base, one of the paper’s coordinating colors….and there are a lot of coordinating colors with this paper!

Next, I got out the Golden Garden Acetate Sheets and found the portion that matched the flowers on the paper and cut it out. I just put tiny dots of Multipurpose Liquid Glue on the back of the acetate on the widest parts of the printed design in hopes of hiding the glue. Actually, when you turn the acetate over, you could use that side instead! Then I carefully overlaid the acetate on the floral paper. Be sure to adhere the ribbon around the designer paper and acetate before you adhere to the card base. I added a piece of the 3/8″ Fine Art Ribbon which is soft, pliable, and has gold in it!

The greeting is stamped in Flirty Flamingo Ink from the Art Gallery Stamp Set in the Suite. I die cut the piece with one of the Tasteful Labels Dies. Next, I cut out two flowers from a scrap of the designer paper and popped them up on the corners of the greeting. I’m not sure if I like them or not, but they are there.

That’s all there is to this card! Once again, the beautiful designer paper does most of the work to give you a lovely card! The acetate overlay is a bonus. HERE is another card I made recently with both sides of the same designer paper.

You’ll find all of these supplies in the January-June 2021 Mini Catalog. And while you are ordering, be sure to keep Sale-A-Bration in mind and order in $50 increments so you earn FREE Sale-A-Bration products! No limits!

If you want EVERYTHING, order the Fine Art Floral Suite Collection (155982) and get it all by just putting in one item number. It has been on backorder but as I write this it should be available next week. Or just order the individual products that you want, or the Bundle. I’m sure you will want these beautiful products to make a card like this Fine Art Floral Golden Garden Birthday Card!

Fine Art Floral Thinking of You Card

Fine Art Floral Thinking of You Card

I’m finally getting a chance to play with some new things in the upcoming January – June 2021 Mini Catalog, coming January 5th and the result was this Fine Art Floral Thinking of You Card.

As you can imagine, this Fine Art Floral Designer Series Paper is gorgeous! When you get your catalog or look at it online next week, look at the back cover because you will see how the artists created the designs for this paper. One side of every sheet is a floral design and the other side is a more generic, plainer watercolor washed design.

And when you look at the back of the designer paper package, you will be amazed at how many coordinating colors go with this paper! I think there were twelve colors plus white. I always write all the colors with a marker on the back cardboard so I can read them easier than trying to squint and read Stampin’ Up!’s tiny print!

The card base is Flirty Flamingo. I cut a strip of the designer paper thinking I would put it on the side of the card, but as I turned over the floral side, I really liked the other side, too, and ended up with this design I adhered two strips of the “other side” to the sides of the card but leaving 1/4″ of Flirty Flamingo showing, and then adhered the floral side over the top and down the middle. That panel is 2 1/4″ wide. Not what I had planned at all, but it’s what it turned out to be!

For the greeting, I sort of copied a sample in the catalog. I die-cut only the word “just” from a die in the Floral Gallery Dies. The die says “just want to say” but I just laid the Merry Merlot Cardstock over the word “just” and die cut that. Don’t forget to save the dot over the J!

I die cut the label for the greeting from the Tasteful Labels Dies in the Annual Catalog. Then I stamped the “thinking of you” in the new Art Gallery Stamp Set on the label in Merry Merlot ink but did not ink up the “I’m”. I got lucky and did not mess it up! Then the die-cut word “just” is adhered to the label also. I popped this greeting up with Stampin’ Dimensionals. You can purchase the Art Gallery Stamp Set and the Floral Gallery Dies in the Art Gallery Bundle and save 10%.

I thought I was finished and was ready to photograph the card but I thought it still needed “something”. Of course that something was a little bling from the Champagne Rhinestone Jewels.

Once I had the design figured out, it was a pretty easy card to make. This is a beautiful suite that you will be attracted to when you see the new catalog!

The new January-June 2021 Mini Catalog starts Tuesday, January 5th….next week!! That will also be the first day of the biggest promotion of the year, Sale-A-Bration! What a week to look forward to!