Tag Archives: Plaid Tidings Designer Series Paper

Plaid Tidings Christmas Wreath Card

Plaid Tidings Christmas Wreath

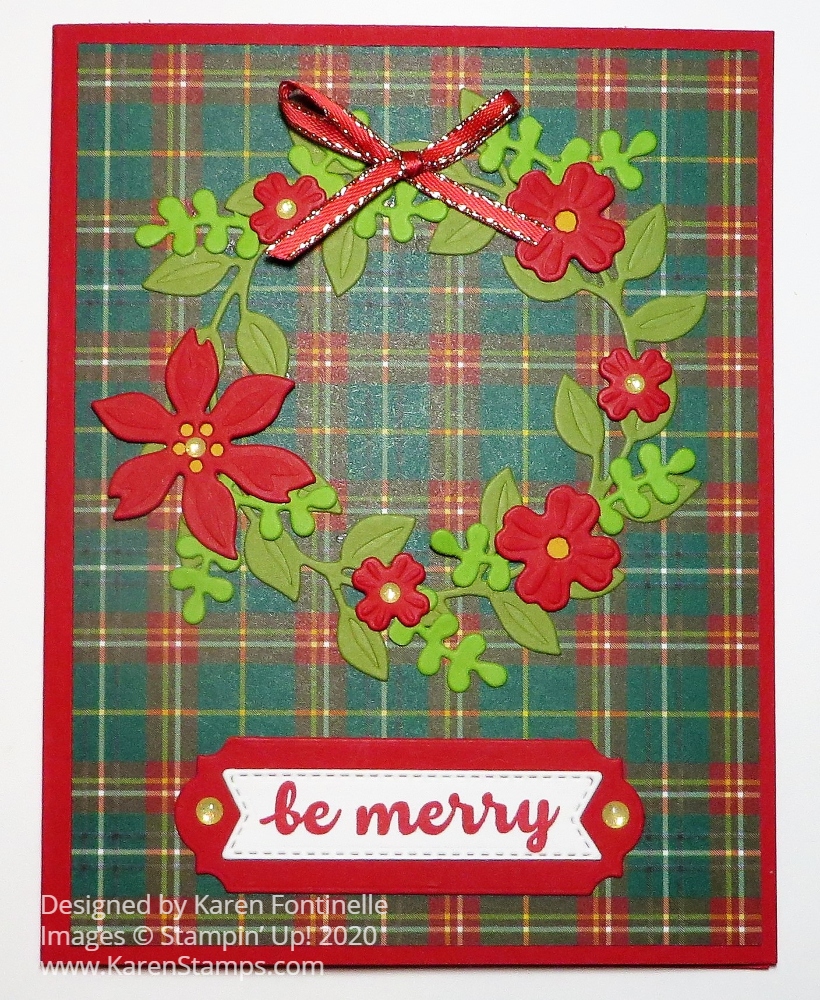
Fresh off making a Thanksgiving card with plaid designer paper, I wondered if I could do one with a wreath and I came up with this Plaid Tidings Christmas Wreath Card.

The card base is Real Red (although I could have used Cherry Cobbler also). Then I chose this red and green plaid pattern in the Plaid Tidings Designer Series Paper. I die cut a wreath with the Wreath Builder Dies. I was going to leave it as is, but I ended up cutting out another partial wreath out of Granny Apple Green for contrast and cut off little sprigs to add on to the main wreath.

I die cut several flowers of different sizes out of Real Red Cardstock with dies in the Wreath Builder Dies. Since the die punches out out a tiny center circle from the flowers, I decided to cut very small pieces of Bumblebee Cardstock to adhere to the back of every flower to give it a yellow center. I wouldn’t have had to since I planned to add a jewel to the center, but I did it. A little tedious, though! After placing and adhering the flowers around the wreath, I added Gold Glimmer Enamel Dots to some of the flowers.

The greeting is stamped in Real Red ink on Whisper White Cardstock from the Banner Year Stamp Set and die cut from the Tasteful Labels Dies. Then this greeting was layered on a Real Red die cut from the Ornate Frames Dies. I also added Gold Glimmer Enamel Dots to each end of that piece.

After I got the wreath adhered to the card front, I added a small bow to the top of the wreath. The ribbon is the All The Trimmings Ribbon Combo Pack. The red color is actually Poppy Parade trimmed in gold but it looks fine on my wreath. The other color in the ribbon combo is Old Olive.

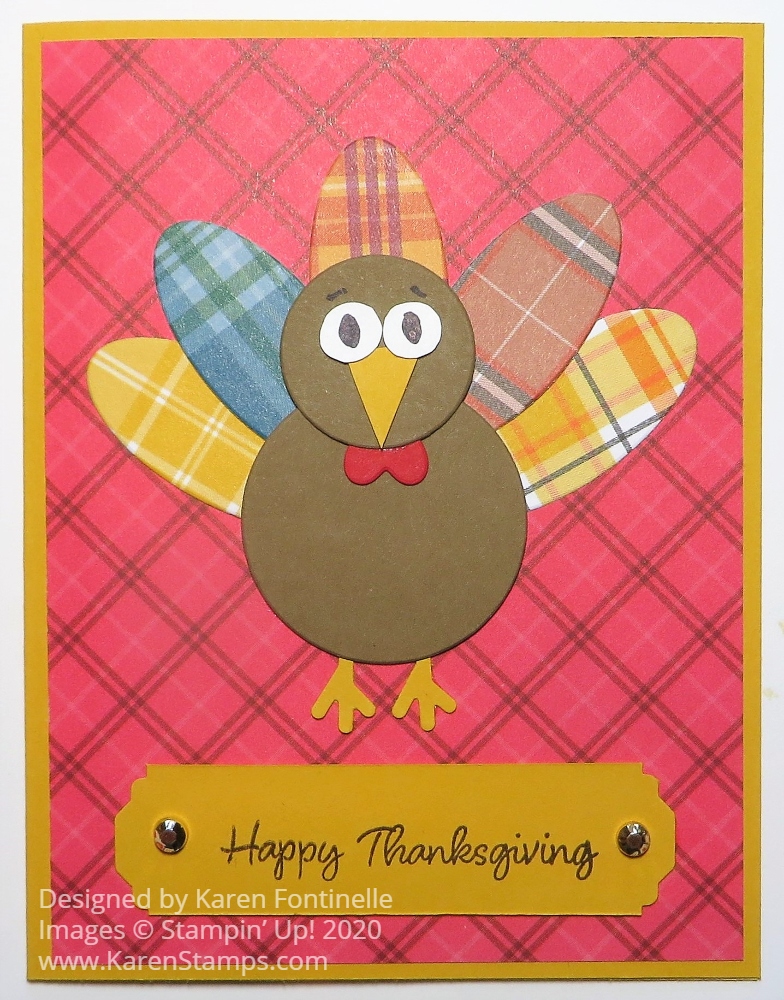
The Arrange A Wreath Bundle is a great one to own and use well past Christmas. You know you can make a wreath for any occasion on any card or project so don’t think it is just for the holidays. Here is a Thanksgiving card I made with the Bundle. Change up the colors for a birthday or whatever occasion you need.

If you start making Christmas cards now, you will be ahead of the game and not so rushed right in the midst of the holidays. It’s already November! So get a head start, maybe make a version of this Plaid Tidings Christmas Wreath Card that is a little bit simpler. But now that you have the design it won’t be so hard to duplicate! Have fun stamping!

SHOP STAMPIN’ UP! ONLINE HERE!

Plaid Tidings Turkey Thanksgiving Card

Plaid Tidings Turkey Thanksgiving Card

To celebrate the first day of November, I made this Plaid Tidings Turkey Thanksgiving Card! After all, now that it is November, it won’t be long until Thanksgiving! When it is time to take down the Halloween decorations, it’s time to put up a few Thanksgiving turkeys, Pilgrims, pumpkins, whatever you have for Thanksgiving.

I copied myself to make this card! Back in 2016, I made this punch art turkey to decorate a candy bar for Thanksgiving. This year we don’t have the same type of punches so I had to look at my dies for the basics. But you’ll be surprised to see how I made the turkey feet!

For the turkey body, I chose two Layering Circles Dies. I chose a small circle for the head and two sizes larger circle for the body. The Plaid Tidings Designer Paper was used for the feathers and I used the Oval Layering Dies. You could even use two or three rows of feathers if you really wanted to die cut a lot of ovals. Or just use colored cardstock instead of designer paper.

I just cut the beak out by hand from Crushed Curry Cardstock. The red wattle hanging on the turkey’s neck is a die cut from the die of a group of little hearts in the Be Mine Stitched Dies. We used to have some heart punches that worked so if you still have your old punches you could substitute some of these dies. Or just cut out a heart by hand. I couldn’t find anything the right size for the turkey eyes (Bring back the Owl Punch!) so I die cut two small flower dies that kind of gave me the circle shape that I could trim out. Then I just used a black marker to color in the eyes. The feet of the turkey stumped me for a bit but when I looked at my punches for a small circle, guess what I found? The Snowman Builder Punch has two stick arms and they were perfect for the turkey feet! Who would have thought?!

The card base is Crushed Curry (I thought I was probably going to use Soft Suede.). I thought I would look through my Plaid Tidings DSP to see IF there was one I could use for the background layer but really thought I would use a solid cardstock color. When I saw this red plaid and tried it, I wanted to use it. I think it is a bright Thanksgiving card with the red paper.

The greeting was also a surprise. I was thinking there weren’t too many “Happy Thanksgiving” greetings out there. I was about to settle on a “Celebrate” saying in the Many Mates Stamp Set when I noticed my Banner Year Stamp Set which actually had a “Happy Thanksgiving” greeting in it! That stamp set is a sleeper! I have used it so much and didn’t really expect to.

The greeting is stamped in Soft Suede Ink on Crushed Curry and punched on each end with the Lovely Labels Pick a Punch. For some embellishment, I used two Gilded Gems on each end.

I like these Gilded Gems but they are a little bit high which could make them difficult to mail. When I have something like these gems or rhinestones on a card, I usually cut a piece of paper towel to cover the front of the card in the envelope. You could also use another piece of paper, particularly if you have a paper crimper that you can use to give it some texture which I think might help protect the embellishments.

This is one way to make a punch art or maybe die-art turkey for a card for Thanksgiving! Dig out your old punches or look through your dies and see what you can use. Or even just cut out pieces by hand if you don’t have the right thing.

It’s November so we are off to the races with the big holidays coming up and I have my first Thanksgiving card made in this Plaid Tidings Turkey Thanksgiving Card.

SHOP STAMPIN’ UP! ONLINE HERE!

Coming Tuesday, November 3rd!

Curvy Celebrations Header

Snowman Season in Plaid Tidings Christmas Card

Snowman Season in Plaid Tidings

I had almost forgotten that this snowman stamp set from last year was still current this year, so when I came across the Snowman Season Stamp Set I knew I had to make this Snowman Season in Plaid Tidings Christmas Card.

You will find this Snowman Season Stamp Set in the Stampin’ Up! Annual Catalog. It was a favorite stamp set from last year – the cute snowmen and also the Snowman Builder Punch. You can’t but feel happy when you stamp with these snowmen in this set!

First I chose the plaid pattern I liked in the Plaid Tidings 6″ x 6″ Designer Series Paper. Then I chose the Seaside Spray Cardstock with a layer of Cherry Cobbler.

The snowman is stamped on a Tasteful Labels Die in Memento Ink. I colored with Stampin’ Blends but you could also use other coloring methods, like maybe Watercolor Pencils. I die-cut a stitched scalloped rectangle in the Stitched So Sweetly Dies out of Cherry Cobbler, but it seemed like too big an area behind the snowman. I decided to add a rectangle of Seaside Spray that would fit inside the stitched die and that solved the problem.

Before adhering the snowman pieces, I adhered a piece of Silver 3/8″ Metallic-Edge Ribbon from top to bottom of the Seaside Spray layer. Then the snowman die piece was popped up on Stampin’ Dimensionals®. I tied a separate bow and adhered it to the top with Mini Glue Dots.

The greetings in the Snowman Season Stamp Set were a little too big, so I used one from the Itty Bitty Christmas Stamp Set. I simply stamped it on a narrow scrap of Whisper White and used the new Lovely Labels Pick a Punch to punch each end of the greeting. It is popped up with Dimensionals on each end so that it is the same level as the snowman piece. For a little bling, I could have used Snowflake Sequins around the snowman, but instead, I used the Elegant Faceted Gems in three spots to resemble snowflakes.

It was fun to find this stamp set from the Holiday Catalog last year and make something updated with it this year! Here is a link to a card I made last year with the set and the Snowman Builder Punch. Choose stamp sets and papers that bring you joy for making your holiday and Christmas cards so it will be a fun endeavor! This Snowman Season in Plaid Tidings Christmas Card will make you happy all day long while you make multiples, perhaps, of this card!

SHOP STAMPIN’ UP! ONLINE HERE!

Remember to use your Bonus Coupons during August if you earned some in July!

Ghoulish Goodies Halloween Clear Tiny Treat Box

Ghoulish Goodies Halloween Clear Tiny Treat Box

For my first, of probably many, Halloween posts for this year, here is a Ghoulish Goodies Halloween Clear Tiny Treat Box. Who knows what Halloween will look like in this pandemic year, but you can still make Halloween treats for your family or even yourself! Thank goodness the grocery stores are still able to deliver craft supplies, such as chocolate candy for treats!

As always, I love and highly recommend keeping a package or two of the Clear Tiny Treat Boxes on hand! They are only 2″ x 2″ x 2″ but food safe and have enough room for a decent treat without being too big. Or add some other small gift inside for any occasion. These boxes come flat, protected by a piece of plastic you remove, then assemble and decorate. Couldn’t be easier!

For this Halloween treat box I wrapped around a piece of the Plaid Tidings 6″ x 6″ Designer Series Paper. Now you may have figured out that a 6″ long strip will not wrap all the way around the box. I cut two strips, then realized I needed the plaid design to march up if I wanted to be picky about it (and of course most of us do!). Actually my strips were only about 1/8″ off so I matched them up, adhered the ends together then trimmed off the excess on each side. It worked fine. Or you can wrap the 6″ strip around from the front to each side and add another piece for the back. Make it longer so you can adhere the ends inside the side pieces to make it look neater.

The tag is stamped in Pumpkin Pie ink on Whisper White with a stamp in the Ghoulish Goodies Stamp Set. What a perfect saying for Halloween treat packages! I die-cut it with a die in the Tasteful Labels set of dies. Then I wanted some kind of layer, so I cut another label which was too small, but I cut it in half lengthwise and added it to each side of the treat tag. This is the Pumpkin Pie piece. To cover up the back, I adhered the whole thing onto a rectangle of Basic Black with just a small margin and simply cut those corner curves by hand. Doesn’t have to be perfect! The tag is already almost too big for the treat box so I couldn’t keep adding larger layers.

To attach the tag and further decorate the box, I used the beautiful Black 3/8″ Glittered Organdy Ribbon. It’s almost too pretty to use on a treat box but it does look great! I punched a small hole in the top of the tag, put a piece of Linen Threat (or whatever twine I had laying around here) through the tag and tied it on to the ribbon, then finished tying the ribbon in a know. You could do a bow instead.

To decorate the front of the box (and to use another new stamp!), I stamped the black cat from Ghoulish Goodies. Then I colored in its eyes with a Granny Apple Green Stampin’ Blend marker and the collar with Pumpkin Pie. I just punched out the cat with my 1 1/2″ Circle Punch and then layered it on a die-cut from the Tasteful Labels Dies again. Love those scalloped circles in that set!!

Put your treat or gift in the box before you tie it up! Luckily I had fresh chocolate kisses wrapped in purple (dark chocolate), perfect for Halloween! These candies are meant for crafting, of course! (Or for after lunch or dinner as a digestive, of course!).

Here’s a super-simple treat I made with the Clear Tiny Treat Boxes recently.

Yes, it’s time to start having fun with Halloween because now that it is August, it is really almost September and you know Halloween isn’t far behind! Check out the Ghoulish Goodies Stamp Set and others in the new holiday mini, August-December 2020 Mini Catalog. If you need a copy, send me your contact information at Karen@Karenstamps.com Then you can start making your own Ghoulish Goodies Halloween Clear Tiny Treat Box or something similar!

Masculine Plaid Tidings Birthday Card

The plaid paper on this Masculine Plaid Tidings Birthday Card is coming soon in the August-December 2020 Mini Catalog on August 4th. Now when I first saw it in the holiday catalog, I wasn’t too thrilled and might have passed it up. I did notice it could be used for Christmas, fall, or Halloween and probably other things but I wasn’t that excited about it. But I did order it and when I opened the package, I just loved the paper!!

The Plaid Tidings 6″ x 6″ Designer Series Paper package has all kinds of plaids in it. There is a long list of coordinating colors! Although we might think of it as holiday paper, whether for Christmas or the oranges for Halloween, Fall, or Thanksgiving, I decided to use a sheet for a birthday card. While it could be for anyone, the plaid gives it a masculine look in this case and we’re always looking for things that work well for masculine cards for the men in our lives. The red on this paper is Cherry Cobbler and the green might be Shaded Spruce or Mossy Meadow. I wasn’t sure!

The card base is Cherry Cobbler and the red and green plaid paper is adhered to that. The greeting is from the Many Mates Stamp Set. It is stamped in black Memento Ink. It’s an outline stamp and you can leave it as is or in this case I colored in the letters. I used my Cherry Cobbler and Mossy Meadow Stampin’ Blends markers.

I stamped the greeting on Whisper White and die cut it with the Stitched Nested Labels Dies. Then I made layers with the same dies out of Cherry Cobbler and Mossy Meadow.

Due to not having the right colors of ribbon, I decided to just use some 1/4″ strips of cardstock scraps for tails hanging from the bottom of the greeting panel. I even cut the little bitty flagged ends with my Paper Snips. You could use more or less strips. I started thinking three would be good and ended up with five! After adhering the strips on the back of the layers with our new Stampin’ Seal Adhesive, I popped the whole thing up on Stampin’ Dimensionals®. Even then I wanted another little something, so I used two gold Metallic Pearls.

This is actually a pretty easy card to make! If you didn’t have the particular dies, you could use rectangles or ovals or circles or even just cut rectangle layers. Just stamp a greeting and choose your favorite plaid paper for the occasion!

You’ll find the Plaid Tidings Designer Paper in the Holiday Catalog, now known as the August-December 2020 Mini Catalog on page 57. I think you will be surprised how much you like this paper and how often you can use it for your projects, like this Masculine Plaid Tidings Birthday Card.