Category Archives: Big Shot

Clear Tiny Treat Box With Sunflower

Clear Tiny Treat Box With Sunflower

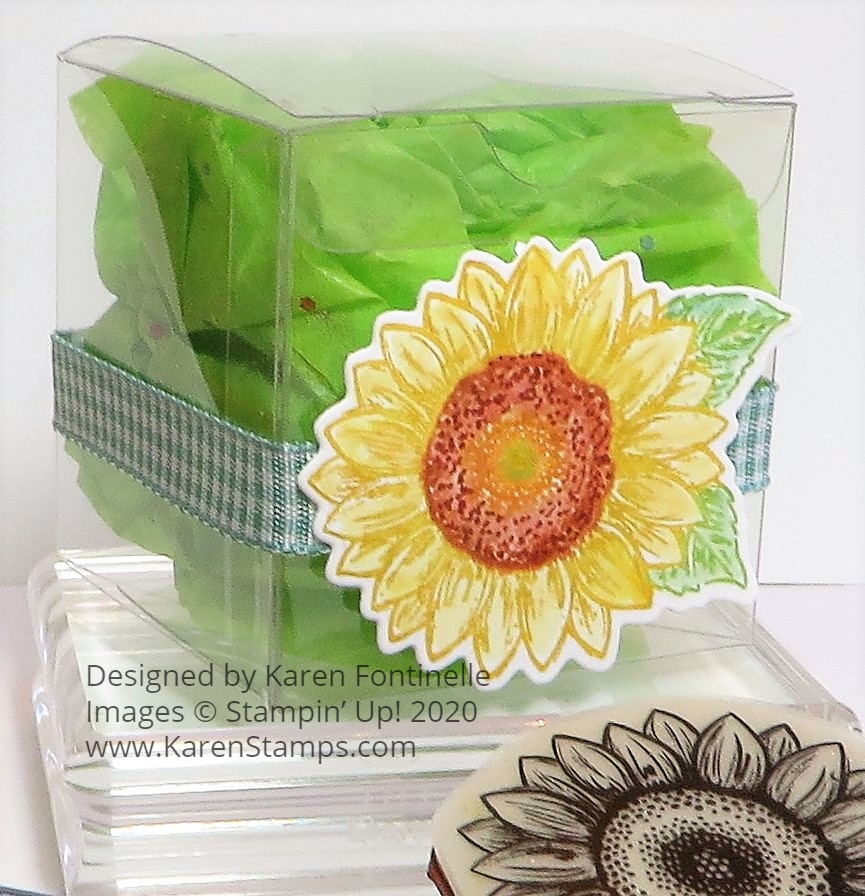
One of my favorite extra products in the Stampin’ Up! Catalog besides stamps, paper, and ink, are the Clear Tiny Treat Boxes which can be decorated like this Clear Tiny Treat Box With Sunflower. Put a candy treat inside or a small gift and you are good to go! Just keep a package of these treat boxes in your stash for any occasion that arises.

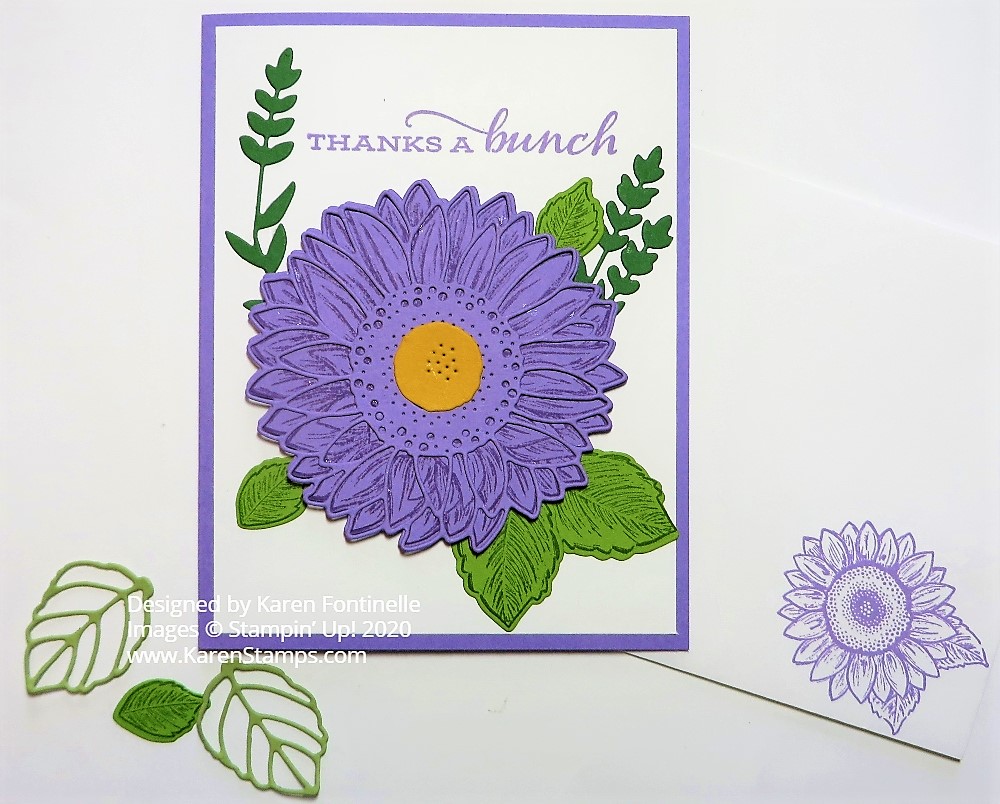
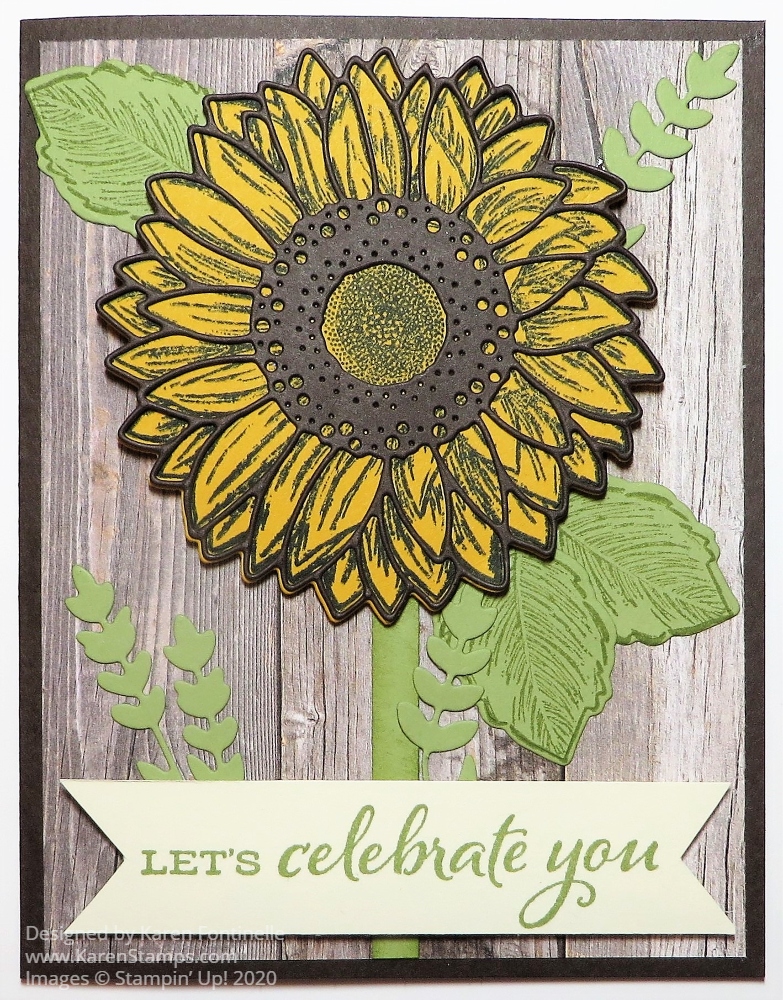
The stamped sunflower is the smaller one in the Celebrate Sunflowers Stamp Set. This is the technique I used to stamp and color this sunflower:

  • Use Stampin’ Write Markers to color directly on the stamp in the different colors, huff on the stamp, then stamp on Whisper White Cardstock.
  • Use a Blender Pen to pick up ink from the ink pad lids of whatever colors you choose to lightly color in the white space on the stamped flower. Although I used a Crushed Curry marker to color on the stamp, I used So Saffron Ink with my Blender Pen to fill in the flower petals. I used a Granny Apple Green marker for the leaves but colored in with Mint Macaron.
  • The flower center didn’t look good filled in with Soft Suede so I went back with Cajun Craze lightly to match the markers. When it looked too solid or something, I used the small tip of the marker to fill in a lot of tiny dots around that center.
  • The very center has some yellow and a tiny bit of green.

Blender pens are good to use because you tend to get a lighter color using them but you can pick up more ink and get a darker shade. We used to use Blender Pens all the time, back in the “olden days” when I first became a Demonstrator. You can pick up ink from the ink pad or lid with them, pick up ink directly from the marker tip, blend Watercolor Pencil colors or even pick up color directly from the Watercolor Pencil tip. They are so handy and versatile. Just enough moisture to work but not enough to pill the cardstock, unless you work it too much. In that case, Shimmery White Cardstock is better than Whisper White.

The sunflower is die-cut with the Sunflowers Die. Then I wrapped a ribbon around the treat box and adhered the die-cut sunflower. This ribbon I used is the green gingham in the Flowers For Every Season Ribbon Combo Pack.

After putting your treat or gift inside, you could tie the ribbon around from the bottom to the top instead or just add a bow to the lid of the box. You could stamp a little tag to add as well.

There are so many things you can do with these Clear Tiny Treat Boxes! They are handy for so many occasions! Here is a favorite one I made at Easter.

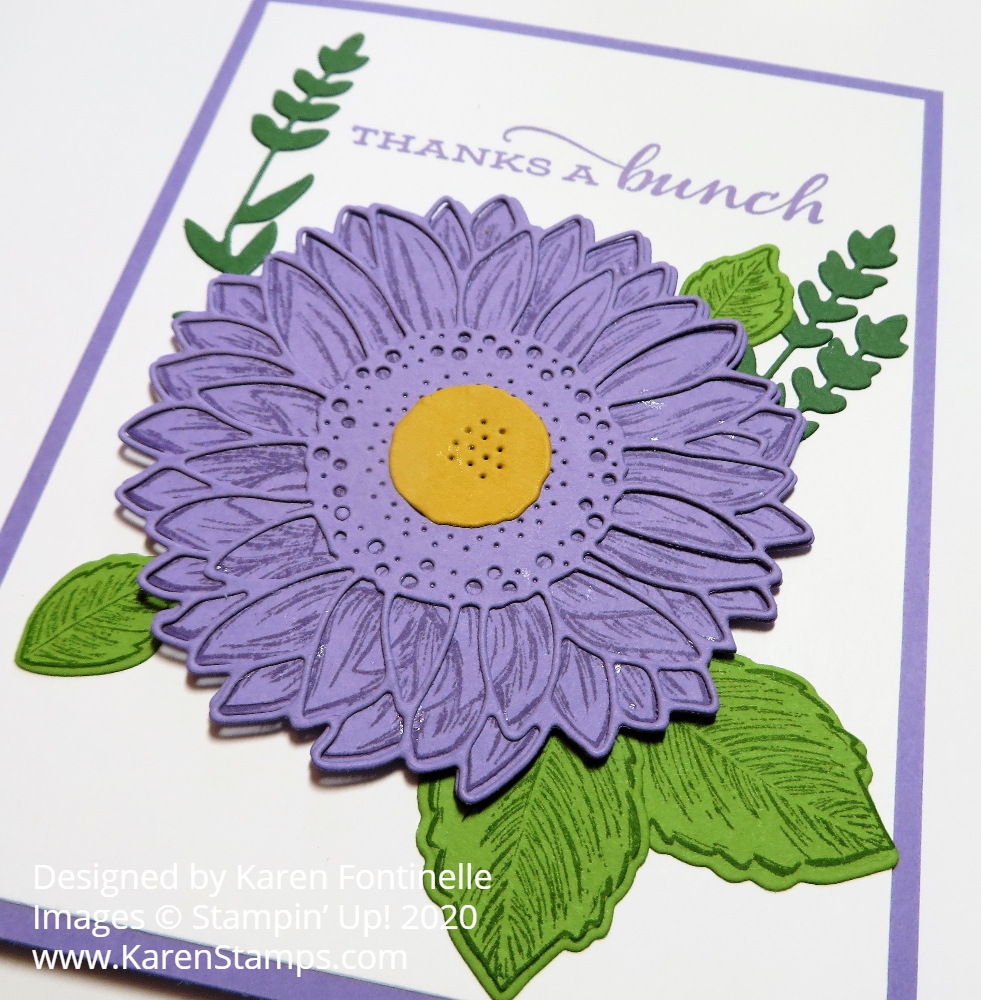
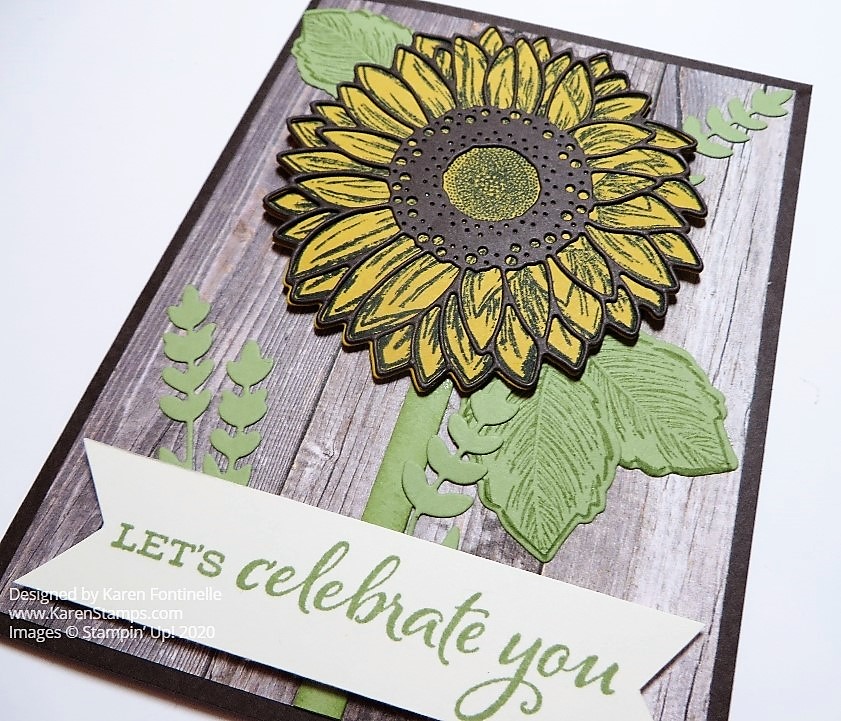
Here is a close-up of the sunflower so you can see the coloring. You could also stamp in Memento Black ink and color with Stampin’ Blends. Or use Watercolor Pencils.

Clear Tiny Treat Box With Sunflower Closeup

Think about getting a package of these Clear Tiny Treat Boxes and also check out the other types of boxes and bags Stampin’ Up! carries for treats and gifts! There are many options!

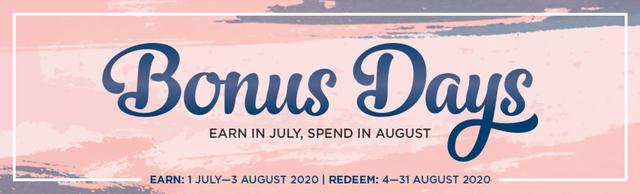
Remember it is Bonus Days for another two weeks in July! With every $50 purchase, you will receive an email with a coupon code for $5 to use in August on your orders. No limits, so if you have a large order, you will have more coupons to use! And with the new Stampin’ Up! Catalog, a large order is pretty easy to come up with! Way too easy!!

SHOP STAMPIN’ UP! ONLINE HERE!

Highland Heather Sunflower Thank You Card

Highland Heather Sunflower Thank You Card

This started out not to be a card! I was going to stamp a sunflower and die cut it and decorate a glass votive candle holder. The sunflower was going to be a little large for that project and when I laid it down on the table I thought it would look pretty on a card. That is how this Highland Heather Sunflower Thank You Card came to be! Don’t be afraid t change your mind from your original idea!

I decided to make my sunflower a different color than yellow, so I happened to choose Highland Heather for the color. I stamped the largest sunflower in the Celebrate Sunflowers Stamp Set in Highland Heather Ink. I die cut that sunflower, as well as the outline, with the Sunflowers Dies also out of Highland Heather Cardstock. I didn’t know if this would be enough contrast or not, but I liked it. I added the die-cut center out of Bumblebee cardstock.

The leaves are stamped in Granny Apple Green Ink on the same color cardstock, then die cut. The leafy stems are cut out of Garden Green Cardstock. The sunflower is popped up on Stampin’ Dimensionals and then I slid the leaves partially underneath. The greeting is also in the stamp set and is stamped in Highland Heather ink. The card base is Highland Heather.

In spite of not planning to even make this card, I was really pleased with it and may even copy myself and make some more, maybe in different colors! We are artists and can be creative with whatever we make!

The sunflower’s name comes from its tendency to face toward the sun. I didn’t even think of any symbolism about the sunflower, but I’ve read that it can symbolize adoration and loyalty. And it may mean something a little different across other cultures. Apparently it is an easy plant to grow because it is heat and drought tolerant and grows in the summer. If heat is good for sunflowers, I could be growing sunflowers filling my whole backyard because it is so hot here in Houston!!

I also stamped a Whisper White layer for inside the card with the smaller sunflower in the set just with Highland Heather Ink. That makes it easier to stamp or write a message inside the card on white instead of purple. While I had the stamp and ink out, I also stamped a corner of the envelope to make it pretty as well! Hopefully the envelope will not get separated from the card and I’ll remember to use it!

If you like sunflowers, this is a popular stamp set so check it out in the Online Store. And if you like the Sunflower Dies as well, you can buy both the stamp set and dies in the Celebrate Sunflowers Bundle at a 10% discount.

SHOP STAMPIN’ UP! ONLINE HERE!

Highland Heather Sunflower Thank You Card

Prized Peony Die-Cut Flower Card

Prized Peony Die-Cut Flower

If you get some or all of this Peony Garden Suite, you will have so many ways to create that you will come up with many kinds of cards and projects like this simple Prized Peony Die-Cut Flower Card.

For this card, I wanted to stamp the flower, color in, and then die cut it! I stamped the flower from the Prized Peony Stamp Set in Memento Ink and colored in the flower and bud with Petal Pink Stampin’ Blend Markers plus Granny Apple Green Stampin’ Blend Markers for the leaves. Then I cut it out with the Peony Dies.

My original idea was to use the Peony Garden Designer Series Paper just in a basic card design way using one side of a pattern of designer paper on half the card and the other side of paper on the lower half (or so), with maybe a ribbon across the seam where the papers join or overlap a little. I thought I would use this gray pattern plus the pink floral design on the other side – but then I decided I liked using just the gray pattern for the card layer! You never know what you will really come up with once you start making a card!

The card base is Gray Granite with the designer paper adhered to the front. I had already colored and die cut the peony flower, but I thought maybe it needed some background to help it stand out. I looked through my dies and choose the largest rectangle in the Stitched So Sweetly Dies. That would have been fine as is, but I wanted to try out the Dainty Diamonds Embossing Folder so I embossed the die cut. It was very pretty!

Before adhering the embossed piece to the card, I wrapped a piece of the pretty Petal Pink 5/8″ Organdy Striped Ribbon around near the bottom. Then I adhered the peony using Stampin’ Dimensionals® and placed it underneath the ribbon. For the final touch, I tied on a small piece of ribbon just in a knot in the center. I didn’t even want to add a greeting.

Inside, since the cardstock was gray, I added a Whisper White layer inside the card, stamping and coloring one of the small flowers in the stamp set in the bottom corner. It has such a pretty vintage floral look! Now I can stamp a greeting inside the card or write my own note or personal message when I want to use the card. Be sure to check out my first card using the Prized Peony Stamp Set in this post yesterday.

Stamping and coloring the peony is another step to take but is easy enough, even the coloring, and certainly the die-cutting. Then I just used a piece behind the flower to help showcase the peony and added a ribbon to my Prized Peony Die-Cut Flower Card.

SHOP STAMPIN’ UP! ONLINE HERE!

Hand-Drawn Blooms Birthday Card For July 4th

Hand-Drawn Blooms Birthday Card For July 4th

This card, Hand-Drawn Blooms Birthday Card For July 4th, could be a birthday card for someone this month or you could think of it as a birthday card for our country while we celebrate Independence Day on Saturday. Do you know someone with a July 4th birthday?

This new Hand-Drawn Blooms Stamp Set comes with an amazing large die plus a few small flowers and I had played with the die and greetings a little bit, but I hadn’t used this stamp of a lovely flower bouquet. The bouquet is actually two parts, the main bouquet and then the bottom part with a bow and the flower stems.

I stamped the two pieces of the bouquet with Memento Ink and then colored in the flowers and leaves with Stampin’ Blends. Actually I was going to use my Watercolor Pencils but I couldn’t find the set I wanted to use! But I love using the Stampin’ Blends. I primarily tried to use red and blue flowers for the 4th of July with a little yellow. I didn’t try at all to be perfect in my coloring, and you would be surprised how quickly you can actually color in most of those flowers. Since they are so small they look difficult, but since they are small you only need a dot or swipe of color to color them in! I just kind of drew over the stems with a swipe of Granny Apple Green with the small tip of the marker. Again, not perfect, but overall the whole thing looks fine!

The birthday greeting comes in the stamp set. Both lines of words are on one stamp, so just stamp it and then cut it out with the Banner Blooms Dies. Since you really only want to cut out the words, use a smaller piece of paper that fits right where the banner area is, otherwise, the die will cut all of the paper you put under it.

This card has a Real Red card base with a layer of Pacific Point blue. I just made narrow margins on this card so it is more difficult to see in the photo. The greeting is popped up on Stampin’ Dimensionals. I added two red Toile Tidings Glitter Enamel Dots (retired) from the Holiday Catalog last year. I couldn’t stop myself so I added some of the smallest Gold Glitter Enamel Dots around the bouquet. Be careful, once you use one of those Gold Glitter Dots, you can’t stop!

Be sure to check out the Hand-Drawn Blooms Bundle with both the Hand-Drawn Blooms Stamp Set and the Banner Blooms Dies. Here is a card I made with the Banner Blooms Die and the new Rainbow Glimmer Paper.

Of course most of the time that you would make this card you probably wouldn’t be thinking about the 4th of July! But you can use these floral bouquet for many occasions and in many color schemes!

SHOP STAMPIN’ UP! ONLINE HERE!

Remember, during July, with every $50 purchase, you will receive via email a $5 coupon code to use on an order in August! No limit!

Stampin' Up! Bonus Days 2020 Banner

Stitched Stars 4th of July Patriotic Card

Stitched Stars 4th of July Patriotic Card

Let’s celebrate with this Stitched Stars 4th of July Patriotic Card because that special day when we celebrate our country is coming up on Saturday! It seems amazing that it is July already! The weather outside does tell me that it is July, though! This year we aren’t having our fireworks displays here so we just have to create our own fireworks by making cards and other 4th of July projects! Use them for decorations in your home!

This red, white, and blue card is designed to make us think of fireworks and patriotism for our country with colors and gleam from the foil paper. The card base is my favorite color, Real Red, with a blue layer of one of the new In Colors, Misty Moonlight. Night of Navy would be another good choice or even Pacific Point. The stars are arranged on a layer of Whisper White.

The stars are all die-cut with the Stitched Stars Dies which first came out in the last holiday catalog. There was also a coordinating stamp set, So Many Stars, in case you still have that. That stamp set retired but the dies survived! I have always said stars, whether stamps or dies are so handy to have to all kinds of congratulatory or celebratory cards and projects.

I die-cut the “flourish” in the die set out of both Gold Foil and Silver Foil Sheets and saved all the stars that poked out of that. That way I could adhere the gold foil flourish to the front of the card and also use the silver foil stars on the card. Then I also die-cut a few red and blue stars out of the set to add to the card. If I would think ahead, it would be a good idea to use Adhesive Sheets before die-cutting on the back of the paper so they would already have adhesive on the back like a sticker. Then there would be no messy glueing with the Multipurpose Liquid Glue! But if you are really careful and put the teeny tiniest dots of glue on these thin lines, you can use it successfully.

The greeting is from the Many Mates Stamp Set, which I’m finding I turn to a lot for sentiments since it has such a good assortment! You might want to add it to your list! The greeting is stamped with the Misty Moonlight In Color Ink and layered on a scrap of Real Red punched at one end with the Lovely Labels Pick A Punch.

I added a Gold Glitter Enamel Dot to the punched piece, but I couldn’t stop myself! I added some more to the card area around the stars with the next larger size of dots. I think that was the finishing touch!

And to help celebrate July, Stampin’ Up! ‘s newest promotion started today, Bonus Days! With every $50 you spend in July, you will receive an email with a coupon code for $5 off in August! No limit! If you spend $100, for example, you will get two coupon codes in an email for $5 each to use on your order in August. Stampin’ Up! will automatically send you the email with your codes right away so be sure to watch for it or even check your spam folder for it. If you don’t receive it after a reasonable time, then let me know and I’ll check with Stampin’ Up! or you can always call yourself. You might consider printing out the emails or writing down the codes you receive so that you will have a “backup”!

READY! SET! SHOP!

Artistry Blooms Friendship Card

Artistry Blooms Friendship Card

We’ve had some really rainy, stormy days here in Houston this week so I thought a bright and happy card was in order like this Artistry Blooms Friendship Card. It’s a quick and easy card to make as is, or you can even make it easier with no die-cutting or more dressed up with additional layers and embellishments.

The card base is the new In Color Magenta Madness Cardstock. The Artistry Blooms Designer Series Paper is amazing with its brushstroke design and also plainer gradient designs on the other sides. This paper can brighten up any cards and projects! I even added a layer of Daffodil Delight Cardstock underneath the designer paper just to brighten it up a bit more.

Artistry Blooms Designer Series Paper
Image copyright Stampin’ Up! 2020

The greeting is from the So Sentimental Stamp Set which has greetings for many occasions in the fun larger fonts mostly. I used one of the Tasteful Labels Dies to cut out the greeting, which fit perfectly. However, there is a die set, the Stitched So Sweetly Dies, that goes with the So Sentimental Stamp Set that you can purchase in a Bundle. This is a great set to have as well! We can never have too many sentiments and greetings to use on our cards and dies with which to cut them out!

To finish off this card, I punched a hole in each end of the greeting with my old Cropadile, but you can use any hole punch, and ran the Magenta Madness 1/4″ In Color Ribbon through the holes and tied a knot in each side. I also added the ribbon running across the card and around the back, going underneath the greeting. The greeting is popped up on Stampin’ Dimensionals®. You could also add some sequins to the card or the In Color Enamel Dots (when they back in stock!).

Don’t be afraid of the Magenta Madness color! I am really liking it! You will likely be toning it down with other papers or using just bits of it to add a touch of brightness and pizzazz to your project. Here is a card I made using Magenta Madness Cardstock in the paper and embellishments.

We don’t always have to make complicated cards or fancy designs. If you are short on time or energy or just want something simple, try a design like this Artistry Blooms Friendship Card.

SHOP ONLINE AT STAMPIN’ UP!

Rainbow Glimmer Banner Blooms Birthday Card

Rainbow Glimmer Banner Blooms Birthday Card

This card began as an experiment to see how this die worked and how it would work with the new glimmer paper and how the banners worked and finally I made this Rainbow Glimmer Banner Blooms Birthday Card!

This is the beautiful floral bouquet die in the Banner Blooms Dies. I thought it would be pretty to die cut the Rainbow Glimmer Paper, which it was! This glimmer paper is not only gorgeous with the ombre effect of multiple colors, but the glimmer doesn’t fall off! And it went through the die just fine! With the older thicker glimmer paper we have had, I often tore off the backing of the glimmer paper so it would be thinner to go through the die-cutting machine. This one worked fine without doing that. I only wish we could get all the colors of the Rainbow Glimmer Paper onto this one die! But you would have to have a 12″ long die!

I adhered the floral bouquet to Whisper White Cardstock with tiny little dots of Multipurpose Liquid Glue. You can do it if you are patient and really use the smallest dots of glue you can imagine. And work quickly! Then make sure to place it on the Whisper White cardstock in the exact spot you want it as best you can so you don’t get the glue where you don’t want it.

I was puzzled by how to make the greeting banners on the bouquet until I looked back at the die and saw that it would cut out the stamped banner. Just stamp your greeting in the Hand-Drawn Blooms Stamp Set and then place the bouquet die right over it, lining up the words inside the banner areas. You don’t need to stamp the greeting on a full piece of paper, just the area with the greeting because you are going to cut it apart. Using your scissors, just cut off the excess away from the banner greetings. Then glue the banners onto the die-cut bouquet on your card! The stamp will have both lines of the greeting, like this one I used on this card, properly placed to fit the die.

That’s all there is to it! When I make a similar card again, I think I will try to jazz it up a little bit. This card is pretty but in my opinion, I think it needs a little something more but not sure what yet! Just play with your new stamps and accessories and see what you come up with.

If you want both the stamp set and the dies, purchase the Hand-Drawn Blooms Bundle and save 10%. This will be an interesting stamp set and dies to play with, something a little different! A beautiful wedding card could be made with this set, congratulations for an engagement or graduation, or a birthday card, to name a few, like my Rainbow Glimmer Banner Blooms Birthday Card.

SHOP STAMPIN’ UP! HERE! NEW PRODUCTS!

Flowers For Every Season You Are The Best Card

Flowers For Every Season You Are The Best Card

It’s possible to go from not liking a card so much to liking it a lot as I did with this Flowers For Every Season You Are The Best Card. Sometimes you just have to keep playing with making a card and sometimes the paper just wins you over after awhile!

This card features the Flowers For Every Season 6″ x 6″ Designer Series Paper. It has beautiful floral designs plus generic designs on the backs of some of the floral sheets so you have a lot to choose from. I wasn’t too crazy about the floral design on this card at first but once I layered it on a piece of cardstock and tied the ribbon and bow around it, I really liked it!

The card base is Whisper White. You can always use the regular Whisper White Cardstock, but if you would like a heavier card base, try the Whisper White Thick Cardstock. I added this Just Jade designer paper layer on the card base. The focal point, the pinkish floral sheet, is cut at 3″ x 4 1/4″ and the Magenta Madness In Color layer underneath it at 3 1/4″ x 4 1/2″. Before adhering the floral paper, I adhered a piece of the Magenta Madness 1/4″ In Color Ribbon around it. I tied the bow separately and adhered to the ribbon with Mini Glue Dots.

For the greeting, I stamped “You Are The Best” from the Tasteful Touches Stamp Set. I used the Ornate Frames Dies to cut out the greeting and also the fancy frame on which to layer it. This is popped up on Stampin’ Dimensionals®. And I couldn’t resist using two of the Magenta Madness In Color Enamel Dots.

This card has the center layers a smaller size than usual so you have wider margins and can see more of the Just Jade paper underneath. If you like florals, you have to get the Flowers For Every Season 6″ x 6″ Designer Paper and make all kinds of pretty cards!

SHOP STAMPIN’ UP! ONLINE HERE!

Celebrate Sunflowers Celebrate You

Celebrate Sunflowers Celebrate You

It was time to play with the Celebrate Sunflowers Stamp Set and matching dies in making this card, Celebrate Sunflowers Celebrate You. You could send this card with this greeting to someone who was celebrating something big or small or just someone who needed a little perking up!

I knew I wanted to use the new In Good Taste Designer Series Paper along with the sunflower. You won’t believe this designer paper! It is photographic images of wood, tile, stone and other elements. Some look like carpet or fabric! And you get 24 sheets in the package, 2 sheets of 12 different double-sided designs! This wood sheet that I used on this card looks like a real piece of wood up close! It’s great!

To make the large sunflower in the Celebrate Sunflowers Stamp Set, I stamped the flower on Crushed Curry Cardstock with Memento Ink. If you stamp on the color of cardstock you like, then you don’t have to color the stamped image.

You can buy the Sunflowers Dies separately or together with the Celebrate Sunflowers Stamp Set in the Celebrate Sunflowers Bundle and save 10%. The dies, of course, are great for cutting out the two sizes of sunflowers and the leaves and sprigs.

I die cut the sunflower outline in Early Espresso to match the card base of Early Espresso. The leaves are stamped in Pear Pizzazz and die cut.

The greeting comes in the stamp set. Of course, you could change it out with almost anything or just leave it off the card. The card design will stand on its own.

The Celebrate Sunflowers Stamp Set and dies are just a couple of the amazing new products in the new Stampin’ Up! Annual Catalog! Get your favorites while you can!

Remember, with a $150 order you earn Stampin’ Rewards, and during June, a $250 or more order earns an EXTRA $25 in Stampin’ Rewards!!

SHOP STAMPIN’ UP! ONLINE HERE!

Celebrate Sunflowers Celebrate You Closeup (3)

Blossoms In Bloom Watercolor Stamping Cards

Blossoms In Bloom Watercolor Stamping Cards

I thought I would try some watercoloring with this stamp set and dies and ended up with these Blossoms In Bloom Watercolor Stamping Cards. I’m calling it watercoloring stamping. I used watercolor paper, moistened it and also spritzed water on the stamp before stamping.

Blossoms In Bloom Watercolor Stamping Card Front

I used my Stamparatus to stamp since the Blossoms in Bloom stamp is so large. I used my Aqua Painter (now Water Painters in the new catalog) to moisten the Fluid 100 Watercolor Paper and I also spritzed the stamp with water after coloring with Stampin’ Write Markers. On the other card, I applied the ink to each flower with Sponge Daubers. When I stamped with the Stamparatus on the wet watercolor paper with the wet stamp, it looked like a mess! But all I had to do was dab with a paper towel to pick up the excess water and it was fine! I really just wanted a bit of color underneath the die cut I would later put on.

After letting the watercolor paper dry, I adhered the thin Whisper White die cut of the Many Layered Blossoms Dies with teeny tiny drops of Multipurpose Liquid Glue. Then this piece was layered on the card front of Melon Mambo Cardstock.

The die cut didn’t quite cut all of the flower centers but I don’t think anyone will mind. I could have even colored them perhaps with yellow to make them look like they were supposed to be there. I like how I didn’t have to place the die cut perfectly, if the color extended beyond, it looked fine because it was watercolor.

Blossoms In Bloom Watercolor Stamping Card

And then I did another one to see if I could get it less watery, but I didn’t, although using a Melon Mambo die cut on Coastal Cabana Cardstock gives this card a different look anyway.

Blossoms In Bloom Watercolor Stamping Coastal Cabana Card

I like the way some of the colors bled into each other which gives it a good watercolor look. I even accidentally got some splatters on the watercolor paper.

If you’d like to watercolor, but don’t know “how”, just use this stamping method on watercolor paper, spritzing before or after. Just experiment! There are lots of ways to do this. If you don’t have official watercolor paper, Shimmery White Cardstock is the next best thing.

Try your hand at some watercoloring with whatever you have! And you can get some other ideas of how to use the Many Layered Dies on these cards in THIS POST.

I think you will find these Blossoms In Bloom Watercolor Stamping Cards fun to make!

SHOP THE NEW CATALOG AT STAMPIN’ UP!

Blossoms In Bloom Sample Cards

These Blossoms In Bloom sample cards are ones I made just playing around with some new Stampin’ Up! products. They are all coming soon in the new Stampin’ Up! Catalog, going live on Wednesday, June 3rd!

With these cards, I wasn’t really trying to make anything special. I just wanted to play with the stamp set and mainly the dies to see how things worked together. But I think they turned out pretty well!

The stamp set is called Blossoms In Bloom and is one of the Distinktive stamp sets. This is what Stampin’ Up! says about Distinktive Stamps:

“Get photo-realistic style images with Distinktive stamps, available only from Stampin’ Up!. Distinktive stamps have a special texture that gives added depth and dimension in a single step. They’re available in red rubber and photopolymer; look for the Distinktive icon. Distinktive patent pending.”

It may look like you didn’t ink up the stamp properly, but just stamp and try it out! If you have too much ink, you won’t see all the detail that this kind of stamp is designed to give. It should look like there were several steps involved in stamping that image but in reality you only had to stamp once!

All that being said, I first stamped the one large image of about five flowers in a bunch. I used Blushing Bride Ink on Whisper White Cardstock. Then I die cut the blossoms image out of Blushing Bride Cardstock with the thinner outline die. These dies are called the Many Layered Blossoms Dies. You will be able to purchase the Blossoms In Bloom Stamp Set and the Many Layered Blossoms Dies in a Bundle and save 10% buying them together. It might take a second to line up the die-cut over the stamped image. You just have to get all areas lined up since the die-cut is so thin and flexible. I used the teeniest dots of Multipurpose Liquid Glue to adhere the die-cut over the stamped image and I didn’t make a mess! Or you can sponge on the glue over a Silicone Craft Sheet or scrap paper. I just got lucky!

Another purpose of mine in making these cards was to try out the new In Color 2020-2022 Magenta Madness. It’s quite a color, and I kind of wanted to see what would go with it. Since this die-cut image is very large I opted to just go with Magenta Madness as the card base and no other layers. I die cut Whisper White with the thin blossom outline and adhered that to the Magenta Madness card base. I think it is rather striking and elegant looking with the white against the bold color.

On my third card, I die-cut Magenta Madness with the thicker outline die from the Many Layered Blossoms Dies. It also makes a great looking card just on it’s own with no stamping underneath. I did stamp some black dots in the center of the flowers before adhering to the card with the stamp in the set. The card base is Magenta Madness with a Whisper White layer and then the Magenta Madness blossom die cut.

I haven’t put greetings on these cards yet as my main purpose was trying out Magenta Madness as a color and trying the new dies along with the stamp set.

There are lots of creative possibilities with these stamps and dies so be sure to check it out when it is time to order from the new Stampin’ Up! Catalog June 3rd!

Bird Ballad Floral Thank You Card

Bird Ballad Floral Thank You Card

As I was using up some designer paper scraps the other day, this Bird Ballad Floral Thank You Card is one that I came up with. This floral pattern is so pretty I think and punching out one of the printed birds on another sheet of the designer paper as a focal point makes for a nice card.

I wasn’t crazy about all the sheets in the Bird Ballad Designer Series Paper, but I thought most of the patterns were really pretty. This paper, on the card front, with just colored flowers, I thought was especially pretty and easy to use on many cards. You can purchase this Bird Ballad DSP on the Last-Chance List at a discount until June 2.

The card base is Petal Pink, one of the coordinating colors of the paper. Then I added a layer of Pool Party underneath the floral designer paper. I punched out the bird from another sheet of the DSP. Then the bird is layered on a Stitched Shapes Die and popped up on Stampin’ Dimensionals®.

Before adhering the designer paper to the Pool Party layer, I adhered a short piece of Whisper White 1/4″ Crinkled Seam Binding Ribbon from the top of the bird image around to the back of the floral paper almost as if the bird image is an ornament. Then I took two strands of the same ribbon together and tied a bow which makes a fluffier bow, especially with this thin ribbon, and adhered it to the top of the die-cut with a Mini Glue Dot or two.

The greeting is from the Peaceful Moments Stamp Set and is stamped in Pool Party ink. Then the greeting is die-cut with one of the Stitched Nested Labels Dies.

This Bird Ballad Floral Thank You Card is a relatively simple design and easy to make so try it with your scraps of designer paper!

Bird Ballad Floral Thank You Card Closeup

SHOP STAMPIN’ UP! ONLINE TODAY!

Bird Ballad Bird Cage Paper Card

Bird Ballad Bird Cage Paper Card

As I was looking through all my designer paper to see which one spoke to me to make a card, perhaps with scraps, it was the Bird Ballad Designer Series Paper that won out, but as I looked through my scraps, what was not a scrap was the pattern with various bird cages printed on the Calypso Coral background. I had a full sheet of this particular paper and decided to use it some way to make a card! It wasn’t a favorite of mine!

Once I cut out a piece to be a layer on a Calypso Coral card base I started liking the design better, especially after I put a thin margin of Whisper White Cardstock underneath. I even used that piece of Whisper White to cut out the Whisper White oval I used on the front of the card. Just don’t tell anyone! I don’t often do it, but it is a little trick you can use if you really want to save paper and if you are positive it will not be apparent to the look of the card.

Because of the sizes of the ovals and needing a large oval on which to layer the bird, I chose a scalloped oval from the Layering Ovals Dies and die cut that out of Whisper White and die cut a plain oval out of Calypso Coral.

Next, I chose a bird that I liked on the scraps I had of the Bird Ballad Designer Paper. I simply cut out the bird, branch, and flowers myself with my Paper Snips while watching TV! You do not have to get into every nook and cranny when you cut something out yourself and I do not find it difficult at all. One tip Stampin’ Up! gave us years ago was to cut just a tiny bit off the actual image instead of on the actual line of the image because that is a little more forgiving in your cutting if it is not exactly perfect. Just do whatever is the easiest for you.

After I cut out the bird, I really like the way it layered on the ovals and how the colors all went together well with the background of the bird cage paper.

I decided to use the “Hello” greeting in the Free As a Bird Stamp Set that coordinates with the designer paper. I was afraid to just stamp it directly in the empty space on the Whisper White lest I make some kind of mess! Maybe if I had planned ahead because you should usually do your stamping first and then other steps. But I opted to stamp and die cut with the little wavy banner in the Ornate Frames Dies. I have loved these dies since they came out in the past Holiday Catalog with a Halloween stamp set, but they are great to use in lots of other ways!

Putting a little “Hello” on a card makes it perfect for almost any reason to send a card, especially just a note to catch up with a friend or family member. On the inside of the card, I adhered a Whisper White layer either with a couple flowers stamped with Calypso Coral Ink or a strip of matching designer paper along the bottom edge of that Whisper White layer.

Here’s another card I made with a different pattern of the Bird Ballad paper. I didn’t care for every sheet in this package of designer paper but several I thought were just beautiful. So if you like this paper, be sure to get some on the Last-Chance List before it is gone. The last date to order retiring products is June 2, 2020.

Remember to do some fussy cutting with good scissors for that like the Paper Snips if you don’t want to stamp or if you like an image on the designer paper. In some cases, you might be able to punch or die-cut a circle or oval from the paper, but I find fussy cutting is a good stress reliever! And remember that sometimes a piece of designer paper that you didn’t think you cared for can really turn into a pretty card like this Bird Ballad Bird Cage Paper Card.

Poppy Moments Altered Birthday Gift Bag

Poppy Moments Altered Birthday Gift Bag

One of my favorite projects to make is to decorate a gift bag like this Poppy Moments Altered Birthday Gift Bag that I made for a friend’s birthday. Sometimes I use a bag I got out shopping and even if it has the store name on the side, I can cover the name with paper and decorate. It’s almost like making a card on the side of a bag! And if you don’t already have a cute shopping bag, you can buy a bunch at the craft store.

To decorate this shopping bag, I used the Poppy Moments Dies and just cut out a few flowers and leaves! I also used the Sprig Punch to punch a few leafy sprigs out of Vellum Cardstock. I made this bag pretty simple because there was no store printing that I had to cover up. After putting a gift inside the bag with tissue paper, you could also tie a ribbon around the bag handles. You could also attach a gift tag that you made. So many possibilities!

Here’s a birthday gift bag I decorated several years ago. The bag itself is pretty with a swirly leaf print on it, but I did need to cover the store name but that’s usually easy to do, sometimes on the front and back of the bag.

This gift bag turned out really pretty I think! I don’t remember if the bag was plain on the front or if it had printing on it, but it was easy to cover almost the whole front of the bag almost like if I had been making a card! You can see how you could make the same design for a card just by making it smaller!

If you are cleaning up closets and cabinets during the pandemic, save those small shopping bags and do something creative with them! Decorate for birthdays or Christmas or something generic and then you will have some personalized gift bags ready to go! Or maybe you can make a bag that matches your gift.

Altering or decorating bags you have around the house is something fun you can easily do and a great way to recycle! And it just might save you a trip to the store for a gift bag!

Garden Lane Paper Strips Thank You Card

Garden Lane Paper Strips Thank You Card

You don’t always have to know exactly what card you are going to make when you start as I didn’t know exactly when I started on this Garden Lane Paper Strips Thank You Card. I simply started looking at my designer paper choices. I had been seeing some cards made with strips of designer paper lately although they were cut on angles. I thought I would just try cutting some scrap strips and see how they would fit if I made a card.

Well, it turned out that cutting strips from the Garden Lane Designer Series Paper at 4″ x 3/4″ made a perfect fit for the top layer of the card. I chose Mint Macaron for the card base, one of the coordinating colors of the designer paper. Instead of gluing the strips right onto the Mint Macaron card base, I adhered them to a piece of Whisper White so I wouldn’t get them crooked or something! If you do this, then you can always do a little trimming if you need to before you adhere the strip piece to the card front.

Because I already had a stamped die-cut piece in my scraps I could see how it would look on the front of this card for the greeting. I played around with what to use for layers and what colors. Then I stamped “Thank You” from the Peaceful Moments Stamp Set in Mint Macaron Ink .and die-cut with a die from the Stitched Labels Dies. This greeting was then layered over Whisper White and Mint Macaron scalloped Layering Circles Dies. You could even add a bit of Whisper White ribbon or bows but I decided to stop. Sometimes you have to know when to stop when you are creating!

This was a fun Easter card I made wit the Garden Lane Paper in the background!

This Garden Lane Designer Series Paper is retiring on June 2 as are all the designer papers in the current catalogs. This one is discounted! Be sure to choose the ones you want to have before they sell out or are gone.

SHOP STAMPIN’ UP!