Tag Archives: Tasteful Touches Stamp Set

Flowers For Every Season Monochromatic Slimline Card

Flowers For Every Season Monochromatic Slimline Card

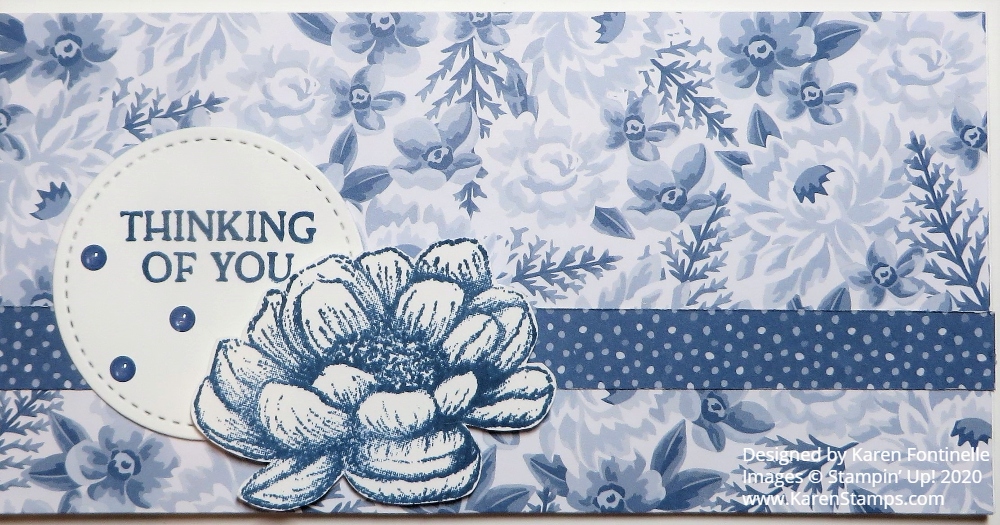
The latest cardmaking craze these days seem to be “slimline cards” so I made this Flowers For Every Season Monochromatic Slimline Card. Now I don’t really even know the exact details of a “slimline” card so maybe this technically isn’t one! But I made a long, narrow card as opposed to our normal 4 1/4″ x 5 1/2″ card! This card is 3″ x 6″ so whatever it is called, that’s what I made!

The other day I was working with my Flowers For Every Season Designer Series Paper and realized all over again how pretty and bright it is and that I hadn’t used it in a long time. When I got out my paper to design a card, since the paper is 6″ x 6″ I thought, “Why not cut it in half and make a card out of a 6″ x 6” piece of cardstock folded in half?

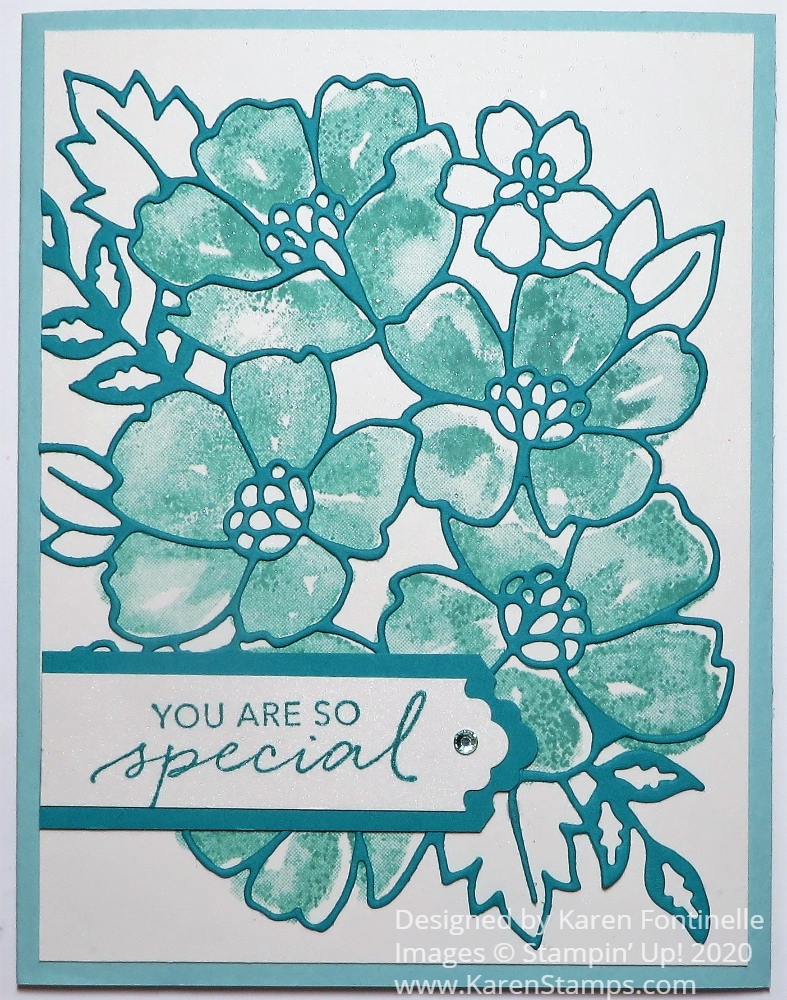
The card base is Whisper White, as I said, cut at 6″ x 6″ and folded in half so that the card front is 3″ x 6″. I cut this blue pattern of the Flowers For Every Season designer paper the full 3″ x 6″. I debated about using ribbon, but decided to just use a 1/2″ strip of a dotted side of the designer paper instead.

The greeting, in the Blossoms In Bloom Stamp Set, was stamped in Misty Moonlight Ink, which matches the designer paper. It is die-cut with a Stitched Shapes Die.

I already had stamped the flower from the Tasteful Touches Stamp Set. I adhered the greeting flat on the card but I popped up the flower with Stampin’ Dimensionals®.

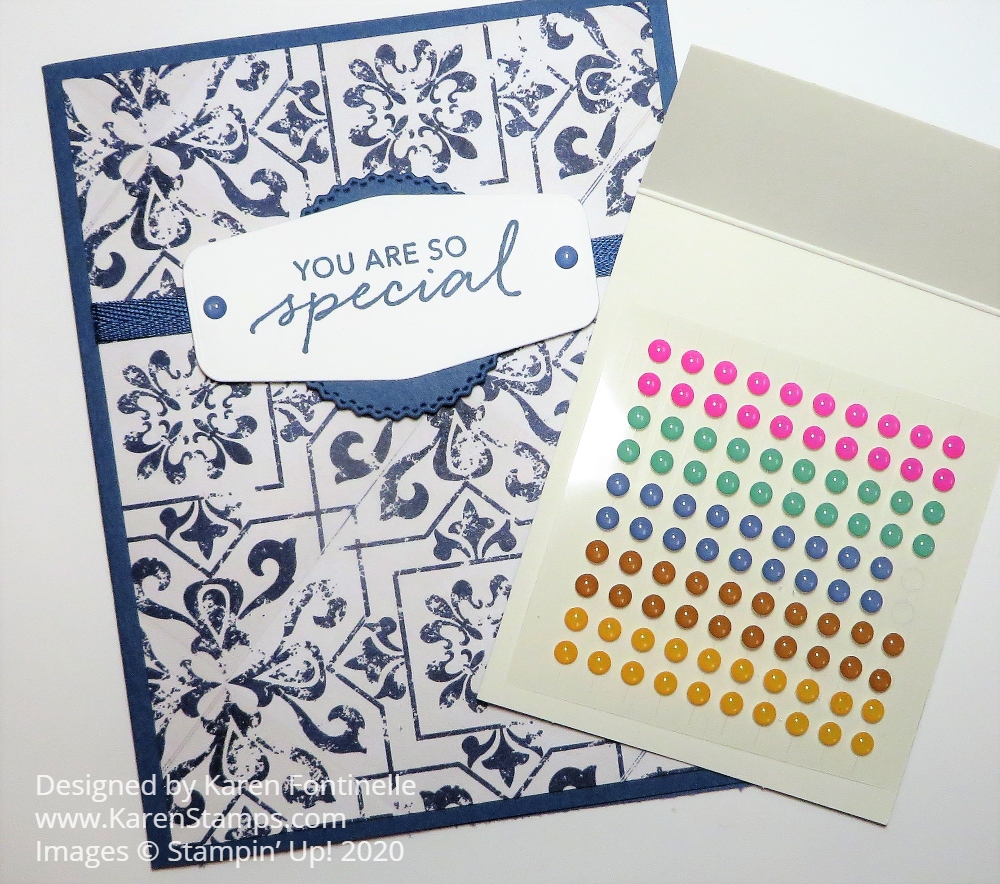
For a little bling, I couldn’t resist adding a few Misty Moonlight 2020-2022 In Color Enamel Dots. I think these have been very popular since they came out in the Annual Catalog! As I write this, they are on “Low Inventory” so get yours while you can! They work so well because they are small and fairly flat.

Try this different style of card, no matter what size you want to make it, as long as it will fit in an envelope you have! Of course you can always make your own envelope. I’ve made this kind of card years ago, so what goes around comes back around again! You can make a card like this a few inches longer and about an inch taller, but since I was working with 6″ x 6″ designer paper, this Flowers For Every Season Monochromatic Slimline Card was the perfect size for me.

Stampin' Up! Bonus Days 2020 Banner

Don’t forget! Last week to spend your Bonus Days Coupons!!

Blossoms In Bloom You Are Special Card

Blossoms In Bloom You Are Special Card

I don’t know what blossom or flower this is in this blueish color, but since it is art it can be anything, right? It all began with die-cutting some designer paper for the fuller layer underneath the outline layer but that didn’t seem to be what I was looking for. Sometimes if you original idea doesn’t work out, you just have to keep going and see what else you can come up with and that’s how this Blossoms In Bloom You Are Special Card came to be!

When you get right down to it, this card is pretty simple to make! The floral outline is die-cut with the Many Layered Blossoms Dies. The die is almost as big as the card front! If you think of it ahead of time, it would be a good idea to use the Adhesive Sheets on the cardstock before you die-cut it so that it will be like a giant sticker and you don’t have to worry about adhering it. I used teeny tiny dots of Multipurpose Liquid Glue but it is a little tedious!

The card base is Pool Party Cardstock, which I didn’t choose until I had the front of the card made! The floral die-cut is Coastal Cabana Cardstock. To add some color, I stamped the blossoms in the Blossoms In Bloom Stamp Set in Pool Party Ink.

I think if you are making a card like this you need to take a minute to think about the direction you want things to lay out in since everything is so large. Since I had the outline die cut first, I laid that down on my card front to see which leaf was going at the top and which way everything was pointing. Then I would know pretty close how to stamp the blossom image that would go underneath the die. It’s not something you can plan perfectly, but just so you get things pretty much how they are going to fit in the end.

The front layer of the card is Shimmery White Cardstock because at first, I thought I might do some watercoloring. Shimmery White Cardstock holds up better to water than Whisper White Cardstock. Plus it is the prettiest paper with its very subtle glimmer. It’s a little more toward the ivory or off-white color than pure white but you can really use it for either way.

The greeting is stamped from the Tasteful Touches Stamp Set. I used the Lovely Labels Pick A Punch which makes two different fancy ends to several sizes of paper strips. You can punch a 1/2″, 3/4″ or 1″ strip of paper. Just stick the length of cardstock way into the punch to get the fancy end. If you want to be extra careful, turn the punch over before punching and make sure the strip is all the way in and centered how you want it. Sometimes a tiny wiggle can get it off-center. I also cut a layer with the same punch with just a wider strip of paper. For a little bling, I used one Clear Epoxy Droplet. I think it was the perfect little bit of pizzazz on the card!

Don’t forget to use your July Bonus Coupons this month! You will see where to enter them on your order. I think you have to do one at a time if you have several to use. You can use all the coupons you have on one order, but you have to enter them one at a time. Before you submit your order, you will see that the coupon amount was taken off. Just remember, if you have a large order and reach Hostess rewards, when you enter your coupons that will bring down your total and you might have to add more to earn the Stampin’ Rewards.

Here is another way to use the Blossoms in Bloom Stamp Set along with the Many Layered Blossoms Dies. You can purchase the stamp set and dies. Then you will be all set to make something like my Blossoms In Bloom You Are Special Card.

Tasteful Touches Flowers Card

Tasteful Touches Flowers Card

I had the idea for this Tasteful Touches Flowers Card but didn’t know if it would really turn out. If I even have an idea before I start making a card, it often changes as it goes. Usually I just think I’m going to use a certain stamp set or certain designer paper and go from there.

In looking at this Tasteful Touches Stamp Set I thought about stamping three (or maybe more) flowers randomly on the card front and use that flowery design stamp off to the side of the flowers. I thought it would maybe make it look a little antique.

Three flowers stamped with Memento Ink seemed to fit just fine and then I stamped the flowery grid stamp a few more times around the flowers and off the page in a few areas. I colored the first flower with Calypso Coral Stampin’ Blend markers, but then I decided to color each flower differently. The second flower is colored with Mango Melody and the third with Highland Heather. I just love coloring with my Stampin’ Blends markers! They are alcohol markers so the light and dark shades or even other colors together blend. Just color lightly with them to preserve the brush tips. Really all you need is gentle coloring and not necessarily perfect. Sometimes leaving tiny bits of white space makes it look more realistic.

I also made a “mask” by stamping a flower on a sticky note, making sure part of the flower was stamped over the adhesive on the other side to hold the mask in place when I used it. I stamped the flower and then cut it out with Paper Snips. You can even cut the tiniest bit inside the lines when you are doing masking. Then just stick the mask flower over the stamped flower and then stamp something else over it, like the leaves I did from the same Tasteful Touches Stamp Set. This protects the stamped flower but allows the leaf stamping to show outside the flower image. If you had a tiny leaf stamp that fit outside the flower, then you wouldn’t have to cover the flower. But this is a large sprig of leaves so if you just stamped it, you would be stamping over the flower and that wouldn’t look good!

After coloring the flowers and the tiny leaves with my Stampin’ Blends, I wasn’t sure about leaving the background white. It would have been fine, but my love of coloring with the Blends kept me coloring!! I used Light Pool Party to just kind of scribble in the white space, without trying to be heavy-handed or perfect. Pool Party is a good color for this because it is light enough that the omitted white spaces don’t show up strongly. You might think it would be a big job to color all that space, but since I was just kind of scribbling and not worrying about perfection it went very quickly. I even colored in between some of the tiny flowers in that grid to make it all fit in together.

I’m probably the least satisfied with the greeting. The card was really pretty enough to leave it plain without a greeting and sometimes, like on this card, it’s a little difficult to find the space for a greeting! This greeting is from the Lovely You Stamp Set, with lots of greetings and a pretty font. I punched the one end with the new Lovely Labels Pick a Punch and even made a layer with a slightly wider strip of cardstock. You can use three widths of paper in this punch – 1″, 3/4″, and 1/2″. At the last minute,

I added a small Gold Glimmer Enamel Dot to the greeting for just a little something to finish it off without taking away from the rest of the card.

So there is a card that takes a little bit of time for coloring, but is also one of the best ways to relax and de-stress, I find! There are lots of creative possibilities with these two stamp sets! I hope you will be inspired to create a card or project using this Tasteful Touches Flowers Card.

Shop Stampin’ Up! Online HERE!

In Good Taste Masculine Father’s Day Card

In Good Taste Masculine Father's Day Card

Father’s Day is coming up on Sunday, June 21, 2020, and this In Good Taste Masculine Father’s Day Card might be one you would want to make. Or just keep it in mind for any masculine card occasion. I actually used a sample in the new Stampin’ Up! Catalog on page 124 to copy. You can use the samples in the catalog for ideas and inspiration whether you copy exactly or change it up to something slightly different or a lot different!

We often think we don’t have enough ideas or the right stamps or supplies for masculine cards. I think if you take a good look at the In Good Taste Designer Series Paper you will find many of the patterns that would be perfect for a masculine card, not to mention any other cards! For this card, I looked through the pack of papers several times before settling on this particular paper. It’s a brown and gray (I think!) tweed, maybe like you would find on a carpet or rug or of course a piece of fabric. Every sheet of this In Good Taste DSP looks real! You will probably at least once touch the piece of paper to make sure it’s not really 3D! The paper is designed from great photographic images!

Once I had my designer paper pattern chosen, I chose Basic Gray Cardstock for the card base with a layer of Crumb Cake with just a thin margin before adhering the designer paper.

To decorate the card, I used the Tasteful Touches Stamp Set. I stamped the little squares on the one stamp on the card front in just a couple places with White Craft Ink, but it didn’t turn out very well! Then I stamped the greeting on a piece of Whisper White Cardstock and die cut with one of the Tasteful Labels Dies. I thought it looked a little plain so I stamped those same squares on it with Crumb Cake Ink (I think stamped off first.). And in copying the catalog sample (except I turned the card sideways) I added a piece of Crumb Cake, just a scrap, partially behind the greeting.

Since I liked the stamp with the sprig of leaves, I stamped that on several different browns. I actually thought there was a die to cut them out, but I had to cut them out by hand! I wasn’t even sure what I would do with them, but ended up, as you can see, sticking them to the sides of the greeting.

The right side of the card looked a little bare so I tied some retired twine around the card. I thought it was Linen Thread at first but it is thicker so it is some un-named twine! And since I can’t resist, I added a few of the In Color Enamel Dots in the Bumblebee color.

And that’s it! A card you can use for Father’s Day for one of the men in your life. It has lots of different textures to make it interesting. You could keep the card the same and change the greeting. Use a “Happy Father’s Day” stamp or something for a birthday or graduation for a boy. Lots of masculine card ideas just because of the paper. And of course the paper can be used on cards and projects for anyone!

If you don’t own this In Good Taste DSP yet but want to make something like this card, use an embossing folder to give the front of the card some texture or do some random stamping on the card. Then just continue on and make something with the look and feel of this In Good Taste Masculine Father’s Day Card!

Shop Stampin’ Up! Online Here!

Flowers For Every Season You Are The Best Card

Flowers For Every Season You Are The Best Card

It’s possible to go from not liking a card so much to liking it a lot as I did with this Flowers For Every Season You Are The Best Card. Sometimes you just have to keep playing with making a card and sometimes the paper just wins you over after awhile!

This card features the Flowers For Every Season 6″ x 6″ Designer Series Paper. It has beautiful floral designs plus generic designs on the backs of some of the floral sheets so you have a lot to choose from. I wasn’t too crazy about the floral design on this card at first but once I layered it on a piece of cardstock and tied the ribbon and bow around it, I really liked it!

The card base is Whisper White. You can always use the regular Whisper White Cardstock, but if you would like a heavier card base, try the Whisper White Thick Cardstock. I added this Just Jade designer paper layer on the card base. The focal point, the pinkish floral sheet, is cut at 3″ x 4 1/4″ and the Magenta Madness In Color layer underneath it at 3 1/4″ x 4 1/2″. Before adhering the floral paper, I adhered a piece of the Magenta Madness 1/4″ In Color Ribbon around it. I tied the bow separately and adhered to the ribbon with Mini Glue Dots.

For the greeting, I stamped “You Are The Best” from the Tasteful Touches Stamp Set. I used the Ornate Frames Dies to cut out the greeting and also the fancy frame on which to layer it. This is popped up on Stampin’ Dimensionals®. And I couldn’t resist using two of the Magenta Madness In Color Enamel Dots.

This card has the center layers a smaller size than usual so you have wider margins and can see more of the Just Jade paper underneath. If you like florals, you have to get the Flowers For Every Season 6″ x 6″ Designer Paper and make all kinds of pretty cards!

SHOP STAMPIN’ UP! ONLINE HERE!

Flowers For Every Season Hello Card

Flowers For Every Season Hello Card

This Flowers For Every Season Hello Card is a pretty basic card design and simple to make. I would also call it a “happy” card because of the pretty colors! If you could see the floral design on the other side of this paper you would call that “happy” also! It’s often difficult to decide which side of the pretty designer paper you want to use!

I’m using two of the new In Colors on this card – Bumblebee and Just Jade. I’m not that crazy about green as a color, but when I opened the package of assorted In Color cardstock, I was really struck by how pretty the Just Jade Cardstock was! I thought using the Just Jade behind the designer paper would help it stand out.

The card base is Bumblebee with a layer of Just Jade, then the Flowers For Every Season 6″ x 6″ Designer Series Paper. You could use any colors and paper pattern that you want plus the same or similar greeting on a different card.

The greeting is stamped from the Tasteful Touches Stamp Set in Just Jade Ink and is die-cut with the Stitched Shapes circle die. The Just Jade piece behind the greeting to help it stand out and just add a little more interest is one of the Tasteful Labels Dies. To save 10%, buy the stamp set and dies together in the Tasteful Touches Bundle.

Before glueing down the designer paper layer, I adhered a piece of the new 1/4″ Bumblebee Gingham Trim across the middle. Then I slipped that Just Jade die-cut underneath the ribbon with the greeting popped up on Dimensionals over the center. I also tied a little ribbon knot on each side of the greeting.

For just a final touch, I added three of the little Bumblebee dots in the 2020 In Color Enamel Dots. These dots were so popular they are out of stock right now but should be back in about two weeks. Get some because the colors are so pretty!

I think I am liking the new 2020-2022 In Colors this year! I ordered the 2020-2022 In Color 8 1/2″ x 11″ Assortment as well as the 12″ x 12″ assortment. That way I have some of all the colors and if I like certain colors a lot, then I can order the packages of single colors.

Have fun checking out all the new products in the Stampin’ Up! Catalog!

SHOP STAMPIN’ UP! ONLINE HERE!

In Good Taste You Are So Special Card

In Good Taste You Are So Special Card

Here is a very simple card that I made with a new color, new designer paper, new stamp set, new die, and new ribbon! Oh, and new enamel dots! However, I did choose the wrong coordinating color, but as you can see, I think it is a close enough match no one will notice! I didn’t!

This blue pattern of paper comes in the In Good Taste package, a really big package of designer paper of photographic images of different textures. And I mean realistic looking images! As I was cutting up this paper, I thought there was a wrinkle or something in the paper, but its just part of the look of the paper. And as I was applying adhesive to the backside of the paper, which is a woodgrain, there was a line in the pattern that I had to touch to make sure it wasn’t sticking up or that something hadn’t gotten on the paper!

The In Good Taste Designer Series Paper has 24 sheets of paper, 2 each of 12 designs. You get images of brick, wood, tile, stone, even ones that look like fabric. Honestly, when I first saw it in the catalog I wasn’t interested, but then I changed my mind when I saw cards other Demonstrators were making and had to have it. I think you will find it will create a lot of texture and interest to use in your cardmaking and other projects.

To make this card, I used a card base of one of the new In Colors, Misty Moonlight to coordinate, I thought. As I found out later, when I looked on the back of the In Good Taste package, the blue coordinating color is Night of Navy. The only thing I noticed was when I stamped a flower from the Tasteful Touches Stamp Set in Misty Moonlight to put on this card somewhere, somehow I didn’t think it looked quite right and didn’t use it. Maybe it was just the card design or maybe it was the color.

I liked the look of this blue pattern in the designer paper and adhered a bit of Misty Moonlight Ribbon around the card before adhering. I realized I usually put the greeting near the bottom of the card, but this time I moved it up near the top. The greeting is stamped from the Tasteful Touches Stamp Set and die cut with the Tasteful Labels Dies. There were several choices there to use! I thought maybe there should be a layer behind the Whisper White greeting and then I noticed the round die-cut in the same Tasteful Labels Dies and used that for just that little bit of color behind the greeting.

And for just a little bit of embellishment that seemed to really finish off the card, I used two of the Misty Moonlight In Color Enamel Dots on the greeting.

When I opened the package of those enamel dots, I just thought the colors were stunning! Maybe it is the bright Magenta Madness! I took a photo with the dots next to the card although the photo doesn’t quite do them justice. The dots are currently unavailable, however, as I write this.

In Good Taste With In Color Enamel Dots

As you look through the new Stampin’ Up! Catalog, check out the In Good Taste Designer Series Paper. You might be surprised that it appeals to you as it did to me with this In Good Taste You Are So Special Card.

SHOP THE NEW STAMPIN’ UP! PRODUCTS ONLINE HERE!