Tag Archives: Prized Peony Bundle

Prized Peony 3D Flower Friendship Card

Prized Peony 3D Flower Friendship Card

I finally tried out the new Peony Dies to see how difficult it would be to make this Prized Peony 3D Flower Friendship Card. And you know what? It wasn’t difficult at all! If I had just gotten the die set and hadn’t seen other videos describing how to use the dies, I don’t know what I would have thought! But really, it is extremely easy to die cut these peony petals and put them together to make a beautiful flower!

Peony Die Cut Pieces

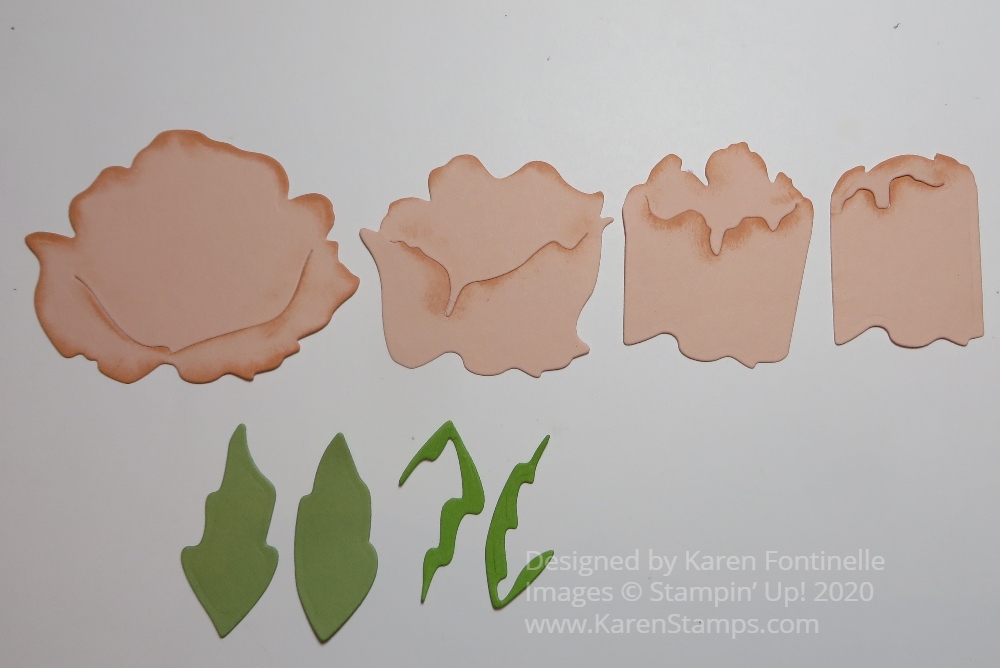
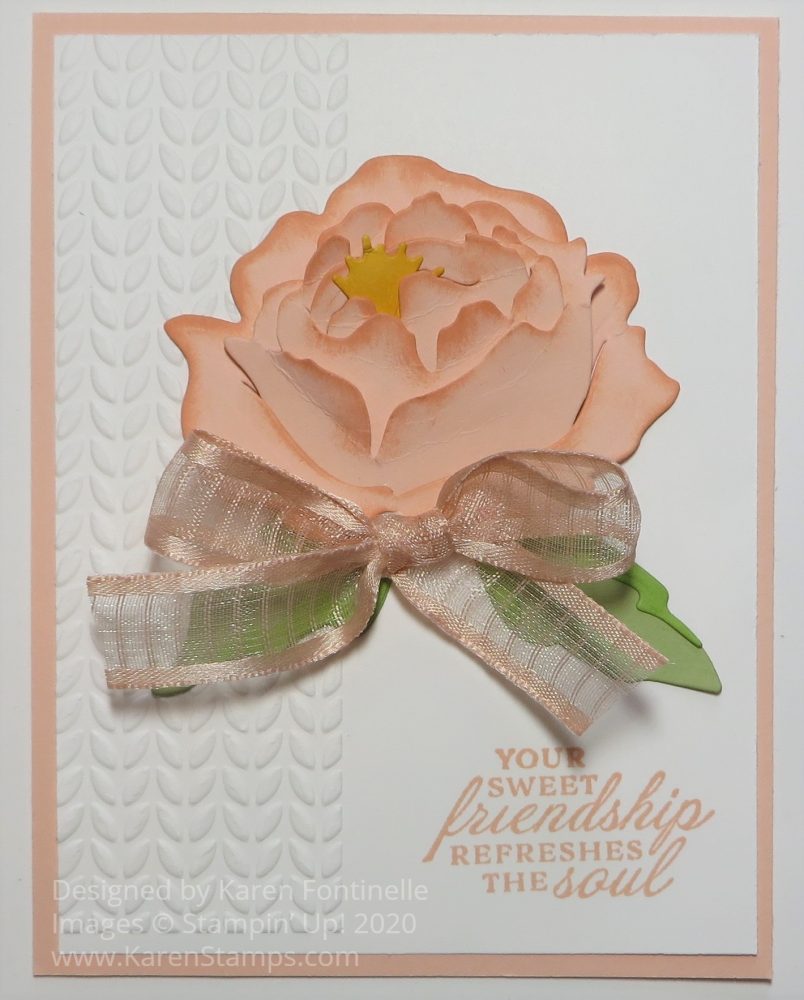
Here are the die-cut pieces, made with the Peony Dies. The flower petals are Petal Pink and sponged with some Petal Pink Ink. The leaves were Pear Pizzazz and Granny Apple Green.

Peony Pieces Assembly on Back

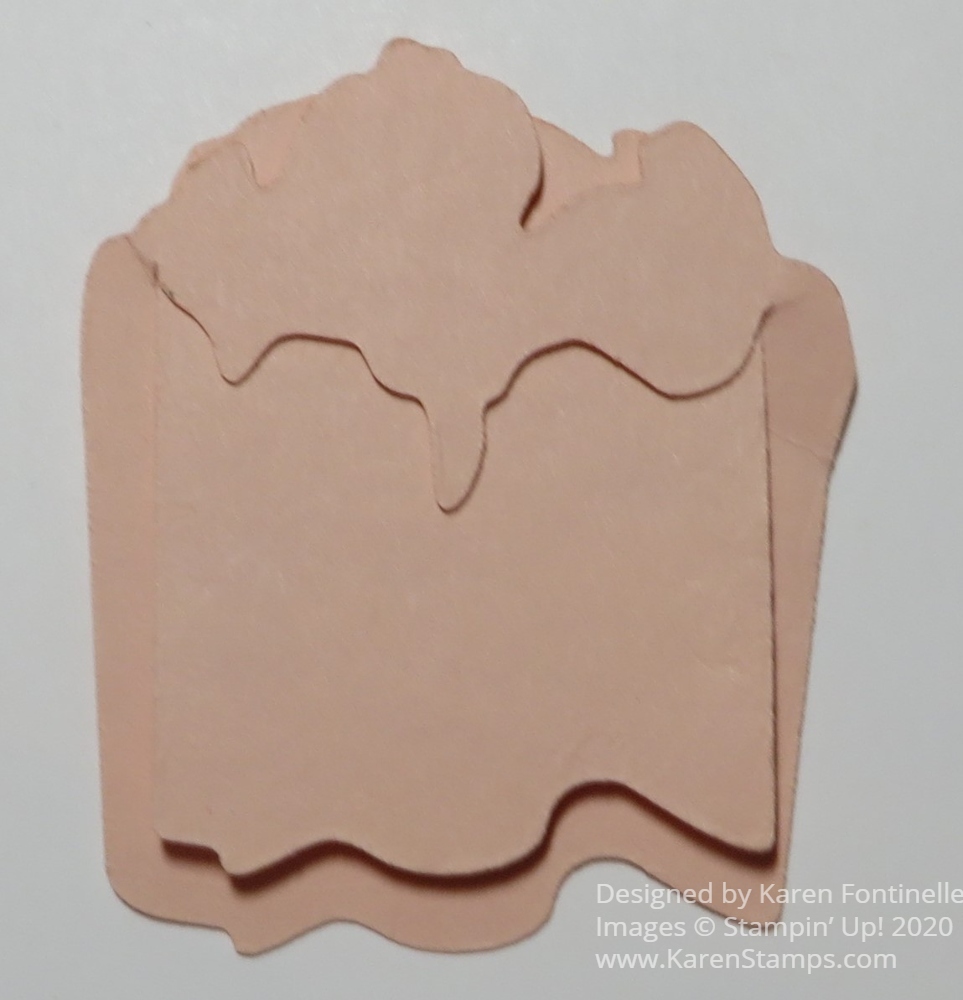
To assemble the flower, use the pieces in order by size. You can start either with the largest piece or the smallest piece. Just slide them inside each other, lining up the bottom edges of each piece. Look at the photo above. This is the back side of my flower with just two pieces. I didn’t push the one piece down all the way so you could see how the bottom edges match! You can see all the curves and imagine pushing that piece down even with the other piece. The bottom edges would line up perfectly! Do that with all four pieces and you will have assembled your peony!

Leave the assembled pieces exactly how they are….flat. OR foof them up a little bit to make the flower look 3D! Use a Bone Folder or even your fingers to try to kind of lift or roll the petal edges. You can also stick some Stampin’ Dimensionals and Mini Dimensionals behind the petals to left them up.

Prized Peony 3D Flower Friendship Card Closeup

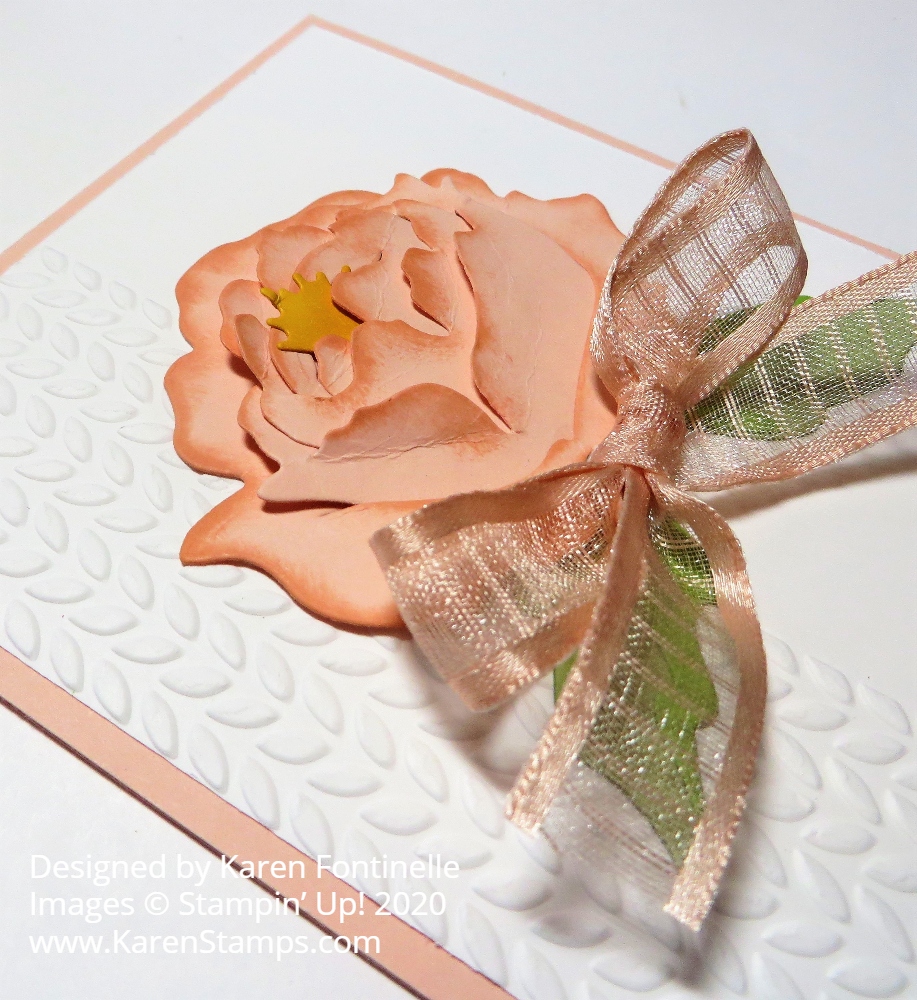
In the photo above, not only does the shading give some definition to the flower, but lifting up the petal edges really adds something!

The card base is Petal Pink with a layer of Whisper White. I used one of the Greenery Embossing Folders to emboss just the left side of the Whisper White. The peony is popped up with Stampin’ Dimensionals with the leaves underneath. Then I decided to have a ribbon tied around the lower portion of the card and attach a bow. But that seemed to take away from the flower, so I pulled off the strip of ribbon and just tied a bow to put at the base of the flower.

Then I risked everything (don’t do as I do, do as I say!) and stamped the greeting on the otherwise finished card! If I had messed up I would have just stamped the greeting on another piece of paper and made a layer and covered up my mistake. But it’s not a good idea to do the stamping when the rest of the card is finished! You can imagine why! By then it might be too late, like with this flower, to use the Stamparatus to make sure my stamping was perfect. I got lucky and stamped the greeting in the Prized Peony Stamp Set right on to the card!

You can get the Prized Peony Stamp Set and the Peony Dies together in a Bundle, the Prized Peony Bundle, and save 10%! And if you want it ALL, get the Peony Garden SUITE! Just put in the number for the Suite (154129) and get everything without having to put in all the item numbers! But if you only want some of the items, you can certainly just add those to your order as usual.

Do NOT be afraid of the Peony Dies because they are as simple as can be! Order whatever peony products you like! If you order by July 31, you will receive Bonus Coupons to use in August for every $50 you spend on an order in July! After you place your Stampin’ Up! order, watch for the email that contains your coupon codes. Make sure you get this email and keep track of it so you don’t lose those codes. So nice to get a little extra something when you order!

SHOP STAMPIN’ UP! ONLINE HERE!

Prized Peony Saying Hello Card

Prized Peony Saying Hello Card

If you like to stamp and color, this Prized Peony Saying Hello Card is really an easy card to make! I did use the masking technique to cover the large peony while I stamped the smaller flowers on the side. Since I love coloring with the Stampin’ Blends markers, for me this is an easy and relaxing card to make! If you don’t like coloring, you could do the same by stamping the flowers in the same or different colors rather than black ink and then do not color them in.

The card base is Flirty Flamingo and after stamping the card, I opted to add a layer of Granny Apple Green Cardstock as a layer under the Whisper White to blend in with the card better since I had used Granny Apple Green on the card.

I stamped the large peony and then stamped it on a “sticky note” being sure to get part of the stamped flower over the sticky area on the back to help hold it over the stamped flower on the card. After stamping on the sticky note, I cut out the flower right on the lines or just barely inside to use this as a mask. After stamping the large flower on the card, I stuck this mask over the flower so I could stamp the side flowers and my stamp would land on the paper mask and not stamp over my original stamped flower.

I stamped the flowers in Memento Ink and then colored in with several Stampin’ Blends Markers. I used both the Light and Dark of Flirty Flamingo on the flower, Granny Apple Green for the few leaves, and a dab of Daffodil Delight for the flower centers. Just to fill in a little white space, I scribbled a little Granny Apple Green beyond the leaves and flowers or in between.

I wanted a large greeting on the card so I simply stamped this one directly on the card front. It is from the Tasteful Touches Stamp Set, which has several very nice greetings to use. There is enough room on this card that I could have stamped it on cardstock and layered it on another piece. I could also have added some sequins or dots so an extra little embellishment, but I kept it simple this time!

You can see how I just stamped the very large peony on THIS CARD in just a colored ink and didn’t have to color it in. It still produced a pretty card doing it this way, so if you don’t like coloring, don’t let that deter you from getting this very lovely Prized Peony Stamp Set and perhaps the Bundle. You will be able to get very creative with this stamp set and perhaps the entire Peony Garden Suite making cards similar to my Prized Peony Saying Hello Card.

SHOP STAMPIN’ UP! ONLINE HERE!

Prized Peony Die-Cut Flower Card

Prized Peony Die-Cut Flower

If you get some or all of this Peony Garden Suite, you will have so many ways to create that you will come up with many kinds of cards and projects like this simple Prized Peony Die-Cut Flower Card.

For this card, I wanted to stamp the flower, color in, and then die cut it! I stamped the flower from the Prized Peony Stamp Set in Memento Ink and colored in the flower and bud with Petal Pink Stampin’ Blend Markers plus Granny Apple Green Stampin’ Blend Markers for the leaves. Then I cut it out with the Peony Dies.

My original idea was to use the Peony Garden Designer Series Paper just in a basic card design way using one side of a pattern of designer paper on half the card and the other side of paper on the lower half (or so), with maybe a ribbon across the seam where the papers join or overlap a little. I thought I would use this gray pattern plus the pink floral design on the other side – but then I decided I liked using just the gray pattern for the card layer! You never know what you will really come up with once you start making a card!

The card base is Gray Granite with the designer paper adhered to the front. I had already colored and die cut the peony flower, but I thought maybe it needed some background to help it stand out. I looked through my dies and choose the largest rectangle in the Stitched So Sweetly Dies. That would have been fine as is, but I wanted to try out the Dainty Diamonds Embossing Folder so I embossed the die cut. It was very pretty!

Before adhering the embossed piece to the card, I wrapped a piece of the pretty Petal Pink 5/8″ Organdy Striped Ribbon around near the bottom. Then I adhered the peony using Stampin’ Dimensionals® and placed it underneath the ribbon. For the final touch, I tied on a small piece of ribbon just in a knot in the center. I didn’t even want to add a greeting.

Inside, since the cardstock was gray, I added a Whisper White layer inside the card, stamping and coloring one of the small flowers in the stamp set in the bottom corner. It has such a pretty vintage floral look! Now I can stamp a greeting inside the card or write my own note or personal message when I want to use the card. Be sure to check out my first card using the Prized Peony Stamp Set in this post yesterday.

Stamping and coloring the peony is another step to take but is easy enough, even the coloring, and certainly the die-cutting. Then I just used a piece behind the flower to help showcase the peony and added a ribbon to my Prized Peony Die-Cut Flower Card.

SHOP STAMPIN’ UP! ONLINE HERE!

Prized Peony Monochromatic Petal Pink Card

Prized Peony Monochromatic Petal Pink Card

This Prized Peony Monochromatic Petal Pink Card is hot off the press! Just opened my order with this stamp set and paper in it and got to work, amid a few other interruptions!

The card base is Petal Pink to match the ink. It is actually lighter in color than in this photograph although the ink is fairly dark. Maybe I just have a juicy ink pad at the moment. I simply stamped the peony in the Prized Peony Stamp Set and the greeting in the same stamp set and cut down the cardstock a little to make it smaller. Then it was layered on a piece of Petal Pink Cardstock.

I looked through the pretty patterns of the Peony Garden Designer Series Paper and choose this one with a small Petal Pink floral print. It provides some interest and is good for the small amount of design that is actually going to show around the stamped peony.

I opted not to add any ribbon on the card wrapped around the peony piece, but after I had the card all made, of course, I couldn’t resist adding some of the new Elegant Faceted Gems. You can feel the facets on them. They are very pretty.

That’s how easy it is to make a monochromatic card with this stamp set, cardstock, and designer paper. You can also purchase the Prized Peony Bundle which includes the stamp set and Peony Dies and you save 10% on the price! Even if you purchase the entire Suite, you will still be getting the discounted price on the Bundle.

If I would have chosen to use the dies, I could have die cut this entire stamped flower and mounted it maybe with Stampin’ Dimensionals on the card to pop it up. This is going to be a beautiful stamp set to play with! If you order it or order the dies, look up some videos online of how to use the “pieces” of the flower to make it layered. You will wonder at first what on earth to do with the pieces that don’t look like anything, but they simply layer together to make something that looks like a 3D flower if you kind of shade the edges of the petals or pop them up with Dimensionals underneath or just have the pieces layered flat on the card which will still be impressive!

Start out with something easy like this Prized Peony Monochromatic Petal Pink Card. Just stamp the large peony in a colored ink or in black and then color in or sponge on some color. I think this stamp set will make beautiful cards with some basic simple stamping or you can make something extremely impressive to the recipient with easy steps for you to make it! Just play and have fun with this peony!

SHOP STAMPIN’ UP! ONLINE HERE!

(Remember Bonus Days! Spend $50, get a $5 coupon for August!)

Stampin' Up! Bonus Days 2020 Banner