Tag Archives: watercolor

Flight and Airy You’re Marvelous Card

Flight and Airy You're Marvelous Card

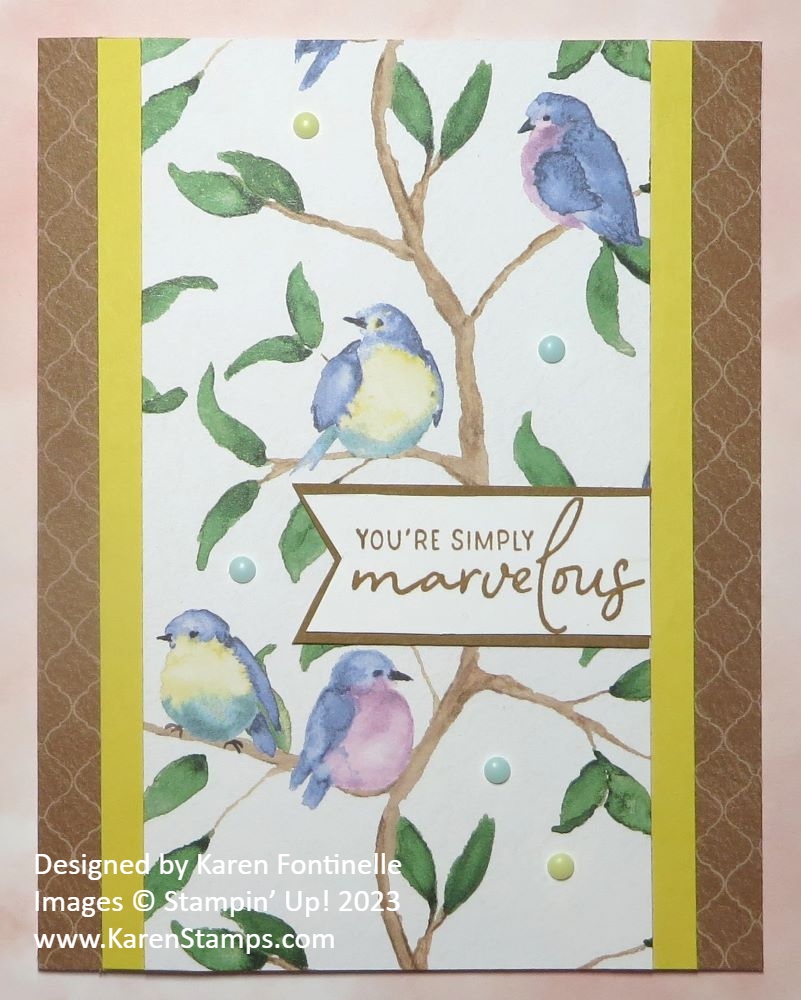
This Flight & Airy You’re Marvelous Card is made with brand new designer paper, and you can earn it for FREE with a $50 purchase during Sale-A-Bration. This Flight & Airy Designer Series Paper is wonderful! It has watercolored birds, foliage, flowers, and washes. These papers will make beautiful cards and projects for spring!

This card has a Basic White card base but instead of leaving a white margin around the layers, I covered the entire card front with designer paper. I started by choosing the sheet of paper with a vertical line of branches and birds. Although you might waste a bit of paper, it was like cutting out the Christmas design with the bears so that you could make a little scene on your card. I chose a section of birds that I liked and cut the strip of paper to include that area. From that full length of paper, I cut the section that I wanted to be on the front of the card. After I worked on the card, I trimmed that piece of designer paper to be just a little bit narrower. It ended up being 3″ x 5 1/2″.

The “other side” of that same paper was a Pecan Pie brown with crisscrossed lines. I liked it and wanted to use it with the birds section. As I played with making the front of the card, I wanted to add another color to brighten up the card a little bit, to bring out the colors of the birds. I chose Daffodil Delight to be just a narrow strip along the side of the designer paper.

I didn’t want to waste a lot of the designer paper, so I cut the brown pattern into two pieces at 3/4″ x 5 1/2″. I adhered those two strips to each side of the card, exactly on the edges, top and bottom. The Daffodil Delight strips, which are 1/2″ x 5 1/2″ were adhered to the sides of the bird paper with just 1/4″ showing. It helps to use Grid Paper to get everything even and straight. Then I adhered that whole section to the front of the card, making sure I had it even top and bottom and with equal amounts of the brown pattern showing on each side.

The greeting is stamped in Pecan Pie ink on Basic White. I diecut it with a Tailor Made Tag Die, but I found it too large for this card. I didn’t want to cover up any of the pretty birds. I ended up trimming that sentiment as narrow as I could, then flagging one end. Then I layered it on a piece of Pecan Pie cardstock and trimmed that as narrow as I could for a layer. Luckily, it fit exactly right on the card without hiding any birds!

You know if I have a new package of embellishments, I must use them! The colors aren’t all perfect matches, but close enough for matching shades of watercolors. I used the Rainbow Adhesive-Backed Dots. These are in the new Spring Mini Catalog on page 33.

Overall this is a pretty basic, easy card for you to make and fantastic when you can get free designer series paper! Plan your orders in January and February in $50 increments so you can take advantage of Sale-A-Bration!

SHOP STAMPIN’ UP! ONLINE HERE!

Blessings of Home Watercolored Flowers Card

Blessings of Home Watercolored Flowers Card

This Blessings of Home Watercolored Flowers Card card was intended to be a Fresh Freesia monochromatic card but took the step of coloring in the large flower with Fresh Freesia and then it was down the rabbit hole! I could have started over because it wasn’t turning out how I intended but I just kept going. I don’t know if that was a mistake or not!

Once I colored in the one flower even though it was purple it just didn’t seem right. So I thought I would color in the other flowers and leaves lightly. But that didn’t look good. Luckily, the paper held up well to my coloring/watercoloring so that was good.

I stamped the flower bouquet in the Blessings of Home Stamp Set with Fresh Freesia ink and then die cut it with one of the Scalloped Contours Dies. To color in the bouquet, I used the Water Painter and picked up ink from the ink refills in the lid of the ink pads I used. Some of the colors I used were Polished Pink, Pool Party, Flirty Flamingo, Mango Melody, Soft Succulent, Daffodil Delight, Soft Suede, and Granny Apple Green.

I realized the reason these flowers and leaves don’t look quite right is that the image is stamped in Fresh Freesia and not in Memento Black ink. With black ink, you see the outlines and the little texture lines in the images even though you color over them. Stamping in a light color of ink makes it look entirely different.

The card base is Fresh Freesia with a layer of the Heart & Home Designer Series Paper in a Fresh Freesia color. I just adhered the floral die cut flat on the card but you could pop it up. The greeting is in the Blessings of Home Stamp Set. However, I didn’t want to use the entire stamped greeting so I covered up the bottom line with a sticky note and inked up just the “Thank You”. Then I removed the sticky note and stamped it on a strip of Basic White. I layered that on a piece of Fresh Freesia and popped up the greeting with Dimensionals.

For embellishing, I tied a bow with the Fresh Freesia 3/8″ Open Weave Ribbon but I thought of putting it on an angle on the corner of the bouquet. Then….you guessed it…I added several Iridescent Rhinestone Basic Jewels on the ends of the greeting and here and there on the flowers!

Here is another card I stamped with the same Blessings of Home Stamp Set and colored with Stampin’ Blends Markers and had stamped in Memento Black ink so it has a whole different look.

All in all, the card has a little different look and it wasn’t what I envisioned when I began! But there are no mistakes in stamping, so I think it turned out okay and I like it fine!

Blossoms In Bloom Watercolor Stamping Cards

Blossoms In Bloom Watercolor Stamping Cards

I thought I would try some watercoloring with this stamp set and dies and ended up with these Blossoms In Bloom Watercolor Stamping Cards. I’m calling it watercoloring stamping. I used watercolor paper, moistened it and also spritzed water on the stamp before stamping.

Blossoms In Bloom Watercolor Stamping Card Front

I used my Stamparatus to stamp since the Blossoms in Bloom stamp is so large. I used my Aqua Painter (now Water Painters in the new catalog) to moisten the Fluid 100 Watercolor Paper and I also spritzed the stamp with water after coloring with Stampin’ Write Markers. On the other card, I applied the ink to each flower with Sponge Daubers. When I stamped with the Stamparatus on the wet watercolor paper with the wet stamp, it looked like a mess! But all I had to do was dab with a paper towel to pick up the excess water and it was fine! I really just wanted a bit of color underneath the die cut I would later put on.

After letting the watercolor paper dry, I adhered the thin Whisper White die cut of the Many Layered Blossoms Dies with teeny tiny drops of Multipurpose Liquid Glue. Then this piece was layered on the card front of Melon Mambo Cardstock.

The die cut didn’t quite cut all of the flower centers but I don’t think anyone will mind. I could have even colored them perhaps with yellow to make them look like they were supposed to be there. I like how I didn’t have to place the die cut perfectly, if the color extended beyond, it looked fine because it was watercolor.

Blossoms In Bloom Watercolor Stamping Card

And then I did another one to see if I could get it less watery, but I didn’t, although using a Melon Mambo die cut on Coastal Cabana Cardstock gives this card a different look anyway.

Blossoms In Bloom Watercolor Stamping Coastal Cabana Card

I like the way some of the colors bled into each other which gives it a good watercolor look. I even accidentally got some splatters on the watercolor paper.

If you’d like to watercolor, but don’t know “how”, just use this stamping method on watercolor paper, spritzing before or after. Just experiment! There are lots of ways to do this. If you don’t have official watercolor paper, Shimmery White Cardstock is the next best thing.

Try your hand at some watercoloring with whatever you have! And you can get some other ideas of how to use the Many Layered Dies on these cards in THIS POST.

I think you will find these Blossoms In Bloom Watercolor Stamping Cards fun to make!

SHOP THE NEW CATALOG AT STAMPIN’ UP!

Watercolored Easter Egg Notecard

Watercolored Easter Egg Notecard

The other day I saw on Facebook a Stampin’ Up! post of a stamping technique that a French Demonstrator, on the Artisan Design Team, had used on a card using the acrylic blocks. I had already been reminded of an Easter card I made of an oval shape and decorated like an Easter egg, so I used her technique to make a Watercolored Easter Egg Notecard.

You can use the largest oval framelit in the Layering Ovals Framelits Dies to make this card although it is a little small. If you want a larger card you will need some kind of template. I just used a notecard in the Note Card & Envelopes since the egg will be small anyway. Fold the note card and position the largest oval die over the note card (closed) but having it off the card a bit over the fold. In other words, you do not want to cut a portion of the fold. If you do, you will have two ovals cut out of the Note Card but they won’t be connected by the fold. Just slide the oval off to the left a little bit so you will still have a fold.

You can see how I made an Easter egg-shaped card HERE a few years ago. The die will cut through the two layers of the card and still have a fold as long as you move the die to the left of the fold.

This is how I colored my egg card. I used a larger acrylic block that the egg could fit on. Then I chose several colors of ink pads and picked up ink from each color with my Aqua Painter one at a time and colored it onto the acrylic block. Instead of picking up the block and stamping it on the card, I placed the front of the egg card down onto the acrylic block loaded with stripes of colors of watery ink. Just press and then lift up carefully.

Depending on how much ink and how much water from your Aqua Painter (or brush) that you use and how you lay down the colors, you will get a different look on your card each time you make one. It’s really fun to do a technique where each time the final look will be a surprise! You could also color directly on the card, but Whisper White cardstock doesn’t hold up really well to very much water. I would recommend using Shimmery White Cardstock.

To decorate my Easter card, I used the Easter greeting from the Fable Friends Stamp Set. It is stamped in Highland Heather ink and layered on Highland Heather Cardstock, both die cut from the Layering Ovals Framelits Dies. For a little bling, I added some self-adhesive Basic Sequins.

As I was getting an envelope for the note card, I decided to color the envelope flap to match. It doesn’t match exactly because I didn’t use an acrylic block, I just colored directly onto the envelope flap. This does make the flap a little “warpy” and the glue on the flap inside gets a little damp so make sure the flap is open. And finally I stamped the bunny from the Fable Friends Stamp Set in Highland Heather on the front of the envelope.

This is a pretty small little Easter egg card but very cute and fun! You can try this technique or you can make one like the one I linked to from three years ago. Of course you can use this ink-on-the-acrylic-block technique to make lots of different kinds of cards, even just stamping the block onto cardstock and leaving a rectangular stamped shape as the Artisan team member did. Get out some ink and an acrylic block and experiment for yourself in making whatever cards you like or one for Easter like my Watercolored Easter Egg Notecard.

SALE-A-BRATION ENDS SUNDAY, MARCH 31! DON’T MISS IT!