Tag Archives: In Good Taste Designer Series Paper

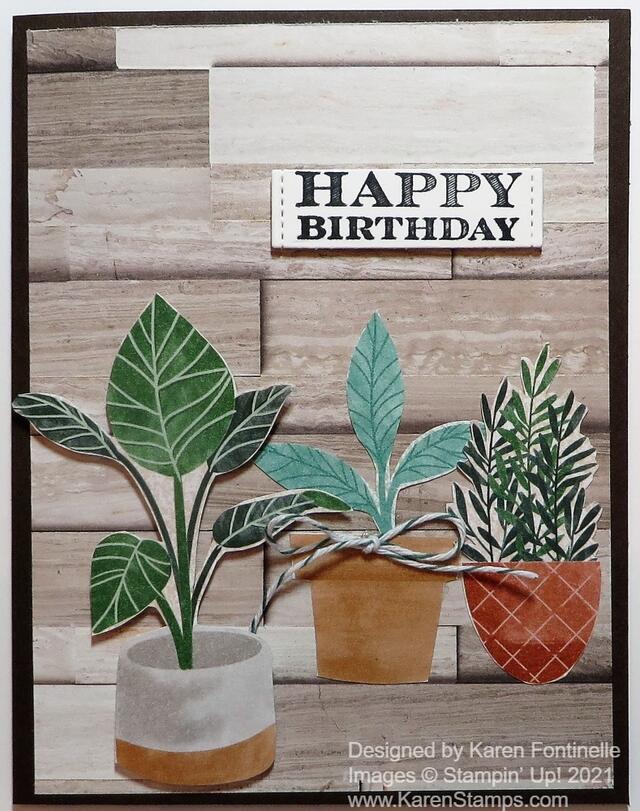
Bloom Where You’re Planted Happy Birthday Card

Bloom Where You're Planted Happy Birthday Card

If you would like to make this Bloom Where You’re Planted Happy Birthday Card, you can buy the paper with the plants and the paper with the background both on sale in the Stampin’ Up! Designer Series Paper Sale! There are nine select papers on sale right now through August 2 so you can stock up or try out new ones at a 15% discount!

To make this card, I used two of the papers on sale now – In Good Taste for the background and Bloom Where You’re Planted for the plants! In Good Taste is a giant package of paper, 24 sheets of paper, 2 papers each of 12 different designs. You are sure to find patterns for every creation in this package! Each sheet has photographic images of wood, tile, stone, and other elements to add visual textures to all kinds of projects. These would be great backgrounds for scrapbook pages as well.

For the card base, I used Early Espresso Cardstock. Since this paper is so dark, you will want to add a Basic White or lighter color layer inside the card on which to stamp or write your message. You might even stamp or add a cutout image of one of the plants to this inside layer for a fun surprise.

For the plants, I just went through the Bloom Where You’re Planted Designer Paper and chose some plants I wanted to cut out. This paper has sheets of separate plants and pots, leafy backgrounds as well as various generic backgrounds to look like walls where you might place a plant. If you have the Perfect Plant Dies, you can cut out certain pots and plants on separate papers by running them through the Stampin’ Cut & Emboss Machine. I just used my Paper Snips to cut out one separate pot and separate plant and the other two were the full pot and plant on another sheet.

The largest plant on the left is popped up on Stampin’ Dimensionals® and the other two are adhered right down on the background paper. I found a retired spool of twine and used that to tie a little bow and adhered it to the middle pot with a Mini Glue Dot.

The greeting was already die-cut in a little pile on my table from the Many Messages Stamp Set and Messages Die. This is an amazing concept! It’s like a large background stamp filled with greetings that is best to stamp with the Stamparatus so you make sure every inch is stamped fully. Then die cut with the one large die, making sure it is lined up properly, and it cuts out all the greetings in one fell swoop! You used to be able to buy both the stamp set and die in a Bundle, but that retired now so you have to buy them separately. However, they added a new stamp set, the Many Happenings Stamp Set, for even more greetings to be stamped and die-cut in the same way! If you stamp and cut out these greetings maybe in a couple of colors of ink or on different colors of cardstock, then store them in a little box or bag, you will have a whole bunch of greetings ready to go when you don’t have time to look for a specific stamp set to use!

In this previous post, you can see how I used the Stamparatus to stamp all these greetings!

Check out all the papers on sale, if you haven’t already! Maybe you have purchased one of the patterns already but used a lot of it. Now is the time to stock up on more at a discount! Every little bit helps! My Bloom Where You’re Planted Happy Birthday Card was fun to make!

SHOP STAMPIN’ UP! TODAY!

Floral Essence Perennial Punch Flowers Card

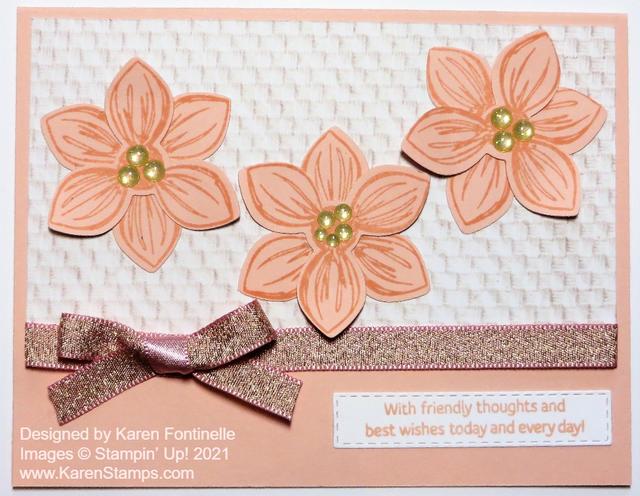
It’s time to use some retiring products on this Floral Essence Perennial Punch Flowers Card! I think no matter the cardstock, designer paper, or accessories, we always hate to see something retire! But it must be done to make room for wonderful new products we will also love!

May 4th is the launch date for the new Stampin’ Up! Annual Catalog! It’s always an exciting time when a new catalog goes live! However, you won’t find this stamp set and punch in the new catalog.

This card base is Petal Pink Cardstock with a partial layer of a pattern in the In Good Taste Designer Series Paper. This is a huge package of paper with different patterns of surfaces and textures. I chose the one that looks like some kind of white fabric.

The flowers are stamped with the Floral Essence Stamp Set and then punched out with the Perennial Flower Punch. The Floral Essence Stamp Set is reduced in price and the Perennial Flower Punch is more than 50% off! They are both on the Last Chance Products List. However, the In Good Taste Designer Series Paper is carrying over to the next catalog! It’s pretty rare for designer paper to continue on to the next catalog. I stamped six flowers so I could double them up to make three full flowers. They are stamped in Petal Pink Ink to match the cardstock.

Then I used the pretty Blushing Bride 3/8″ Metallic Ribbon to cover where the designer paper ends. This ribbon is in the Spring Mini Catalog so it will be around until at least the end of June. Even though it is a different pink than the cardstock, it still looks good together. I tied the bow separately and adhered it with Glue Dots.

The greeting is from the Floral Essence Stamp Set and die-cut with one of the Stitched Rectangles Dies. It fits perfectly at the bottom of this card. To finish embellishing this card, I used Gold Glitter Enamel Dots on the flower centers.

This Floral Essence Perennial Punch Flowers Card is pretty easy to make and you can add lots of different greetings to it. Remember to purchase retiring products by May 3rd at Stampin’ Up!

SHOP STAMPIN’ UP! ONLINE HERE!

In Good Taste Navy Z-Fold Thank You Card

In Good Taste Navy Z-Fold Thank You Card

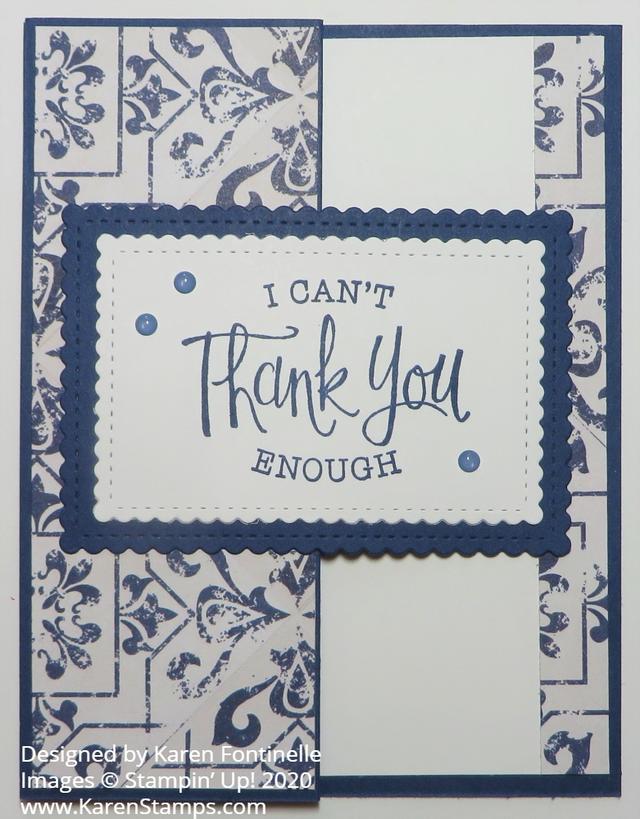
I always think it is fun and impressive to make a card with a different fold and this In Good Taste Navy Z-Fold Thank You Card uses the easiest one there is! I was working on another project with this same designer paper which I really like so I used it on this card. You can use any designer paper and change the sentiment for almost any kind of card. You can even change the shape of the greeting layer on the card.

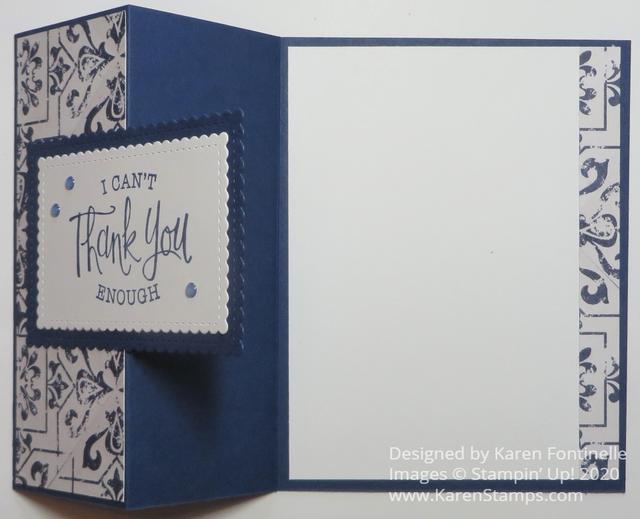
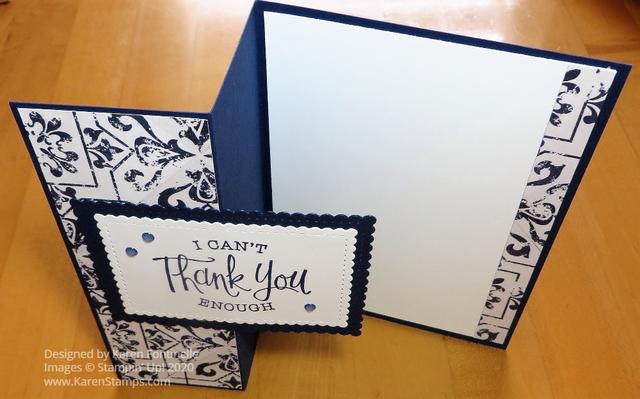
The basic z-fold card is so easy to make! The card base starts off like any card, 8 1/2″ x 5 1/2″, scored and folded at 4 1/4″. But then you will fold the card front back on itself, in half. After scoring the card normally at 4 1/4″, next score the front of the card at half of that, 2 1/8″ and fold that part back like you see in the following photos in this post.

Next, decide on what designer paper you want to use on your card or even stamp the panels you want to add. Just do whatever you like or whatever the occasion requires. This card base is Night of Navy and the designer paper is the In Good Taste Designer Series Paper. This designer paper comes in a large package with many patterns – 12 designs, 2 sheets of each! When I first saw it in the catalog, wasn’t really interested, but after I saw how many different textures were captured on this paper, I was quite intrigued. This Night of Navy print resembles tile or china I think.

Since that folded back front panel measures 2 1/8″ x 5 1/2″, you probably want your designer paper or panel to measure 2″ x 5 3/8″ for a narrow margin around the edge or 1 7/8″ x 5 1/4″ for a wider margin. Figure it just like you would for a card.

Since the cardstock is dark, I added a Whisper White layer inside the card and put a strip of the designer paper along the edge. This was just a scrap, but it is about 1/2″ wide by 5 1/4″.

For the greeting on the front of the card, I wanted to use something kind of large. I chose one from the So Sentimental Stamp Set. It is stamped in Night of Navy ink. The die-cut scalloped rectangles I used are in the Stitched So Sweetly Dies set. When you adhere it to the front of the card, remember to only add adhesive to half of the back of the greeting so it only sticks to that folded front panel and not the rest of the card. If you are going to have a greeting on the inside of the card, you probably want that front greeting to cover up what is inside the card.

For a little bling, I added some Misty Moonlight 2020-22 In Color Enamel Dots. They are not the exact same color as the Night of Navy used on the card, but I thought they were close enough.

I could have added another color with the greeting layer and the enamel dots and ink if I didn’t want it to be the monochromatic look.

Here’s another card I made with the z-fold using really pretty designer paper from 2019, some ribbon, and a different shaped greeting on the front of the card, just to give you another idea.

Here are some other views of this card so you can see how the folds go.

In Good Taste Navy Z-Fold Thank You Card Inside
In Good Taste Navy Z-Fold Thank You Card Folds

Try your hand at making an easy Z-Fold card like this In Good Taste Navy Z-Fold Thank You Card.

SHOP STAMPIN’ UP! ONLINE!

In Good Taste Masculine Father’s Day Card

In Good Taste Masculine Father's Day Card

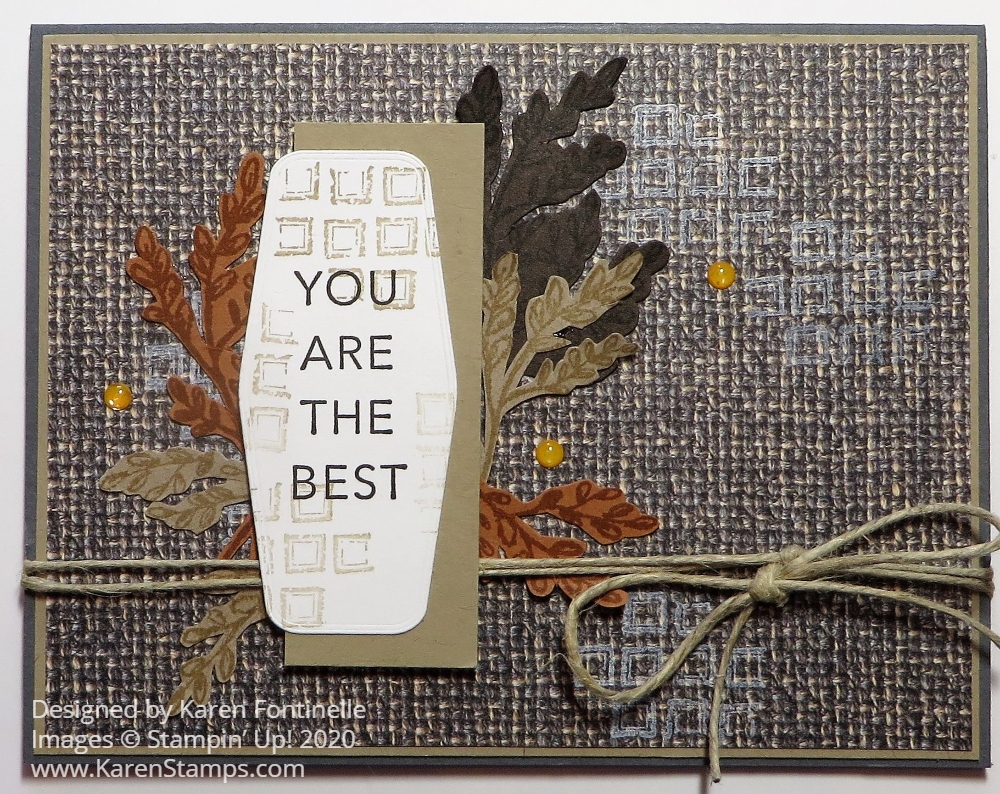
Father’s Day is coming up on Sunday, June 21, 2020, and this In Good Taste Masculine Father’s Day Card might be one you would want to make. Or just keep it in mind for any masculine card occasion. I actually used a sample in the new Stampin’ Up! Catalog on page 124 to copy. You can use the samples in the catalog for ideas and inspiration whether you copy exactly or change it up to something slightly different or a lot different!

We often think we don’t have enough ideas or the right stamps or supplies for masculine cards. I think if you take a good look at the In Good Taste Designer Series Paper you will find many of the patterns that would be perfect for a masculine card, not to mention any other cards! For this card, I looked through the pack of papers several times before settling on this particular paper. It’s a brown and gray (I think!) tweed, maybe like you would find on a carpet or rug or of course a piece of fabric. Every sheet of this In Good Taste DSP looks real! You will probably at least once touch the piece of paper to make sure it’s not really 3D! The paper is designed from great photographic images!

Once I had my designer paper pattern chosen, I chose Basic Gray Cardstock for the card base with a layer of Crumb Cake with just a thin margin before adhering the designer paper.

To decorate the card, I used the Tasteful Touches Stamp Set. I stamped the little squares on the one stamp on the card front in just a couple places with White Craft Ink, but it didn’t turn out very well! Then I stamped the greeting on a piece of Whisper White Cardstock and die cut with one of the Tasteful Labels Dies. I thought it looked a little plain so I stamped those same squares on it with Crumb Cake Ink (I think stamped off first.). And in copying the catalog sample (except I turned the card sideways) I added a piece of Crumb Cake, just a scrap, partially behind the greeting.

Since I liked the stamp with the sprig of leaves, I stamped that on several different browns. I actually thought there was a die to cut them out, but I had to cut them out by hand! I wasn’t even sure what I would do with them, but ended up, as you can see, sticking them to the sides of the greeting.

The right side of the card looked a little bare so I tied some retired twine around the card. I thought it was Linen Thread at first but it is thicker so it is some un-named twine! And since I can’t resist, I added a few of the In Color Enamel Dots in the Bumblebee color.

And that’s it! A card you can use for Father’s Day for one of the men in your life. It has lots of different textures to make it interesting. You could keep the card the same and change the greeting. Use a “Happy Father’s Day” stamp or something for a birthday or graduation for a boy. Lots of masculine card ideas just because of the paper. And of course the paper can be used on cards and projects for anyone!

If you don’t own this In Good Taste DSP yet but want to make something like this card, use an embossing folder to give the front of the card some texture or do some random stamping on the card. Then just continue on and make something with the look and feel of this In Good Taste Masculine Father’s Day Card!

Shop Stampin’ Up! Online Here!

In Good Taste You Are So Special Card

In Good Taste You Are So Special Card

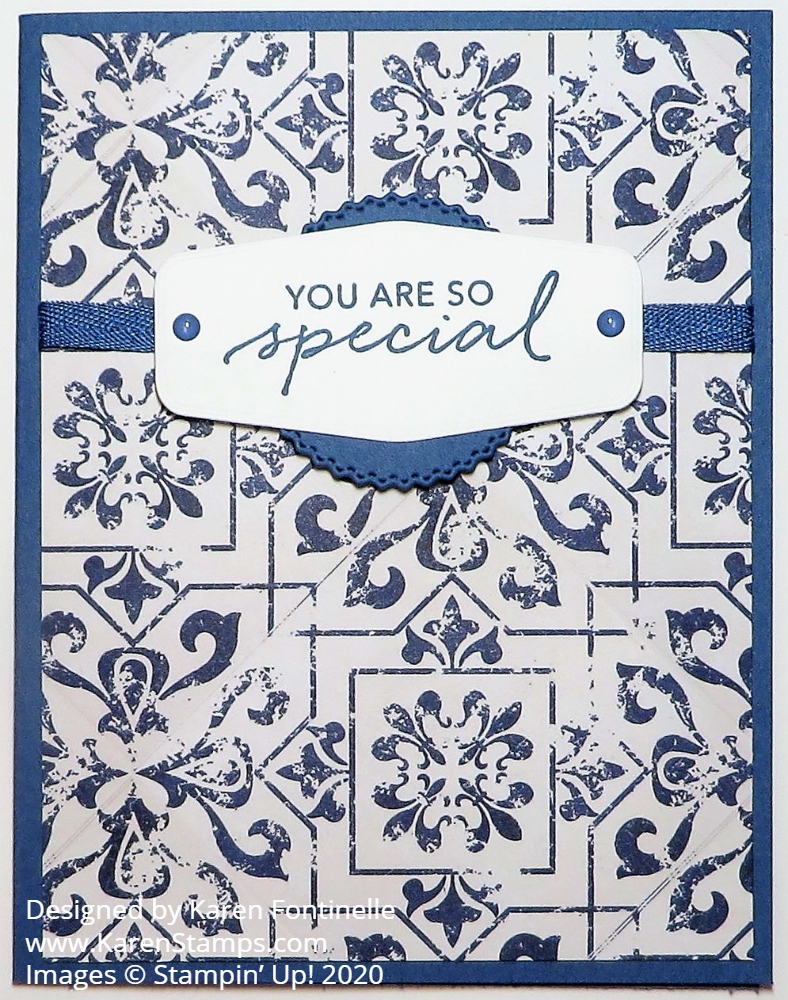
Here is a very simple card that I made with a new color, new designer paper, new stamp set, new die, and new ribbon! Oh, and new enamel dots! However, I did choose the wrong coordinating color, but as you can see, I think it is a close enough match no one will notice! I didn’t!

This blue pattern of paper comes in the In Good Taste package, a really big package of designer paper of photographic images of different textures. And I mean realistic looking images! As I was cutting up this paper, I thought there was a wrinkle or something in the paper, but its just part of the look of the paper. And as I was applying adhesive to the backside of the paper, which is a woodgrain, there was a line in the pattern that I had to touch to make sure it wasn’t sticking up or that something hadn’t gotten on the paper!

The In Good Taste Designer Series Paper has 24 sheets of paper, 2 each of 12 designs. You get images of brick, wood, tile, stone, even ones that look like fabric. Honestly, when I first saw it in the catalog I wasn’t interested, but then I changed my mind when I saw cards other Demonstrators were making and had to have it. I think you will find it will create a lot of texture and interest to use in your cardmaking and other projects.

To make this card, I used a card base of one of the new In Colors, Misty Moonlight to coordinate, I thought. As I found out later, when I looked on the back of the In Good Taste package, the blue coordinating color is Night of Navy. The only thing I noticed was when I stamped a flower from the Tasteful Touches Stamp Set in Misty Moonlight to put on this card somewhere, somehow I didn’t think it looked quite right and didn’t use it. Maybe it was just the card design or maybe it was the color.

I liked the look of this blue pattern in the designer paper and adhered a bit of Misty Moonlight Ribbon around the card before adhering. I realized I usually put the greeting near the bottom of the card, but this time I moved it up near the top. The greeting is stamped from the Tasteful Touches Stamp Set and die cut with the Tasteful Labels Dies. There were several choices there to use! I thought maybe there should be a layer behind the Whisper White greeting and then I noticed the round die-cut in the same Tasteful Labels Dies and used that for just that little bit of color behind the greeting.

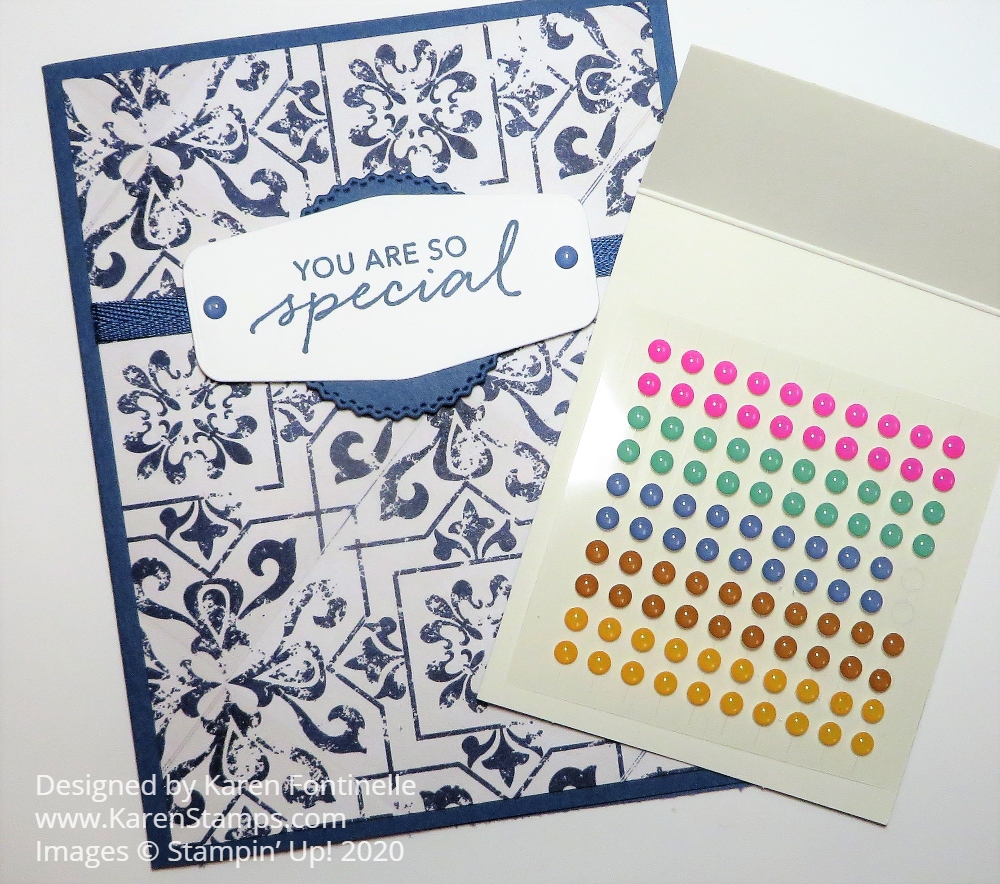
And for just a little bit of embellishment that seemed to really finish off the card, I used two of the Misty Moonlight In Color Enamel Dots on the greeting.

When I opened the package of those enamel dots, I just thought the colors were stunning! Maybe it is the bright Magenta Madness! I took a photo with the dots next to the card although the photo doesn’t quite do them justice. The dots are currently unavailable, however, as I write this.

In Good Taste With In Color Enamel Dots

As you look through the new Stampin’ Up! Catalog, check out the In Good Taste Designer Series Paper. You might be surprised that it appeals to you as it did to me with this In Good Taste You Are So Special Card.

SHOP THE NEW STAMPIN’ UP! PRODUCTS ONLINE HERE!

Celebrate Sunflowers Celebrate You

Celebrate Sunflowers Celebrate You

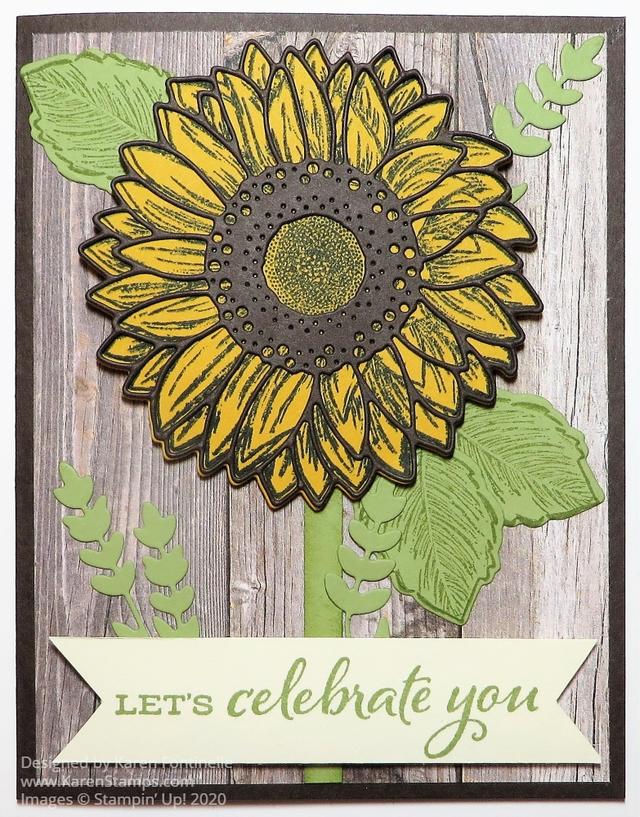
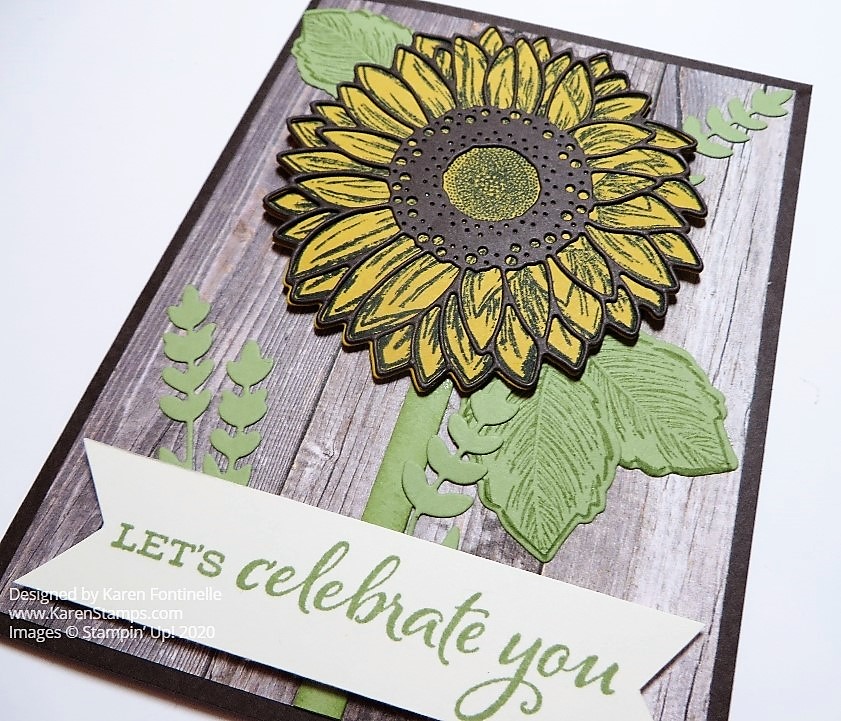
It was time to play with the Celebrate Sunflowers Stamp Set and matching dies in making this card, Celebrate Sunflowers Celebrate You. You could send this card with this greeting to someone who was celebrating something big or small or just someone who needed a little perking up!

I knew I wanted to use the new In Good Taste Designer Series Paper along with the sunflower. You won’t believe this designer paper! It is photographic images of wood, tile, stone and other elements. Some look like carpet or fabric! And you get 24 sheets in the package, 2 sheets of 12 different double-sided designs! This wood sheet that I used on this card looks like a real piece of wood up close! It’s great!

To make the large sunflower in the Celebrate Sunflowers Stamp Set, I stamped the flower on Crushed Curry Cardstock with Memento Ink. If you stamp on the color of cardstock you like, then you don’t have to color the stamped image.

You can buy the Sunflowers Dies separately or together with the Celebrate Sunflowers Stamp Set in the Celebrate Sunflowers Bundle and save 10%. The dies, of course, are great for cutting out the two sizes of sunflowers and the leaves and sprigs.

I die cut the sunflower outline in Early Espresso to match the card base of Early Espresso. The leaves are stamped in Pear Pizzazz and die cut.

The greeting comes in the stamp set. Of course, you could change it out with almost anything or just leave it off the card. The card design will stand on its own.

The Celebrate Sunflowers Stamp Set and dies are just a couple of the amazing new products in the new Stampin’ Up! Annual Catalog! Get your favorites while you can!

Remember, with a $150 order you earn Stampin’ Rewards, and during June, a $250 or more order earns an EXTRA $25 in Stampin’ Rewards!!

SHOP STAMPIN’ UP! ONLINE HERE!

Celebrate Sunflowers Celebrate You Closeup (3)