Tag Archives: Peaceful Moments Stamp Set

Make & Send a Card on World Cardmaking Day 2020

World Cardmaking Day 2020

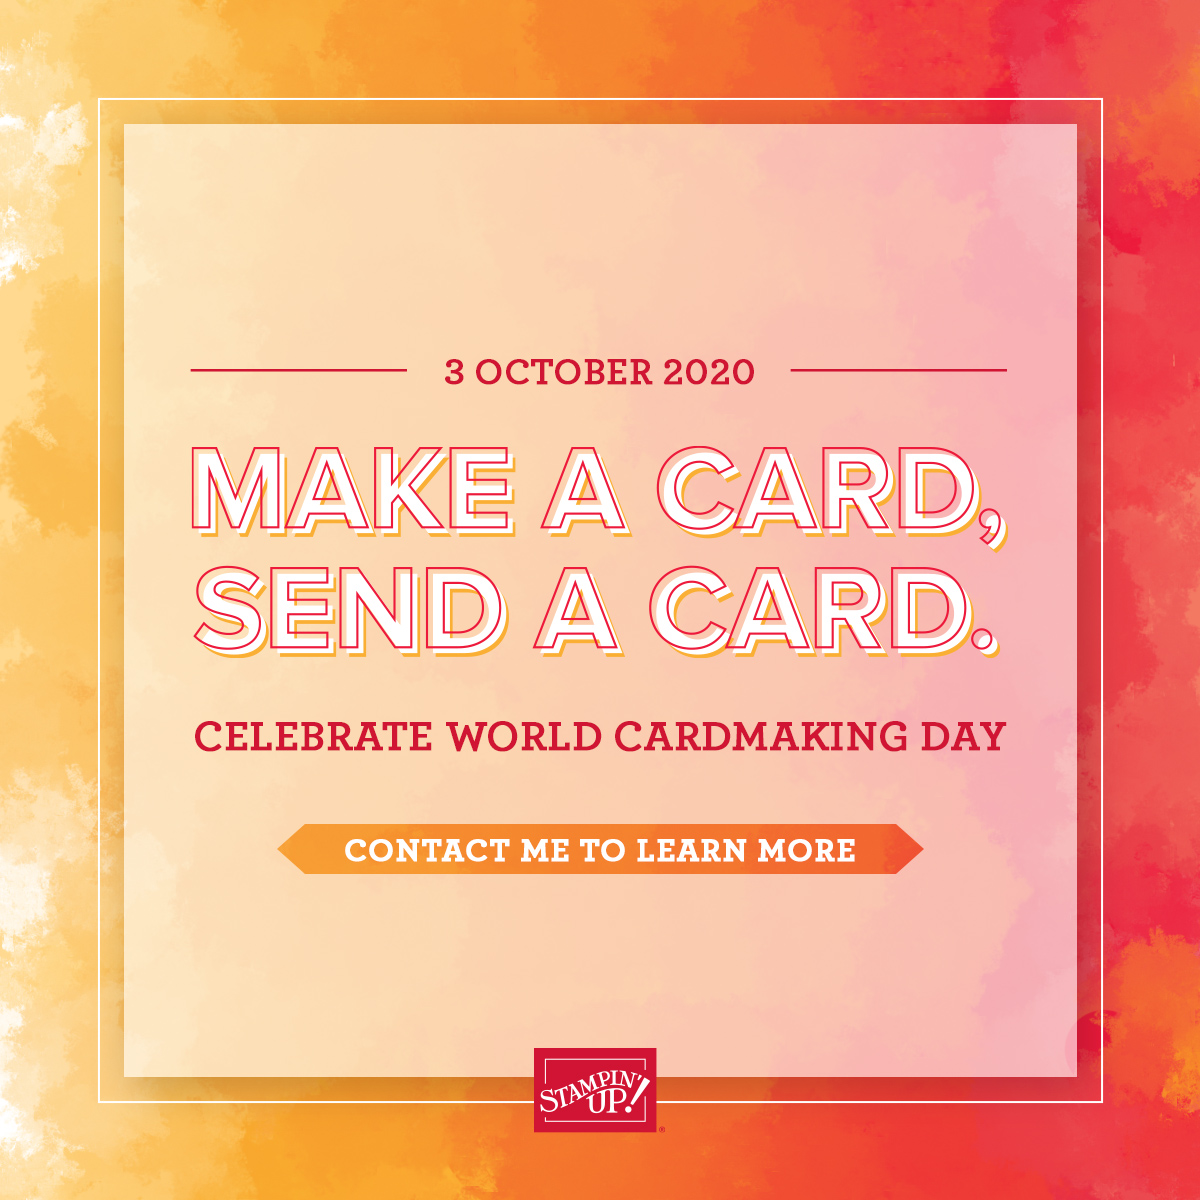
Today is World Cardmaking Day! Almost everyday is Cardmaking Day for a lot of us avid stampers and papercrafters, but today we should make a card and MAIL ONE to someone…..or even better, make and mail several cards! It’s good for us to take some time for being creative and getting our mind off the news and it will also be good for the recipient to know that you were thinking of them!

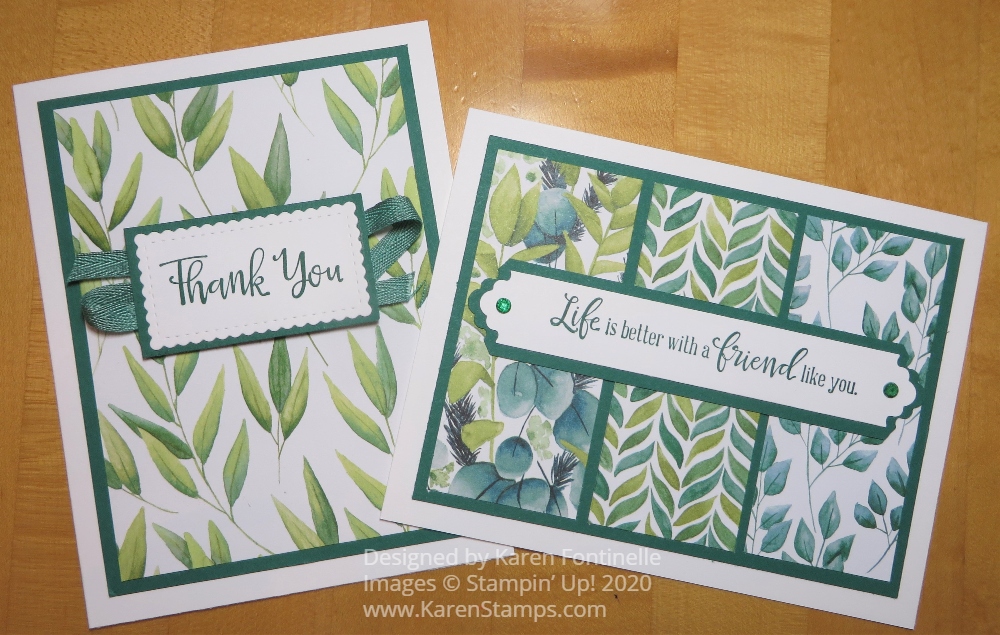
Here are two cards I made with the Forever Greenery Designer Series Paper. As it happens, this paper is on sale 15% off during the month of October in the Designer Series Paper Sale! Be sure to check out the list of papers on sale so you can order your choices soon.

Forever Greenery Friend Card

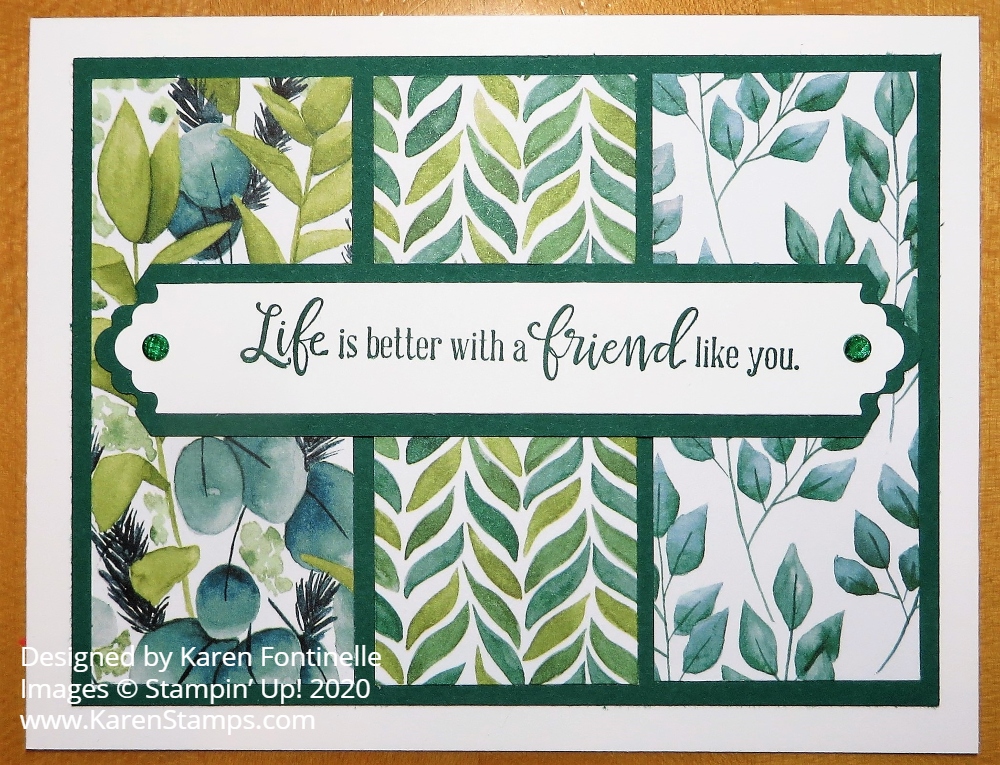
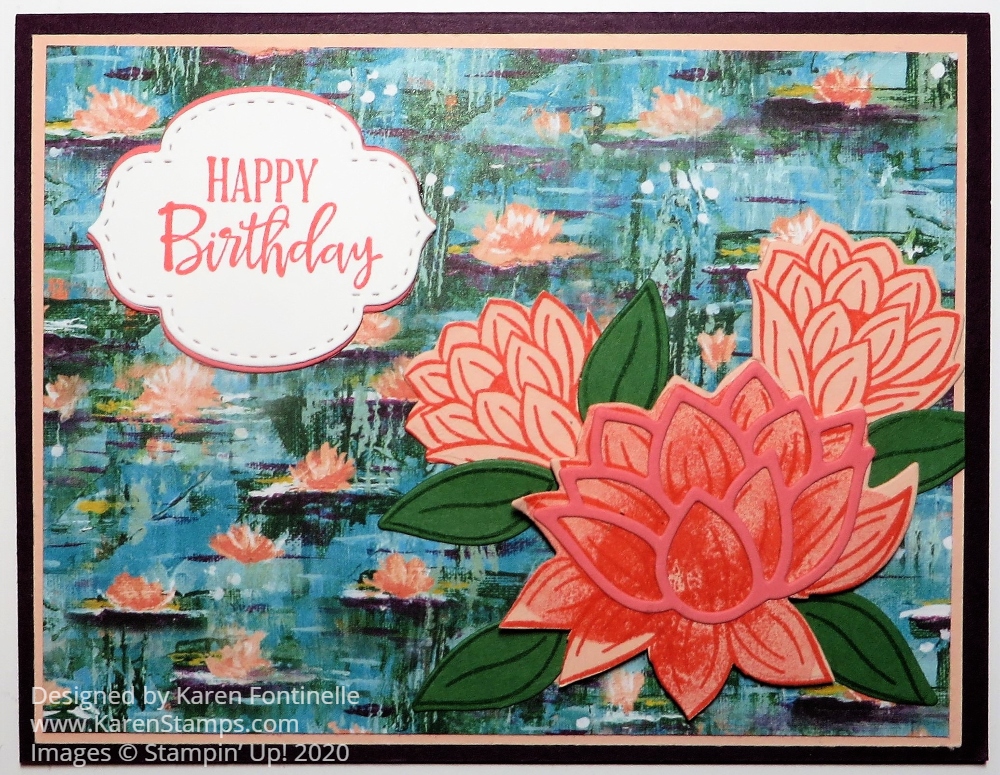
This card was made with a Whisper White card base (you could use the Thick Whisper White Cardstock also) and larger margins than usual. I cut Shaded Spruce Cardstock a little smaller than usual, 5″ x 3 3/4′”. Then I chose three of the designer paper patterns and cut them into smaller pieces to make the card panels. They measured 1 1/2″ x 3 1/2″. The greeting is from the Peaceful Moments Stamp Set. I cut it out with the Lovely Labels Pick a Punch and a wider strip of Shaded Spruce for a layer. I wanted a little embellishment on each end of the punched greeting so I chose the Elegant Faceted Gems. I didn’t feel like they stood out enough so I colored them with the Dark Shaded Spruce Stampin’ Blend Marker. It worked! I think they add just a little something in the right color. The Forever Greenery Paper uses several colors of greens so you can have your choice of greens that you have available.

Forever Greenery Easy Thank You Card

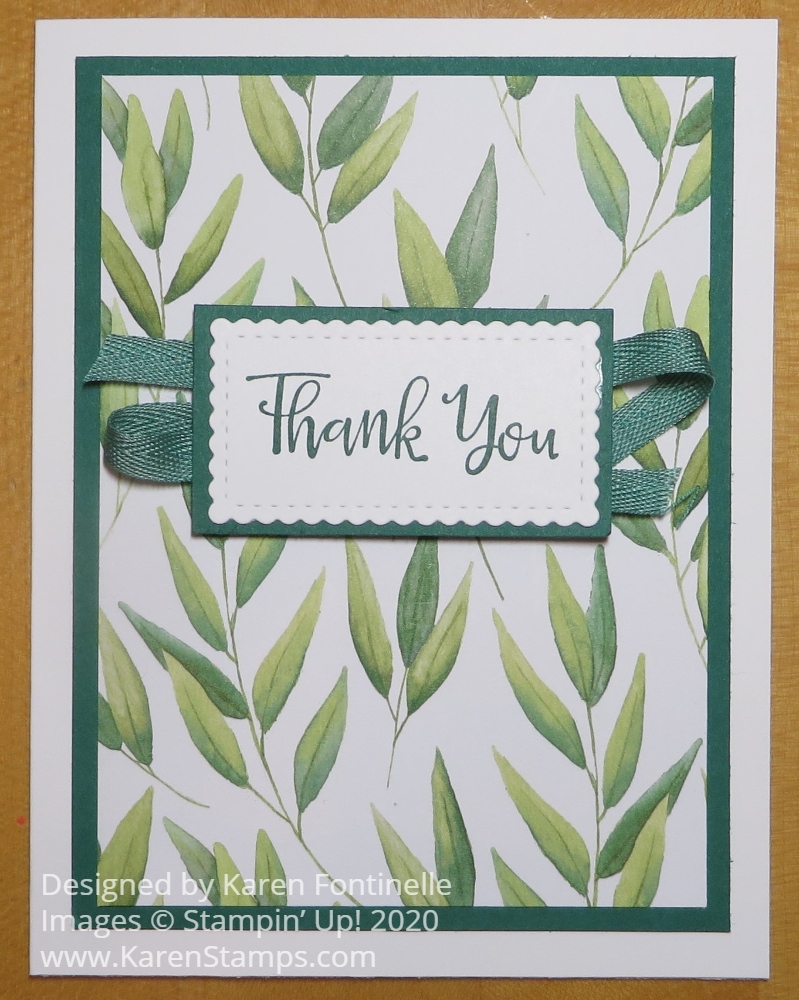
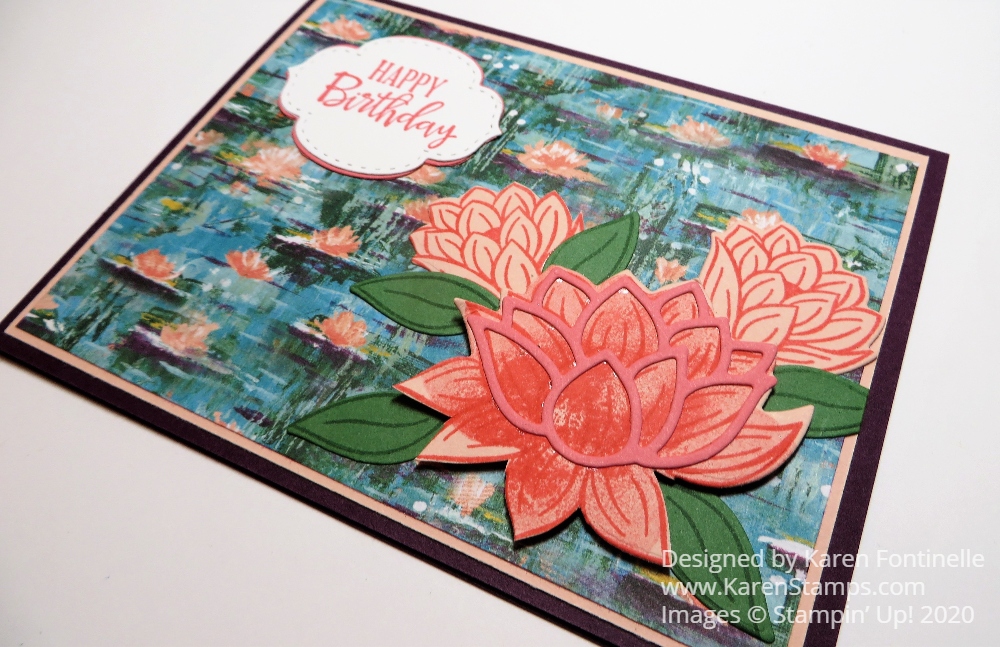
This card is really easy to make! Again, it uses a Whisper White card base with wider margins than usual. The layer under the Forever Greenery Designer Series Paper is Shaded Spruce. The greeting is stamped with Shaded Spruce Ink from the Peaceful Moments Stamp Set also. I used the Stitched So Sweetly Dies to cut out the greeting and for size considerations, just cut a rectangle to layer underneath. For something a little extra, I used some Just Jade Ribbon back and forth under the greeting. You could make either of these cards with any designer paper that you have so you have no excuses! Try something!

Let’s all celebrate World Cardmaking Day by sending one of our handmade cards to at least one person or stick one in your neighbor’s mailbox!

Happy World Cardmaking Day 2020!

(one of the good things about 2020!)

Forever Greenery Easy Cards

Bird Ballad Floral Thank You Card

Bird Ballad Floral Thank You Card

As I was using up some designer paper scraps the other day, this Bird Ballad Floral Thank You Card is one that I came up with. This floral pattern is so pretty I think and punching out one of the printed birds on another sheet of the designer paper as a focal point makes for a nice card.

I wasn’t crazy about all the sheets in the Bird Ballad Designer Series Paper, but I thought most of the patterns were really pretty. This paper, on the card front, with just colored flowers, I thought was especially pretty and easy to use on many cards. You can purchase this Bird Ballad DSP on the Last-Chance List at a discount until June 2.

The card base is Petal Pink, one of the coordinating colors of the paper. Then I added a layer of Pool Party underneath the floral designer paper. I punched out the bird from another sheet of the DSP. Then the bird is layered on a Stitched Shapes Die and popped up on Stampin’ Dimensionals®.

Before adhering the designer paper to the Pool Party layer, I adhered a short piece of Whisper White 1/4″ Crinkled Seam Binding Ribbon from the top of the bird image around to the back of the floral paper almost as if the bird image is an ornament. Then I took two strands of the same ribbon together and tied a bow which makes a fluffier bow, especially with this thin ribbon, and adhered it to the top of the die-cut with a Mini Glue Dot or two.

The greeting is from the Peaceful Moments Stamp Set and is stamped in Pool Party ink. Then the greeting is die-cut with one of the Stitched Nested Labels Dies.

This Bird Ballad Floral Thank You Card is a relatively simple design and easy to make so try it with your scraps of designer paper!

Bird Ballad Floral Thank You Card Closeup

SHOP STAMPIN’ UP! ONLINE TODAY!

Thinking of You Card With Perennial Essence Paper

Thinking of You Card With Perennial Essence Paper

The other day I was looking through the Perennial Essence Designer Paper and was reminded how beautiful it is so I came up with this Thinking of You Card With Perennial Essence Paper. It’s a basic simple card design, you can make this card with an even easier look. It just depends on how you want to design your card.

The Perennial Essence Designer Series Paper is designed with handpainted impressionistic images. While you might think that isn’t your cup of tea, when you see the paper it really is beautiful and the paper has so many coordinating colors. For this card, I chose the beautiful white flowers that coordinate with Petal Pink, for one color. I used Petal Pink as the card base with a layer of Whisper White in between the colored cardstock and the designer paper.

The Perennial Essence Designer Paper is even discounted in price in the Last-Chance Products! Usually, you can count on almost all designer paper to be retired to make room for new patterns in the new catalog!

Before adhering the designer paper to the cardstock, I adhered some Petal Pink 1/4″ Metallic Edge Ribbon around the side of the designer paper. I tied the bow separately and stuck it on with Mini Glue Dots. That’s a little easier getting it oriented exactly how you want it rather than tying it onto the ribbon.

For the greeting, you can choose almost anything! If you are lucky enough to have a mother or grandmother to send a Mother’s Day card to, this card would be lovely. Actually you could even use this greeting if you didn’t have a Mother’s Day greeting. And with the world in the situation it is in right now, this card and greeting is perfect to send to almost anyone in our lives, because who are we not thinking of with all of our heart? This greeting is in the Peaceful Moments Stamp Set. I am so glad this set is carried over to the new catalog!

The greeting is stamped on Whisper White Cardstock in Petal Pink Ink and die cut with one of the rectangle dies in the Stitched So Sweetly Dies. As I write this, these dies are “Unorderable” but they should be available soon. And they will be in the new catalog! I like these dies! Then the greeting is layered on another Petal Pink die cut from the same set. And I couldn’t resist adding a little bit of bling in the empty space! I added two Petal Pink Rhinestone Jewels to the top and bottom of the die-cut. These pink rhinestones of various shapes are in the Last-Chance products at a discounted price!

Mother’s Day is coming May 10th so get ready by making a card like this Thinking of You Card With Perennial Essence Paper or change the greeting for almost any other occasion.

Easy Tropical Oasis Birthday Card

Easy Tropical Oasis Birthday Card

I wanted to make a quick card and the design I used for this card, Easy Tropical Oasis Birthday Card, is almost always a very quick and easy one to use! This Tropical Oasis Designer Series Paper has such gorgeous colors and floral patterns in it. I just flipped this floral pattern over, and the pineapples were on the opposite side! I saw some tiny pineapples at the grocery store one day and thought of this whole Tropical Oasis Suite!

One of the colors that go with this paper is Real Red! My favorite color, so I could not pass it up! So Real Red it was for the card base. Without measuring, I cut out a longer rectangle than I needed because I wanted to have a little overlap of the two papers so that I could glue them together. In the end, the two pieces adhered together measured like any card layer, 5 1/4″ x 4″.

I always like to cover the seam of where two papers meet, so I used the Daffodil Delight 1/4″ Ruched Ribbon. I just took a longer strip than the card and adhered it around on the back of the card layer. After I made the greeting, I use the ribbon to tie a bow on each end of the layered background for the greeting.

The greeting is stamped from the Peaceful Moments Stamp Set. You could choose lots of other greetings or sentiments with this card design and paper. I layered it on Real Red paper punched with the. Everyday Label Punch. Then I trimmed down another punched label of Daffodil Delight and cut it in half so I could make it smaller to fit under the greeting. I didn’t do a perfect job but I was trying!

The greeting itself is tricky to explain. I tried something for the first time. I used a Stitched Rectangle Die to cut it out. As you can see, the rectangle dies are longer than I wanted my greeting to be. I cut only part of the rectangle by not putting my cutting plate over the part of the die I did not want to be cut. Then I switched the die around, still lining it up with the die-cut outline on the sides (it just sticks back on the same lines) and just put the cutting pad on the end that now needed to be cut to make the greeting shorter and only rolled over that end. That all produced the smaller rectangle greeting! I didn’t take pictures because I wasn’t even sure I was doing it right! But I did!

This card design is always great to keep in mind when you want an easy card that still looks great. No fancy folds or directions to follow. Just add some designer paper to all or part of a card base, in either direction, one side of paper or two, add a ribbon or embellishment or not, then add a greeting for whatever occasion. Here’s another card I made that is similar, using a whole layer of designer paper with a strip of a different pattern going across under the greeting. When you have designer paper as bright and pretty as this, almost any card design you use like this Tropical Oasis Birthday Card will turn out beautiful.

Lily Impressions Birthday Card

 103 Kingsley Farms Road in Gouldsboro, ME

It took me a little longer to come up with this Lily Impressions Birthday Card, I have to admit. This was my first try with all the “Lily” products in the Stampin’ Up! Sale-A-Bration Brochure and I found it a little difficult at first to use everything together. Not everything fits together perfectly, which is fine, but you just have to play with it and not expect everything to line up!

Once I really looked through the Lily Impressions Designer Series Paper, I thought it was beautiful and I couldn’t wait to make something with it. I chose the pattern that you see on the card, layered on Petal Pink (not a coordinating color but I liked it) and Blackberry Bliss for the card base. This designer paper does have a LONG list of coordinating colors!

The three flowers are all stamped with the Lovely Lily Pad Stamp Set. They are stamped on Petal Pink with Flirty Flamingo Ink. There is a stamp that you can use to “color in” the large flower but it doesn’t fit the shape exactly. But that’s okay! It just gives a different look! You could also stamp the flower and color it in yourself if you want it to be exact. The Lily Pad Dies don’t fit everything exactly either! AND some of the stamps are reversible so you can stamp the solid shape, clean the stamp, then turn it over on the block and stamp with the detailed image. To earn the Lily Pad Dies, you must spend $100, but just $50 for each of the stamp set and paper.

Watch the Stampin’ Up! video below to get an idea of how everything works from Shannon at the Home Office!

On this card, I popped up the large lily and glued down the smaller flowers flat. Then I die cut and added some Garden Green leaves. For a greeting, I chose “Happy Birthday” from the Peaceful Moments Stamp Set in the Occasions Mini Catalog. I stamped this in Flirty Flamingo and die cut with a shape in the Stitched So Sweetly Dies also in the Occasions Catalog. I wanted a bit of a layer but there isn’t a die for layering, so I just die cut a second one out of Flirty Flamingo Cardstock, cut it in half horizontally, and very carefully layered it under the greeting with just a tiny margin showing.

Lily Impressions Birthday Card Closeup

For the inside, since the Blackberry Bliss is so dark, you can add a Whisper White layer for stamping a greeting or writing a personal message, but I just grabbed a layer of Petal Pink and put that inside. And since I had an outline die cut leftover from my trials, I glued that to the inside corner for a little decoration.

Lily Impressions Birthday Card Inside

If you feel like working with some really artistic paper, stamps and dies, I recommend all these Lily products available during Sale-A-Bration. You will make some beautiful cards with even just the Lily Impressions Designer Series Paper! But if you get all of the products, just play and experiment and see what you come up with!

SHOP STAMPIN’ UP! ONLINE TODAY!

Peaceful Poppies Watercolor-Look Birthday Card

Peaceful Poppies Watercolor-Look Birthday Card

This Peaceful Poppies Watercolor-Look Birthday Card is just so bright and happy, I think it would brighten anyone’s day even if it was already that person’s birthday! This card is an example of how the beautiful designer paper does all the work of making a card!

The Peaceful Poppies Designer Series Paper was designed from actual watercolored images. One side of the paper has the floral images and the other side has watercolor washes in stripes, polka dots, and solids. Don’t think your designer paper is printed badly, the watercolor washes have different shadings in them like a watercolor painting would have than just a regular solid color.

Sometimes when you page through a package of designer paper, no matter what you were planning to use, one design jumps out at you. This time it was this particular poppy design! Then I also chose this little piece of green stripe design from another page with a gorgeous floral design on the other side that I hated to cut into!

The card base is Old Olive with the fold at the top. Just cut your cardstock in half lengthwise and score in half at 5 1/2″. The green stripe piece is adhered to the poppy paper and then the Whisper White Polka Dot Tulle Ribbon (one of my favorites!) is wrapped around the two layers of designer paper and adhered on the back. Next, the designer paper layer is adhered to the card base. I also tied on a knot on with the ribbon on each side of the greeting.

For the greeting, I stamped “Happy Birthday” from the Peaceful Moments Stamp Set and die cut with a die from the Stitched So Sweetly Dies.

For a final embellishment, I added a few Peaceful Poppies Sequins to the card front.

Peaceful Poppies Watercolor-Look Birthday Card Closeup

Here is another card I made with just a strip of this same pattern in the Peaceful Poppies Designer Series Paper! Be sure to check out the whole Peaceful Poppies Suite in the Occasions Mini Catalog! Earn FREE products, too, during Sale-A-Bration with every $50 purchase!

SHOP STAMPIN’ UP!

Peaceful Poppies Multicolor Thinking of You Card

Peaceful Poppies Multicolor Thinking of You Card

If you want to brighten up someone’s day, make and send them this Peaceful Poppies Multicolor Thinking of You Card! Even though I’ve looked through the beautiful poppy designer paper, this particular design jumped out at me today and I set it aside to make a card! You could put many different greetings on this card if you wanted to.

The card base is Rich Razzleberry Cardstock, which is a color I probably don’t use often enough. My original intent was just to layer the piece of Peaceful Poppies Designer Series Paper on top of the cardstock. This particular design with the purple poppies really caught my eye and I wanted to use it right away! All of this beautiful designer paper has handpainted blooms and watercolor washes.

When I first layered the designer paper on the Rich Razzleberry, I thought maybe it needed another layer of color to really make it pop, so I chose Poppy Parade. There were a few Poppy Parade poppies on the paper, although I may have covered one up with the greeting.

The greeting is from the Peaceful Moments Stamp Set, but I only wanted the “Thinking of You” so I colored just that portion of the stamp with my Poppy Parade Stampin’ Write Marker. I used the die in the Petal Labels Dies for the greeting on Whisper White and the fancy layer in Poppy Parade.

The ribbon I tied around the designer paper is the new Whisper White 1/4″ Crinkled Seam Binding Ribbon. I was planning to tie a bow and adhere it to the left of the greeting, but instead, I tied on three knotted pieces of ribbon, just for something different!

If you don’t own the Peaceful Poppies Designer Series Paper, you are missing out on a pretty paper collection in your stash! You can check out the whole Peaceful Poppies Suite of lovely products on page 24 in the Occasions Mini Catalog!