Tag Archives: Rainbow Glimmer Paper

Rainbow Glimmer Christmas Trees Card

Rainbow Glimmer Christmas Trees Card

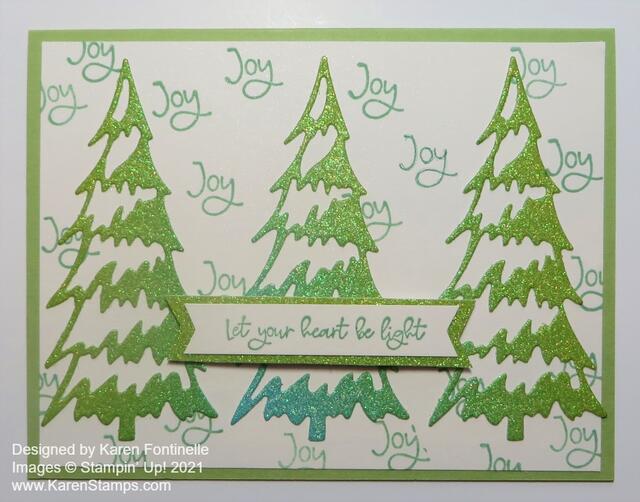
This Rainbow Glimmer Christmas Trees Card was sort of in my head, but then I started on two other projects first before deciding to give this idea a try! I thought it would be fun to use the Rainbow Glimmer Paper and try to get the ombre shades of the green color. The middle tree shows a different color at the base but the other two have slight variations in the green that doesn’t show up in the photo. I think it would be fun if this paper had narrower bands of colors so you could get more of an ombre effect on any projects. But, it is still really pretty and fun paper to use!

The card base is Mint Macaron with a layer of Shimmery White Cardstock. After cutting out and temporarily placing the trees on the card, I decided to try stamping the word “Joy” in the Whimsical Trees Stamp Set around in the background. There wasn’t a lot of empty space on which to do a little stamping so I’m not sure I like what I did. Maybe I do. What do you think??

The greeting is also in the Whimsical Trees Stamp Set and stamped with Mint Macaron. I layered it on a narrow piece of the Rainbow Glimmer Paper. I almost didn’t add a greeting since the card is a little busy already but I did! I really do like the Rainbow Glimmer Paper trees!

If you own the Christmas Trees Dies or will be purchasing them soon on the Last Chance Sale or the Whimsical Trees Bundle, note that there are two “pages” of dies in your package! I guess somehow I was only using what I saw when I pulled the dies out of the package and either forgot or never saw the rest of them! I wondered what happened to the trees that I used on this card that I had seen on other samples! So now I have lots more dies than I thought I had! Duh!

Remember the way these retirements work is that even if Bundles are carried over in the future to another catalog, they won’t still be Bundles. You might still be able to buy the stamp set and dies or whatever the individual components of the Bundle are, but you won’t get the 10% off discounted price. Be sure to check out the Last Chance Sale and the updated Clearance Rack to get the best chance of getting what you want lest anything sell out!

It was a rough morning because my website was not working so I couldn’t post my card until I went through two different Help Chats! Ugh! And even then they said it might work in a few minutes or it could take 24-48 hours globally! Thankfully it started working again after lunch!

Do some Christmas stamping this weekend! I hope to do that AND put up my tree! Wish me luck!

Rainbow Glimmer Halloween Card

Rainbow Glimmer Halloween Card

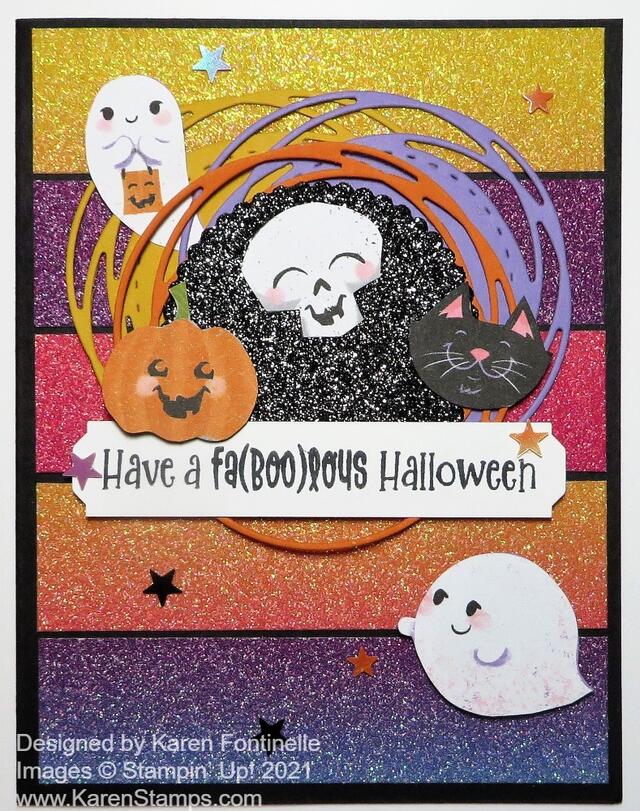
I can easily promise you I had no idea this Rainbow Glimmer Halloween Card would be what I would create. I don’t even remember what I thought I was going to make! I even had a Christmas stamp set out too! But I had seen a card made with strips of this beautiful Rainbow Glimmer Paper that was a birthday card and that’s where the original idea came from to use these strips. I thought they might be perfect for a Halloween card! Other than that, I had no ideas for exactly what to do with the card! Sometimes you just have to work with colors, die cuts, maybe walk away and come back, and eventually, something will come together for you.

The card has a Basic Black card base. The strips of Rainbow Glimmer Paper are cut 1″ x 4″ with just a tiny space in between each strip. You could also have them all touching with no space. I actually cut them not just in consecutive strips or the colors might be nearly the same, which is okay if that is what you want. So I had to cut into the areas of the paper that had the colors of strips that I wanted. It might kill you to cut into a lot of different parts of the paper rather than conserve it, but hey, it’s just paper and we can buy more! Use it!!

I wanted to use the Black Glitter Paper as the center with the Halloween characters adhered to it, but I played around with the background layer and different colors. I settled on the Pumpkin Pie cardstock die cut with the circle die in the Painted Labels Dies. This looked fine, but as I worked with it, I thought it needed another layer or “something”….a little more pizzazz. I cut out another circle from Highland Heather cardstock and that looked good but of course was mostly covered up by the Pumpkin Pie circle! I tried staggering it underneath and that was good but I felt it needed another one to balance it out. So I tried Crushed Curry and once I got the three circles placed just right I was satisfied!

I cut out the ghosts, skeleton, black cat, and pumpkin from the Cute Halloween 6″ x 6″ Designer Series Paper. I love those little characters! I could have stamped them as well with the Cutest Halloween Stamp Set and used the coordinating punch, the Halloween Punch (which is currently unavailable as I write this).

The greeting is from the Cutest Halloween Stamp Set. I stamped it in Memento Ink and trimmed the ends with the Lovely Labels Pick a Punch. I was considering putting it down lower on the card, but then thought it might work better going across those circles. I liked that and then adhered the Halloween characters around where I liked them. And for a little more bling, I had to add some Cute Stars Adhesive Backed Sequins.

The card may be a little crazy, but it’s for Halloween so that’s good! If you don’t have the Rainbow Glimmer Paper, you can just use different colors of cardstock strips. Just play and you will come up with some great ideas. Use this Rainbow Glimmer Halloween Card for inspiration!

SHOP STAMPIN’ UP! ONLINE HERE!

Rainbow Glimmer Daisies Thinking of You Card

Rainbow Glimmer Daisies Thinking of You Card

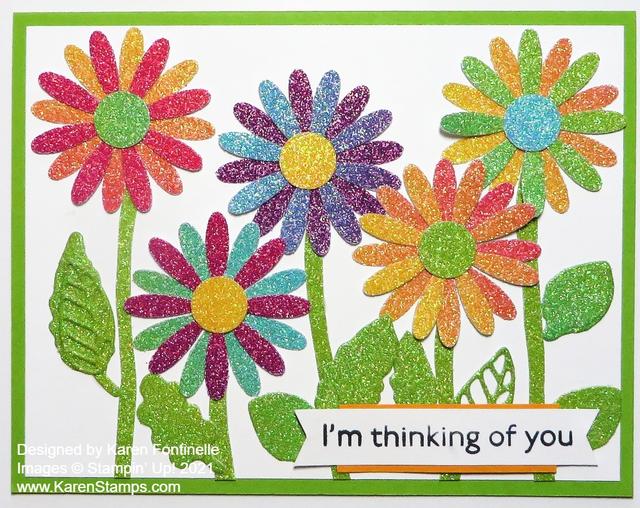
The other day when I was playing with the beautiful, fun Rainbow Glimmer Paper to make my little leprechaun hat and shamrocks for St. Patrick’s Day, I couldn’t put it away! This Rainbow Glimmer Daisies Thinking of You Card is the result of playing some more with it!

The card base is Granny Apple Green Cardstock with a layer of Basic White. I thought I would try punching out some flowers in all the colors! I used the Medium Daisy Punch, punching out two daisies for each flower. I tried to cover all the color shades I could on the Rainbow Glimmer Paper. For the flower centers, I used my retired 1/2″ Circle Punch.

The flower stems I just cut by hand and purposely made them a little curvy so it didn’t matter if I got them straight or not! The leaves are all die-cut with various dies. I just looked through my dies for small leaf dies. Not sure it’s a good look to have all these different looking leaves on Rainbow Glimmer daisies, but it’s a fun card so it’s okay!

On this busy card, I didn’t have much room for a greeting and probably could have left it off. I used one from the Art Gallery Stamp Set. I wanted something that wasn’t too big but big enough to show up on the busy card. I experimented with layering it on another color or even leaving the greeting un-layered, but I settled on just adding a slim piece of Mango Melody on the top and bottom of the greeting but not going all the way across. I like it. Just a little pop of color but doesn’t interfere with all the flowers.

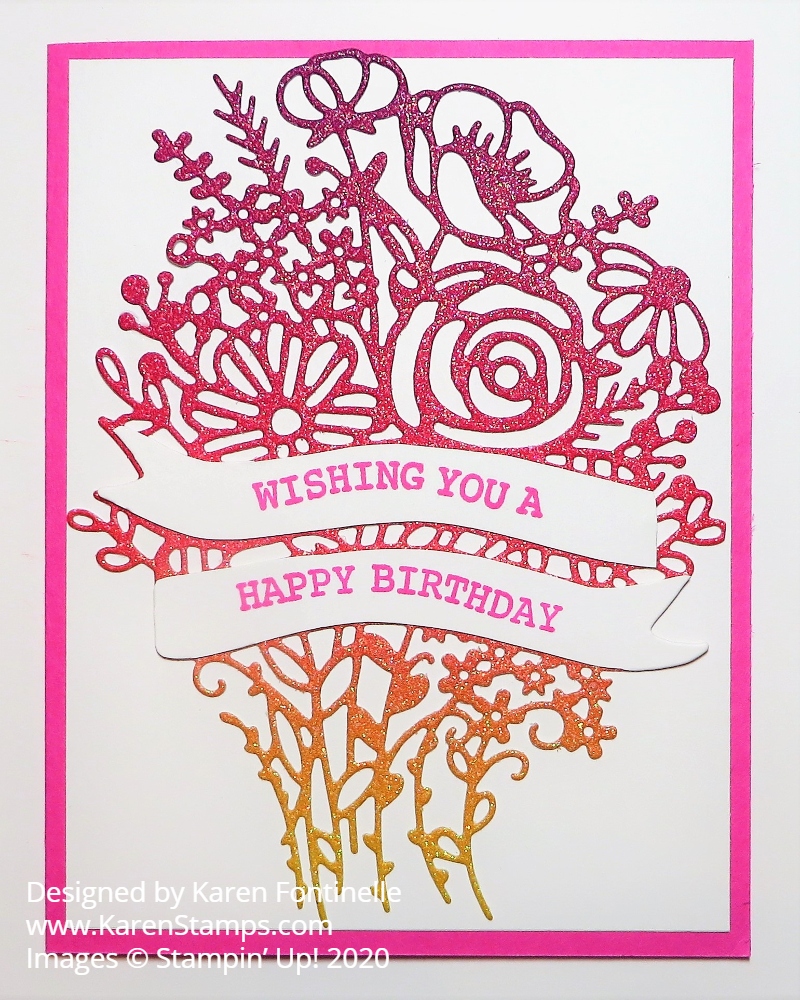
I don’t think I have the Rainbow Glimmer Paper out of my system yet so a little more playing might be in order. Here is a card I made a while back using the Banner Blooms Die. I tried to get as many shades of the glimmer paper into the bouquet as I could. You just don’t know exactly what look you will get when you use this paper! That’s the fun of the rainbow glimmer bands on the paper!

Remember, the Stampin’ Up! retirement list will be coming out very soon, so if there is anything you think “might” be retiring from the Annual Catalog, you might want to grab it early so you don’t miss out when the list actually hits. No one but Stampin’ Up! know what is on it yet!

SHOP STAMPIN’ UP! ONLINE HERE!

Celebrate St. Patrick’s Day With Free Shipping At Stampin’ Up!

St Pats Day 2021

Happy St. Patrick’s Day!

Save some “green” on St. Patrick’s Day! Get FREE SHIPPING at Stampin’ Up! with a $50 minimum order (before tax) TODAY ONLY!!

Look through the catalogs and find some things you wanted but passed up before. Or stock up on basic supplies like the new Basic White cardstock and envelopes, adhesives, colored cardstock, retiring In Colors. You can even get free shipping on Prepaid Paper Pumpkin Kits!

If you happen to be using a coupon code, your final merchandise total still has to reach $50 before tax to be eligible for FREE SHIPPING.

Don’t delay because some products are on “Low Inventory” so they could sell out and be unorderable or backordered.

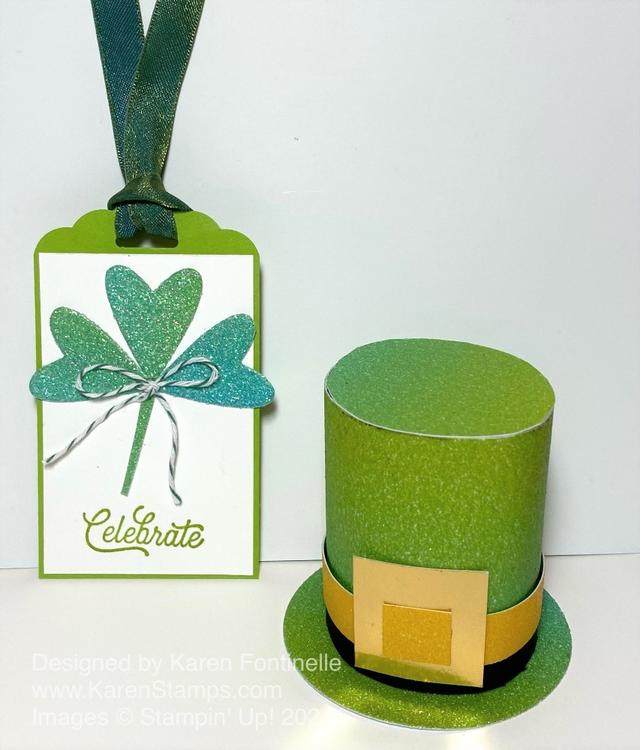
My little leprechaun hat is made from half a toilet paper roll and covered with the amazing Rainbow Glimmer Paper! And then I had to keep using this paper, so I die cut three hearts from the greenish/bluish part of the paper with the Stitched Be Mine Dies to make a shamrock and put it on a tag. You can see the rainbow effect of Granny Apple Green and Bermuda Bay on the hearts.

Have Fun Shopping!!

Free Shipping Mar 2021 my info

Rainbow Glimmer Banner Blooms Birthday Card

Rainbow Glimmer Banner Blooms Birthday Card

This card began as an experiment to see how this die worked and how it would work with the new glimmer paper and how the banners worked and finally I made this Rainbow Glimmer Banner Blooms Birthday Card!

This is the beautiful floral bouquet die in the Banner Blooms Dies. I thought it would be pretty to die cut the Rainbow Glimmer Paper, which it was! This glimmer paper is not only gorgeous with the ombre effect of multiple colors, but the glimmer doesn’t fall off! And it went through the die just fine! With the older thicker glimmer paper we have had, I often tore off the backing of the glimmer paper so it would be thinner to go through the die-cutting machine. This one worked fine without doing that. I only wish we could get all the colors of the Rainbow Glimmer Paper onto this one die! But you would have to have a 12″ long die!

I adhered the floral bouquet to Whisper White Cardstock with tiny little dots of Multipurpose Liquid Glue. You can do it if you are patient and really use the smallest dots of glue you can imagine. And work quickly! Then make sure to place it on the Whisper White cardstock in the exact spot you want it as best you can so you don’t get the glue where you don’t want it.

I was puzzled by how to make the greeting banners on the bouquet until I looked back at the die and saw that it would cut out the stamped banner. Just stamp your greeting in the Hand-Drawn Blooms Stamp Set and then place the bouquet die right over it, lining up the words inside the banner areas. You don’t need to stamp the greeting on a full piece of paper, just the area with the greeting because you are going to cut it apart. Using your scissors, just cut off the excess away from the banner greetings. Then glue the banners onto the die-cut bouquet on your card! The stamp will have both lines of the greeting, like this one I used on this card, properly placed to fit the die.

That’s all there is to it! When I make a similar card again, I think I will try to jazz it up a little bit. This card is pretty but in my opinion, I think it needs a little something more but not sure what yet! Just play with your new stamps and accessories and see what you come up with.

If you want both the stamp set and the dies, purchase the Hand-Drawn Blooms Bundle and save 10%. This will be an interesting stamp set and dies to play with, something a little different! A beautiful wedding card could be made with this set, congratulations for an engagement or graduation, or a birthday card, to name a few, like my Rainbow Glimmer Banner Blooms Birthday Card.

SHOP STAMPIN’ UP! HERE! NEW PRODUCTS!