Tag Archives: Clear Tiny Treat Boxes

Tiny Christmas Treat Box With Trees

Tiny Christmas Treat Box With Trees

It’s time to be making some Christmas treats to have on hand or to gift as extra little gifts or stocking stuffers. Here is one you can make in minutes using a couple of punches, paper, and ribbon…..plus the candy!

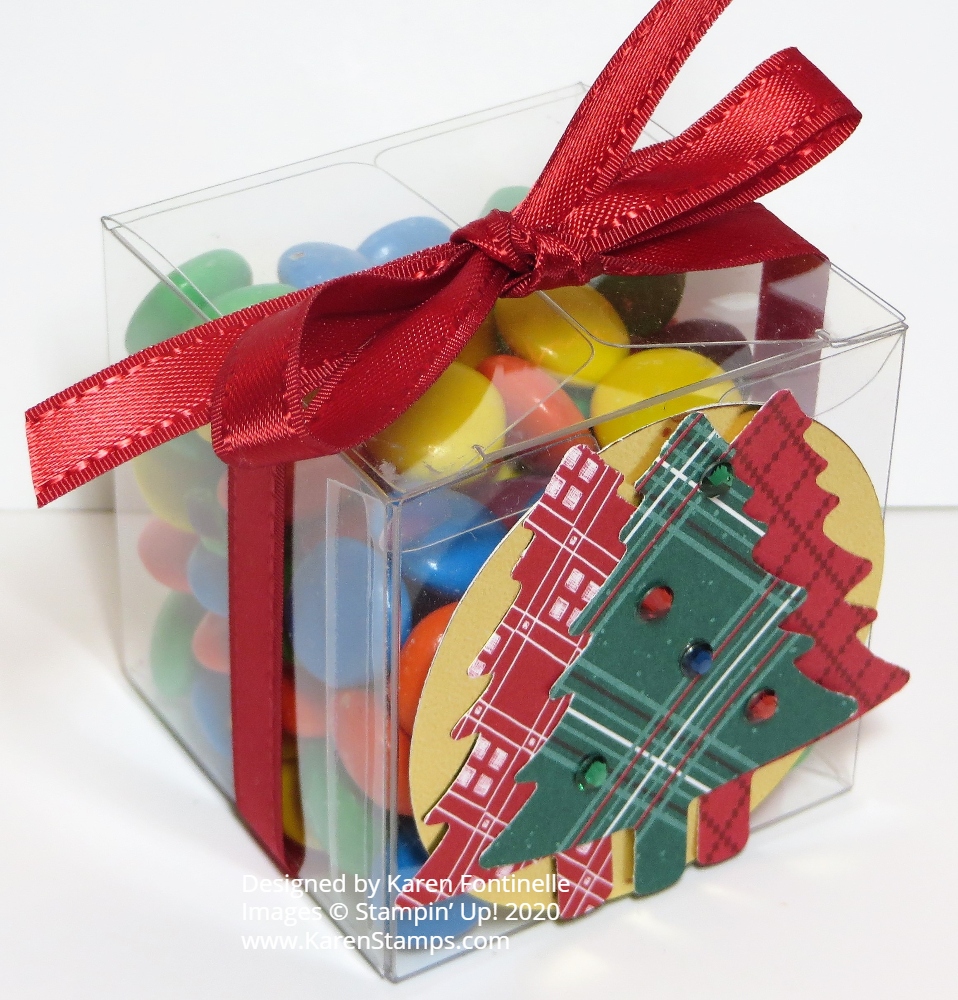
I always have some Clear Tiny Treat Boxes on hand because you can make something like this little Christmas treat very quickly and easily. Just put whatever candy treat you have inside or even a very small gift and then decorate.

I got the idea for decorating this treat box kind of from the Christmas card I made on yesterday’s post with the Pine Tree Punch and using the same paper!

To make my little treat box really quick and easy, I just punched out a green Christmas tree from the ‘Tis The Season 6″ x 6″ Designer Series Paper using the Pine Tree Punch. I was only going to put that one tree on the front of the box, but I liked some of the red paper too so I thought, “Why not have two red trees also?”. I punched out two red trees and placed them on each side behind the green tree. Next, I thought it would be nice to have a piece of Gold Foil behind the trees, so I punched a circle that would fit with the 2″ Circle Punch.

For a little bling, I of course had to add a few of the Holiday Rhinestone Jewels just to the green plaid tree. The final step was to just tie a Real Red 3/8″ Stitched Satin Ribbon around the box. Not only is it decorative for the top of the box but it also keeps the lid closed! You could also add a greeting on the box or tie it on to the ribbon, perhaps from the Itty Bitty Christmas Stamp Set.

These Clear Tiny Treat Boxes keep you from having to look up measurements to make a little box! They store flat and all you have to do is unfold it, crease on the score lines, and make it into the box. Be sure to put a package on your next order!

SHOP STAMPIN’ UP! ONLINE!

Clear Tiny Treat Box With Sunflower

Clear Tiny Treat Box With Sunflower

One of my favorite extra products in the Stampin’ Up! Catalog besides stamps, paper, and ink, are the Clear Tiny Treat Boxes which can be decorated like this Clear Tiny Treat Box With Sunflower. Put a candy treat inside or a small gift and you are good to go! Just keep a package of these treat boxes in your stash for any occasion that arises.

The stamped sunflower is the smaller one in the Celebrate Sunflowers Stamp Set. This is the technique I used to stamp and color this sunflower:

  • Use Stampin’ Write Markers to color directly on the stamp in the different colors, huff on the stamp, then stamp on Whisper White Cardstock.
  • Use a Blender Pen to pick up ink from the ink pad lids of whatever colors you choose to lightly color in the white space on the stamped flower. Although I used a Crushed Curry marker to color on the stamp, I used So Saffron Ink with my Blender Pen to fill in the flower petals. I used a Granny Apple Green marker for the leaves but colored in with Mint Macaron.
  • The flower center didn’t look good filled in with Soft Suede so I went back with Cajun Craze lightly to match the markers. When it looked too solid or something, I used the small tip of the marker to fill in a lot of tiny dots around that center.
  • The very center has some yellow and a tiny bit of green.

Blender pens are good to use because you tend to get a lighter color using them but you can pick up more ink and get a darker shade. We used to use Blender Pens all the time, back in the “olden days” when I first became a Demonstrator. You can pick up ink from the ink pad or lid with them, pick up ink directly from the marker tip, blend Watercolor Pencil colors or even pick up color directly from the Watercolor Pencil tip. They are so handy and versatile. Just enough moisture to work but not enough to pill the cardstock, unless you work it too much. In that case, Shimmery White Cardstock is better than Whisper White.

The sunflower is die-cut with the Sunflowers Die. Then I wrapped a ribbon around the treat box and adhered the die-cut sunflower. This ribbon I used is the green gingham in the Flowers For Every Season Ribbon Combo Pack.

After putting your treat or gift inside, you could tie the ribbon around from the bottom to the top instead or just add a bow to the lid of the box. You could stamp a little tag to add as well.

There are so many things you can do with these Clear Tiny Treat Boxes! They are handy for so many occasions! Here is a favorite one I made at Easter.

Here is a close-up of the sunflower so you can see the coloring. You could also stamp in Memento Black ink and color with Stampin’ Blends. Or use Watercolor Pencils.

Clear Tiny Treat Box With Sunflower Closeup

Think about getting a package of these Clear Tiny Treat Boxes and also check out the other types of boxes and bags Stampin’ Up! carries for treats and gifts! There are many options!

Remember it is Bonus Days for another two weeks in July! With every $50 purchase, you will receive an email with a coupon code for $5 to use in August on your orders. No limits, so if you have a large order, you will have more coupons to use! And with the new Stampin’ Up! Catalog, a large order is pretty easy to come up with! Way too easy!!

SHOP STAMPIN’ UP! ONLINE HERE!

Easter Bunny Clear Tiny Treat Box

Easter Bunny Clear Tiny Treat Box

Which do you like better, the Easter Bunny Clear Tiny Treat Box or the chocolate bunnies?! Luckily, they go together so you can like both and not choose! Any time you need a quick and easy treat box, you can turn to the Clear Tiny Treat Boxes in the Stampin’ Up! Annual Catalog!

I intentionally made this Easter treat super simple. You can decorate these Clear Tiny Treat Boxes in many ways, of course. I started with the bunny in the Welcome Easter Stamp Set. It is stamped in Memento Ink and colored in with a Light Crumb Cake Stampin’ Blend marker and a bit of the Dark for shading. For the little bit of pink in his ears and bottom of his feet, I used a Light Flirty Flamingo Stampin’ Blend Marker.

Since the area on the front of the Tiny Treat Box is fairly small, I just cut out the bunny by hand. I wrapped around a 3/4″ strip of Seaside Spray Cardstock, one of the current In Colors, around the box. If you put the ends of the strip on the front of the box, the junction of those paper ends will be covered up by the image you put on the front of the box. You could also use ribbon, but since I was going to tie ribbon around the top of the box, I just used cardstock. You could also use some pretty border dies to die cut a strip going around the box. You can apply a little bit of Snail Adhesive to hold the strip in place. Then the bunny is popped up on Stampin’ Dimensionals on the center of the box front.

Be sure to fill the box first with candy treats or a small gift and then tie with a ribbon. This is decorative plus holds the lid of the box closed for sure. The ribbon I used is the Seaside Spray 1/2″ Scalloped Linen Ribbon. It is very pretty with the linen and the light blue! I just tied it around in a bow. You could also adhere just the ribbon and then tie a bow separately to adhere to the top of the box if you wanted the bow closer to perfect.

Here is a very similar design with a Clear Tiny Treat Box that I made for Halloween using a strip of designer paper around the box and a Halloween image cut out from designer paper with a ribbon tied around the box.

That’s all there is to it! You could also stamp a “Happy Easter” greeting or a “Happy Spring” greeting. Maybe it would be a party favor at a baby shower and that would be cute with the bunny! Keep a stash of these Clear Tiny Treat Boxes on hand to use for quick treats or gifts or order a quantity for a party or event. For a treat or even a little home decoration, try this Easter Bunny Clear Tiny Treat Box for this spring or Easter!

SHOP STAMPIN’ UP! ONLINE HERE!

Monster Bash Halloween Clear Tiny Treat Box

Monster Bash Halloween Clear Tiny Treat Box

Make this Monster Bash Halloween Clear Tiny Treat Box so quickly and easily for all your Halloween ghosts and goblins! It’s practically October and you know that means it’s time to think about fun Halloween treat packaging!

This treat might be something more for family, friends, co-workers or other people, more than random trick-or-treaters since you will be using the Clear Tiny Treat Boxes. I always keep a package of these on hand for small treats or gifts. They are so easy to use and so versatile, not to mention they store flat. Just take off the bit of plastic wrap on them that protects the surface and crease the scored lines to form the treat box.

For this Halloween treat, I simply wrapped a strip, about 1 3/4″ wide, of the Monster Bash Designer Series Paper around the box. It will be longer than you need but just wrap around the box, creasing fairly lightly at each corner. Then take the paper off, trim the end to overlap the front edge just a little bit (since the decoration is going to hide where the paper overlaps) and use a Bone Folder to crease those score lines you created, keeping them straight along the edge of the strip of paper. Now put the paper back around the box and use a little adhesive to join the overlapping ends.

For this box, I wanted to just keep it super simple. I just cut out one of the Halloween character images from the Monster Bash paper with my Paper Snips and adhered him to the front of the box with two Stampin’ Dimensionals. I could have die cut a layer, maybe one of the Ornate Frames, to mount him on, but I was making it quick and easy!

After putting my candy inside (you could add some paper shred if you didn’t want so much room for candy!), I tied a Basic Black Satin Ribbon around the top to make sure the lid stays closed. The recipient can easily untie the bow to get to the candy!

Here’s another example in this post of a Halloween treat box from last year using the Clear Tiny Treat Box.

Another option would be to wrap the designer paper around the box across the top and decorate the top of the box, then wrap the ribbon around the sides of the box. Or just put some decoration on top of the box.

These would be cute party favors at a Halloween party and easy to make! The boxes are clear acetate and food safe so you don’t have to worry! And with the cute Monster Bash Designer Series Paper, you have no limit on decorating options for your treats! Try the Monster Bash Halloween Clear Tiny Treat Box for some Halloween fun!

Shop the Stampin’ Up! Holiday Catalog Here!

Clear Tiny Treat Box with Pressed Petals

Clear Tiny Treat Box with Pressed Petals

I wanted a little thank you gift for someone and one of the easiest things to make is a Clear Tiny Treat Box filled with candy! Chocolate of course! This is one of the things that I LOVE to make since years ago when I saw the idea. That is, covering candy nuggets with a 1″ x 3″ strip of designer paper (being careful not to get adhesive on the actual candy, only the paper!). We used to put them in tins that had to be specially ordered, but now we have the Clear Tiny Treat Boxes that work!

The Clear Tiny Treat Boxes come sixteen to a package and come flat, so storage is no problem. They come wrapped in some plastic to protect from scratches. Just open and crease all the flaps, then assemble and decorate! These boxes are food safe and acid free. They are sized 2″ x 2″ x 2″. Perfect for a candy treat or small gift.

The fun way to decorate candy pieces like these chocolate nuggets is to cut a strip of designer paper (or stamped or decorated cardstock, but designer paper is easiest) that is 1″ x 3″. Just wrap around the candy and apply adhesive to the overlap. I like to use the Multipurpose Liquid Glue, carefully. Keep any adhesive off the candy.

To decorate this Tiny Treat Box, I wrapped a piece of Pressed Petals Specialty Designer Series Paper around the box. Make it as narrow or wide as you want, but you won’t need the full 12″ strip. Start by just wrapping around, creasing on the corners, then cut off the excess and adhere. Depending on your design, if you are putting something on the front of the box like this box, start the end on the front of the box and that junction will be covered by the flower. Otherwise, put the ends on the back of the box.

To decorate the front of the box I made a washi tape flower as I described in THIS POST. The new Pressed Petals Specialty Washi Tape comes with a roll of individual flower petals that you can peel and stick however you like or make a flower like this one! I added a few small rhinestones to the flower center. You can add one of the Perennial Essence Flower Centers if you have them.

The ribbon wrapped around the box is the Gold 3/8″ Metallic-Edge Ribbon, one of my favorites because it is so versatile. The little greeting is stamped with the Itty Bitty Greetings Stamp Set on Very Vanilla and partially layered over a piece of Merry Merlot Cardstock. You can use the Tailored Tag Punch to punch the flagged ends. Just adhere with Mini Glue Dots.

This is a fun and easy thank you gift to personalize for someone! Put the Clear Tiny Treat Boxes on your next order and keep them on hand for when you need to give a little gift like this Clear Tiny Treat Box with Pressed Petals.