Tag Archives: Stamparatus

Using the Stamparatus at Christmas

Using the Stamparatus

If you don’t own a Stamparatus yet, you need one! When you are making a lot of Christmas cards, you definitely need a Stamparatus! I keep mine handy and use it often but using it at Christmas is really the big time!

I like to make many different card designs and make several cards of that design, maybe five, maybe 10, whatever I feel like at the time. When you are stamping the same greeting over and over again for the inside of the card, if you spend a moment getting it straight and centered or however you want it on the inside of the card, then the stamp stays in the same place and you get perfect stamping every time.

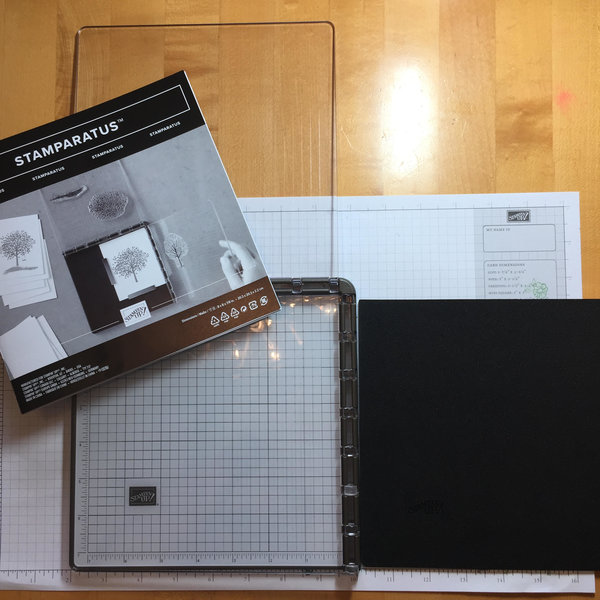
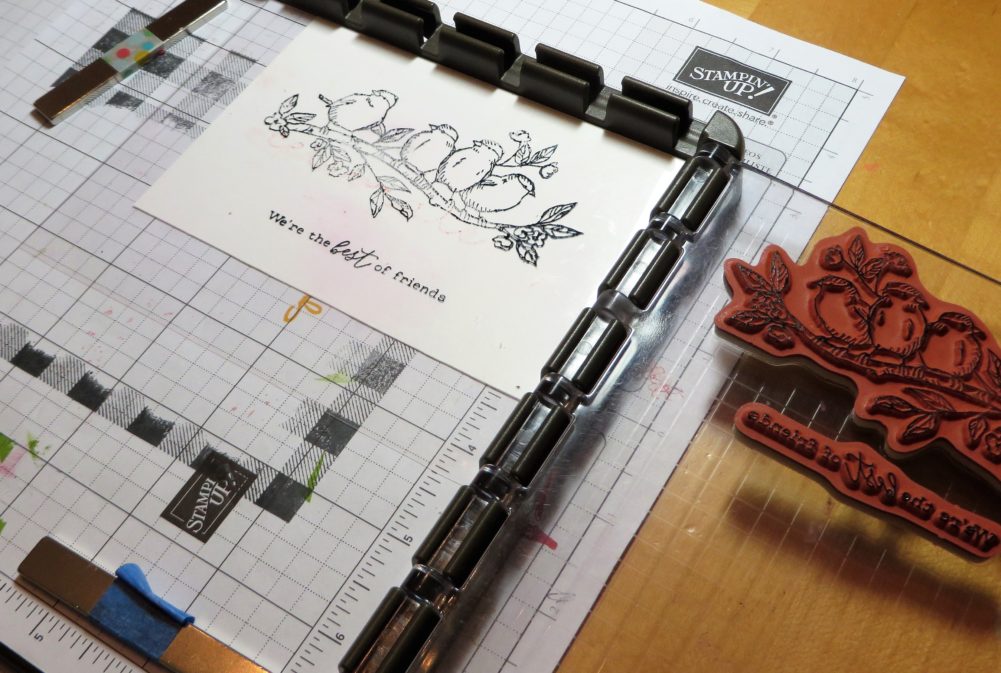
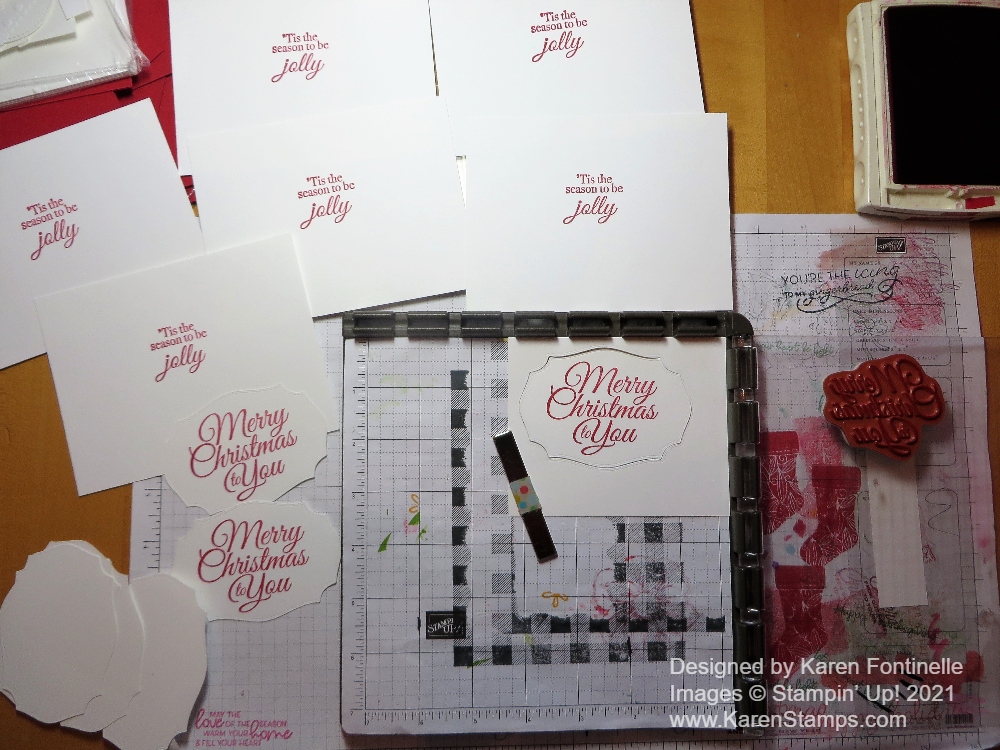
As you can see in the photo, up above the Stamparatus, you can see I stamped at least six inside card layers. Next, I worked on stamping on die cuts I had made for the front of the card. Instead of hoping I stamped the greeting on the die cut centered and straight, I used the Stamparatus PLUS the negative of the die cut. I placed the negative in the corner of the Stamparatus and then made sure the stamp was in the right place to stamp right in the center of that die cut. Then leaving the negative in place, I could place a new die cut into that negative and then stamp. That made it quicker and easier to stamp the die cuts rather than stamping all over the cardstock and trying to line up the die to fit the stamped greeting properly. It worked great!

In my messy, real-life stamping photo above, you can see the used Grid Paper inside the open Stamparatus and the messy stamped large Grid Paper on my kitchen table. You can see the Merry Christmas stamp stuck on the plastic plate of the Stamparatus, ready to be inked up on the right.

Usually, when I am trying to make sure I have the stamp lined up exactly where I want it, I place a window sheet over the card stock and stamp on that first to make sure the words are straight and everything is centered. That way I can alter the stamp position and just wipe off the window sheet until I have it just right and THEN I’m ready to stamp right on the cardstock.

The Stampin’ Up! Stamparatus has a lot of features that I don’t think others on the market have. If you mess up and your image doesn’t stamp as well as you want, just reink and stamp again because the paper hasn’t moved. Use one of the magnets to hold your paper in place. Just be careful not to get those two magnets anywhere near each other!! I found that out the first time I used my Stamparatus!

It might be a good gift to ask Santa for this year to use next year! But if you want it right away, use the Expedited 2-day shipping for an extra $20 and hopefully, that will do it!

Stamparatus
Stampin’ Up! Stamparatus (146276) $49.00

SHOP FOR THE STAMPIN’ UP! STAMPARATUS!

Festive Foliage Merry Christmas Card

Festive Foliage Merry Christmas Card

You may think that this card, the Festive Foliage Merry Christmas Card, has lots of stamping on it, but it is really only ONE stamp! The stamp is Festive Foliage! I have to admit, it is one stamp that I really overlooked in the Stampin’ Up! Annual Catalog. You’ll find it on page 90 in the lower-left corner of the page. Very easy to miss! But when a few of my customers started ordering it, I wondered what the big deal was and started looking at some samples. Of course, then I had to have it, too! All that foliage will make some very pretty Christmas cards!

The card base is Shaded Spruce cardstock with a layer of Real Red. You wouldn’t have to add the red layer, but I love red and I think it brightens up the stamping and all the green. The foliage is stamped in Memento Ink on Basic White cardstock.

It’s really handy if you have a Stamparatus (146276) with a large stamp like this one. As long as you don’t move the stamp or the paper, you can reink the stamp and stamp again if you need to. Sometimes one little area doesn’t get inked well enough or doesn’t get pressed enough to transfer the ink from the stamp to the paper. But with the Stamparatus, you can just stamp again!

Stamparatus GIF

For coloring the foliage I used Stampin’ Blends…almost all the greens I could find! And then I dotted and colored in all the little berries with Real Red.

The greeting is in the Perfectly Plaid Stamp Set. This is one we have had for a couple of years. It is stamped with Real Red ink and then die cut with one of the Tasteful Labels Dies. It is popped up on Stampin’ Dimensionals. There was plenty of space and plenty of foliage still showing on this card to use such a large label. Then for some bling, I added two green Holiday Rhinestones and tied a bow with the Real Red 3/8″ Sheer Ribbon. It is adhered with a Glue Dot. I liked this sheer ribbon because it adds something to the card but because it is sheer, it doesn’t block the stamping underneath!

If you like coloring, you will love the Festive Foliage Stamp….and if you don’t love coloring, just stamp it in one color like green and don’t color in anything!

If you don’t own the Stamparatus, to get a good image with a background stamp like this one, I recommend laying the stamp face up, ink it up, and then lay your cardstock over the top. Put a piece of computer paper over the top or pull up your Grid paper over it, and give it a good rub with your fingers to get all the ink to transfer to the cardstock. This way you can see what you are doing and have a little more control over the pressure on the cardstock and stamp.

I can’t wait to make more cards with my new Festive Foliage Stamp because I really like how this Festive Foliage Merry Christmas Card turned out! Go check it out in the Online Store and see if you noticed it before in the catalog or missed it!

SHOP STAMPIN’ UP!

Good Morning Magnolia Enjoy Today Card

Good Morning Magnolia Enjoy Today Card

This Good Morning Magnolia Enjoy Today Card is one I had to make before this beautiful stamp set retires soon! I can’t believe they are taking away this beautiful, dramatic flower, but I think it has been around for two years. However, I haven’t had enough opportunity to play with it!

The Good Morning Magnolia Stamp Set is on the Last-Chance List for the Stampin’ Up! Annual Catalog. It is easiest to see what is retiring and still available by going to the Stampin Up! Store. There are also coordinating dies, the Magnolia Memory Dies, that are retiring along with the stamp set. You can get these dies for the low, low, ridiculously low price of $8.75!! Be sure to check these out!

To make this card, I started with a card base of Petal Pink. I stamped the large magnolia using my Stamparatus because with a very large stamp like this one, it could be that one area of the stamp might not stamp as well. If you are using the Stamparatus, you can simply reink the stamp, still attached to the Stamparatus, and stamp again focusing on the area that needs more pressure or more ink. The Stamparatus is so great for things like this! The Stamparatus even has its own Craft & Carry Stamparatus Bag that is on sale for only $11.60 after being reduced from $29.00. This is a great bag, actually, even if you don’t own a Stamparatus. Even if you do, you can use the bag for other things. There are nice pockets inside for holding all kinds of things, crafting or otherwise.

After stamping the magnolia on Basic White Cardstock, I colored it with Stampin’ Blends. You can use various methods of coloring but I love using the Stampin’ Blends. I used the Petal Pink Combo on the flower and then for some crazy reason added tiny bits of Melon Mambo. It really was a strong color on the flower and I figured I had ruined it! BUT, I kept blending with my Petal Pink colors and I think it all worked out! I die cut it with the Magnolia Memory die. As I got ready to layer the flower on the card, I saw a piece of designer paper from the Peony Garden Designer Series Paper and thought this Petal Pink pattern would look good behind the flower. (Honestly, I had looked all over for the Magnolia DSP I thought I had and had loved, but I guess that was from the year before!)

Because the die cut had a bit of white showing on it, I decided to put a layer of Basic White with a very narrow margin underneath the pink designer paper, which helped it stand out a little from the Petal Pink cardstock base. The magnolia is popped up with Stampin’ Dimensionals®. I chose a greeting in the stamp set and stamped it in Petal Pink Ink and die cut it with a frame in the Ornate Frames Dies. To finish off the card, I added two Champagne Rhinestone Basic Jewels to the Ornate Frame.

Here is a similar card I made with the Good Morning Magnolia Stamp Set and the designer paper almost two years ago. Really, this Good Morning Magnolia Enjoy Today Card is an easy card to make so check out the stamp set and dies if you don’t already own them on the Stampin’ Up! Retiring List.

Blossoms In Bloom Watercolor Stamping Cards

Blossoms In Bloom Watercolor Stamping Cards

I thought I would try some watercoloring with this stamp set and dies and ended up with these Blossoms In Bloom Watercolor Stamping Cards. I’m calling it watercoloring stamping. I used watercolor paper, moistened it and also spritzed water on the stamp before stamping.

Blossoms In Bloom Watercolor Stamping Card Front

I used my Stamparatus to stamp since the Blossoms in Bloom stamp is so large. I used my Aqua Painter (now Water Painters in the new catalog) to moisten the Fluid 100 Watercolor Paper and I also spritzed the stamp with water after coloring with Stampin’ Write Markers. On the other card, I applied the ink to each flower with Sponge Daubers. When I stamped with the Stamparatus on the wet watercolor paper with the wet stamp, it looked like a mess! But all I had to do was dab with a paper towel to pick up the excess water and it was fine! I really just wanted a bit of color underneath the die cut I would later put on.

After letting the watercolor paper dry, I adhered the thin Whisper White die cut of the Many Layered Blossoms Dies with teeny tiny drops of Multipurpose Liquid Glue. Then this piece was layered on the card front of Melon Mambo Cardstock.

The die cut didn’t quite cut all of the flower centers but I don’t think anyone will mind. I could have even colored them perhaps with yellow to make them look like they were supposed to be there. I like how I didn’t have to place the die cut perfectly, if the color extended beyond, it looked fine because it was watercolor.

Blossoms In Bloom Watercolor Stamping Card

And then I did another one to see if I could get it less watery, but I didn’t, although using a Melon Mambo die cut on Coastal Cabana Cardstock gives this card a different look anyway.

Blossoms In Bloom Watercolor Stamping Coastal Cabana Card

I like the way some of the colors bled into each other which gives it a good watercolor look. I even accidentally got some splatters on the watercolor paper.

If you’d like to watercolor, but don’t know “how”, just use this stamping method on watercolor paper, spritzing before or after. Just experiment! There are lots of ways to do this. If you don’t have official watercolor paper, Shimmery White Cardstock is the next best thing.

Try your hand at some watercoloring with whatever you have! And you can get some other ideas of how to use the Many Layered Dies on these cards in THIS POST.

I think you will find these Blossoms In Bloom Watercolor Stamping Cards fun to make!

SHOP THE NEW CATALOG AT STAMPIN’ UP!

Ornate Garden Monochromatic Floral Card

Ornate Garden Monochromatic Floral Card

If you want to stamp an EASY card, make this Ornate Garden Monochromatic Floral Card! The front of the card only uses two stamps and then a little bit of ribbon and a bow. You can’t get much easier than that! And with the beauty of just the one large floral stamp, you really don’t need much more!

The card base is Lovely Lipstick, one of the outgoing In Colors when Stampin’ Up! releases the annual retirement list. Lovely Lipstick was one of my favorite In Colors so I hate to see it go. If you want any of those colors in paper, ink or accessories, you should probably order before the retirement list comes out.

I started to stamp the floral image with the largest acrylic block, but then I thought this would be the perfect time to use my Stamparatus. If I didn’t get every area on the large stamp inked up just right or didn’t press well enough in the right place, I wouldn’t have to worry with the Stamparatus because I could just stamp again over the exact same position!

This large floral image is in the Ornate Garden Suite in the Ornate Style Stamp Set and the greeting is in the Ornate Thanks Stamp Set. You really should look at all the greetings and combinations you can make with that stamp set! You don’t always have to use the large words either. And even on the inside of the card, I stamped two of the corners with the smaller corner stamp.

If you stamp a monochromatic card, you just use and stamp one color so that makes it easy! Here’s another monochromatic Easter card I made recently.

Check out the Ornate Garden Suite and also the Clearance Rack which was just refreshed yesterday! Then try your hand at stamping a monochromatic card with whatever stamps you choose!

Free As a Bird Notecard & Envelope

Free As a Bird Notecard & Envelope

Even though I posted a card with the Bird Ballad Designer Paper yesterday, I think that whole suite is so pretty I had to do something else with it for today, the Free As a Bird Notecard & Envelope. My original idea was to just stamp directly on the front of the Notecard, but since I was going to use my Stampin’ Blends to color in the stamped image, I didn’t want to have the coloring show through to the other side. I’m not positive it would since the notecard paper seems fairly heavy, but no point in taking a chance! I even decided to add a Petal Pink layer with a narrow margin behind the stamped layer.

Free As a Bird coloring
Back side of Whisper White

I absolutely love coloring with the Stampin’ Blends alcohol markers! Don’t be intimidated to use them, thinking about “blending”. Just color! I usually use the light color first and then maybe color the edges or highlighted areas on the stamped image with the darker color. Then maybe I even go back and color over again with the lighter marker to blend any rough lines. Just play and do whatever you want. I can almost guarantee you will be satisfied with the result with these markers.

Since I originally thought I was going to stamp the birds directly on the notecard, I knew I just had that one chance to get it right so I pulled out my Stamparatus®! In order to see how everything lined up, I put down a piece of clear Window Sheet on top of the notecard so I could stamp the image on the window sheet and see if anything was crooked (usually the words). Be sure to use the gridlines on the Stamparatus plate to see if you have your stamp or words straight if that is what you want. I could also put two stamps on the Stamparatus at one time and get everything spaced just right!

Free As a Bird & Stamparatus

When you have everything where you want it, remove the window sheet, make sure the cardstock is still in the corner or wherever you stamped it with the window sheet and have your magnets holding down the paper. Then stamp! If the image doesn’t come out fully stamped, just ink up the stamp again without moving anything and stamp again (or again if necessary) until you have a good image. That’s one of the most important benefits of the Stamparatus.

As I have said before, the Note Cards & Envelopes are just handy to have on hand always. When you want to do some quick stamping and write a short note, they are perfect. AND they come with their own mailable envelopes! To fancy up the envelope a little bit, I used a piece of the Bird Ballad Designer Paper on the back flap! You could put the paper inside as a liner if you wanted instead. I put the adhesive on the envelope flap, then glue on a larger than needed piece of paper. Then I trim off the excess with scissors. So easy and so pretty!

Always remember to be careful with the magnets because they really like to jump together and then they are difficult to pull apart. These magnets are very strong, which is good, until they get stuck together! Watch out for your fingers, too! I like to put the magnets on opposite sides of the table if I don’t have then in use so that they are FAR apart!

Check out all these great products in the Stampin’ Up! Online Store…..the Bird Ballad Suite, the Note Cards & Envelopes, the Stampin’ Blends Markers, and the Stamparatus. Stampin’ Up! has the best products! Have fun stamping something today!

Bird Ballad Laser-Cut Card With Bloom and Grow Flowers

Bird Ballad Laser-Cut Card with Bloom and Grow

One of the things in the new Stampin’ Up! Catalog that I think you could easily overlook (because I did!) is the Bird Ballad Laser-Cut Cards & Tin on page 168. It’s the first item underneath “Cards and Envelopes”.

You get this very pretty tin holding twelve cards with the laser-cut front in Very Vanilla plus envelopes with a pretty scallop edge on the flap! Then just decorate however you like!

Bird Ballad Laser-Cut Cards and Tin

You can work with these cards one of two ways. If you want to add a color underneath the lacy laser-cut card front panel, you can cut a piece of cardstock just slightly smaller than the card and glue it underneath the card front. OR you can do what I did and glue the cardstock to the inside back panel of the card. That way the recipient can lift up just the laser-cut front by itself.

I used one of the new In Colors 2019-2021, Terracotta Tile. I think it is quite striking underneath the laser-cut design! That piece is adhered to the inside of the card.

To decorate the front of the card, since so many samples I’ve seen used the Bird Ballad Suite, I decided to do something different. I stamped a smaller floral image from the Bloom and Grow Stamp Set on Very Vanilla Cardstock in Memento Ink. Then I colored in the flowers with my Stampin’ Blends Markers. I wanted the flowers to match the In Colors somewhat if I could and since we don’t have a Terracotta Tile marker yet, I thought Calypso Coral was pretty close! The other flower is colored with Highland Heather and the leaves with Old Olive and touches of Daffodil Delight yellow.

The greeting is also in this stamp set, but the stamps are larger than they appear on the front of the stamp case. I decided to only stamp the word “Celebrate” from the stamp so I colored it with my Calypso Coral Stampin’ Write Marker. I used the Stamparatus to make sure the word got stamped well and in the correct position. That tool sure comes in handy for making sure something gets stamped right! Next, the greeting was die cut using the Stitched Nested Labels Dies.

Bird Ballad Laser-Cut Card Designing

The label piece had to be adhered to the card front with tiny dots of glue on the laser-cut front design. I first figured out where the label was going to go on the card front and applied the tiniest dots of Multipurpose Liquid Glue to the laser design. To keep the glue from getting everywhere, I placed the Silicone Craft Sheet underneath the front of the card.

After this label with the flowers was adhered, I die cut the next smaller size of Stitched Nested Label Dies. I stamped a birthday greeting on this from the Beautiful Day Stamp Set, again coloring it with the Calypso Coral Markers. I placed this on the underside of the flower label on the front and put tape on it. When I was sure I had it right, I closed the bottom of the card over it so it would be adhered underneath the flower label and not showing. I stamped a little extra flower on it as well!

And for a little embellishment, I added two In Color Faceted Dots to see how it would look!

Bird Ballad Laser-Cut Card Inside

This is actually a pretty easy card to make, at least the idea is easy! Try this Bird Ballad Laser-Cut Card With Bloom and Grow Flowers both ways, adhering the colored sheet attached to the back inside of the card or glued right on the back of the card front under the laser-cut design. Just think if you made an assortment of cards, placed them back in the tin, and gave it all for a gift! Check out the Bird Ballad Laser-Cut Card & Tin in the Stampin’ Up! Catalog today in the Stampin’ Up! Online Store!