Tag Archives: Stitched Nested Labels Dies

Gilded Autumn Gather Together Card For Fall

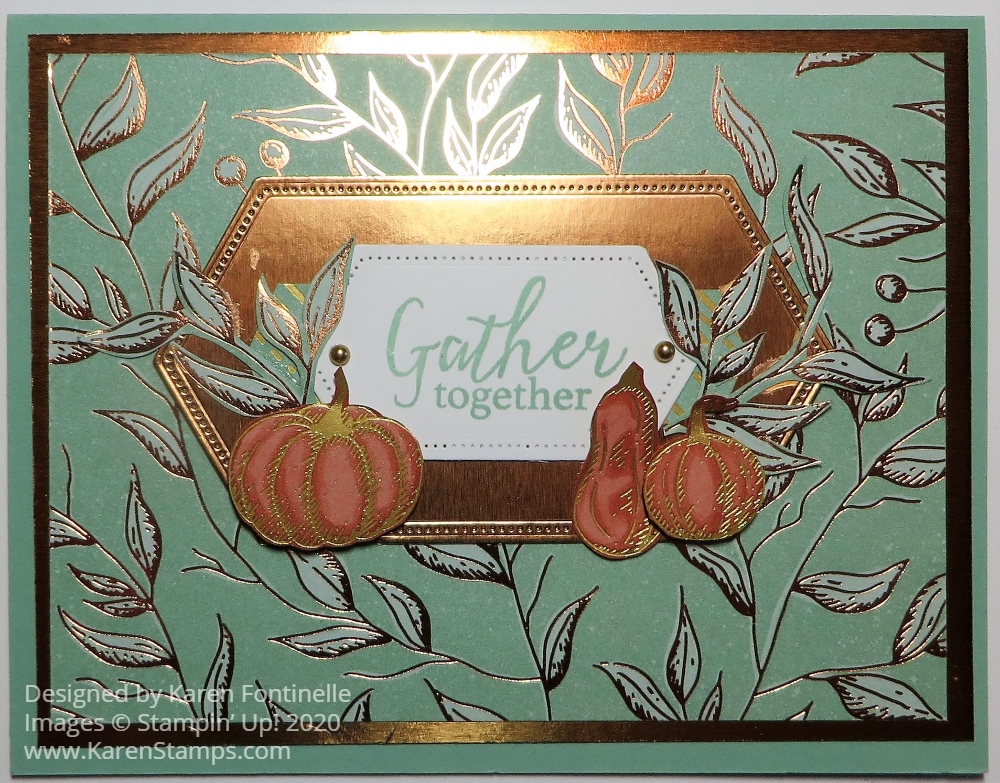
This Gilded Autumn Gather Together Card For Fall is one I created by copying a fall card I made last year with the same stamp set but using this year’s new designer paper! You can take any card or project you’ve made in the past and update it with a new greeting, new colors, new paper, new embellishments.

Here is the card I was copying from last year. Click the card to see the blog post.

Gather Together Fall Card on the First Day of Fall

The new Gilded Autumn Specialty Designer Series Paper in the Holiday August-December 2020 Mini Catalog is just beautiful this year with its earth tone colors and some copper and gold foil accents. I really like this paper! For the card base, I used Mint Macaron Cardstock because it goes with the pattern I wanted to use. This leafy pattern is what I used to cut out some leaves as embellishments.

Under the leafy pattern designer paper, I put a layer of Copper Foil. If you want to cheat, you can die-cut a piece out of the center of the foil, which will be hidden underneath the designer paper, if you want to use every bit of the foil sheets!

For the center of the card, to match the one from last year, I cut out a Copper Foil piece from the Stitched Nested Labels Dies. You can choose whichever size works best for your card.

The greeting, from the Gather Together Stamp Set, is stamped on Whisper White Cardstock in Mint Macaron Ink and die cut with a smaller Stitched Nested Labels Die. I added a little Gold Metallic Pearl on each side. The pumpkins and one gourd are cut out with Paper Snips by hand from the paper in the Gilded Autumn selection. I love the pattern with all the pumpkins and gourds! I just cut out three of them and a few leaves and adhered them to the front around the greeting. That’s all there is to it! Seems pretty simple, right?!

What is it about fall that makes us all so excited to expect it and to make fall projects like colored leaves and pumpkins and more?!

Be sure to check out the Gilded Autumn Specialty Designer Series Paper in the new Stampin’ Up! Online Store because the photos of the paper are really great! Next best thing to seeing them in person!

The Gilded Autumn Paper and the Foil Sheets are so pretty that’s almost all you need on this Gilded Autumn Gather Together Card For Fall.

Masculine Plaid Tidings Birthday Card

The plaid paper on this Masculine Plaid Tidings Birthday Card is coming soon in the August-December 2020 Mini Catalog on August 4th. Now when I first saw it in the holiday catalog, I wasn’t too thrilled and might have passed it up. I did notice it could be used for Christmas, fall, or Halloween and probably other things but I wasn’t that excited about it. But I did order it and when I opened the package, I just loved the paper!!

The Plaid Tidings 6″ x 6″ Designer Series Paper package has all kinds of plaids in it. There is a long list of coordinating colors! Although we might think of it as holiday paper, whether for Christmas or the oranges for Halloween, Fall, or Thanksgiving, I decided to use a sheet for a birthday card. While it could be for anyone, the plaid gives it a masculine look in this case and we’re always looking for things that work well for masculine cards for the men in our lives. The red on this paper is Cherry Cobbler and the green might be Shaded Spruce or Mossy Meadow. I wasn’t sure!

The card base is Cherry Cobbler and the red and green plaid paper is adhered to that. The greeting is from the Many Mates Stamp Set. It is stamped in black Memento Ink. It’s an outline stamp and you can leave it as is or in this case I colored in the letters. I used my Cherry Cobbler and Mossy Meadow Stampin’ Blends markers.

I stamped the greeting on Whisper White and die cut it with the Stitched Nested Labels Dies. Then I made layers with the same dies out of Cherry Cobbler and Mossy Meadow.

Due to not having the right colors of ribbon, I decided to just use some 1/4″ strips of cardstock scraps for tails hanging from the bottom of the greeting panel. I even cut the little bitty flagged ends with my Paper Snips. You could use more or less strips. I started thinking three would be good and ended up with five! After adhering the strips on the back of the layers with our new Stampin’ Seal Adhesive, I popped the whole thing up on Stampin’ Dimensionals®. Even then I wanted another little something, so I used two gold Metallic Pearls.

This is actually a pretty easy card to make! If you didn’t have the particular dies, you could use rectangles or ovals or circles or even just cut rectangle layers. Just stamp a greeting and choose your favorite plaid paper for the occasion!

You’ll find the Plaid Tidings Designer Paper in the Holiday Catalog, now known as the August-December 2020 Mini Catalog on page 57. I think you will be surprised how much you like this paper and how often you can use it for your projects, like this Masculine Plaid Tidings Birthday Card.

Bird Ballad Floral Thank You Card

Bird Ballad Floral Thank You Card

As I was using up some designer paper scraps the other day, this Bird Ballad Floral Thank You Card is one that I came up with. This floral pattern is so pretty I think and punching out one of the printed birds on another sheet of the designer paper as a focal point makes for a nice card.

I wasn’t crazy about all the sheets in the Bird Ballad Designer Series Paper, but I thought most of the patterns were really pretty. This paper, on the card front, with just colored flowers, I thought was especially pretty and easy to use on many cards. You can purchase this Bird Ballad DSP on the Last-Chance List at a discount until June 2.

The card base is Petal Pink, one of the coordinating colors of the paper. Then I added a layer of Pool Party underneath the floral designer paper. I punched out the bird from another sheet of the DSP. Then the bird is layered on a Stitched Shapes Die and popped up on Stampin’ Dimensionals®.

Before adhering the designer paper to the Pool Party layer, I adhered a short piece of Whisper White 1/4″ Crinkled Seam Binding Ribbon from the top of the bird image around to the back of the floral paper almost as if the bird image is an ornament. Then I took two strands of the same ribbon together and tied a bow which makes a fluffier bow, especially with this thin ribbon, and adhered it to the top of the die-cut with a Mini Glue Dot or two.

The greeting is from the Peaceful Moments Stamp Set and is stamped in Pool Party ink. Then the greeting is die-cut with one of the Stitched Nested Labels Dies.

This Bird Ballad Floral Thank You Card is a relatively simple design and easy to make so try it with your scraps of designer paper!

Bird Ballad Floral Thank You Card Closeup

SHOP STAMPIN’ UP! ONLINE TODAY!

Bird Ballad Laser-Cut Card With Bloom and Grow Flowers

Bird Ballad Laser-Cut Card with Bloom and Grow

One of the things in the new Stampin’ Up! Catalog that I think you could easily overlook (because I did!) is the Bird Ballad Laser-Cut Cards & Tin on page 168. It’s the first item underneath “Cards and Envelopes”.

You get this very pretty tin holding twelve cards with the laser-cut front in Very Vanilla plus envelopes with a pretty scallop edge on the flap! Then just decorate however you like!

Bird Ballad Laser-Cut Cards and Tin

You can work with these cards one of two ways. If you want to add a color underneath the lacy laser-cut card front panel, you can cut a piece of cardstock just slightly smaller than the card and glue it underneath the card front. OR you can do what I did and glue the cardstock to the inside back panel of the card. That way the recipient can lift up just the laser-cut front by itself.

I used one of the new In Colors 2019-2021, Terracotta Tile. I think it is quite striking underneath the laser-cut design! That piece is adhered to the inside of the card.

To decorate the front of the card, since so many samples I’ve seen used the Bird Ballad Suite, I decided to do something different. I stamped a smaller floral image from the Bloom and Grow Stamp Set on Very Vanilla Cardstock in Memento Ink. Then I colored in the flowers with my Stampin’ Blends Markers. I wanted the flowers to match the In Colors somewhat if I could and since we don’t have a Terracotta Tile marker yet, I thought Calypso Coral was pretty close! The other flower is colored with Highland Heather and the leaves with Old Olive and touches of Daffodil Delight yellow.

The greeting is also in this stamp set, but the stamps are larger than they appear on the front of the stamp case. I decided to only stamp the word “Celebrate” from the stamp so I colored it with my Calypso Coral Stampin’ Write Marker. I used the Stamparatus to make sure the word got stamped well and in the correct position. That tool sure comes in handy for making sure something gets stamped right! Next, the greeting was die cut using the Stitched Nested Labels Dies.

Bird Ballad Laser-Cut Card Designing

The label piece had to be adhered to the card front with tiny dots of glue on the laser-cut front design. I first figured out where the label was going to go on the card front and applied the tiniest dots of Multipurpose Liquid Glue to the laser design. To keep the glue from getting everywhere, I placed the Silicone Craft Sheet underneath the front of the card.

After this label with the flowers was adhered, I die cut the next smaller size of Stitched Nested Label Dies. I stamped a birthday greeting on this from the Beautiful Day Stamp Set, again coloring it with the Calypso Coral Markers. I placed this on the underside of the flower label on the front and put tape on it. When I was sure I had it right, I closed the bottom of the card over it so it would be adhered underneath the flower label and not showing. I stamped a little extra flower on it as well!

And for a little embellishment, I added two In Color Faceted Dots to see how it would look!

Bird Ballad Laser-Cut Card Inside

This is actually a pretty easy card to make, at least the idea is easy! Try this Bird Ballad Laser-Cut Card With Bloom and Grow Flowers both ways, adhering the colored sheet attached to the back inside of the card or glued right on the back of the card front under the laser-cut design. Just think if you made an assortment of cards, placed them back in the tin, and gave it all for a gift! Check out the Bird Ballad Laser-Cut Card & Tin in the Stampin’ Up! Catalog today in the Stampin’ Up! Online Store!