Tag Archives: Free As a Bird Stamp Set

Bird Ballad Bird Cage Paper Card

Bird Ballad Bird Cage Paper Card

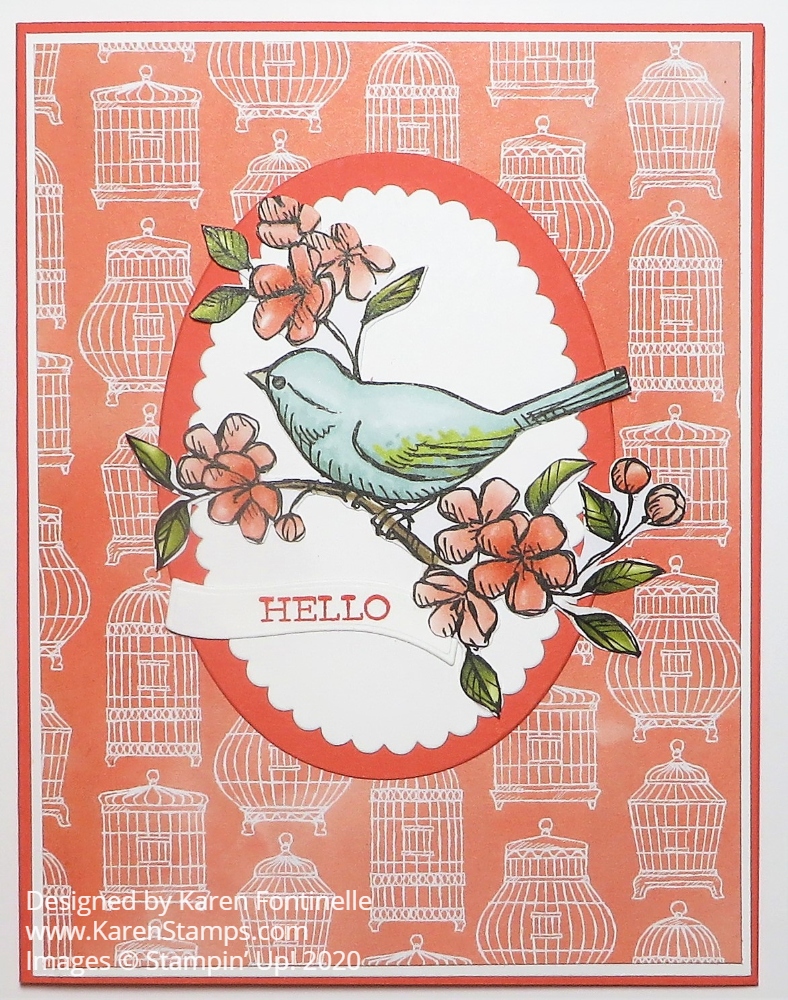
As I was looking through all my designer paper to see which one spoke to me to make a card, perhaps with scraps, it was the Bird Ballad Designer Series Paper that won out, but as I looked through my scraps, what was not a scrap was the pattern with various bird cages printed on the Calypso Coral background. I had a full sheet of this particular paper and decided to use it some way to make a card! It wasn’t a favorite of mine!

Once I cut out a piece to be a layer on a Calypso Coral card base I started liking the design better, especially after I put a thin margin of Whisper White Cardstock underneath. I even used that piece of Whisper White to cut out the Whisper White oval I used on the front of the card. Just don’t tell anyone! I don’t often do it, but it is a little trick you can use if you really want to save paper and if you are positive it will not be apparent to the look of the card.

Because of the sizes of the ovals and needing a large oval on which to layer the bird, I chose a scalloped oval from the Layering Ovals Dies and die cut that out of Whisper White and die cut a plain oval out of Calypso Coral.

Next, I chose a bird that I liked on the scraps I had of the Bird Ballad Designer Paper. I simply cut out the bird, branch, and flowers myself with my Paper Snips while watching TV! You do not have to get into every nook and cranny when you cut something out yourself and I do not find it difficult at all. One tip Stampin’ Up! gave us years ago was to cut just a tiny bit off the actual image instead of on the actual line of the image because that is a little more forgiving in your cutting if it is not exactly perfect. Just do whatever is the easiest for you.

After I cut out the bird, I really like the way it layered on the ovals and how the colors all went together well with the background of the bird cage paper.

I decided to use the “Hello” greeting in the Free As a Bird Stamp Set that coordinates with the designer paper. I was afraid to just stamp it directly in the empty space on the Whisper White lest I make some kind of mess! Maybe if I had planned ahead because you should usually do your stamping first and then other steps. But I opted to stamp and die cut with the little wavy banner in the Ornate Frames Dies. I have loved these dies since they came out in the past Holiday Catalog with a Halloween stamp set, but they are great to use in lots of other ways!

Putting a little “Hello” on a card makes it perfect for almost any reason to send a card, especially just a note to catch up with a friend or family member. On the inside of the card, I adhered a Whisper White layer either with a couple flowers stamped with Calypso Coral Ink or a strip of matching designer paper along the bottom edge of that Whisper White layer.

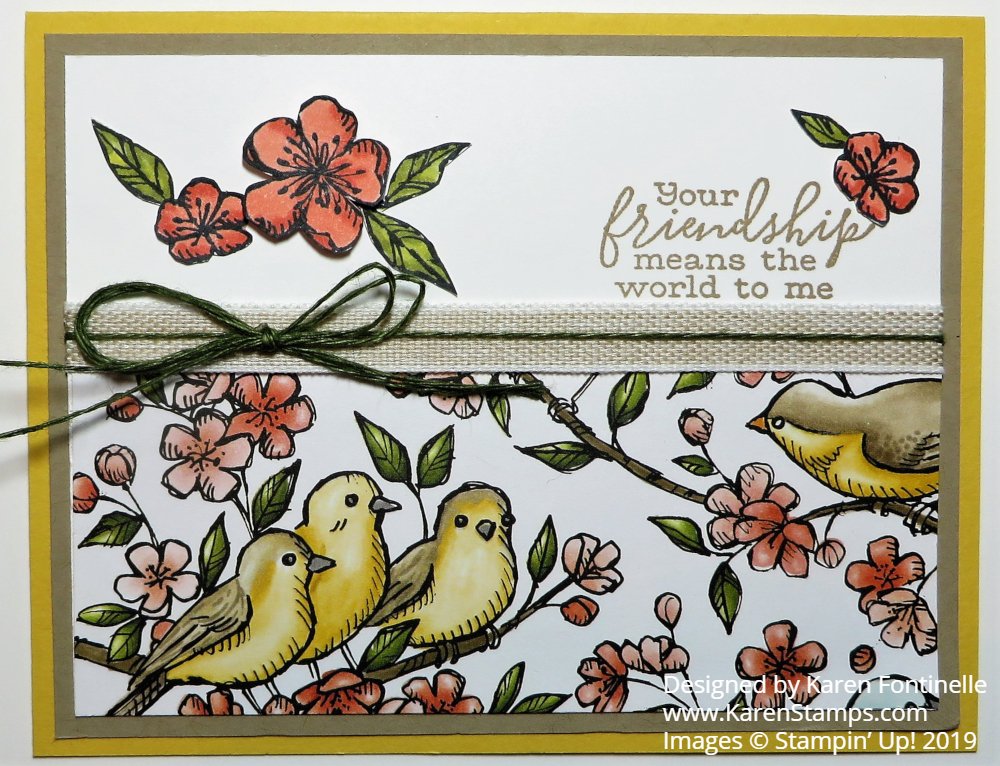
Here’s another card I made with a different pattern of the Bird Ballad paper. I didn’t care for every sheet in this package of designer paper but several I thought were just beautiful. So if you like this paper, be sure to get some on the Last-Chance List before it is gone. The last date to order retiring products is June 2, 2020.

Remember to do some fussy cutting with good scissors for that like the Paper Snips if you don’t want to stamp or if you like an image on the designer paper. In some cases, you might be able to punch or die-cut a circle or oval from the paper, but I find fussy cutting is a good stress reliever! And remember that sometimes a piece of designer paper that you didn’t think you cared for can really turn into a pretty card like this Bird Ballad Bird Cage Paper Card.

Free As a Bird Notecard & Envelope

Free As a Bird Notecard & Envelope

Even though I posted a card with the Bird Ballad Designer Paper yesterday, I think that whole suite is so pretty I had to do something else with it for today, the Free As a Bird Notecard & Envelope. My original idea was to just stamp directly on the front of the Notecard, but since I was going to use my Stampin’ Blends to color in the stamped image, I didn’t want to have the coloring show through to the other side. I’m not positive it would since the notecard paper seems fairly heavy, but no point in taking a chance! I even decided to add a Petal Pink layer with a narrow margin behind the stamped layer.

Free As a Bird coloring
Back side of Whisper White

I absolutely love coloring with the Stampin’ Blends alcohol markers! Don’t be intimidated to use them, thinking about “blending”. Just color! I usually use the light color first and then maybe color the edges or highlighted areas on the stamped image with the darker color. Then maybe I even go back and color over again with the lighter marker to blend any rough lines. Just play and do whatever you want. I can almost guarantee you will be satisfied with the result with these markers.

Since I originally thought I was going to stamp the birds directly on the notecard, I knew I just had that one chance to get it right so I pulled out my Stamparatus®! In order to see how everything lined up, I put down a piece of clear Window Sheet on top of the notecard so I could stamp the image on the window sheet and see if anything was crooked (usually the words). Be sure to use the gridlines on the Stamparatus plate to see if you have your stamp or words straight if that is what you want. I could also put two stamps on the Stamparatus at one time and get everything spaced just right!

Free As a Bird & Stamparatus

When you have everything where you want it, remove the window sheet, make sure the cardstock is still in the corner or wherever you stamped it with the window sheet and have your magnets holding down the paper. Then stamp! If the image doesn’t come out fully stamped, just ink up the stamp again without moving anything and stamp again (or again if necessary) until you have a good image. That’s one of the most important benefits of the Stamparatus.

As I have said before, the Note Cards & Envelopes are just handy to have on hand always. When you want to do some quick stamping and write a short note, they are perfect. AND they come with their own mailable envelopes! To fancy up the envelope a little bit, I used a piece of the Bird Ballad Designer Paper on the back flap! You could put the paper inside as a liner if you wanted instead. I put the adhesive on the envelope flap, then glue on a larger than needed piece of paper. Then I trim off the excess with scissors. So easy and so pretty!

Always remember to be careful with the magnets because they really like to jump together and then they are difficult to pull apart. These magnets are very strong, which is good, until they get stuck together! Watch out for your fingers, too! I like to put the magnets on opposite sides of the table if I don’t have then in use so that they are FAR apart!

Check out all these great products in the Stampin’ Up! Online Store…..the Bird Ballad Suite, the Note Cards & Envelopes, the Stampin’ Blends Markers, and the Stamparatus. Stampin’ Up! has the best products! Have fun stamping something today!

Free As A Bird Friendship Card

Free As A Bird Friendship Card

Here’s my first card with new catalog product, the Free As A Bird Friendship Card. There are a lot of pretty designer papers coming in the new Stampin’ Up! Annual Catalog, but I think this Bird Ballad Designer Series Paper is one of the nicest. This new catalog has larger photos of the designer paper this year, but I still think you won’t know how beautiful the papers are until you see them in person!

I decided to use this card design with just half the card front being covered with designer paper so when I looked at the designer paper, I saw this grouping of yellow birds right near the bottom of the sheet so it was perfect! I chose Daffodil Delight Cardstock for the card base. First I planned to use one of the gray coordinating colors for a layer, but the birds seemed to have more brown in them so I switched to Crumb Cake Cardstock for a layer.

On a layer of Whisper White, I adhered the piece of Free As A Bird DSP with the yellow birds. I used a piece of the new Linen Ribbon with white edges along with the Mossy Meadow Linen Thread, both included in the Magnolia Lane Ribbon Combo Pack. I think the green linen thread is a nice accent on top of the linen ribbon. I doubled a separate piece of the green linen thread so I had two strands and made a bow with that, adhered with a Mini Glue Dot.

The greeting is included in the Free As A Bird Stamp Set, as are some other very nice, usable greetings. I stamped it in Crumb Cake Ink. I could have also used Black. The flowers from the stamp set are stamped in Memento Ink and colored with Stampin’ Blends, the Calypso Coral Light and Dark colors. I cut out the flowers with Paper Snips and adhered them to the card, one popped up with Stampin’ Dimensionals. I stamped one stem of leaves, colored with Old Olive Stampin’ Blends, and cut it apart to add to the flowers.

Again, the illustrations on the paper are just gorgeous! This piece I used looks like someone painted it or colored it by hand.

When June 4th rolls around, you might really want to add some of the products in this Bird Ballad Suite to your new catalog order! Especially the paper!

A stamp set on the Last-Chance List with a cute bird and flowers is called Petal Palette, so if you like birds you might want to check out this stamp set before it retires! Here is a card I made with the flowers in this stamp set.

Be sure to check out the retiring products and the Clearance Rack for what you need before the current catalog goes out!