Tag Archives: So Sentimental Stamp Set

Gilded Autumn Pumpkins Fall Friendship Card

Gilded Autumn Pumpkins Fall Friendship Card

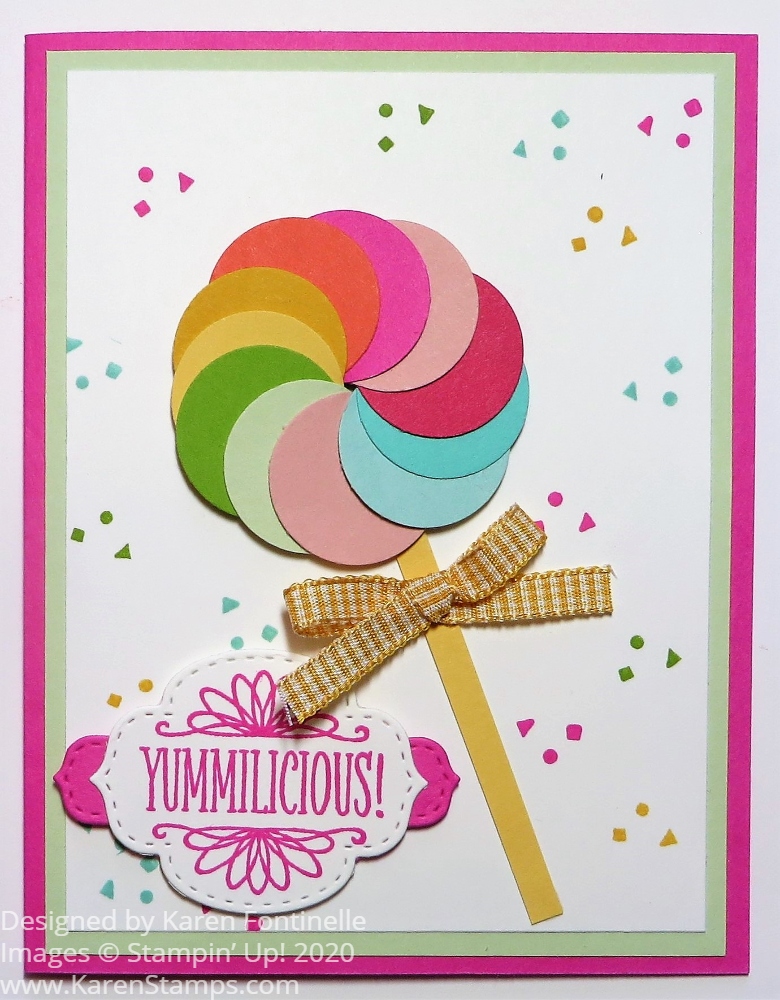
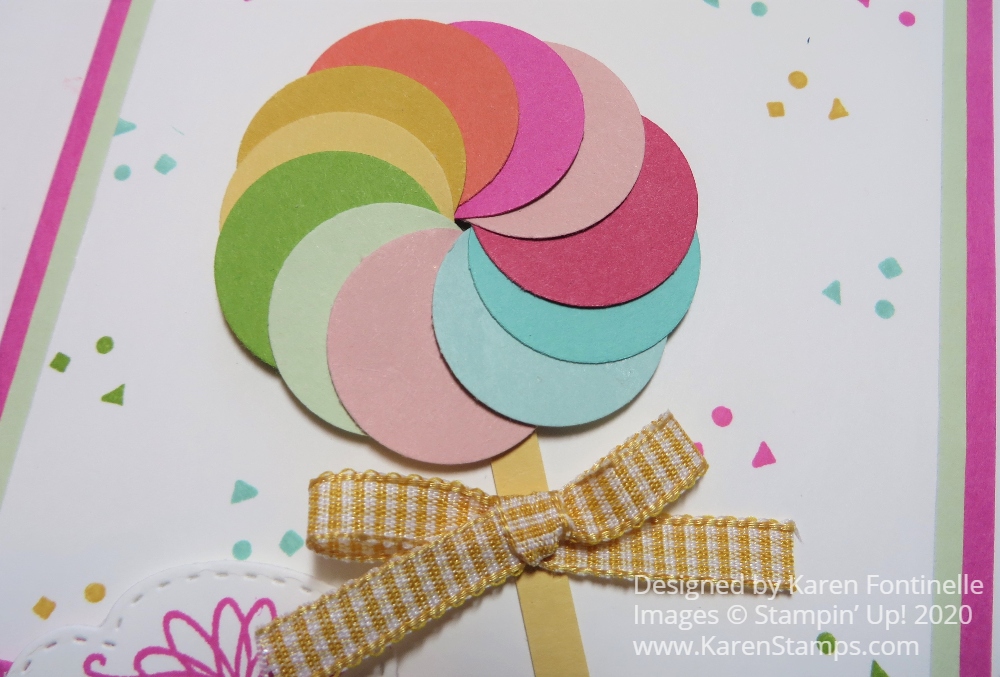
This fall paper in the Stampin’ Up! August-December Mini Catalog 2020 is some of the prettiest designer paper we have had (or do I say that about almost every paper?!) so I had to make this Gilded Autumn Pumpkins Fall Friendship Card with this pretty paper with gold embossed pumpkins.

It’s really a very simple card and I wanted to keep it that way. Sometimes we get carried away with all our pretty embellishments and die cuts, but we can make simple, easy cards too that are just as nice.

This card has a Cajun Craze card base to match the Gilded Autumn Specialty Designer Series Paper. I don’t really use Cajun Craze very often but it is lovely on this pumpkin paper! I was going to use another piece of the paper as a side strip but after placing the full layer of the pumpkin paper on the card base, I liked that look just fine and didn’t want to add anything else except a greeting.

The greeting is from So Sentimental, one of the good greetings stamp sets we have in the Annual Catalog. I stamped it in Cajun Craze ink to match on Very Vanilla Cardstock. Then I die-cut it with one of the Stitched So Sweetly Dies. Actually, the greeting looked fine on the card against that paper just as is, but I did want to add some Gold Foil to the card. I cut the same die cut out of the Gold Foil and then cut it in half so I could have it extend above and below the Very Vanilla greeting. That is something you can do when you want a layer of some kind but the dies don’t fit or extend beyond the greeting. It usually works pretty well!

The inside of the card will need a layer of Very Vanilla on which to stamp a greeting or write a personal note because of the dark Cajun Craze card base.

That’s really all there is to this Gilded Autumn Pumpkins Fall Friendship Card with just adhering a designer paper layer and a greeting for a very nice card to send to someone during this fall season or even looking ahead to Thanksgiving cards you might want to send.

SHOP STAMPIN’ UP! ONLINE HERE!

Flowers For Every Season Thank You Card

Flowers For Every Season Thank You Card

If you are in need of a cheerful, bright, and happy card, you most likely will want to choose this designer paper I used on my Flowers For Every Season Thank You Card. The bright florals on this piece of designer paper goes with the new In Color, Magenta Madness and that’s about all you need!

The card base is Whisper White with a Magenta Madness layer. I added a strip of the Flowers For Every Season 6″ x 6″ Designer Series Paper just to the side. You can make it whatever width you want. Almost any of the papers in this package are sure to brighten someone’s day!

The greeting is stamped with Magenta Madness ink on a piece of Whisper White Cardstock with the So Sentimental Stamp Set. This greeting fits perfectly in this die from the Stitched So Sweetly Dies. I love the stitched border around this die!

This is such a simple card design! Anyone can make it and you can change the greeting for lots of other occasions. And for just a little embellishment, I tied a bow with the Magenta Madness 1/4″ 2020-2022 In Color Ribbon and adhered it with a couple of Mini Glue Dots.

If you like the Flowers For Every Season Designer Series Paper, here is another card I made using this paper.

When you need some quick and easy cards, this card is the way to go!

This is the last week for Bonus Days at Stampin’ Up! For every $50 you spend in July, you will earn a $5 coupon to use in August! Bonus Days ends Friday, July 31!! Don’t delay!

Shop Stampin’ Up! Online Here!

In Good Taste Navy Z-Fold Thank You Card

In Good Taste Navy Z-Fold Thank You Card

I always think it is fun and impressive to make a card with a different fold and this In Good Taste Navy Z-Fold Thank You Card uses the easiest one there is! I was working on another project with this same designer paper which I really like so I used it on this card. You can use any designer paper and change the sentiment for almost any kind of card. You can even change the shape of the greeting layer on the card.

The basic z-fold card is so easy to make! The card base starts off like any card, 8 1/2″ x 5 1/2″, scored and folded at 4 1/4″. But then you will fold the card front back on itself, in half. After scoring the card normally at 4 1/4″, next score the front of the card at half of that, 2 1/8″ and fold that part back like you see in the following photos in this post.

Next, decide on what designer paper you want to use on your card or even stamp the panels you want to add. Just do whatever you like or whatever the occasion requires. This card base is Night of Navy and the designer paper is the In Good Taste Designer Series Paper. This designer paper comes in a large package with many patterns – 12 designs, 2 sheets of each! When I first saw it in the catalog, wasn’t really interested, but after I saw how many different textures were captured on this paper, I was quite intrigued. This Night of Navy print resembles tile or china I think.

Since that folded back front panel measures 2 1/8″ x 5 1/2″, you probably want your designer paper or panel to measure 2″ x 5 3/8″ for a narrow margin around the edge or 1 7/8″ x 5 1/4″ for a wider margin. Figure it just like you would for a card.

Since the cardstock is dark, I added a Whisper White layer inside the card and put a strip of the designer paper along the edge. This was just a scrap, but it is about 1/2″ wide by 5 1/4″.

For the greeting on the front of the card, I wanted to use something kind of large. I chose one from the So Sentimental Stamp Set. It is stamped in Night of Navy ink. The die-cut scalloped rectangles I used are in the Stitched So Sweetly Dies set. When you adhere it to the front of the card, remember to only add adhesive to half of the back of the greeting so it only sticks to that folded front panel and not the rest of the card. If you are going to have a greeting on the inside of the card, you probably want that front greeting to cover up what is inside the card.

For a little bling, I added some Misty Moonlight 2020-22 In Color Enamel Dots. They are not the exact same color as the Night of Navy used on the card, but I thought they were close enough.

I could have added another color with the greeting layer and the enamel dots and ink if I didn’t want it to be the monochromatic look.

Here’s another card I made with the z-fold using really pretty designer paper from 2019, some ribbon, and a different shaped greeting on the front of the card, just to give you another idea.

Here are some other views of this card so you can see how the folds go.

In Good Taste Navy Z-Fold Thank You Card Inside
In Good Taste Navy Z-Fold Thank You Card Folds

Try your hand at making an easy Z-Fold card like this In Good Taste Navy Z-Fold Thank You Card.

SHOP STAMPIN’ UP! ONLINE!

Forever Greenery Thank You Card

Forever Greenery Thank You Card

Talk about a quick and easy card to make, this Forever Greenery Thank You Card is one! I don’t think I’d even gotten around to using this designer paper so I thought it was about time.

I think every green color Stampin’ Up! has is included in this Forever Greenery Designer Series Paper. I love the new In Color 2020-22 called Just Jade. Normally I’m not a big fan of green, but I really like this color. Just Jade is the card base with a layer of Whisper White Cardstock. Then I added the designer paper layer. Originally, I planned to just have a very thin margin of the Whisper White to kind of separate the designer paper from the Just Jade. But I liked more of the white showing so I made all the standard layers.

Before adhering the designer paper layer to the Whisper White Cardstock, I wrapped around a strip of Just Jade 1/4″ Ribbon and adhered it to the back. After the layer is adhered to the card, you can tie a separate bow and adhere it to the ribbon with a Mini Glue Dot.

The greeting is stamped with Just Jade Ink with a stamp in the So Sentimental Stamp Set. This is a great stamp set for greetings! There are large ones and very small ones! Then I cut out the greeting with a Stitched So Sweetly Die.

To set off the greeting a little bit, I punched a strip of Just Jade Cardstock with the Lovely Labels Pick A Punch. Then of a little bling, I added a Gold Glitter Enamel Dot on each end.

That’s all there is to making this card! And so many pretty patterns to choose from in the Forever Greenery Designer Series Paper!

Check out all the new Stampin’ Up! catalog items and when you place your order, remember the Bonus Days promotion going on during July! With every $50 you spend in July, you will receive a $5 coupon to spend on your order in August! Be sure to look for the email from Stampin’ Up! right after you order!

SHOP STAMPIN’ UP! ONLINE!

Colorful Lollipop Greeting Card

Colorful Lollipop Greeting Card

I had saved a magazine photo from YEARS ago with a card like this Colorful Lollipop Greeting Card. It has survived the purging of the file of torn out magazine pages, mostly scrapbook page ideas, several times so I finally decided to leave it out on my coffee table so maybe I would finally make it someday soon. Well, the day came and I made a card with this cute lollipop made out of circles!

There weren’t any super specific instructions on how to make this but I thought it would be easy enough to figure out. It’s a great way to use up some scraps of cardstock or even designer paper or mix the two.

You can use various sizes of circles, whatever suits your fancy and fits on your card. I used a 1″ Circle Punch (retired) but you could use something larger or larger die cuts. I just chose a bunch of colors of cardstock that looked good together.

It may seem a little difficult to get the circles placed correctly in a circle to form the lollipop. It might help you to put a pencil dot on your card where you want the center of the lollipop to be and you can kind of arrange the circles around that. When you get to the last circle in the lollipop, tuck it under the beginning circle, otherwise the two pieces on either side of that first circle will overlap it. So you want the last circle to tuck under it.

Use the Multipurpose Liquid Glue to just dab in between the circles to adhere them together into the lollipop shape. That glue gives you a little “wiggle time” to get the circles shaped the way you want them. After you get the lollipop formed, you can either glue it down directly onto the card front or pop it up with Stampin’ Dimensionals® or cut down some Foam Adhesive Strips to fit.

If you have a real lollipop stick, that would be fun to use or just cut a very thin strip of cardstock. I had a white one but of course it didn’t show up against this white cardstock so I just use a strip of Bumblebee Cardstock instead. Then I tied a bow of Bumblebee Gingham Trim and adhered it to the stick with a Mini Glue Dot.

For the greeting, I thought this one in the So Sentimental Stamp Set was perfect! I stamped it in Magenta Madness Ink and die cut with a die in the Stitched So Sweetly Dies. Then I die-cut another piece out of Magenta Madness that was smaller and I just cut it in half so I could use each end under the greeting to help it stand out from the Whisper White card layer.

I also thought it would be fun to stamp the little confetti stamp around the card in different colors to fill in all the white space. I just used some of the lollipop colors. The card base is Magenta Madness with a layer of Soft Sea Foam cardstock.

This is certainly a fun card to make and something different. It would be fun to make a few and make them into birthday cards or just “Hello” cards to send to a friend to brighten their day! Who wouldn’t be happy to receive this special Colorful Lollipop Greeting Card card?!

Colorful Lollipop Greeting Card Closeup

Artistry Blooms Friendship Card

Artistry Blooms Friendship Card

We’ve had some really rainy, stormy days here in Houston this week so I thought a bright and happy card was in order like this Artistry Blooms Friendship Card. It’s a quick and easy card to make as is, or you can even make it easier with no die-cutting or more dressed up with additional layers and embellishments.

The card base is the new In Color Magenta Madness Cardstock. The Artistry Blooms Designer Series Paper is amazing with its brushstroke design and also plainer gradient designs on the other sides. This paper can brighten up any cards and projects! I even added a layer of Daffodil Delight Cardstock underneath the designer paper just to brighten it up a bit more.

Artistry Blooms Designer Series Paper
Image copyright Stampin’ Up! 2020

The greeting is from the So Sentimental Stamp Set which has greetings for many occasions in the fun larger fonts mostly. I used one of the Tasteful Labels Dies to cut out the greeting, which fit perfectly. However, there is a die set, the Stitched So Sweetly Dies, that goes with the So Sentimental Stamp Set that you can purchase in a Bundle. This is a great set to have as well! We can never have too many sentiments and greetings to use on our cards and dies with which to cut them out!

To finish off this card, I punched a hole in each end of the greeting with my old Cropadile, but you can use any hole punch, and ran the Magenta Madness 1/4″ In Color Ribbon through the holes and tied a knot in each side. I also added the ribbon running across the card and around the back, going underneath the greeting. The greeting is popped up on Stampin’ Dimensionals®. You could also add some sequins to the card or the In Color Enamel Dots (when they back in stock!).

Don’t be afraid of the Magenta Madness color! I am really liking it! You will likely be toning it down with other papers or using just bits of it to add a touch of brightness and pizzazz to your project. Here is a card I made using Magenta Madness Cardstock in the paper and embellishments.

We don’t always have to make complicated cards or fancy designs. If you are short on time or energy or just want something simple, try a design like this Artistry Blooms Friendship Card.

SHOP ONLINE AT STAMPIN’ UP!