Today is the LAST DAY for SALE-A-BRATION and this Sale-A-Bration Darling Donkey is kicking up his heels hoping you will remember to get your order in before Sale-A-Bration comes to a screeching halt tonight!
With every $50 Stampin’ Up! purchase you make, you can earn a FREE product in the Sale-A-Bration Brochure! No limits! Like this Darling Donkeys Stamp Set!
With a $300 order, yours alone or shared with others, you can choose the FREE Punch Party Stamp Set.
And if you want to JOIN Stampin’ Up! as a Demonstrator, with your Starter Kit you will also receive 5 packages of upcoming 6″ x 6″ Designer Series Paper Packs included in your business supplies FREE!
Today is the last day to earn FREE product during Sale-A-Bration!
Think about stocking up on adhesives, cardstock, ink refills…some basics you need to reach your $50 or more!
This easy card is made with a card base of Granny Apple Green to match the leaves on the Flower & Field Designer Series Paper, another one of the Sale-A-Bration choices, by the way! I love this package of paper!
The Darling Donkey is stamped on Basic White Cardstock in Memento Ink and cut out with the Rectangle Stitched Dies. The greeting is also in the Darling Donkeys Stamp Set. I colored in the donkey with Stampin’ Blends in Crumb Cake and Smokey Slate. The bow is tied with the Braided Linen Trim. And I couldn’t resist adding two red Resin Hearts Embellishments!
If you would like this Darling Donkeys Stamp Set or the beautiful Flower & Field Designer Paper, be sure to shop at Stampin’ Up! today!
This Flower & Field All-Occasion Card was supposed to look exactly like a sample in the Sale-A-Bration Brochure, but this shows what can happen when you start copying something! Sometimes you change things a little or a lot!
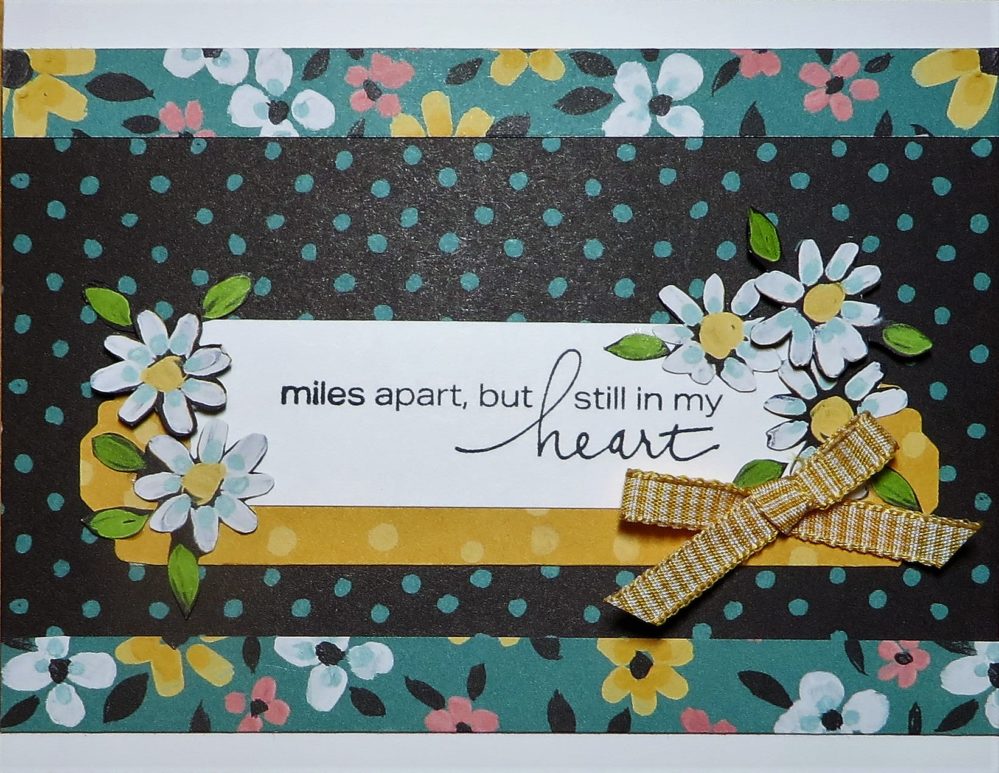
I wanted to make a card with the Flower & Field Designer Series Paper and looked in the Sale-A-Bration Brochure for ideas. Right away the card in the bottom right of page 11 caught my eye. But when I looked through the package of paper, this black background with the Just Jade polka dots is the one that caught my eye!
As I toyed with maybe adding strips of Just Jade Cardstock as a layer under the top and bottom of the polka dot piece, somehow I came up with strips of this flowered pattern instead. I fiddled with the paper sizes until I had about 1 /4″ top and bottom margins on the Basic White Cardstock card base.
The greeting is stamped from the Lovely You Stamp Set. I wanted a greeting that was long in length. I used the same Bumblebee yellow polka dot scrap of designer paper that the brochure sample used to layer underneath the greeting. I used the Lovely Labels Pick a Punch to punch each end of the yellow polka dot layer.
Then for fun, unless you hate cutting with scissors, I cut out several white daisies from another pattern of the Flower & Field Designer Paper to adhere around the greeting. It was a little tedious, but not too bad! You can even consider cutting with Paper Snips relaxing! I popped up a couple of the daisies with Stampin’ Dimensionals.
For a finishing touch, I added a bow of Bumblebee 1/4″ Gingham Ribbon. You could also add some rhinestones or gem embellishments of any kind.
I absolutely love this Flower & Field Paper! If you do too, you can get it FREE during Sale-A-Bration with a $50 Stampin’ Up! purchase. But you have to hurry, because Sunday, February 28 is the last day of Sale-A-Bration! You don’t want to miss out on FREE products!
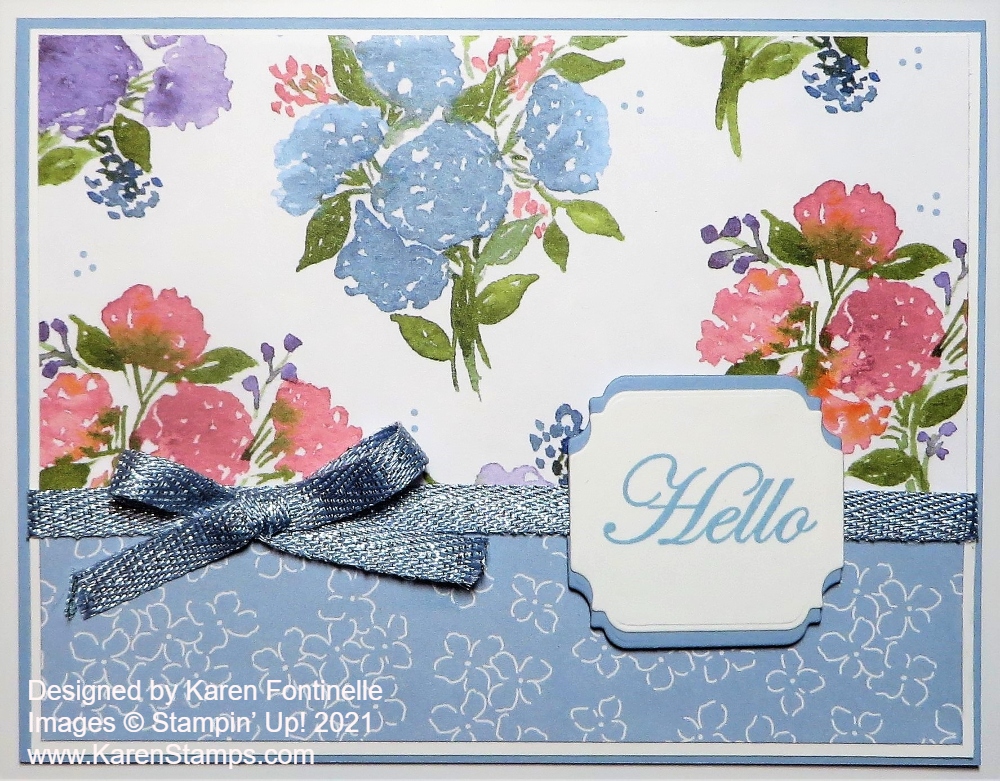
I needed a “happy” card and when I looked through the Hydrangea Hill paper, this sheet of small bouquets and this other sheet with a more generic pattern of little white flowers caught my eye. Even my husband commented as he walked by that those were pretty colors! And that’s how this Hydrangea Hill Floral Hello Card was born!
Sometimes when I am using two designer papers together, I like to adhere them to another piece of cardstock just to make it easier for me to get them glued together and then be able to tie a piece of ribbon across the seam where the two papers meet. In this case, I adhered them to a piece of Basic White Cardstock with a 1/16″ margin on all sides rather than 1/8″. Then I added a piece of Seaside Spray 1/4″ Metallic Ribbon across the seam. I tied a separate bow and adhered it with Mini Glue Dots. You could also tie it right onto the base ribbon if you wanted or tie on a knot.
The greeting is stamped in Seaside Spray Ink on Basic White Cardstock. The greeting is from the Good Morning Magnolia Stamp Set. I didn’t want something too big to cover the flower bouquets so I chose a small greeting. It is die-cut from the Ornate Frames Dies. I cut another one in Seaside Spray for a little layer. It’s the same size so I just cut it in half horizontally and then let each half layer underneath a little bit at the top and bottom.
Here’s another card I made with the Hydrangea Hill DSP in much the same design. Put this paper on your Stampin’ Up! order along with some other things total $50 or more and take advantage of Sale-A-Bration before it ends Feb. 28!
This Hydrangea Hill Floral Hello Card is an easy one to make to showcase the pretty Hydrangea Hill Designer Series Paper!
One week from today Sale-A-Bration 2021 will be over! Can you believe it! Your last day to earn any FREE Sale-A-Bration products is Sunday, February 28. Every year, while we really have fun with the Holiday Catalog, once the holidays are over, we look forward to the Spring Mini Catalog and Sale-A-Bration, Stampin’ Up!’s biggest promotion! It has been held every year since the early days of Stampin’ Up! The January-June Mini Catalog continues on, but Sale-A-Bration comes to an end on Sunday! Be sure to place your Stampin’ Up! orders as soon as possible to avoid the last minute rush and get your free stuff!
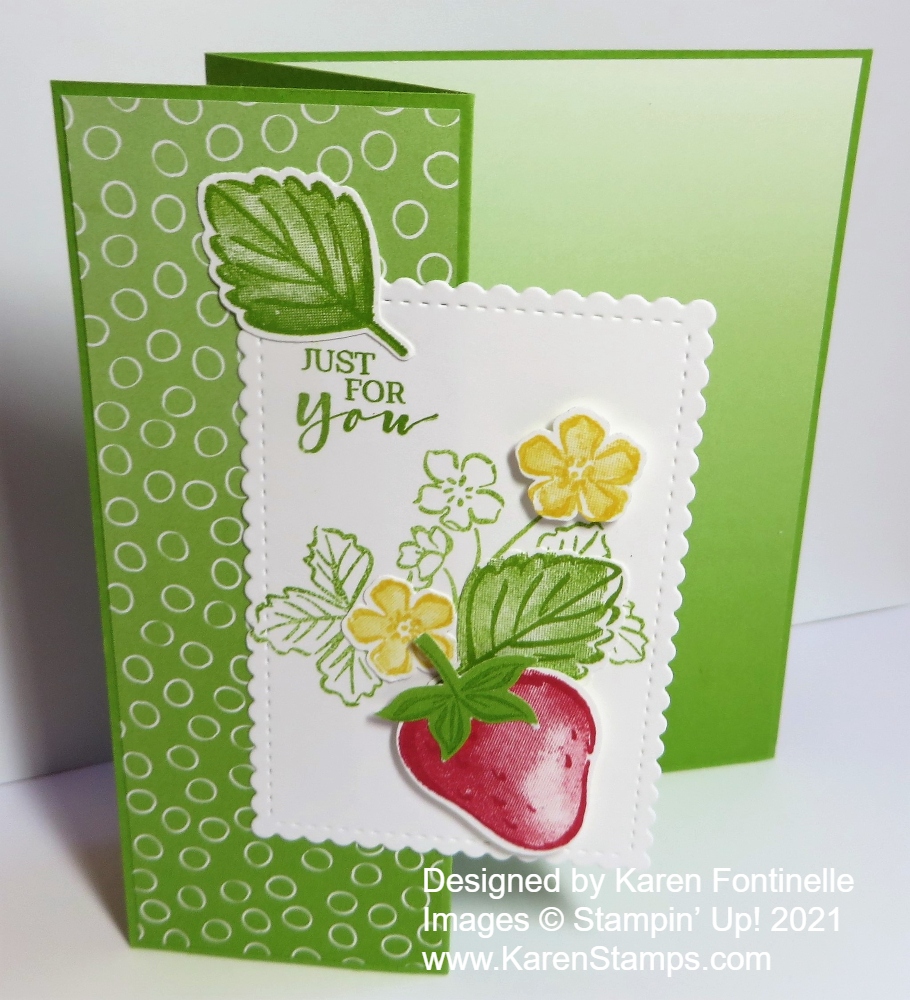
This card showcases one of the Sale-A-Bration options. It’s a Z-fold card in Granny Apple Green, which means half of the front of the card is just folded back to form a z-shape. I used the Oh So Ombre 6″ x 6″ Designer Series Paper on the card, free with a $50 Stampin’ Up! purchase. On the front panel, I used the design with the circles, and for the inside of the card, I used another sheet that just has solid ombre colors with no pattern. This way I can stamp a greeting or write a note inside on the plainer ombre paper.
Now if you spend $100, you can choose the Berry Blessings Bundle in the Sale-A-Bration Brochure for strawberry and berry patterned paper plus a berry stamp set. This Sweet Strawberry Stamp Set used on this card is in the January-June Mini Catalog but it coordinates with the set in the Sale-A-Bration Brochure. You can also purchase the Sweet Strawberry Bundle which includes the Sweet Strawberry Stamp Set and the Strawberry Punch, which is really fun! (As I write this, the Strawberry Punch is not available until the week of March 1, therefore the Bundle can’t be ordered until then!)
It was fun decorating the front of the card! The rectangle is die-cut from the Stitched So Sweetly Dies in Basic White. I stamped the image in the Sweet Strawberry Stamp Set of the strawberry plant leaves and blooms as the background on this die-cut piece. It is inked up in Granny Apple Green and stamped off, although it wasn’t all that faint. Then I stamped and punched a strawberry, some leaves and some Daffodil Delight blossoms and placed them over this image of the strawberry plant. Some are glued down flat and some are popped up on Stampin’ Dimensionals. The greeting is also from the same stamp set.
The leaf at the top over the greeting might not have been there except that I dropped one of the flower stamps with yellow ink on it right at the top of the die-cut piece. I knew I would figure out a way to cover it up and I liked adding the stamped and punched strawberry leaf up there! As we say, “There are no mistakes in stamping!”
This Oh So Ombre Strawberry Z-Fold Card turned out well, I think, in spite of no real plan when I sat down to stamp and has a bright, happy look to it because of the colors!
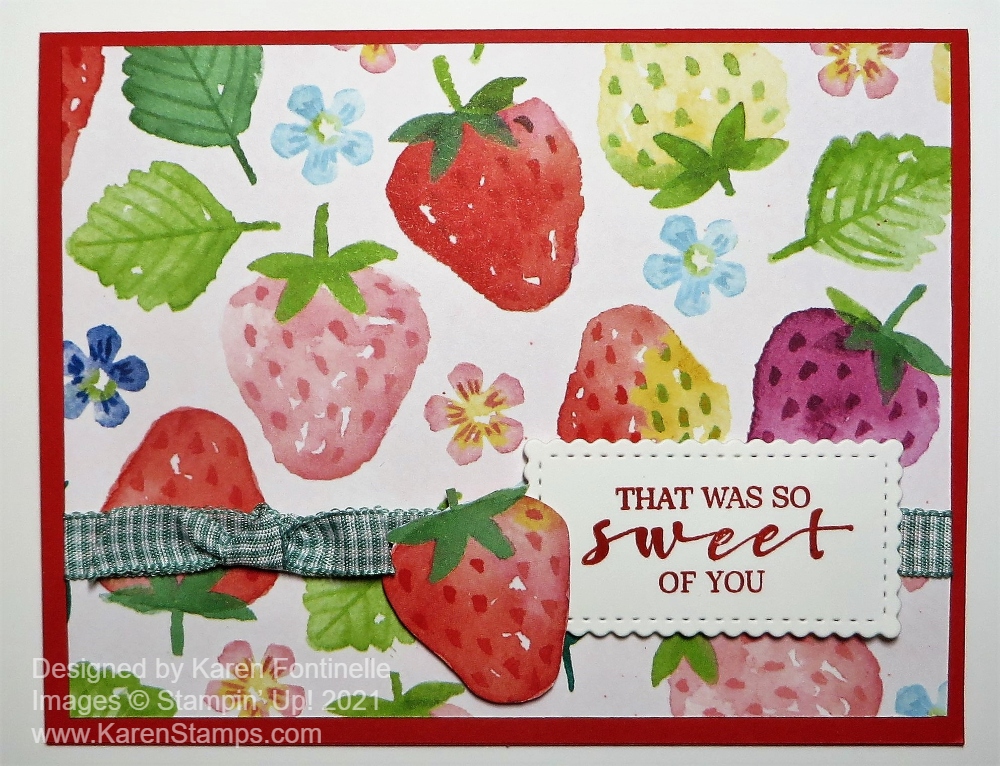
When I saw this particular strawberry paper in the package, I just fell in love and had to make this Berry Delightful Strawberry Card. It just seems to have a lovely watercolored look to it.
This is the last week to earn free products during Sale-A-Bration at Stampin’ Up! Monday, Feb. 28th is the LAST DAY! With every $50 purchase, you can earn a free product in the Sale-A-Bration Brochure. With a $100 you may choose two of the $50 choices or you may choose one of two $100 level choices, with this Berry Blessings Bundle being one of them! Earn the Berry Blessings Stamp Set and the Berry Delightful Designer Series Paper together in one Bundle!
This card is made with a Poppy Parade Cardstock base, with just a layer of the Berry Delightful Designer Series Paper. If you want something to brighten up these winter days, this paper is it! I also love the other side of this paper, as seen in this card I made for Valentine’s Day.
I used the Just Jade Gingham ribbon in the Flowers For Every Season Ribbon Combo Packaround the designer paper before adhering to the card base. The greeting is stamped in Poppy Parade ink from the Berry Blessings Stamp Set and die cut with a scalloped rectangle in the Stitched So Sweetly Dies. I popped it up with Stampin’ Dimensionals.
Since the strawberries on this paper are so pretty I cut one out with Paper Snips and popped it up on the corner of the greeting. Then I tied a little knot with the gingham ribbon. Very easy card and the paper makes it!
Sale-A-Bration is quickly coming to an end so check your Stampin’ Up! shopping list and see what else you need! Don’t forget to stock up on cardstock, adhesives, ribbons, whatever you need to help earn your free products!
It was another cold day in Houston yesterday (although 40 degrees!) and a hard freeze during the night. At least our power has stayed on except for one evening. But instead of winter, I felt the need for a colorful, bright, springtime card! We will soon be back to warmer temperatures here.
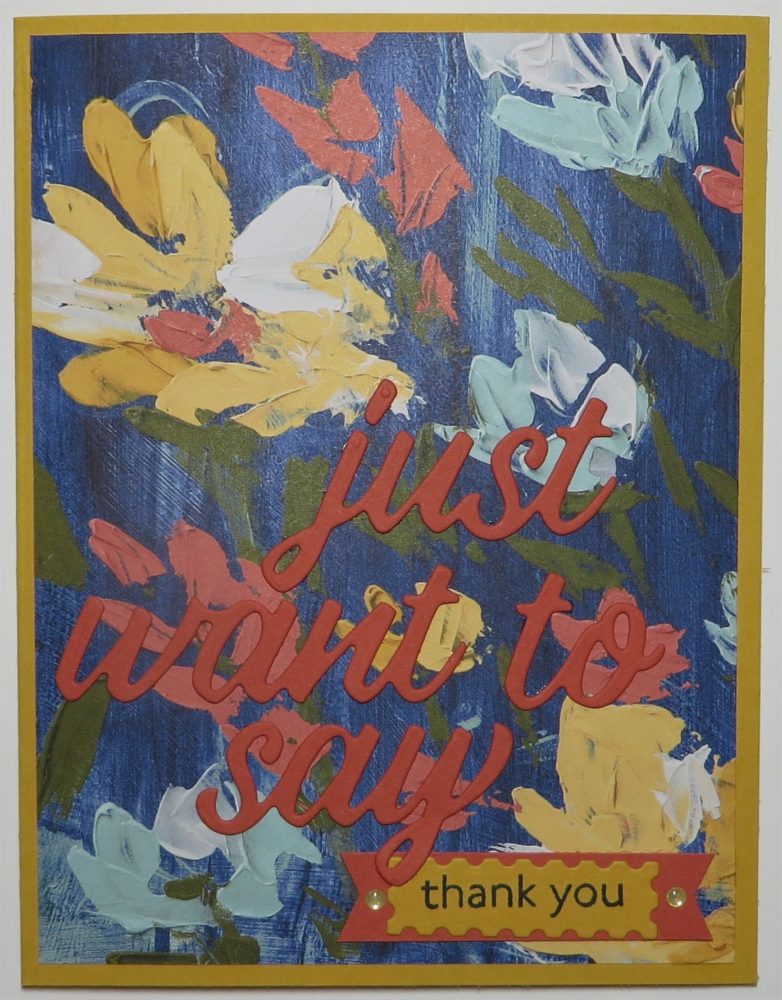
This was actually an easy card to make even though with the die-cut greeting you might think it was harder than it is! The greeting is part of the Floral Gallery Dies. It is all one die but cuts out all the words separately. It would be handy to remember to use the Adhesive Sheets on the piece of cardstock so that when the words were die-cut, they would already have adhesive on the back. I never remember to do that, so I just put teeny tiny drops of the Multipurpose Liquid Glue on the back of the words. The good part of using this liquid glue is there is a little wiggle room to get the piece placed exactly where you want it. Be sure to save the little piece that is the dot above the letter “j” when you die cut. If you lose it, as I did, just put a tiny scrap under that part of the letter and die cut it again or just punch a dot.
The card base is Bumblebee Cardstock with a layer of the dark blue pattern in the Fine Art Floral Designer Series Paper. The die-cut words are Terracotta Tile in the previous In Color collection.
Here is another way to use just one of the die-cut words on a card along with a stamped greeting on this Fine Art Floral Thinking of You Card I made previously.
To finish the greeting, I stamped the words “thank you” in Night of Navy Ink from the Art Gallery Stamp Set on a scrap of Bumblebee Cardstock and cut out with a die in the same Floral Gallery Dies. Then I layered it on a strip of Terracotta Tile Cardstock and just flagged the ends. For a little pizzazz, I added two of the smallest Gold Glitter Enamel Dots.
Get the Art Gallery Stamp Set and Floral Gallery Dies together in the Art Gallery Bundle and save 10%!
All in all a very easy card to make and yet looks impressive! Just think of putting adhesive sheets on the FRONT of the words and then using the Gilded Leafing on the die-cut words! That would be impressive! I may try that! You can’t go wrong using this Fine Art Floral Paper on quick and easy cards like this Fine Art Floral Thank You Card.
With all the snow, ice, and cold weather, not just in Texas but all over the country, I thought it was time to think about spring! Tulips, bunnies, and a basket of eggs – that says spring quite well, I think!
I pulled out the Springtime Joy Stamp Set which is in the Spring Mini Catalog. It’s not part of a Bundle or anything, just a simple stamp set, so don’t miss it! It’s perfect for spring and Easter and other occasions.
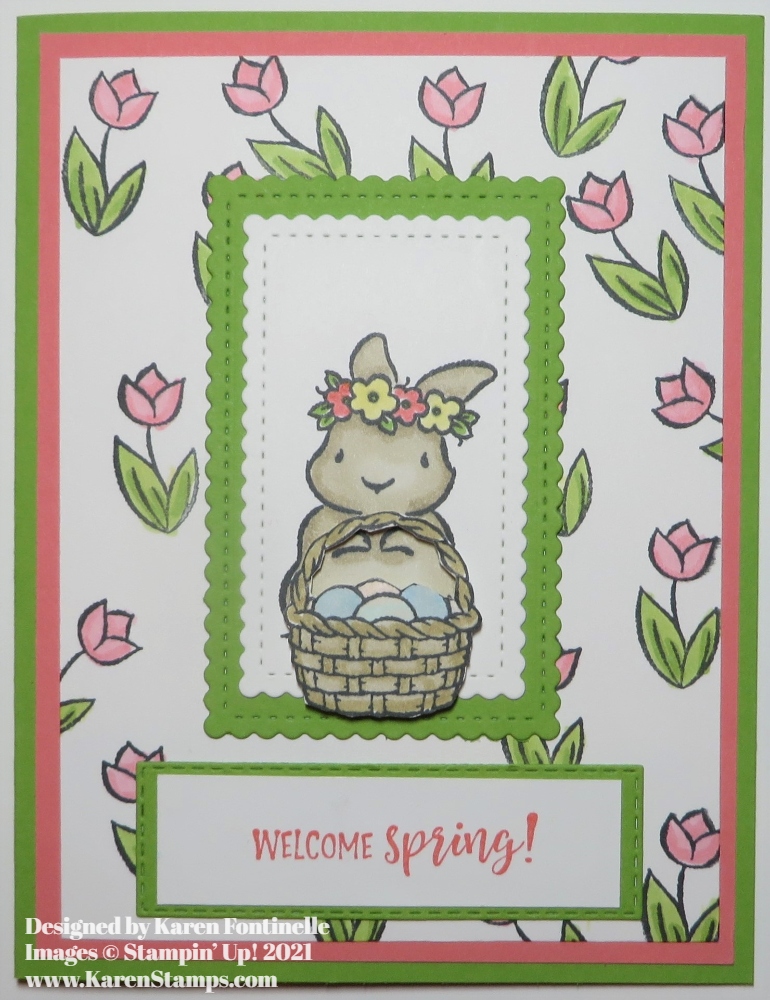
I often like to stamp randomly on the cardstock to make a background myself rather than use designer paper so I stamped all over the background with the tulip stamp in Memento Ink and then colored in the tulips with Stampin’ Blends. I used Flirty Flamingo and Granny Apple Green for the tulips with a bit of Daffodil Delight on the green leaves.
The card base is Granny Apple Green with a Flirty Flamingo layer. The way I made this big color decision was when I pulled out the cardstock, these two colors were right next to each other! I thought it looked springy and bright so used them!
The bunny and the basket were stamped on a piece of Basic White Cardstock. I played around with various dies until I found something that fit around the bunny and could have a layer behind it. I chose these rectangles in the Stitched So Sweetly Dies to cut out the bunny and then to make a Granny Apple Green layer. I cut the basket of eggs out separately with my Paper Snips and popped it up like the bunny is holding the basket. The eggs were colored with Pool Party, Balmy Blue, and a bit of light pink.
The greeting is stamped with the spring sentiment in the Springtime Joy Stamp Set and then layered on a die-cut piece of Granny Apple Green. Here is another way I used the bunny in this stamp set by placing it on a gift bag.
If you purchase this stamp set early, you will have time to use it for spring and Easter, but the darling bunny and lamb could be used for baby cards and projects, also.
Although I found the winter weather we finally had in Houston after several years to be a little exciting and I’m always happy to see snow as long as my family and I are at home, I think we are all reaching our limit with this winter storm with power outages and such low water pressure you barely have water! Usually winter in Houston lasts one day but this one is something else! Time to think about spring! If you are snowed in, maybe it is time to make something for spring similar to this Welcome Spring Bunny Card.
Don’t forget about the cute little boxes you can make easily for some Valentine candy, even at the last minute! Any cardstock or designer paper you have will work, but for Valentine’s Day you might want to use some fancy designer paper!
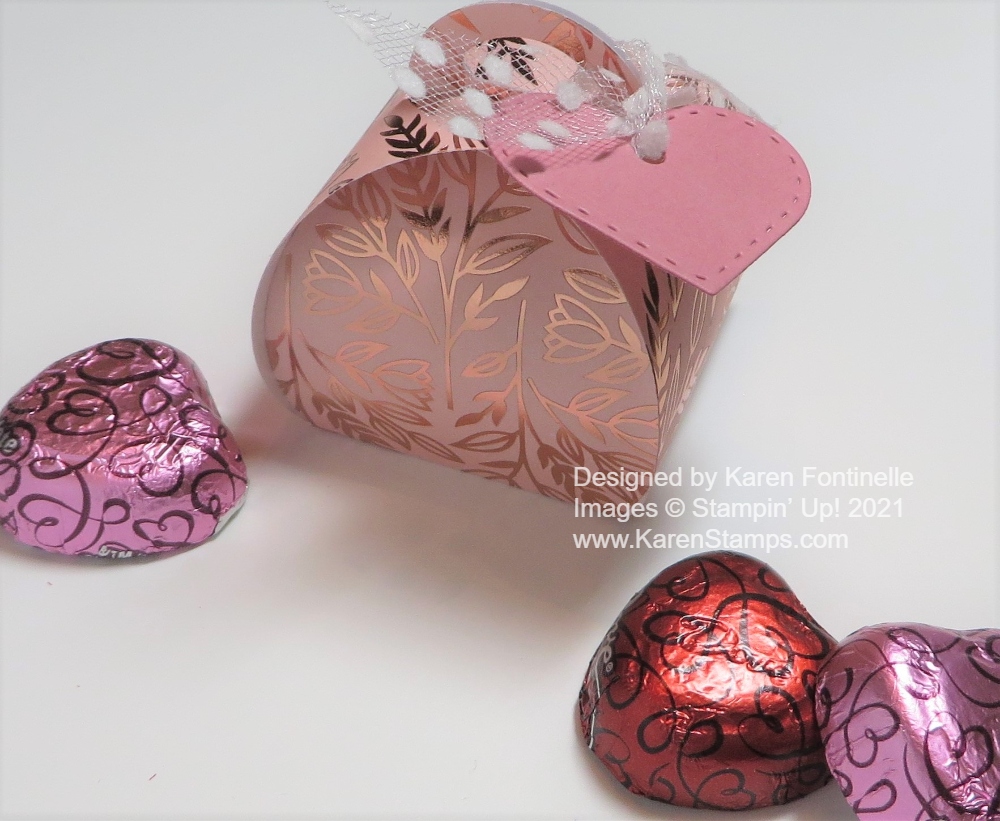
This cute little box is made with the Mini Curvy Keepsakes Box Dies. You just need a piece of 6″ x 6″ paper for the box. Then you can also die-cut a little heart in the same set to tie onto the box. Just cut the paper, fold on the score lines, then assemble. Push down on the two handle pieces and fold over the two slit pieces to hold the box together. Be sure to put your treat in first!
I used the pretty Love You Always Specialty Designer Series Paper with the foil accents. The die-cut heart is Rococo Rose Cardstock. I tied it on with the Whisper White 5/8″ Polka Dot Tulle Ribbon. That’s all there is to it! You could use this little box for Valentine candy or maybe a little table decoration or party favor. You can get very creative with this Mini Curvy Keepsakes Box and make all kinds of creations.
This little Mini Curvy Keepsakes Box For Valentine’s Day matches the card I made with the Love You Always Specialty Paper here in this post! Make a matching set!
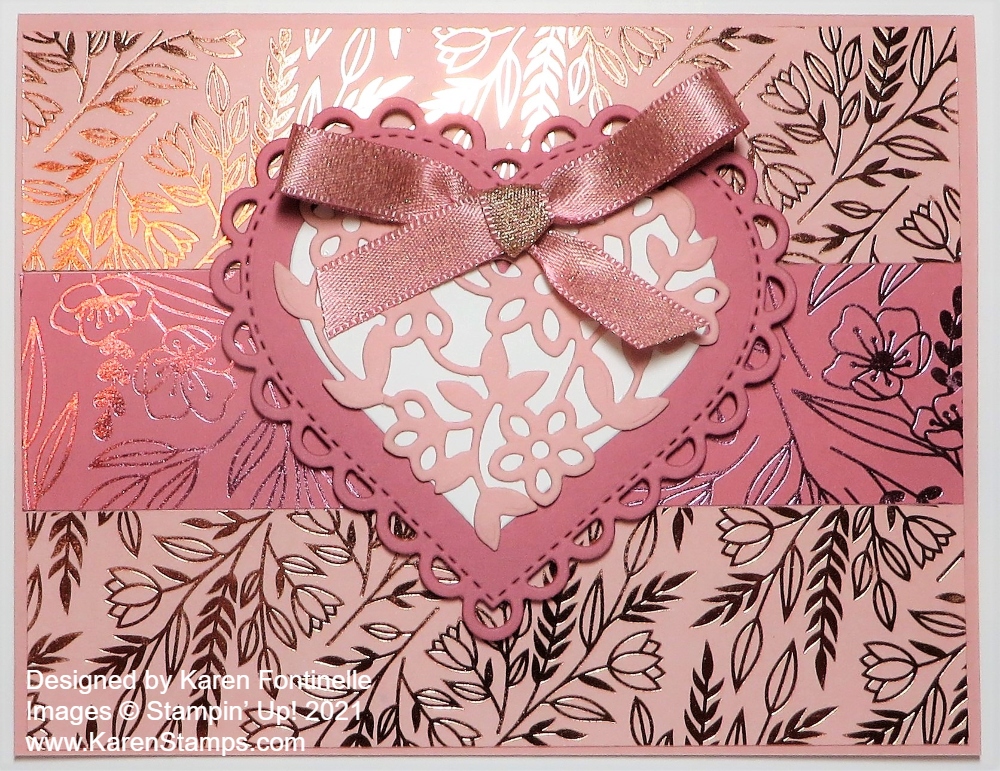
This Love You Always Fancy Heart Card can certainly be for Valentine’s Day tomorrow or it can be for other occasions! I left off a greeting just to show that you can use this card design in multiple ways.
The card base is Blushing Bride because it coordinates with the beautiful designer paper I used on the card. The Love You Always Specialty Designer Series Paper is so pretty on this card. It’s always a little hard to photograph paper that has foil accents as this one does. You always get a little glare! But I think you can see the shine a little bit of the foil.
Can you tell that I used three strips of paper on this card front? I cut two strips from the light Blushing Bride pink paper and then a strip of the Rococo Rose darker pink paper. You can cut the sizes however you like. I have a very narrow margin around the edge of the card. You can cut the strips larger than you want them and then trim down to see what will fit on the card base. These strips were glued right down onto the card base.
The die-cut scalloped heart I just love and is in the Many Hearts Dies. I cut it out of Rococo Rose Cardstock. In the center is a plain die-cut Basic White heart overlaid with the floral heart die in the same set cut out of Blushing Bride. The Basic White behind the floral heart makes it show up against the Rococo Rose heart. I like the way it turned out.
For an embellishment, I tied a bow with the very pretty Blushing Bride 3/8″ Metallic Ribbon and adhered it to the top of the heart with a few Mini Glue Dots. The ribbon has one satin side and one metallic side so you get a little bit of both when you tie a bow!
You can add a greeting to this card, but I thought it looked pretty enough without one. It would make a special Valentine, or a gorgeous engagement, wedding or anniversary card. I always say hearts are for any time so you can get a lot of use out of heart stamps or dies!
If you don’t have contrasting designer paper to use on a card design like this, you can stamp different designs on strips of paper and use it the same way! Maybe this Love You Always Fancy Heart Card will give you an idea of a card to make for Valentine’s Day or some other occasion.
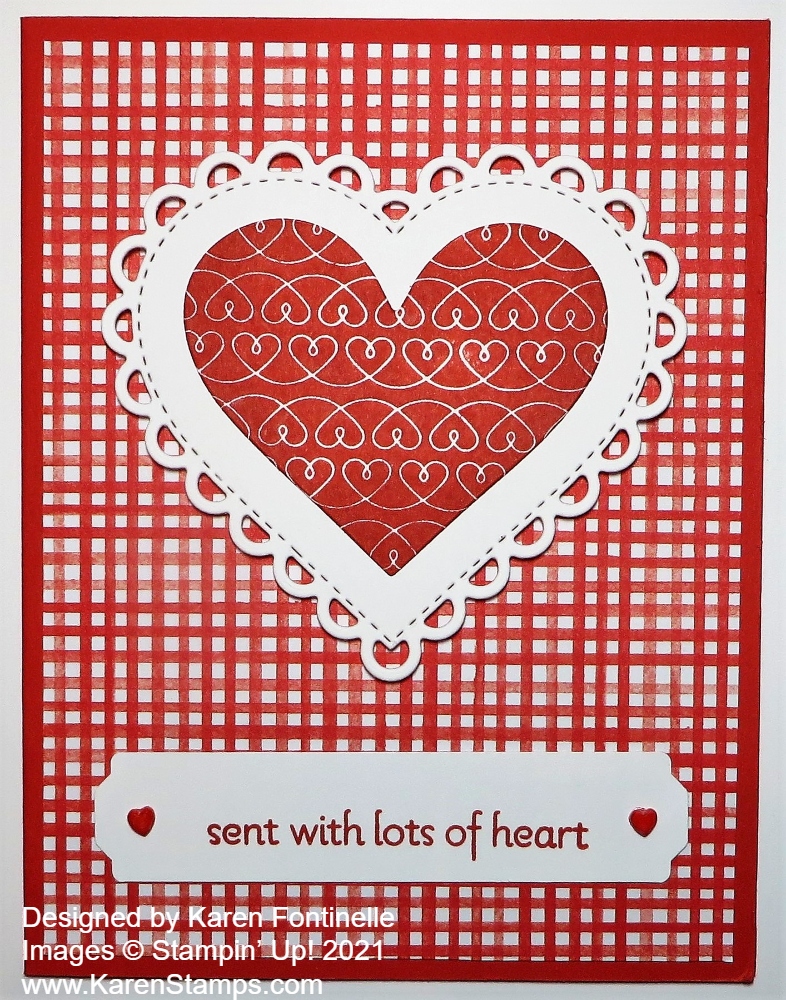
It’s time for making, sending, giving Valentines like this Die-cut Hearts For a Valentine card. I am so happy about this background designer paper on this card! This year we do not have a whole package of “Valentine” paper to use so I looked to see what I could maybe use. You can use this card for other times, not just Valentine’s Day.
Other years at Stampin’ Up! we have maybe had “Valentine” paper that had assorted hearts or a lot of red and white patterns. It wouldn’t HAVE to be for Valentine’s Day but it suggested it. So I looked through my packages of current designer paper and I found this red and white plaid paper in the Sale-A-Bration Berry Delightful Designer Series Paper in the Berry Blessings Bundle! It’s on the opposite side of a beautiful, soft-colored strawberry images. I wouldn’t have even thought to tell you this was a pattern in this package of designer paper, but when I found it, was thrilled to use it on my valentine card! It’s just a different look!
The coordinating color is Poppy Parade so I used that cardstock as a card base with this plaid paper as a layer. I stamped the center heart with Poppy Parade Ink from the Lots of Heart Stamp Set in the Spring Mini. It is just stamped on Basic White and then die cut with one of the Many Hearts Dies. If you want both the stamp set and dies, then get the Lots of Heart Bundle and save 10%! I also die-cut the “fancy” heart from the Many Hearts Dies and layered them. Then the hearts are popped up on Stampin’ Dimensionals.
The greeting, in the same stamp set, is stamped in Poppy Parade Ink and punched with the Lovely Labels Pick A Punch. I just adhered it flat on the card so I could add an embellishment that would not stick up too high for mailing. I wanted to use the Resin Hearts Embellishments, but the colors were white (which wouldn’t show up very well) or red (which might be okay but the rest of the card is Poppy Parade). I decided to try coloring the white hearts Poppy Parade with the Poppy Parade Dark Stampin’ Blends. It worked! I went over it a couple of times and around the sides a little bit. So the next time you want something to be a different color, try coloring with Stampin’ Blends!
Overall, this was an easy card to make for Valentine’s Day because it has hearts or any time because the greeting isn’t just for Valentine’s Day! Hearts can be for any time, also! And I do love the little Resin Hearts!
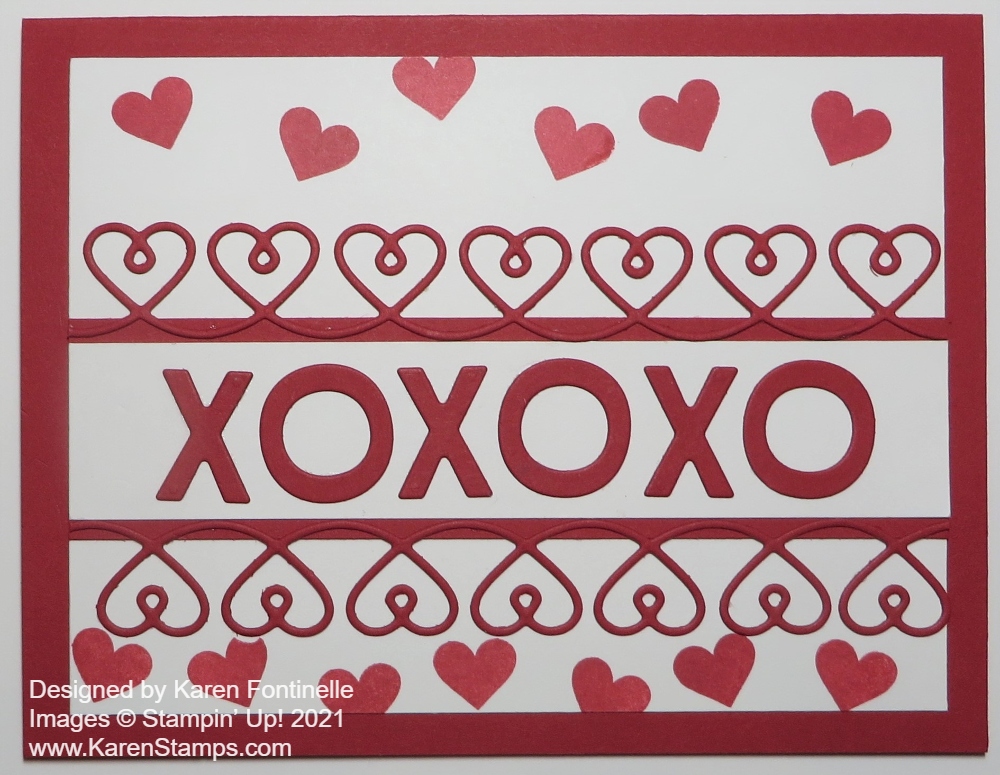
Express your love with some “X’s” and “O’s” plus hearts on a card like this Playful Alphabet Valentine. It requires some die-cutting and a little stamping, but it’s a fun card to make and I’m sure to receive!
The card base is Real Red with a layer of Basic White Cardstock. I cut it a little smaller than normal (5″ x 3 3/4″) to allow more of the Real Red card base to show. I also cut a strip of Basic White (5″ x 1″) layered on a wider strip of Real Red (5″ x 1 1/4″) for the center (or so) of the card on which to layer the X’s and O’s.
I used the Playful Alphabet Dies to cut out the X’s and O’s and adhered them to the Basic White Strip with tiny dots of Multipurpose Liquid Glue. For an extra embellishment, I die-cut two strips of hearts in the Many Hearts Dies.
The little red hearts at the top and bottom of the card are from the Lots of Heart Stamp Set. Normally I might stamp the little hearts randomly on the area where I want them to show, but with the strips of die-cut hearts having open hearts, I didn’t want stamping interfering behind them. I probably should have positioned the center portion of the card better so the hearts at the bottom weren’t so crowded. But I doubt the recipient will be as critical as we are of our own work! We should remember that as we are making and stamping our cards!
That’s all there is to this card. On the inside, you might add a Basic White layer either stamped with a few hearts in the corner or along the top or bottom, or maybe add another X and O for fun! You could just stamp a greeting on the Real Red in black ink, too.
On the front of the card, if you wanted to embellish more, you could add the little Resin Hearts or rhinestones at the beginning and ending of the X’s and O’s. I might have done that, but I also thought maybe the card was busy enough and didn’t need anything extra.
Valentine’s Day is coming soon so take some time to make some valentines for your family or maybe some to mail! Receiving your card might be the only Valentine celebration they have this year! Use this Playful Alphabet Valentine to give you some ideas for making your own valentines today!
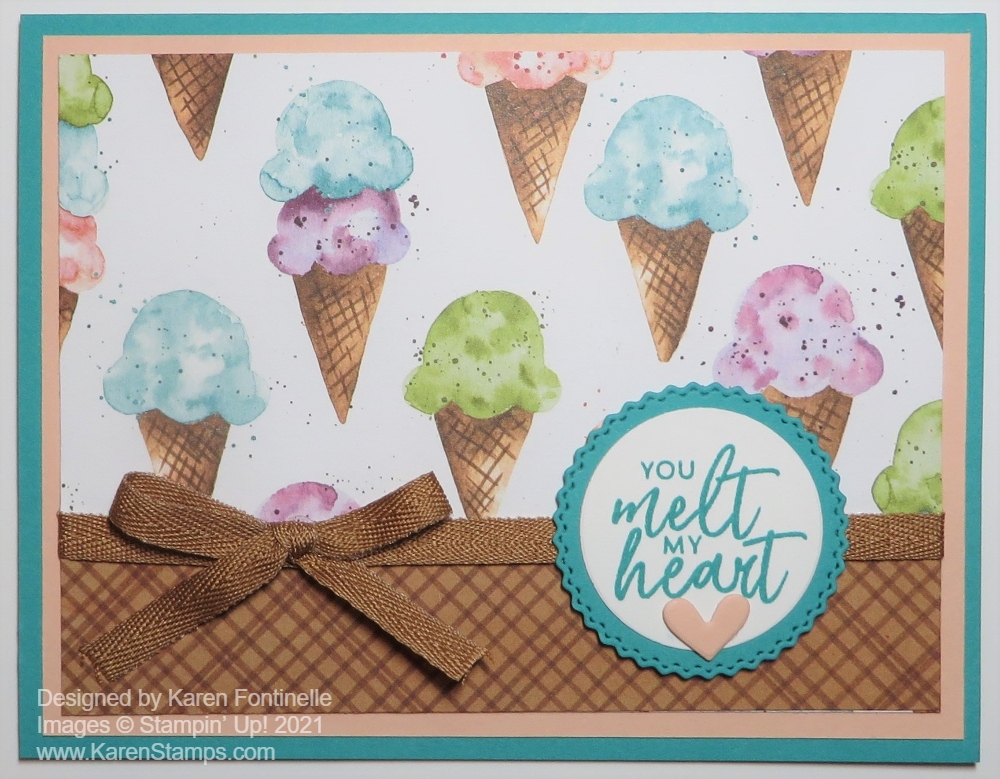
While it is time to be making Valentines and mailing them, this ice cream paper just stole my heart and I had to use it! But with the greeting, I think this Ice Cream Corner Valentine Card could be used as a Valentine! Why not?!
I hadn’t made anything yet with the cute Ice Cream Corner Designer Series Paper and some of the patterns in the package I don’t really care for. But the ice cream patterns are adorable, and then they can be paired with the generic designs as I did here on this card.
There are lots of coordinating colors with this paper so you have a wide choice of colors to use making cards and projects! I chose Bermuda Bay for the card base and a layer of Petal Pink. Once I cut the ice cream cone paper to layer on the card front, the card looked plenty finished and cute as it was! So you could make a very simple card just like that and add a greeting
I also liked the underside of the ice cream cone pattern, which is this cross-hatch paper that looks like an ice cream cone. I cut a narrow strip of it and adhered it over the bottom of the ice cream cone paper, then added some Cinnamon Cider Ribbon and bow over the seam of the two papers.
I originally thought I would have to make this cute card a birthday card, but when I looked at the Sweet Ice Cream Stamp Set and saw the “You Melt My Heart” greeting, I knew that was the one I had to use! I didn’t want it to be too large and take away from the cute ice cream cones in the background, so these dies seemed to work well.
The greeting is stamped in Bermuda Bay Ink on Basic White (the new replacement for Whisper White) and die cut with one of the smaller Layering Circles Dies. This was layered on a Bermuda Bay die-cut (one of my favorite ones!) from the Tasteful Labels Dies and popped up on Stampin’ Dimensionals®.
For a final touch, I die cut some hearts with the Many Hearts Dies. I chose a small one to add just below the greeting to convey a little bit of a valentine feeling or at least “love”. So I think you can use this Ice Cream Corner Paper for a Valentine like this Ice Cream Corner Valentine Card.
What’s in store for this month’s kit? February’s Paper Pumpkin kit—Bouquet of Hope—provides a way to offer comfort, care, and condolences to those enduring life’s challenges. With beautiful blooms and supportive sentiments, theBouquet of Hope Paper Pumpkin Kit will soothe sorrow and share sympathy in a heartfelt, handmade way. While you can create nine cards of comfort and coordinating envelopes with this month’s kit, the kit’s exclusive, versatile stamp set can be used to uplift loved ones during trying times, any time.
These look like they will be beautiful cards to make for many occasions, even if you don’t need a sympathy or comforting card. But it is nice to have those cards on hand because when you need one, you’d like to be able to send a card out quickly.
The Bouquet of Hope Paper Pumpkin Kit provides enough supplies to create nine cards and coordinating envelopes. This soft, sympathetic kit includes patterned card bases, die-cut floral elements, ribbon, embellishments, and more!
Details:
Kit contains enough supplies to create 9 cards—3 each of 3 designs—and coordinating envelopes. Kit includes card bases, decorative die-cut pieces, embellishments, and more.
Card size: 4-1/4″ x 5-1/2″ (10.8 x 14 cm)
Envelope size: 4-1/2″ x 5-3/4″ (11.4 x 14.6 cm)
Coordinating colors: Basic Black, Bumblebee, Just Jade, Merry Merlot, Mossy Meadow, Rococo Rose
The kit’s exclusive Bouquet of Hope Stamp Set features supportive sentiments centered around comfort, care, hope, and love. Such a versatile stamp set can be used throughout the year!
Don’t miss out!! Sign up for Paper Pumpkin today and then you won’t forget!
You have two choices!
Sign up for month by month. Get a kit every month, skip a month now and then, or cancel if it’s not right for you. Click HERE to join Paper Pumpkin.
Buy a Prepaid Subscription in the Stampin’ Up! Online Store! It just goes on a regular order according to how many months you want to purchase! It may help you reach Stampin’ Rewards on your whole order! And keep Sale-A-Bration in mind: 3-month, 6-month, and 12-month subscriptions earn free Sale-A-Bration products! Or add a 1-month subscription to your order to reach $50 for Sale-A-Bration. Stampin’ Up! will send an email with instructions on how to set up your account with the prepaid code. Click HERE to see the Prepaid Subscription page.
This chart may help to explain better!
And once you are a Paper Pumpkin subscriber, if available, you can purchase past kits or refills that you might have missed.
Let me know if you have any questions! Deadline is February 10 and your kit ships out within days after.
Or sign up at this link and add my name as your Demonstrator.
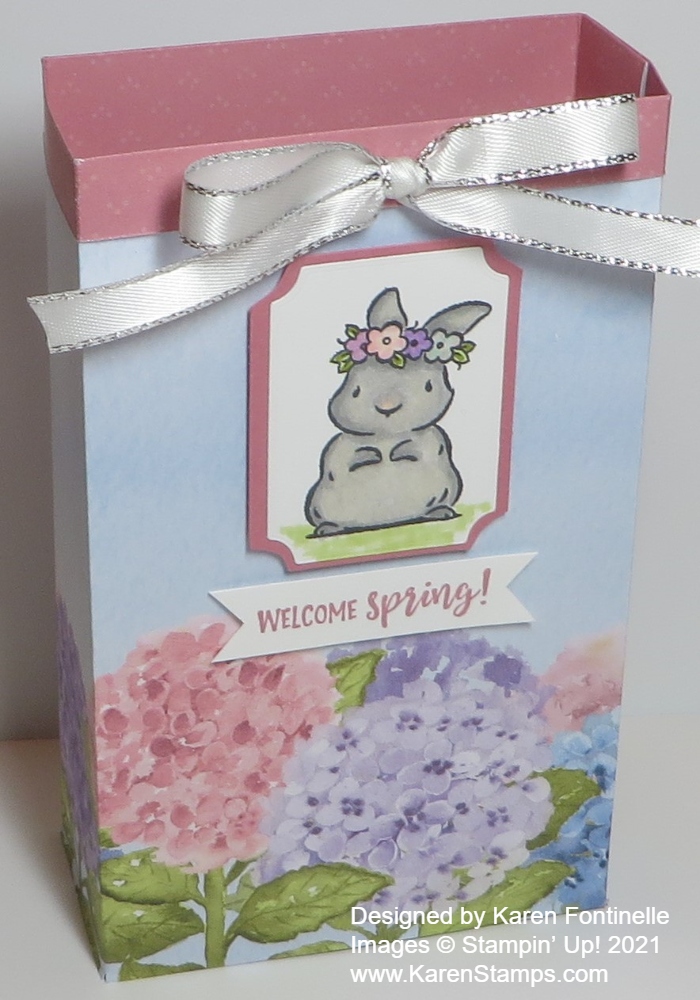
Spring will be coming even though many places are in the midst of a very cold winter right now, so I combined hydrangeas and a bunny for spring in this Springtime Joy Gift Bag. This would be cute for Easter treats or a gift or for Mother’s Day in May or any other time!
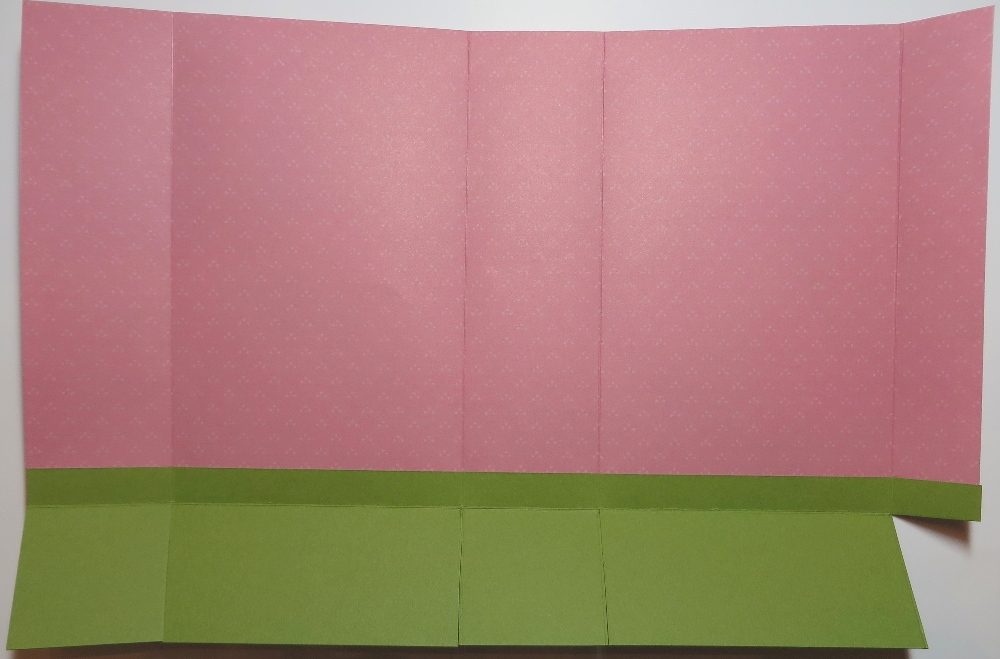
I started off wanting to make this gift bag with the Hydrangea Hill Designer Series Paper just as you see, with the border of hydrangeas at the bottom of the bag with room in the plain area for a greeting or whatever I would come up with. I wanted to use that sheet that has the borders of hydrangeas at the top and bottom. Shortly, I realized that if i scored the paper like normal, most of the hydrangea images would end up at flaps at the bottom of the gift bag! So I had to engineer an extra piece of cardstock at the bottom to make the bottom flaps without cutting into the hydrangeas!
I did a little math and added on a 12″ strip of Old Olive cardstock to the bottom of the hydrangea piece.
To make this gift bag, I cut the designer paper at 6 3/4″ x 12″. Make sure your hydrangeas are where you want them before you cut! The Old Olive piece is 2 1/4″ x 12″. I adhered just 1/2″ of the Old Olive to the designer paper because I wanted 1 3/4″ to be the bottom of the gift bag.
Score the bag and Old Olive piece at 1 3/4″, 5 1/2″, 7 1/4″, and 11″. Then turn the paper and score the Old Olive portion at 1 3/4″ and 8″. This gives a 1/2″ lip at the top of the bag I folded over to show the inside color of the bag for contrast.
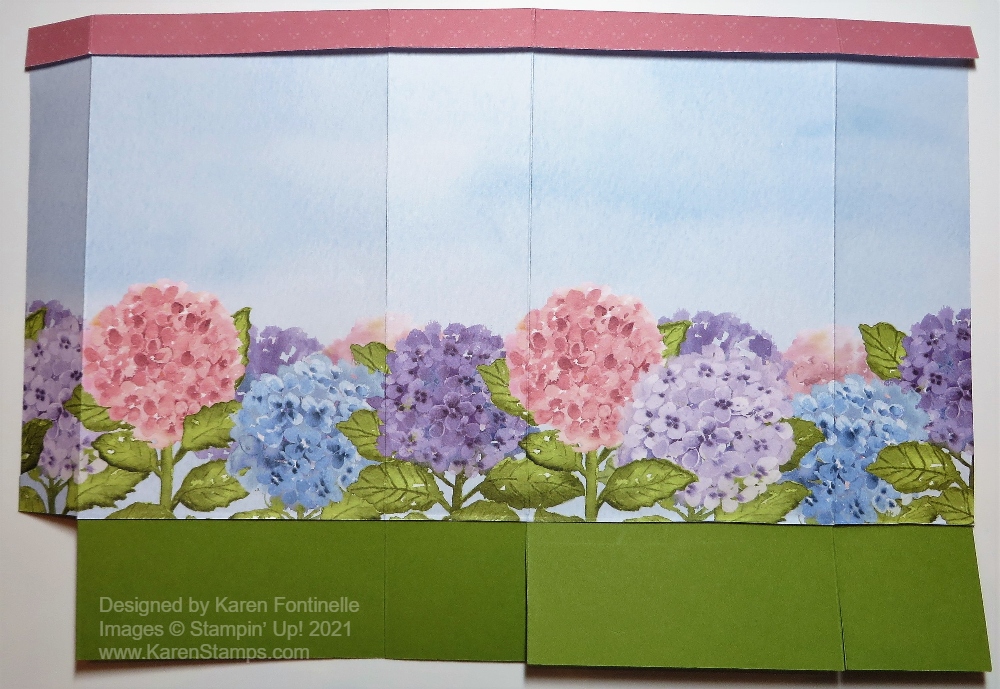
Cut up from the bottom on all the scored lines up to the edge of the designer paper. Normally this would all be the same paper, of course! Then cut off just the little narrow piece of the Old Olive as shown in the photos above.
Next, crease all the score lines, fold and assemble. Put some adhesive on that narrow side about the cut-off piece and fold the other side over to make the seam. Form into a box shape and fold in the flaps at the bottom, applying as much adhesive as you think necessary to close the bottom of the bag. Reach in from the top of the bag with a ruler or bone folder to press down from the inside on those bottom tabs to make sure everything is stuck together well.
Once you have the bag made, you can embellish however you like. You can even punch some holes in the top and tie ribbon through to hold the bag closed. Just pinch in the sides a little to get the top to close. But on my bag, I just tied a separate bow and adhered it with a couple of Mini Glue Dots.
The little bunny is from the cute spring stamp set, Springtime Joy. You’ll find it in the Spring Mini Catalog on page 22. I stamped the little bunny (the lamb was too big!) in Memento Ink and colored in with several Stampin’ Blends markers. For the bunny, I just used the light and dark Smokey Slate plus a little Crumb Cake and then pink and purple flowers for the little crown. I die cut the bunny with a die in the Tasteful Labels Dies. I wanted a layer underneath it so I just cut a Rococo Rose rectangle to fit underneath and with my Paper Snips, cut those curved corners after I adhered the two pieces together. I popped up the bunny with Stampin’ Dimensionals. The greeting is from the same Springtime Joy Stamp Set and stamped in Rococo Rose Ink to match the paper.
I think it’s a cute little bag, a relatively easy gift bag to make. You’ve probably made one just the same way. With the rest of that same sheet of hydrangea paper, check out the cards I made in this post. It would have been nice if the cards fit in the bag, and I could have made them smaller, but I just made regular size cards as a separate project! I can use this little bag as a decoration around Easter time or as a gift! Just think of this Springtime Joy Gift Bag filled with chocolate Easter eggs or a chocolate bunny!
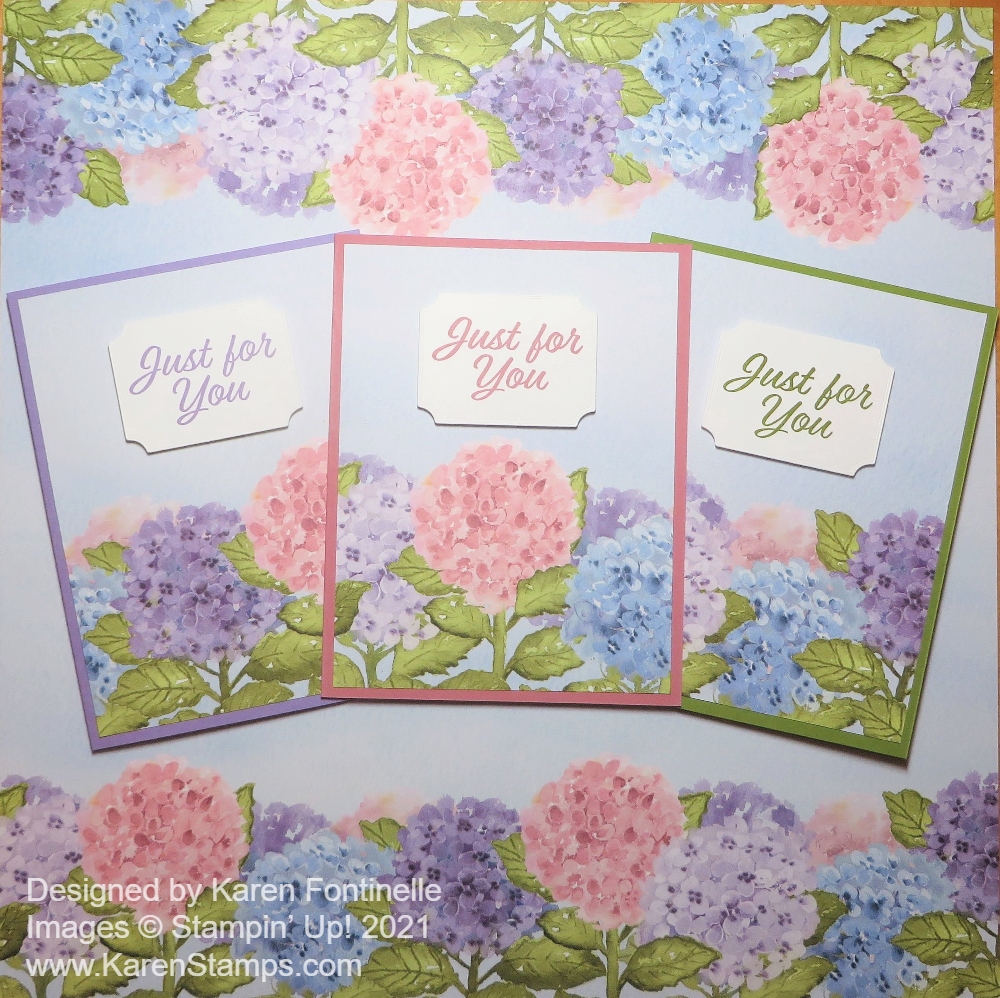
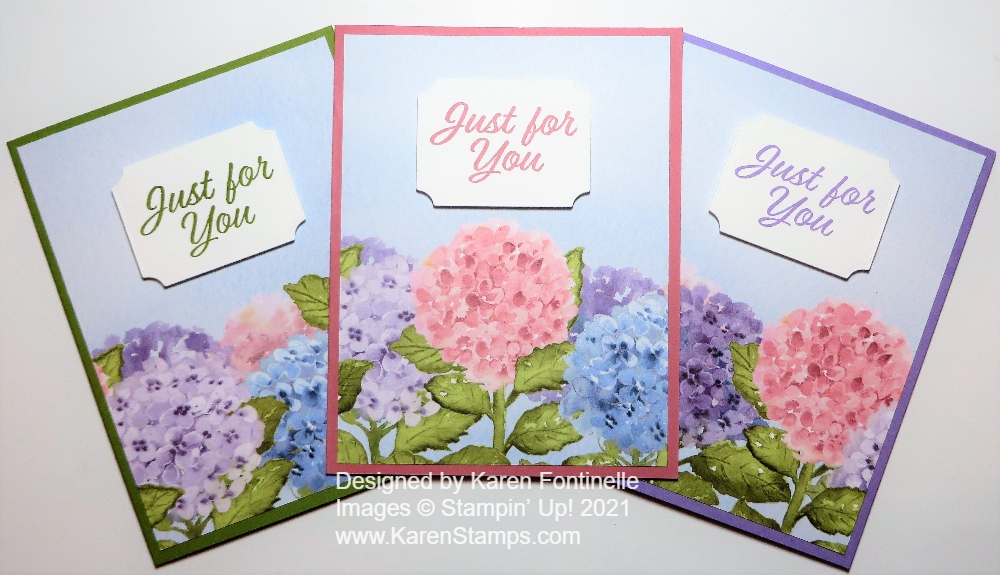
You can’t beat the beauty of the Hydrangea Hill Designer Series Paper as you can see here on these Hydrangea Hill Designer Paper Trio of Just For You Cards, with the designer paper behind them! Besides these three cards, I made something else with the rest of the designer paper that I will show you tomorrow!
This one sheet alone in the package of Hydrangea Hill Designer Series Paper makes the purchase worthwhile! If you are a scrapbooker, just think what a beautiful page you could make by just adding your photos to this already beautiful paper. And if you take a deep breath, shut your eyes, and cut into it, you can make all kinds of beautiful cards and projects with this unusual sheet with the flowers at the top and bottom.
To make these cards, I knew the dimensions of designer paper as a layer on a card base is 5 1/4″ x 4″. I just cut across the DSP at 5 1/4″ with one of the flower edges at the bottom. Make sure you pay attention which way you are placing your paper before you cut! Basically, you will cut off the bottom edge of the paper with the flowers at 5 1/4″ Then cut this 12″ x 5 1/4″ panel into three pieces at 4″ wide each.
For these cards, I used card bases of coordinating colors, such as Highland Heather, Rococo Rose, and Old Olive. Then I stamped the greeting in the matching ink color. The greeting is from the Meant To Be Stamp Set, which is in the Annual Catalog. Next, I used the die in the Tasteful Labels Dies to cut out the greeting and popped it up with Stampin’ Dimensionals. That’s all there is to these cards! You could add some little jewels or embellishments, but basically, I wanted to keep the cards simple with such pretty paper.
The Hydrangea Hill Paper is so pretty you can just use it and a greeting to make a card! It will be hard to cut into your designer paper, but after you do, you will make something even more beautiful than the paper itself. Then send your lovely card off to someone who will certainly appreciate hearing from you!