Category Archives: Wedding

Creativity Now Splendid Thoughts New Life Together Card

Creativity Now Splendid Thoughts New Life Together Card

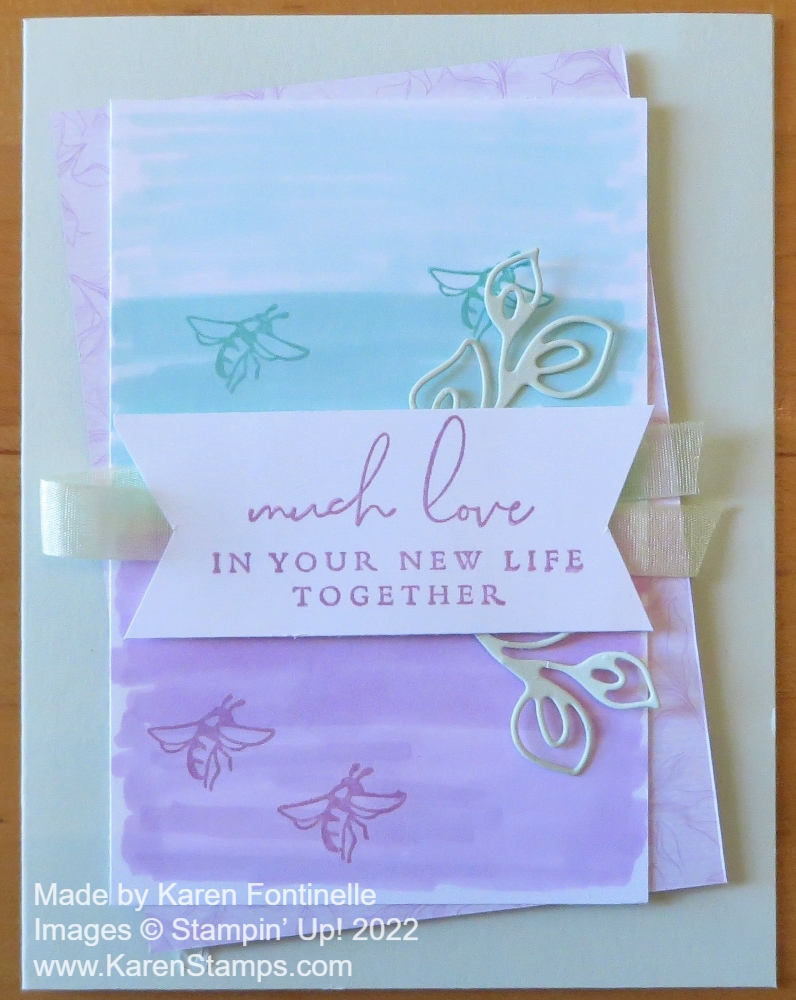
Last month Stampin’ Up! offered a virtual event for Demonstrators called “Creativity Now”. It was all stamping, no business, as they said. Just a gathering of Demonstrators from all over, stamping together following different presenters making several cards plus a couple of interviews with designers talking about the Splendid Day Suite and the Sweetest Christmas Suite. I always love “behind the scenes” information! I didn’t get to watch and stamp live last month but I did get to catch up and watch the recording and make most of the cards. This card, Creativity Now Splendid Thoughts New Life Together Card, is the first one that was shown.

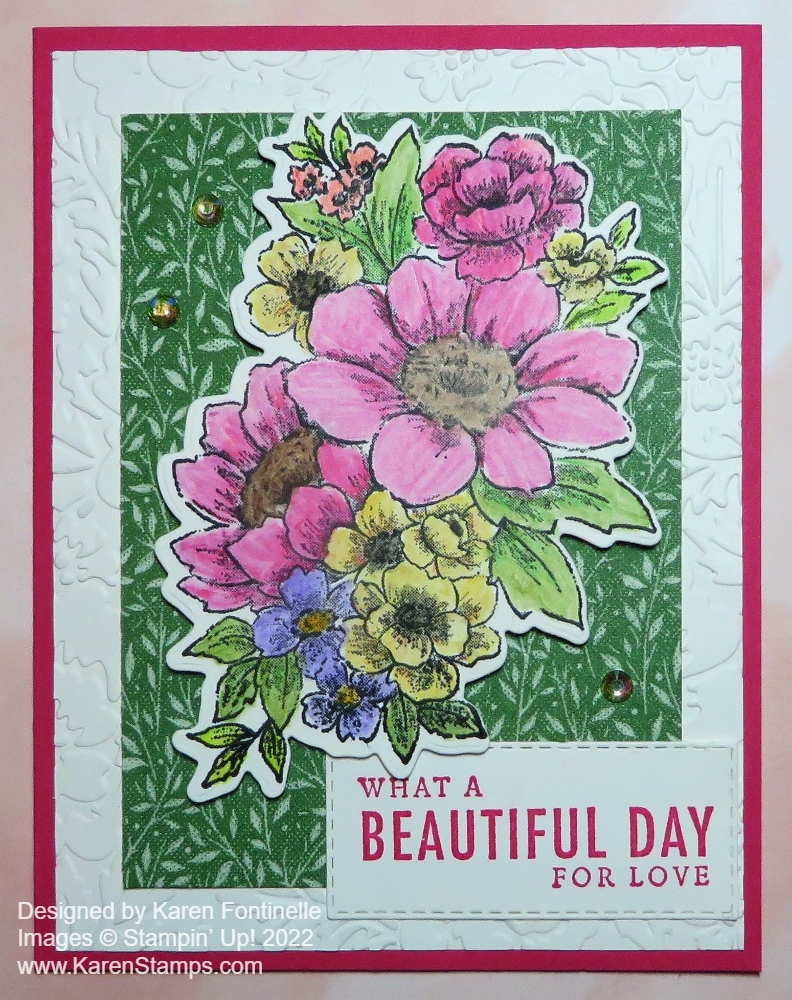
This card sort of fits into “Watercolor Month”. Although it’s not really watercolored, it has that look in the background made with Stampin’ Blends markers rather than true watercoloring. The card base is Soft Sea Foam cardstock with a layer of Basic White cardstock and a piece of the Splendid Day Specialty Designer Series Paper. We started with the Basic White piece on which we “scribbled” light and dark colors of Pool Party and Fresh Freesia Stampin’ Blends markers. The top half of the Basic White is colored with the Light Pool Party and the bottom half (not quite out to all the edges) with Light Fresh Freesia. Then halfway down the Light Pool Party, it is colored with Dark Pool Party down to the Fresh Freesia. Likewise, the Light Fresh Freesia is half-colored with Dark Fresh Freesia. We were told just to scribble back and forth and you could do this as solidly or less solidly as you liked. If you wanted to, you could have used water and ink to achieve the same look. Just be cautious on Basic White so that you don’t get too much water.

After coloring the bands of color on the Basic White piece, we stamped the bee in the stamp set a couple of times, randomly, in upper and lower halves both in Pool Party ink and Fresh Freesia ink.

The greeting is stamped with one from the Splendid Thoughts Stamp Set in Fresh Freesia ink on a piece of Basic White, then the ends were “flagged” with Paper Snips. On the back of this sentiment piece, an 8″ piece of Soft Sea Foam Ribbon is folded in half and adhered to the back with a loop on the left side and the ribbon tails hanging out on the right side. The ribbon can be secured with Stampin’ Dimensionals.

We also used the Splendid Stems Dies to die cut two of the leafy stems in Soft Sea Foam. These are adhered to the back of the greeting, top and bottom, using Mini Glue Dots. This greeting piece is adhered to the center of the Basic White piece. Then this Basic White piece is adhered, at an angle, to a piece of the Splendid Day Specialty Designer Series Paper. We used the Fresh Freesia print side of one of the patterns, not the foil side. Then this layered piece is adhered to the card base popped up on Stampin’ Dimensionals. It is adhered at an angle. The presenter said she tried to place it so that the Basic White top piece is straight and then the designer paper underneath is angled slightly. You can do that or have it all straight as we usually do it.

You can take this idea and change it up a bit. Add a different greeting, different diecuts, color in the background with true watercoloring or different colors or even blocks of cardstock, stamp a random design on the card base, add some bling! So many possibilities, yet this card is soft and beautiful just as it is. It could be an engagement or wedding card or change the greeting for another occasion. This design idea is very versatile.

I think this Splendid Day Suite is kind of a sleeper in the Holiday Mini Catalog that might be overlooked. The designer paper is just gorgeous and the coordinating colors make for soft, colorful, and even relaxing impressions. There are lots of choices in the stamps and dies for leafy stems or stamped images. Be sure to check out the Splendid Thoughts Bundle for a savings of 10% if you want both the stamp set and dies. If you also want the designer paper and embellishments of Soft Sea Foam Ribbon and Open Leaf Trinkets, then just order the whole Suite!

Shop Stampin’ Up! Here!

Blessings of Home Floral Bouquet Valentine

Blessing of Home Floral Bouquet Valentine

Although this card has the title of Blessings of Home Floral Bouquet Valentine, it could be a valentine but it could be a wedding card, anniversary card, or engagement card. Change the greeting for a birthday or “thinking of you” card. Flowers can be for almost anything!

I actually wanted to make a card that could be a valentine without hearts like all the other ones I made. I chose this bouquet stamp in the Blessings of Home Stamp Set in the Spring Mini Catalog. I used my Stamparatus to stamp the image on Basic White because I wanted to make sure I got a good impression. As it turned out, it was okay but I re-stamped it which was easy to do with the Stamparatus just to make it a tiny bit darker.

I looked through the Heart & Home Designer Series Paper and decided on this green leafy background which I thought would look good against the bouquet of flowers. The card base turned out to be Melon Mambo cardstock after I colored the flowers. The first layer on the card base is Basic White embossed with the Pretty Flowers Embossing Folder. The designer paper is cut smaller so the embossing shows at least a little bit around the margins.

Can you guess what the flowers are colored with? Almost always I use Stampin’ Blends Markers, but I was in the mood for something different and tried the Watercolor Pencils! We have two different packages of Watercolor Pencils. I used some colors from both boxes. When you color with Watercolor Pencils, you likely will want to use a Blender Pen to smooth and blend the colors. You can actually just kind of scribble in some color and then use the Blender Pen, which is moist, to move the color around and smooth it out. You can’t work it too much or you will rub and moisten the Basic White paper too much. Just a light and quick touch are all you need. Watercolor Pencils always take me back to my early days in Stampin’ Up! when we used Watercolor Pencils a lot and I loved using them with the Blender Pen! Now we have more things for coloring and I think they get forgotten, but they are fun and easy to use.

Stampin' Up! Watercolor Pencils

The whole flower bouquet was die cut with one of the Flowers of Home Dies. You can purchase the stamp set and dies together in the Blessings of Home Bundle and save 10%.

The greeting is stamped in Melon Mambo ink and is from a stamp in the Blessings of Home Stamp Set. It is die cut with one of the Rectangle Stitched Dies. It fits just underneath the floral bouquet, which is popped up on Stampin’ Dimensionals®. For a little sparkle, I adhered three Iridescent Rhinestone Basic Jewels.

Whether you use this card for a Valentine or some other occasion, using the Blessings of Home Stamp Set will guarantee you a pretty card!

Stampin’ Up! Online Store HERE!

Last Day: Kisses and Hugs Paper Pumpkin Kit

Last Day Today to Subscribe to Paper Pumpkin For This

January 2022 Kisses & Hugs Kit!

We all know that roses are red and violets are blue—it’s time that love-themed cards got an upgrade! The Kisses & Hugs Paper Pumpkin Kit will help you express that forever kind of love with heart-shaped cards that would make Cupid jealous.

The Kisses & Hugs kit is not bound to just Valentine’s Day, it works for all love occasions year-round like anniversaries, weddings, birthdays, or those “just because” days.

Last day to sign up:  January 10, 2022.

ABOUT THE KIT
Name: Kisses & Hugs (160148)

Details:

  • Kit contains enough supplies to create 10 cards—5 each of 2 designs—and 10 coordinating envelopes
  • Kit features an exclusive Two-Step photopolymer stamp set
  • Kit includes a Gray Granite Classic Stampin’ Spot
  • Card size: 4-1/2″ x 4-1/4″ (11.4 x 10.8 cm) heart-shaped cards; folded
  • Coordinating colors: Blushing Bride, Flirty Flamingo, Gray Granite, Very Vanilla

ADD-ON
Name: Kisses & Hugs Mini Treat Boxes (160147) $10.00 USD

Details:

  • Contains 20 mini treat boxes and 20 heart tags
  • Gold cord: 10-1/2″ yards (9.6 m)
  • Finished size: 1-3/4″ x 1-3/4″ x 1-3/4″ (4.4 x 4.4 x 4.4 cm)
  • Printed with gold foil
  • These coordinated treat boxes are not included in this month’s kit and are only available for purchase separately as an add-on online starting 25 January. You must be a Paper Pumpkin subscriber to purchase and they are only available while supplies last.

NOTE: Unfortunately, the ongoing international shipping issues and delays have impacted our January Paper Pumpkin kit and some of the components needed to finalize assembly are not going to arrive on time. They are in transit, and we’ve done what we can to help the components ship and arrive faster. Despite our efforts, billing and shipping for the January kit will be delayed. We anticipate that we’ll be able to ship the kits out before the end of the month and still in plenty of time to prepare your projects for Valentine’s Day as anticipated.

SIGN UP FOR PAPER PUMPKIN NOW!

Kisses and Hugs for the January Paper Pumpkin Kit

Paper Pumpkin BANNER1_KISSESHUGS_JANPP

We all know that roses are red and violets are blue—it’s time that love-themed cards got an upgrade! The Kisses & Hugs Paper Pumpkin Kit will help you express that forever kind of love with heart-shaped cards that would make Cupid jealous.

The Kisses & Hugs kit is not bound to just Valentine’s Day, it works for all love occasions year-round like anniversaries, weddings, birthdays, or those “just because” days.

ABOUT THE KIT
Name: Kisses & Hugs (160148)

Details:

  • Kit contains enough supplies to create 10 cards—5 each of 2 designs—and 10 coordinating envelopes
  • Kit features an exclusive Two-Step photopolymer stamp set
  • Kit includes a Gray Granite Classic Stampin’ Spot
  • Card size: 4-1/2″ x 4-1/4″ (11.4 x 10.8 cm) heart-shaped cards; folded
  • Coordinating colors: Blushing Bride, Flirty Flamingo, Gray Granite, Very Vanilla

ADD-ON
Name: Kisses & Hugs Mini Treat Boxes (160147) $10.00 USD

Details:

  • Contains 20 mini treat boxes and 20 heart tags
  • Gold cord: 10-1/2″ yards (9.6 m)
  • Finished size: 1-3/4″ x 1-3/4″ x 1-3/4″ (4.4 x 4.4 x 4.4 cm)
  • Printed with gold foil
  • These coordinated treat boxes are not included in this month’s kit and are only available for purchase separately as an add-on online starting 25 January. You must be a Paper Pumpkin subscriber to purchase and they are only available while supplies last.

SIGN UP FOR PAPER PUMPKIN NOW!

Expressions In Ink Wedding Anniversary Card

Expressions In Ink Wedding Anniversary Card

If you want to make a truly beautiful card, just start with the Expressions In Ink Specialty Designer Series Paper, as I did with this Expressions In Ink Wedding Anniversary Card. I use the word “beautiful” not to brag about my card and not to just toss the term out there as an adjective describing a card. I think this designer paper is some of the most beautiful we have ever had.

The floral patterns and colors in this Expressions In Ink Paper are pretty enough themselves, then add the kind of alcohol ink look or watercolor look to the patterns, plus the gold foiling, and it is over the top! If you want to make a really simple card, just adhere a layer of this designer paper to the front of the card base, add a greeting, maybe a bit of ribbon if you like, and you are done!

This anniversary card was specially made for my daughter and son-in-law for their wedding anniversary. The card base is Mint Macaron (I think!). You can test which color you would like to use with this paper! Now this paper has a lot of white space throughout the 12″ x 12″ paper. I particularly wanted a lot of the blues and greens on this card and not so much the white, so I had to cut into the paper at the right portion to get the look I wanted.

The greeting is stamped in Just Jade Ink and is in the Forever Fern Stamp Set. I thought it was a good sentiment for an anniversary card and especially for this couple! Then the greeting was diecut with one of the Stitched Rectangle Dies.

Just for a little interest, there is a strip of a gold striped pattern in this designer paper at the bottom of the card. It just adds a little “something” to catch your eye.

I also added some gold foil leaves and foliage in the Expressions In Ink Ephemera Pack. Some I cut apart to get everything where I wanted it! I just tucked those in above and below the greeting. I didn’t want anything to interfere with the colors of the paper in the top area of the card. And of course, I added a little bling to the sides of the greeting. You can use whatever gems or jewels you like! Or place some around on the card. Whatever makes you happy!

Even in the midst of the beginning of the holiday season, don’t forget this beautiful Expressions in Ink Designer Paper! You still will need some “regular” cards like this Expressions In Ink Wedding Anniversary Card so make some cards using this pretty paper for birthdays, anniversaries, sympathy, thinking of you, any occasion you want.

SHOP STAMPIN’ UP! ONLINE HERE!

Golden 50th Anniversary Card

Golden 50th Anniversary Card

This Golden 50th Anniversary Card is one I just made recently although with some retired products. I don’t usually use retired products on my blog posts, but I’m starting to find that hopefully, I will be needing some 50th wedding anniversary cards coming up in the near future so I thought maybe some of you will be, too!

One of my favorite family memories is of my grandparents’ 50th wedding anniversary and the surprise party my mother threw for them! My other grandparents didn’t make it that long so that was bittersweet. My mother wasn’t necessarily planning to do anything like a party for her parents until their next-door neighbor said she “had” to have a party for them! Relatives and friends came from out of town from all over! My grandma’s sister and her husband came ahead of time, as if they were just visiting, so she could be in place at my grandparents’ house. Another long-time family friend came from Kansas City and stayed at our house. She made really good fried chicken, I remember! The day before the party, my grandpa drove over to our house with his visiting brother-in-law to stop in! This lady had to go hide down in the basement, but then my grandpa and uncle went down in the basement for some reason so she had to hide in the bathroom and hoped they wouldn’t come in there!

On Sunday everyone showed up to surprise my grandparents at their house! It was such a fun party with relatives, friends, and neighbors! I thought my brother and I shouldn’t have to go to school on Monday because we were at this party all afternoon and evening on Sunday, but my mother sent us! Now my brother and I have some of the Golden Anniversary gifts that our grandparents received as remembrances.

Recently my sister-in-law and her husband celebrated 50 years of marriage! This is the card I sent them. You wouldn’t have to use all gold, of course, but why not?! The card base is Basic White with a layer of Basic White. Then there is a layer of Gold Foil with another layer of Basic White. The Basic White is covered by a piece of the retired Golden Garden Designer Specialty Acetate from the Spring Mini 2021 Catalog in the Fine Art Floral Suite. To the side of the acetate is a gold striped piece of designer paper from the Expressions In Ink Specialty Designer Series Paper. I covered the seam with a piece of Gold 3/8″ Shimmer Ribbon.

The numerals are made from the retired Large Numbers Framelits and cut from Gold Foil. The “50” is layered on a die cut circle of Basic White and layered on a scalloped circle of Gold Foil. That is all layered on top of a die cut from the Tasteful Labels Dies.

The “Congratulations” is embossed with Gold Embossing Powder and cut by hand to fit the gold layer. It is in the Hand-Drawn Blooms Stamp Set. I used the dies in the Banner Blooms Dies, just the banner in the bouquet, for that gold foil layer behind the greeting. Probably had to trim it by hand also!

And that’s all! Sounds complicated to write up, but if you copied it, it wouldn’t be that hard because you would already have the design. It’s pretty amazing when a couple celebrates their 50th golden wedding anniversary so they deserve a special card! Maybe you should look ahead and see if any family or friends of yours are coming up on that special milestone and think about a special card you can make, like this Golden 50th Anniversary Card!

Love You Always Fancy Heart Card

Love You Always Fancy Heart Card

This Love You Always Fancy Heart Card can certainly be for Valentine’s Day tomorrow or it can be for other occasions! I left off a greeting just to show that you can use this card design in multiple ways.

The card base is Blushing Bride because it coordinates with the beautiful designer paper I used on the card. The Love You Always Specialty Designer Series Paper is so pretty on this card. It’s always a little hard to photograph paper that has foil accents as this one does. You always get a little glare! But I think you can see the shine a little bit of the foil.

Can you tell that I used three strips of paper on this card front? I cut two strips from the light Blushing Bride pink paper and then a strip of the Rococo Rose darker pink paper. You can cut the sizes however you like. I have a very narrow margin around the edge of the card. You can cut the strips larger than you want them and then trim down to see what will fit on the card base. These strips were glued right down onto the card base.

The die-cut scalloped heart I just love and is in the Many Hearts Dies. I cut it out of Rococo Rose Cardstock. In the center is a plain die-cut Basic White heart overlaid with the floral heart die in the same set cut out of Blushing Bride. The Basic White behind the floral heart makes it show up against the Rococo Rose heart. I like the way it turned out.

For an embellishment, I tied a bow with the very pretty Blushing Bride 3/8″ Metallic Ribbon and adhered it to the top of the heart with a few Mini Glue Dots. The ribbon has one satin side and one metallic side so you get a little bit of both when you tie a bow!

You can add a greeting to this card, but I thought it looked pretty enough without one. It would make a special Valentine, or a gorgeous engagement, wedding or anniversary card. I always say hearts are for any time so you can get a lot of use out of heart stamps or dies!

If you don’t have contrasting designer paper to use on a card design like this, you can stamp different designs on strips of paper and use it the same way! Maybe this Love You Always Fancy Heart Card will give you an idea of a card to make for Valentine’s Day or some other occasion.

SHOP STAMPIN’ UP! ONLINE!

The Under My Umbrella Bundle Perfect For Spring!

I don’t own this Under My Umbrella Bundle in the Occasions Mini Catalog, but of course, I wish I did! This Bundle will be perfect for spring (even if you have snow outside and can’t image spring!) with it’s flowers, rain boots, and umbrella images. Besides a “rain-themed” card you could make with an umbrella, as they show in the video you can turn the umbrella upside down and fill it with flowers for a happy card. Just think of how you could use it for wedding or baby showers, too!

And now, whether you have the Under My Umbrella Bundle or not, or want to order it, be sure to check out the Pleased As Punch Designer Series Paper, offered as one of the Coordination Products just released earlier this month! Looks very cute and has a long list of coordinating colors! While supplies last!

Pleased As Punch Designer Series Paper

SHOP STAMPIN’ UP! HERE!

It’s Not Just Super Bowl Sunday….It’s February 2nd!

Super Bowl 2017 Card With Punch Art Football Helmets

Yes, it is Super Bowl Sunday today, February 2nd, and all that that entails! Parties, food, neighbors, drinks, food, and more food. If all goes well, I’m planning to make a yummy salad I made first at Christmas and some Ham & Swiss Sliders that I read about that sound good to take to our neighbor’s annual party. It’s always fun to see current and past neighbors and watch the commercials and half-time show on a big screen TV….oh, and the football game.

It’s not just Super Bowl Sunday, though! It’s also Groundhog Day! It’s the day the nation watches Punxsutawney Phil to see whether or not he sees his shadow when he comes out of his hole so we know if we’ll have six more weeks of winter or not. It’s pretty hard in Houston to know if we’re having winter or spring so what the groundhog does isn’t really of interest to me. You can read about Groundhog Day HERE.

Groundhog Day

But there are two things that are interesting to me on this Super Bowl Sunday, or rather February 2nd. Back during my second year of college, February 2nd was the day after my dear friend/college roommate’s birthday but since her birthday was on a Thursday many, many, many, many years ago, she and her boyfriend waited until Friday night to go out to dinner to celebrate. He proposed to her and when I came back to our dorm room late that night, she told me she was engaged!

That led to a “candlelight” ceremony on our dorm floor. We would put a note under the door of the RA on the floor and she would put up a sign announcing there would be a candlelight ceremony that night, and at the appointed time ( we used to have to all be back in the dorm by a certain hour back in the day!) everyone gathered in a circle on the floor in the hall, all of us singing a song, passing a candle around until the girl who secretly got engaged blew it out and then got tossed in the shower or some such thing! I had news for her, too, about my evening, but not as exciting as a diamond ring!

That same February 2nd, I had been out for the evening, too. The girls in the suite next to mine asked me to go to the mall with them that evening and I said yes. When my RA heard that, she said no, I was supposed to go to this party with her at her friend’s apartment that she had been talking about for weeks where some boys she and her friend had met at some festival were coming to visit. So I went to the party.

These boys were pretty late getting there, I was wondering if they would ever show up, but when they did my life changed because I met my husband! He had a nice smile and looked a lot like a boy who was a family friend. He was only there because he was the one with a car that night so they drove two hours down the interstate to this party. He had two flat tires but they made it! We chatted the rest of the evening and then he walked me back to the dorm, where I think he scribbled down my address on a scrap of paper.

I went straight to another friend’s room who had gone to the same high school as this boy and we found his photo in her yearbook! I think a few days later I got a letter from him and then a valentine and that was the beginning of two shoeboxes full of letters (and maybe a few expensive long-distance phone calls) over several years until we finally got married!

All this to say, Super Bowl Sunday may be February 2, 2020, and it may be Groundhog Day, but for me, it’s about something else! But enjoy the game and all the fun!

Super Bowl 2020

Get a Free Sale-A-Bration Product With a $50 Purchase!

Occasions & SAB Catalogs 2020

Today is the day we’ve been waiting for! Sale-A-Bration begins and with every $50 Stampin’ Up! purchase, you can choose a Sale-A-Bration product in the brochure! And to help you, the Occasions Mini Catalog is LIVE today with all new spring and summer products!

One of the products that I think will be the most popular is the Painted Poppies Stamp Set. I made this easy card with just some basic stamping and coloring by stamping the group of poppies twice and then quickly coloring in the flowers and grass with the Stampin’ Blends markers. I didn’t color “carefully”, I just dabbed some Light Poppy Parade marker on all the flowers and then went back and dabbed on a little bit of Dark Poppy Parade. I used Granny Apple Green Blends on the stems and drew in some grass.

Easy Painted Poppies Birthday Card

The greeting on this card is from the Sending Thoughts Stamp Set, FREE with a $50 purchase during Sale-A-Bration! You will find it under the Sale-A-Bration category in the Online Store and in the SAB brochure. I simply stamped it in Memento Black Ink right on the card front to keep things simple! Sometimes we forget “simple”! The card base is Poppy Parade with a bit of Granny Apple Green Cardstock showing under the stamped image.

Occasions Mini Catalog (Jan. – June 2020) PDF

SHOP the Mini Catalog in the Online Store!

Sale-A-Bration Brochure 2020 PDF

See the Sale-A-Bration product choices in the Online Store!

Sign Up For the January Paper Pumpkin About LOVE!

Paper Pumpkin Banner Jan 2020

Paper Pumpkin’s first kit of 2020 is all about L-O-V-E. Whether you want handmade favors for Valentine’s Day, a bridal shower, or a remarkably romantic wedding, this month’s kit has everything you need to help you celebrate your favorite friendships and love stories. So make it a “LOVE”-ly year with Paper Pumpkin!

Kit details: 

  • Makes 20 treat bags + 10 mini cards and envelopes
  • Card size: 3″ x 3″ (7.5 x 7.5 cm)
  • Envelope size: 3-1/8″ x 3-1/8″ (7.8 x 7.8 cm)
  • Bag size: 3-1/4″ x 4″ (8.2 x 10 cm)
  • Coordinating Stampin’ Up! colors: Crushed Curry, Highland Heather, Mint Macaron, and Rococo Rose

Get more from the I’ll Bee Yours Kit when you buy the Heart Punch Pack (item 151292) from the 2020 January–June Mini Catalog. Both punches coordinate with the heart stamp in the kit so you can craft for love-filled occasions now . . . and later! Think: weddings, showers, birthdays, and more! Check out the flyer advertising this super-versatile punch pack in your January kit!

Heart Punch Pack (item 151292), $34.00 USD

JOIN PAPER PUMPKIN HERE! Sign up by January 10, 2020!

Beautiful Bouquet Floral Anniversary Card

Beautiful Bouquet Floral Anniversary Card

For a change from Halloween and Christmas ideas, here is the Beautiful Bouquet Floral Anniversary Card I made for my daughter and son-in-law. I can’t believe they are starting to rack up quite a few anniversaries now.

I started with one card idea and as I began putting the card together I didn’t like it. What to do?? Sometimes I can keep playing with something and it will turn out, but this time I turned to the Stampin’ Up! catalog for inspiration. I found it on page 85 up in the top corner. I already had stamped and die cut some of the Beautiful Bouquet flowers for the original card idea so that’s why I immediately went to the Beautiful Bouquet Stamp Set in the catalog.

Often you may not have the same products they used on a card or project in the catalog. It is highly likely that you can substitute something you DO have at that moment. Then if you really want that product, you can put it on your next order. But if you need something right away, just choose something in your stash!

For example, on the catalog sample on page 85, behind the bouquet of flowers is a die-cut made with the Stitched Lace Thinlits. I don’t own that so instead, I chose to emboss the entire background with the Stylish Scroll Embossing Folder. I think that works out fine even though I didn’t have the lace background.

For all the leaves, I just chose several colors of green cardstock and punched or die-cut sprigs and stems of leaves.

The flowers can either just be stamped or you can play a little in the way the sample was made and do some “faux watercoloring”. In this technique, the stamp is inked up and then spritzed with water before stamping. Just spritz lightly to barely moisten the ink and then stamp on Watercolor Paper. You probably want to make extras and then decide which ones came out the best or which ones maybe have an edge that didn’t come out well but you can stick underneath another flower! There is even a Whisper White die-cut scroll of flowers and leaves die-cut with the Flourish Dies.

For the suggestion of a vase, I die-cut a piece with the Stitched Rectangles Dies. The bow is tied with a piece of Braided Linen Trim and adhered with Mini Glue Dots. The tag in the sample is made from a punch in a kit, but I just used a die from the Ornate Frames Dies. The greeting stamped on the tag is from the Itty Bitty Greetings Stamp Set. This is a great stamp set to own! Then the tag is tied on to the bow with Linen Thread.

For some extra sparkle, I colored the flowers with some Wink of Stella and added a Gold Faceted Gem to one flower. Some of the flowers are popped up on Stampin’ Dimensionals.

Beautiful Bouquet Floral Anniversary Card Closeup

I made this card for an anniversary, but of course, a bouquet of flowers whether real or on a card can be given for many occasions. This exact same card with a different greeting could be for a birthday, sympathy, congratulations, even a wedding. That’s what makes the Beautiful Bouquet Stamp Set so useful and versatile.

SHOP STAMPIN’ UP! ONLINE HERE!

Easy Floral Romance Card

Easy Floral Romance CardIf you want to make a beautiful card easily, just grab the Floral Romance Specialty Designer Series Paper and start creating! Some of the pages are vellum, like this one on this card. It is really beautiful paper that you will love!  The papers of Floral Romance are perfect for weddings, anniversaries, birthdays, or simply to say “Hello” and that you are thinking about that person. Everyone would love to get a personal handmade card in the mail instead of more junk mail!

I started with a card base of Fresh Fig Cardstock because it is one of the coordinating colors and then a layer of Whisper White to be placed under the printed vellum.  I just applied the Multipurpose Liquid Glue to the darkest colors on the backside of the vellum and I don’t think it is showing through.  This printed vellum is great for that!

For the greeting, I stamped with Petal Pink, another coordinating color of the designer paper, on a piece of Whisper White with a stamp from the Forever Lovely Stamp Set. That was punched with the 1 1/4″ Circle Punch and layered on a die cut from the Stitched Labels Framelits Dies.  I used Petal Pink for the circle die cut.

I tried several ribbons to tie around the side of the card but nothing looked quite right so I went with a piece of the Whisper White 5/8″ Flax Ribbon, although it is currently on backorder until mid-February. It is just adhered underneath the circle die cut and greeting.  If you don’t already have the Flax Ribbon, just substitute some other wide ribbon.  If you have narrow ribbon, try winding it back and forth underneath for another look! And of course, a few Petal Pink Basic Adhesive-Backed Sequins.

Here is a birthday card I made using a different pattern of the Floral Romance vellum.

Remember to put the new postage on your envelope and all your mail beginning today! This easy Floral Romance card could be sent for a Valentine, birthday, so many occasions! Just let someone know you are thinking of them!


All My Love Party Favor Treat Box For Valentine’s Day

All My Love Party Favor Treat Box For Valentine's Day

One of the new pretty designer papers in the Occasions Catalog is this All My Love Designer Series Paper which I have used to make this All My Love Party Favor Treat Box For Valentine’s Day.  This paper has hearts and florals so it covers almost any occasion!  Remember, hearts are just for Valentine’s Day! The Occasions Catalog has a whole suite of products to go with this paper.

To make this little box or bag, for a treat to give someone or maybe as a party favor (think bridal showers, maybe?), just make the classic 2-4-6-8 box!

This paper is cut at 5 1/2″ x 8 1/2″, even though the designer paper is 12″ x 12″.  Don’t you hate to cut into new designer paper?!  Then just score at 2″, 4″, 6″, and 8″.  Turn the paper to make the bottom flaps of the box at 2″. Cut up on those score lines to the horizontal score line to make the bottom flaps, cutting out the tiny little piece at the end.  Your paper will look something like this.

2-4-6-8 Box Scored Lined

On my treat box today, I also scored a line about 3/4″ down from the top so that I could fold over the top and see the other side of the paper.  Or you can just fold it on your own before you start assembling the box.

Crease and fold all the score lines and assemble the box. I just used the Multipurpose Liquid Glue to hold everything together.   You could also use the Tear & Tape Adhesive.

Once the box is assembled, tie a little ribbon around the top and use the new Be Mine Stitched Framelits Dies to cut out the little hearts. This smallest heart is really cute because it comes out with the pretty edge and the little stitching! I used Glue Dots on the back of the hearts to adhere to the ribbon.  If you have trouble with the hearts hanging where you want them, another Glue Dot on the back won’t hurt to place them properly! If you wanted, you could use a  white gel pen to write a name or message on the hearts.

Fill with some treats or a little gift and you are done! The All My Love DSP is so pretty and can be used for almost any occasion.  You will think of it for Valentine’s Day but you are not limited to that at all. And the box is pretty on it’s own without the hearts because the paper is so pretty.

Check out the All My Love Suite in the new Occasions Catalog! Remember Sale-A-Bration — with every $50 purchase you earn a free Sale-A-Bration product!

Practice making some 2-4-6-8 boxes so you will know how easy they are to do! Here’s one I made at Christmas at this link. You can also squeeze the sides in a bit and the top together as I did on that Santa’s Workshop box. Try your hand at this All My Love Party Favor Treat Box For Valentine’s Day.

Shop the Occasions Catalog at Stampin’ Up!

The All My Love Suite For Valentine’s Day, Weddings, and Love

All My Love Suite

Image © Stampin’ Up! 2019

One of the most beautiful suites in the new Occasions Catalog is the All My Love Suite. And I would say one of the most useful suites!  We might immediately think of Valentine’s Day with this suite, but it’s also perfect for weddings, birthdays, anniversaries, engagements……lots of occasions!

This Suite actually includes two different Bundles, the Forever Lovely Bundle with a stamp set and dies that cut out the beautiful floral border, and the Meant To Be Bundle that includes a stamp set with hearts and dies that cut out those heart shapes.  Of course, there is also a lovely designer paper, All My Love Designer Series Paper and extra embellishments like the Heart Epoxy Droplets and the All My Love Ribbon Combo Pack.

Enjoy these two Stampin’ Up! videos about these products and then put them on your order right away so you can use them for Valentines and birthdays if you like.

Shop the Occasions Catalog and more in the

Stampin’ Up! Online Store!