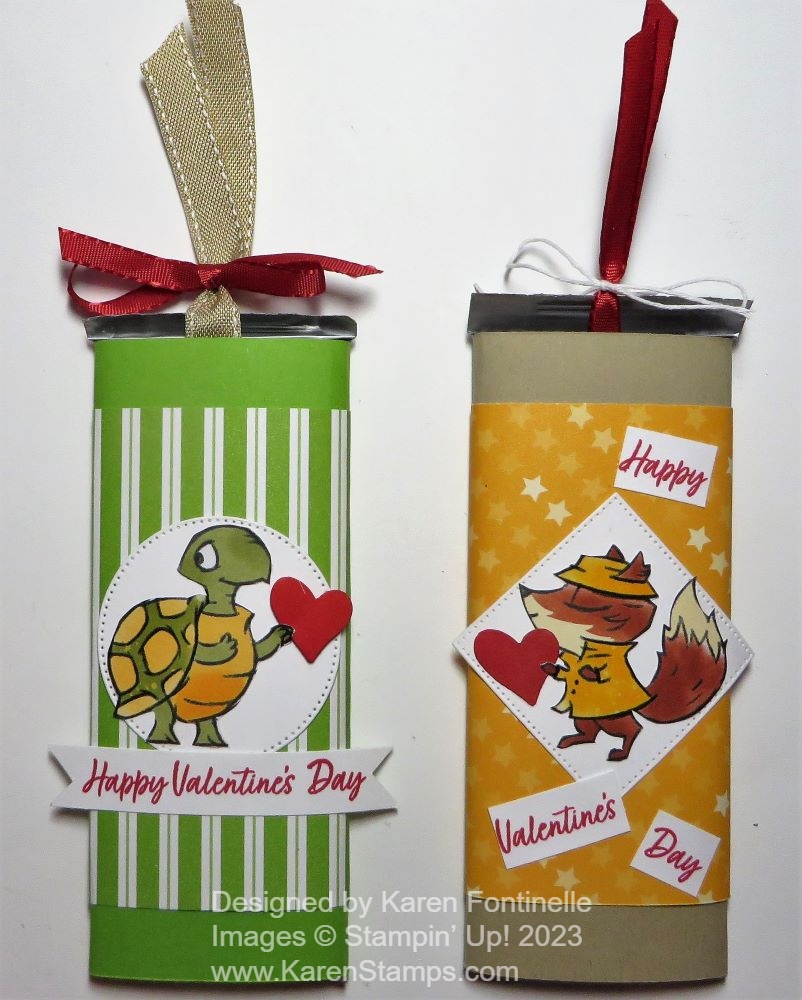
This has always been one of my favorite things to do for any holiday! Decorate a candy bar! A full-size chocolate bar is the best, but you can probably do smaller ones if that is what you have.
These candy holders are great for any holiday and have been around a long time! Easy to make fold-over cardstock and decorated holders for those yummy chocolate squares!
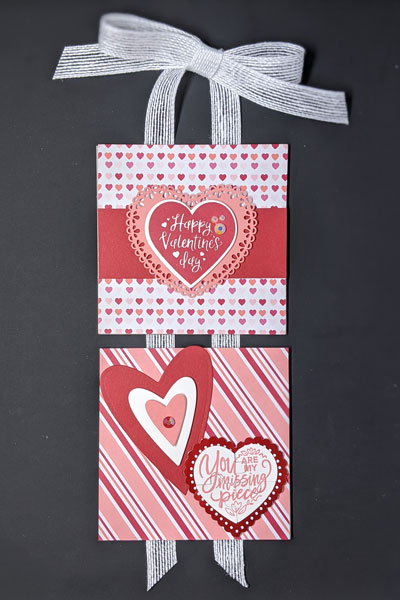
Simple Valentine Banner Gift
Find some pieces of cardboard of whatever size you like and decorate for Valentine’s Day, almost like a card, but adhere them to ribbon with strong adhesive to make a little hanging decoration for the home.
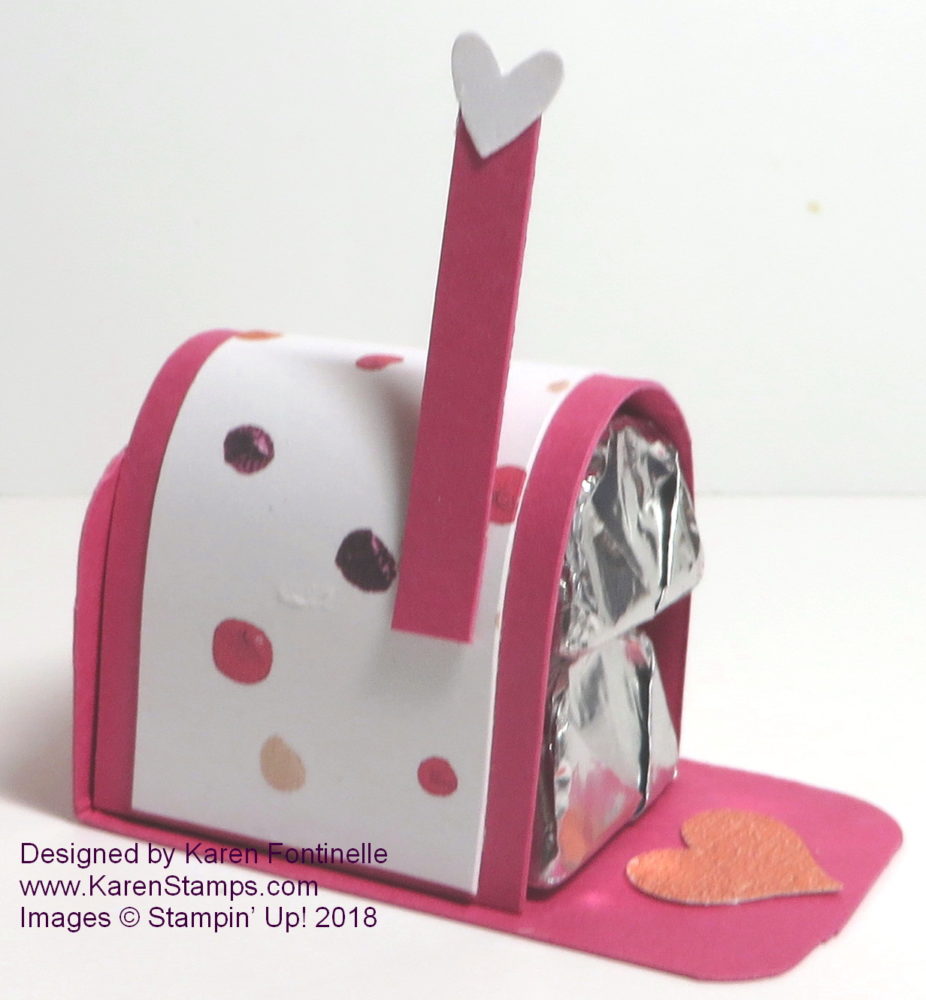
Here’s a fun little candy holder for Valentine’s Day! What’s more perfect for Valentine’s Day than a little mailbox, especially if it has chocolate candy in it! Just click on the title above to go to the original post for the measurements and directions.
I hope these ideas give you a little inspiration for something fun to make for your Valentine!
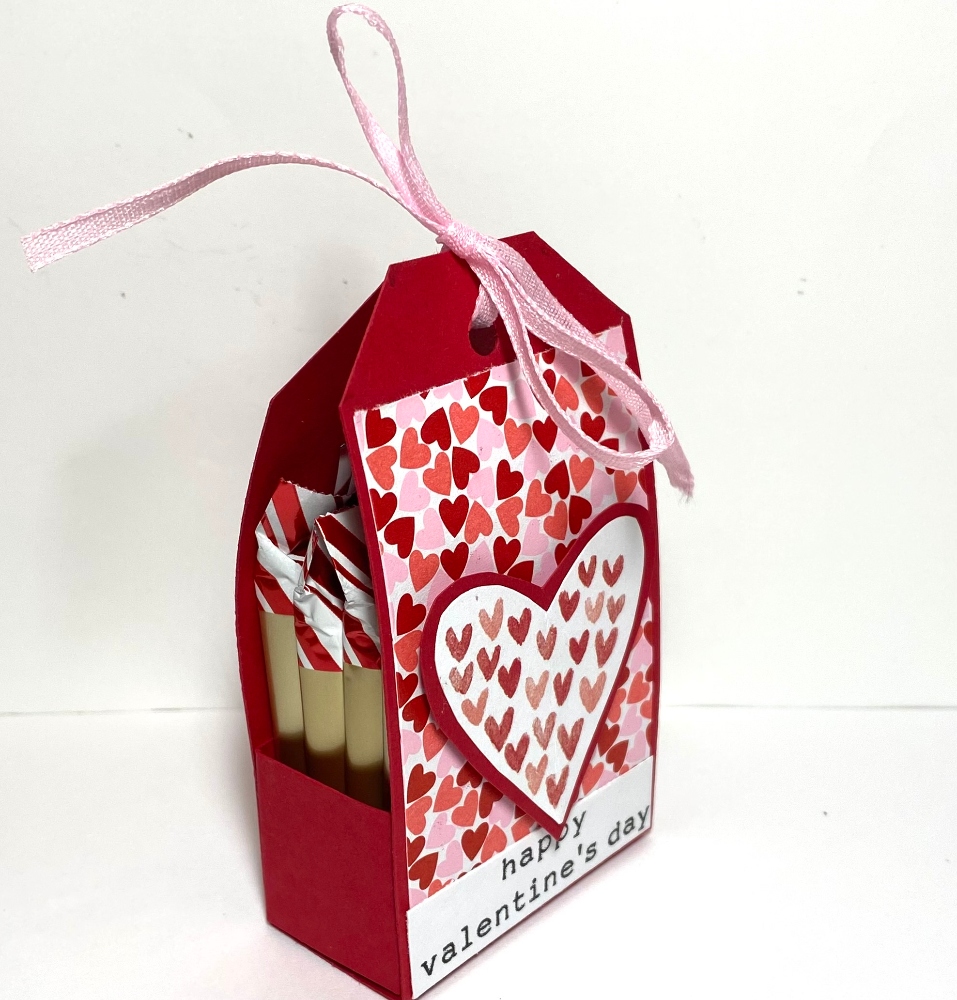
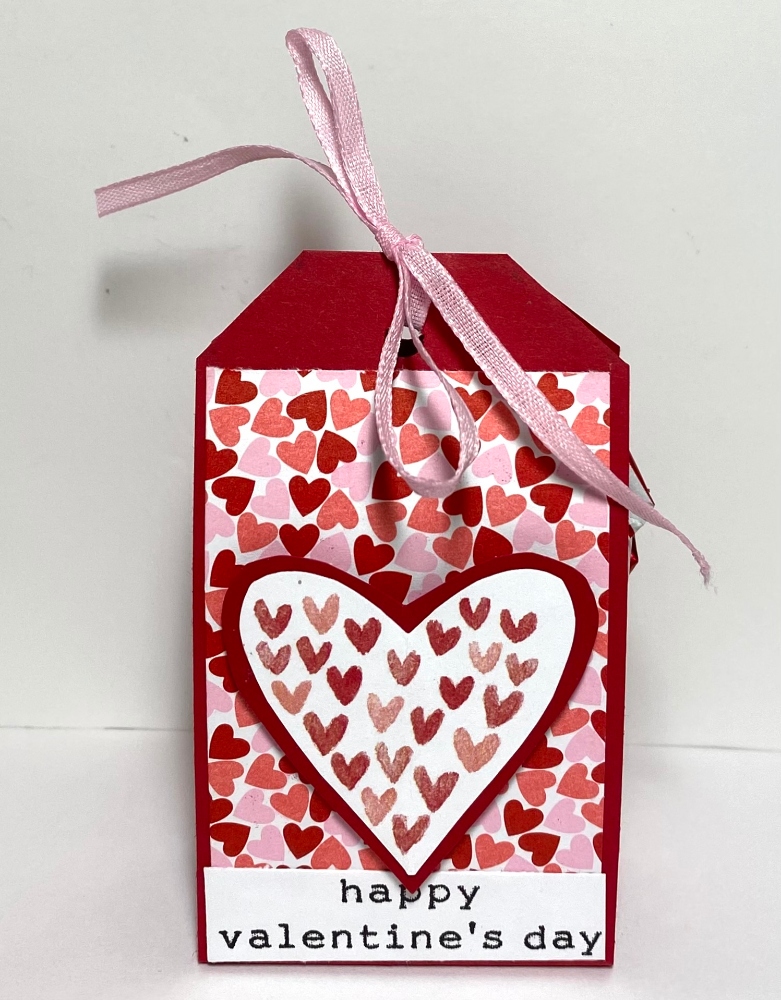
This Valentine’s Day Candy Treat Box is rather quick and easy to make, and the recipient will surely be happy with the chocolate treat inside! You will almost think these measurements are too small, but they turn out to be perfect for holding four Ghirardelli square chocolates! You could modify the measurements if you had different candy you wanted to gift to someone or use as a party favor. Something like this would be a nice table decoration placed at each person’s place setting at a dinner or luncheon.
I used cardstock for a little sturdiness and then decorated with designer series paper. You could probably use designer paper only. My sample is made with Real Red cardstock, cut at 8″ x 2″. Score at 3 1/2″ and 4 1/2″. When you crease and fold on those lines you can see what is the space created to hold the candy.
For the little “box” inside, it’s very easy and not really a box. Cut two pieces of cardstock at 2″ x 1″ Score at 1/2″ from each side edge. Crease and fold those little pieces and see how they will be adhered to the inside sides of the first piece you created. In other words, these two little pieces will make the sides of the treat box. It’s easy when you are seeing it and doing it.
If you want to, you can cut the top corners of the treat box off at an angle as I did, or use a corner rounder punch of some kind, or just leave it as is. Punch a hole or two holes in the top for a rib 1/8″ bon to hold it closed.
I decorated my Valentine treat box with some Valentine paper, the Made WIth Love Designer Series Paper. The heart is from the Love Notes 6″ x 6″ Designer Series Paper as is the greeting. I just trimmed around the heart image from the paper, placed it on a piece of Real Red and cut around that for a layer. The heart is popped up with Stampin’ Dimensionals. The greeting was trimmed down as small as possible so it would fit at the bottom of the treat box. I used the narrow Bubble Bath 1/8″ Faux Linen Ribbon to tie my box closed. This narrow ribbon is great for small things like this!
Have fun making one of these treat boxes! It would be great for any other occasion, too! Just decorate differently!
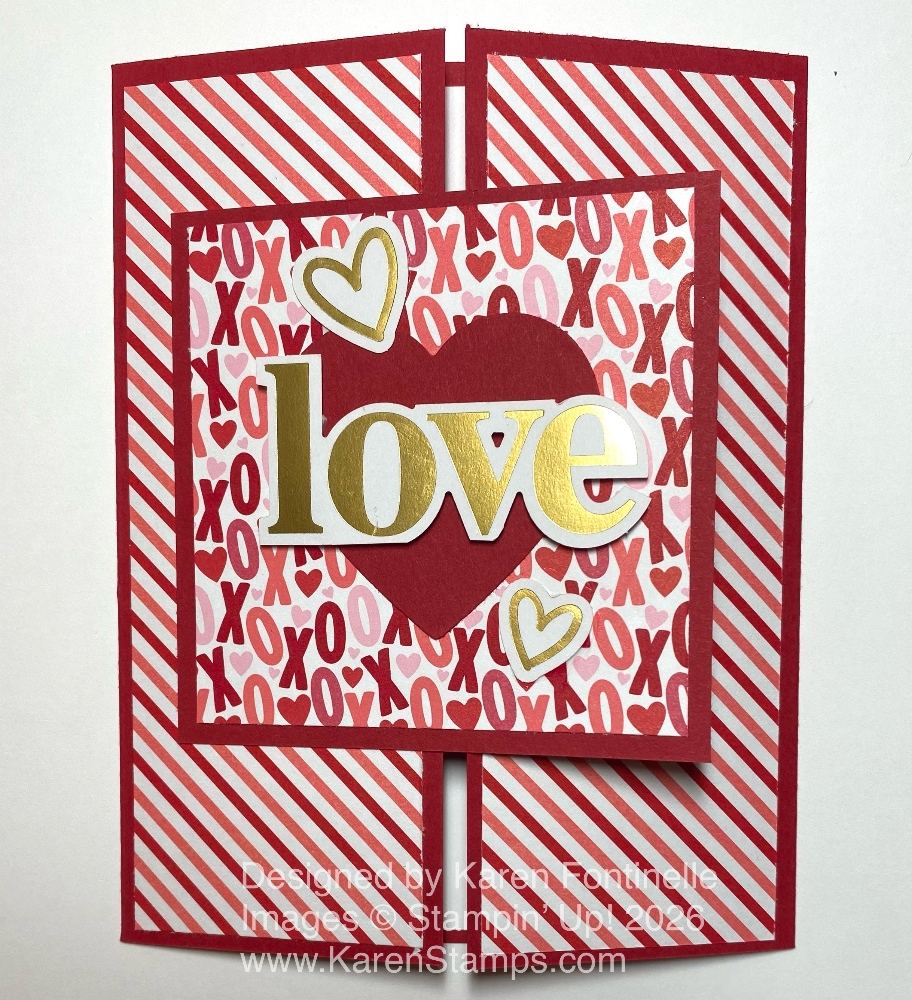
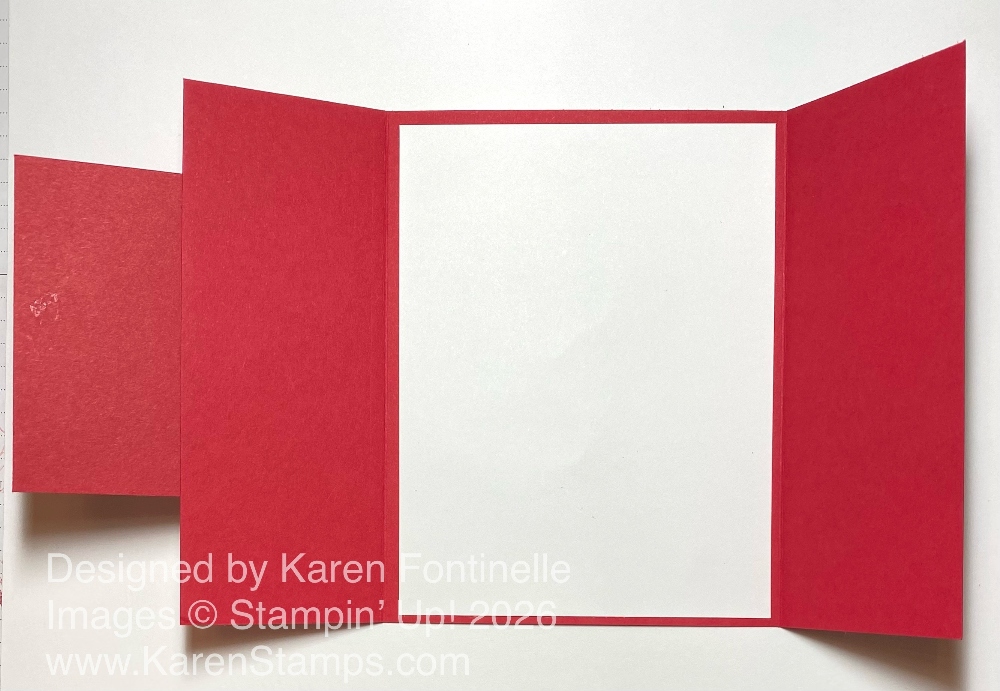
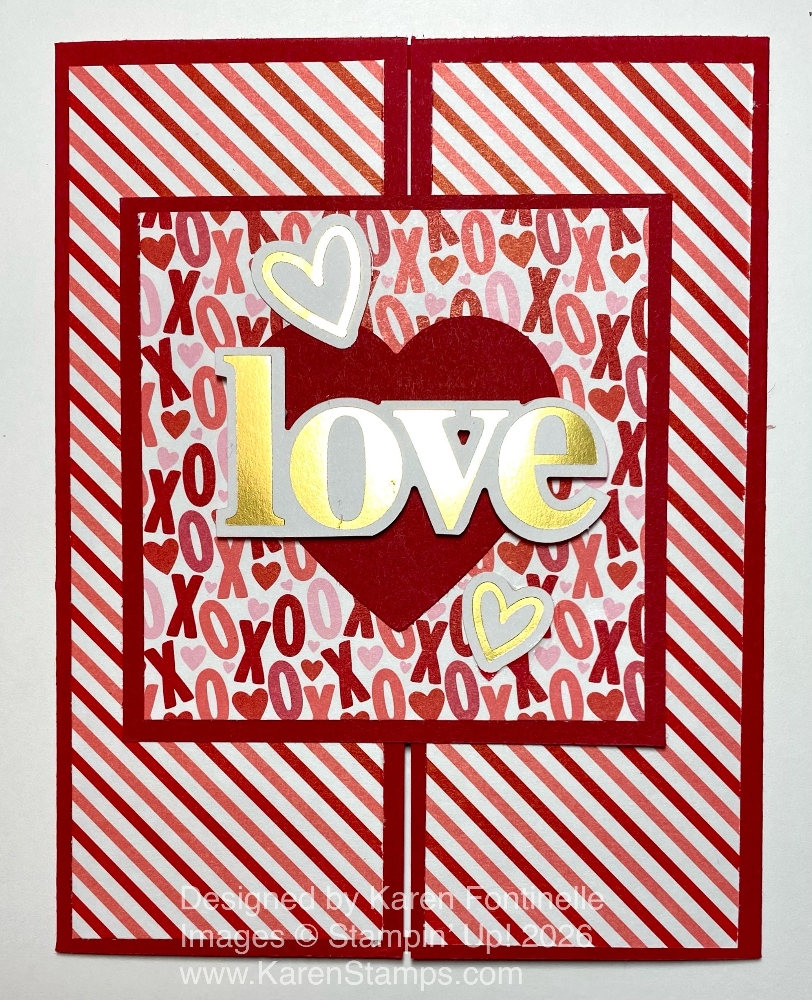
If you need another Valentine’s Day idea, here is the Made With Love Gate Fold Valentine that you can copy or use for inspiration. It’s kind of like the Z-fold card that I always say is so easy for us to make, but makes the recipient think you created something extra-special! Making a gate fold (or gatefold) card only requires one more score line than a regular card.
Start with the usual 8 1/2″ x 5 1/2″ piece of cardstock. I used Real Red. Score at 2 1/8″ and 6 3/8″ on the long side. Crease and fold on those score lines, and the two sides should meet in the middle. It’s just like a double-panel front door. You can open both doors and walk inside! To decorate, you can adhere a strip of designer series paper or a stamped panel on each of the two sides. These would likely measure 1 7/8″ x 5 1/4″. This would give you the normal margins we usually use for our other cards. I used the Made With Love Designer Series Paper.
For the focal point on the front of the card, I just used a square piece of cardstock and designer series paper. Die cut labels or other designs would also be fine. The Real Red square is 3 1/4″ x 3 1/4″. The designer paper pattern is 3″ x 3″. To adhere this to the card, you only want glue on the portion that will attach to the left panel of the card. Figure out or eyeball approximately the middle of this square and line it up where you want it. Make sure you only get adhesive on the portion that will attach to the card, leaving the other side with no adhesive. I usually hold my finger approximately where the middle is and pay attention to which side is which when I flip the piece over to apply adhesive. Then I open it up and make sure no adhesive has leaked out or shows on the inside.
Here is what the card looks like from the inside. You can see I added a Basic White 4″ x 5 1/4″ panel for a stamped greeting or written note. On the left side you can see how the square front piece extends out.
To decorate the front, I added a Real Red heart plus some ephemera. The word “love” and the two small gold hearts are found in the Unforgettable Times Ephemera Pack. These pieces are gold foil but other pieces are in different fonts and bright colors. These are perfect for scrapbooking but you can also use them for cards as you see! I popped up the word “Love” with Stampin’ Dimensionals.
If you want the two flaps to stay closed, you might want to add a belly band around the card that would slide on and off or tie a piece of ribbon. I didn’t really think about it until I had the card made but I liked it just fine the way it was. You could also add some gems or other embellishments if you wanted to.
Also, if you really wanted the two sides to stay closed, you could add just a tiny bit of Multipurpose Liquid glue to the right side of the square, let it dry, and then it can be opened and shut without a belly band or ribbon and probably will not even be noticeable.
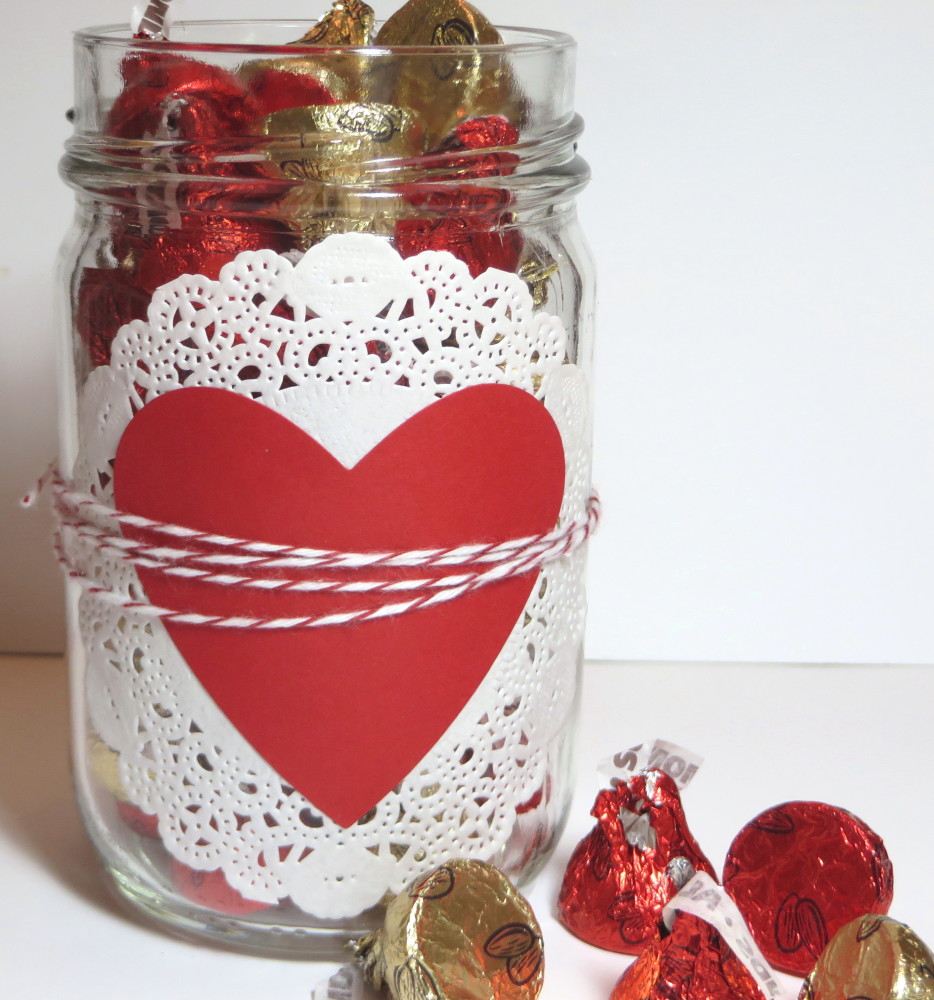
We are down to the wire for making Valentines, but there is time right up until almost the time you want to hand the card to someone! Or mail it and say “Sorry this is late, but I wanted to let you know I was thinking of you!” Just think back to your elementary school years and reminisce about making valentines yourself with construction paper, white paste in a jar, and doilies!
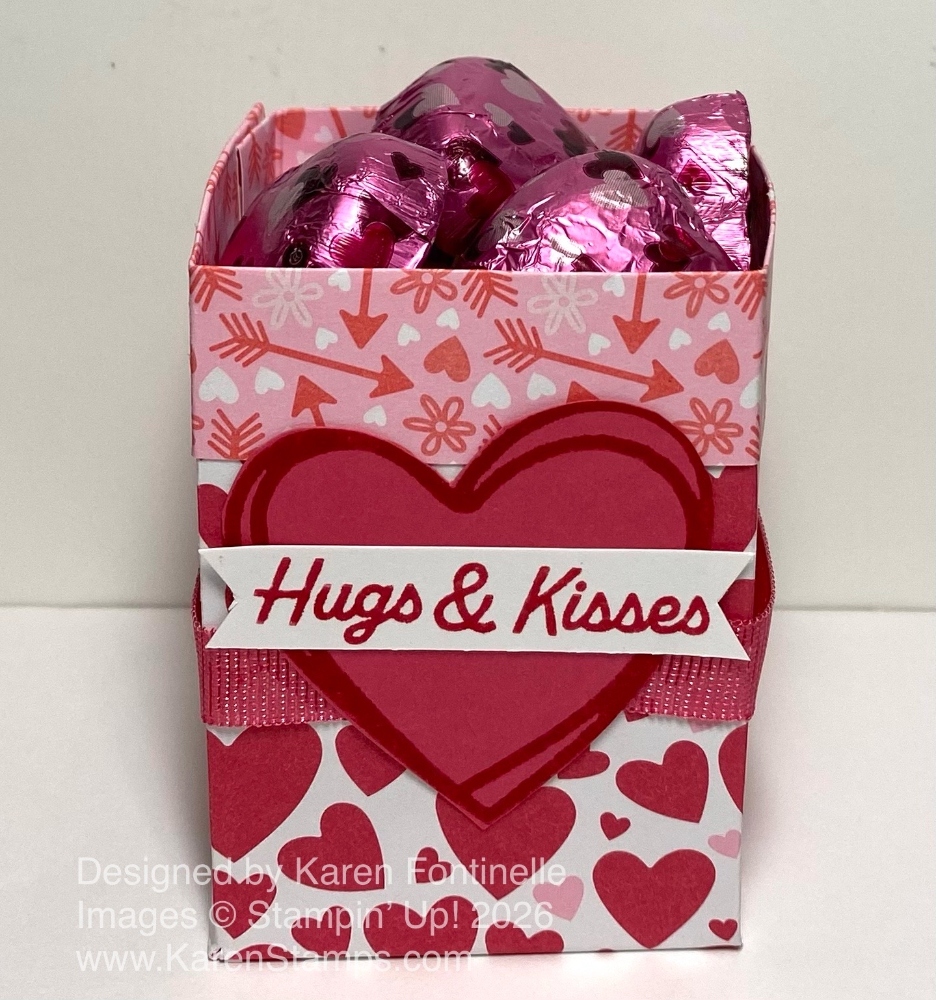
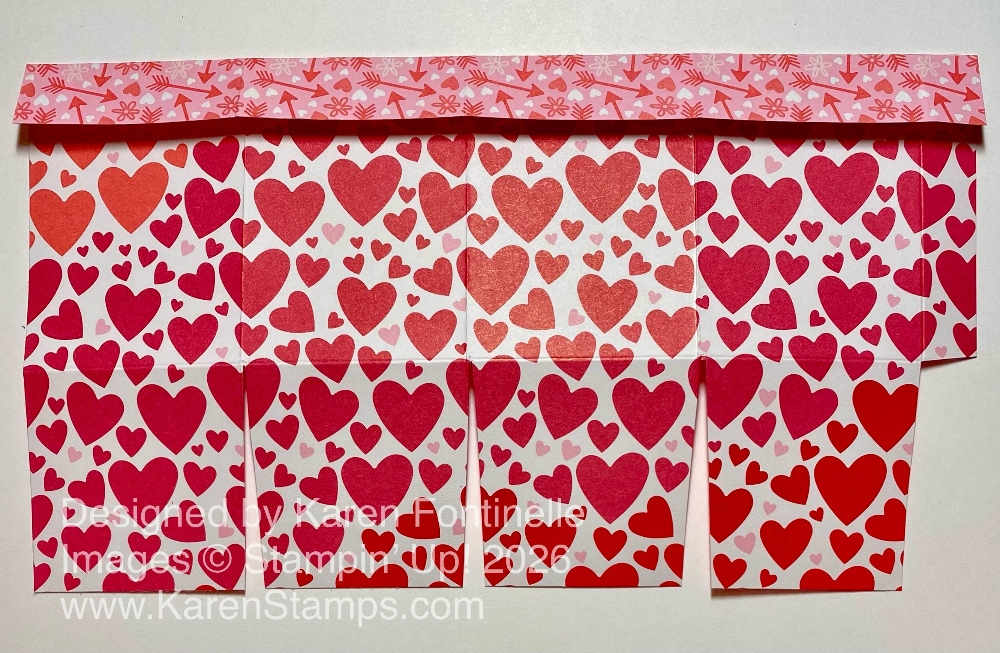
If you want an easy treat box for Valentine’s Day, make this one! It’s actually a 2-4-6-8 box, which, if you have been stamping for a while, you’ve probably learned how to make or heard of. If you haven’t, just follow these directions because it is easy. You can use it for any occasion.
Cut a piece of cardstock or designer series paper at 5 1/2″ x 8 1/2″. I used the Made With Love Designer Series Paper. Pay attention to the pattern if you are using designer paper. I almost missed checking that! Score at 2″, 4″, 6″, and 8″ along the long side, of course. Turn the paper and score at 2″ along what will be the bottom of the box. Again, watch out for the pattern to make sure you have it going the right way. If you want to have the top edge turn down to show the opposite side of the paper, score at 3/4″. You can vary these measurements if you want your treat box to be taller or shorter. Then cut where you scored for the bottom flaps to separate them and cut off the smallest little piece. See the photo below.
Crease and fold all the score lines, and fold up the box so you can see how it will go together. Then apply adhesive to the smallest side piece and fold the opposite side over flat on the table to meet it, so you don’t have to hold it in the air and line everything up.
Once you have the box assembled, decorate it however you like. I wrapped around a piece of Strawberry Slush 3/8″ Faux Linen Ribbon. I stamped a heart in the Endless Love Stamp Set on Strawberry Slush cardstock with Strawberry Slush ink and cut out. It fits perfectly on this box. I also stamped the greeting from the same stamp set and made a little Basic White banner across the heart.
Now you have a cute little treat box you can fill with chocolate hearts or whatever kind of candy or small gift you have. To make one for another occasion, such as a birthday or maybe birthday party favors, just change the designer paper and decoration. This is a fun and simple project to make!
Are you stamping today or watching the Super Bowl?? I guess there is time for both! Basically, the Super Bowl is on almost all day so there will be plenty of time to stamp before the actual game starts!
This Love Notes Valentine Flowers Card came about because I absolutely love this paper with the little heart flowers in the Love Notes 6″ x 6″ Designer Series Paper. I saw a card online using this paper and decided to somewhat copy it.
This card has a base of Flirty Flamingo cardstock. I accidentally cut the flower paper smaller than I intended, but since “there are no mistakes in stamping,” I made the best of it. I just added a layer of Pretty in Pink cardstock, and that smaller size allowed the pretty Flirty Flamingo to show off more around the margins. The hearts are punched out with one of my retired heart punches from the Love Notes DSP. I layered both of these hearts on top of a diecut Pretty in Pink circle from the Spotlight on Nature Dies. I also added a strip of the Garden Green Chevron Ribbon across the lower part of the card and also a bow on the top heart. The pink heart on the white heart already says “Be Mine” so it could be a Valentine without any addition greeting or you could add something else.
I also added three Strawberry Slush & Pretty In Pink Gems to the card for a little sparkle. They’re a little dark on this card so I wish I’d used something else or a lighter color. But I do love those gems. They are on the Last Chance list with a little discount if you want some!
Remember, if you order anything at Stampin’ Up! this month and have Bonus Days coupons to use, be sure to add those codes that were emailed to you. And if you have a $75 order, you can pick up the Painted Illusions Designer Series Paper for only $5, so I would get it for sure! It’s very beautiful and artistic paper!
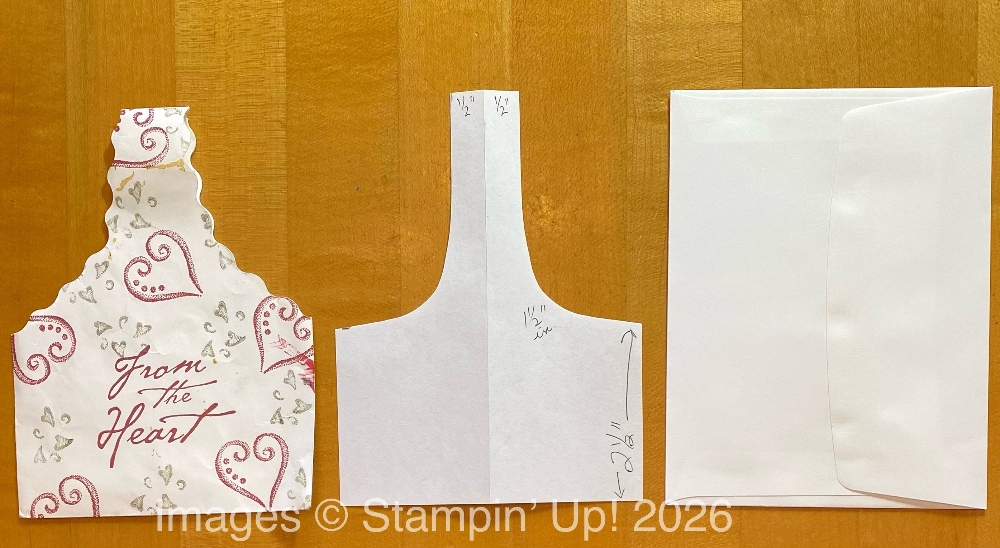
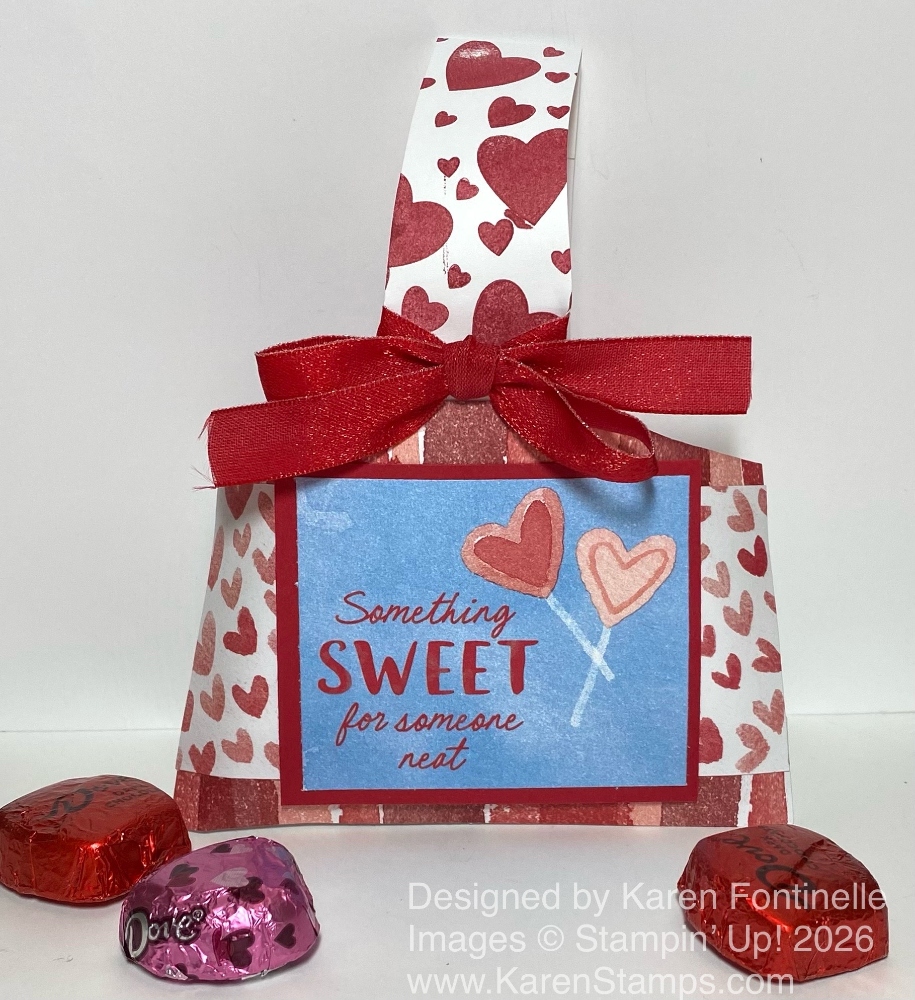
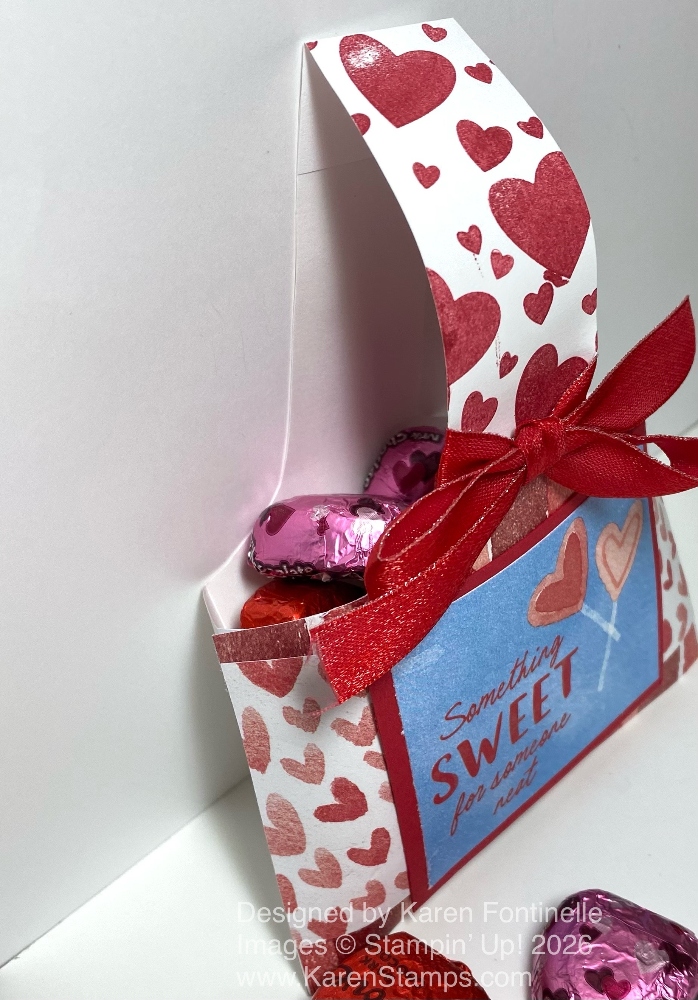
Maybe you don’t know how this Envelope Valentine Treat Bag was made unless you have been around Stampin’ Up! a very long time like me! It was one of those creative ideas I learned when I first joined Stampin’ Up! or maybe when I first started stamping. There were many ideas I saw like this that just amazed me with the creativity!
Here is my original treat bag which is probably over twenty years old! I don’t remember if I made this one or if my upline made it and gave it to me for a sample. Anyway, I have saved it all these years.
This little treat bag is made with a Stampin’ Up! Medium Envelope! These are the best envelopes. You should have a couple of packages. I can identify a Stampin’ Up! envelope in my hand if I get one in the mail! They have a nice smooth feel to them.
Here is how to make this easy treat bag with a Stampin’ Up! envelope. Begin by sealing the envelope. Turn it so the envelope flap is vertical, not the usual horizontal. You could freehand making the handle, but I cut a piece of computer paper the same size as the envelope for a pattern. That way, I could fold it in half, as if you were cutting out a heart, so it would be symmetrical. I had measured up about 2 1/2″ up from the bottom on both sides and 1/2″ from the fold at the top so the handle would be about 1″ wide. I cut a curved line from the side to the top to make the pattern for the handle as you can see in the photo below. Then I used the pattern to cut the envelope. Remember, you hold the envelope on its side, so it’s long from top to bottom, not the usual horizontal position.
Once you have the envelope cut like the pattern and like the sample, decorate it however you like! I used two different patterns of the Love Notes 6″ x 6″ Designer Series Paper to decorate the front of the treat bag. First, I cut a piece with the hearts at 4 3/8″ x 2″ to put across the front. Then I decided I would like a little border top and bottom using another paper with stripes. These two were each 3/4″ wide x 4 3/8″. I glued the top one a little higher than the top of the “bag” portion to cover up the curve going to the handle, then, after adhering, trimmed off the excess following the curve of the bag.
The greeting on the front is one of the cut-apart images in the Love Notes DSP. I cut it smaller than it is on the sheet so it would fit better. It is 2 5/8″ x 2 1/8″. Then I layered it on a piece of Real Red cardstock 2 7/8″ x 2 3/8″. To decorate the handle, I stamped Real Red hearts with the hearts in the Endless Love Stamp Set. And finally, I tied a bow around the handle before putting candy inside. I used the Real Red 1/2″ Shiny Ribbon. Just add candy when you are ready!!
You have to try making one of these envelope treat bags for any occasion! It’s really fun and easy!
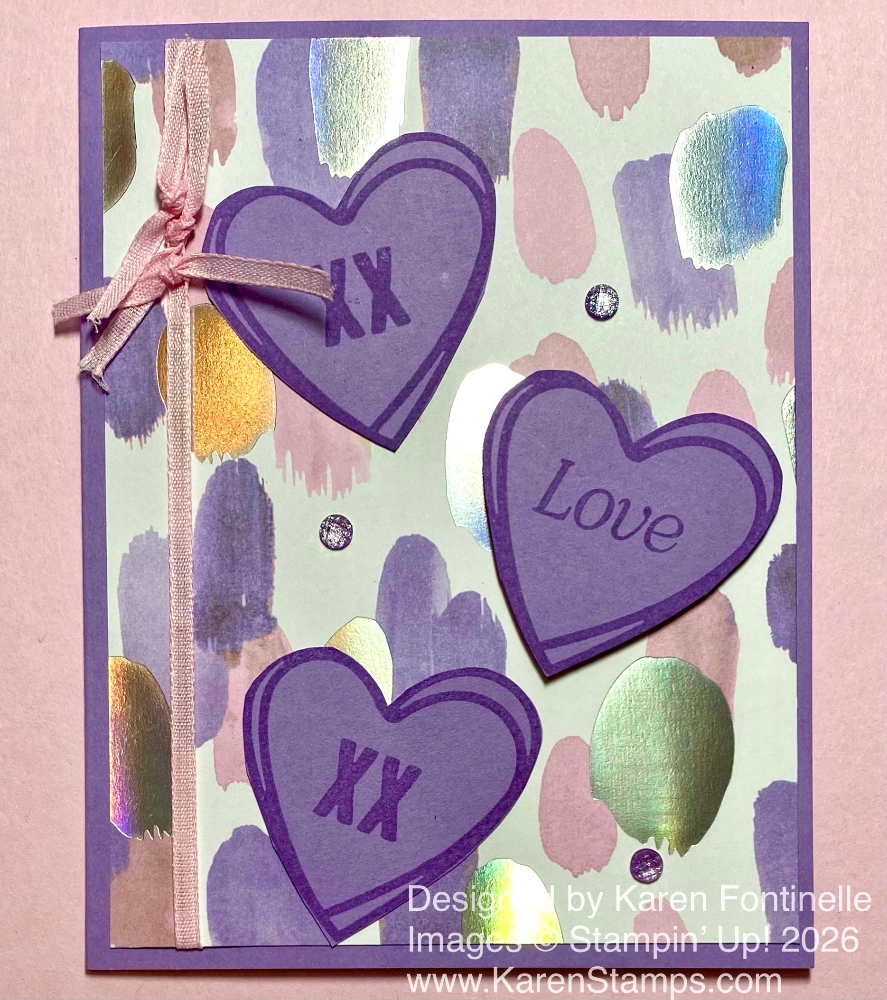
If you want a less-than-traditional Valentine, try this Splash of Sparkles Endless Love Valentine Card. Valentines can be almost any style, so if you want something other than the traditional red and pink, you can use any colors, any paper, any design that is pleasing to you or to the person to whom you are sending the valentine.
For this valentine, I chose to use the Splash of Sparkles Specialty Designer Series Paper. I love this paper because it is so colorful and artistic! The gold and iridescent foil really makes it special and sparkly! It could even be called Splash of Color! I chose this pattern with “splashes” of purple and pink blotches along with the foil colors for the background paper on this card. The card base is Highland Heather cardstock, one of the coordinating colors with this designer series paper.
Before adhering the designer paper to the card base, I added a piece of the Bubble Bath 1/8″ Faux Linen Ribbon. This ribbon is part of the Made With Love Suite Collection in the January-April 2026 Mini Catalog. This ribbon is great because it is so narrow so it works well in certain cases. On this card, I didn’t want anything covering too much of the designer paper. Instead of a bow, I just tied three pieces of ribbon in knots at the top.
The hearts are stamped with Highland Heather Ink on Highland Heather cardstock using the Endless Love Stamp Set, also part of the Made With Love Suite. I liked these open hearts because then I could add the XX from the same stamp set and the word “Love” from the Lovely Arrangements Stamp Set. This stamp says “Love you” so I only inked up the word “Love” and stamped that. Then the three hearts were cut out. The two hearts were glued down flat on the card and the Love heart is popped up on Stampin’ Dimensionals. I really felt this Valentine called for a bit more sparkle, so I chose the Purple Fine Shimmer Gems, in the Annual Catalog. These were the perfect addition on this card!
As you can see, we can use something other than red, white, or pink for valentines! All that really matters is the thought and the message. Inside the card, I added a Basic White layer and stamped “Happy Valentine’s Day” using the Endless Love Stamp Set.
I hope you are working on your valentines because Valentine’s Day is coming up really quick! Have fun making them!
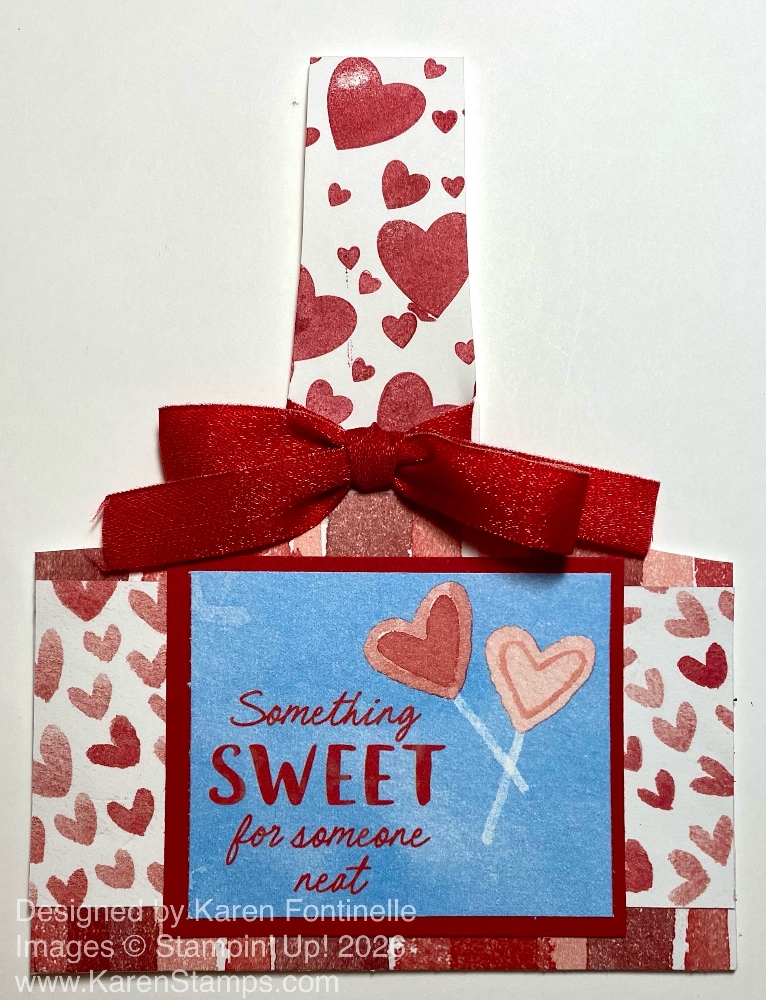
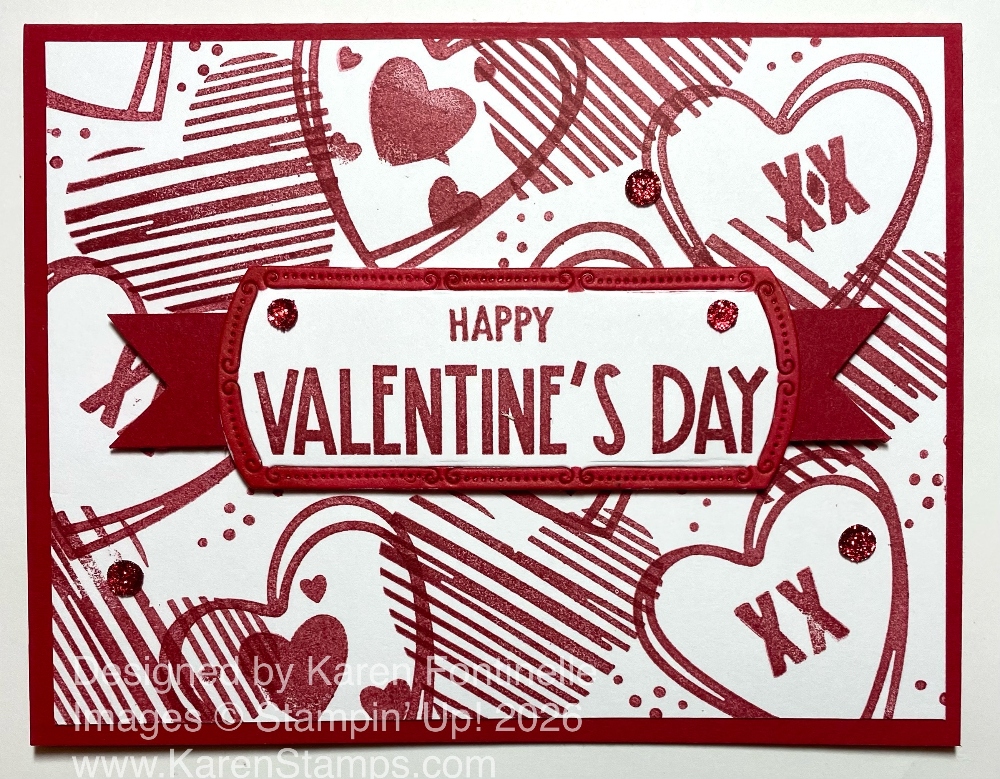
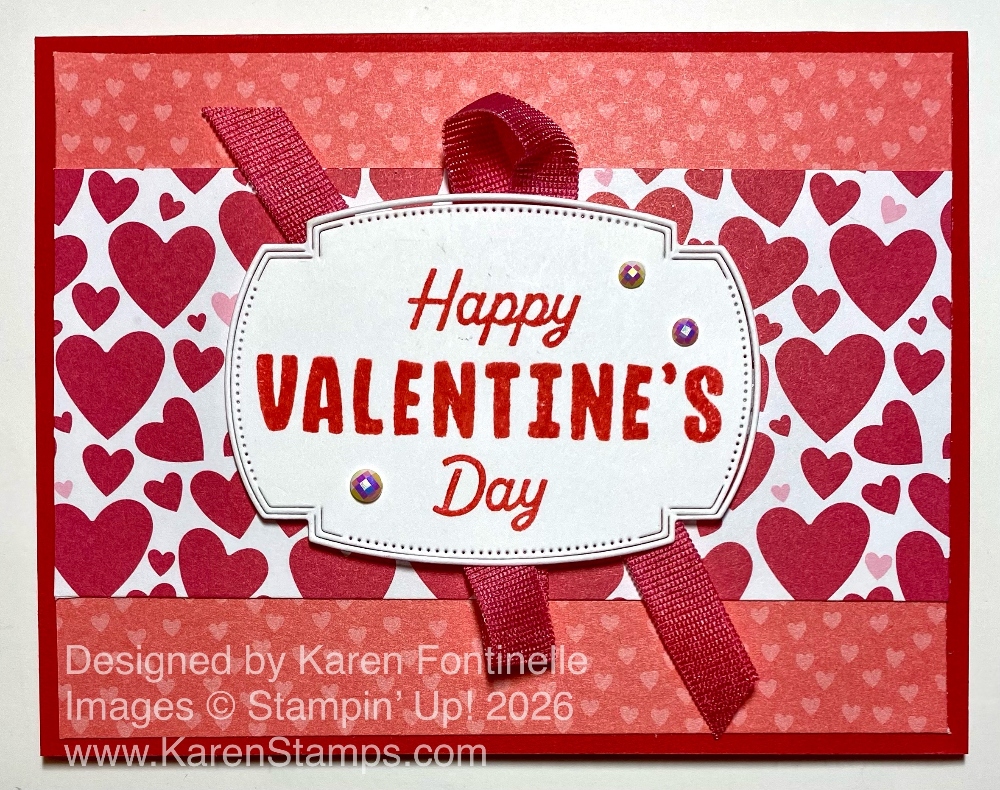
To make this Easy Monochromatic Valentine Card, you only have to choose one color to use! That makes life easier, right?! And you don’t have to think very hard if you want a basic color for a Valentine! It has to be Real Red, my favorite color!
Of course, Valentines can be any color and often use many colors. However, for this card, while trying out this new stamp set, I just made it easy and chose Real Red cardstock and ink. I also enjoy random stamping on a piece of cardstock to make a background or my own designer series paper. Sometimes, with all our beautiful designer papers and ephemera, I feel I am not actually stamping enough. It really feels good to do lots of stamping on a piece of paper!
This card has a Real Red card base and Basic White layer. I used the Endless Love Stamp Set in the Spring Mini Catalog. This stamp set is part of the Made With Love Suite Collection. The stamp set is perfect for making Valentines or Valentine scrapbook pages, but you can also use it for wedding cards or just any kind of card sending love to someone. You can also choose the Endless Love Dies,Made With Love Designer Series Paper, an embossing folder, ribbon, and Valentine sprinkles for shaker cards.
If you want to have some fun stamping, just use several different stamps, starting with the larger ones, and stamp on the background paper. I started with the two kinds of hearts, then added the hearts inside the hearts, the XX in some other ones. Then to fill in the little bit of empty space, I used the little dots.
The greeting is from the Reason To Celebrate Stamp Set, one that is full of sentiments that you can mix and match and use for lots of occasions. I used the Traditional Labels Dies (now retired, unfortunately) and also cut a banner to place underneath. Then the whole greeting is popped up on Stampin’ Dimensionals. For a little sparkle, I used a few of the red Traditional Sparkling Sequins for a little sparkle. These are on the Last Chance List for 10% off. I loved using these over Christmas and you certainly can use them other times too if you like glitter and sparkle. And they are flat, so good for mailing. I’d say pick up a package or two while you can!
On the inside of the card, I added a Basic White layer and put strips on the side using Made With Love Designer Series Paper, just to decorate the inside a little bit.
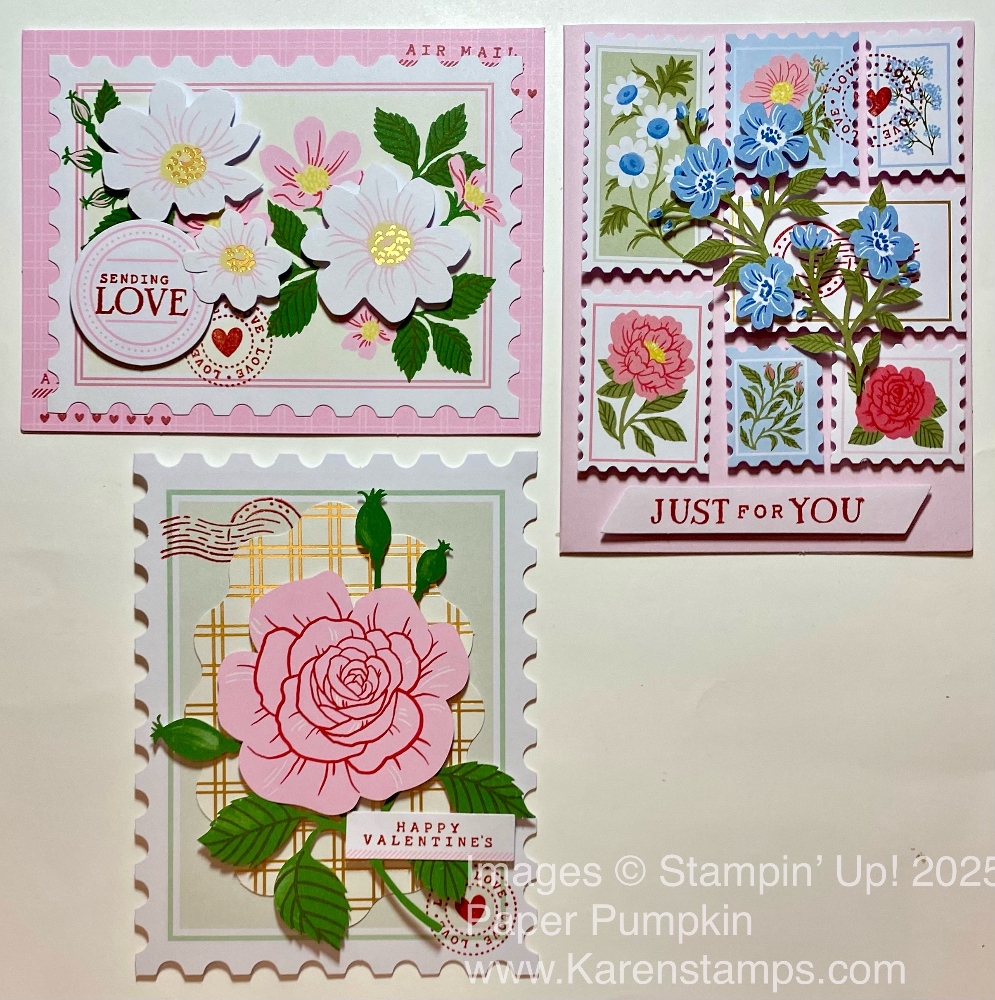
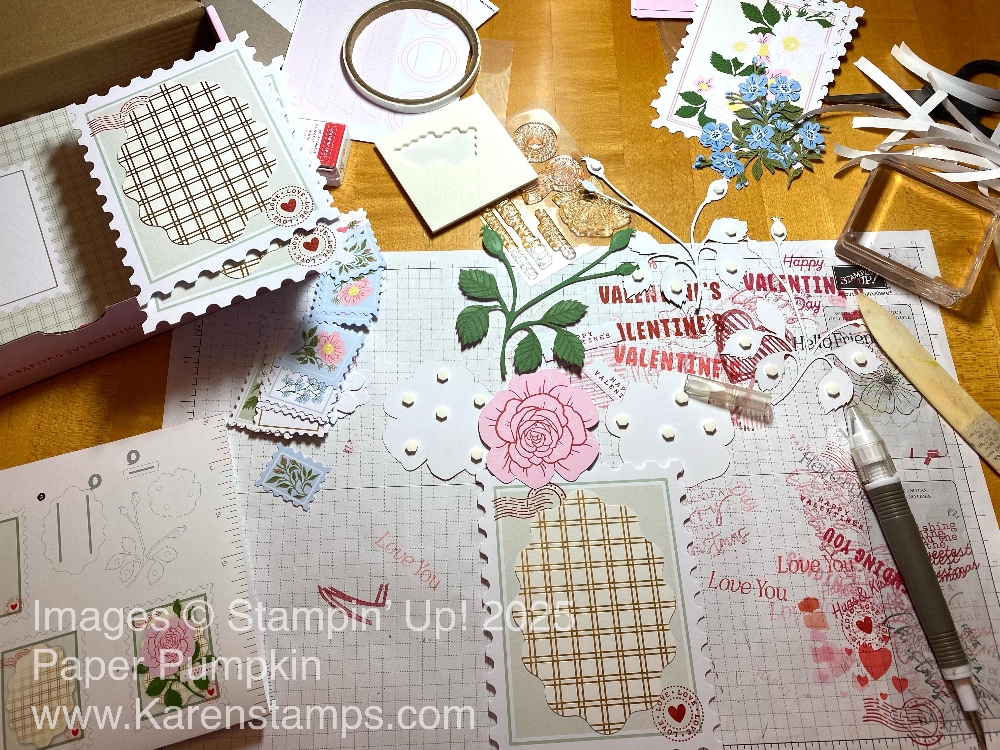
Last night was the moment to spend some relaxing time making my January 2026 Paper Pumpkin Kit, Special Delivery. Paper Pumpkin is the monthly treat you get in your mailbox when you subscribe! Usually, the kit is for making cards, but sometimes it is something different. This kit even had a specially designed box that is worth saving. The pretty boxes are nice for storage, and we all have plenty of supplies that need storing! While this kit came with Valentine stamps (mostly), the cards are just pretty ones that you could send any time.
I always love opening up the box with everything wrapped in tissue paper and all the supplies sealed up. Then you get to open that package and see what goodies you got to make the project. Adhesive is even included! Usually it is dimensionals and sticky strip tape. Sometimes you get sparkly gems to use as embellishments. Each kit comes with an exclusive stamp set and ink spot. I tend to save my ink spots and use my regular ink pads. There is even a video you can watch to see the whole process from unboxing to assembling the cards or project, if you want a little extra help besides the printed instructions.
Paper Pumpkin is a kit that comes to you in the mail and there is no risk or obligation. Just go into your account after you subscribe and you can skip a month or cancel your subscription any time by the 10th of any month before the next kit gets billed and sent out. It’s good for beginning crafters or those who just like to get a project already planned out and all the supplies in one box!
Join Paper Pumpkin before February 10th to get the cute Celebrate Spring Kit!
Subscribe January 11–February 10 Craft whimsical handmade cards that celebrate Easter and sweet spring days. • Makes 9 cards: 3 each of 3 designs with 9 coordinating envelopes • Precut paper pieces and pink baker’s twine • Iridescent pink and yellow sequins • Coordinating colors: Balmy Blue, Crumb Cake, Lemon Lolly, Peach Pie, Pretty in Pink, Shy Shamrock (Classic Stampin’ Spot)
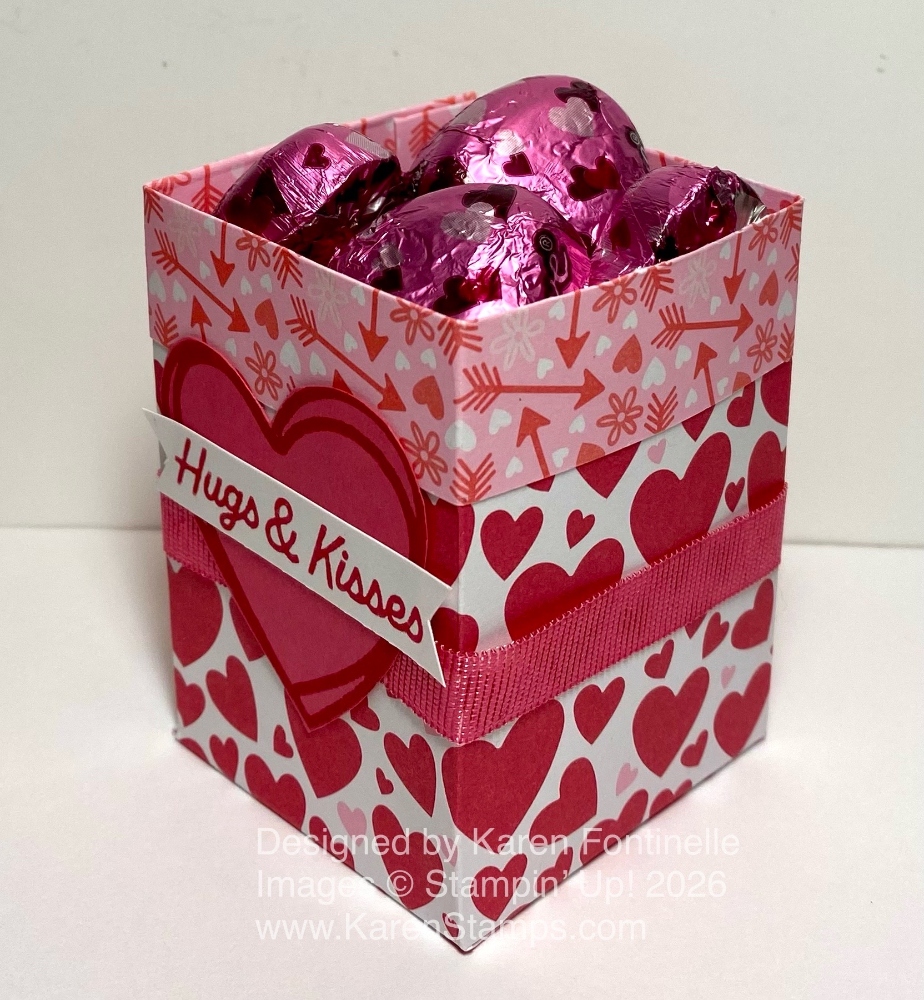
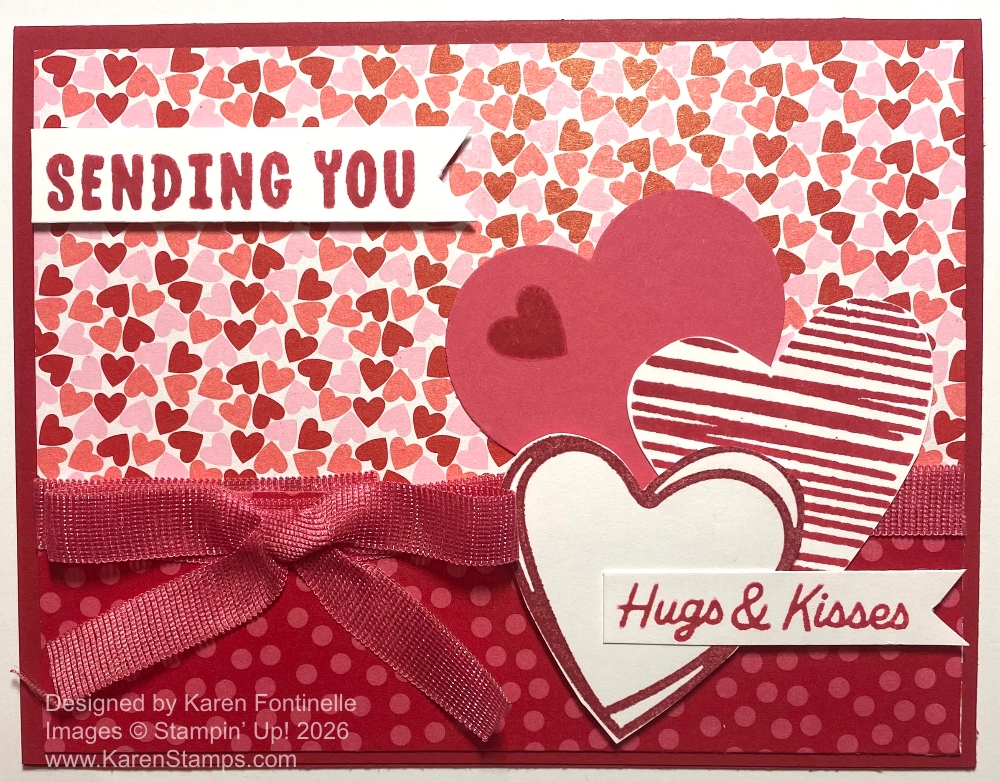
I was so happy with the way this Made With Love Hugs & Kisses Valentine Card turned out, even without a clear idea of what I would make and with so many choices of pretty papers and combinations of those papers! Get the Made With Love Designer Series Paper and the Endless Love Stamp Set, and you are set for making many valentines!
The Made With Love Designer Series Paper is chock-full of hearts in different sizes and colors, X’s and O’s, love arrows, and then the more generic sheets that coordinate with the Valentine sheets but will also be good to use on other kinds of cards. The beautiful colors are Bubble Bath, Flirty Flamingo, Poppy Parade, Real Red, and Strawberry Slush. You will find this paper, stamp set, and all the extras in the Made With Love Suite Collection in the Stampin’ Up! January-April 2026 Mini Catalog on pages 30-33.
If you would like a sticker sheet to coordinate with the Made With Love Paper for scrapbooking or even cards and other projects, check out the Made With Love Designer Series Paper & Sticker Sheet on page 59 of the Mini Catalog. These Sticker Sheets we have had recently at Stampin’ Up! are really fun to use and quick and easy in some cases, too!
For this card, I used Real Red cardstock for the card base. I cut the top layer of designer paper with the small hearts at the usual size 4″ x 5 1/4″, although you could make it a little shorter if you wanted to save a strip of paper, as long as the bottom paper would overlap a little bit. The bottom piece of polka dots is cut at 5 1/4″ x 1 1/2″. Adhere those two papers together before adhering to the card so you can wrap the ribbon around over the seam first. Any time I put ribbon on a card like this, I just extend the ribbon about an inch or less around to the back or the paper on each side, not all the way around. It saves a couple inches of ribbon on each card! Put a little Stampin’ Seal on the back to hold the ribbon. After you have the ribbon attached, adhere the designer paper to the card base. The ribbon I used is the Strawberry Slush 3/8″ Faux Linen Ribbon, which is in the Stampin’ Up! Annual Catalog 2025-2026.
To decorate this card I used three hearts. Two are stamped with theEndless Love Stamp Set. The striped heart is stamped in Strawberry Slush ink (although it looks close to Real Red!) and the open heart is stamped in Real Red, both on Basic White cardstock. I just fussy-cut these by hand. We’ve all cut out hundreds of hearts by hand since childhood, haven’t we??! The Strawberry Slush cardstock heart is just punched out with a heart punch (retired) that I have. I believe it’s the one that came with a scalloped-edge heart punch in the set. I found this heart punch was practically the same size as the stamped hearts so I thought it worked fine. However, there are the Endless Love Dies you can purchase along with the stamp set in a Bundle if you would like dies. Hearts, whether dies or punches, are always useful for your stash! I played around with the placement of the three hearts before settling on this design. The white heart is popped up on Stampin’ Dimensionals.
I used the words in the Endless Love Stamp Set in Strawberry Slush ink on Basic White for the greeting on the card. After stamping them first, I cut them into narrow strips with one end flagged like a banner. The top one is popped up on Dimensionals. The bottom one is adhered with a little Stampin’ Seal on the white heart with a Dimensional under the banner end to be even with the white heart.
Finally, I tied a bow and adhered it to the ribbon on the front of the card with MIni Glue Dots. I thought about adding some gems or jewels, but it was late and I couldn’t even think which ones would go with the card! And, actually, I thought the card looked fine without any bling. There already is a lot going on with the busy hearts paper, the three paper hearts, and ribbon!
Start making some Valentines now so you won’t be rushed when the calendar turns to February, especially if you are going to be mailing some cards!
And on the inside, on a piece of Basic White cardstock, I used the three stamps in the Endless Love Stamp Set, “Happy”, “Valentine’s” and “Day” to stamp the greeting in Strawberry Slush ink. You could also add a scrap strip of one of the designer papers to the bottom. Then you are set to write a little Valentine message or simply sign your card!
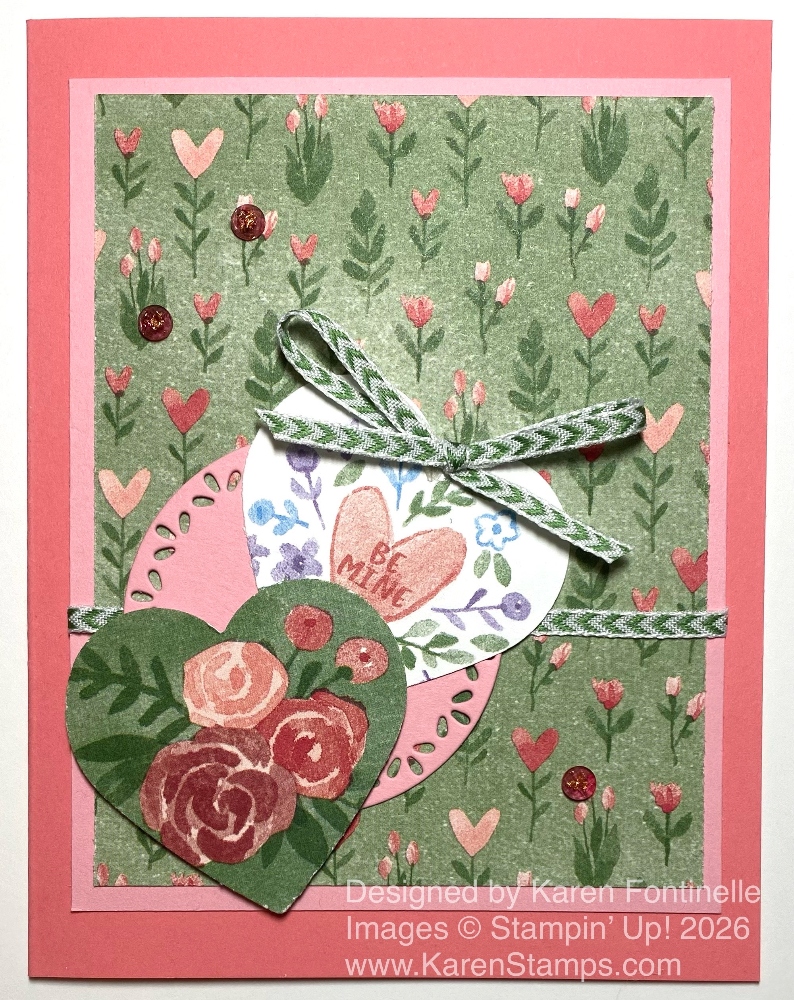
This Love Notes Heart Love Card for Valentine’s Day is fun and easy to make with the Love Notes 6″ x 6″ Designer Series Paper. This paper is cuter and more useful than you might imagine just looking at it in the catalog or online. You can use these 48 sheets of paper, 8 sheets of each of 6 designs, to make all kinds of cards, tags, scrapbook pages, and any projects you want! The cool part is that some of the sheets have cut-apart sections that you can cut down even further if you like to make whatever you come up with.
This card has a Flirty Flamingo card base which coordinates with this Love Notes paper. I used this section with the watercolor-look background and heart. I trimmed down the white margin to fit it on my card base. For the greeting, I cut out the word “Love”, layered it on another piece of the designer paper, then layered that on a piece of Flirty Flamingo cardstock cut into a banner. The banner was cut with the Stylish Shapes Dies, some of my favorites. I popped it up on Stampin’ Dimensionals.
I felt that the card still needed some pizzazz, so I looked through my embellishments and found these retired little hearts and flowers – well, that’s what they are called: Adhesive-backed Hearts & Flowers. I liked the look of the little hearts scattered around the card! If you ever feel like your card needs a little something, look through all your embellishments and you will likely find something to add!
Remember BONUS DAYS!! Spend in $50 increments and earn a $5 Bonus Coupon Code to spend on an order in February during the redemption period! Check your email after you order to find your bonus codes from Stampin’ Up! SAVE THEM!!
I’m here to tell you that if you like to make easy Valentines or a lot of Valentines, this Love Notes 6″ x 6″ Designer Series Paper is for you! Put it on your order right away! If I didn’t already own this package of paper, but I saw this pattern with the little heart flowers, I would buy it just for this sheet of paper! This Love Notes pack of paper has 8 sheets of each of 6 double-sided designs, so that’s a lot of paper you can use making multiples. Some papers are 6″ x 6″ full sheets, but lots are cut-apart designs to be used for making Valentines, tags, scrapbook pages, cards, or whatever you are making. Just trim down the designs you want to use. You can make them smaller than the design on the paper if you like or use part of the design or fussy-cut it for something different. Once you start playing you might not be able to stop!
This photo above gives you an idea of what the papers are like. You can easily cut out one of these square designs or the other larger and smaller designs to make whatever design you want on your card or project.
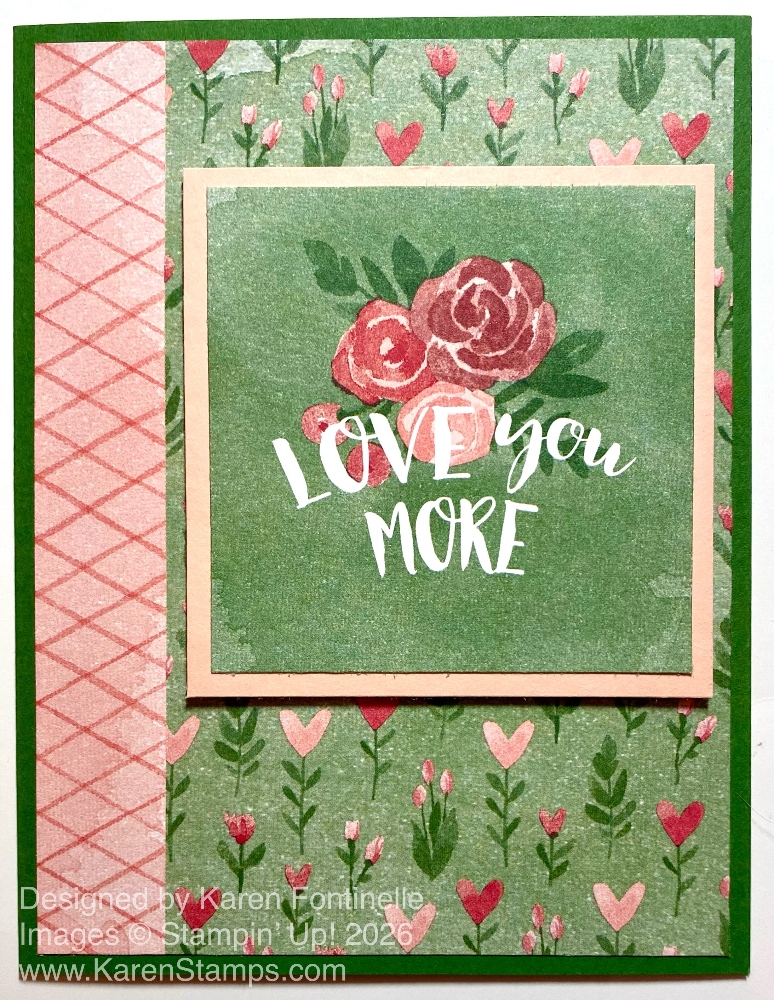
My sample card today has a card base of Garden Green cardstock. The designer paper layer on the card is exactly what the 6″ x 6″ paper looks like except that I trimmed it down for my card. It comes with that diagonal design on the left side of the heart flower garden. I trimmed it down so the side design was only 3/4″ of an inch wide, and of course trimmed down the whole sheet to 4″ x 5 1/4″ to fit on the card front. I didn’t have to add the extra diagonal piece on the side because it was already part of the paper!
The center focal point is one of the square designs on one of the cut-apart papers. It is 2 3/4″ x 2 3/4″. I layered it on a square 3″ x 3″ piece of Petal Pink cardstock and popped it up on Stampin’ Dimensionals.
Now this is one of the rare cards that I did not embellish! No ribbon, no sequins, no gems, no sparkle! I wanted to show you how EASY this card was to make and yet it is still very pretty even without any extra things or work!
On the inside of the card, I added a Basic White layer for a stamped or handwritten message or greeting and I added one of the scrap strips from the heart-flowered paper to the side of the white layer for a little decoration inside the card.
While a lot of this paper is Valentine-themed, you can still use a lot of it for other occasions. So if you need some paper for Valentines and wonder what you will do with the rest, I’m sure you will be able to use it beyond (or before!) Valentine’s Day.
I know some people are not ready to see Valentine’s cards, but we are crafters, and we have to get a head start! I saw a funny post on Instagram before Christmas by a dad who posts jokes , who said he was shopping too late, his family was going to get Valentine gifts for Christmas! I haven’t been out in the stores yet since Christmas, but I imagine it’s all Valentine’s now! So here is my first Made With Love Valentine’s Day Card.
You’ll find this Made With Love Designer Series Paper in the upcoming January-April Mini Catalog 2026, going live on Tuesday, January 6th. It is part of the Made WIth Love Suite Collection which also includes the Endless Love Stamp Set that I used for the greeting. There are also the Endless Love Dies,which you can buy in a Bundle along with the stamp set. Those weren’t used on this card.
The card base is Poppy Parade, a color I haven’t used very much recently. For some contrast, and to try out the new papers, I chose two different papers for this card. I first cut a piece with all the hearts at 4″ x 5 1/4″, but later I cut it down to 2 1/2″ x 5 1/4″. I was trying to get a mixture of lighter and darker hearts, an ombre effect on the paper, so I trimmed some off the top and some off the bottom to get the middle. I saved those two 3/4″ x 5 1/4″ strips and added those top and bottom on to the Basic White layer I put inside the card so it would be ready for a stamped or written message. I think the first card I made with this paper had more of a distinction of the colors of the hearts. Whatever you end up with is fine, though! All the hearts are pretty! Then at the top and bottom I adhered 1″ x 5 1/4″ of the tiny hearts paper to the card, and then the big hearts panel right in the center.
The greeting is stamped in Flirty Flamingo ink on Basic White and then diecut with one of the labels in the Traditional Labels Dies. These are on the Last Chance list and discounted a tiny bit right now. I hate to see these dies go. I have used them a lot.
For some embellishments, I used Strawberry Slush 3/8″ Faux Linen Ribbon behind the sentiment. I like to apply some Stampin’ Seal Adhesive to the back and get the ribbon placed how I like it with the help of that adhesive. Then I also used Stampin’ Dimensionals to help hold down the ribbon and also pop up the greeting. I also tried out the new Pearlized Faceted Circles. They have several different shades in the package so they will go with a lot of colors. You will find these in the Spring Mini in the Lovely & Beautiful Suite Collection. But they will also go well with any Valentine projects and lots of other things.
View the papers in the Made With Love Designer Series Paper.
BONUS DAYS COMING JANUARY 6! With every multiple of $50 you spend, you will receive a $5 coupon code to use on an order in February. You must have your own Stampin’ Up! account and correct email address to be eligible to receive the coupon code.
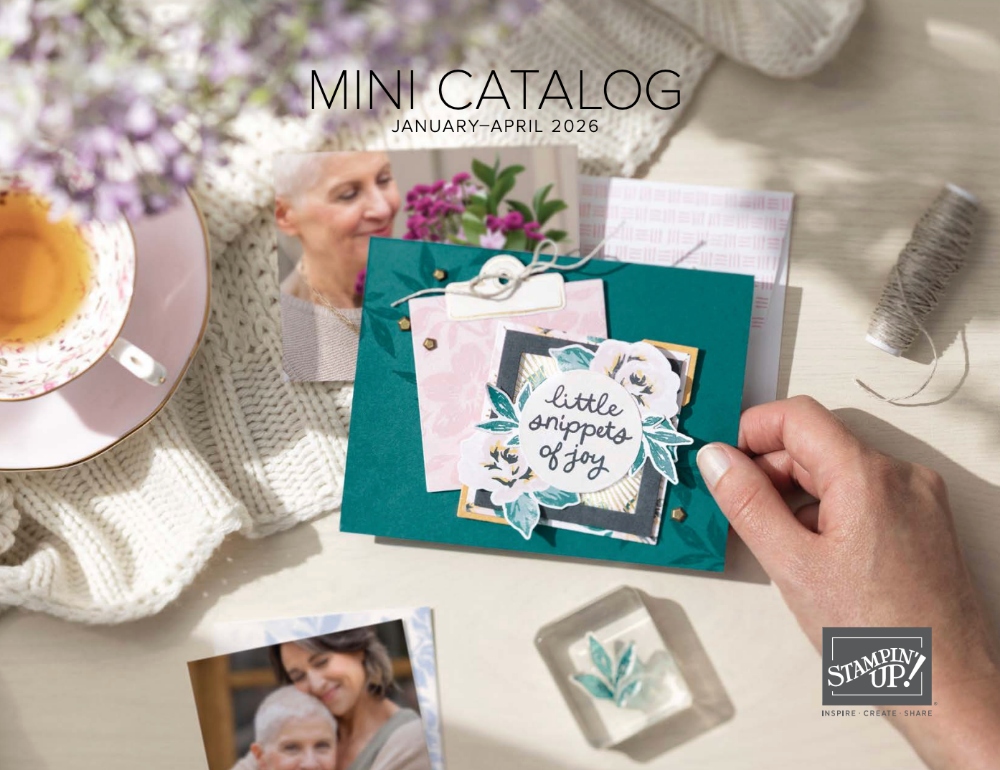
NEW SPRING JANUARY – APRIL 2026 MINI CATALOG LIVE Tuesday, Jan. 6th.
NEW ONLINE EXCLUSIVES on Jan. 6th.
NEW KITS on Jan. 6th!
Mark your calendar for Tuesday!! It’s a big day at Stampin’ Up!
And not just the January-April 2026 Spring Mini Catalog will be available, but also new January Online Exclusives beginning January 6th! PLUS a new Product of the Month and three new Kits in the Kits Collection! Now that’s a day worth circling in red on your calendar! It’s all coming in the New Year on January 6th! At the same time, the Holiday Mini Catalog will end on January 5th, but now we have this new system of some carryover products being shown in the Online Exclusives and retiring products going in the Last Chance Category. I think I have that right, anyway!
Here are some sneak peeks of the new Mini Catalog and Online Exclusives products that I ordered before Christmas and barely got to look at until now.
These stamp sets are all in the new Spring Mini except for the Lovely Arrangements Stamp Set is an Online Exclusive in the Lovely Blossoms Suite Collection. The Easter Basket Dies (part of the Easter Basket Bundle which includes the stamp set and dies) is next to the stamp set and says “Stampin’ Cut & Emboss” at the top with the name of the dies in tiny print above the images. Remember, these are all in the new packaging of the plastic sleeves rather than the cases for the stamp sets so if you want to, you can slide the dies in with the stamp set. I haven’t thought about yet how I will organize these sets with the new packaging.
Three new Spring Mini ephemera packs, the bottom one being vellum with gold foil. I have been loving using the ephemera packs for “quick and easy” cardmaking or other projects!
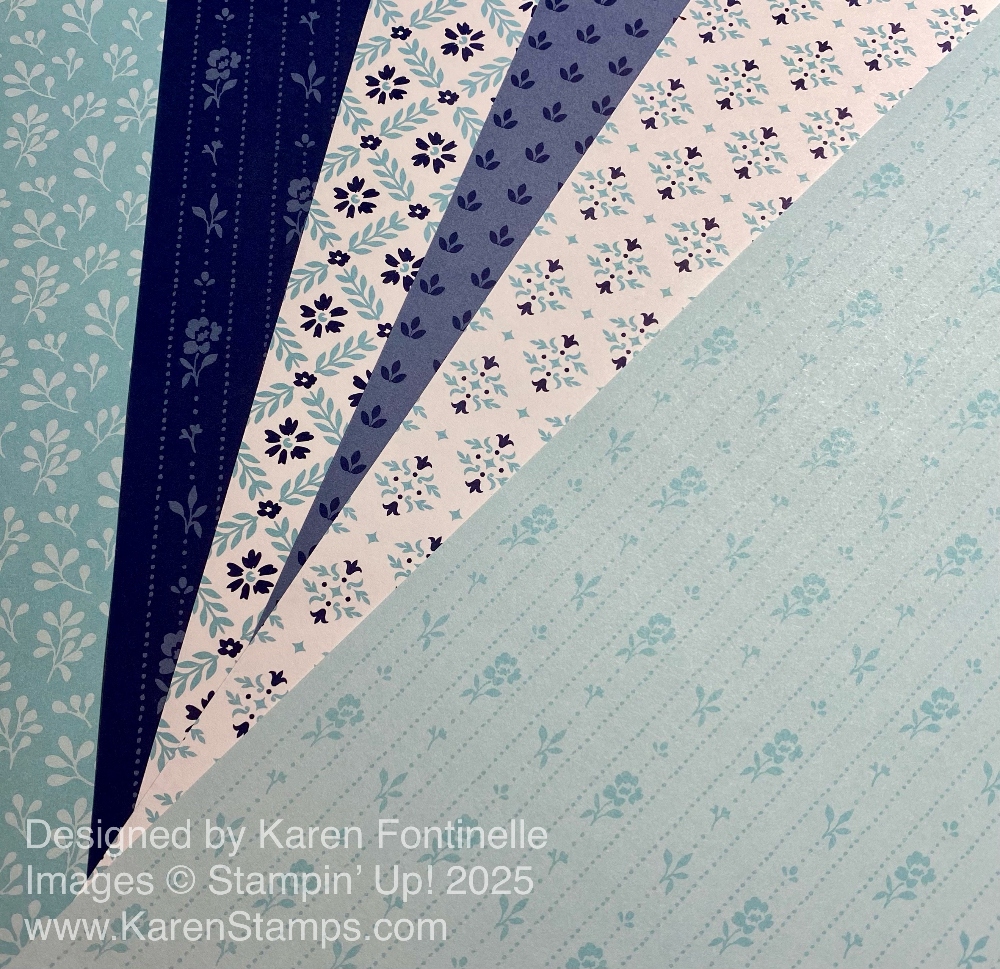
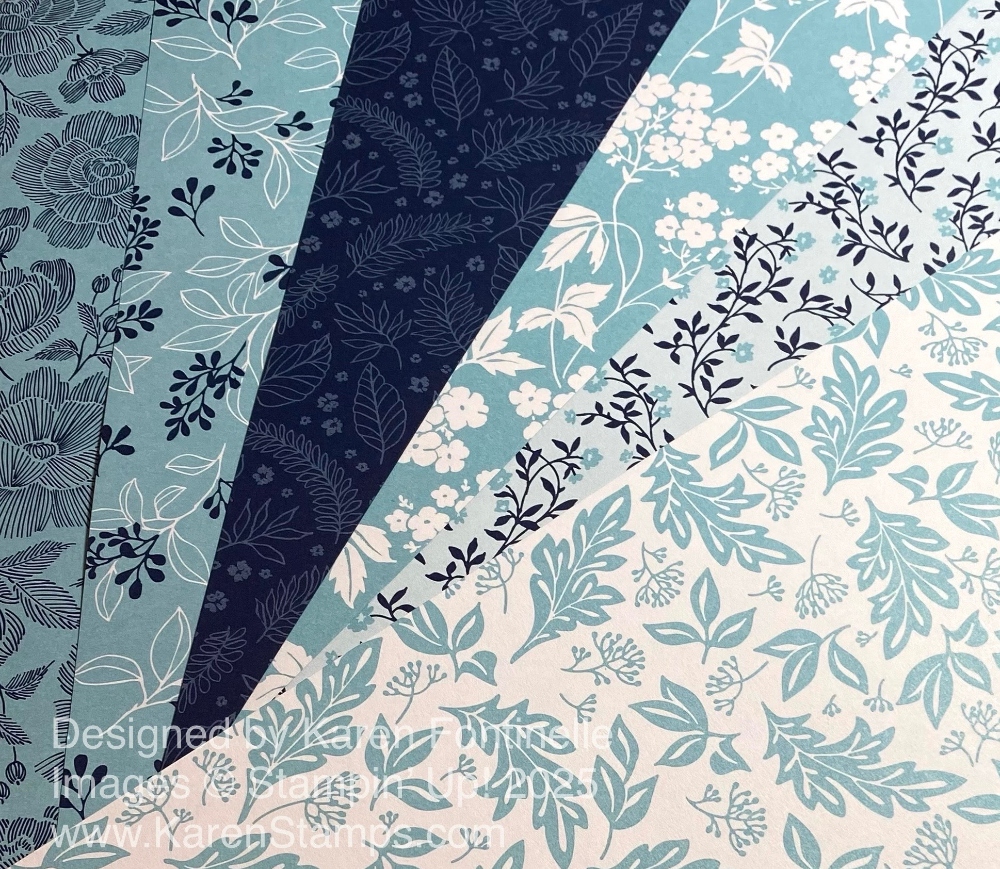
I didn’t open the packages, but here are the new designer series papers I ordered! Some floral, some Valentine’s, some Easter, and BUGS! Living in Houston, I’m not one to make any cards with bugs on them because we see too many of the real creatures in our daily lives living here in the tropics! But this Cute As A Bug Suite Collection is pretty cute so I did get some bug stamps and bug paper! However, the Cute As A Bug paper isn’t all bugs – it has strawberries and mushrooms on separate sheets as well so I can tolerate that! But these bugs are CUTE!
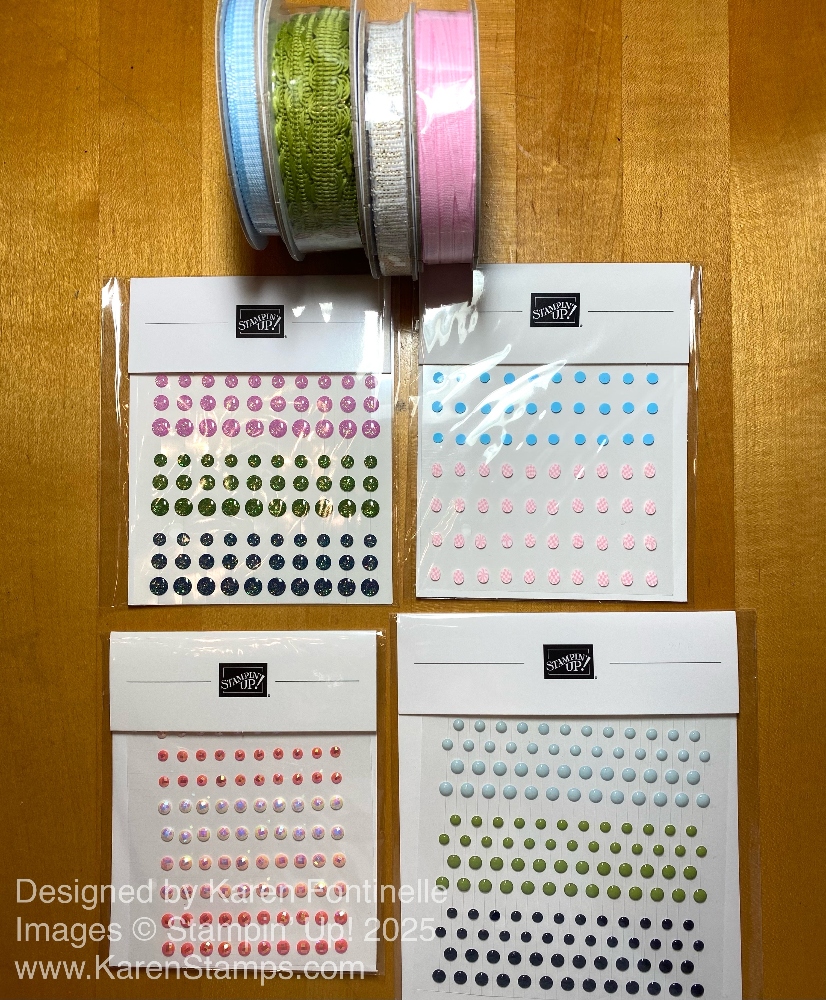
Some new ribbon and embellishments for all our fun projects!
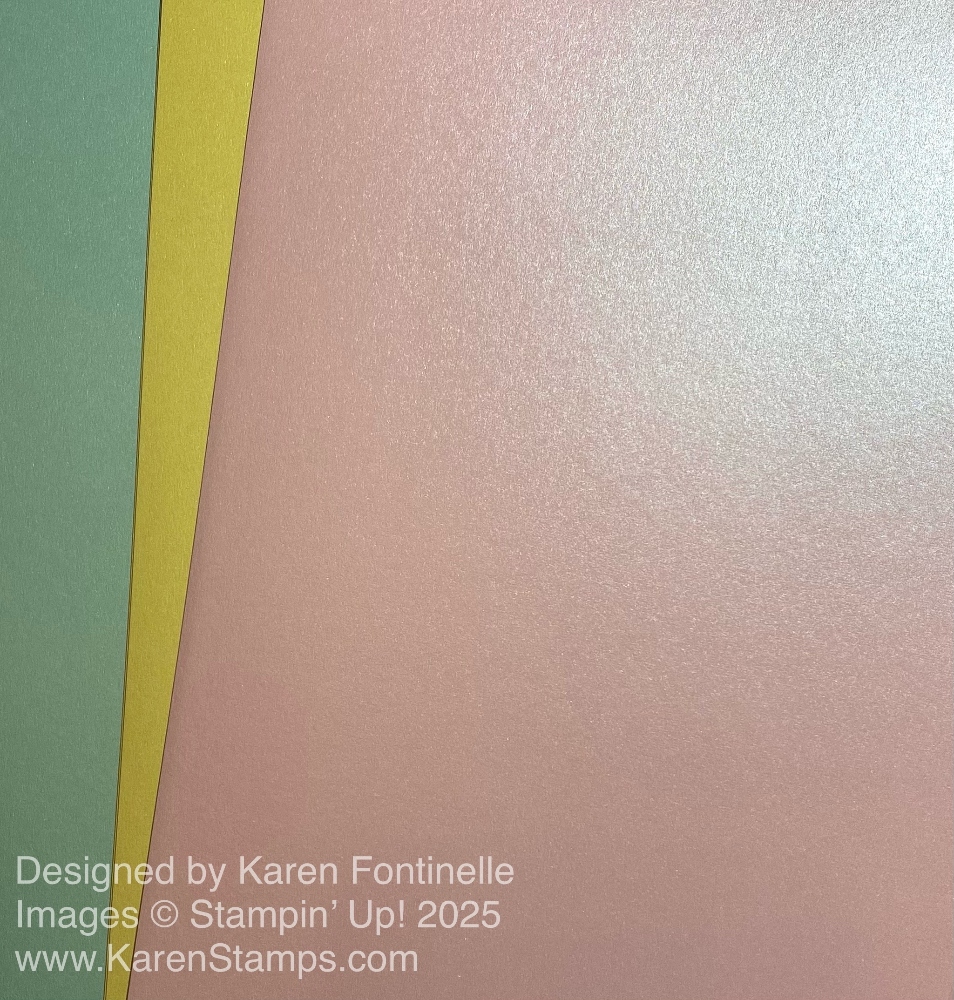
The Product of the Month for December, True Blue Florals Designer Series Paper, is still available as I write this and can be purchased with a minimum order, after any Rewards or coupons, of $75. When the January POM comes out, if the December POM is still available, you can choose either one with your $75 order. One to a customer.
Beautiful Pastels Shimmer 12″ x 12″ Specialty Paper, perfect for springtime and Easter cards and projects! The colors are Bubble Bath, Lemon Lolly, and Pool Party.
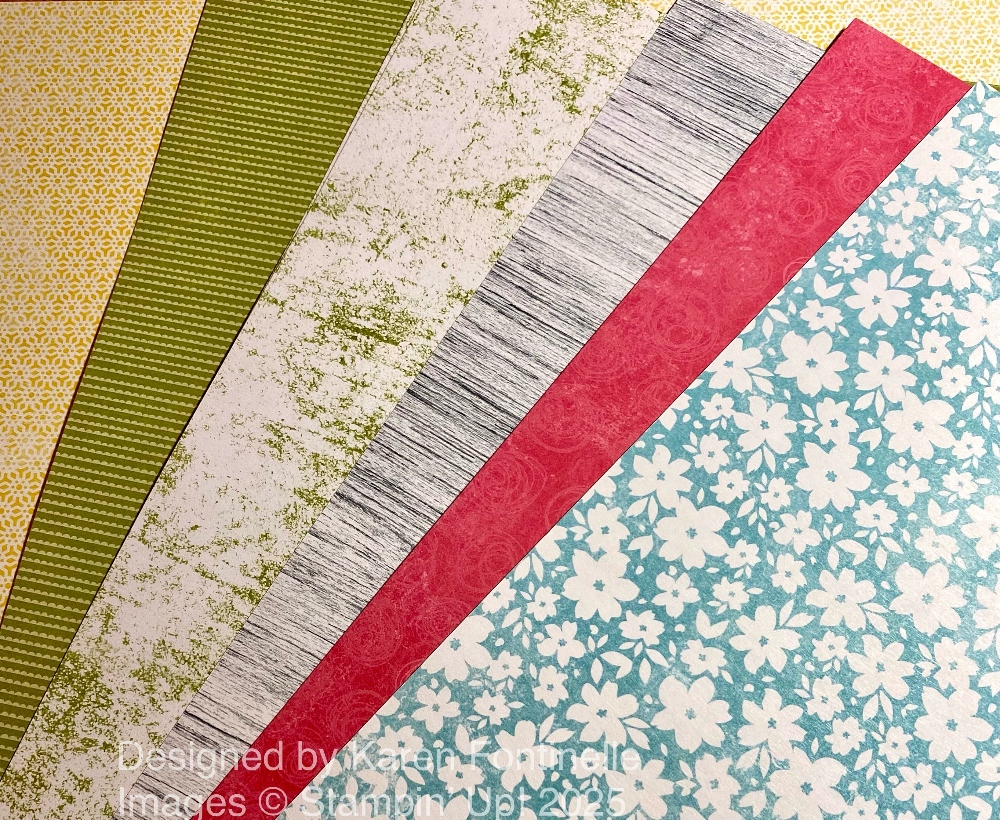
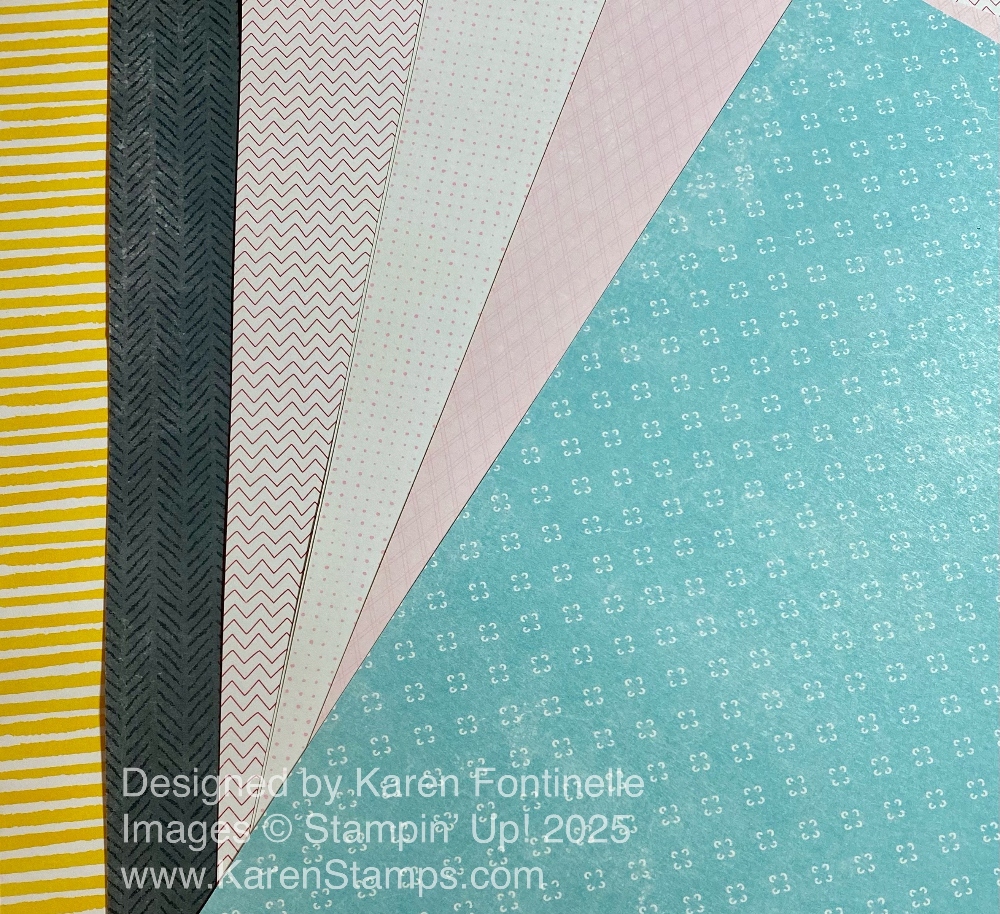
The two photos above show both sides of the new Mixed Up Patterns 12″ x 12″ Designer Series Paper. This paper coordinates with Suites and products in the new Spring Mini.
If Christmas is over, Valentine’s Day is not far behind! This cute Love Notes 6″ x 6″ Designer Series Paper in the Spring Mini is much like other paper we have had with cut-apart smaller images to use as parts of your cards or other projects and scrapbook pages. But other sheets are regular 6″ x 6″ designer series paper so you get both in one pack!
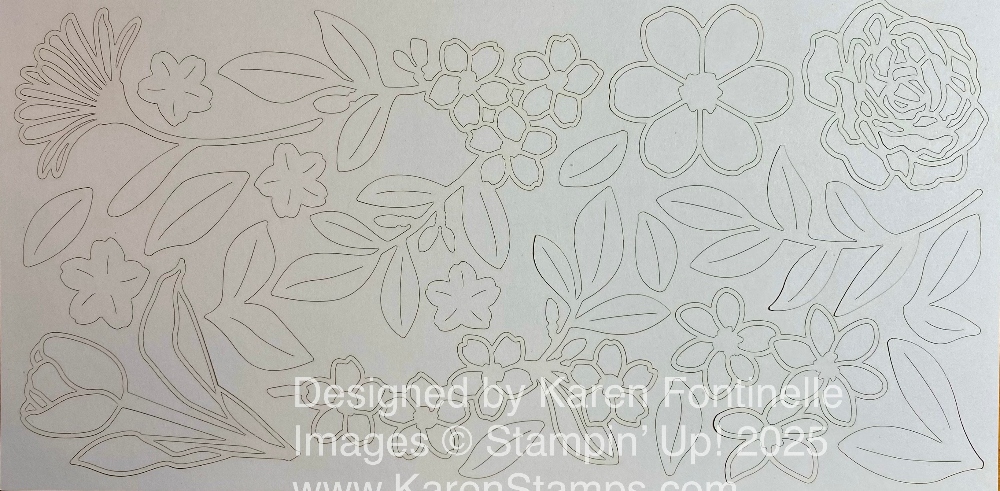
This may be a little difficult to see, but it is one sheet of diecut flowers and foliage. This is the Covered In Flowers Accents. The whole sheet is white so you can use as is or color the pieces as you see fit. It is called “paperboard” and is thicker than designer series paper. I used it on a card my newsletter subscribers will see tomorrow (so sign up in the red box if you want to receive my newsletters on Tuesdays!) and I liked using the flower very much. They are diecut so you just poke out the pieces you want. For that card I just left my flower as is. Another time I will try coloring and see how it turns out. The only thing is, as I said, it is just one sheet, so you may want multiples.
So this gives you a little peek into what is coming next week, January 6th, in the new Spring Mini and the Online Exclusives for January. Plus there will be three new Kits in the Kits Collection and new Product of the Month (POM). Always remember to check the Last Chance list as well before you place your order and try to find a bargain!
It’s finally here! Do you have a special Valentine’s Day planned? Does it remind you of when you were in elementary school and had a party at school where everyone exchanged valentines? I think we either made our own valentines with construction paper, paste or Elmer’s glue, and doilies or we bought a box of valentines with envelopes that we would just sign on the back to give out to classmates. Then we also had a decorated shoe bag or lunch sack at our desk and everyone would scurry around delivering valentines! Even when my kids were in school I remember getting to meet other moms in their classes to help with the Valentine party.
The greeting is stamped with Melon Mambo ink on Basic White cardstock. This is in the Hearts of Elegance Stamp Set. The banner shape was then cut out with one of the Stylish Shapes Dies. To add a little bling, I added some gold gems. You can use whatever you have. Lots of embellishments would look very pretty!
Have a wonderful Valentine’s Day and I hope you get some good chocolate candy!