Tag Archives: Playful Alphabet Dies

Halloween Ghosts Boo Card

Halloween Ghosts Boo Card

It’s time to make some fun Halloween cards like this Halloween Ghosts Boo Card! While I can’t believe it is October already, the time is here to enjoy the preparations for all the upcoming holidays, including fall and Halloween! Several houses have their Halloween decorations up already which I enjoy going for our walks around the neighborhood every day. I love the fun part of Halloween and hope to get more Halloween cards and treats made soon! Remember, if you are mailing Halloween cards to anyone, better send them extra early since the mail has been “slowed”.

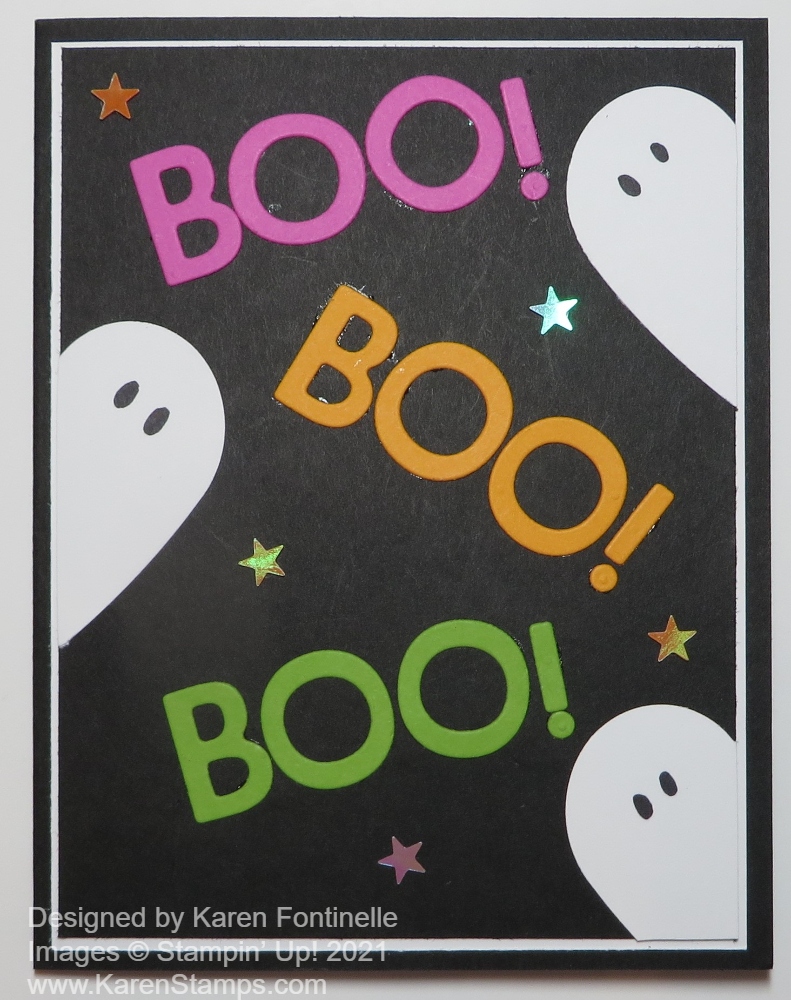
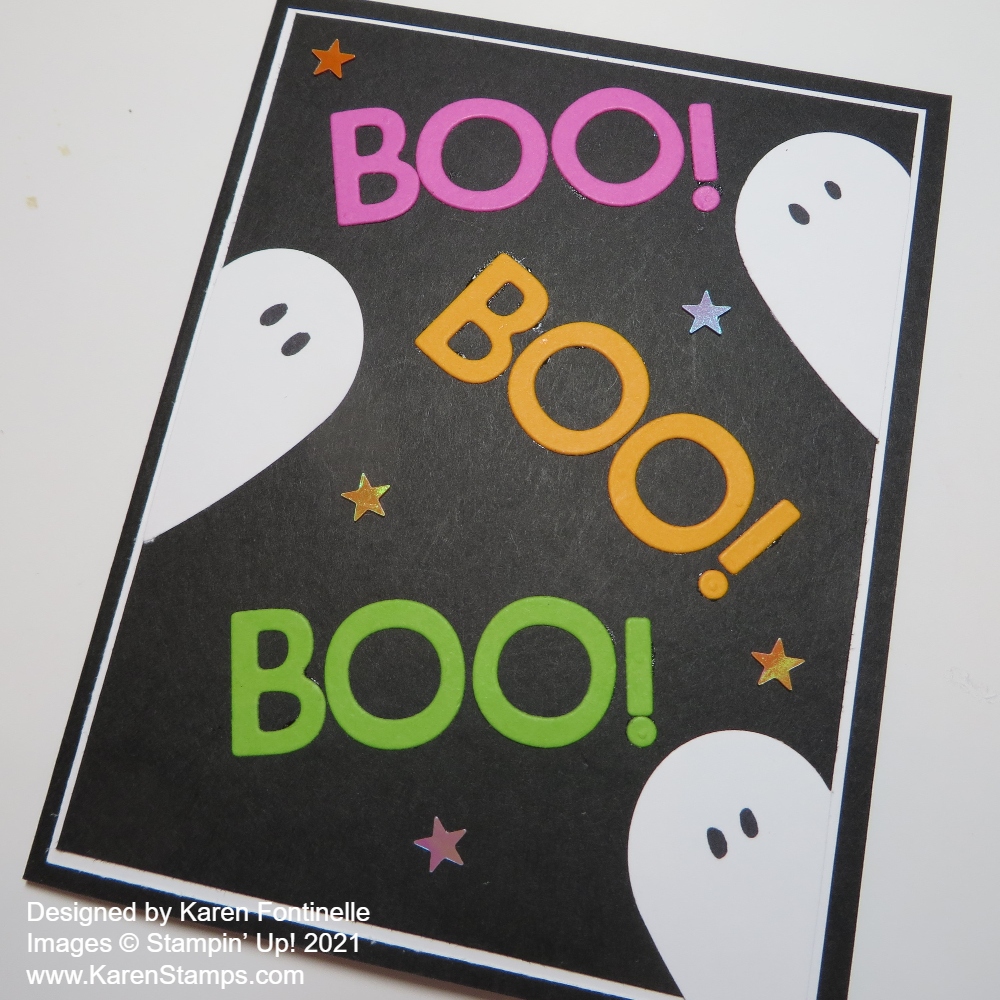
This card has a Basic Black base with a layer of Basic White with just a thin margin. The front of the card is Basic Black so that my colorful words and ghosts would stand out. I’m not sure where I got the inspiration for this card, maybe from myself when I made THIS CARD. I loved how the “BOO” turned out on that card and maybe that’s what made me think of the idea for this card!

The words are spelled out with the cute letters die cut with the Playful Alphabet Dies. This is a die set I haven’t used very much but I should! It’s really very useful and different to use on cards and projects. The font of the letters is just fun, I think. I used some bright colors to stand out against the black, like Granny Apple Green, Mango Melody, and Magenta Madness. There are other colors you can use that work just as well. Just experiment and see which colors you like the best! There is an exclamation point in that die set as well and I think it goes well with these words.

The ghosts have a little story, which you may have heard before and will likely hear again! Just before I signed up to be a Demonstrator, I was visiting my friend in St. Louis and went with her to her team meeting. There were lots of displays of cards, of course, and one had ghosts like on this card. Do you know how I made them? They are hearts cut in half! I used the plain heart punch in the Heart Punch Pack but you could use any punches or heart dies that you have. Then just cut the heart in half from the bottom point up! When I saw that at this meeting, I was completely taken by that creative idea! Then you can adhere them to the sides of the card as if they are peeking in! I just drew on the black eyes with a black marker. You could punch tiny circles or use googlie eyes! So fun!

As a finishing touch, I added some Cute Stars Adhesive-Backed Sequins. I wish they were in more colors, but these worked okay. I love it when these embellishments come with adhesive on the back rather than using a tiny drop of glue!

Halloween Ghosts Boo Card angle

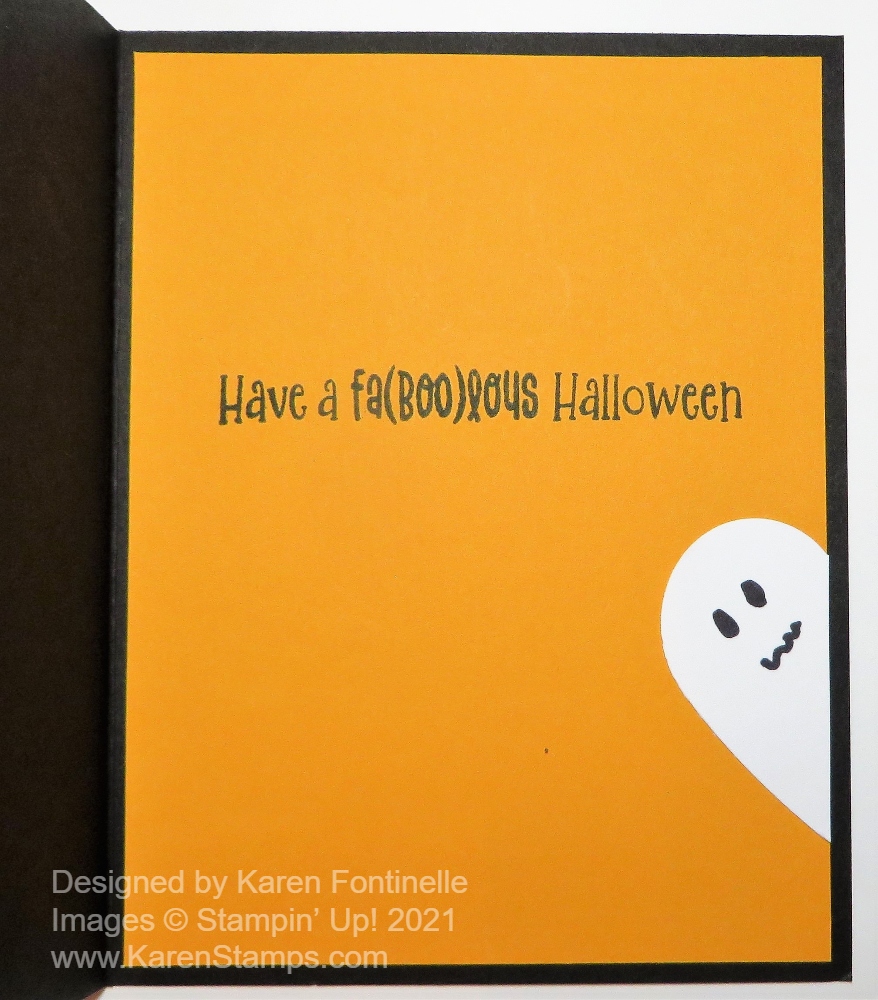
Since the card base is Basic Black, unless you are going to use white embossing for a message inside or a white gel pen, you need to add a layer of a light color, usually Basic White, to the inside of the card. This time I thought I would use a different color since it’s a Halloween card after all. I used the same Mango Melody I used for one of the words. The greeting is stamped from the Cutest Halloween Stamp Set. And since I had an extra half of a heart, I made a ghost peeking around the corner on the inside of the card as well!

Halloween Ghosts Boo Card Inside

This is one of those cards I REALLY enjoyed making and REALLY like how it turned out if I do say so myself! LOL! Actually, you could make this as just a card front and maybe put it in a little frame and use it for a home decoration! Those tiered trays are all the rage on Instagram with people putting an abundance of small decorations on them for each holiday! You could make your own decoration with a card like this! I might try that myself now that I thought of it!

This is the best time of year with fall weather, fall decorations, and anticipation of all the upcoming holidays! Get your supplies out and start stamping! If you need some supplies, just go shopping at my Stampin’ Up! Online Store HERE! And TOMORROW, October 6, new items will be added to the Stampin’ Up! Clearance Rack!! The early bird gets the worm!

Cute Halloween Ghost Boo Card

Cute Halloween Ghost Boo Card

My first Halloween card of the season! I love this cute pack of 6″ x 6″ paper with Halloween designs! I love the cute and whimsical Halloween styles, not the scary, dark ones. I’m hoping we can have normal trick-or-treating this year because I love handing out candy to the little ones, especially. Last year I had to block off my front door and put out a sign saying “See you next year!”

This card uses the Cute Halloween Designer Series Paper which is the 6″ x 6″ size. I just picked out the top sheet in the pack with these cute flying ghosts with their trick-or-treat bags! Isn’t that cute??!!! When I turned the paper over, I saw the design was the tiny printed “Boos”. I just had to use that on the front of the card along with the ghosts! That section started out being wider but I didn’t want to cover up much of the ghost paper.

The card base is Highland Heather with a layer of Basic Black. I played around with those two colors and Pumpkin Pie to see which ones I wanted to use and in which order. I think any other combination would also look good. I ended up with a very thin strip of the Boo paper on the left side of the card. To cover the seam and to add another color, I cut a very thin strip of Pumpkin Pie cardstock in between the two designs.

For a greeting, I got the idea to cut out the letters to spell “Boo” with the Playful Alphabet Dies. I haven’t used these dies much, but I love how they turned out on this card! I cut the letters and exclamation point out of Pumpkin Pie cardstock and layered them on one of the Tailor Made Tags Dies. You would think I shouldn’t use Highland Heather as a color for the tag because it blends into the background color of the designer paper too much, but I kind of liked that because it helped the letters stand out without detracting too much from the ghosts. I popped up the tag on Stampin’ Dimensionals® and tied on a piece of the Black & White 1/4″ Gingham Ribbon.

Sometimes you make a card and it’s just fine and you like it, and sometimes you make a card and LOVE how it turned out! That is how I feel about this Cute Halloween Ghost Boo Card and I hope it will inspire you to make some fun Halloween cards with this cute Cute Halloween paper!

SHOP STAMPIN’ UP! ONLINE HERE!

Playful Alphabet Valentine

Playful Alphabet Valentine

Express your love with some “X’s” and “O’s” plus hearts on a card like this Playful Alphabet Valentine. It requires some die-cutting and a little stamping, but it’s a fun card to make and I’m sure to receive!

The card base is Real Red with a layer of Basic White Cardstock. I cut it a little smaller than normal (5″ x 3 3/4″) to allow more of the Real Red card base to show. I also cut a strip of Basic White (5″ x 1″) layered on a wider strip of Real Red (5″ x 1 1/4″) for the center (or so) of the card on which to layer the X’s and O’s.

I used the Playful Alphabet Dies to cut out the X’s and O’s and adhered them to the Basic White Strip with tiny dots of Multipurpose Liquid Glue. For an extra embellishment, I die-cut two strips of hearts in the Many Hearts Dies.

The little red hearts at the top and bottom of the card are from the Lots of Heart Stamp Set. Normally I might stamp the little hearts randomly on the area where I want them to show, but with the strips of die-cut hearts having open hearts, I didn’t want stamping interfering behind them. I probably should have positioned the center portion of the card better so the hearts at the bottom weren’t so crowded. But I doubt the recipient will be as critical as we are of our own work! We should remember that as we are making and stamping our cards!

That’s all there is to this card. On the inside, you might add a Basic White layer either stamped with a few hearts in the corner or along the top or bottom, or maybe add another X and O for fun! You could just stamp a greeting on the Real Red in black ink, too.

On the front of the card, if you wanted to embellish more, you could add the little Resin Hearts or rhinestones at the beginning and ending of the X’s and O’s. I might have done that, but I also thought maybe the card was busy enough and didn’t need anything extra.

Valentine’s Day is coming soon so take some time to make some valentines for your family or maybe some to mail! Receiving your card might be the only Valentine celebration they have this year! Use this Playful Alphabet Valentine to give you some ideas for making your own valentines today!