There’s so much to love about fall—some love the haunts of Halloween, many love the time to give thanks, and others love the changing colors and cooler temperatures.
Whatever you love most about fall, September’s kit has everything you need to celebrate the season your way! Between a multi-occasion stamp set and enough supplies to design 20 cracker box treat packages, you can create custom fall crafts to celebrate Halloween, Thanksgiving, pumpkins, and leaves.
Whether you make them all the same or mix ‘n’ match your crafts, there’s something for everyone in this kit! Remember, you can make anything you want with a Paper Pumpkin Kit and alternative ideas are always posted on the internet after people start making their kits!
I love the look of the Paper Pumpkin box for this month and can’t wait to get it and see what is inside!!
Thursday, September 10th is the last day to sign up to get this September Kit!
Sometimes you just need to stamp and do some coloring! I needed some relaxation and stamping images randomly on a card and then coloring them with markers was just the perfect thing! I think we all need a hobby of some kind to turn to for a little stress relief and enjoyment! Stamping certainly is mine!
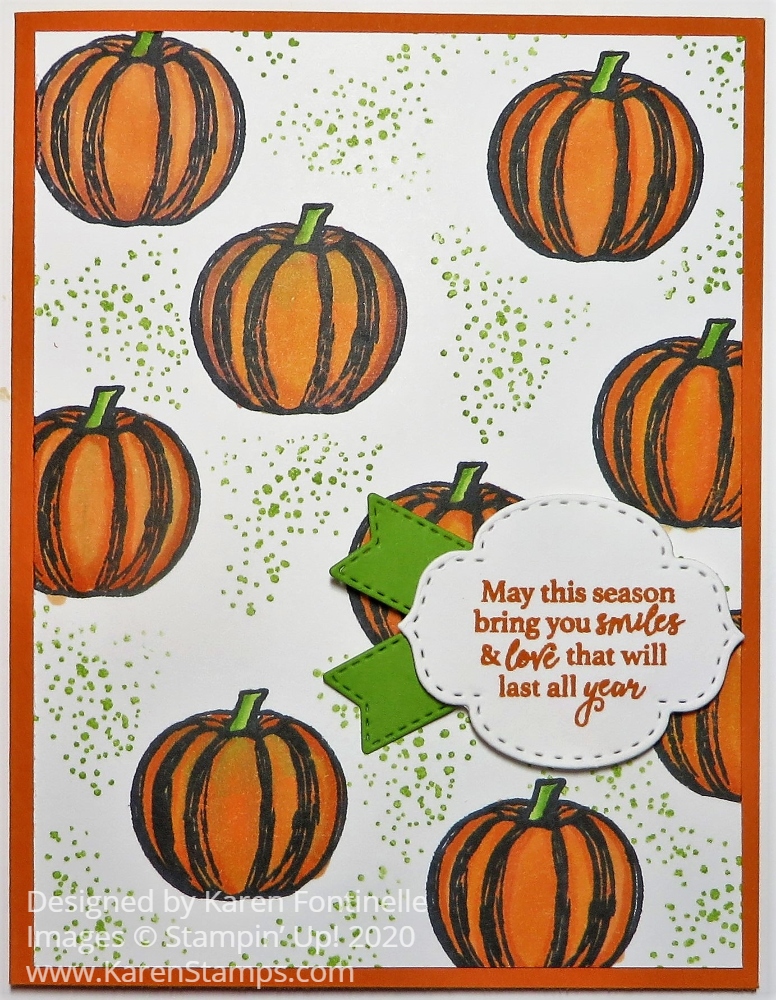
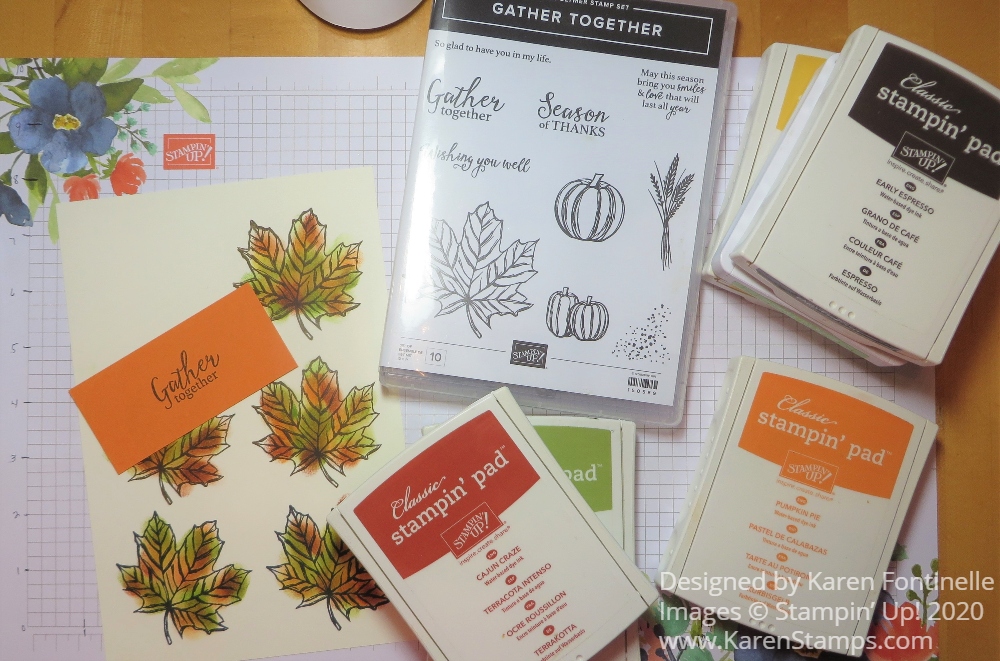
These pumpkins are images in the Gather Together Stamp Set which was in the Stampin’ Up! Holiday Catalog last year. You can click on that link to view the PDF of the catalog from last year and get more ideas for samples for that stamp set and dies, but of course most things in that catalog have retired. It was a favorite and I was happy to see it return this year!
There is also a set of dies that go with the Gather Together set, the Gathered Leaves Dies. You can purchase the stamps and dies in the Gather Together Bundle and save 10%! The leaves are also very pretty in this stamp set.
To make this card, stamped the pumpkins randomly on a piece of Whisper White Cardstock. I used Memento Ink since I was going to color in with our alcohol markers, Stampin’ Blends. Mainly I used the Light and Dark Pumpkin Pie with a touch of Light Daffodil or Light Granny Apple Green. I also had out Cajun Craze and used that on a few for a slightly darker shade. The stems are all Light and Dark Granny Apple Green.
After I had the pumpkins stamped and colored it, I was tempted to stamp in the empty spaces with that dotted image in the stamp set. I wasn’t sure I should and perhaps ruin my card after all that coloring. But I was daring and I did it! I chose Granny Apple Green Ink and stamped off on my Grid Paper first to make it a little lighter. Since it is a photopolymer stamp and I could see through it, I could see if the stamp was going to fit in a space so I wasn’t stamping on the pumpkins. I think it added a little something to the card!
I have to admit I was a little sloppy in my coloring on a couple of the pumpkins. I used the Color Lifter but in my opinion it doesn’t always work as well as I would like. Maybe it depends on the color. And it wasn’t that bad, but I was able to cover it with my greeting! Remember, there almost always is a way to fix a mistake…..in fact, there are no mistakes in stamping!
I stamped the greeting in the stamp set in Pumpkin Pie ink and die-cut it with theStitched So Sweetly Dies. There isn’t something that layers perfectly underneath it, so I chose the flagged banner die in the Tasteful Labels Die Set. It barely stuck out on the sides of the greeting, so I cut it in half and was going to make each end longer sticking out from the sides. It was a little tricky to fit on the card the way I wanted it, so I got the idea to put the two pieces off on the left side almost like two tail ends of ribbon. That’s something different and it made the greeting stand out a little. The greeting is popped up on Stampin’ Dimensionals.
That’s really all these is to the card. The stamped layer was adhered to a card base of Pumpkin Pie. I tried an extra layer either in Granny Apple Green or Basic Black but I like it fine just on the Pumpkin Pie card base.
Here’s another card with stamped pumpkins from the Gather Together Stamp Set that I cut out and arranged in a group on a card.
Sometimes it is good to get back to some basic stamping and whatever coloring technique you like for a simpler card. Pick this stamp set or another one you like and stamp the image randomly for the background of the card. If you don’t want to color in, just stamp in a color. See what you can make using my Gather Together Fall Pumpkin Card as inspiration!
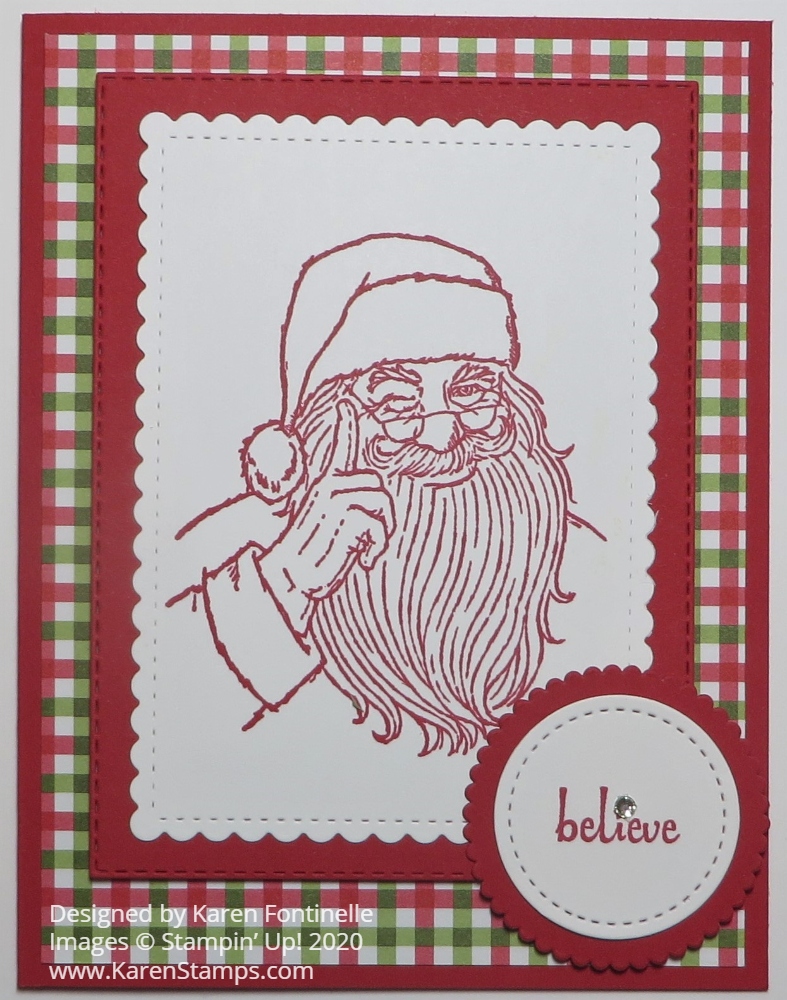
I got this Don’t Stop Believin’ Santa Christmas Card idea from myself, from Pinterest! I happened to see my Christmas Pinterest board and spotted a card I made last year with the Holly Jolly Christmas Stamp Set and thought I could do the same thing with a current stamp this year!
I planned to call this a monochromatic card, but since there is green in the plaid paper, maybe it’s technically not monochromatic! The card does have a “red” theme, though.
I wanted a layer underneath the Santa in Real Red but the Rectangle Stitched Dies don’t fit the Stitched So Sweetly rectangles exactly. I wasn’t quite sure what I was doing, but I shortened the Stitched Rectangle so it would fit the Santa better. You can find the best technique for doing this, but I took a guess and it worked. I die-cut the rectangle part way, then moved the die up so it would be shorter, keeping the die fit into the part that was already cut. You can feel it, if it is still in its die-cut design.
Next, I stamped the word “believe” in Real Red ink from the Itty Bitty Christmas Stamp Set. That word is die-cut with a small Stitched Shapes circle die. Then this was layered on a scalloped circle die in the Layering Circles Dies in Real Red.
There is a tiny star above the “i” and I thought it would be cute to put a smallRhinestone above it, almost like the twinkle in Santa’s eye. Actually, I’m not sure I like the rhinestone there, maybe some rhinestones scattered around the Santa would have been better. What do you think?
I popped up the Santa image and layers on Stampin’ Dimensionals and also the greeting. I had to put the Dimensional under the greeting off to the one side so it would line up with the popped up Santa image. Otherwise, one side of the greeting would be above the Santa. I did add a Mini Glue Dot to the side of the greeting that would overlap the Santa image to hold it in place there.
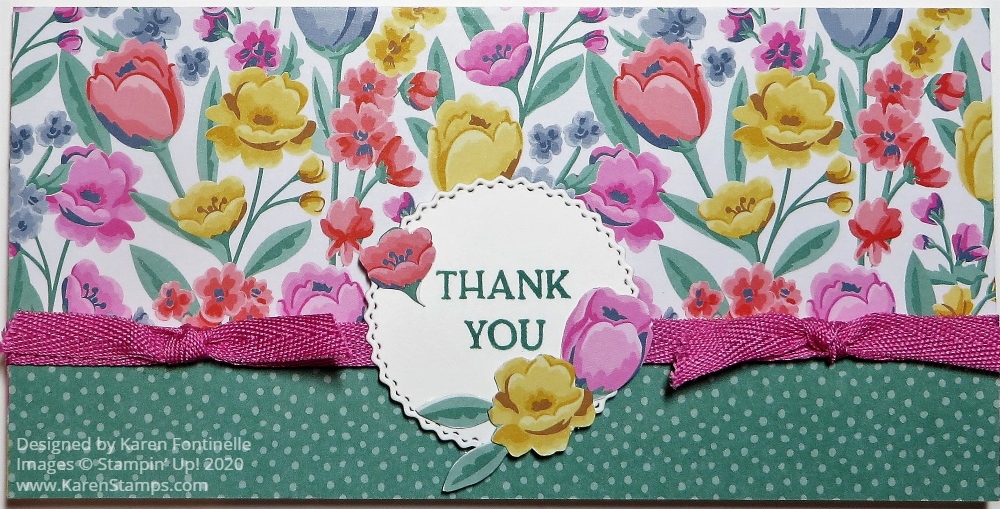
If you are looking to make a “happy card”, look no further than this Flowers For Every Season Thank You Slimline Card! Some days you just need something “happy” and the flowers and colors in this pretty paper will improve anyone’s mood or day!
This is what is called a slimline card since it is long and narrow. You can make these cards longer and a little less narrow and they will still fit in a business-size envelope. Since this paper is 6″ x 6″, I thought 6″ wide would be plenty slim-enough. Half a sheet of the designer paper would fit on the card front. This card will fit in that smaller regular size envelope that people use, not our good Stampin’ Up! envelopes.
For this card, I just made a card base of Whisper White at 6″ x 6″ folded in half to 6″ x 3″. I chose two patterns of the Flowers For Every Season Designer Series Paper for this card. There isn’t any margin, the designer paper is the full size of the card base. Actually the flowers and the polka dots are the same sheet of paper, opposite sides. I just cut each piece wide enough to overlap on the front of the card and adhered a ribbon across the seam of the two papers. It’s a very easy card to make.
The ribbon is the pretty Magenta Madness In Color Ribbon. I adhered it around the designer paper layer and then adhered the designer paper to the card base. I also tied a knot on each side of the greeting.
The greeting is in the Blossoms In Bloom Stamp Set. I wanted it to fit on this particular circle die cut so I stamped the words individually one above the other. Make sure the stamp is completely clean so you don’t get a bit of ink where you don’t want it. It is stamped in Just Jade Ink to match the polka dot paper, then die-cut with that pretty circle in the Tasteful Labels Dies. As extra little accents on the greeting, I cut out by hand a few flowers from the designer paper and adhered them to the greeting die cut. The greeting is popped up on Stampin’ Dimensionals®
If you would like to try something a little bit different but easy, try one of these narrow, slimline cards. Here is another one I made recently that I really liked making.
While we are all getting excited and beginning to get wrapped up in making holiday cards and projects out of the new August-December 2020 Mini Catalog, let’s not forget the pretty things in the Stampin’ Up! Annual Catalog. There is still time for colorful flowers like on this lovely designer paper and we could all use some bright and happy colors and cards in our lives right now so try something like this Flowers For Every Season Thank You Slimline Card.
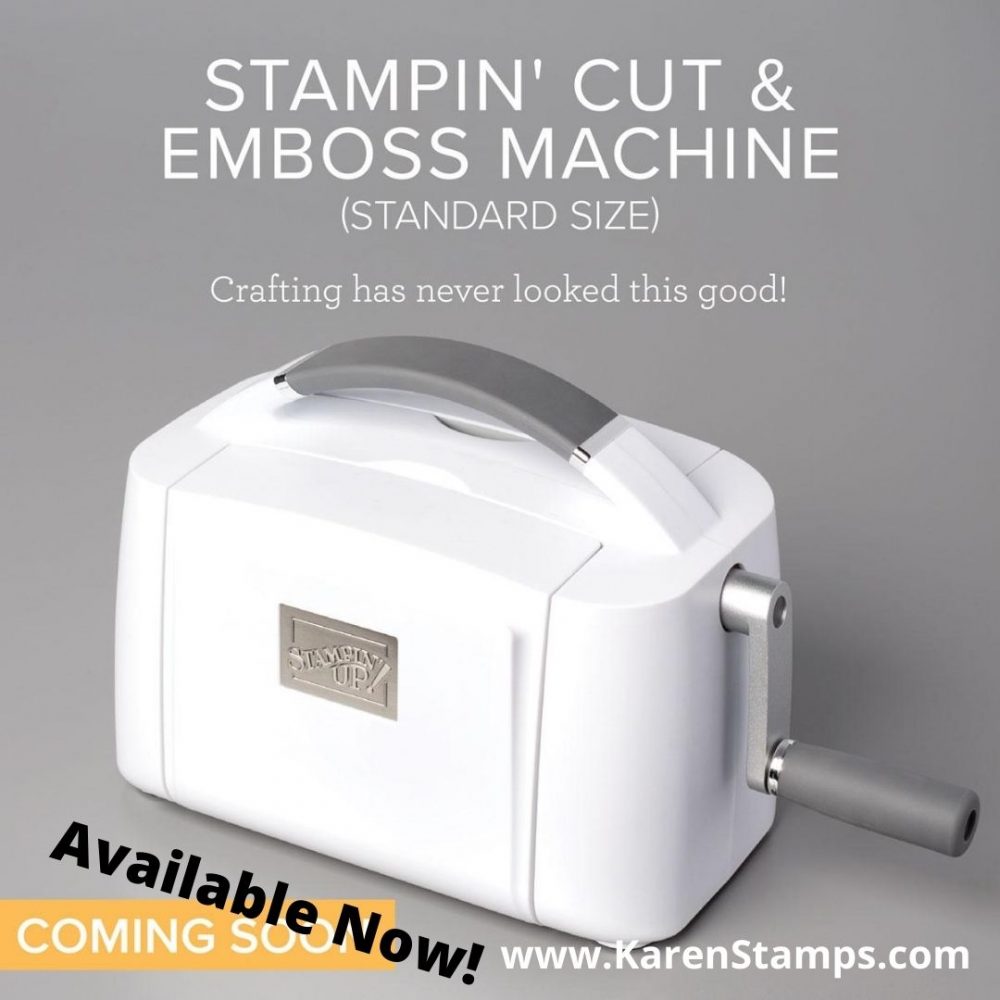
Tuesday the new Stampin’ Cut & Emboss Machine became available to customers so now it’s time to get familiar with the machine. Watch the video above to find out about the machine.
It’s easy to figure out the sandwich for each situation, unless the previous machine where I had to check my notes now and then to see what to use and in what order. These instructions are printed on the base platform and the plates are numbered. Note that he says in the video you don’t have to place the die in the center all the time.
Keep in mind that there are the regular, more flexible embossing folders and the 3D embossing folders that are stronger and don’t bend. The sandwiches are different for each.
https://youtu.be/gLjviY6zjOQ
I can’t wait to get my Magnetic Plate I ordered! It should be much better than the one we have had previously. There aren’t scattered magnets inside the platform which used to pull our dies off to the side sometimes. The whole piece is magnetic and it will be used as a cutting plate.
This should get you off to a good start with your new Stampin’ Cut & Emboss Machine!
Everything you need is included when you purchase the Stampin’ Cut & Emboss Machine. Included are 1 Base Plate (Plate 1), 1 Die Plate (Plate 2), 2 Cutting Plates (Plate 3), and 1 Specialty Plate (Plate 4). You don’t have to purchase anything extra right away to use the machine.
However, if you would like, Stampin’ Up! just announced that the new Magnetic Plate(149656 $24) IS available for purchase TODAY!
“It is a thin, fully magnetic sheet with self-healing cutting surface. Magnetic Cutting Plate (Plate 5) holds dies securely in place, even nested dies. This slim, portable sheet replaces a Cutting Plate in your sandwich, making it even easier to take with you. Use with the Stampin’ Cut & Emboss Machine.”
This means it is BETTER than the one we had with our old machine! On our old one, the magnets inside the platform were spaced around inside so when you sometimes put down a die, it would jump over a bit to the nearest magnet in the platform! This new one will have a full magnetic area. You do not NEED the Magnetic Plate with the machine BUT I highly recommend it. I’m ordering one!
So what sets our machines apart from the rest? Here are some of our favorite features:
Durable machines with high-quality results. The solid steel construction frame and rubber feet that securely grip the work surface produce crisp, clean, precise cutting and beautifully detailed embossing.
Easy to use. The machines and tools are designed for an intuitive die-cutting and embossing experience. For example, all plates are labeled with a number and are color-coded for easy reference and use when building your sandwich. And just like the name suggests, our Magnetic Cutting Plates have fully-magnetic surfaces to make it easy to securely position your dies and keep them in place.
Simple to store. The platforms on both machines fold for space-saving storage and they look pretty too–the sleek, clean design suits any crafting space.
Portable. You can use both machines at home or on the go with their folding platforms and ergonomic carrying handles. This makes it easy to showcase the product line in your classes and workshops! It’s also convenient for those of you who like to attend crops or other crafting get-togethers.
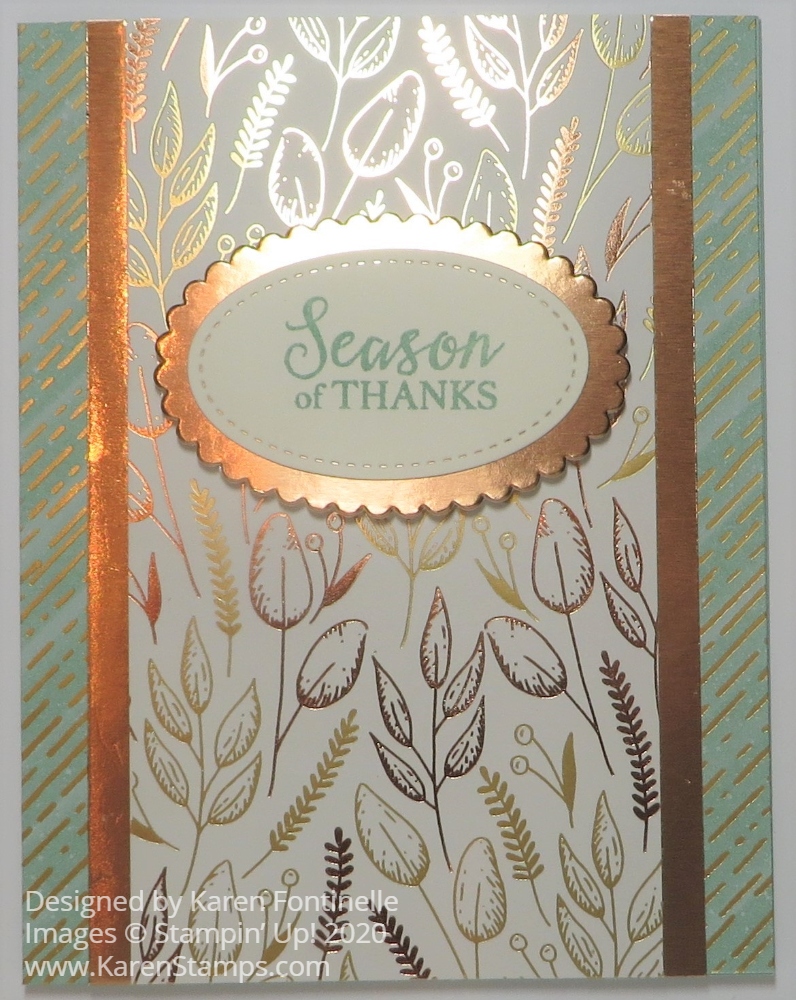
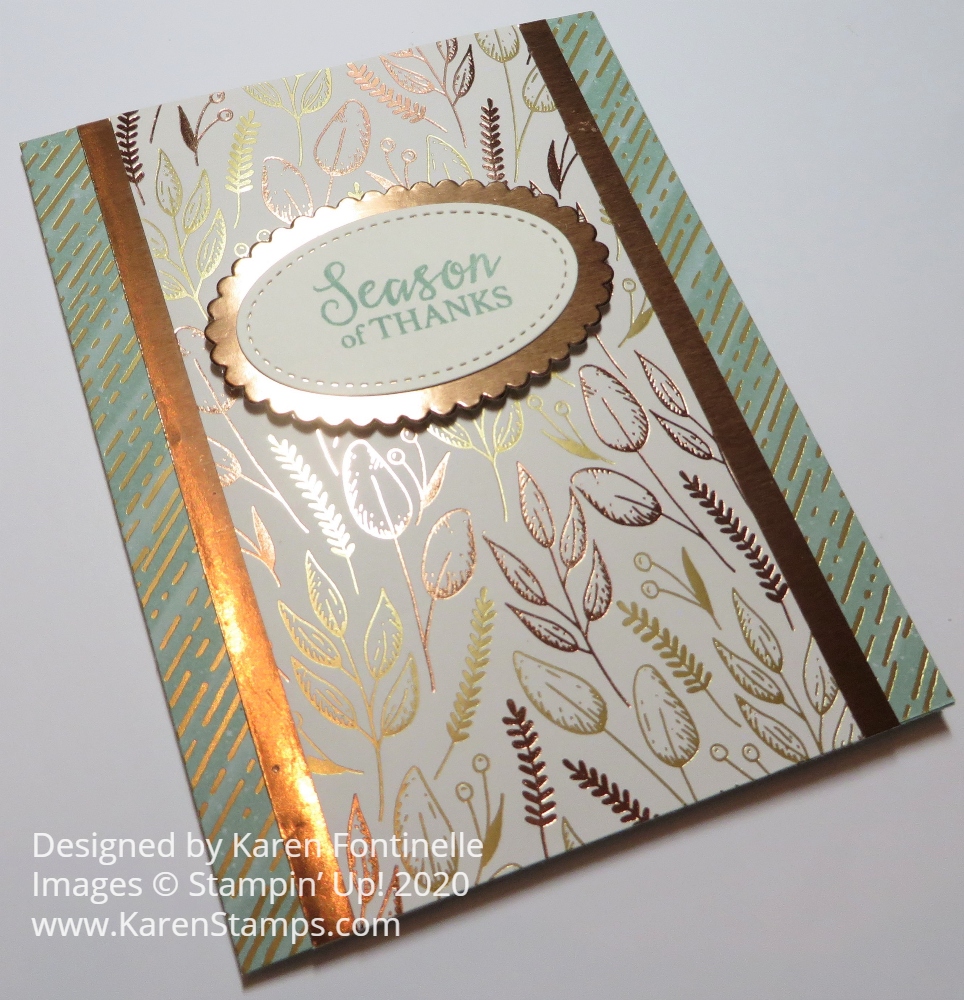
You will absolutely love this fall designer paper in the Stampin’ Up! holiday catalog that I used on this Gilded Autumn Season of Thanks Fall Card. I had to resist the urge to try to decorate it any further. Sometimes you just have to tell yourself to stop! The card already has a lot going on just in the papers so no need for more bling!
The card base is Mint Macaron which matches the Mint Macaron diagonally striped pattern of the Gilded Autumn Specialty Designer Series Paper. This paper has gold and copper foil accents so it is very pretty but very difficult to photograph for a blog! All the shiny-ness of the foil makes for a lot of glare for a photograph, but in person is very pretty!
It looks like I covered the entire front of the card with the Mint Macaron striped paper, but in reality I just cut two 1″ strips and adhered them to each side of the card. The center panel with the leaf designs in gold and copper accents is cut at 3″ wide so that I could add Copper Foil strips along each side. The foil is cut at about 1/2″ x 5 1/2″. I luckily already had a strip of the foil that I only needed to cut the two lengths of. I lined everything up on my Grid Paper and adhered each copper foil strip to the side of the leaf paper, then adhered that directly to the card.
The greeting is from the Gather Together Stamp Set on page 47 in the holiday catalog. This was a favorite from last year and was carried over this year! It is stamped on Very Vanilla Cardstock in Mint Macaron Ink and then die-cut with an oval Stitched Shapes Die. This was then layered on a scalloped Layering Ovals Die cut out of Copper Foil.
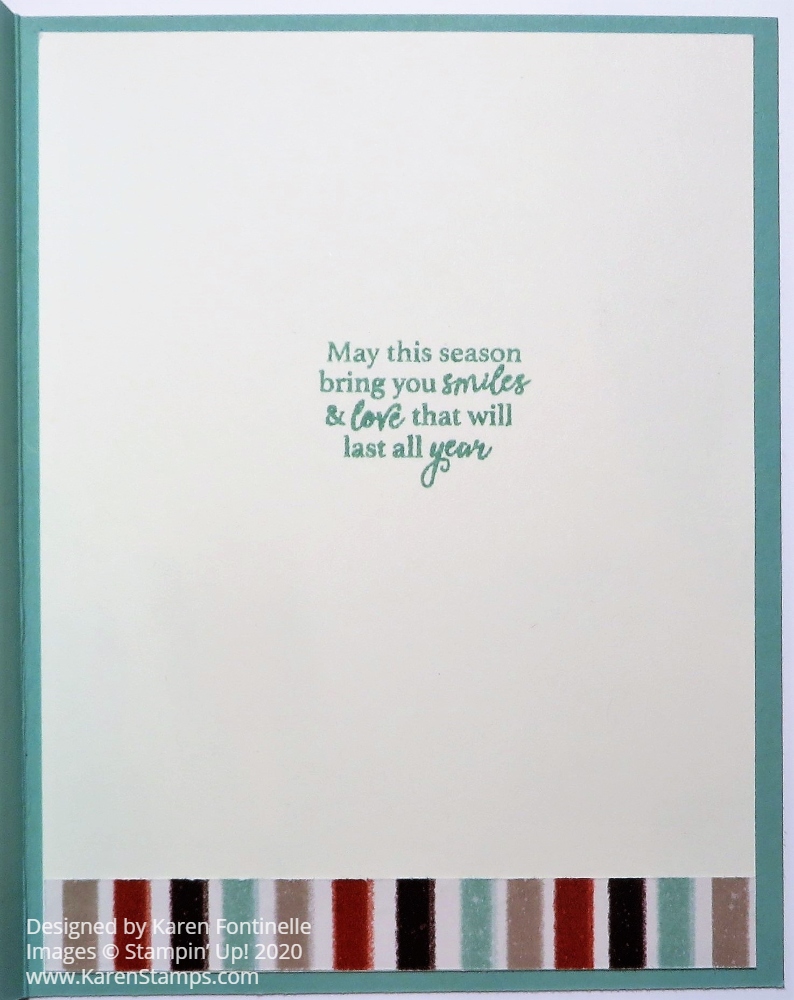
For the inside of the card, I stamped a greeting from the same stamp set in Mint Macaron ink on a piece of Very Vanilla. I happened to have a tiny scrap of the same leaf design paper I have on the front of the card and the opposite side has these colored stripes. So I used that to adhere to the bottom of the card for a little interest when someone opens the card.
All in all, a pretty easy card to make. The paper makes it look very fancy and special! You could make it even easier with just one of the papers as a layer on the front of the card plus the greeting. Here’s another card I made recently with the Gilded Autumn paper. These cards will be so nice to have for Thanksgiving or any time in the fall season.
Try this Gilded Autumn Season of Thanks Fall Card or even change up the designer papers and make something with a different look.
Even though we always want new things, I was happy to see a few things I already purchased last year show up in the new Stampin’ Up! Annual Catalog. Two things I used on this Pine Tree Punch Christmas Card were thePerfectly Plaid Stamp Setfor the greeting and the Pine Tree Punch for the Christmas trees.
I got the idea for this card by looking back at last year’s Holiday Catalog at a sample of a tag. I changed it a little bit plus made it into a card. Of course, I could have stamped the trees from the Perfectly Plaid Stamp Set and punched them out as they did on the sample from last year’s catalog, but instead, I wanted to use our new Plaid Tidings 6″ x 6″ Designer Series Paper for the trees. One punch and done!
The card base is Real Red with a layer of Shimmery White Cardstock. I love the Shimmery White Cardstock for its very subtle shimmer. It is basically white but just a tiny shade off-white. I embossed this layer with the new Winter Snow Embossing Folder.
The circle behind the trees is actually two die cuts in Real Red. The outer one is the largest Layering Circle Die with a scalloped edge and then a Stitched Shapes Die circle on top of that.
The greeting is stamped in Real Red Ink from the same Perfectly Plaid Stamp Set on Shimmery White. I got the idea to punch just the ends out of this narrow strip using the Everyday Label Punch.
Be sure you stick in the label from the top of the punch, not from the side like usual or you will punch both ends, unless that would happen to fit perfectly, but usually when you do a trick like this you have to punch one end at a time.
I tried various ways of layering some color underneath the greeting, even thinking about leaving the greeting without a layer, but finally, I came up with red just under the top and bottom of the greeting. Then I added a Red Rhinestone on each end. If you don’t have the Red Rhinestones, just color one of your clear rhinestones with a Stampin’ Blend marker! You can have rhinestones in any color!
I also added some Snowflake Sequins on the layer behind the trees and also on two of the trees. The gold embossed tree didn’t seem to need anything else! Mixed in with the sequins are other sequins that are not snowflakes so I used a few of those on the trees almost like ornaments. Put just the teeny tiniest dab of Multipurpose Liquid Glue where you want the sequin and place the sequin with the Take Your Pick tool. If you don’t already own this tool, you should put it on your next order! It is handy for picking up sequins with the sticky end and the pointy end or spatula end are great for picking rhinestones and other things up off their sheet getting underneath the adhesive. You will use it a lot!
Once you make one of this Christmas card, you could easily do an assembly-line process of making more. Get all the pieces punched or embossed or stamped and then just assemble. Don’t make one whole card at a time, except for maybe the first one for a sample. Cut all the strips for the greeting, emboss all the card layers, punch all the trees of one color, punch all the trees of the other color, etc. etc. In some ways, you almost get muscle-memory while you are working doing the same thing over and over and it makes assembly go faster! And it’s fun to make multiple cards without having to thing of designing each one! Try it with this Pine Tree Punch Christmas Card.
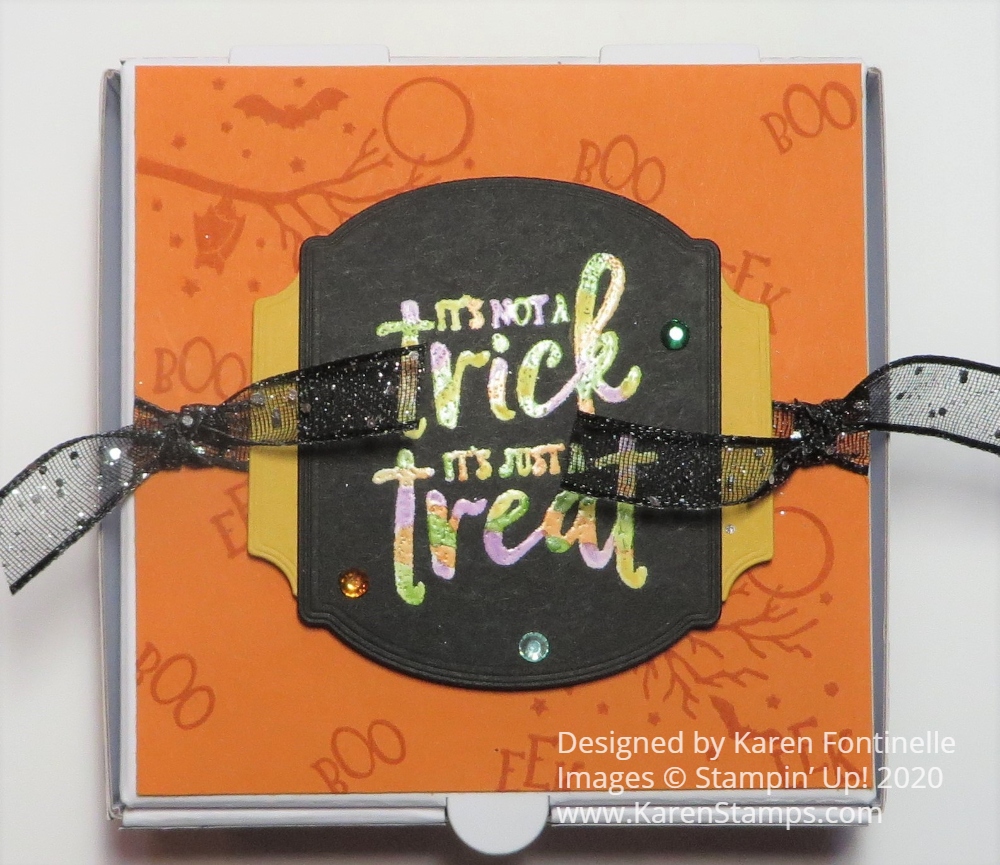
Here’s a technique you can try if you want to make a Halloween treat box like this Halloween Mini Pizza Box Colored Embossing treat box. It’s a fun way to color the greeting on the box to make it look a little more interesting or spookier for Halloween!
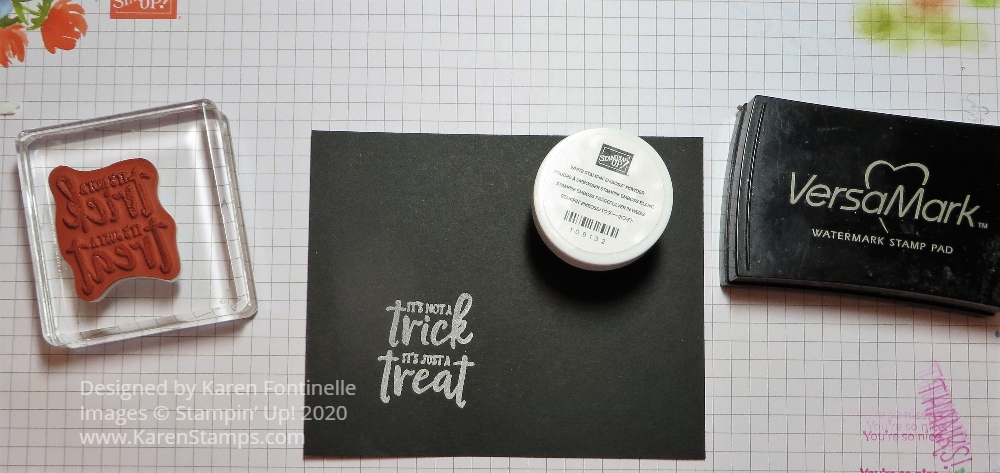
The technique involved is easy. You can use it for greetings or other images. Just emboss with Versamark Ink and White Stampin’ Emboss Powder the way you normally would, using your Heat Tool to melt the powder.
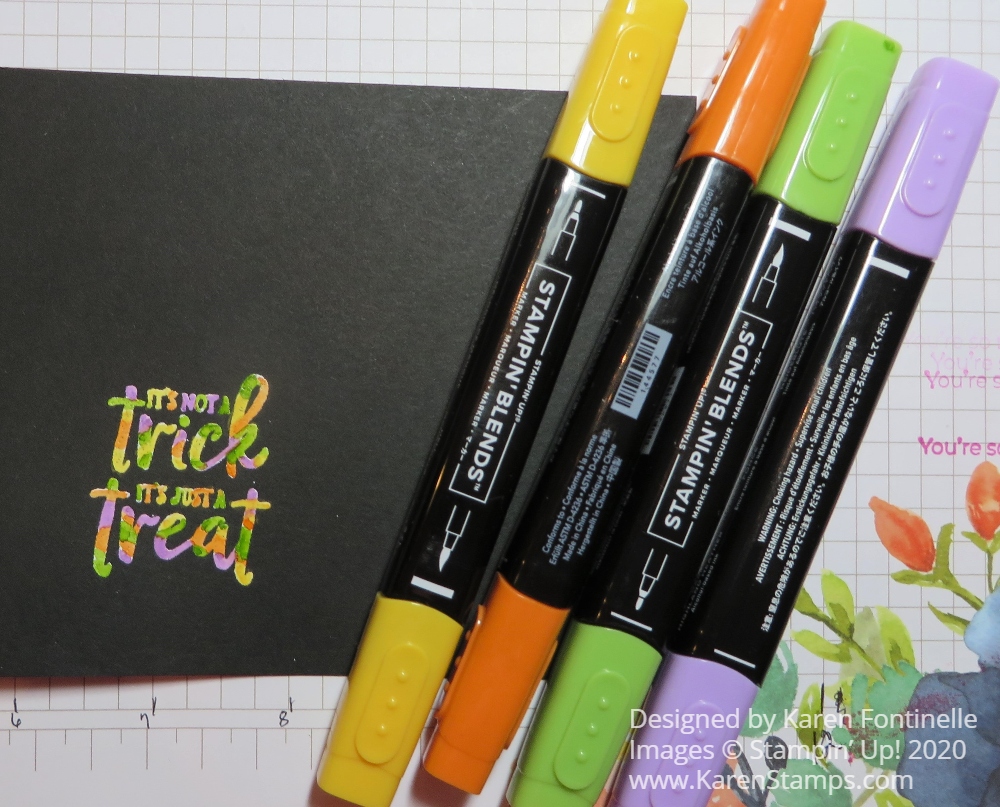
After embossing, let cool for a second and then color right over the white embossed areas with Stampin’ Blends markers. Try not to get off the embossing or it will show on the paper, even black. If you do get some marker ink on the paper, use the Color Lifter to “move” the color back over very lightly. For this Halloween project, I used multiple colors on the Halloween sentiment.
I had a similar project on my recent newsletter, so if you would like to get ideas like this and more delivered every Tuesday to your Inbox, just sign up for my Mailing List in the red box in the right sidebar or scroll all the way down on your phone to get to it.
This project is made with the Mini Pizza Box. These are handy to have on hand. They are unassembled and store flat. You get 8 food-safe boxes, 3 1/2″ x 3 1/2″ in size. You can easily put the box together, the decorate for whatever occasion. Put some cookies inside, 3″ x 3″ notecards, or some other small gift or treat.
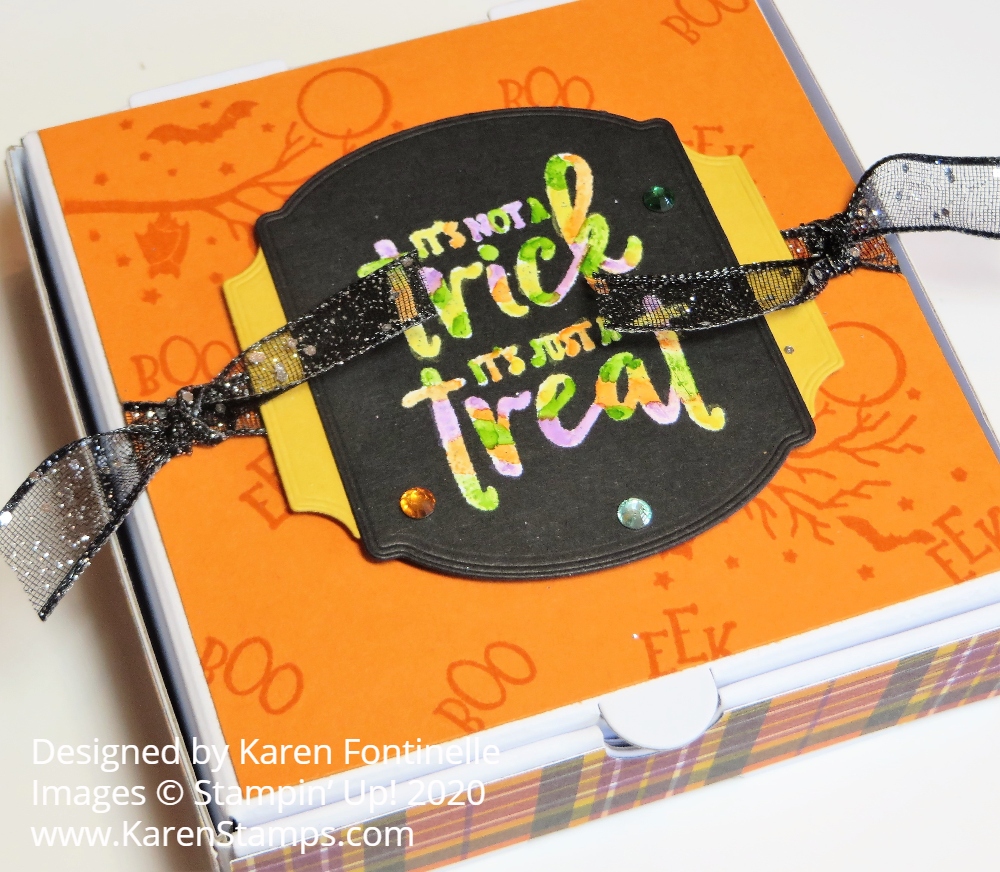
For this box, I stamped a piece of Pumpkin Pie Cardstock for the lid with images from the Ghoulish Goodies Stamp Set. Around the sides of the box, I used pieces of the Plaid Tidings Designer Paper. Since the paper is only 6″ wide, I cut four individual strips of paper. I was even fastidious enough to match the plaid lines before cutting, but you wouldn’t have to be so perfect.
The embossed sentiment is cut out with one of the Tasteful Labels Dies. For a little layer behind the sentiment I die cut another shape from the same dies and cut it in half so a little bit would show under the side of the sentiment. Before adhering the Pumpkin Pie paper to the top of the box, I adhered ends of the Black 3/8″ Glittered Organdy Ribbon to the underside and popped up the greeting with Dimensionals. Then I tied on a little knot on each side of the greeting with the ribbon. Love this Glittered Ribbon! For a little bling, I added three Holiday Rhinestones that I thought kind of matched the Halloween colors.
Who knows what kind of treats we will be able to give out this Halloween or if there will be trick-or-treating or Halloween parties, but these Mini Pizza Boxes are one of those good things to always have in your stash for when the need arises when you want to give a little treat or gift. Or order more if you have a certain occasion or gathering.
Here is another example of how to use these Mini Pizza Boxes for just a gift, not necessarily a certain occasion. I used the Peaceful Poppies Designer Series Paper (retired) to decorate this box and the Poppy Moments Dies.
These Mini Pizza Boxes are fun to decorate for many occasions. Try this fun technique of heat embossing white powder and then coloring with Stampin’ Blends markers right over the embossing to make this fun project, Halloween Mini Pizza Box Colored Embossing.
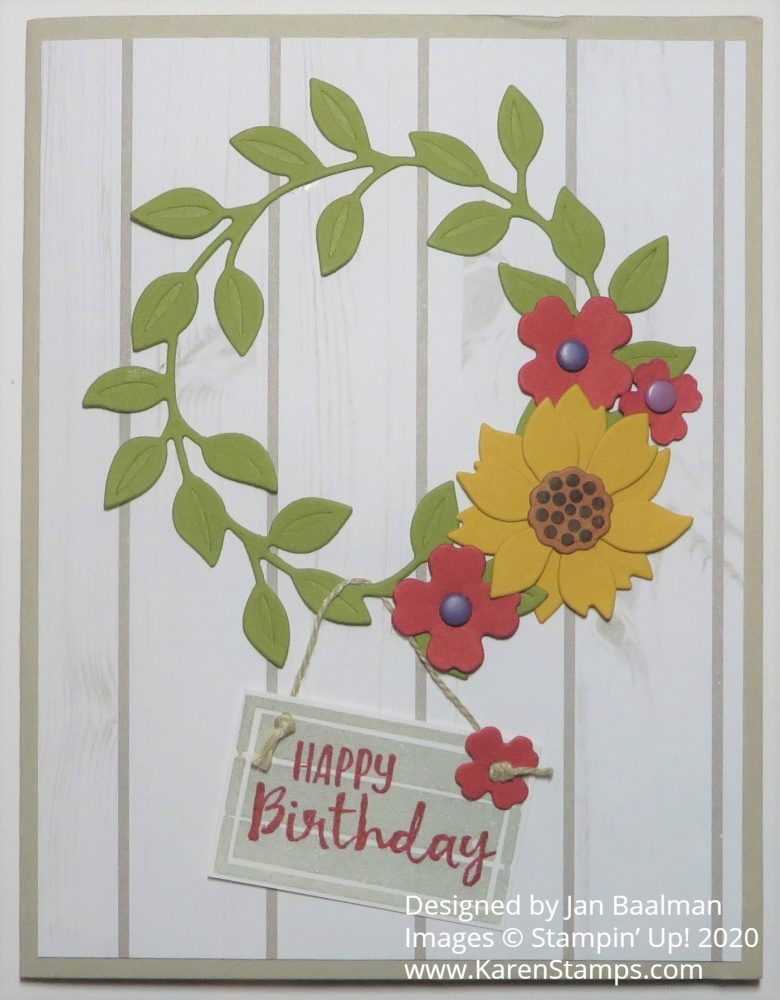
I got several very nice cards for my birthday a couple of weeks ago and this Arrange a Wreath Happy Birthday Card was made by my dear, long-time friend who got me into Stampin’ Up! in the first place!
I still remember stopping by her house when we were in town to go to a wedding shower and her taking just a few minutes to show me some projects she had made at a party by this company called Stampin’ Up! that I had never heard of. I barely knew anything about rubber stamping and had not been successful in my stamping attempts with stamps from the craft store, but her projects were so cute!! She had just received her Starter Kit but hadn’t opened it yet and we didn’t have time that day anyway. When I went back later in the summer for our friend’s wedding, I got to spend time stamping with her and fell in love with it! I didn’t really want to go anywhere else or do anything else, just stay at her house and stamp or look at the cards and things she had made. A few months later, I think, I signed up to be a Demonstrator.
This card was made with the Arrange a Wreath Stamp Set and Wreath Builder Dies. You can purchase both together in a Bundle and save 10%. I have seen some really cute cards made with this Bundle so I just might have to purchase it myself someday!
The card base is Sahara Sand with a layer of designer paper. You could choose something from the In Good Taste Designer Series Paper that might look similar. The wreath is die cut with the Wreath Builder Die out of Old Olive Cardstock. Then you can diecut some flowers from the set in any colors you like to decorate the wreath She used some enamel dots for the flower centers. I think the little Happy Birthday sign hanging from he wreath is so cute!
Obviously you can use this wreath for LOTS of occasions and all the seasons of the year, making this a very versatile stamp set. I love this card!
The latest reports about Hurricane Laura are that Houston is “out of the cone” so we should just have minimal effects, maybe some bands of rain and some gusty winds. The storm will go in around the Texas-Louisiana border which is certainly bad for those people. I just hope our power stays on! We’ve been lucky through many storms but you never know when your power might go out seemingly for no reason! We were making hurricane preparations anyway when it looked like it was coming directly here, so we have batteries and candles and lanterns and a ton of chocolate chip cookies I baked last night!
Take a look at the Arrange a Wreath Bundle for your next Stampin’ Up! order. You’ll find it in the Stampin’ Up! Annual Catalog on page 127 with the dies on page 173. Don’t forget to use your Bonus Coupons from July by August 31 when they expire.
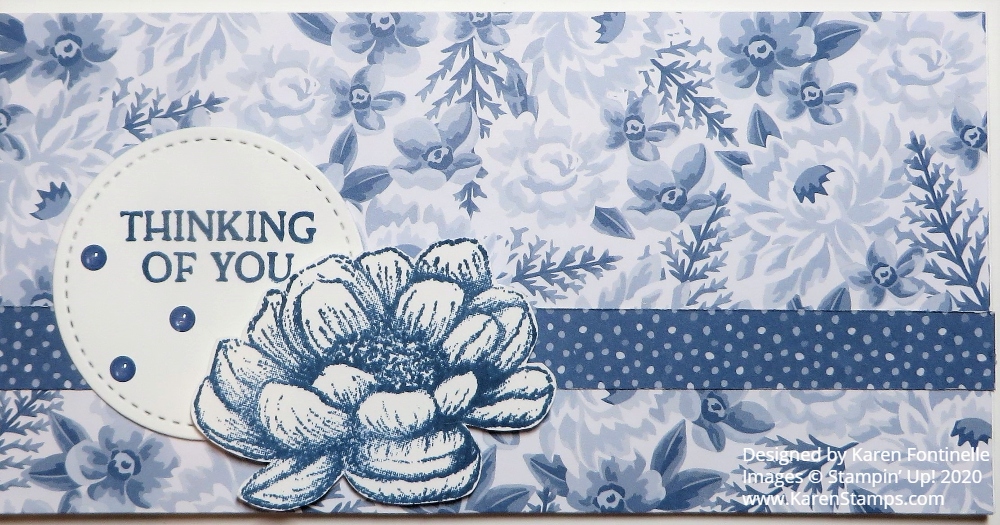
The latest cardmaking craze these days seem to be “slimline cards” so I made this Flowers For Every Season Monochromatic Slimline Card. Now I don’t really even know the exact details of a “slimline” card so maybe this technically isn’t one! But I made a long, narrow card as opposed to our normal 4 1/4″ x 5 1/2″ card! This card is 3″ x 6″ so whatever it is called, that’s what I made!
The other day I was working with my Flowers For Every Season Designer Series Paper and realized all over again how pretty and bright it is and that I hadn’t used it in a long time. When I got out my paper to design a card, since the paper is 6″ x 6″ I thought, “Why not cut it in half and make a card out of a 6″ x 6” piece of cardstock folded in half?
The card base is Whisper White, as I said, cut at 6″ x 6″ and folded in half so that the card front is 3″ x 6″. I cut this blue pattern of the Flowers For Every Season designer paper the full 3″ x 6″. I debated about using ribbon, but decided to just use a 1/2″ strip of a dotted side of the designer paper instead.
I already had stamped the flower from the Tasteful Touches Stamp Set. I adhered the greeting flat on the card but I popped up the flower with Stampin’ Dimensionals®.
For a little bling, I couldn’t resist adding a few Misty Moonlight 2020-2022 In Color Enamel Dots. I think these have been very popular since they came out in the Annual Catalog! As I write this, they are on “Low Inventory” so get yours while you can! They work so well because they are small and fairly flat.
Try this different style of card, no matter what size you want to make it, as long as it will fit in an envelope you have! Of course you can always make your own envelope. I’ve made this kind of card years ago, so what goes around comes back around again! You can make a card like this a few inches longer and about an inch taller, but since I was working with 6″ x 6″ designer paper, this Flowers For Every Season Monochromatic Slimline Card was the perfect size for me.
Don’t forget! Last week to spend your Bonus Days Coupons!!
This little gnome stamp set is just too cute so I made a Gnome For The Holidays 3 Gnomes Christmas Card. All three gnomes have come together to send holiday wishes on this card!
To make this card, I stamped each gnome in the Gnome For the Holidays Stamp Set side by side. Even though they are cling stamps, you can stamp them close together and likely not overlap them. The gnomes are stamped in Memento Ink because I knew I would use my Stampin’ Blends to color them in. I stamped them on a large scrap of Whisper White, not exactly knowing how I would die-cut them to put them on the front of the card.
After looking through my dies and the large size I needed to fit in all the gnomes, I decided to just cut the paper into a rectangle that would fit inside the Stitched So Sweetly scalloped rectangle die that I could use as a layer. Then I looked through the Heartwarming Hugs Designer Series Paper to see what paper I wanted to use with the gnomes. I really liked this red and green plaid!
The card base is Real Red with the Heartwarming Hugs DSP layer and then the gnomes focal point on top of that. I decided not to pop up anything but you could.
After adhering all the layers together, I stamped the greeting, also from the Gnome For the Holidays Stamp Set. I cut the strip down to 3/4″ wide and used the Lovely Labels Pick a Punch to punch each end of the greeting. Then I added a Red Rhinestone Basic Jewel to each end for a little “bling”!
You likely will want to put a Whisper White layer inside the card unless you want to stamp on the Real Red cardstock base. You could stamp one gnome or the house on this Whisper White piece or adhere a strip of the matching designer paper along the bottom edge.
If you like coloring and wanted to make a few more of these Gnome For The Holidays 3 Gnomes Christmas Cards, you could make this card pretty easily (except for lots of coloring!). Always plan to make multiple cards of the same design assembly-line fashion because it goes faster that way!
You will find the Gnome For the Holidays Stamp Set in the August-December 2020 Mini Catalog on page 23. It’s a simple little stamp set and has fun greetings. Here is a link to the first gnome Christmas card I made! I really like the little Christmas lights on the gnome house! So cute!
Be sure to use your July Bonus Coupons by August 31 on your Stampin’ Up! order!
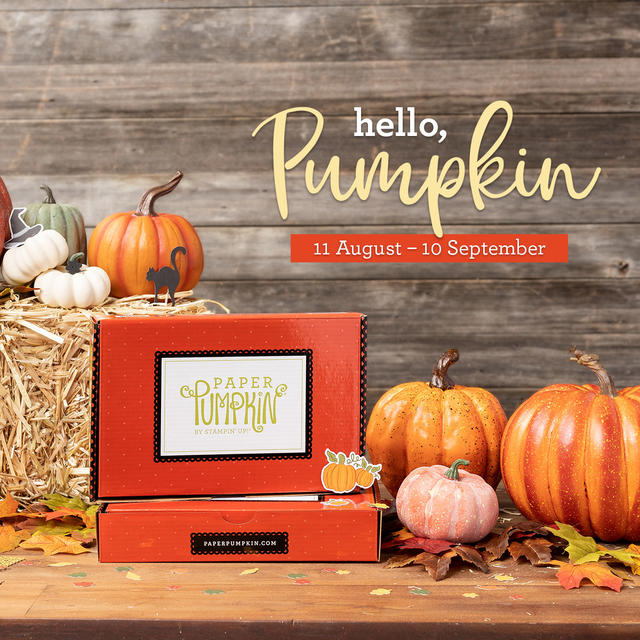
Don’t you just want to reach into this photo and grab that pretty Paper Pumpkin Box and the pumpkins?! I do!! I can’t wait for this box to arrive in September! This one is called Hello, Pumpkin, and comes in this special box for fall!
Paper Pumpkin is our monthly subscription service that offers fun ‘n’ easy papercrafting projects for crafters of any skill level! In these themed all-inclusive kits, subscribers receive pre-cut paper pieces, embellishments, ink, and an exclusive stamp set. As the subscription continues, subscribers will have a collection of cards and other creations for a variety of occasions, in addition to a stockpile of supplies!
As the autumn season approaches, prepare to celebrate with the September Paper Pumpkin Kit! There’s so much to love about fall—some love the haunts of Halloween, many love the time to give thanks, and others love the changing colors and cooler temperatures. Whatever you love most about fall, September’s kit has everything you need to celebrate the season your way! Between a multi-occasion stamp set and enough supplies to design 20 cracker box treat packages, you can create custom fall crafts to celebrate Halloween, Thanksgiving, pumpkins, and leaves. Whether you make them all the same or mix ‘n’ match your crafts, there’s something for everyone in this kit!
Each cracker box treat package can be customized to celebrate Halloween, Thanksgiving, the autumn season, or all three!
Coordinating Colors: Bumblebee, Basic Black, Cajun Craze, Cinnamon Cider, Mossy Meadow, Old Olive, Pumpkin Pie, white
Don’t miss out on all the fall fun! You can subscribe to the Hello Pumpkin Paper Pumpkin Kit between 11 August and 10 September.
Did you know you can also add a Prepaid Subscription to your regular Stampin’ Up! order? Just choose which length of time you would like. This adds to your Stampin’ Up! order so maybe you will reach Stampin’ Rewards! You can do this even if you have a monthly subscription already! It will just add on to your account.
Use my personalized link to join Paper Pumpkin so you don’t have to search for my name!
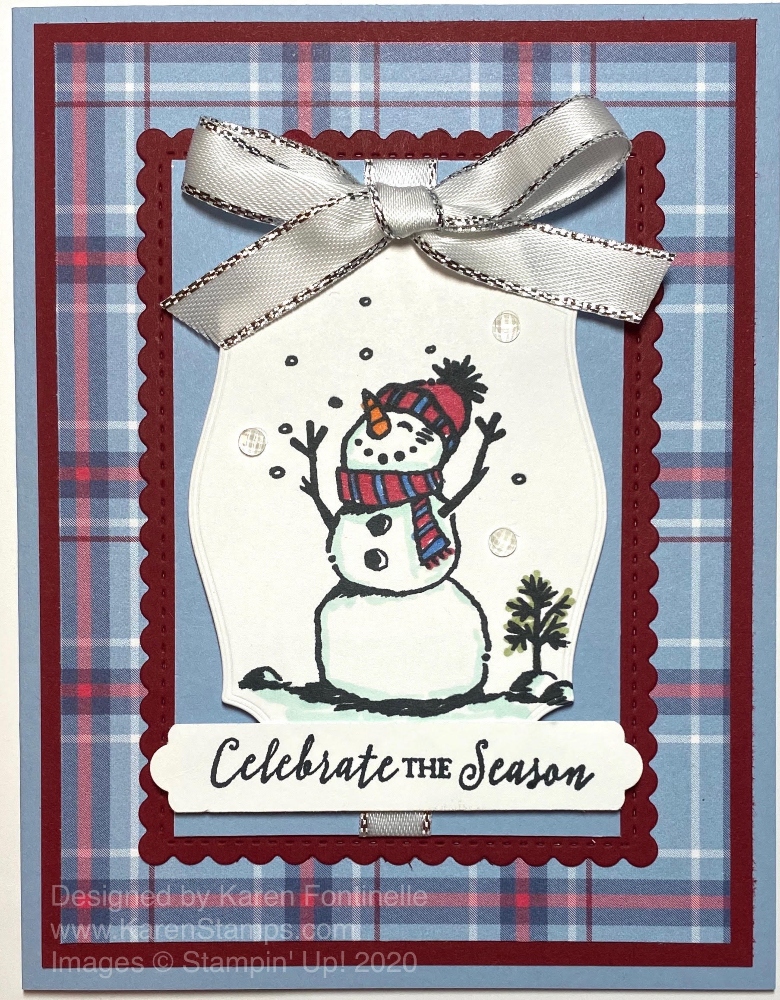
I had almost forgotten that this snowman stamp set from last year was still current this year, so when I came across the Snowman Season Stamp Set I knew I had to make this Snowman Season in Plaid Tidings Christmas Card.
You will find this Snowman Season Stamp Set in the Stampin’ Up! Annual Catalog. It was a favorite stamp set from last year – the cute snowmen and also the Snowman Builder Punch. You can’t but feel happy when you stamp with these snowmen in this set!
First I chose the plaid pattern I liked in the Plaid Tidings 6″ x 6″ Designer Series Paper. Then I chose the Seaside Spray Cardstock with a layer of Cherry Cobbler.
The snowman is stamped on a Tasteful Labels Die in Memento Ink. I colored with Stampin’ Blends but you could also use other coloring methods, like maybe Watercolor Pencils. I die-cut a stitched scalloped rectangle in the Stitched So Sweetly Dies out of Cherry Cobbler, but it seemed like too big an area behind the snowman. I decided to add a rectangle of Seaside Spray that would fit inside the stitched die and that solved the problem.
Before adhering the snowman pieces, I adhered a piece of Silver 3/8″ Metallic-Edge Ribbon from top to bottom of the Seaside Spray layer. Then the snowman die piece was popped up on Stampin’ Dimensionals®. I tied a separate bow and adhered it to the top with Mini Glue Dots.
The greetings in the Snowman Season Stamp Set were a little too big, so I used one from the Itty Bitty Christmas Stamp Set. I simply stamped it on a narrow scrap of Whisper White and used the new Lovely Labels Pick a Punch to punch each end of the greeting. It is popped up with Dimensionals on each end so that it is the same level as the snowman piece. For a little bling, I could have used Snowflake Sequins around the snowman, but instead, I used the Elegant Faceted Gems in three spots to resemble snowflakes.
It was fun to find this stamp set from the Holiday Catalog last year and make something updated with it this year! Here is a link to a card I made last year with the set and the Snowman Builder Punch. Choose stamp sets and papers that bring you joy for making your holiday and Christmas cards so it will be a fun endeavor! This Snowman Season in Plaid Tidings Christmas Card will make you happy all day long while you make multiples, perhaps, of this card!
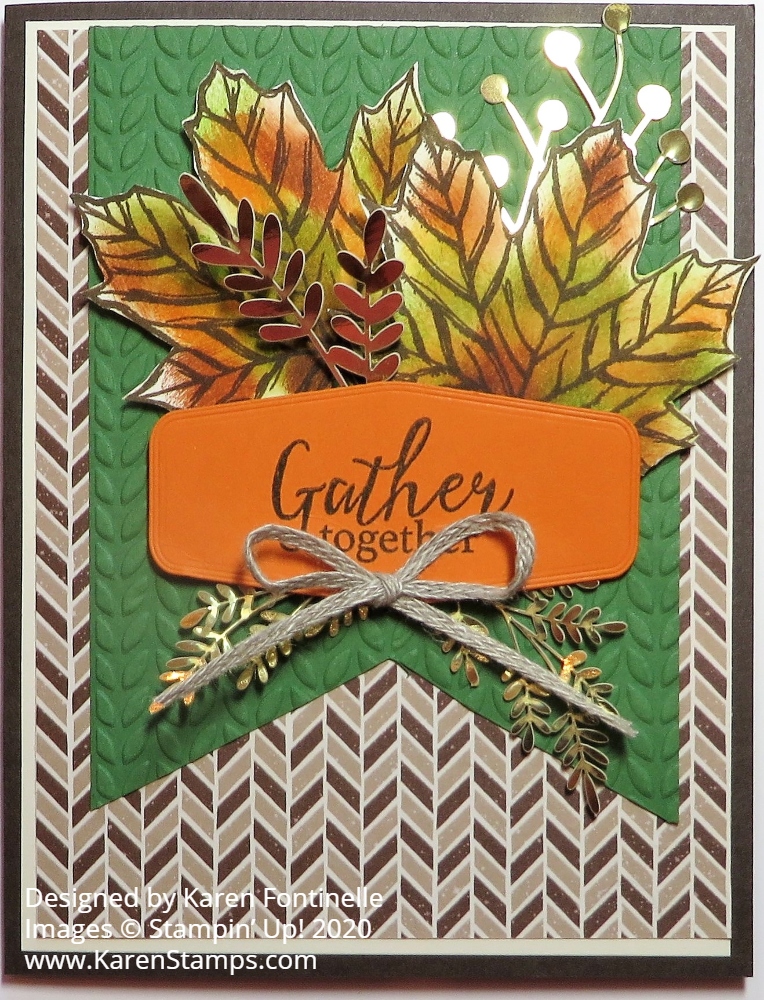
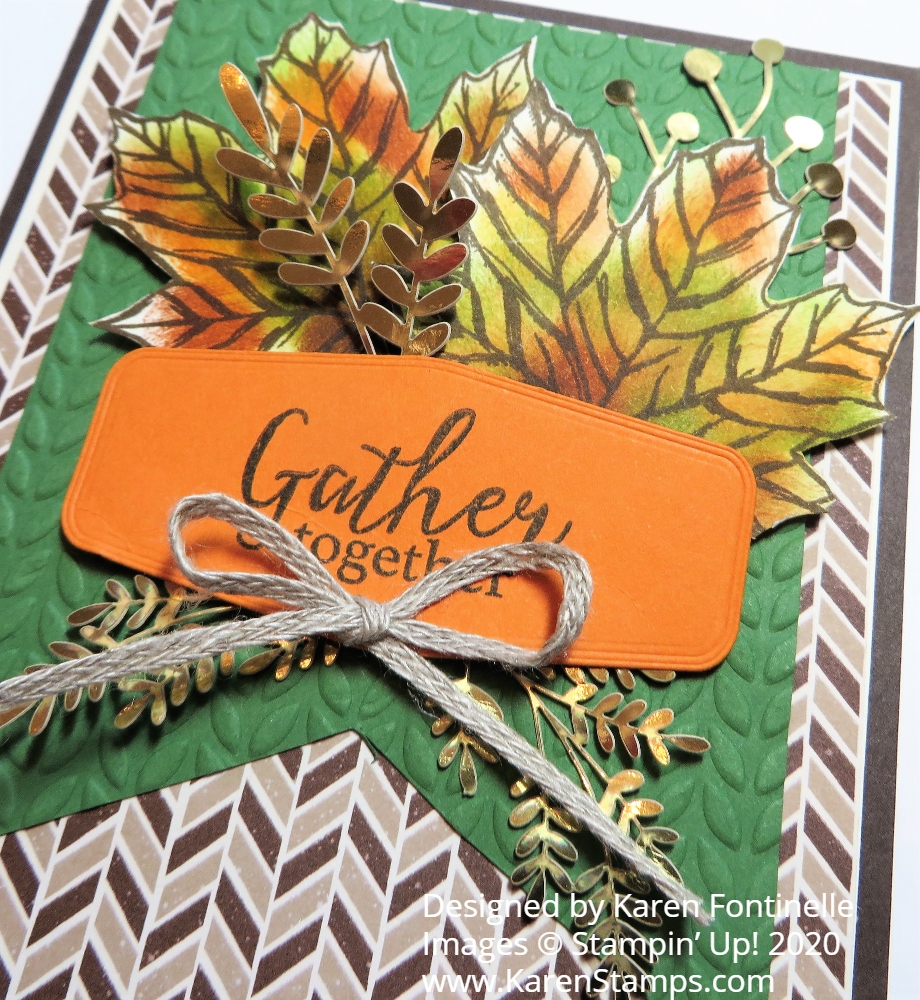
I used several products on this Gather Together Fall Leaves Card, as I thought about them while making the card. I probably started out with a simpler version in my head of making this fall card, and then I came up with more ideas as I worked on it. That’s probably the way a lot of us do our cardmaking!
The beginning of the card was simply the stamping and coloring of the leaves in the Gather Together Stamp Set. You may already have this set if you purchased it last year. Happily, it was carried over into this August-December 2020 Mini Catalog as a favorite from last year! I stamped a few leaves in Memento Ink first but I thought the black outline was too stark. Then I stamped some in Soft Suede Ink. In the end, after they were colored, I’m not sure it made much difference so I think you can do either.
To color the leaves, I used Sponge Daubers and various ink pads. Just choose whatever colors you like for fall. I used Old Olive, Crushed Curry, Pumpkin Pie, Cajun Craze, and Granny Apple Green. I intended to leave parts of the leaves uncolored, but it didn’t so much turn out that way! I was sort of using a card on page 47 in the Mini as inspiration with the leaves. I didn’t try to be precise, especially as far as coloring “outside the lines” because I knew I would be cutting out the leaves anyway. I don’t own the dies but I don’t mind doing some “fussy-cutting” with my Paper Snips.
The card base is Early Espresso Cardstock with a layer of Very Vanilla to offset the layer of Gilded Autumn Specialty Designer Series Paper. This paper is so beautiful, it was difficult choosing which pattern to use. But I didn’t want to take too much away from the leaves so I chose a plainer pattern, not one with the gold and copper foil accents which are so pretty.
Next, I used a piece of Garden Green Cardstock to make a banner and embossed it with one of the Greenery Embossing Folders. These are narrower folders for smaller pieces you want to emboss. I also stamped the greeting in the Gather Together Stamp Set in Early Espresso Ink and die-cut it with a die in the Tasteful Labels Dies.
After adhering the layers together plus the banner on the card, I adhered two fall leaves with Stampin’ Dimensionals and added some of the gold foil pieces in the Forever Gold Laser-Cut Specialty Paper. I think they really add a little pop of pizzazz! The greeting was centered over everything, also popped up on Dimensionals. For a final touch, I added a bow made with the 3/16″ Braided Linen Trim.
It’s time to start making some fall or autumn cards, maybe just to send to friends and family and maybe to save for Thanksgiving. Who knows if we will be able to “Gather Together” this Thanksgiving so we might want to have cards ready to send to those people we want to remember on the holiday. This Gather Together Fall Leaves Card would suit the purpose just fine!