Tag Archives: Heartwarming Hugs Designer Series Paper

Heartwarming Hugs Christmas Tree Card

Heartwarming Hugs Christmas Tree Card

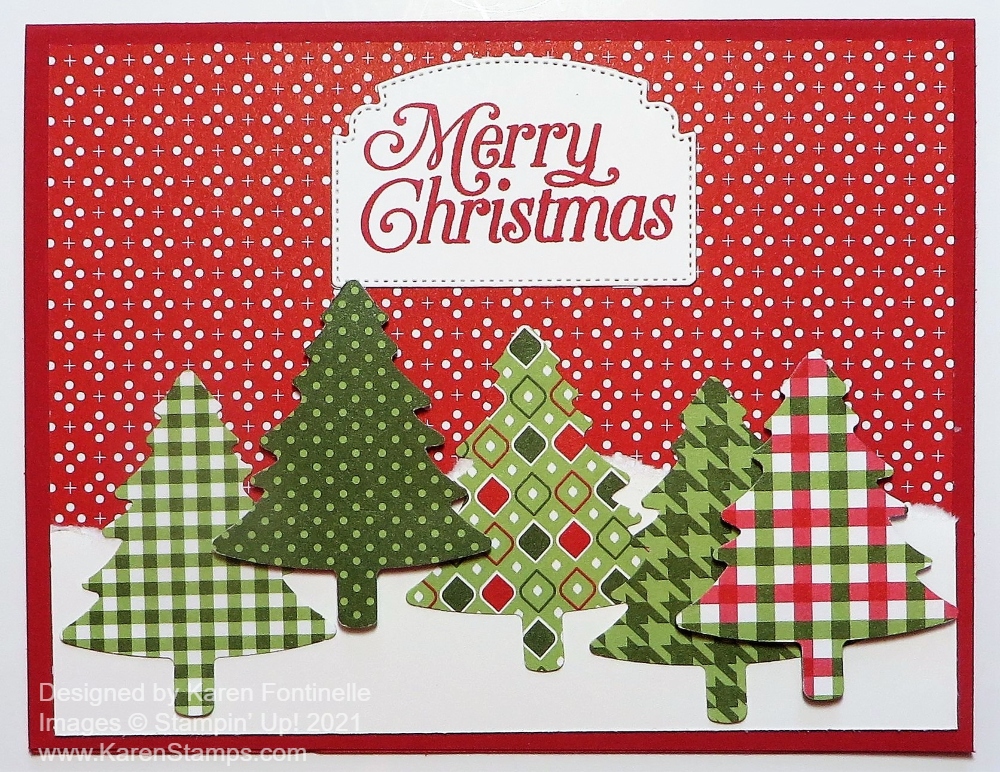
If you are anxious to get started on Christmas in July but you can’t order the new things yet in the Holiday Catalog, see if you still have some Heartwarming Hugs Designer Series Paper from last year’s catalog and make a card like this Heartwarming Hugs Christmas Tree Card! The paper is coming back in this current Holiday Catalog, going live August 3!

I still had some of this Heartwarming Hugs Designer Series Paper and I really like it. Lots of different plaids and stripes in traditional red, green and white! It’s just cute paper without having any special designs. Great for backgrounds on cards or other projects. Cute for making boxes and gift bags with both the inside and outside matching and looking like the holidays! Check your stash and see if you still have some.

The Pine Tree Punch is still current in the new Annual Catalog so get that out too! You can punch out lots of Christmas trees to your heart’s content!

To make this card, I started with a base of Real Red Cardstock (my favorite color!). I chose this red background paper with white dots to see what I could do with it or if it would work with the punched trees. I started with a vertical card, but when that wasn’t quite coming together, I turned it sideways and that worked, of course!

I went back to one of the first techniques I ever learned in stamping – tearing the cardstock! Hold the paper in front of you and pull down with your right hand as evenly or unevenly as you want. You want that torn edge look with kind of the underneath layer of the cardstock showing. That’s the best I can describe it. You don’t necessarily want a very straight, even, perfect edge. I used Basic White to make a snowy base for the trees.

I punched out several trees with the Pine Tree Punch and just placed them along the “snow”, popping up a few with Stampin’ Dimensionals® and some just adhered flat on the card.

The greeting is from the Perfectly Plaid Stamp Set. This is another product carried over into the new Stampin’ Up! Annual Catalog that you may already have. I think it’s been around a couple of years now, which is nice. I stamped it in Real Red Ink and then cut it out with one of the Ornate Frames Dies. It seems to fit perfectly on the card! I love the little stitching around the edge and the shape of the die is already cute.

That’s all there is to this card! I could have added some sparkle to the trees or on the background. Sometimes all I can think of is adding bling to a card, and sometimes I don’t think of it at all – until after I have taken the photo for my blog! Either way, keep it simple or jazz it up, this Heartwarming Hugs Christmas Tree Card is a fun and easy card to make.

SHOP STAMPIN’ UP! ONLINE!

Heartwarming Hugs DSP Thank You Cards

Heartwarming Hugs DSP Thank You Cards

I wanted to make some thank you cards to have on hand, and while it is the Christmas season, I didn’t want them to look like Christmas cards! These thank you cards made with pieces and scraps of my Heartwarming Hugs Designer Series Paper in the August-December 2020 Mini Catalog (Holiday Mini) were easy and fun to make! I loved this designer paper, especially the red and green plaid. You may think it is Christmas paper at first glance since it was introduced in the Holiday Mini Catalog, but if you look closely the designs are generic, not Christmasy, so you can use it long past Christmas!

Just look through your stamp sets. I chose various “Thank You” stamps to use and cut or layered them on various dies and a few punches. Again, look through what you have. You will have something to use or even just cut rectangles or squares with your Paper Trimmer.

You can keep it really simple with no embellishments or you can use some ribbon, like the Real Red 3/8″ Double-Stitched Satin Ribbon I used on some of these cards. You can use something else, it doesn’t have to be exactly what I used.

These cards all have either Real Red or Pear Pizazz card bases. Then I just cut various pieces and sizes of the Heartwarming Hugs Designer Paper to add to the card base plus a greeting. I made thank you cards, but you can see you could do birthday cards or just cards to send to friends. This is “happy” paper! If you have some left after making holiday cards, use it up by making cards like these to use up your scraps so you can buy new paper next season! OR if you don’t have Heartwarming Hugs and like it, hurry up and get it on the Stampin’ Up! Giant Year-End Closeout as it is retiring Jan. 4th.

Yesterday I posted this one card but I also just made the nine extra cards you see in the photo above. Once you get going, you will find it so easy to make a whole batch of cards. You could even leave the greetings off until you know what you want to use the card for, then stamp and add the appropriate greeting. Use one side of the paper on one card, then cut another piece and use the opposite side. Make some cards square. Use two or three patterns of the paper on the same card front. Just go wild! You can do it!

It’s handy to make several cards while you have your supplies out and it is really handy when you need a card in a hurry and you already have some generic cards made ready-to-go save for adding a greeting and maybe a little extra embellishment. Get out your Heartwarming Hugs DSP and make some Thank You cards quickly and easily or add other greetings for a variety for your stash! Check that Closeout in the Stampin’ Up! Store for all the remaining retiring items from the August-December 2020 Mini Catalog!

Heartwarming Hugs Thank You Card

Heartwarming Hugs Thank You Card

Now that the holidays are over, it’s time to write a few thank you notes for gifts you received. At least that is the old-fashioned way of doing things and I think still the best! Which would you rather receive? An email on your computer or a handmade card in the mail with a handwritten note thanking you for a gift you gave or sent to someone?

Christmas may be over but you can still get out any leftover Heartwarming Hugs Designer Series Paper that you have and make a whole assortment of cards! If you look closely at the paper, it has no Christmas or holiday designs, just reds and greens. You can still use this paper for almost anything because it is not specifically designed for Christmas!

This easy card just starts with a Real Red card base with a layer of one of the patterns in Heartwarming Hugs. This paper is on the Year-End Closeout Sale at Stampin’ Up! but the inventory is running low so if you want it, order it soon! I wrapped a piece of Silver 3/8″ Metallic Edge Ribbon around the middle of the designer paper before adhering it to the card base.

The greeting is stamped in Real Red Ink in the Good Morning Magnolia Stamp Set. I die cut the greeting with a scalloped rectangle in the Stitched So Sweetly Dies. Then this was layered on another die in the set in Real Red. If you wanted to embellish this card further, you could add one kind of jewel or another on the sides of the Real Red die-cut.

Add a Whisper White layer to the inside and write your thank you note for your lovely gift or gathering or whatever you want to write! The recipient is sure to be impressed with your manners and cardmaking skills!

Don’t Stop Believin’ Santa Christmas Card

Don't Stop Believin' Santa Christmas Card

I got this Don’t Stop Believin’ Santa Christmas Card idea from myself, from Pinterest! I happened to see my Christmas Pinterest board and spotted a card I made last year with the Holly Jolly Christmas Stamp Set and thought I could do the same thing with a current stamp this year!

I planned to call this a monochromatic card, but since there is green in the plaid paper, maybe it’s technically not monochromatic! The card does have a “red” theme, though.

The card base is Real Red Cardstock with a layer of red & green plaid in the Heartwarming Hugs Designer Series Paper. The Santa is stamped from the Don’t Stop Believin’ Stamp Set. Isn’t that the best name?! It’s really a cute stamp set, worth a look! I stamped the Santa in Real Red on Whisper White and die-cut with one of the Stitched So Sweetly rectangle dies. The next smaller one was a little too small.

I wanted a layer underneath the Santa in Real Red but the Rectangle Stitched Dies don’t fit the Stitched So Sweetly rectangles exactly. I wasn’t quite sure what I was doing, but I shortened the Stitched Rectangle so it would fit the Santa better. You can find the best technique for doing this, but I took a guess and it worked. I die-cut the rectangle part way, then moved the die up so it would be shorter, keeping the die fit into the part that was already cut. You can feel it, if it is still in its die-cut design.

Next, I stamped the word “believe” in Real Red ink from the Itty Bitty Christmas Stamp Set. That word is die-cut with a small Stitched Shapes circle die. Then this was layered on a scalloped circle die in the Layering Circles Dies in Real Red.

There is a tiny star above the “i” and I thought it would be cute to put a small Rhinestone above it, almost like the twinkle in Santa’s eye. Actually, I’m not sure I like the rhinestone there, maybe some rhinestones scattered around the Santa would have been better. What do you think?

I popped up the Santa image and layers on Stampin’ Dimensionals and also the greeting. I had to put the Dimensional under the greeting off to the one side so it would line up with the popped up Santa image. Otherwise, one side of the greeting would be above the Santa. I did add a Mini Glue Dot to the side of the greeting that would overlap the Santa image to hold it in place there.

Here is my card from last year, the Monochromatic Real Red Holly Jolly Santa Christmas Card. This card is even a little simpler, cutting just rectangle shapes and an oval.

You might enjoy making this Don’t Stop Believin’ Santa Christmas Card with this cute stamp set, no matter which card design you come up with!

Shop Stampin’ Up! Online HERE!

Gnome For The Holidays 3 Gnomes Christmas Card

Gnome For The Holidays 3 Gnomes Christmas Card

This little gnome stamp set is just too cute so I made a Gnome For The Holidays 3 Gnomes Christmas Card. All three gnomes have come together to send holiday wishes on this card!

To make this card, I stamped each gnome in the Gnome For the Holidays Stamp Set side by side. Even though they are cling stamps, you can stamp them close together and likely not overlap them. The gnomes are stamped in Memento Ink because I knew I would use my Stampin’ Blends to color them in. I stamped them on a large scrap of Whisper White, not exactly knowing how I would die-cut them to put them on the front of the card.

After looking through my dies and the large size I needed to fit in all the gnomes, I decided to just cut the paper into a rectangle that would fit inside the Stitched So Sweetly scalloped rectangle die that I could use as a layer. Then I looked through the Heartwarming Hugs Designer Series Paper to see what paper I wanted to use with the gnomes. I really liked this red and green plaid!

The card base is Real Red with the Heartwarming Hugs DSP layer and then the gnomes focal point on top of that. I decided not to pop up anything but you could.

After adhering all the layers together, I stamped the greeting, also from the Gnome For the Holidays Stamp Set. I cut the strip down to 3/4″ wide and used the Lovely Labels Pick a Punch to punch each end of the greeting. Then I added a Red Rhinestone Basic Jewel to each end for a little “bling”!

You likely will want to put a Whisper White layer inside the card unless you want to stamp on the Real Red cardstock base. You could stamp one gnome or the house on this Whisper White piece or adhere a strip of the matching designer paper along the bottom edge.

If you like coloring and wanted to make a few more of these Gnome For The Holidays 3 Gnomes Christmas Cards, you could make this card pretty easily (except for lots of coloring!). Always plan to make multiple cards of the same design assembly-line fashion because it goes faster that way!

You will find the Gnome For the Holidays Stamp Set in the August-December 2020 Mini Catalog on page 23. It’s a simple little stamp set and has fun greetings. Here is a link to the first gnome Christmas card I made! I really like the little Christmas lights on the gnome house! So cute!

Be sure to use your July Bonus Coupons by August 31 on your Stampin’ Up! order!

SHOP STAMPIN’ UP! ONLINE HERE!

Gnome For the Holidays Christmas Card

Gnome For the Holidays Christmas Card

I just got my Holiday Catalog pre-order late Saturday night (love that UPS now delivers on Saturday!) so I chose this gnome stamp set for my first project with my new things, Gnome For the Holidays Christmas Card.

I never was really into gnomes and not sure I am now exactly, until last Christmas when I started following a craft lady, @thelittlegreenbean, on Instagram, who was making stuffed gnomes. Even then I wasn’t into gnomes, but I liked her and finally could resist no longer and bought myself one of her gnomes. Then another time I went back and bought two more for Christmas gifts, plus later, one for Valentine’s Day! So when I saw this gnome stamp set in the new August-December 2020 Mini Catalog (the Holiday Mini!) I decided to get it, maybe because I especially liked the little gnome house with the Christmas lights!

I also loved this Heartwarming Hugs Designer Series Paper from what I could see of it online. It belongs in a suite but it just has generic Christmasy designs in red, white, and green Christmas colors so you can use it for all kinds of cards. It doesn’t have a theme, except Christmas! And some of the papers are really generic so you could use it any time of the year.

The card base is Real Red with a layer of the top paper that was in my Heartwarming Hugs package! See what I mean about the paper….even this page you could use on a birthday card or all-occasion card!

I stamped the gnome house with Memento Ink and die cut with a Layering Ovals die with the house stamped near the top because the house is not completely drawn in at the top. Then I used Mossy Meadow are a layer underneath with one of the scalloped oval dies.

The cute little gnome is stamped and cut out by hand just because I wanted him separate and popped up on Stampin’ Dimensionals®. Of course, I colored in everything with Stampin’ Blends, my favorite method of coloring!

You can use whatever colors you like. I primarily used Real Red, Crumb Cake, Granny Apple Green, gray, Daffodil Delight, Ivory, and some others.

The greeting comes in the set and I punched it out with the new Banners Pick a Punch. This is a punch that you don’t “have” to have really, but I wanted the Banner Year Stamp Set that is in the Banner Bundle, so I figured I might as well get it!

There are some really big, beautiful suites in the holiday catalog, but sometimes it is fun to look for the stamp sets that probably won’t get as much attention. The holiday catalog is coming on Tuesday, August 4th! I think this gnome stamp set is going to be a popular one because gnomes seem to be “in” these days! I hope you enjoy my little gnome and gnome house on my Gnome For the Holidays Card!

SHOP STAMPIN’ UP! ONLINE!