Tag Archives: Stitched Rectangle Dies

Don’t Stop Believin’ Santa Christmas Card

Don't Stop Believin' Santa Christmas Card

I got this Don’t Stop Believin’ Santa Christmas Card idea from myself, from Pinterest! I happened to see my Christmas Pinterest board and spotted a card I made last year with the Holly Jolly Christmas Stamp Set and thought I could do the same thing with a current stamp this year!

I planned to call this a monochromatic card, but since there is green in the plaid paper, maybe it’s technically not monochromatic! The card does have a “red” theme, though.

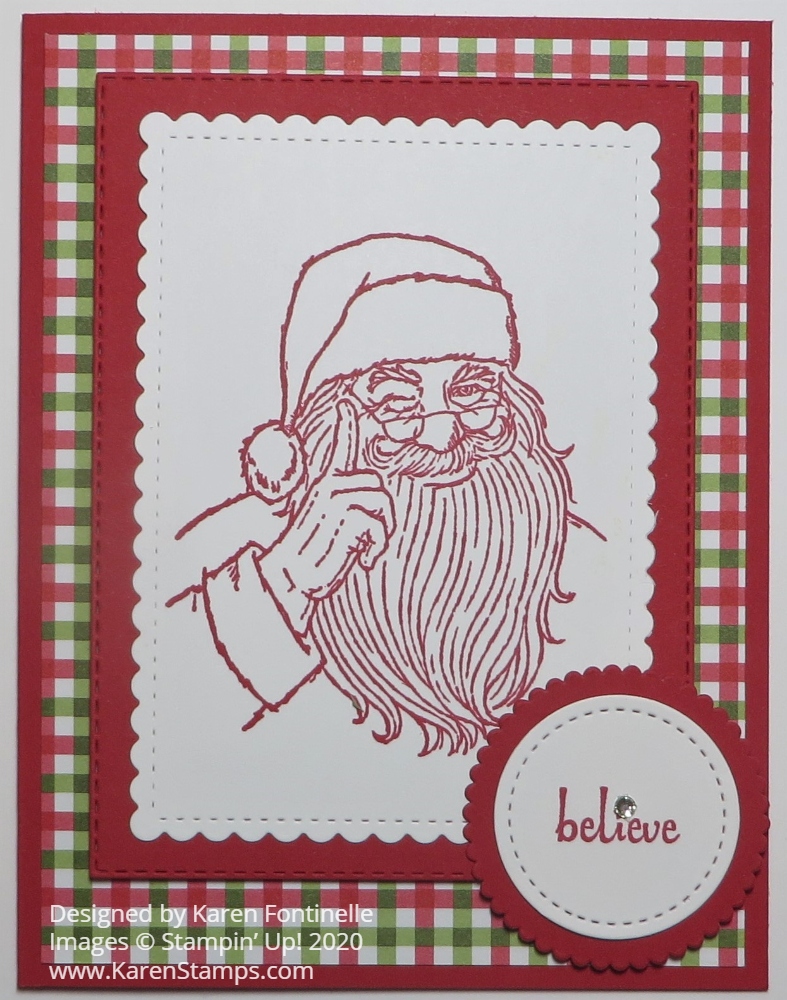
The card base is Real Red Cardstock with a layer of red & green plaid in the Heartwarming Hugs Designer Series Paper. The Santa is stamped from the Don’t Stop Believin’ Stamp Set. Isn’t that the best name?! It’s really a cute stamp set, worth a look! I stamped the Santa in Real Red on Whisper White and die-cut with one of the Stitched So Sweetly rectangle dies. The next smaller one was a little too small.

I wanted a layer underneath the Santa in Real Red but the Rectangle Stitched Dies don’t fit the Stitched So Sweetly rectangles exactly. I wasn’t quite sure what I was doing, but I shortened the Stitched Rectangle so it would fit the Santa better. You can find the best technique for doing this, but I took a guess and it worked. I die-cut the rectangle part way, then moved the die up so it would be shorter, keeping the die fit into the part that was already cut. You can feel it, if it is still in its die-cut design.

Next, I stamped the word “believe” in Real Red ink from the Itty Bitty Christmas Stamp Set. That word is die-cut with a small Stitched Shapes circle die. Then this was layered on a scalloped circle die in the Layering Circles Dies in Real Red.

There is a tiny star above the “i” and I thought it would be cute to put a small Rhinestone above it, almost like the twinkle in Santa’s eye. Actually, I’m not sure I like the rhinestone there, maybe some rhinestones scattered around the Santa would have been better. What do you think?

I popped up the Santa image and layers on Stampin’ Dimensionals and also the greeting. I had to put the Dimensional under the greeting off to the one side so it would line up with the popped up Santa image. Otherwise, one side of the greeting would be above the Santa. I did add a Mini Glue Dot to the side of the greeting that would overlap the Santa image to hold it in place there.

Here is my card from last year, the Monochromatic Real Red Holly Jolly Santa Christmas Card. This card is even a little simpler, cutting just rectangle shapes and an oval.

You might enjoy making this Don’t Stop Believin’ Santa Christmas Card with this cute stamp set, no matter which card design you come up with!

Shop Stampin’ Up! Online HERE!

Easy Tropical Oasis Birthday Card

Easy Tropical Oasis Birthday Card

I wanted to make a quick card and the design I used for this card, Easy Tropical Oasis Birthday Card, is almost always a very quick and easy one to use! This Tropical Oasis Designer Series Paper has such gorgeous colors and floral patterns in it. I just flipped this floral pattern over, and the pineapples were on the opposite side! I saw some tiny pineapples at the grocery store one day and thought of this whole Tropical Oasis Suite!

One of the colors that go with this paper is Real Red! My favorite color, so I could not pass it up! So Real Red it was for the card base. Without measuring, I cut out a longer rectangle than I needed because I wanted to have a little overlap of the two papers so that I could glue them together. In the end, the two pieces adhered together measured like any card layer, 5 1/4″ x 4″.

I always like to cover the seam of where two papers meet, so I used the Daffodil Delight 1/4″ Ruched Ribbon. I just took a longer strip than the card and adhered it around on the back of the card layer. After I made the greeting, I use the ribbon to tie a bow on each end of the layered background for the greeting.

The greeting is stamped from the Peaceful Moments Stamp Set. You could choose lots of other greetings or sentiments with this card design and paper. I layered it on Real Red paper punched with the. Everyday Label Punch. Then I trimmed down another punched label of Daffodil Delight and cut it in half so I could make it smaller to fit under the greeting. I didn’t do a perfect job but I was trying!

The greeting itself is tricky to explain. I tried something for the first time. I used a Stitched Rectangle Die to cut it out. As you can see, the rectangle dies are longer than I wanted my greeting to be. I cut only part of the rectangle by not putting my cutting plate over the part of the die I did not want to be cut. Then I switched the die around, still lining it up with the die-cut outline on the sides (it just sticks back on the same lines) and just put the cutting pad on the end that now needed to be cut to make the greeting shorter and only rolled over that end. That all produced the smaller rectangle greeting! I didn’t take pictures because I wasn’t even sure I was doing it right! But I did!

This card design is always great to keep in mind when you want an easy card that still looks great. No fancy folds or directions to follow. Just add some designer paper to all or part of a card base, in either direction, one side of paper or two, add a ribbon or embellishment or not, then add a greeting for whatever occasion. Here’s another card I made that is similar, using a whole layer of designer paper with a strip of a different pattern going across under the greeting. When you have designer paper as bright and pretty as this, almost any card design you use like this Tropical Oasis Birthday Card will turn out beautiful.