Category Archives: Christmas

Quick and Easy Toile Tidings Christmas Cards

Quick and Easy Toile Tidings Christmas Cards

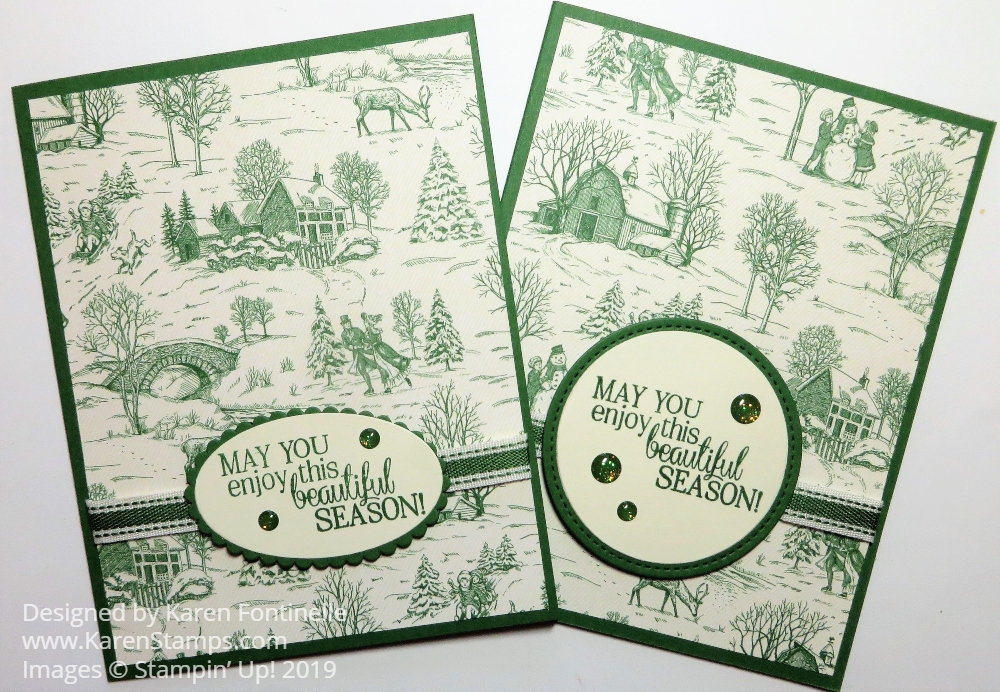
I wanted some quick and easy cards the other day (because who has any time with Christmas racing to get here?!) so I made these Quick and Easy Toile Tidings Christmas Cards. I love this toile paper, probably because I have some toile fabric covering the seats of a couple of chairs.

The card base is Garden Green. I just cut the Toile Tidings Designer Series Paper to fit and adhered some Garden Green 3/8″ Double-Stitched Ribbon around the paper first before adhering to the card. Nice if you can think of this before you adhere the designer paper! Don’t ask me how I know!

Then the card just needed a greeting so I chose this one from the So Many Stars Stamp Set. It is stamped in Garden Green Ink on Very Vanilla Cardstock, which was die cut and then layered on a piece of Garden Green. I made the circle one first but then I changed to the oval die cuts. The greeting is kind of large. The greeting seemed to beg for another little something so I added a couple of Toile Tidings Glitter Enamel Dots.

That’s all there was to it, so if you need some easy cards, just use this Toile Tidings Paper. I love all the little scenes on it! In fact, you could use this paper after Christmas, during the winter for cards or to write thank you notes after the holidays.

SHOP STAMPIN’ UP! ONLINE HERE!

(Did you know you can expedite your Stampin’ Up! order? There is a drop down box when you check out for shipping. It IS extra ($20 for 2nd Day Air and $35 for Next Day Air, on top of regular SU shipping) but if you need it, you need it! Warning: 2nd Day Air CAN be addicting for large orders! (What’s another $20 if I’ll get it in two days?!) You have to place your order by 11:00 am MT (that’s noon Central Time) for it to go out that day.

Do You Have Any Shiny Brite Vintage Ornaments?

Shiny Brite Vintage Ornaments

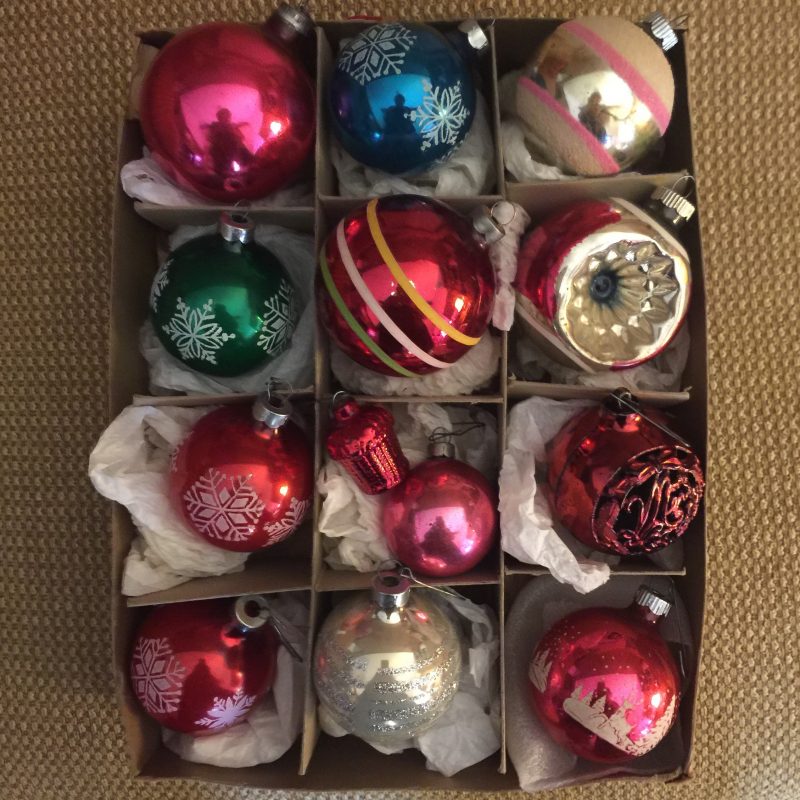
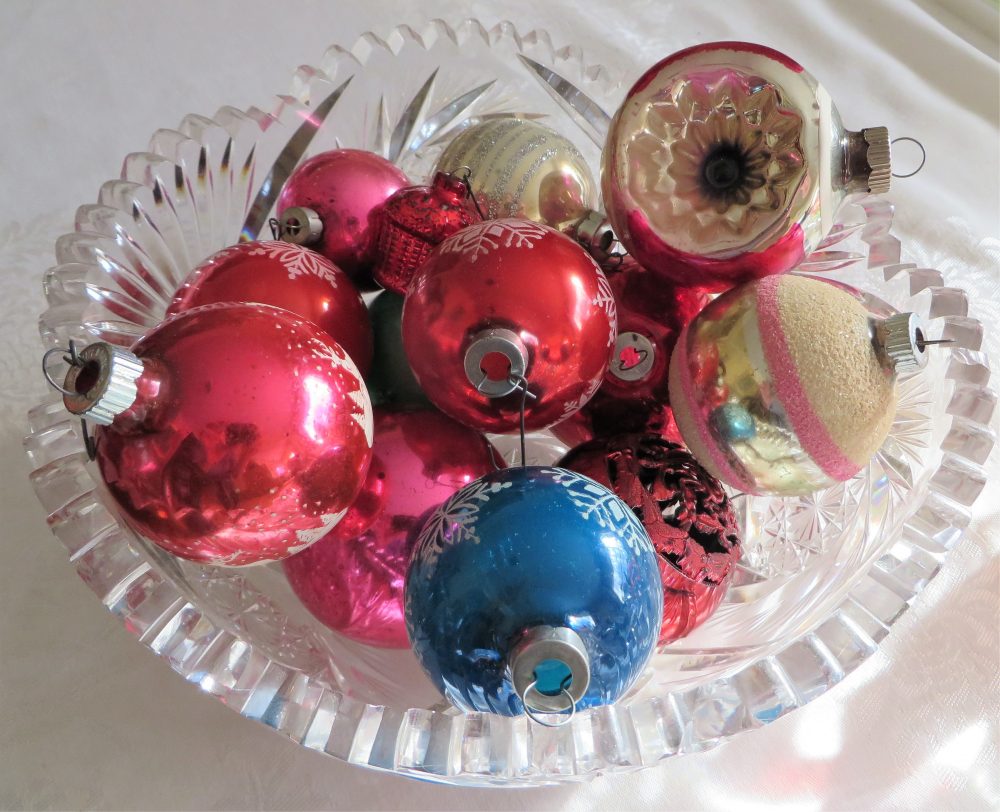
You might be surprised to hear I have not completely finished my holiday decorating, but finally yesterday I came across my Shiny Brite box of ornaments. While I can’t vouch that they are all Shiny Brite ornaments, I do know they are “vintage” (which means from my childhood!).

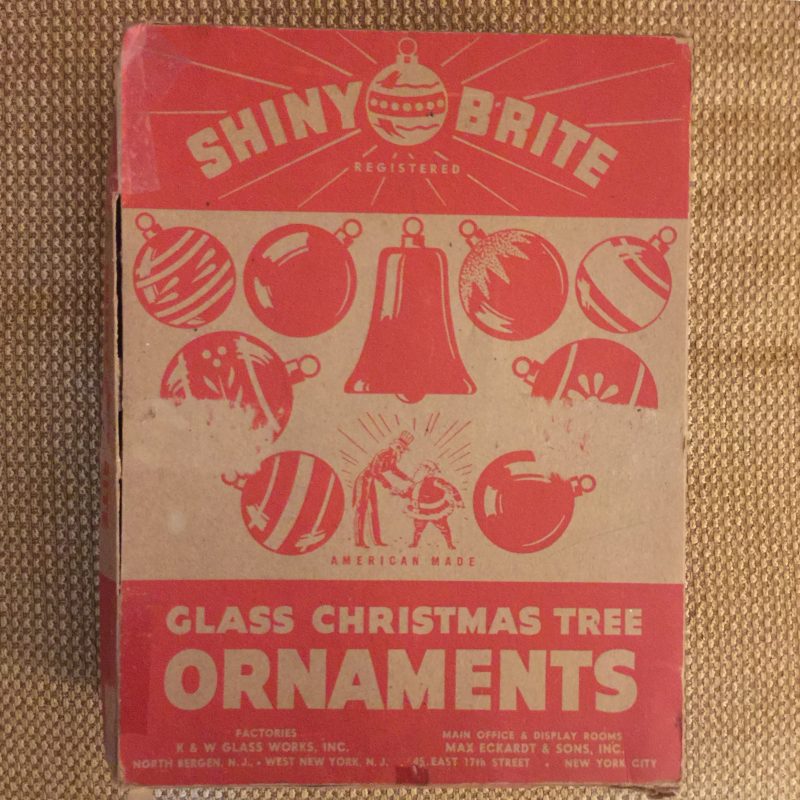
The other day I came across an article about Shiny Brite ornaments and their history that I found quite interesting. I was pretty sure that I had an old box that said Shiny Brite. I even see a written “10 cents” on the side of the box! I know these ornaments hung on our family’s Christmas tree every year. Now I put them all in a glass bowl as a decoration rather than hanging them on a tree.

Shiny Brite Ornaments in Bowl

The ornaments are even in a vintage crystal bowl! Maybe I should add some greenery too. Besides my big tree in the family room, full of ornaments, I have my dad’s small tree that he started putting up when it was too much work to put up his big tree, but I have certain small ornaments on it and these are a little large. So I think a bowl, where they won’t fall off a tree limb, is maybe a safer place and makes a nice table decoration.

Here’s the box. Like I said, I can’t say for sure all these ornaments came in this box, but some ornaments must have!

Shiny Brite Ornament Box

If you are interested in these old ornaments and perhaps have some yourself, please read this article I came across on Facebook. (I don’t know how to embed part of the article like I used to know how to do so I’m just putting this link!)

Happy Christmas Decorating!

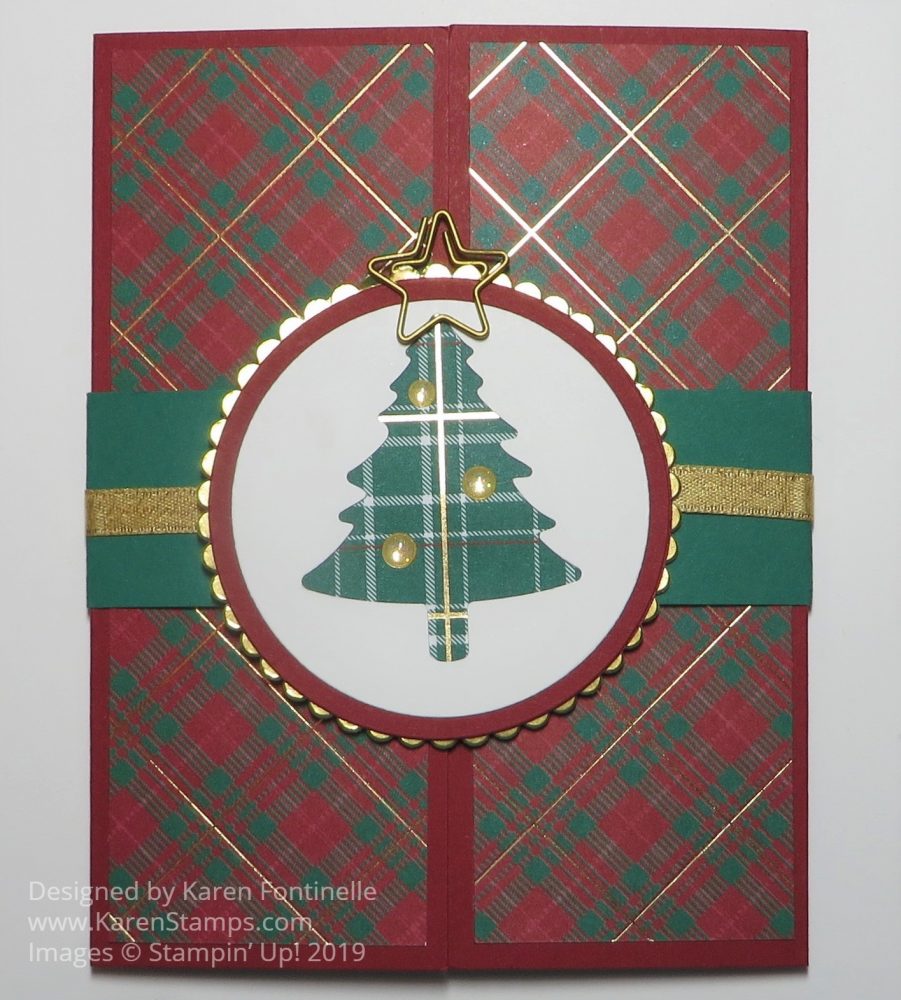
Wrapped in Plaid Gatefold Christmas Card

Wrapped in Plaid Gatefold Christmas Card

This Wrapped in Plaid Gatefold Christmas Card is fairly easy to make especially if you just copy my design! Gatefold cards are easy enough and yet look impressive to the recipient, especially knowing that you made it! It is still the size of a regular card and you can decorate the card base any way you like.

The card base is 8 1/2″ x 5 1/2″ as per usual. Instead of scoring and folding in half, score from each end to fold over the center of the card. Score at 2 1/8″ from each end of the Cherry Cobbler Cardstock. Crease and fold with the two ends meeting in the center.

If you want to use designer paper as I did with the Wrapped in Plaid 6″ x 6″ Specialty Designer Series Paper, cut two pieces at 1 7/8″ x 5 1/4″. Adhere these to the two front panels.

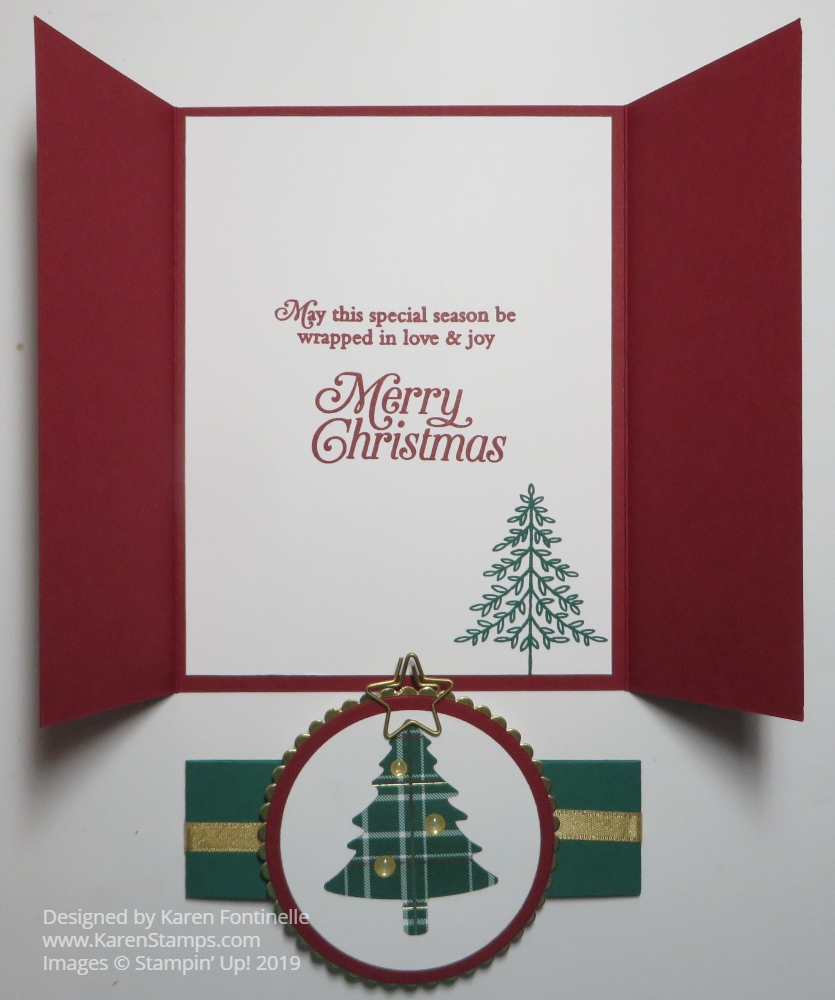
For the inside of the card, cut a piece of Whisper White and stamp whatever greetings you like. I added a tree from the Perfectly Plaid Stamp Set. You could also stamp right on the inside of the Cherry Cobbler Cardstock, but since it is a little dark, you might prefer the Whisper White layer for your personal greeting and signature.

Wrapped in Plaid Gatefold Christmas Card Inside

For the belly band cut a strip of Shaded Spruce 11″ x 1 1/4″ or whatever width you would like. Fold around the card, crease the folds, cut off the excess length and have the overlapping ends meet at the front center of the card. You might think you would want the belly band to meet at the back, but if it meets at the front, the tree piece that you add will cover up the ends. I added a piece of Gold Shimmer Ribbon around the belly band and held in place with Mini Glue Dots.

You can add whatever you like for the center of the belly band. I used the Pine Tree Punch to punch a tree out of a piece of Whisper White and then die cut this piece with the Layering Circles Die. Behind that, I die cut a slightly smaller piece of Wrapped in Plaid DSP that I wanted to show through and adhered to the back of the punched tree. This was layered on a Cherry Cobbler die-cut circle, which is then layered on a die-cut scalloped circle of Gold Foil.

As I was looking in my drawer for embellishments, I came up this clip-on star that had been on the Clearance Rack. Perhaps you already own these clip shapes. If not, just punch out a gold star from whatever you have. And for a little extra bling, besides the gold accents in the Wrapped in Plaid DSP, I adhered a few Gold Glitter Enamel Dots. These dots, along with the Gold Shimmer Ribbon are items that are in the Christmastime Is Here Suite.

SHOP STAMPIN’ UP! ONLINE HERE!

Make Snowman Season Tic Tac Holder Stocking Stuffers

Snowman Season Tic Tac Holder Stocking Stuffers
Images copyright Stampin’ Up! 2019

Remember! Today is FREE SHIPPING with a $50 order at Stampin’ Up!

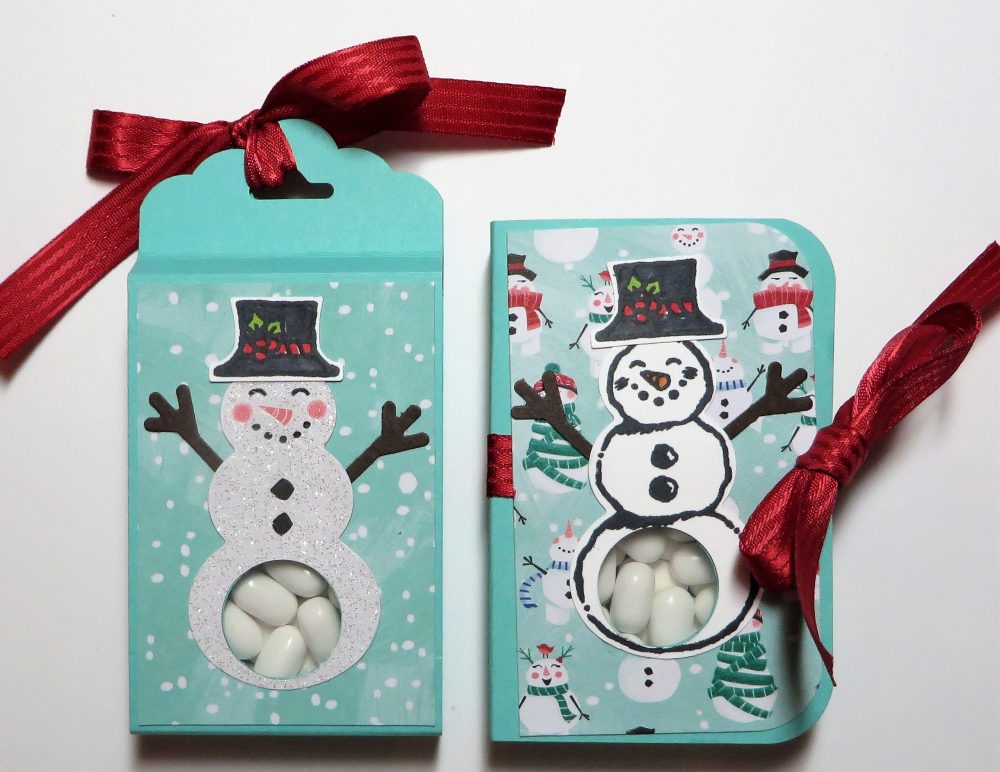
You may have seen these on my Facebook page last week when my website wasn’t working, but I thought I would go ahead and post these Snowman Season Tic Tac Holder Stocking Stuffers here on my blog so more people will see them. They are easy and fun to make and lots of us want some stocking stuffer or little extra gift ideas for people for Christmas.

I had fun making these Tic Tac holders with the Snowman Season stamp set and Let It Snow designer paper! Just punch a hole in his belly so you can see the Tic Tacs! Or don’t. I used the 3/4″ Circle Punch (retired) since the 1″ was a little too large for these snowmen. But if you are making another design and can use a 1″ Circle Punch, it’s good to show a bigger area of the mints inside!

The first Snowman Season Tic Tac Holder is a strip of 2″ x 9″ cardstock, scored at 1″, 1 5/16″, and 4 3/16. Then turn and score from the other end with the same measurements. Punch each end with the Scalloped Tag Topper Punch or whatever you like. Or leave it squared off. Kind of pinch the top together along the score lines and then decorate. You have to punch the snowman (this one punched from the DSP with the Snowman Punch), then through the DSP, then through the cardstock if you want the Tic Tacs to show. Tie at the top. I used some retired Real Red ribbon.

This snowman is cut out from the Let It Snow Specialty Designer Series Paper. (It is no longer available but I know lots of you have it) Then I stamped, colored and punched out his hat and punched out his arms with the Snowman Punch.

The second one is kind of like a book just folded around the container. Cut cardstock at 3 1/4″ x 4 7/8″ Score at 2 1/8″ x 2 3/4″, round the corners if desired. Cut a piece of designer paper 3 1/8″ x 1 7/8″ to layer. Stamp and punch snowman. Use a 3/4″ Circle Punch for the belly. Be sure to wrap the ribbon around before adding layers to the front.

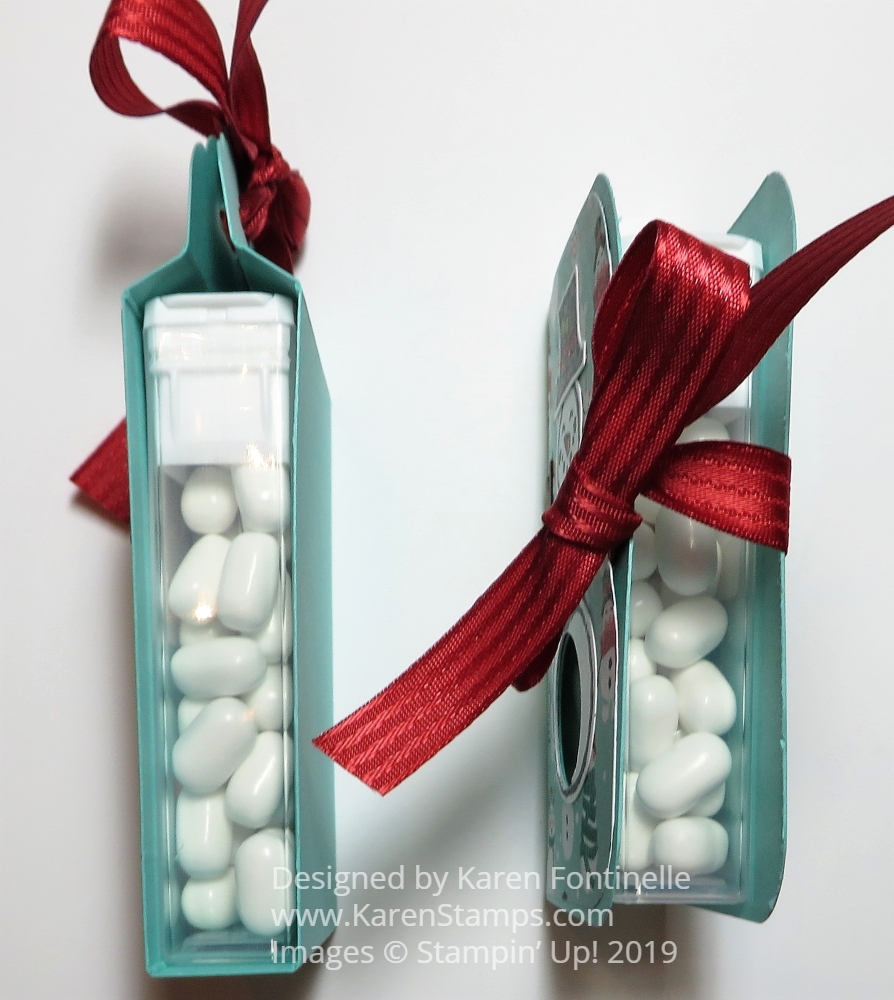
Have fun! Great stocking stuffer! There are different sizes of Tic Tac products so just modify your design to fit. This idea has been around a long time and is always fun to make!

Snowman Season Tic Tac Holders Side view
Free Shipping Banner Dec. 2019

Make Some Holiday Gift Card Holders

Toile Tidings Christmas Red Gift Card Holder

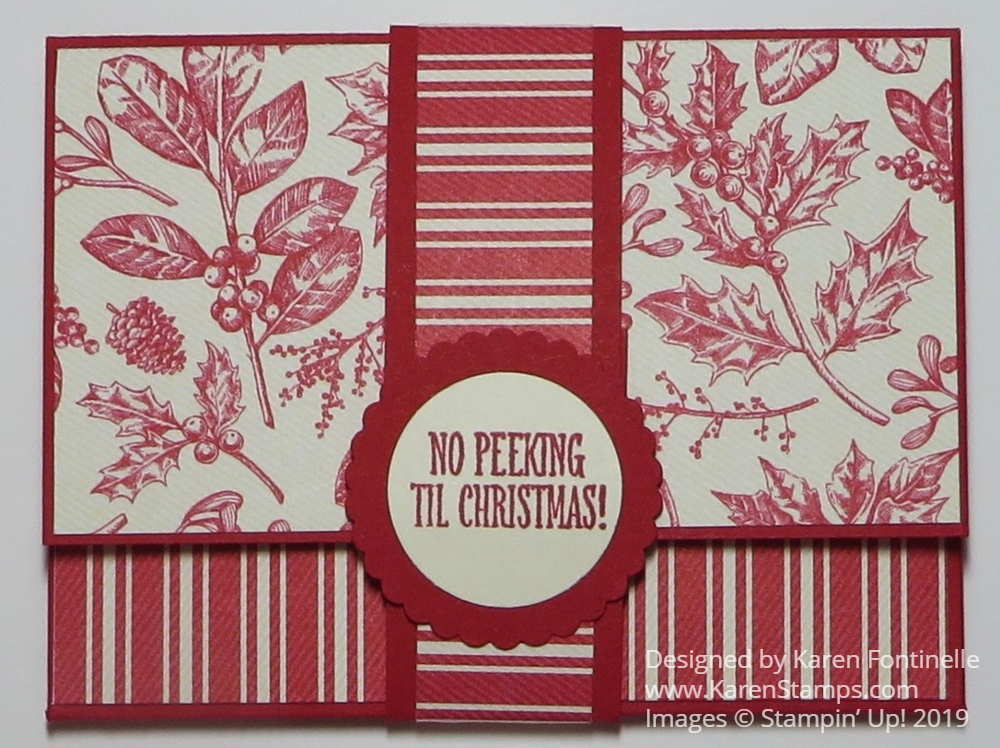
It’s time to make some gift card holders that you can use at Christmastime for those people that you plan to give a gift card to and for those for whom you buy last-minute gift cards to finish off your shopping! It’s a great way to make the gift card itself something extra-special with your cardmaking touch!

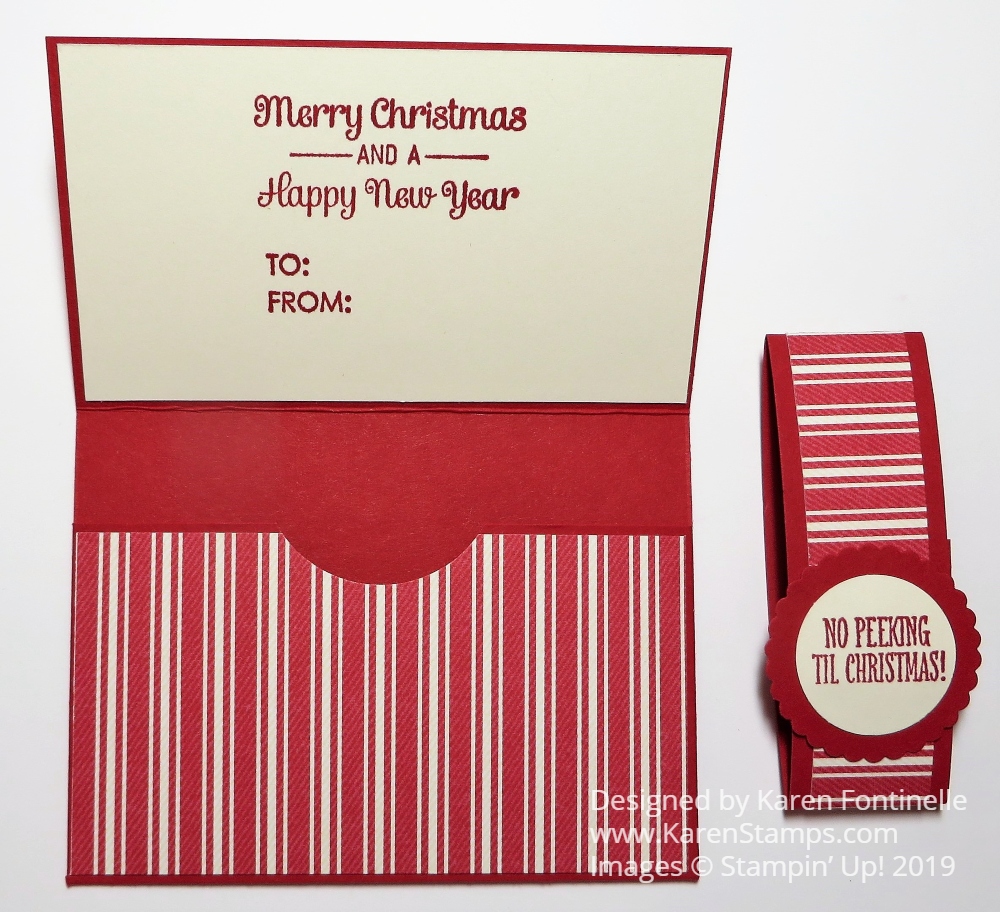
There are all sorts of gift card holders you can make. Basically, you just need a card with a little pocket inside! This one I made is pretty easy. It has a belly band to hold it closed and inside is a pocket to hold the gift card and also a place for a greeting and/or a personal message. You can put it right under the treat or mail it in an envelope.

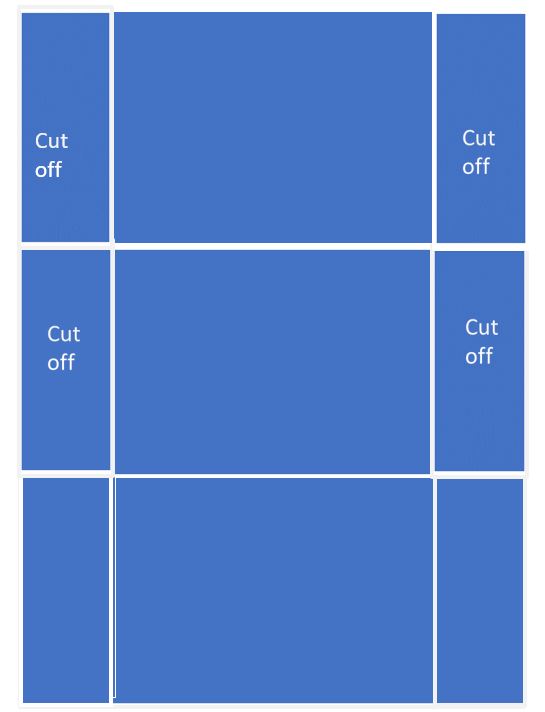
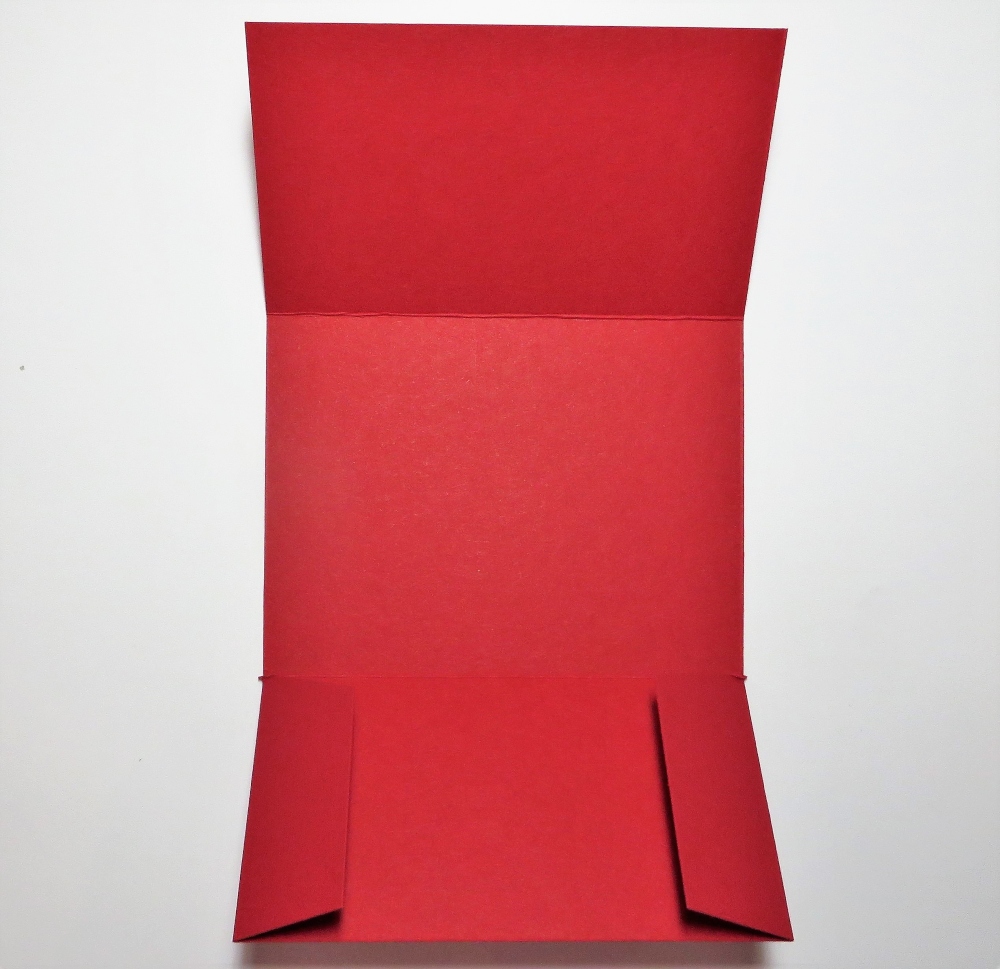
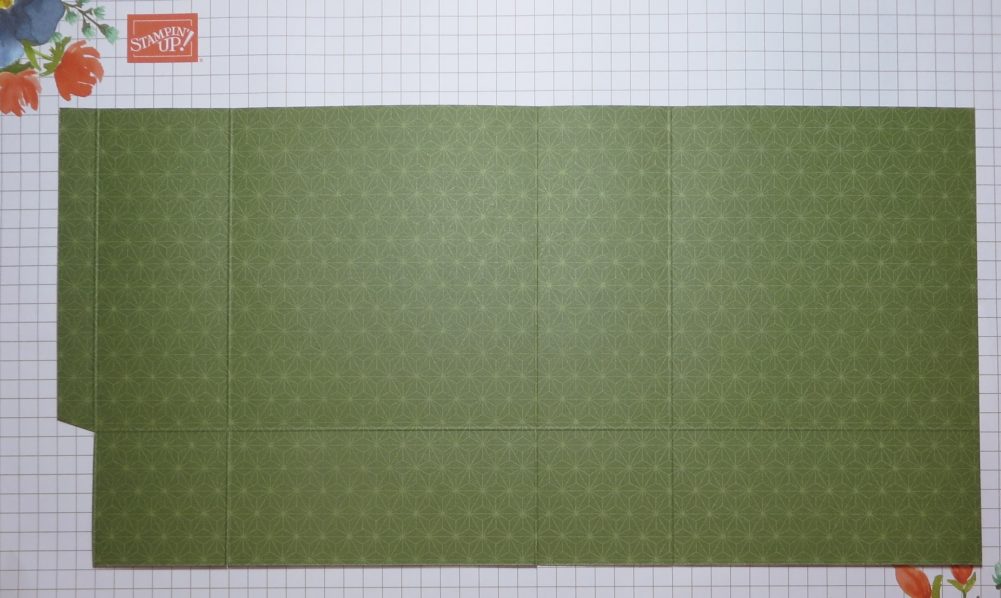
To begin, start with a piece of cardstock 7 1/2″ x 6″. On the 7 1/2″ side, score the paper at 2 1/4″ and 5 1/4″. Turn and score the 6″ side at 1″ and 5″. Then cut away both 1″ sides down to the last score line as you see in the diagram below. You can cut those bottom tabs at an angle just to fold them in easier. That bottom portion folds up to make the pocket to hold the gift card and then the top folds down. Easy peasy!

Toile Tidings Gift Card Holder Diagram

To decorate the holder, cut the Toile Tidings Designer Paper or whatever you want to use. Cut two pieces at 3 7/8″ x 2 1/8″ and one piece at 3 7/8″ x 2 7/8″. One piece goes on the inside pocket. Adhere and then use some circle punch partially inserted into the pocket to punch out a half-circle at the top, if you wish, just to make it easier to grab the gift card. You can also cut out a plain piece of cardstock on which to stamp a greeting or write a personal message for inside the top of the gift card holder as you see in my sample.

Toile Tidings Red Christmas Gift Card Holder Folded
Toile Tidings Red Gift Card Holder Inside

To make the belly band, if you want one, cut cardtock 7″ x 1″ and designer paper 7″ x 3/4″. Stamp a greeting, punch out, and layer however you like. I used the Itty Bitty Christmas Stamp Set. It’s so handy!

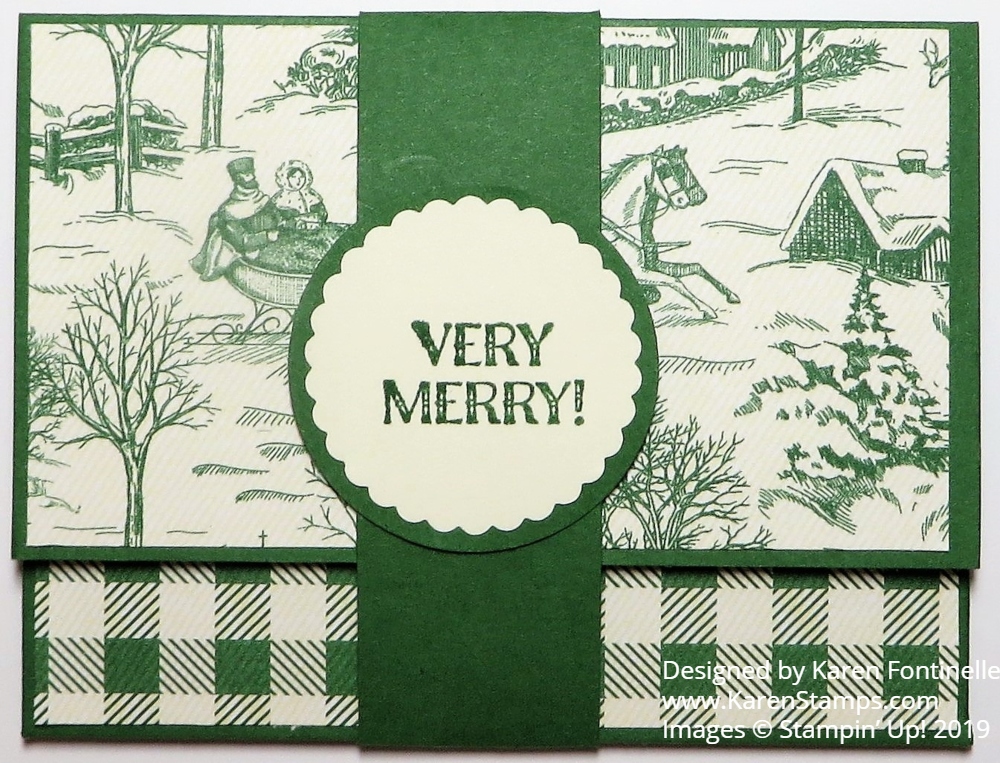
And here’s an example of the same pattern using the Garden Green designer paper, perhaps better for a man than the red and a little plainer.

Toile Tidings Green Christmas Gift Card Holder

Remember, tomorrow, December 11th is FREE SHIPPING for orders $50 or more!! It’s one day only.

Don’t start inputting your order until Dec. 11 or it might not take the free shipping. Just get your list ready today! You can use it on regular orders, Year-End Closeout, Clearance Rack, Paper Pumpkin Prepaid Subscriptions! What fun!

Today is the last day to sign up for Paper Pumpkin and get the December Kit!

JOIN PAPER PUMPKIN HERE!

This will be a kit with an exclusive stamp set with many greetings and supplies to make 12 cards for the New Year!

SHOP STAMPIN’ UP! ONLINE HERE!

Christmas Mini Curvy Keepsake Boxes

Christmas Mini Curvy Keepsake Boxes

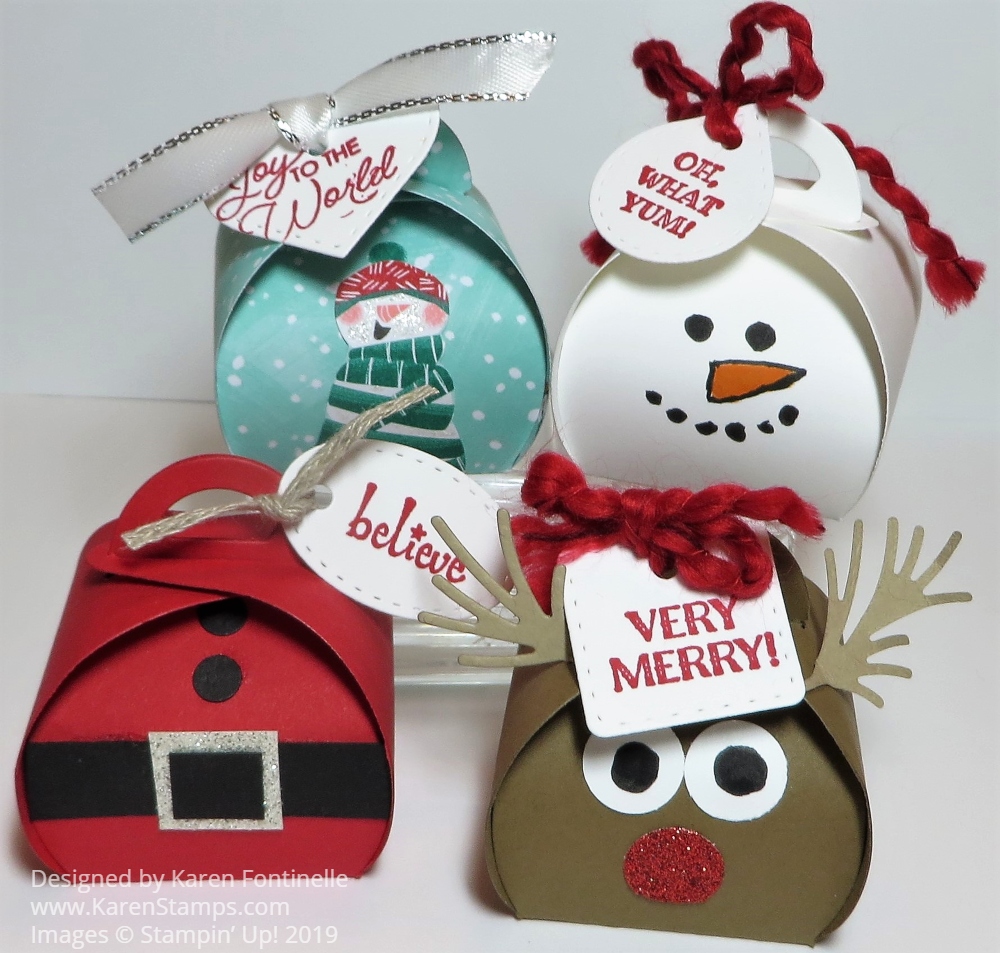
I thought it would be fun to just make some of these Christmas Mini Curvy Keepsake Boxes to have on hand for the holidays – now that the holidays are upon us!! These are just easy boxes that you have probably seen online, nothing too creative, but cute nonetheless!

All you need to make these and other cute creations is the Mini Curvy Keepsake Box Dies. The one big die cuts out the box and then you also have little tags and other pieces you can use. Very creative people make the most creative characters and designs with these boxes!

Snowman Face Mini Curvy Keepsake Box

This easy snowman is made with Whisper White Cardstock and I just drew on his face with Stampin’ Write Markers. You could alternately punch out pieces for his eyes, nose, and mouth but for me, it was easiest to draw. I used the greeting from the Itty Bitty Christmas Stamp Set. The Real Red Curly Ribbon makes a cute way to tie on the tag and add a little something to the snowman.

Santa Outfit Mini Curvy Keepsake Box

This little Santa box is easy to make with Real Red Cardstock and a bit of Basic Black scrap and Silver Glimmer Paper. Use a hole punch for a couple of buttons on Santa’s suit. To make the belt, just adhere a narrow strip of black cardstock. Add on a square of Silver Glimmer Paper and then adhere a smaller square of Basic Black on top of the glimmer paper to make it look like the belt going through the buckle! The greeting is tied on with a piece of Braided Linen.

Snowman Mini Curvy Keepsake Box

This keepsake box uses a piece of the Let It Snow Specialty Designer Series Paper with a snowman from another piece of the paper that is cut out and adhered to the side of the box. If the recipient opens up the box, they will find the cute inside pattern of lots of little snowmen. The only trouble with prints and this die is you would have to make sure the patterns and designs are going in the direction that you want. The greeting is stamped from Itty Bitty Christmas and tied on with a bit of the Silver 3/8″ Metallic-Edge Ribbon.

Rudolph the Reindeer Mini Curvy Keepsake Box

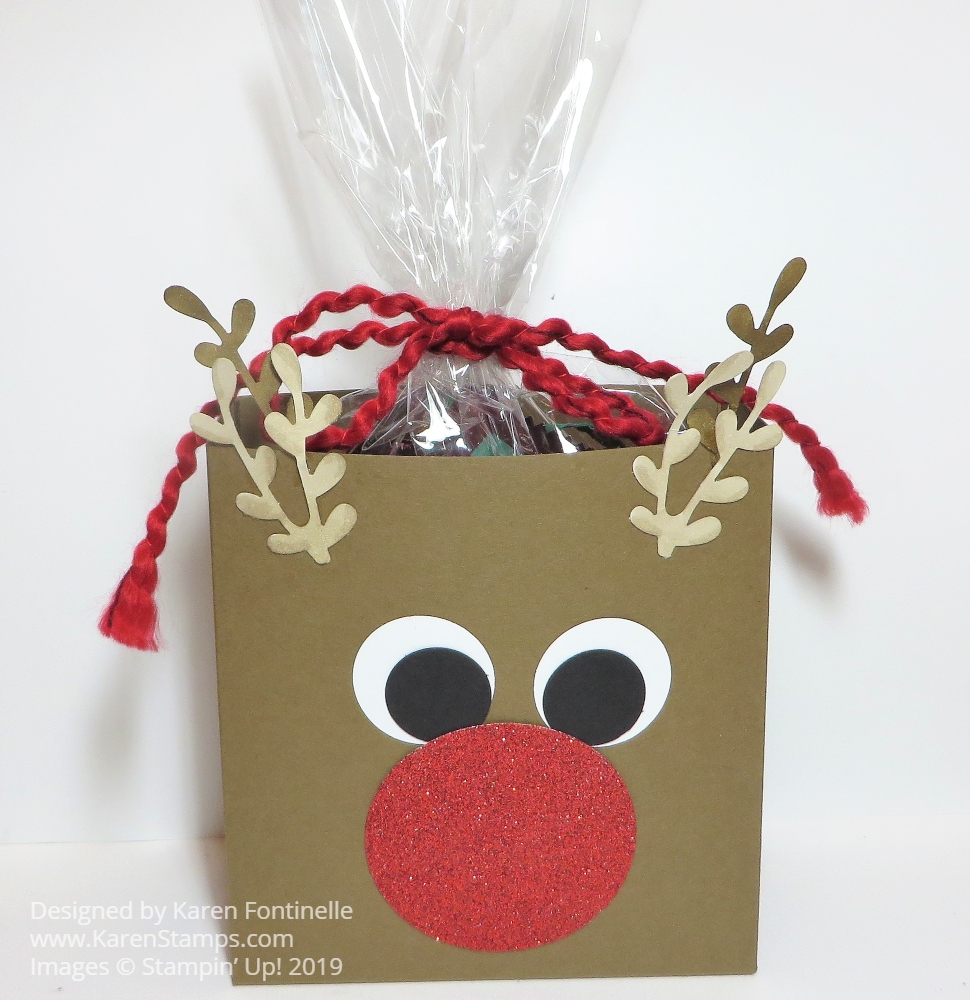
This cute little reindeer can be made various ways. He is made out of Soft Suede Cardstock for his body and a lighter color for the antlers, Crumb Cake. Of course you must you Red Glimmer Paper for Rudolph’s nose. The eyes are punched out and the black pupils colored in with a black marker. The antlers are glued on by bending back the stem of the die-cut piece and just glued on the top of the box. The tag, stamped with a greeting from Itty Bitty Christmas, is tied on with the Real Red Curly Ribbon.

As you can see, you can do a lot with these dies, much more really than these samples. But once you start making things with this box die, you can almost not stop!

if you don’t own the Mini Curvy Keepsake Box Dies, you might want to check them out in the Online Store. You can put a small gift or treat inside. Their little size makes them especially cute!

SHOP STAMPIN’ UP! ONLINE HERE!

Only 4 Weeks Left of My “12 Weeks of Christmas” Holiday Emails!

12 Weeks of Christmas Banner 2019

Every week for the past eight weeks I have been sending my mailing list subscribers a free holiday project that you can use to make your holiday preparations easier! This is a thank you for my mailing list subscribers that I like to do every year. Just like in my regular weekly email, I send a photo of a project, a list of supplies needed, and all the directions to make it.

These are the final four weeks! Can you believe it?! These last four weeks we will concentrate on gift wrap, tags, and bags for those Christmas gifts!

You may have missed the first weeks, but sign up today for my mailing list before 1:00 pm Central Time and you will get the remaining 4 weeks, plus you’ll be on the list for next year!

All you have to do is sign up in the red box in the upper right of my blog or in the form below.

Subscribe to My Mailing List! 

Exclusive Projects

Stampin’ Up! News & Updates

FREE Welcome Gift!

Name: 

Continue reading

Monochromatic Real Red Holly Jolly Santa Christmas Card

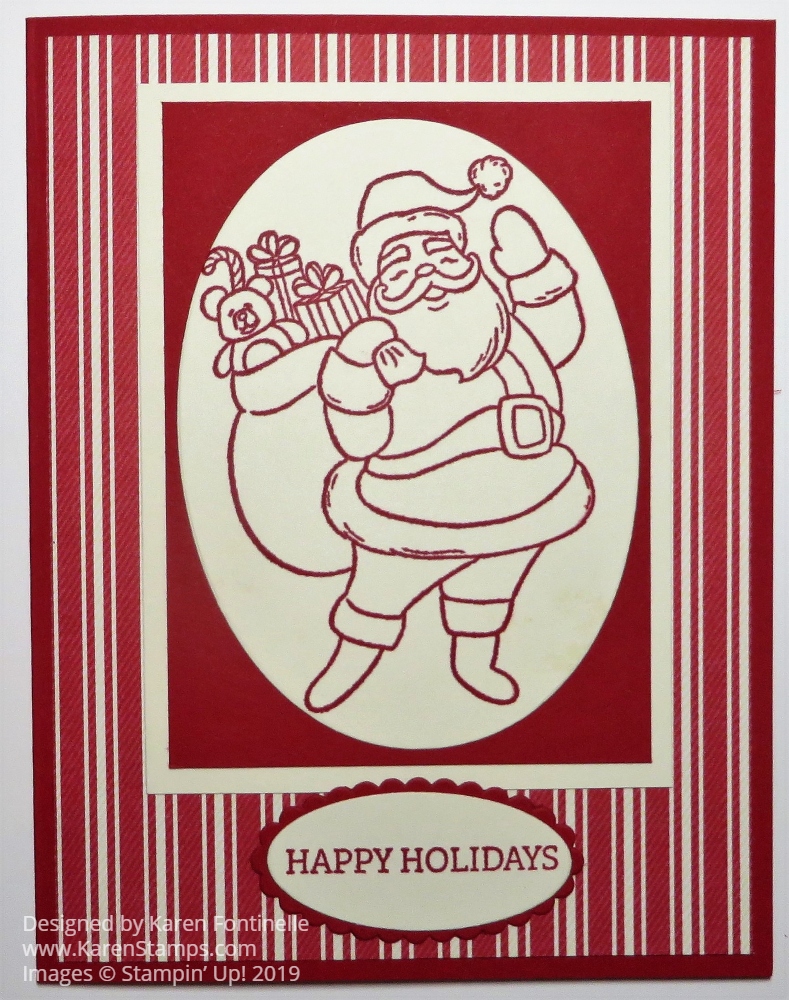
Monochromatic Real Red Holly Jolly Santa Christmas Card

If you love this Santa, but don’t want to color him in, monochromatic is the way to go for this card, the Monochromatic Real Red Holly Jolly Santa Christmas Card. After making several other Christmas cards with this Santa and taking time to stamp in black and then color in all the areas with Stampin’ Blends, I would say, even though I LOVE coloring with my Stampin’ Blends, that it can take a fairly long time to color the Santa. So if you want to make a lot of cards in a hurry, just stamp Santa in Real Red Ink and call it a day!

This is a really simple card. The card base is Real Red and the designer paper layered on the base is the red stripe pattern in the Toile Tidings Designer Series Paper in the Holiday Catalog.

The Santa is from the Holly Jolly Christmas Stamp Set. He is just stamped in Real Red on Very Vanilla Cardstock. I have made several cards with this Santa and coloring him in with Stampin’ Blends and as much as I like coloring, it takes a while to do several Santas for several cards! This is super easy, just stamping him in red ink and die-cutting with a Layering Ovals Die. He is layered on a piece of Real Red Cardstock. I was going to stop there but I thought having a layer of Very Vanilla underneath made it stand out just a bit more.

The greeting is stamped in Real Red ink on Very Vanilla from the Itty Bitty Christmas Stamp Set. I keep turning to all these “Itty Bitty” stamp sets for greetings since they have so many choices and don’t take up much room on a card if you don’t have much room for a greeting! The greeting is then die-cut with a small Layering Ovals Die and layered on a scalloped oval die in the same set. You could also have the greeting be just a straight strip of paper too.

I suppose you could even add some rhinestones or sequins to this card, but I liked it just the simple, basic way it turned out. I didn’t even pop anything up on Dimensionals but you could. If you weren’t making a bunch of these cards, you could also stamp the Santa in Memento ink and color in with Stampin’ Blends or whatever color medium you liked. This is just a time-saving method that still delivers a very nice card! Here is a card I previously stamped and colored the Santa. I loved this card, too, and looked forward to making several more to send out, and I did, but it took time.

It’s not too late to get this stamp set or Bundle with the dies and whatever paper you need for Christmas cards! Just go shop at Stampin’ Up! and find what you need!

Feels Like Frost Santa’s Sleigh Card

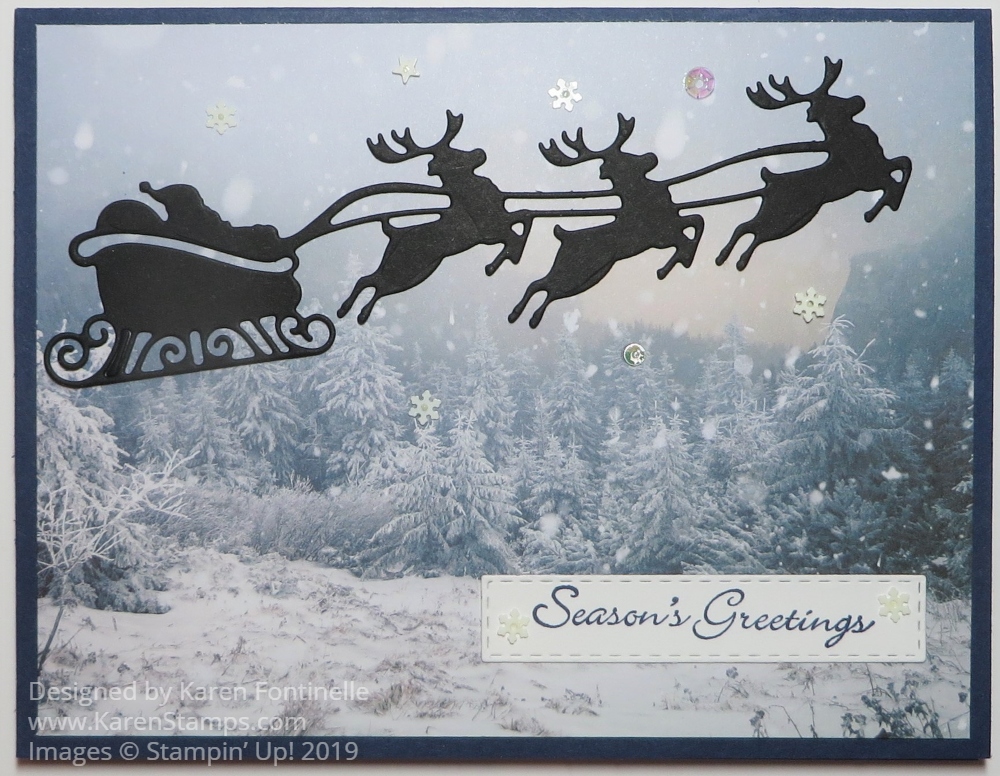
Feels Like Frost Santa's Sleigh Card

As I paged through the papers of the Feels Like Frost 6″ x 6″ Designer Series Paper, I saw this wintry scene jumped out at me. It looked like a scene out in the middle of nowhere and I just pictured Santa traveling all over the world, delivering gifts to children everywhere, no matter how remote, distant, or wintry! I thought the die-cut sleigh with Santa would be perfect up in the sky over this scene.

As I began working on this blog post, I found out that the Feels Like Frost DSP is sold out! At first, I thought I should scrap this post since I didn’t want to advertise something you couldn’t order if you wanted it. But then I realized that if you loved this paper when you saw it in the Holiday Catalog, you probably already ordered it and maybe would like to see another idea for using it. Obviously there is not enough time for Stampin’ Up! to order more paper for the holidays at this late date.

I wanted this card to look like very late at night, out in the distant woods, wherever it is, so I used a card base of Night of Navy Cardstock. Since this cardstock is so dark, you will have to put a layer of Whisper White or a light color inside the card so you can stamp a greeting or write a personal note. Or you can use heat embossing with white or metallic embossing powder on the dark cardstock.

The designer paper is just adhered to the Night of Navy Cardstock. Santa and his sleigh are a die-cut from the Jolly Season Dies in the Holiday Catalog. I used Basic Black Cardstock but you could also use Night of Navy I think. The dies are part of the Night Before Christmas Suite, which is one I absolutely love!

I tried various greetings and finally settled on this one from the Itty Bitty Christmas Stamp Set. I die-cut it with the Stitched Rectangle Dies and also die-cut a Silver Foil rectangle to layer under the greeting. However, in the end, I liked just the greeting by itself.

For a little bit of bling, I added some Snowflake Sequins to the background and also two on the greeting. A really handy thing to have when you are working with sequins is the Take Your Pick tool. You can use the putty end to pick up the sequins and place them and you can use the pointy end for transferring things like rhinestones and jewels from the package to the project.

Overall, this is a very simple Christmas card so if you already own the Feels Like Frost Designer Paper and the Jolly Season Dies with the sleigh. If you don’t have the paper, you could stamp your own background with a night sky and trees below. Mainly I like the story of Santa’s sleigh going everywhere all over the world!

SHOP STAMPIN’ UP! ONLINE HERE!

Brightly Gleaming Ornament Gift Bag

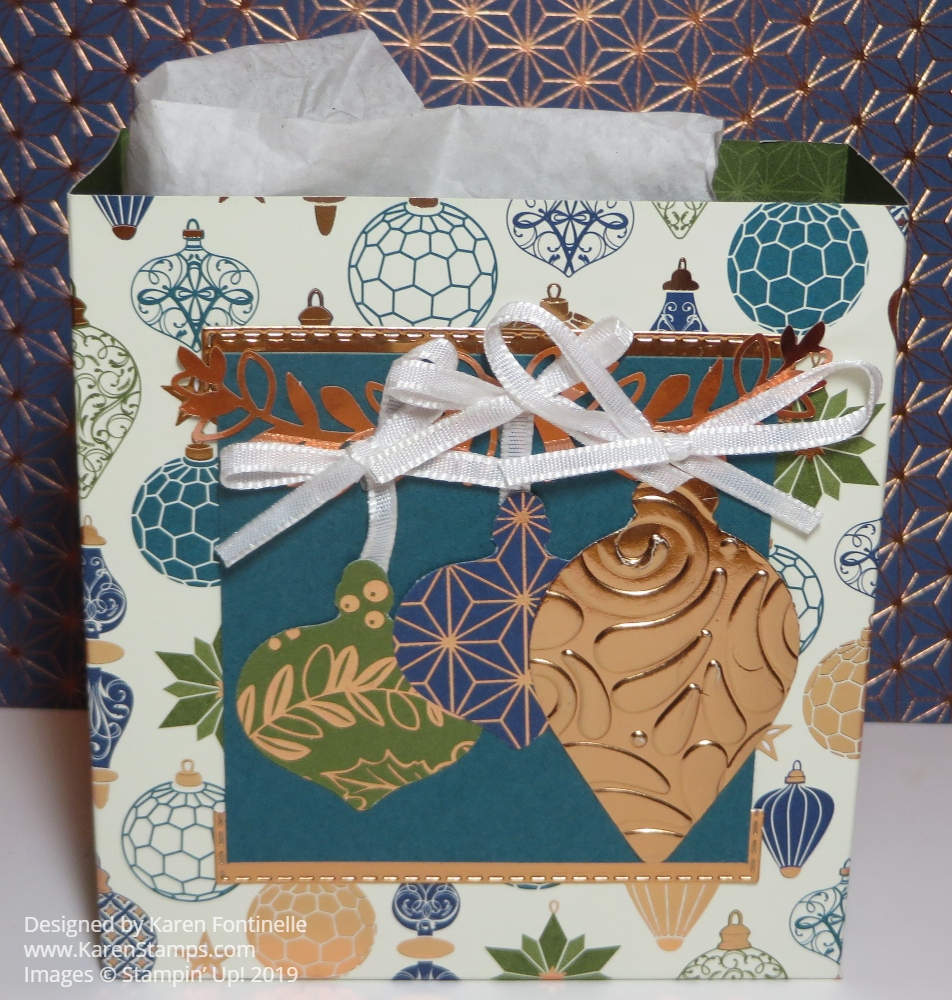
Brightly Gleaming Ornament Gift Bag

This Brightly Gleaming Ornament Gift Bag is perfect for a small gift and looks prettier than anything you would buy in a store! And instead of driving to a store for a little bag, use the time and stay home and make your own! It’s much more fun! Even better, sit down and make more than one bag and you’ll have a collection ready to go!

This gift bag is much like the 2-4-6-8 bag we often make but has a wider dimension. I used the beautiful Brightly Gleaming Specialty Designer Series Paper to make the bag.

Start with a 6″ x 12″ piece of paper. Score at 4″, 5 3/4″, 9 3/4″, and 11 1/2″. Turn the paper so the short edge is at the top and score at 1 3/4″. This will make the bottom flaps of the bag. Cut those short bottom tabs up to the 1 3/4″ score line. Cut off the little 1/2″ tab on the bottom

Fold on all the score lines and crease well with the Bone Folder.  Adhere the tab on the end to the other side to assemble the bag.  Then adhere the flaps on the bottom. The Tear & Tape Adhesive works great as far as strength but does not allow for any “wiggle room” like the Multipurpose Liquid Glue. So use whichever works best for you. You will be able to see how the bag goes together as you start to assemble it.

This little Brightly Gleaming gift bag doesn’t need too much in the way of decoration, but of course, I had to put a little more into it than I needed to! I punched the three ornaments with the Gleaming Ornaments Punch Pack. The copper foil ornament is embossed first with the Swirls & Curls Embossing Folder and then punched, but you could punch it out first.

I thought the ornaments needed a little bit of a background and I happened to have a scrap piece of Pretty Peacock Cardstock handy so I just used that, cutting it down as small as I could. Then I also saw a die cut Copper Foil piece and cut that in half lengthwise to be a top and bottom layer under the Pretty Peacock.

I used some copper foil branches in the Brightly Gleaming Foil Elements to look like the branches the ornaments were hanging from. I used some scrap white ribbon to “hang” the ornaments and then tied small bows.

That’s more embellishing than I needed to do on a little gift bag but it was fun! You could even put a cookie or two inside, tea bags, some jewelry, even a gift card. Make this basic gift bag with half a sheet of 12″ x 12″ paper for any occasion!

SHOP STAMPIN’ UP! ONLINE!

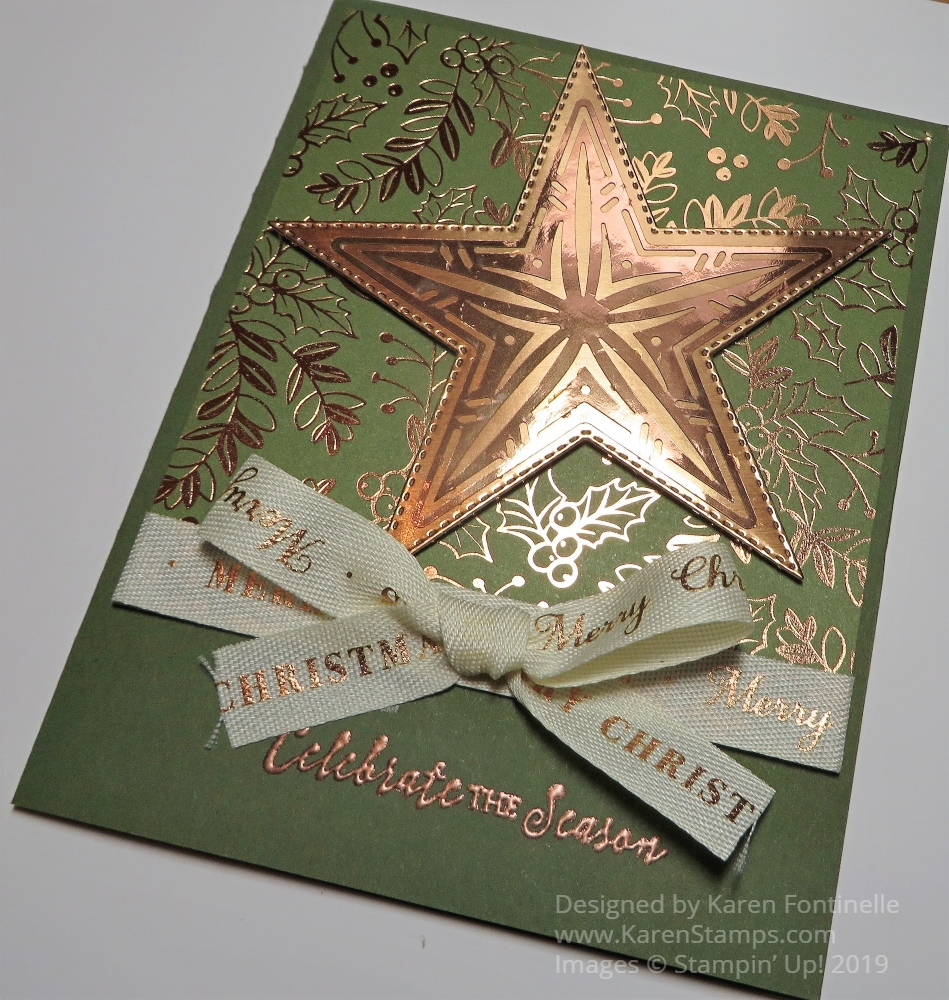
Brightly Gleaming Stitched Star Christmas Card

Brightly Gleaming Stitched Star Christmas Card

This Brightly Gleaming Stitched Star Christmas Card was very difficult to photograph without a giant glare of the Copper Foil, but I think I got it pretty well now on an angle! I’m feeling like I haven’t had enough time to play with all my Christmas stamp sets and accessories and time is getting short! Panic is setting in! And a sore throat that slowed me down this past week!

However, I did fit in some stamping time and here is one example! It seemed like a lot of samples I was seeing used the Night of Navy designer paper in the Brightly Gleaming Specialty Designer Series Paper. I thought I would change things up a bit and use the Mossy Meadow color.

The card base is Mossy Meadow and the Mossy Meadow patterned designer paper just comes down partway on the card base. Be sure to adhere some of the Very Vanilla/Copper 1/2″ Classic Weave Ribbon around the bottom of the designer paper before adhering the designer paper to the card base! And before you do any of that, if you want to emboss a greeting at the bottom of the card, do it before you have ribbon hanging in the way with the potential to ruin the card! I got lucky and could have covered it up with an embossed greeting on a different paper. But it’s better if you plan your card and space first and stamp or emboss before you get everything adhered to the cad!

The star is die cut with the largest star in the Stitched Stars Dies. I just love that we have star dies again because I think stars are SO useful in designing cards and projects. Just think about how many things you can use stars for besides Christmas! Birthdays, congratulations, babies, retirement, everything! These stars are beautiful dies and certainly not just for the holidays.

The star is cut from Copper Foil. Then that Copper Foil star is overlaid with the large star in the Brightly Gleaming Foil Elements. I used the Multipurpose Liquid Glue in teeny tiny dots on the back of the foil element to adhere to the die-cut star. I got lucky and didn’t make a mess with the glue so it worked fine. On this card, I popped up the foil star with Stampin’ Dimensionals, but you can also adhere it flat on the card.

The ribbon is really beautiful. I need to learn how to tie a bow with the words all going in the same direction if that’s possible! I passed it up on one of my first Holiday Catalog orders, but then added it later because it is something different!

For the greeting on the card front, I chose one from the Itty Bitty Christmas Stamp Set because I knew I needed something small. I stamped it with Versamark and heat embossed with Copper Stampin’ Emboss Powder and my Heat Tool. Heat embossing is magical, if you haven’t tried it yet!

For the inside of the card, I added a Very Vanilla layer of cardstock, stamped with a greeting in Mossy Meadow Ink and with a strip of the same Brightly Gleaming DSP along the inside edge of the Vanilla layer. The greeting used inside the card says “Hoping all your Christmas wishes come true.” in the So Many Stars Stamp Set. Save 10% by purchasing the So Many Stars Stamp Set and Stitched Stars Dies in a Bundle.

Thanksgiving is coming up so make those cards first if you are mailing a few cards to friends and family. But then it’s really time to get serious about Christmas cards!! You’ve probably paged through the Holiday Catalog a bunch of times, but maybe you need another few run-throughs before it gets too close to the holidays!

SHOP STAMPIN’ UP! ONLINE HERE!

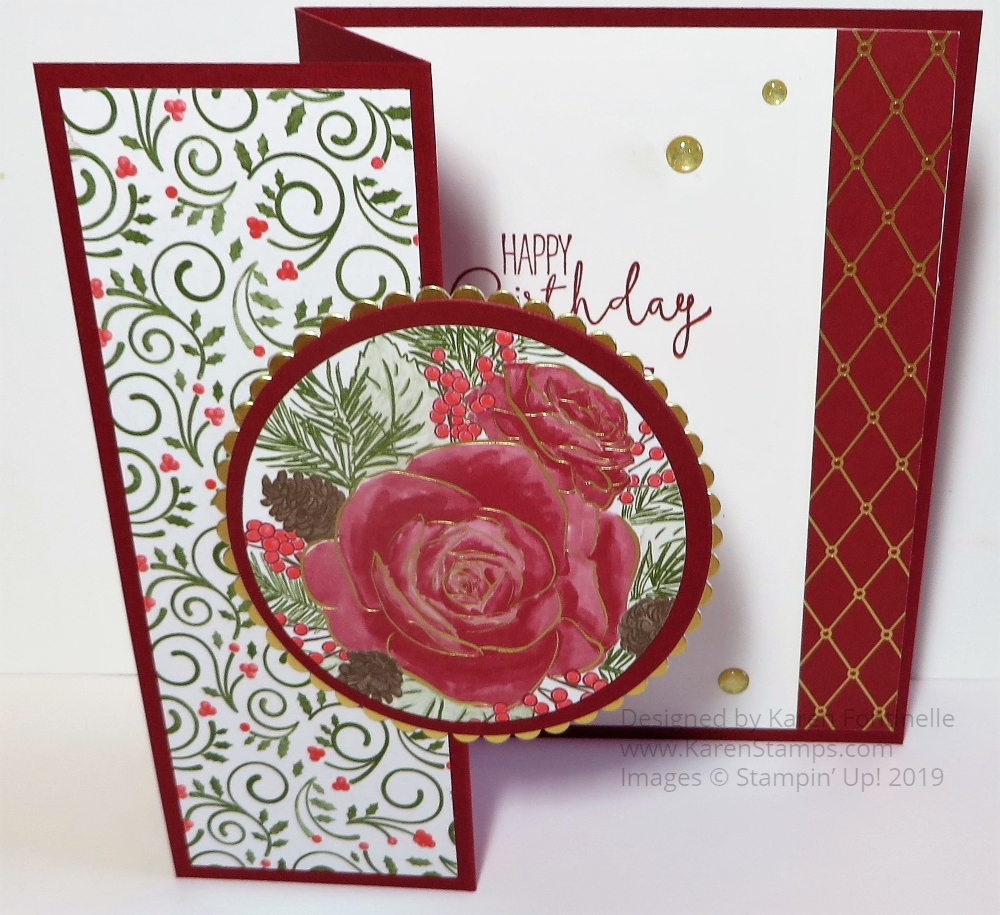
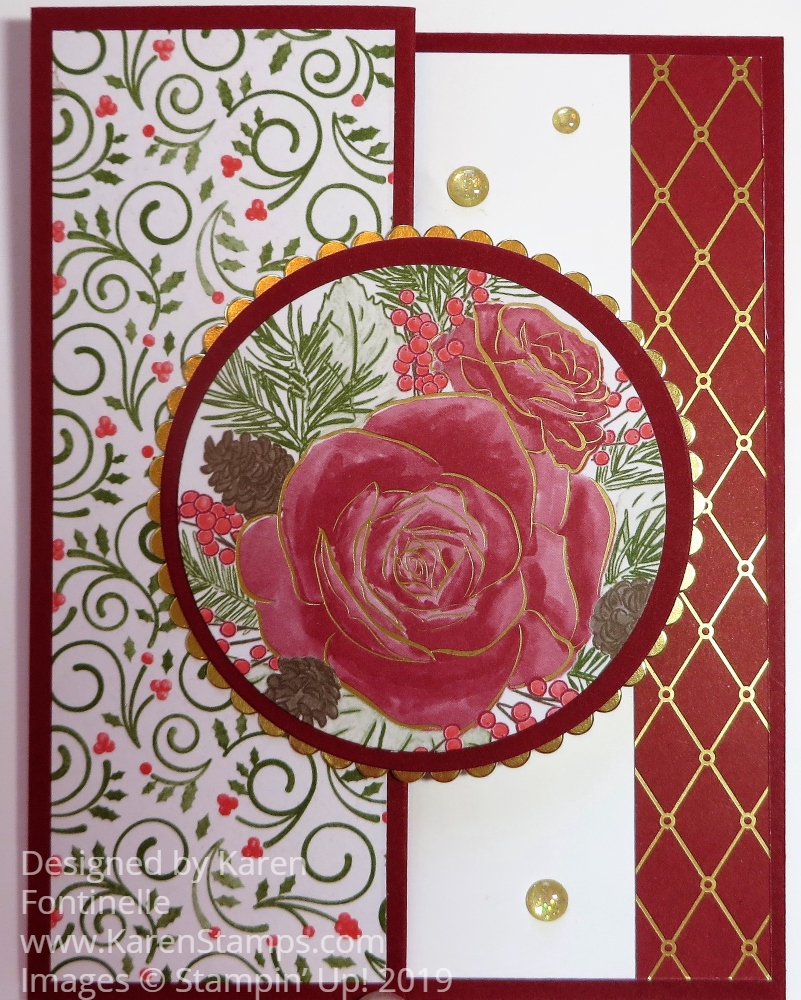
Christmastime Is Here Z Fold Rose Birthday Card

Christmastime Is Here Z Fold Birthday Card Open

I think these Z-Fold cards, such as this Christmastime Is Here Z Fold Rose Birthday Card, just look impressive and yet they are perfectly easy to make! This is a birthday card, in spite of the fact that the designer paper and suite of products is called “Christmastime Is Here”. Just think of the people with December birthdays that maybe get tired of their birthdays being completely tied in with holiday designs. This paper, while recognizing the season, can be used for birthdays or other occasions. And some of the patterns have no hint of any season so you can use them at any time.

This card base is Cherry Cobber Cardstock, folded in half as usual. To make it a z-fold card, just score the front of the card in half (so half of 4 1/4″ would be 2 1/8″). Basically, you fold half of the front of the card back on itself. This makes the “z”.

For the front panel of the card, I cut a piece of the Christmastime Is Here Specialty Designer Series Paper at 5 1/4″ x 1 7/8″. The inside of the card is Whisper White 5 1/4″ x 4″ with a 3/4″ x 5 1/4″ strip of the designer paper down the side. Stamp the greeting inside the card if you are putting one inside and then adhere the layer inside the card. (If you mess up with the stamping, you haven’t ruined the card!)

For the front of the card, I die-cut a portion of the floral paper with the Layering Circles Dies which was then layered on a Cherry Cobbler die cut circle layered on a die-cut circle scalloped circle of Gold Foil to match the gold accents on the designer paper.

Christmastime Is Here Z Fold Rose Birthday Card

To finish the card, I added a few Gold Glitter Enamel Dots and that was it! As you can see in the photos and in the Online Store, this Christmastime Is Here Specialty Paper is just gorgeous with its gold foil accents on many of the sheets. I added the Gold Glitter Enamel Dots and the Gold Shimmer Ribbon to my order even though I did not purchase the stamp set and dies. The good part about this Christmastime Is Here Suite is that you can get it all or pick and choose what you like or need.

If you are still considering choices for Christmas cards and projects, I would remind you to check out this Christmastime Is Here Suite. It only came out in November, is not in the Holiday Catalog, and is available while supplies last.

SHOP THE CHRISTMASTIME IS HERE SUITE IN THE ONLINE STORE!

Four Easy Christmas Cards With Toile Tidings

Four Easy Christmas Cards With Toile Tidings

Surprisingly I hadn’t even played with the Toile Tidings Designer Series Paper in the Stampin’ Up! Holiday Catalog, so I thought I would make an assortment of Four Easy Christmas Cards with Toile Tidings. They are all the basic design of easy cards, put in one orientation or the other, using the Real Red side of the paper or the Garden Green side, full front layer of just one paper pattern or a split layer using two patterns of paper. A greeting is added and a bit of ribbon. That’s all!

The Toile Tidings Designer Paper coordinates with Real Red and Garden Green Cardstock along with Very Vanilla. I made two cards with the Real Red card base and two with the Garden Green. The paper with the toile scene has the same toile scene in the opposite color on the other side so that makes it easy!

On two of the cards, I used a sheet that has the houndstooth check pattern, red on one side and green on the other. I used a small strip of the check pattern underneath the toile pattern, in both orientations, portrait and landscape. This adds a little bit of interest and has a ribbon covering the junction of the two pieces.

On these cards, I used the Garden Green 3/8″ Double-Stitched Ribbon and also a retired Real Red ribbon. If you want the current ribbon, which I don’t have, you can use the Real Red 3/8″ Cotton Ribbon. You might even have something else that would work.

For the greetings, I just chose some from several stamp sets. The “Season’s Greetings” stamp is from the Still Scenes Stamp Set with the globe. I used the pretty “Merry Christmas” stamp on two of the cards. It is from the Perfectly Plaid Stamp Set. And finally, the “Wishing You Peace….” stamp is from the Merry Christmas To All Stamp Set.

You can use any punches or dies to cut out your greetings and layers for them. I’m going to add some designer paper to the inside Very Vanilla layer since the card stock is colored. I may even add some colored rhinestones or dots to some of these cards…maybe. This is a simple card design and depending on your designer paper, you can leave your card as simple or as embellished as you want to. Just have fun with it because Christmastime only comes around once a year!

SHOP STAMPIN’ UP! ONLINE!

Christmastime Is Here Paper on Gold Mini Pizza Gift Box

Christmastime Is Here Paper on Gold Mini Pizza Gift Box

Projects like this one are difficult to photograph because of the glare, but you won’t find it difficult to work with when you choose some or all of the products in the Stampin’ Up! Christmastime Is Here Suite! This paper is beautiful with the roses and the gold foil accents. It is just stunning and I think you will find uses for it long after the holidays are over!

We’ve been using the Mini Pizza Boxes for a while now that Stampin’ Up! sells, but these are extra special GOLD Mini Pizza Boxes! They are hardly for pizza, though, unless you had a very, very small pizza! But the box is designed almost like a pizza box so that’s how they got their name! You could actually reverse these boxes and have the gold on the inside as an elegant surprise to the recipient and decorate the white side on the outside! You will find these Gold Mini Pizza Boxes in the Holiday Catalog on page 13.

Gold Mini Pizza Boxes are small gift boxes that are just the right size for a cookie or 3″ x 3″ note cards. Also perfect for small gifts and other treats!

  • 8 shiny gold boxes
  • Folded box size: 3-1/2″ x 3-1/2″ x 1″
  • Food safe

There are infinite ways to decorate these gold boxes, and of course, they are perfect for the holidays when you really want something special. This box just has a layer of Cherry Cobbler designer paper from the Christmastime Is Here Specialty Designer Series Paper. Then a square portion of the rose pattern in the paper is layered on a piece of Mossy Meadow Card Stock that is popped up on Stampin’ Dimensionals®. This way once the gift is placed inside, a piece of the Gold 1/4″ Shimmer Ribbon can be slipped under this popped up layer and tied on the side to hold the lid shut and add a nice embellishing touch. You could even add a little greeting on there somewhere if you wanted to.

These Gold Mini Pizza Boxes come flat so they are easy to store until you need them. At that time they are easy to fold on the score lines and assemble. Then decorate to your heart’s content!

Get a package or two of the Gold Mini Pizza Boxes to have on hand for any gift-giving occasions, especially the holidays! Use the Christmastime Is Here Specialty Designer Paper with roses to decorate the Gold Mini Pizza Box with a special gift or treat inside for one of your gift-giving occasions!

SHOP STAMPIN’ UP! ONLINE HERE!

Have Fun Making Holiday Gift Tags With Paper Pumpkin!

Paper Pumpkin Nov 2019 Ad my info

This November Paper Pumpkin Kit from Stampin’ Up! makes 24 holiday-themed gift tags of 4 various sizes and designs. The coordinating colors are Early Espresso, Pool Party, Poppy Parade, and Shaded Spruce. We are all going to need gift tags when the holidays get closer and we are wrapping gifts, whether for our family, neighbors, co-workers, teachers, etc.

TODAY, Nov. 10th, is the LAST DAY to SIGN UP!

JOIN PAPER PUMPKIN TODAY TO GET YOUR NOVEMBER KIT!

Even if you don’t need gift tags, make them as tags and then add one to the front of a cardstock card base and make a card! Maybe you need more cards than tags! You can do this with any tag. Just use it as the focal point on your card front! Add a greeting on the tag or on the card front.

Don’t run out to the store and buy the cheap tags at the dollar stores to stick on presents! Make your own with this Paper Pumpkin Kit! Remember, presentation is everything! Making a plate of cookies or treats for a neighbor or holiday party? Place a tag on the top over the plastic wrap or lid. Hang it on a wine bottle you are taking as a hostess gift!

Everything you need for the project comes in the kit! If you are a new subscriber, you will also get a clear acrylic block on which to mount your stamps. That’s why these Paper Pumpkin Kits are so good for new stampers and crafters or those who do not have many supplies….or don’t WANT many supplies!

In each Paper Pumpkin Kit you will receive an exclusive stamp set, an ink spot (1″ x 1″) (great to use on the Stamparatus to ink up stamps!), and a package of materials to make the project! And the presentation is everything of course! You will love receiving this gift to yourself!

Treat yourself to a present in the mail once a month! And if some months you are too busy or traveling or don’t care for that upcoming kit, just skip a month! If Paper Pumpkin really is not for you, there is no obligation to continue. Simply go into your account and cancel or ask me to take care of it for you.

In fact, if you want to add a Paper Pumpkin subscription to your Stampin’ Up! order (maybe to reach Hostess Rewards??), just choose which length of time is good for you and add it to your order. Stampin’ Up! will send you an email with directions on how to set up your Paper Pumpkin account and put in the special code showing that you ordered a series of kits in the Online Store. Even if you already have a monthly subscription to Paper Pumpkin, you can purchase a Paper Pumpkin subscription in the Online Store and your account will use those first and then go back to your monthly subscription. Just ask if you have any questions.

The deadline for signing up for the November kit with materials for making holiday tags is today, November 10, 2019.

JOIN PAPER PUMPKIN TODAY!

Have Fun Making Holiday Gift Tags With Paper Pumpkin!