Tag Archives: Christmas Gleaming Stamp Set

Christmas Gleaming Deck the Halls Holly Card

Christmas Gleaming Deck the Halls Holly Card

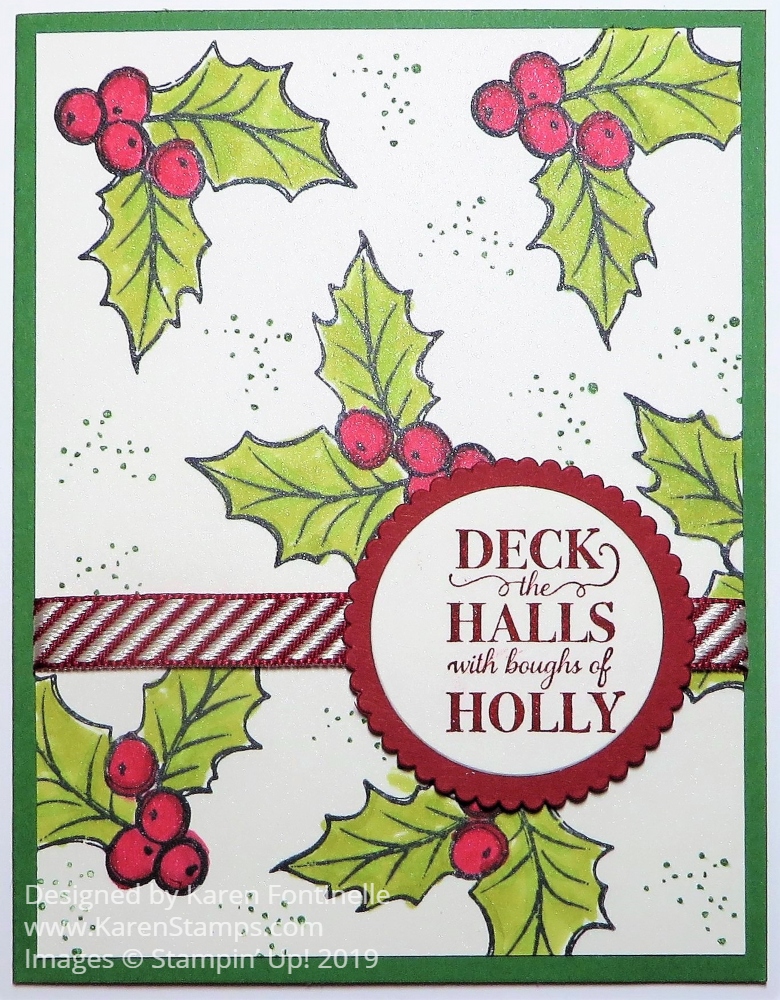
If the designer paper on this card looks familiar, it’s because it was in the Holiday Mini Catalog last year! This paper and the stamp set was carried over as were a few other products from last year into the upcoming August-December 2020 Mini Catalog. I had too many ideas in my head with too many new things and couldn’t think of a single card to make so I looked at the new holiday catalog and “got inspiration” for this Christmas Gleaming Deck the Halls Holly Card on page 19. And then I changed it up a little bit!

The card base is Pretty Peacock, one of the 2019-2021 In Colors. Then I used this striped pattern of the beautiful Brightly Gleaming Specialty Designer Series Paper (150429) for the card layer. I only left a 1/8″ margin around the edge of the card.

The focal point of the card is this Very Vanilla layer stamped with images from the Christmas Gleaming Stamp Set, also on page 19. I stamped the holly leaves in Memento Ink and colored them with Stampin’ Blends markers. I used Granny Apple Green with a touch of Daffodil Delight first on the leaves and a little bit of Mossy Meadow to draw over the leaf veins. The berries are Real Red, of course!

The greeting is stamped in Real Red Ink and die cut with the Tasteful Labels Dies. I loved the circle die in this set. After it cuts out the circle with the pretty edge, there is also a pretty edge left on the paper you cut the circle out of. I cut out another circle out of Real Red to layer behind the greeting, off center since it is the same size as the greeting.

Before I adhered the greeting to the Very Vanilla panel, I thought it needed a little something more so I used the stamp with tiny dots and stamped that randomly in Mossy Meadow. I added a piece of Real Red 3/8″ Double-Stitched Satin Ribbon folded over so it sticks out behind both sides of the greeting and layer. I popped up this greeting with Stampin’ Dimensionals®. I think it would also be fun to spritz the card with Champagne Mist Glimmer Paint in a Spritzer. I might try that if I make some more of this design!

After you get your new Holiday Catalog products and you make a Christmas card you really like, you might want to make maybe 5 cards and then you’ll have five cards made real easily and you can still make multiples of other designs! I usually like to make several different designs of cards!

On the inside of the card you will want to put a Very Vanilla layer since the card itself is a dark color. You can stamp a greeting for the inside of the card or use a strip of the designer paper or stamp one of the ornaments from the stamp set. You could also stamp an ornament on the envelope while you have everything out!

Don’t forget to use the wonderful Stampin’ Up! catalogs for inspiration! Copy exactly or change it up if you get a slightly different idea.

The August-December 2020 Mini Catalog (otherwise known as the Holiday Mini!) goes live Tuesday, August 4th! If you don’t have a copy you will be able to view it online on that day or just see all the products in the Online Store! If you already have this designer paper and stamp set from last year, you can duplicate this Christmas Gleaming Deck the Halls Holly Card right now!

Christmas Gleaming Deck the Halls Holly Card Closeup

Christmas Gleaming Holly Leaves Christmas Card

Christmas Gleaming Holly Leaves Christmas Card

Here is a card I mostly copied from one I found online except I think she die-cut all the holly leaves and adhered them to the card. I simply stamped them randomly on the card front and colored them in on my Christmas Gleaming Holly Leaves Christmas Card.

The card base is Garden Green although you could also use Cherry Cobbler as the sample I saw did. I used Shimmery White Cardstock, one of my favorite papers. I think you can kind of see the shimmer in the photo a little bit on the colored areas. Even in person, you can barely see it, but it is there! It’s also the next best paper on which to watercolor if you don’t have real watercolor paper.

I stamped the holly leaves and berries in Memento Ink and colored in with Stampin’ Blends. It takes a little time to color even only using green and red. I used two shades of green to give a subtle bit of variation in the leaves.

There is a stamp in the Christmas Gleaming Stamp Set that makes those little dots. I stamped some of those around in Garden Green just to fill in the space a little bit around the leaves. I didn’t want to stamp too many holly leaves because then I’d have to color them in!

The greeting from the same stamp set is stamped in Cherry Cobbler Ink and die cut with a Layering Circle Die and Scalloped Circle Die in the same set.

The ribbon is the Cherry Cobbler Diagonal Stripe Ribbon (no longer available). The greeting is then popped up over the ribbon using Stampin’ Dimensionals.

This is a relatively easy card to make except for the coloring taking a little bit of time. But coloring is relaxing and therapeutic!

Have fun finishing up your Christmas cards, if you are still working on them!

Brightly Gleaming Ornament Christmas Card

Brightly Gleaming Ornament Christmas Card

My second Christmas card, the Brightly Gleaming Ornament Christmas Card, is also one that I pretty much copied from the upcoming Stampin’ Up! Holiday Catalog. It was my favorite sample in the catalog for the Brightly Gleaming Suite! Mine has a few variations based on what I had or didn’t have or what effort I wanted to go to!

This Suite certainly has some beautiful designer series paper! It has copper foil accents on one side and beautiful generic designs on the other side. Except for the ornaments and the pattern with holly leaves, you can use most of this paper for other occasions. It doesn’t all have to do with Christmas! You will want to put this Brightly Gleaming Specialty Designer Series Paper on your Holiday Catalog order.

The card base is one of the In Colors, Pretty Peacock. The designer paper layer from Brightly Gleaming DSP is next with a smaller piece of Vellum Cardstock over it. I think the sample used one of the Stitched Rectangle Dies so it is probably either the vellum or the DSP but I couldn’t tell from the sample in the catalog. You can do it or not.

The greenery at the top really had me fooled! Finally, I figured out that it came from the Brightly Gleaming Foil Elements in the Suite on page 31. You can use the foil side but you can also flip them over and color the white side on the back! I used a Dark Old Olive Stampin’ Blend Marker to color the two greenery pieces. They may have used one more piece in the catalog because both sides of their greenery are turned up on the ends. I just used two pieces which I think are fine. They use Linen Thread to tie the bow and attach to the greenery. I am out of Linen Thread (although it is one of my staples to have on hand!) so I used the 3/16″ Braided Linen Trim.

The blue and green ornaments are punched with the large ornament in the Gleaming Ornament Punch Pack out of the Brightly Gleaming DSP. The sample stamps the green ornament and punches it out. I just used the pretty paper! The copper one is punched out of Copper Foil and then embossed using the Country Floral Embossing Folder! There is a new embossing folder in the suite that is used in the sample, the Hammered Metal 3D Embossing Folder.

The smallest ornament is stamped on Very Vanilla Cardstock using part of the wording on a stamp in the Christmas Gleaming Stamp Set. Just color in the words you want to use with a Pretty Peacock Stampin’ Write Marker and stamp. Then I punched it out with the smaller ornament in the ornament pack. Very handy to sell two sizes in one pack!

After arranging the ornaments, I just drew the strings to the greenery with the small tip of the Basic Black Stampin’ Write Marker. I popped up the green ornament and the ornament with the greeting with a Stampin’ Dimensional®.

The sample also has stars from the Stars Designer Elements package. I don’t have those so I found a retired punch, the Confetti Punch, which had tiny stars in it and used those from Copper Foil.

The good thing is you have lots of covered space behind the greenery and ornaments on the backside of the vellum where you can apply glue and it won’t show through to the front!

I think this card would be fairly easy to make if you wanted to make multiples once you know exactly how it is made. While you play around with your new products from the Holiday Catalog, go ahead and make multiples, maybe 5, or each design you try. Before you know it, you will have a stack of Christmas cards ready to send!

Catalogs are arriving in mailboxes for my customers so keep an eye on your mail! If you think you should be getting a catalog from me and don’t, either they are reading it at the post office or it has gotten lost. I can have Stampin’ Up! send out another one to you. If you are new and would like a catalog, please email me at Karen@Karenstamps.com with your contact information and I’d be happy to send one to you so you can order some of these beautiful new goodies as soon as the catalog goes live!

SHOP STAMPIN’ UP! ONLINE HERE!

Don’t forget to use your July Bonus Coupons and if you got the August Paper Pumpkin Kit and you want to make cards, order the Add-On Kit in the Online Store on your next order! While Supplies Last!