Tag Archives: Stampin’ Blends

Floral Charm Blessed Fall Card

Floral Charm Blessed Fall Card

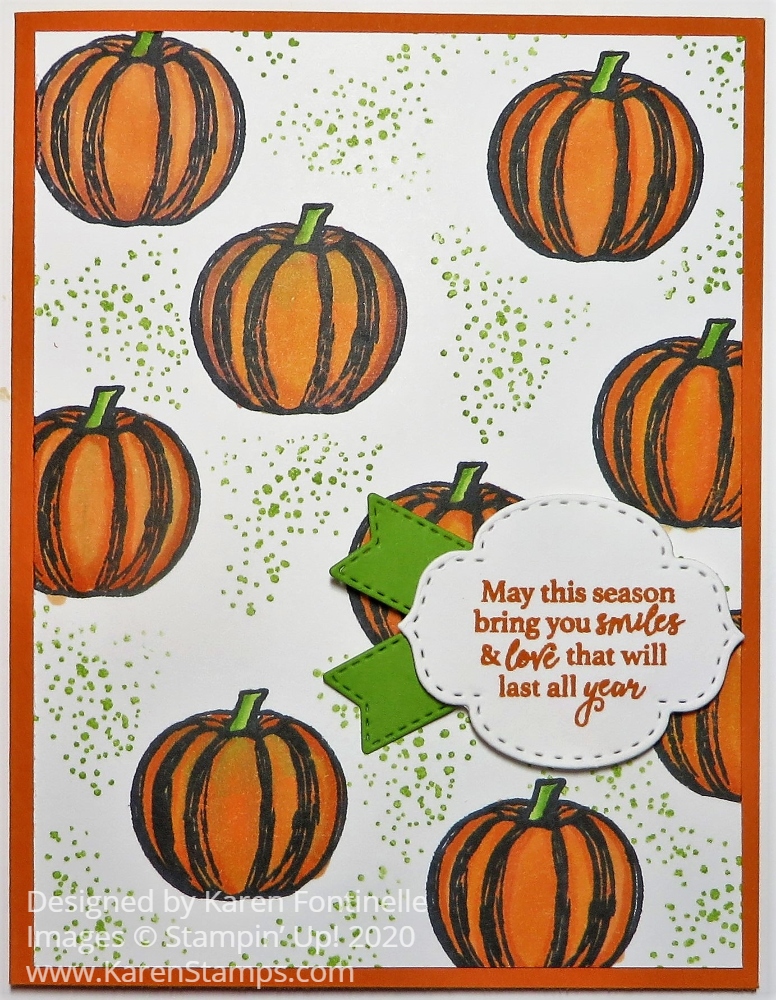
This Floral Charm Blessed Fall Card shows that you can mix and match different papers and stamps and still make a pretty card! What I ended up with isn’t what I started out to make, but I like how it turned out! I thought I was going to make just a pretty floral card with the Floral Charm Designer Series Paper and maybe a diecut flower or two, but when I pulled out this paper, everything changed!

This pretty paper just looked like fall to me! It has various greens, browns, and oranges in it so it is perfect! The card base is Timid Tiger, one of the 2025-2027 In Colors. The designer paper was cut at 5 1/2″ to fit the full length of the card front and 4 1/2″ wide. To show off the other side of paper, I folded back 1/2″ on the right side to reveal the orange floral “other side”. Because some measurement was a little bit off, I centered the paper with the folded right side on the card front with a little margin of Timid Tiger visible on each side.

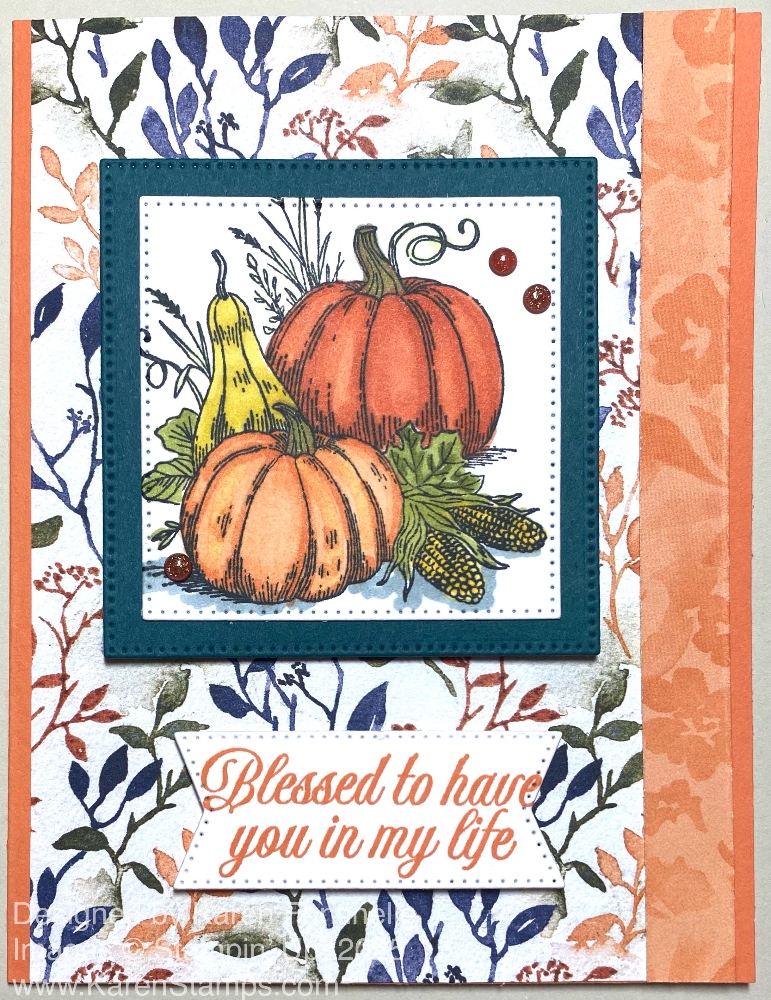
I thought the pumpkin image in the Amber Autumn Stamp Set would go perfectly with this designer paper. I stamped the pumpkins with Memento ink on Basic White cardstock. The image is colored in with various Stampin’ Blends markers. I used Timid Tiger, Pumpkin Pie, Daffodil Delight, Darling Duckling, Old Olive, Pecan Pie and a little Cloud Cover for the shadow. I diecut this with the second largest square in the Stylish Shapes Dies, then cut a larger square out of Pretty Peacock cardstock to match some of the foliage colors in the paper. These two pieces are popped up on Stampin’ Dimensionals.

The greeting is also in the Amber Autumn Stamp Set and is stamped in Timid Tiger ink on Basic White cardstock. I used a banner die in the Stylish Shapes Dies. The greeting just barely fit inside the die, but I didn’t want anything too large so this worked out fine. The greeting is also popped up. You could adhere the stamped image and greeting flat on the card as well if you preferred. I really wanted to use the new Cajun Craze & Gold Dots which you can find in the Gathering Together Suite Collection. I managed to fit three of the smallest ones around the pumpkins. These dots are a great color for fall with a little gold dust, it looks like, inside them!

Remember to check out ALL the new products Stampin’ Up! released on Sept. 3rd! New Mini Catalog, new Online Exclusives, and two new Kits in the Kits Collection! Not to mention, only a few more days to sign up for the Paper Pumpkin subscription and get a kit to make some fall cards with all the supplies included in the box that shows up in your mailbox like a gift to you!

SHOP STAMPIN’ UP! ONLINE HERE!

Charming Day Damask Birthday Card

Charming Day Damask Birthday Card

This Charming Day Damask Birthday Card was a fun card to make! I used a Petal Pink Two-Tone cardstock for the background to show one of the techniques you can use with this two-tone cardstock. This paper has a light shade on one side and a darker shade of the same color on the other side, plus a white core. I took advantage of the white core of the paper with the embossed background.

In order to create the interesting background for this card, I embossed the Petal Pink Two-Tone cardstock with the Damask Designs Embossing Folder. This is a pretty embossing folder to use just as it comes out, but if you have two-tone cardstock, you can do something extra with the embossed paper. After embossing the pretty design, use a sanding block, or whatever you have, to lightly rub across the top of the embossed images. Go lightly at first. You can always do more as long as you don’t tear the paper. When you do the sanding, it will expose the white core of the paper! It’s very subtle on this card with the light-colored paper, but you can see it.

The card base is Basic White cardstock and the embossed Damask Designs layer is adhered to it. If you wanted a more dramatic background, use a darker color of the two-tone cardstsock.

For the flowers, I stamped this little cluster of flowers in the Charming Day Stamp Set with Memento Ink on Basic White cardstock. The flowers are colored in with Petal Pink Stampin’ Blends and the leaves with Lemon Lime Twist Stampin’ Blends. Then it was diecut with the Charming Day Dies. If you want the stamp set and dies, you can get the Charming Day Bundle and save 10%. The greeting is also in the stamp set and is stamped in Memento ink. It is diecut with my go-to…. the banner in the Stylish Shapes Dies. The flowers are popped up with Stampin’ Dimensionals, but the greeting is adhered flat to the card.

For a little embellishment, I used three of the Strawberry Slush & Pretty In Pink Gems on the embossed layer. They are small and just add a little sparkle. I didn’t want to add too much to this particular card because I wanted to show off the sanded embossing on the card using the two-tone cardstock.

If you are interested in any of the colors in the Two-Tone cardstock, there is a sale going on today and tomorrow, July 10 – 11. You can check out all the colors on page 77 in the Annual Catalog. The paper is 20% off on these last two days of the three-day sale! This cardstock is great for cardmaking and other projects as well as scrapbooking!

Before you decide on individual colors, check out the various assortment packs. There are seven assortments with two sheets of each of six colors which would give you several colors to try. They are mixed in on the Two Tone Sale page so just scroll through. Choose the grouping of colors you like the best or get all of them!

Read more about the Two-Tone cardstock HERE.

SHOP THE TWO TONE SALE!

Florals In Bloom Birthday Gift Bag

Florals In Bloom Birthday Gift Bag

And sometimes you forget to hit the “Publish” button after you write a blog post! It was supposed to be on my blog Friday, but I forgot to push the button! Anyway, here is this fun and easy gift bag you can make in no time!

It might be time to make a few gift bags to have on hand this time of year. You probably have graduations coming up or lots of summer birthdays, hostess gifts for parties, maybe even Father’s Day! You can make your own small gift bag in just a few minutes and decorate for the particular occasion.

This particular pattern of gift bag is made with just half a sheet of 12″ x 12″ sheet of paper, whether card stock or designer series paper. This finished gift bag is 4 1/4″ tall, 4″ wide, and 1 3/4″ deep. It is large enough for a small gift or maybe a gift card and a congratulatory card. You could put a cello bag with a few cookies or candies in there. So it is small but not tiny!

While you can cut the paper at 6″ x 12″, I made mine 7″ x 12″ so that I could fold the top edge down 1″ to show the other side of the paper for a little interest on the bag. Either way the rest of the measurements and scoring are the same.

For this bag, I used this floral pattern in the Florals In Bloom Designer Series Paper. You’ll find it in the Annual Catalog. It is part of the Florals In Bloom Suite Collection. Make sure any pattern on any paper is going in the direction you want it to go on your project when you cut your paper and when you score, depending on the project.

Start with a 6″ x 12″ piece of paper (or if you want to fold over the top make your paper 7″ x 12″). Score at 4″, 5 3/4″, 9 3/4″, and 11 1/2″. Turn the paper so the short edge is at the top and score at 1 3/4″. This will make the bottom flaps of the bag. Cut those short bottom tabs up to the 1 3/4″ score line. Cut off the little 1/2″ tab on the bottom.  Fold on all the score lines and crease well with the Bone Folder.  Adhere the tab on the end to the other side to assemble the bag.  Then adhere the flaps on the bottom. I used Multipurpose Liquid Glue for the ease of getting things lined up properly before it sticks together or you can use Tear & Tape Adhesive.

Florals In Bloom Gift Bag Scoring

Have fun decorating your bag! I folded over the top 1″ before assembling the bag. You can punch holes front and back to tie ribbon through in order to close the bag or just do it decoratively with a bow as I did. I stamped a Basic White Countryside Corners diecut (dies on the Last Chance list) with a greeting in the Poised Peony Stamp Set (retired). You can use whatever greeting you have. I layered this diecut on the next larger die in Peach Pie cardstock. The greeting is stamped in Strawberry Slush ink and the little peony is stamped in Memento ink and colored in with Peach Pie and Granny Apple Green Stampin’ Blends alcohol markers. I stuck this up underneath the folded over top edge and I think it fits just fine. It looks a little like a banner. I added a few of the new Strawberry Slush & Pretty In Pink Gems to the greeting for a little sparkle.

And that’s how easy making this basic gift bag is!

SHOP STAMPIN’ UP! ONLINE HERE!

Florals In Bloom Birthday Wishes Gift Bag

Perfectly Penciled Colored Flowers Card

Perfectly Penciled Colored Flowers Card

The other day, on this post, I made a card with the Perfectly Penciled Designer Series Paper but left the design black and white. Here is another card using the same designer paper, but with a smaller floral pattern. This time I colored in the flowers to make the Perfectly Penciled Colored Flowers Card. I find coloring in these images to be easy and fun. With the coloring techniques we have, you really don’t have to be too perfect. You don’t have to exactly stay inside the lines or color every single spot. Just get some color down in the area and it will look fine.

This card has a base of So Saffron and a layer of Pool Party cardstock. For the Pool Party, however, I stamped around the edge with one of the small flower stamps in the Happiness Abounds Stamp Set. The designer paper piece is cut at 3″ x 4 1/4″ and colored with Stampin’ Blends. Just use whatever colors you like. I was using light colors such as Petal Pink, So Saffron, Pool Party, Highland Heather, and Granny Apple Green for the leaves.

The greeting is also in the Happiness Abounds Stamp Set. It is stamped in Pool Party ink and then die cut with a stitched circle in the Stylish Shapes Dies. I almost put the greeting as is on the Basic White on the card, but then decided to add a Pool Party layer die cut with one of the scalloped circles in the Layering Circles Dies. I think it adds a lot.

I colored the White 1/4″ Crinkled Seam Binding Ribbon with a Dark So Saffron Stampin’ Blend Marker to add some embellishment to the card. I adhered the designer paper to a piece of Basic Black and then adhered a strip of ribbon around and added a bow. For a final touch, I added three Iridescent Rhinestone Jewels to the bottom of the greeting. This card is a simple one yet has several areas of interest so it’s not too plain.

SHOP STAMPIN’ UP! ONLINE!

SHOP SEPTEMBER WEEKLY DEALS!

Hello Harvest Pumpkins Card

Hello Harvest Pumpkins Card

This Hello Harvest Bundle in the new Holiday Mini Catalog is right up my alley because I love fall, pumpkins, and Halloween! This Hello Harvest Pumpkins Card is not for Halloween necessarily but you could make it look that way. For now, this is just a pretty fall card that you could send anytime during the fall for a birthday or just a “thinking of you” kind of card and certainly for Thanksgiving. Not to mention using the pretty pumpkins for fall or Thanksgiving treats and favors if you like to make those!

This card has a card base of Early Espresso cardstock and a Very Vanilla layer. I don’t use Very Vanilla that often but this card idea seemed to call for it. I stamped two of the pumpkins directly on the Very Vanilla card front and spaced them apart a little bit. If I had spaced things a little better on this card, I would have stamped the pumpkins a little lower on the card to allow more space for the greeting at the top. But it is still okay as is.

The middle pumpkin is stamped on a Very Vanilla scrap and die cut using the Rustic Pumpkin Dies. I colored the pumpkins with Light and Dark Pumpkin Pie Stampin’ Blends and the middle one with a bit of Cajun Craze. Then the middle pumpkin is popped up on Stampin’ Dimensionals®. I also die-cut the little curly-cue stems in Old Olive cardstock and adhered those to the pumpkins plus a little flower that is in the stamp set.

The greeting is stamped from the Hello Harvest Stamp Set. There are some nice greetings in that set. It is stamped in Early Espresso ink on Very Vanilla then diecut with the little banner piece in the Scalloped Contours Dies. Next, I trimmed off the scalloped edges and die-cut another banner piece in Old Olive and layered the greeting on that. It is also popped up on Stampin’ Dimensionals.

For a little grounding for the pumpkins, I very lightly scribbled in some Light Soft Sea Foam Stampin’ Blends under the pumpkins across the bottom of the card. It is literally scribbled lightly, not heavy-handed coloring. On the inside of the card I would suggest putting a layer of Very Vanilla maybe stamped with a little something from the stamp set since the Early Espresso is too dark of a color on which to write.

If you like fall, you will really like this Hello Harvest Bundle and maybe even the entire Rustic Harvest Suite Collection!

Check it out in the Stampin’ Up! Online Store HERE!

Coloring on Perfectly Penciled Designer Paper

Coloring on Perfectly Penciled Designer Paper

I’m not crazy but yes, I did color in this whole card front on this Coloring on Perfectly Penciled Designer Paper card! If you like coloring, you’ll understand that coloring is fun, and if you don’t like coloring, then you can stick to the beautiful black and white images on this paper!

The Perfectly Penciled Designer Series Paper has hand-drawn black and white floral images on one side of the paper that you can use beautifully as is or add color in any of many different ways. On the other side are generic graphic patterns that you can use as backgrounds on cards. It’s really great paper to use!

I simply cut the Perfectly Penciled Paper to have the floral design I wanted in the center of my card. You may have to think a little bit unless your paper has already been cut into, to get the design that you want to work with. Maybe it doesn’t matter how the images show up on your card design. Just so you are happy with it. I colored in the floral pattern and then I designed the rest of the card.

I started with the large flowers in the center and decided to color those with the Light and Dark Pale Papaya Stampin’ Blends. The leaves are mostly Granny Apple Green, some with a touch of Daffodil Delight, and a few smaller leaves colored with Old Olive Blends. The star-shaped flowers are colored with Melon Mambo, which at first I thought was too bright, but once I got the whole thing done, I liked that pop of bright color. Other flowers and buds are Daffodil Delight Blends and some Flirty Flamingo pinkish buds down in the lower-right corner. There is one little butterfly on the card which I colored with a purple and orange, but I’m not happy with it! Luckily it is off to the side and partially obstructed by the bow! I could have left the colored images as is, but I sometimes love coloring in the background, too! For this card, I used the Light Pool Party Stampin’ Blend. If you just kind of scribble around lightly, it’s not that difficult to color in the whole background. If you bear down with the point of the marker, trying to color in perfectly every nook and cranny, it will probably be an unpleasant experience…unless that is really what you want to do!

To make the actual card, I decided to layer and piece of Pale Papaya under the designer paper and then adhere that to a card base of Melon Mambo. The greeting is in the Celebrating You Stamp Set, a great set to have for sentiments for lots of occasions. It is stamped in Melon Mambo ink and then die cut with a die in the Meadow Dies. It looked like too much to layer it on Melon Mambo so I left it as is. The ribbon across the lower portion of the card is the pretty Pale Papaya Open Weave Ribbon. The bow is tied separately and adhered to the card with Mini Glue Dots. For a finishing touch, I couldn’t resist adding some Iridescent Rhinestone Basic Jewels plus one little Brushed Brass Butterfly!

This card could be for almost any occasion if you just change the greeting. Actually, this greeting is perfect for almost any occasion! It could be for a birthday, thinking of you, congratulations, wedding, anniversary, or even sympathy. Here is another card I made recently by coloring the black and white design using Blending Brushes and ink and not trying to color inside the lines at all!

You’ll find the Perfectly Penciled Designer Series Paper in the brand-new Stampin’ Up! Annual Catalog!

Blessings of Home Floral Birthday Card

Blessings_of_Home_Floral_Birthday_Card

The Blessings of Home Stamp Set in the new January-June 2022 Mini Catalog has this beautiful bouquet stamp in it. You might think it would be too involved to color in this Blessings of Home Floral Birthday Card, but I found that I was done before I knew it.

This time I started with the stamp set, Blessings of Home, with the largest bouquet. I would decide later what color the card base would be, etc. I stamped the bouquet on a piece of Basic White Cardstock and die-cut it with the Flowers of Home Dies. You can purchase both the stamp set and dies in the Blessings of Home Bundle and save 10% over buying them separately.

I stamped the bouquet in Memento Ink so I could color it with my Stampin’ Blends alcohol markers. I looked at the colors that coordinate with the Heart & Home 12″ x 12″ Designer Series Paper but mostly I just wanted a soft look to the flowers. I started with Pale Papaya for the big center flower with a Delightful Daffodil center, with maybe a touch of Mango Melody to darken it. The other flowers are Calypso Coral, Highland Heather, and Pool Party. The leaves are mostly Granny Apple Green. Just use whatever colors you are in the mood for!

I decided on Cinnamon Cider for a card base with a Pale Papaya layer. Then I cut two pieces of the Heart & Home Designer paper to use for angled layers. They are 3″ x 4 3/4″. I actually mixed them up by accident! I intended for the wood pattern one to go behind the flowers since it is plainer, but I think it works okay the way I made it. The busy flower pattern is behind the bouquet but I think it still looks good. You probably can’t go wrong with the pretty designer paper and this floral stamp! The floral bouquet is popped up on Stampin’ Dimensionals®.

The birthday greeting is in the Blessings of Home Stamp Set. I simply stamped it in Memento Ink on a scrap strip of Basic White and cut it down to the right length. I put a strip of Basic Black behind it to help it stand out. I could have used Cinnamon Cider perhaps or one of the other colors in the flowers instead. Since it goes across the popped up bouquet, I put Mini Dimensionals on each end and a bit of Stampin’ Seal in the center to adhere to the card over the bouquet.

It really didn’t take me long to color the flowers. Besides, coloring is good for our mental health and relaxation so we should take the time and not feel rushed! But if you don’t have time or really don’t like to color, just stamp the bouquet in a color. HERE is a card I made earlier with the smaller bouquet and just stamped it in Cinnamon Cider.

There are many beautiful and fun stamp sets and products in the new January-June 2022 Mini Catalog or Spring Mini, so take your time and make out your shopping list! Don’t delay too long though for things you really want because you know what can happen sometimes! And don’t forget about Sale-A-Bration! With every $50 purchase, you earn a FREE Sale-A-Bration product!

HAPPY SHOPPING!

Beautifully Penned Floral Tag Card

Beautifully Penned Floral Tag Card

You won’t believe where this Beautifully Penned Floral Tag Card came from! I opened the package of Beautifully Penned Paper that I got free during Sale-A-Bration on my recent order which is all black and white in design. I saw this design with the squiggly lines and I immediately thought it looked like a fun paper to use!

My first inclination was to color in between all the lines! But that might have taken a while so I pulled out different Stampin’ Blends and just drew ON the lines in between the lines! Sometimes I used the brush tip and sometimes the bullet tip, but I think the bullet tip is a little easier. I decided it did not have to be perfect. In fact, since the curves are irregular, your hand doesn’t get into a set pattern after coloring a few lines so each one is different. This paper is only available during Sale-A-Bration through September and coordinates with the Hand-Penned Designer Series Paper in the Stampin’ Up! Annual Catalog. You will find this Beautifully Penned 12″ x 12″ Designer Series Paper on page 7 of the Sale-A-Bration Brochure.

This paper with its black and white designs is perfect for coloring using various techniques! You can color with markers, Watercolor Pencils, Blender Pen and Ink, pastels, or Blending Brushes. Or just leave it as is and have a black and white card or add a splash of color by adding some colorful flowers or other designs. Just play!

This card has a card base of Polished Pink. Black would have been interesting, too, or a layer of black on the pink under the designer paper. Or vice versa. The tag is die-cut from the Tailor Made Tags Dies. The flowers are stamped with the Color & Contour Stamp Set and cut out with the Scalloped Contours Dies. The leaves I stamped and cut out by hand. The flowers are two-step stamping but the stamps don’t line up perfectly so don’t knock yourself out trying! The tag is popped up on Stampin’ Dimensionals as is the pink flower. I had a third flower stamped and die cut but I thought the tag would be too crowded with it, so I added a Basic White layer inside the card and adhered the third flower to the inside of the card! It’s fun to decorate the inside of cards. We should really do it more often!

These are the colors I used in Stampin’ Blends markers and also the ink. These colors are in order starting from the top of the card: Poppy Parade, Daffodil Delight, Granny Apple Green, Polished Pink, Pool Party, and Flirty Flamingo.

The greeting is also in the Color & Contour Stamp Set, stamped in Polished Pink ink. And to finish the card, I added a bow tied with the Polished Pink 3/8″ Open Weave Ribbon. All of these new In Color ribbons are so pretty! I just love the style!

With every $50 you spend during Sale-A-Bration, you can choose a FREE product in the Sale-A-Bration Brochure. This Beautifully Penned Paper is available with a $50 purchase! What is better than free paper?!

True Love Red Floral Card

True Love Red Floral Card

Would you believe this True Love Red Floral Card is made from the True Love Designer Series Paper except for the vellum and the greeting? This black and white designer paper with all sorts of designs give you all sorts of opportunities to be creative!

To make this card, I decided to copy a sample card in the January-June 2021 Mini Catalog on page 10 in the Love You Always Suite. I changed the colors of the flowers and how I arranged them and I put a different greeting on my card. My greeting took up a little extended space since it was longer and narrower than the sample card, so that caused me to move the flowers around a little.

The card base is Thick Whisper White and the striped pattern of the True Love Designer Series Paper covers the whole front of the card base. I didn’t leave any margin. The piece of vellum is 5 1/2″ x 3 1/4″. You could make yours any size. Just don’t glue it down yet because glue and other adhesives show through vellum.

Then I chose another of the patterns in the designer series with these flowers. I decided which ones I wanted as close to the edge of the paper as I could get and cut those out of the sheet. I colored them in with Stampin’ Blends Markers, the Light and Dark Real Red. I wanted my card to be black, white and Real Red! The flower center is just colored with Dark Daffodil Delight. The leaves are Granny Apple Green, Light and Dark, along with a touch of Daffodil Delight. An artist friend I know always said to mix some yellow in with green, so I do!

You can leave the flowers in the group in which they appear on the designer paper or if you need to cut them apart to make them fit on your card you can do that. Some I popped up on Stampin’ Dimensionals and one flower and one leaf is adhered right on the vellum.

The greeting is stamped in Real Red Ink on Whisper White from the Lots of Heart Stamp Set. It is die-cut with a die in the Tasteful Labels Dies as is the Real Red piece behind it.

If you place and adhere everything on to the vellum before you attach it to the card, you can turn the vellum over and apply adhesive on areas that are covered by the greeting and flowers on the front. That will hold it on to the card front without showing the adhesive through the vellum. I used Stampin’ Seal.

When you are looking for card ideas, if you don’t already have one in your head, think about looking at any of your Stampin’ Up! catalogs! You can copy any of the ideas, and most likely you will come up with your own version once you start creating!

Remember, Sale-A-Bration is going on so with every $50 you spend, you earn a free product in the Sale-A-Bration Brochure! No limit!

Be sure to check out the black and white True Love Designer Series Paper so you can have fun either designing with it as is or using different methods of coloring it like on this True Love Red Floral Card.

True Love Red Floral Card Closeup

Gather Together Fall Pumpkin Card

Gather Together Fall Pumpkin Card

Sometimes you just need to stamp and do some coloring! I needed some relaxation and stamping images randomly on a card and then coloring them with markers was just the perfect thing! I think we all need a hobby of some kind to turn to for a little stress relief and enjoyment! Stamping certainly is mine!

These pumpkins are images in the Gather Together Stamp Set which was in the Stampin’ Up! Holiday Catalog last year. You can click on that link to view the PDF of the catalog from last year and get more ideas for samples for that stamp set and dies, but of course most things in that catalog have retired. It was a favorite and I was happy to see it return this year!

There is also a set of dies that go with the Gather Together set, the Gathered Leaves Dies. You can purchase the stamps and dies in the Gather Together Bundle and save 10%! The leaves are also very pretty in this stamp set.

To make this card, stamped the pumpkins randomly on a piece of Whisper White Cardstock. I used Memento Ink since I was going to color in with our alcohol markers, Stampin’ Blends. Mainly I used the Light and Dark Pumpkin Pie with a touch of Light Daffodil or Light Granny Apple Green. I also had out Cajun Craze and used that on a few for a slightly darker shade. The stems are all Light and Dark Granny Apple Green.

After I had the pumpkins stamped and colored it, I was tempted to stamp in the empty spaces with that dotted image in the stamp set. I wasn’t sure I should and perhaps ruin my card after all that coloring. But I was daring and I did it! I chose Granny Apple Green Ink and stamped off on my Grid Paper first to make it a little lighter. Since it is a photopolymer stamp and I could see through it, I could see if the stamp was going to fit in a space so I wasn’t stamping on the pumpkins. I think it added a little something to the card!

I have to admit I was a little sloppy in my coloring on a couple of the pumpkins. I used the Color Lifter but in my opinion it doesn’t always work as well as I would like. Maybe it depends on the color. And it wasn’t that bad, but I was able to cover it with my greeting! Remember, there almost always is a way to fix a mistake…..in fact, there are no mistakes in stamping!

I stamped the greeting in the stamp set in Pumpkin Pie ink and die-cut it with the Stitched So Sweetly Dies. There isn’t something that layers perfectly underneath it, so I chose the flagged banner die in the Tasteful Labels Die Set. It barely stuck out on the sides of the greeting, so I cut it in half and was going to make each end longer sticking out from the sides. It was a little tricky to fit on the card the way I wanted it, so I got the idea to put the two pieces off on the left side almost like two tail ends of ribbon. That’s something different and it made the greeting stand out a little. The greeting is popped up on Stampin’ Dimensionals.

That’s really all these is to the card. The stamped layer was adhered to a card base of Pumpkin Pie. I tried an extra layer either in Granny Apple Green or Basic Black but I like it fine just on the Pumpkin Pie card base.

Here’s another card with stamped pumpkins from the Gather Together Stamp Set that I cut out and arranged in a group on a card.

Sometimes it is good to get back to some basic stamping and whatever coloring technique you like for a simpler card. Pick this stamp set or another one you like and stamp the image randomly for the background of the card. If you don’t want to color in, just stamp in a color. See what you can make using my Gather Together Fall Pumpkin Card as inspiration!

SHOP STAMPIN’ UP! ONLINE HERE!

Halloween Mini Pizza Box Colored Embossing

Here’s a technique you can try if you want to make a Halloween treat box like this Halloween Mini Pizza Box Colored Embossing treat box. It’s a fun way to color the greeting on the box to make it look a little more interesting or spookier for Halloween!

The technique involved is easy. You can use it for greetings or other images. Just emboss with Versamark Ink and White Stampin’ Emboss Powder the way you normally would, using your Heat Tool to melt the powder.

After embossing, let cool for a second and then color right over the white embossed areas with Stampin’ Blends markers. Try not to get off the embossing or it will show on the paper, even black. If you do get some marker ink on the paper, use the Color Lifter to “move” the color back over very lightly. For this Halloween project, I used multiple colors on the Halloween sentiment.

I had a similar project on my recent newsletter, so if you would like to get ideas like this and more delivered every Tuesday to your Inbox, just sign up for my Mailing List in the red box in the right sidebar or scroll all the way down on your phone to get to it.

This project is made with the Mini Pizza Box. These are handy to have on hand. They are unassembled and store flat. You get 8 food-safe boxes, 3 1/2″ x 3 1/2″ in size. You can easily put the box together, the decorate for whatever occasion. Put some cookies inside, 3″ x 3″ notecards, or some other small gift or treat.

For this box, I stamped a piece of Pumpkin Pie Cardstock for the lid with images from the Ghoulish Goodies Stamp Set. Around the sides of the box, I used pieces of the Plaid Tidings Designer Paper. Since the paper is only 6″ wide, I cut four individual strips of paper. I was even fastidious enough to match the plaid lines before cutting, but you wouldn’t have to be so perfect.

The embossed sentiment is cut out with one of the Tasteful Labels Dies. For a little layer behind the sentiment I die cut another shape from the same dies and cut it in half so a little bit would show under the side of the sentiment. Before adhering the Pumpkin Pie paper to the top of the box, I adhered ends of the Black 3/8″ Glittered Organdy Ribbon to the underside and popped up the greeting with Dimensionals. Then I tied on a little knot on each side of the greeting with the ribbon. Love this Glittered Ribbon! For a little bling, I added three Holiday Rhinestones that I thought kind of matched the Halloween colors.

Who knows what kind of treats we will be able to give out this Halloween or if there will be trick-or-treating or Halloween parties, but these Mini Pizza Boxes are one of those good things to always have in your stash for when the need arises when you want to give a little treat or gift. Or order more if you have a certain occasion or gathering.

Here is another example of how to use these Mini Pizza Boxes for just a gift, not necessarily a certain occasion. I used the Peaceful Poppies Designer Series Paper (retired) to decorate this box and the Poppy Moments Dies.

These Mini Pizza Boxes are fun to decorate for many occasions. Try this fun technique of heat embossing white powder and then coloring with Stampin’ Blends markers right over the embossing to make this fun project, Halloween Mini Pizza Box Colored Embossing.

Snowman Season in Plaid Tidings Christmas Card

Snowman Season in Plaid Tidings

I had almost forgotten that this snowman stamp set from last year was still current this year, so when I came across the Snowman Season Stamp Set I knew I had to make this Snowman Season in Plaid Tidings Christmas Card.

You will find this Snowman Season Stamp Set in the Stampin’ Up! Annual Catalog. It was a favorite stamp set from last year – the cute snowmen and also the Snowman Builder Punch. You can’t but feel happy when you stamp with these snowmen in this set!

First I chose the plaid pattern I liked in the Plaid Tidings 6″ x 6″ Designer Series Paper. Then I chose the Seaside Spray Cardstock with a layer of Cherry Cobbler.

The snowman is stamped on a Tasteful Labels Die in Memento Ink. I colored with Stampin’ Blends but you could also use other coloring methods, like maybe Watercolor Pencils. I die-cut a stitched scalloped rectangle in the Stitched So Sweetly Dies out of Cherry Cobbler, but it seemed like too big an area behind the snowman. I decided to add a rectangle of Seaside Spray that would fit inside the stitched die and that solved the problem.

Before adhering the snowman pieces, I adhered a piece of Silver 3/8″ Metallic-Edge Ribbon from top to bottom of the Seaside Spray layer. Then the snowman die piece was popped up on Stampin’ Dimensionals®. I tied a separate bow and adhered it to the top with Mini Glue Dots.

The greetings in the Snowman Season Stamp Set were a little too big, so I used one from the Itty Bitty Christmas Stamp Set. I simply stamped it on a narrow scrap of Whisper White and used the new Lovely Labels Pick a Punch to punch each end of the greeting. It is popped up with Dimensionals on each end so that it is the same level as the snowman piece. For a little bling, I could have used Snowflake Sequins around the snowman, but instead, I used the Elegant Faceted Gems in three spots to resemble snowflakes.

It was fun to find this stamp set from the Holiday Catalog last year and make something updated with it this year! Here is a link to a card I made last year with the set and the Snowman Builder Punch. Choose stamp sets and papers that bring you joy for making your holiday and Christmas cards so it will be a fun endeavor! This Snowman Season in Plaid Tidings Christmas Card will make you happy all day long while you make multiples, perhaps, of this card!

SHOP STAMPIN’ UP! ONLINE HERE!

Remember to use your Bonus Coupons during August if you earned some in July!

Masculine Plaid Tidings Birthday Card

The plaid paper on this Masculine Plaid Tidings Birthday Card is coming soon in the August-December 2020 Mini Catalog on August 4th. Now when I first saw it in the holiday catalog, I wasn’t too thrilled and might have passed it up. I did notice it could be used for Christmas, fall, or Halloween and probably other things but I wasn’t that excited about it. But I did order it and when I opened the package, I just loved the paper!!

The Plaid Tidings 6″ x 6″ Designer Series Paper package has all kinds of plaids in it. There is a long list of coordinating colors! Although we might think of it as holiday paper, whether for Christmas or the oranges for Halloween, Fall, or Thanksgiving, I decided to use a sheet for a birthday card. While it could be for anyone, the plaid gives it a masculine look in this case and we’re always looking for things that work well for masculine cards for the men in our lives. The red on this paper is Cherry Cobbler and the green might be Shaded Spruce or Mossy Meadow. I wasn’t sure!

The card base is Cherry Cobbler and the red and green plaid paper is adhered to that. The greeting is from the Many Mates Stamp Set. It is stamped in black Memento Ink. It’s an outline stamp and you can leave it as is or in this case I colored in the letters. I used my Cherry Cobbler and Mossy Meadow Stampin’ Blends markers.

I stamped the greeting on Whisper White and die cut it with the Stitched Nested Labels Dies. Then I made layers with the same dies out of Cherry Cobbler and Mossy Meadow.

Due to not having the right colors of ribbon, I decided to just use some 1/4″ strips of cardstock scraps for tails hanging from the bottom of the greeting panel. I even cut the little bitty flagged ends with my Paper Snips. You could use more or less strips. I started thinking three would be good and ended up with five! After adhering the strips on the back of the layers with our new Stampin’ Seal Adhesive, I popped the whole thing up on Stampin’ Dimensionals®. Even then I wanted another little something, so I used two gold Metallic Pearls.

This is actually a pretty easy card to make! If you didn’t have the particular dies, you could use rectangles or ovals or circles or even just cut rectangle layers. Just stamp a greeting and choose your favorite plaid paper for the occasion!

You’ll find the Plaid Tidings Designer Paper in the Holiday Catalog, now known as the August-December 2020 Mini Catalog on page 57. I think you will be surprised how much you like this paper and how often you can use it for your projects, like this Masculine Plaid Tidings Birthday Card.

Gnome For the Holidays Christmas Card

Gnome For the Holidays Christmas Card

I just got my Holiday Catalog pre-order late Saturday night (love that UPS now delivers on Saturday!) so I chose this gnome stamp set for my first project with my new things, Gnome For the Holidays Christmas Card.

I never was really into gnomes and not sure I am now exactly, until last Christmas when I started following a craft lady, @thelittlegreenbean, on Instagram, who was making stuffed gnomes. Even then I wasn’t into gnomes, but I liked her and finally could resist no longer and bought myself one of her gnomes. Then another time I went back and bought two more for Christmas gifts, plus later, one for Valentine’s Day! So when I saw this gnome stamp set in the new August-December 2020 Mini Catalog (the Holiday Mini!) I decided to get it, maybe because I especially liked the little gnome house with the Christmas lights!

I also loved this Heartwarming Hugs Designer Series Paper from what I could see of it online. It belongs in a suite but it just has generic Christmasy designs in red, white, and green Christmas colors so you can use it for all kinds of cards. It doesn’t have a theme, except Christmas! And some of the papers are really generic so you could use it any time of the year.

The card base is Real Red with a layer of the top paper that was in my Heartwarming Hugs package! See what I mean about the paper….even this page you could use on a birthday card or all-occasion card!

I stamped the gnome house with Memento Ink and die cut with a Layering Ovals die with the house stamped near the top because the house is not completely drawn in at the top. Then I used Mossy Meadow are a layer underneath with one of the scalloped oval dies.

The cute little gnome is stamped and cut out by hand just because I wanted him separate and popped up on Stampin’ Dimensionals®. Of course, I colored in everything with Stampin’ Blends, my favorite method of coloring!

You can use whatever colors you like. I primarily used Real Red, Crumb Cake, Granny Apple Green, gray, Daffodil Delight, Ivory, and some others.

The greeting comes in the set and I punched it out with the new Banners Pick a Punch. This is a punch that you don’t “have” to have really, but I wanted the Banner Year Stamp Set that is in the Banner Bundle, so I figured I might as well get it!

There are some really big, beautiful suites in the holiday catalog, but sometimes it is fun to look for the stamp sets that probably won’t get as much attention. The holiday catalog is coming on Tuesday, August 4th! I think this gnome stamp set is going to be a popular one because gnomes seem to be “in” these days! I hope you enjoy my little gnome and gnome house on my Gnome For the Holidays Card!

SHOP STAMPIN’ UP! ONLINE!

Jar of Flowers Daisies Card

Jar of Flowers Daisies

This Jar of Flowers Daisies Card was fun and easy to make, especially when it matched so nicely with the designer paper I already had on an unfinished card. Sometimes your creative card ideas can just come from the pile of stuff on your table!!

The card base is Whisper White Cardstock with a layer of the new In Color, Magenta Madness, which I am loving! It’s a little shocking when you first see it in person but it grows on you! Then I had added a strip of daisies in the Flowers For Every Season 6″ x 6″ Designer Series Paper and adhered a piece of Magenta Madness 1/4″ Ribbon, plus tied on a bow. I already had this card made to this point except for the bow when I found it on my desk and thought I should just finish it off!

I stamped the jar in the Jar of Flowers Stamp Set in Memento Ink and colored in some water with the Light Pool Party Stampin’ Blend. I also stamped the flower stems and colored those with the Old Olive Stampin’ Blend with some shading of Mossy Meadow. Then the jar was punched out with the Jar Punch. I always forget there aren’t dies with this stamp set for the flowers!

For the flowers, since the designer paper had daisies on it, I used the Medium Daisy Punch to punch out six daisies so I would have two daisies layered for each flower. I glued these two layers together with Multipurpose Liquid Glue but then popped them up (the two front daisies) with Stampin’ Dimensionals® on the card. I decided to add some little lines in pink on each petal to copy the designer paper. I just used one of my Stampin’ Blends but you could also use a Stampin’ Write Marker or not do it at all! I also used my Perennial Essence Floral Centers (retired) in the center.

The jar is popped up on Stampin’ Dimensionals with the two front flowers, as I mentioned. the third daisy in the back , at the top, is just glued right onto the card front.

Besides not having much room, I liked the card as is and decided to even try to add a greeting. You don’t have to on every card although we usually do. But we don’t have to!

It’s flower season in the heat of summer so try out that Flowers For Every Season DSP and flower stamps or the flower dies and daisy punches! Soon we will be starting on holiday projects! Yikes!

Here is another card I made with both sizes of daisy punches and you can see another choice to use for the flower center, also retired, but you can substitute the Gold Glitter Enamel Dots.

This Jar of Flowers Daisies Card would make a bright and happy card to send to someone or give with a gift.

Shop Stampin’ Up! Online HERE!

Jar of Flowers Daisies Closeup