Tag Archives: Rustic Pumpkin Dies

A Halloween Witch in the Pumpkin Patch Card

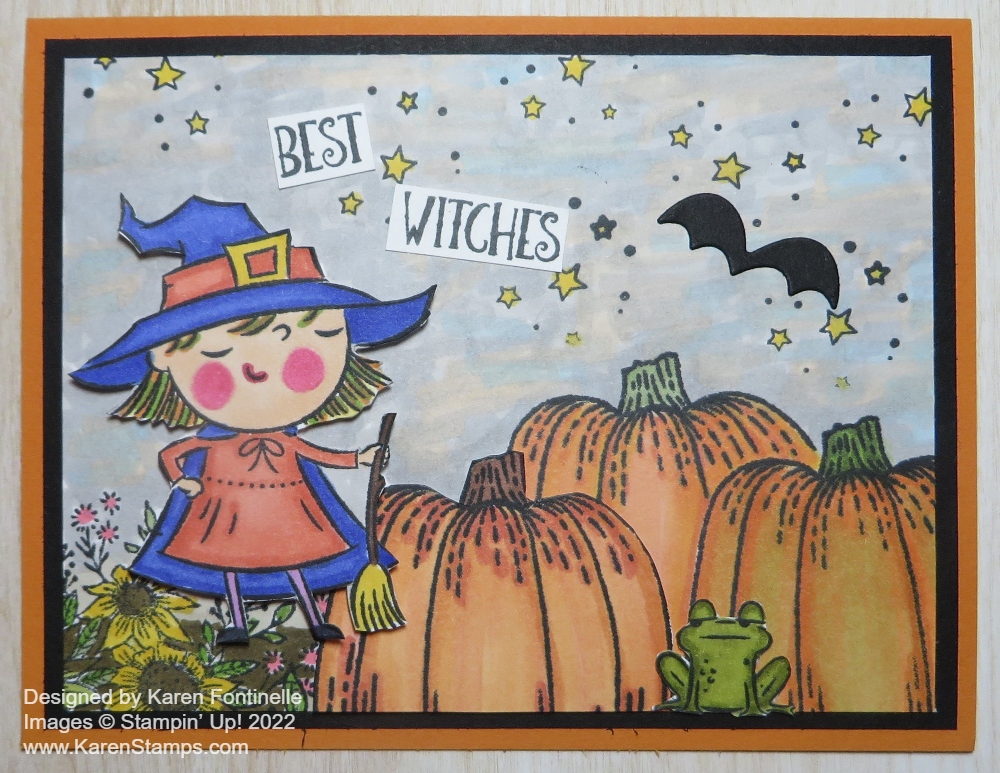
This A Halloween Witch in the Pumpkin Patch Card is one that I had fun making and kept adding more and more to it! You could make something similar but with a lot less detail! You have to like coloring if you make this same card although you could use something other than Stampin’ Blends if you wanted to.

The card base is Pumpkin Pie with a layer of Basic Black. You wouldn’t have to use the extra black layer, but I think it helps the card front to stand out.

The real story of this card is the card’s front layer! It is a piece of Basic White. Of course, the basic information is easy….just stamp the images, cut out and color, place everything and adhere! The witch is from the Best Witches Stamp Set. She is stamped in Memento Ink and colored with Stampin’ Blends. I chose some colors that are a little different so just play around with your markers! This witch obviously has a little too much blush on her cheeks! After coloring the witch, I looked for the die set to cut her out, then remembered that there aren’t any dies! So I just cut her out with my Paper Snips! She is popped up on Stampin’ Dimensionals and even a few Mini Dimensionals.

The first pumpkin I stamped and diecut with the Rustic Pumpkin Dies. It’s the pumpkin on the left that I set down low and trimmed off the overhanging bottom of the pumpkin in order to make it smaller. Then I stamped the pumpkin on the far right and planned to overlap that one with the die cut pumpkin. But then I thought, why not mask that pumpkin and stamp another one behind it?! I used various oranges and maybe some yellow and green on these pumpkins.

To give the witch some way to stand a little higher, I stamped the group of flowers in the Hello Harest Stamp Set in the left corner of the card. I colored the flowers and put some brown down around the flowers to look like ground and dirt for the witch to stand on!

For the sky, I stamped the little stars, colored them in with Dark Daffodil Delight, and then played around with the sky. I ended up using Smoky Slate first in just a scribbly way, then adding some other colors, like Petal Pink, Balmy Blue, and maybe some Pale Papaya. I think it ended up looking a little bit like a Halloween sky!

For the greeting, which I didn’t even think I had room for, I stamped “Best Witches” from the Best Witches Stamp Set on a scrap of Basic White. Then I just trimmed it by hand, cutting pretty close to the letters and cutting apart the words. I really like the way it fits on the card! I also had that stamped and colored little frog in the stamp set and the die-cut bat laying on my table so I stuck those on also! I really think the stamp sets that you can kind of build a little scene with are fun to play with!

If you like to color and make a Halloween night scene in the pumpkin patch, give this card a try!

SHOP STAMPIN’ UP! ONLINE HERE!

Hello Harvest Pumpkins Card with Banner

Hello Harvest Pumpkins Card with Banner

This Hello Harvest Pumpkins Card with Banner turned out differently than the idea I had in my head when I started, but that’s what happens when you start looking through designer paper or different colors of paper or stamp sets. You never know for sure what you will come up with!

The card base is Soft Suede, after trying a multitude of different colors of cardstock! Then there are two layers of the Rustic Harvest Designer Series Paper. The yellow Crushed Curry pattern adhered to the Soft Suede card base is the reverse side of the layer of black and white acorns pattern! I had another black & white striped paper picked out to be the background layer but I liked this acorn pattern better. The acorn layer is 3 1/2″ x 4 3/4″ because I wanted more of the yellow to show.

The pumpkins are made with the Rustic Pumpkin Dies using Pumpkin Pie cardstock. These dies have a texture that transfers to the cardstock. I found that the texture would show better if I ran them through twice. The large pumpkin is made with the extra narrower piece adhered to the center of the large pumpkin piece. I also sponged some Pumpkin Pie ink around the edges of the pumpkin pieces and on top of the textured areas. For the little pumpkins, I die cut a narrow piece and then just trimmed it down, top and bottom, to make the two little pumpkins! The stems are diecut from Soft Suede. The vines are diecut from Shady Spruce and Granny Apple Green on the small pumpkins. I also sponged the little pumpkins but added some green ink because sometimes pumpkins have some variations of color on them.

The banner is stamped on the Crushed Curry Rustic Harvest paper, the same as the card layer. I first stamped the banner on Pumpkin Pie and sponged it but it was too much. The Crushed Curry banner looked better. Normally I don’t like things placed cockeyed, but since the large pumpkin is kind of tall and the banner is kind of large, I decided to place it at an angle in the corner! Sometimes you have to craft dangerously! Try something new!

Here is another fall card I made with the Rustic Harvest DSP with pumpkins. So many pretty patterns of paper for fall.

Shop Stampin’ Up! Online HERE!

Hello Harvest First Day of Fall Pumpkin Card

Hello Harvest First Day of Fall Pumpkin Card

Today is the first day of fall so I thought I would make this Hello Harvest First Day of Fall Pumpkin Card, possibly with the hope that it would feel like fall where I live! No such luck, it’s still as hot as almost any summer day here. I’m ready to see colored leaves and wear a jacket in cool weather so I hope this card will bring us a weather change soon!

I used the Holiday Mini Catalog for the idea for this card. I pretty much copied one of the samples on page 50 in the Rustic Harvest Suite. But I did change some things!

The card base is Crushed Curry with a layer of a piece of the Rustic Harvest Designer Series Paper. At the top and bottom of this black and white piece of designer paper, I added just a narrow strip of a different pattern in the Rustic Harvest paper.

The really fun part of this card was stamping the pumpkins in the Hello Harvest Stamp Set, die-cutting them with the Rustic Pumpkin Dies, and then coloring them! The two orange pumpkins on the sides are colored with Stampin’ Blends, mostly the Pumpkin Pie Combo but I also used tiny amounts of some other colors. Just play with the markers and see what you get! The center pumpkin I tried to copy from the catalog but I got it a lot darker than I would have liked. The sample in the Holiday Catalog uses watercolor paper and the pumpkin is colored with a Water Painter and Merry Merlot ink. I had to be careful because I was only using Basic White cardstock which, of course, doesn’t handle water as well as watercolor paper! But it worked out all right except I like the lighter-colored pumpkin in the sample.

For the fall leaves, I used the stamp in the Hello Harvest Stamp Set. Rather than using an ink pad, I used various colors of Stampin’ Write Markers. You can apply color directly to the stamp with one color and then just dab on other fall colors. If you get a darker color on a marker just scribble with it on scrap paper to get the excess ink off. Then “huff” on it with your breath and stamp. There is also a die to cut out the leaves. I really had fun making assorted leaves to add on at the base of the pumpkins.

To assemble the card, after adhering the designer paper piece, I adhered the two side pumpkins with Multipurpose Liquid Glue and popped up the middle one with Stampin’ Dimensionals. I very carefully added some glue to the back of little pumpkin vines to adhere to the pumpkins.

The greeting is stamped on the same designer paper that I used for the strips at the top and bottom of the black & white paper. It is in the Hello Harvest Stamp Set. Behind the diecut greeting, I added some Gold & Vanilla 3/8″ Satin Edged Ribbon going back and forth. Then I placed the little die-cut flowers around the card as well.

Here is another card I made with just a single colored and diecut pumpkin.

If you want to get in a fall mood, be sure to order the Hello Harvest Bundle and maybe the Rustic Harvest Designer Paper and have fun!

SHOP STAMPIN’ UP! ONLINE!

Hello Harvest Pumpkins Card

Hello Harvest Pumpkins Card

This Hello Harvest Bundle in the new Holiday Mini Catalog is right up my alley because I love fall, pumpkins, and Halloween! This Hello Harvest Pumpkins Card is not for Halloween necessarily but you could make it look that way. For now, this is just a pretty fall card that you could send anytime during the fall for a birthday or just a “thinking of you” kind of card and certainly for Thanksgiving. Not to mention using the pretty pumpkins for fall or Thanksgiving treats and favors if you like to make those!

This card has a card base of Early Espresso cardstock and a Very Vanilla layer. I don’t use Very Vanilla that often but this card idea seemed to call for it. I stamped two of the pumpkins directly on the Very Vanilla card front and spaced them apart a little bit. If I had spaced things a little better on this card, I would have stamped the pumpkins a little lower on the card to allow more space for the greeting at the top. But it is still okay as is.

The middle pumpkin is stamped on a Very Vanilla scrap and die cut using the Rustic Pumpkin Dies. I colored the pumpkins with Light and Dark Pumpkin Pie Stampin’ Blends and the middle one with a bit of Cajun Craze. Then the middle pumpkin is popped up on Stampin’ Dimensionals®. I also die-cut the little curly-cue stems in Old Olive cardstock and adhered those to the pumpkins plus a little flower that is in the stamp set.

The greeting is stamped from the Hello Harvest Stamp Set. There are some nice greetings in that set. It is stamped in Early Espresso ink on Very Vanilla then diecut with the little banner piece in the Scalloped Contours Dies. Next, I trimmed off the scalloped edges and die-cut another banner piece in Old Olive and layered the greeting on that. It is also popped up on Stampin’ Dimensionals.

For a little grounding for the pumpkins, I very lightly scribbled in some Light Soft Sea Foam Stampin’ Blends under the pumpkins across the bottom of the card. It is literally scribbled lightly, not heavy-handed coloring. On the inside of the card I would suggest putting a layer of Very Vanilla maybe stamped with a little something from the stamp set since the Early Espresso is too dark of a color on which to write.

If you like fall, you will really like this Hello Harvest Bundle and maybe even the entire Rustic Harvest Suite Collection!

Check it out in the Stampin’ Up! Online Store HERE!