Category Archives: Stampin’ Cut & Emboss Machine

Rainbow Glimmer Christmas Trees Card

Rainbow Glimmer Christmas Trees Card

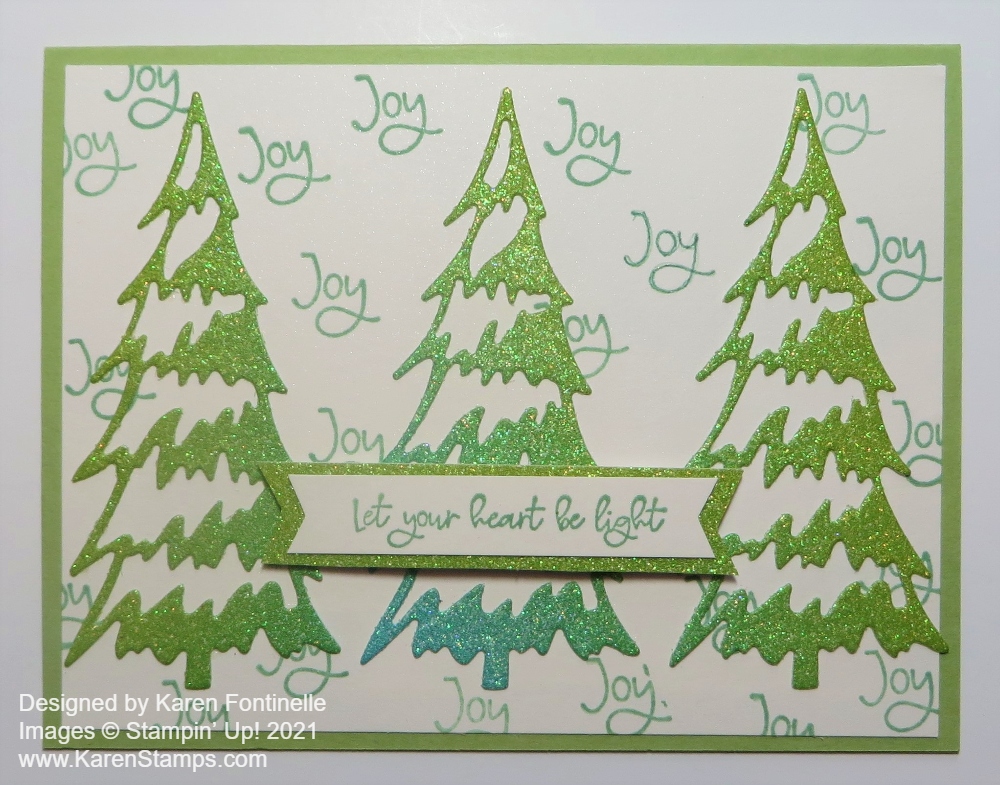
This Rainbow Glimmer Christmas Trees Card was sort of in my head, but then I started on two other projects first before deciding to give this idea a try! I thought it would be fun to use the Rainbow Glimmer Paper and try to get the ombre shades of the green color. The middle tree shows a different color at the base but the other two have slight variations in the green that doesn’t show up in the photo. I think it would be fun if this paper had narrower bands of colors so you could get more of an ombre effect on any projects. But, it is still really pretty and fun paper to use!

The card base is Mint Macaron with a layer of Shimmery White Cardstock. After cutting out and temporarily placing the trees on the card, I decided to try stamping the word “Joy” in the Whimsical Trees Stamp Set around in the background. There wasn’t a lot of empty space on which to do a little stamping so I’m not sure I like what I did. Maybe I do. What do you think??

The greeting is also in the Whimsical Trees Stamp Set and stamped with Mint Macaron. I layered it on a narrow piece of the Rainbow Glimmer Paper. I almost didn’t add a greeting since the card is a little busy already but I did! I really do like the Rainbow Glimmer Paper trees!

If you own the Christmas Trees Dies or will be purchasing them soon on the Last Chance Sale or the Whimsical Trees Bundle, note that there are two “pages” of dies in your package! I guess somehow I was only using what I saw when I pulled the dies out of the package and either forgot or never saw the rest of them! I wondered what happened to the trees that I used on this card that I had seen on other samples! So now I have lots more dies than I thought I had! Duh!

Remember the way these retirements work is that even if Bundles are carried over in the future to another catalog, they won’t still be Bundles. You might still be able to buy the stamp set and dies or whatever the individual components of the Bundle are, but you won’t get the 10% off discounted price. Be sure to check out the Last Chance Sale and the updated Clearance Rack to get the best chance of getting what you want lest anything sell out!

It was a rough morning because my website was not working so I couldn’t post my card until I went through two different Help Chats! Ugh! And even then they said it might work in a few minutes or it could take 24-48 hours globally! Thankfully it started working again after lunch!

Do some Christmas stamping this weekend! I hope to do that AND put up my tree! Wish me luck!

Blessings of Home Birthday Card

Blessings of Home Birthday Card

This weekend we Stampin’ Up! Demonstrators got to enjoy attending the OnStage Stampin’ Up! event….virtually! If we wanted to, we could preorder a few products so we could stamp along during the event presentations. This Blessings of Home Birthday Card uses some of those new products that will be coming in January in the January-June 2022 Mini Catalog! We got to view the new catalog plus the Sale-A-Bration Brochure also coming in January 2022! If you would like to be a Demonstrator and get in on some of this fun, consider joining now during the special Starter Kit offer during November!

This card uses the new Blessings of Home Stamp Set along with the new Heart & Home Designer Series Paper. I started with a card base of Cinnamon Cider and layered that with a piece of Pale Papaya cardstock. I chose this pattern with the foliage and bumblebees on it and layered that on the Pale Papaya.

The flower bouquet is stamped in Cinnamon Cider ink on Basic White cardstock. I wanted to make it kind of a monochromatic card although it’s not really that. It kind of has the look, though! I only stamped the flowers, I didn’t try to color anything in. This stamp set has a lot of details already designed into the stamp. I die cut the flowers with the die in the Flowers of Home Dies.

The greeting is stamped in Cinnamon Cider Ink on really a scrap of Pale Papaya that happened to be laying there! This sentiment is also in the Blessings of Home Stamp Set. I flagged the ends using the Tailored Tag Punch. This punch is so useful for punching into those ends of cardstock to cut out that little notch to make it look like a banner or flag!

The flower die-cut piece is popped up on Stampin’ Dimensionals onto a Pale Papaya scalloped rectangle in the Scalloped Contours Dies. The birthday greeting is laid across the stem with a Dimensional on each end of the strip so that it fits over the popped up flower.

For some bling, I added three of the new Classic Matte Dots in white. Then I remembered the Bumblebee Trinkets that we already have and just had to add one bumblebee to the card! If I hadn’t already popped up the flower, I could have adhered the bumblebee right on the flower bouquet instead of off to the side, but if you get too many layers popped up the embellishments might not make it through the mail! I think the Bumblebee Trinkets will be really cute with this paper!

That’s it! Pretty easy card to make and certainly lots of fun ahead with this new paper and stamping with the new floral stamps! We have to get through the holidays first, but once January hits, you know we will be ready for some fresh new products!

Don’t forget the Seasonal Sale starting Tuesday, Nov. 16 for three days only, through Thursday, Nov. 18!

Don’t miss it!

Shop Stampin’ Up! Online Here!

Festive Foliage Merry Christmas Card

Festive Foliage Merry Christmas Card

You may think that this card, the Festive Foliage Merry Christmas Card, has lots of stamping on it, but it is really only ONE stamp! The stamp is Festive Foliage! I have to admit, it is one stamp that I really overlooked in the Stampin’ Up! Annual Catalog. You’ll find it on page 90 in the lower-left corner of the page. Very easy to miss! But when a few of my customers started ordering it, I wondered what the big deal was and started looking at some samples. Of course, then I had to have it, too! All that foliage will make some very pretty Christmas cards!

The card base is Shaded Spruce cardstock with a layer of Real Red. You wouldn’t have to add the red layer, but I love red and I think it brightens up the stamping and all the green. The foliage is stamped in Memento Ink on Basic White cardstock.

It’s really handy if you have a Stamparatus (146276) with a large stamp like this one. As long as you don’t move the stamp or the paper, you can reink the stamp and stamp again if you need to. Sometimes one little area doesn’t get inked well enough or doesn’t get pressed enough to transfer the ink from the stamp to the paper. But with the Stamparatus, you can just stamp again!

Stamparatus GIF

For coloring the foliage I used Stampin’ Blends…almost all the greens I could find! And then I dotted and colored in all the little berries with Real Red.

The greeting is in the Perfectly Plaid Stamp Set. This is one we have had for a couple of years. It is stamped with Real Red ink and then die cut with one of the Tasteful Labels Dies. It is popped up on Stampin’ Dimensionals. There was plenty of space and plenty of foliage still showing on this card to use such a large label. Then for some bling, I added two green Holiday Rhinestones and tied a bow with the Real Red 3/8″ Sheer Ribbon. It is adhered with a Glue Dot. I liked this sheer ribbon because it adds something to the card but because it is sheer, it doesn’t block the stamping underneath!

If you like coloring, you will love the Festive Foliage Stamp….and if you don’t love coloring, just stamp it in one color like green and don’t color in anything!

If you don’t own the Stamparatus, to get a good image with a background stamp like this one, I recommend laying the stamp face up, ink it up, and then lay your cardstock over the top. Put a piece of computer paper over the top or pull up your Grid paper over it, and give it a good rub with your fingers to get all the ink to transfer to the cardstock. This way you can see what you are doing and have a little more control over the pressure on the cardstock and stamp.

I can’t wait to make more cards with my new Festive Foliage Stamp because I really like how this Festive Foliage Merry Christmas Card turned out! Go check it out in the Online Store and see if you noticed it before in the catalog or missed it!

SHOP STAMPIN’ UP!

Encircled in Beauty Christmas Card

Encircled in Beauty Christmas Card

Don’t forget to think of the Encircled in Beauty Dies when it comes to making Christmas cards, as I used in this Encircled in Beauty Christmas Card. We also have the Encircled in Warmth Stamp Set with wonderful greetings for the holidays. There are so many pretty possibilities!

This card is relatively easy to make. The card base is Blushing Bride with a layer of Basic White Cardstock. I used the Encircled in Beauty Die to cut out the doily image but I did not use the outer die to cut out the whole image from the Basic White paper. Instead, I used the “negative” image left in the paper as the focal point, removing the center circle that was die cut. Next, I embossed the paper just for some texture with the Ornate Floral 3D Embossing Folder.

I layered this die-cut and embossed piece of Basic White on the Blushing Bride while I decided how to finish off the card. I decided to use the greeting in the Encircled in Warmth Stamp Set. It is stamped in Blushing Bride ink and die cut with one of the Stitched Rectangle Dies.

While looking at the beautiful Whimsy & Wonder Designer Series Paper I thought of cutting out one of the ornaments on the paper with Paper Snips and using it in the center of the doily image. I used a piece of the silver metallic thread from the Flowers For Every Season Ribbon Combo Pack. You could use any other kind of twine or ribbon. I wanted something very thin.

I popped up the Basic White die cut piece with Stampin’ Dimensionals® and also the ornament to look like it was hanging inside the empty circle. Then the greeting was adhered flat on the card front with Stampin’ Seal.

You will find the Encircled in Beauty Dies in the Stampin’ Up! Annual Catalog and you will find the Encircled in Warmth Stamp Set in the Holiday Mini Catalog. I think it might be easy to forget about these stamps and dies but they will make beautiful and unique cards, for Christmas and other occasions using the Encircled in Friendship Stamp Set also.

It’s time to plan your Christmas cards and gather your supplies to get a start on your holiday preparations! If you already own these Encircled in Beauty Dies, be sure to pull them out and use this Encircled in Beauty Christmas Card for some inspiration.

SHOP STAMPIN’ UP! ONLINE HERE!

Beauty of Friendship Fall Trees Card

Beauty of Friendship Fall Trees

Last night we were out for a walk and the sky inspired me to make this Beauty of Friendship Fall Trees Card. We can’t really see the pretty sunsets very well because we aren’t up high enough and our neighborhood now has lots of big trees in the way. But last night as we were walking back to the house the silhouettes of the trees against the bits of the orange-ish sky we could see in between the trees was really pretty.

I knew that kind of a “sunset” card would likely turn into a Halloween card, but actually I think being a fall card is just perfect! The greeting is in the Banner Year Stamp Set. The full saying is, “Happy Fall, y’all!” but because of space I just cut off the last word and lined it up with the edge of the front layer of the card. I think it also covered up an ink smudge! And I added a bow with Linen Thread.

The card base is Garden Green. The card layer is Basic White. I used my Blending Brushes to add ink to the Basic White. I would say just pull out a bunch of ink pads you think you might want to use! I started with the sky with a light Balmy Blue but added a bit of Smoky Slate gray. Next I added some yellow below the sky. I used some Crushed Curry as well as Mango Melody. For the grass I used Pear Pizzazz, but then stamped with the little “mound” stamp in the Beauty of Friendship Stamp Set. It could be used for grass or dirt or just a little something when you need some texture or something extra. Some I stamped directly, using Mossy Meadow Ink and some I stamped off. I got a little carried away with the stamping and didn’t notice my block had ink on it and I was getting some smudges everywhere!! But there’s always a way to doctor things up a little bit with more stamping or more color or covering up or something! I decided the orangish sky needed to be a deeper color because when we were out walking it was getting darker outside quickly so I added some Pumpkin Pie ink. There are no right colors and layers, etc. just play and experiment. Just keep going and you’ll get to where you want to be.

I was almost afraid to stamp on my beautiful sunset background and indeed, I did mess up the first tree I stamped! Luckily, I was able to stamp the second tree to covered up some of the branches that didn’t come out! I stamped some green leaves from the stamp set over those two small trees. I used Early Espresso Ink.

However, the large tree is die cut with the Beautiful Trees Dies out of Early Espresso Cardstock. I thought about using Basic Black but used the brown color. I didn’t try to add any leaves to this tree because I wanted the sky to show through (even though leaves are not falling here yet in Houston!).

Of course this fallish looking card just screamed for some pumpkins here in October! I stamped just the smallest pumpkin from Pretty Pumpkins with Memento Ink, cut them out, and colored with Stampin’ Blends. I glued two down directly on the card and one is popped up on Stampin’ Dimensionls®.

To cover up a smudge or two and just because who doesn’t love adding some gems to a card, I added three of the smallest Elegant Faceted Gems in pearlescent white. The other colors in the package are Clear and Petal Pink. I thought about just using one of the largest ones to look a little like the moon coming up, but you know, you can’t resist adding gems once you start so it had to be three!

Here’s a tip: Before cutting out something intricate like the die-cut tree, add Adhesive Sheets to the back of the cardstock so you already have adhesive on the back and don’t have to add tiny dots of Multipurpose Liquid Glue to the back! It never occurs to me until right before I go to adhere it!

You can use a card like this all this month and through November for fall, Halloween, and Thanksgiving! I hope you will get out your Blending Brushes or Stamping Sponge piece and make your own sunset, like on this Beauty of Friendship Fall Trees Card.

Beauty of the Earth Thinking of You Card For Fall

Beauty of the Earth Thinking of You Card For Fall

Somehow I didn’t get around to acknowledging the first day of fall last week, so now I have made a card for the glorious fall season! We were even lucky enough here in Houston to experience some fall weather with cooler temperatures, but not colored leaves yet like this Beauty of the Earth Thinking of You Card For Fall. I actually had a physical reaction the other day when I walked out the back door and my body was stunned to not feel like I had just opened the oven door! It was cool outside!! We won’t get colored leaves here until probably December, but I’m amazed to see photos on the internet of places way north that do have colored leaves already!

This card uses the Beauty of the Earth Designer Series Paper to make a fall card. This paper is really quite interesting, different than what Stampin’ Up! usually has. You can use the paper as is in many ways, or you can even die-cut it to look like the leaves on the trees that you stamp or diecut. You can be very creative with this paper. This Suite also has the Beautiful Trees Dies which I think you really need to get the most use out of this set.

The card base is Cinnamon Cider, one of the In Colors. The layer on the card is Very Vanilla but since I actually covered it with ink it could have been Basic White! My idea was to have a strip of the Beauty of the Earth Designer Paper along the side and a fall tree on the Vanilla overlapping the designer paper. I thought the background needed to be colored in so I used Granny Apple Green ink (I think!) for the grass and Pool Party for the sky. The Beauty of Friendship Stamp Set had a little stamp in it that I used for some splotches of grass or shadows or whatever at the bottom of the card to give it a little texture and look more like a grassy area. I stamped that with Pear Pizzazz I think that I had out.

I adhered a strip of the more greenish designer paper sheet to the inked Very Vanilla piece and wrapped a piece of Linen Thread around the strip. Then I adhered the diecut tree in Cinnamon Cider covered with a diecut piece of the designer paper in the reds and golds. Again, it would have been handy to remember to use Adhesive Sheets before cutting out the tree especially but since the tree was getting mostly covered up anyway, I didn’t have to be super careful with the Multipurpose Liquid Glue because it was going to get covered with the designer paper. The leafy piece was easier to glue down because there were some larger areas to apply the glue.

The greeting is in the Beauty of Friendship Stamp Set. It is stamped in Cinnamon Cider Ink and die cut with the rectangle dies in the Beautiful Trees Dies. And because we have seen some blue jays around here (not to mention hawks!) I added two bluebirds in the tree. I love that little die that cuts out two birds at once! I added just a tiny dot of white for each bird’s eye with a white gel pen that we used to sell. Here’s another card I made in July that is very similar.

With the dies and the designer paper, this is a pretty easy card to make and it looks much more complicated. I don’t think it is going to stay cool here but at least we had a much needed cool break for a few days and will look forward to the next one! In the meantime, I’ll pretend it’s really fall here by making cards like this Beauty of the Earth Thinking of You Card For Fall.

SHOP STAMPIN’ UP! ONLINE HERE!

Don’t forget! Sale-A-Bration ends Thursday, September 30!! Don’t miss it!

Counting Sheep Birthday Card

Counting Sheep Birthday Card

If you like sheep, I hope you are able to get this cute stamp set and dies to make a card like this Counting Sheep Birthday Card. I really had fun making this card and coloring the sheep and the background of the card. I think it’s the party hats and balloon that made me so happy! Who can’t be happy when you have party hats??!

The card base is Old Olive and the top layer is Basic White, but I colored it with ink. For the grassy area, I used Granny Apple Green ink and applied it with the Blending Brush. For the sky, I used Coastal Cabana ink. The fences are cut with the Sheep Dies. When I was going through some retired stuff in my stash, I found these wood sheets that Stampin’ Up! sold several years ago. It’s so thin it’s meant to be used like paper almost. So I die cut the fences using the wood sheets rather than paper! I also thought about using the Cork Paper! You can use any card stock you like.

The sheep were stamped on Basic White Cardstock with Memento ink and I colored them in with various Stampin’ Blends. The party hats were also stamped and colored with Blends and then everything was die cut with the Sheep Dies. The stamp set for everything is the Counting Sheep Stamp Set. After I had everything planned where I wanted it placed, I stamped the greeting at the top, which is in the same stamp set. I stamped the “You’re Amazing” on the inside of the card as well.

You can earn the Counting Sheep Stamp Set or the Sheep Dies during Sale-A-Bration with a $50 purchase. If you want both the stamps and the dies, you would need a $100 order. Sale-a-Bration ends Thursday, September 30 so don’t let it pass you by! It’s the biggest promotion of the Stampin’ Up! year and this year we had TWO Sale-A-Brations so that was pretty special…and historic! Check HERE under Sales & Specials in the Online Store to see what is currently available during Sale-A-Bration. Right now the only thing that is gone is the Be Dazzling Designer Paper.

I hope you are having as much fun as these sheep are on this Counting Sheep Birthday Card celebrating someone’s birthday!

SHOP STAMPIN’ UP! ONLINE HERE!

Harvest Meadow Pretty Pumpkins Card

Harvest Meadow Pretty Pumpkins

This year it seems to be trendy to have pumpkins of non-traditional colors so I thought I would try that with this Harvest Meadow Pretty Pumpkins Card. I’m not even sure how I came up with this particular idea but I pulled out the Harvest Meadow Designer Series Paper and played around with the various papers to see how these would work as pumpkins. I also was very interested in using the die in the Detailed Pumpkins Dies.

The card base is Old Olive mainly because I had already cut out the leaves in the Detailed Pumpkins Dies from an Old Olive scrap on the table while I was cutting out the pumpkins. I cut out the pumpkins and played around with their placement and combinations just on the table before I tried to put them on a card.

The background layer is the striped pattern in the Cute Halloween 6″ x 6″ Designer Series Paper. I just was looking through various papers to see if there was something I wanted to use for the background layer or if maybe I would use cardstock and emboss it in a folder to add some texture. At first, I didn’t think there would be anything in the Cute Halloween Paper but found this striped paper that was pretty subtle but had Old Olive in it, one of the colors I was already using. I think it provides some interest in the background without clashing with the prints on the pumpkins.

The pumpkins are cut out with the outline die in the Detailed Pumpkins Dies. I chose some patterns from the Harvest Meadow DSP that I thought could look okay as pumpkins, even the blue! The one pumpkin is die-cut from Calypso Coral Cardstock with the die with the slits. I wanted another color behind those slits, so I traced the die cut on a scrap of Bumblebee Cardstock and then cut it out with Paper Snips just inside the pencil lines so it wouldn’t stick out from the Calypso Coral cardstock. A couple of the pumpkins are popped up on Stampin’ Dimensionals® as are a couple of the leaves.

The greeting is in the Pretty Pumpkins Stamp Set. I stamped it in Old Olive ink on a scrap of Basic White Cardstock. I kept it simple by just leaving it as a rectangle. I didn’t want to take up too much more room on the card or take away from the pumpkins.

Here is another card on my blog that I made recently using non-traditional colors (but now trendy!) for the pumpkins. This was a fun card to make and I liked how it turned out with the different colors. When you make a fall card with pumpkins, take some artistic license and see what new colors you can use for the pumpkins! Just have fun with it! Experiment, like I did on this Harvest Meadow Pretty Pumpkins Card, until you are happy with your result!

SHOP STAMPIN’ UP! ONLINE HERE!

What To Buy During Sale-A-Bration!

Stampin' Cut & Emboss Machine Open catalog
Images © Stampin’ Up! 2021 Stampin’ Up! Annual Catalog page 152-153
www.KarenStamps.com

What should you buy during Sale-A-Bration while you can earn a free product for every $50 you spend? If I didn’t already have one, I would surely purchase the new Stampin’ Up! Cut & Emboss Machine! It has been years ago that Stampin’ Up! came out with the Big Shot, our first die-cutting machine. I don’t know what we did before we had that! And now, we have an even better (and prettier!) machine, this Stampin’ Cut & Emboss!

There are SO many sets of dies and embossing folders, and now even some embossing folders that work as dies. It adds so much more to your cardmaking and projects. Some of the die sets even have extra little pieces that are just fun to use with your creations.

This new machine cuts even easier and better, in my opinion, than the Big Shot. It even has the convenient benefit of folding up the platform to save space during storage (if yours is ever in storage! I use mine almost every day!). The pieces that make up the “sandwich” are numbered so you know which ones to use when, depending on if you are just die-cutting or embossing.

The price for the Stampin’ Cut & Emboss Machine is $120.00. That is why I am suggesting you purchase it now during Sale-A-Bration if you have been considering it! If you add on some dies or embossing folders, to reach $150, you will be able to choose 3 FREE products in the Sale-A-Bration Brochure! Or another choice would be one product at the $100 Level and one more at the $50 Level. This is in addition to Stampin’ Rewards of 10% of your merchandise. That means another $15 or more free merchandise in any current products. This all makes this purchase a LOT more advantageous for you and the price point a lot more tolerable! It’s not a frivolous purchase, but I feel certain you will get a lot of use out of it and really step up your creative options.

Another option, for space considerations, price, or “cuteness”, is the Mini Stampin’ Cut & Emboss Machine. Why are smaller things so cute?! This small machine has a 3 1/2″ platform and will fit the smaller dies and embossing folders. The price of this machine is $60. Even with this machine, you can earn one FREE Sale-A-Bration product, although you might also want some of the dies and embossing folders to go with it and that might earn you another free Sale-A-Bration product. While I think this Mini Machine is adorable and convenient if you “travel” with your machine, whether on trips or retreats or gathering with friends to stamp, I know you will have a lot more options with the full-size machine. If you have the full-size machine, maybe you want the Mini for portability as I stated.

Sale-A-Bration runs through September 30, 2021 so you have a lot of time. However, if there are particular Sale-A-Bration items you would like to earn, there are some that may not be able to be supplied by the end of Sale-A-Bration and therefore will not be restocked once they run out. So the early bird gets the worm!

SHOP STAMPIN’ UP! ONLINE HERE!

Hand-Penned Gatefold Birthday Card

Hand-Penned Gatefold Birthday Card

Bet you can’t make a card with this Hand-Penned Designer Series Paper, like this Hand-Penned Gatefold Birthday Card, without feeling happy afterward! It’s not about making the card, it’s that designer paper that just is so pleasing to me!

Just to make things a little more interesting, I made this into a gatefold card. Instead of folding the card the normal way, you fold in both sides. The center greeting is just glued on the left side so that it can be opened!

The card base is Basic White. Cut the cardstock in half like usual – 5 1/2″ x 8 1/2″. But don’t score and fold in the middle! Score each end at 2 1/8″. The math is that you want the center of the card to be 5 1/2″ x 4 1/4″. So you divide 4 1/4″ in half, so each side “gate” will fold in to cover the center of the card. That gives you 2 1/8″ on each end. Mine somehow didn’t quite meet in the middle. Maybe I should have folded the sides in from the opposite side. You can try both ways!

For this card, I cut a Highland Heather piece of cardstock to go on the inside of the card. I made it the usual layer size, 5 1/4″ x 4″. I stamped a greeting on the inside before I adhered it to the center of the card. This greeting is from the Inspired Thoughts Stamp Set.

On the front of the card, I cut a layer of Highland Heather to go behind the Hand-Penned Designer Series Paper. Since the gate-fold panel is already pretty narrow, you have to cut the other layers pretty narrow. The Highland Heather layer is 5 3/8″ x 2″ on each gatefold panel. The designer paper is 5 1/4″ x 1 7/8″.

Now as I was putting glue on the back of this pretty floral designer paper, I also liked the Highland Heather color print on the other side. So I added that side of the designer paper to the inside panels of the card!

Hand-Penned Gatefold Birthday Card Inside

For the greeting on the front of the card, you could use a variety of shapes – circles, rectangles, squares, ovals. Use whatever you like or fits the greeting. I used these two die cuts from the Stitched So Sweetly Dies. The Happy Birthday greeting is from the Peaceful Moments Stamp Set. I stamped that in Highland Heather Ink and also stamped a few flowers and leaves in the Hand-Penned Petals Stamp Set. Layer the Basic White stamped piece on top of the Highland Heather piece. Be sure to only apply adhesive to the left side of the greeting from the middle over to the left side. Check the inside to make sure no glue is showing on the inside or it will stick to the other side of the card. I added two Elegant Faceted Gems to each side of the Highland Heather die cut.

Here is a fairly recent card I made in the gatefold style using the Expressions In Ink Designer Series Paper.

This is an easy card but the gatefold gives it a little extra pizzazz. Try your hand at making something like this Hand-Penned Gatefold Birthday Card.

SHOP STAMPIN’ UP! ONLINE HERE!

It’s Sale-A-Bration (Again!) at Stampin’ Up!

Sale-A-Bration Aug Sept 2021

In case you are new to Stampin’ Up!, you might not know what Sale-A-Bration is! Sale-A-Bration has been around since the beginning or near the beginning of Stampin’ Up, except back then it was called “Sell-A-Bration”. I believe I heard it was an idea to save the company back in the beginning when things got rough, as they often do in many companies, especially small ones. It really took off and has been an annual promotion ever since, one that everyone loves! Except for THIS year, we are having TWO Sale-A-Brations!! We only had it starting in January before, but right now we are having the second one in 2021! And at a perfect time when we are purchasing new products anyway in the Holiday Catalog!

The concept of Sale-A-Bration is that when you spend $50 or more, you get to choose a FREE product in the Sale-A-Bration Brochure! And we all love FREE stamping supplies! If you spend $100 or more, you have a choice of one $100 Level product in the brochure or two $50 Level products. You will see those designations in the brochure. No limits to what you can spend and get for FREE!

TAKE A LOOK AT THE SALE-A-BRATION BROCHURE HERE!

Watch this video to learn about the Sale-A-Bration products!

If you have a large order yourself or go in together with friends, you can choose a FREE Host stamp set, In Your Words, with a $300 order! It’s on page 17 in the Sale-A-Bration Brochure.

In Your Words SAB Host Set 2021

Sale-A-Bration is a fun time at Stampin’ Up! This year, it is double the fun of having a second Sale-A-Bration going on now! But it won’t last forever! Sale-A-Bration ends on September 30 and you know how time flies! Get what you want before things sell out! Enjoy the Sale-A-Bration video!

Counting Sheep Sale-A-Bration Card

Counting Sheet Sale-A-Bration Card

The stamp set and the dies used on this Counting Sheep Sale-A-Bration Card are ones that everyone can earn FREE during Sale-A-Bration at Stampin’ Up! What is Sale-A-Bration? It’s a favorite, annual promotion of Stampin’ Up! where you can earn a free Sale-A-Bration product for every $50 that you purchase. No limits! Normally Sale-A-Bration only happens once a year, in January, but this year for the first time we are having a second Sale-A-Bration now in August through September! How exciting!

During Sale-A-Bration, with a $50 purchase, you can choose this Counting Sheep Stamp Set (156591) and stamp all kinds of cute cards with these delightful sheep! If you spend another $50, you just might want to choose the Sheep Dies (156600) FREE also coordinate with the Counting Sheep Stamp Set. The dies not only cut out the sheep and the little party hat, but they also come with a fence, a flag, a balloon, clouds, and a sun! So cute, I think!! I tried to use as many things on this card to show you as I could!

I stamped all three styles of sheep with Memento Ink and then added just a tiny bit of gray color and shading on the sheep with Stampin’ Blends. I actually stamped three of each kind of sheep and die-cut them just to have a bunch of sheep ready to use! I love the fence die! I used Crumb Cake Cardstock but I also cut out some from Soft Suede.

The card base is Pool Party cardstock with a layer of Basic White. I used my Blending Brush to pick up some Pool Party Ink for the sky and Granny Apple Green for the grass. I’m still learning how to best use these Blending Brushes correctly! If you don’t have them yet, you can use Sponge Daubers or an old Stampin’ Sponge you may have. I also stamped some grass on the bottom green part.

I just placed the clouds in the sky plus the cute sun, and then played with the sheep and the fence to get them where I liked them. A couple of sheep are popped up on Stampin’ Dimensionals. The greeting is in the Counting Sheep Stamp Set. I die cut it with one of the many choices on the Messages Die. You don’t always have to stamp all the greetings and die-cut them all. Just place a scrap of paper under the one die you want to use and run it through the Stampin’ Up! Cut & Emboss Machine! To save some space, I cut a sliver off the right side of the greeting so I could slide it up against the edge of the card.

There are so many cute animal stamps in the Stampin’ Up! Annual Catalog, the Holiday Mini, and now the sheep in the Sale-A-Bration Brochure! I think these sheep are going to be a lot of fun for cardmaking and other projects, even baby cards! When you get your Stampin’ Up! order in during Sale-A-Bration I know you will have fun choosing which FREE item you want!

SHOP STAMPIN’ UP! ONLINE HERE!

Gingerbread & Peppermint Christmas Card

Gingerbread & Peppermint Christmas Card

I wanted to play some more with the festive Gingerbread & Peppermint Paper in the Holiday Catalog and this Gingerbread & Peppermint Christmas Card is what turned out! I also wanted to try out that little decorative strip I put between the two patterns of paper. This is a pretty basic card design using designer papers and a greeting, maybe just fancied up a little bit with some diecuts.

The card base is Real Red Cardstock. I used the Gingerbread & Peppermint 6″ x 6″ Designer Series Paper. These two patterns are actually on the same sheet, just opposite sides! If the diagonal striped piece looks dirty, it’s just the splattering on the paper. I don’t know why! I die cut that middle strip with the Gingerbread Dies. They are part of the Frosted Gingerbread Bundle, if you want both the stamp set and dies and want to save 10% buying them together! I just used teeny dots of Multipurpose Liquid Glue on that strip.

The greeting is stamped in Real Red Ink on Basic White. The stamp is in the Frosted Gingerbread Stamp Set. It is die-cut with a die in the Ornate Frames Dies as is the Real Red layer. To help it all stand out a little better, I layered the greeting on a larger Basic White Layering Circles Die. And for a little bling, I added three Red Rhinestone Jewels to the greeting.

It will soon be Christmas card time so check out the new Stampin’ Up! July-December 2021 Mini Catalog for all the new stamps, dies, embellishments, and ideas and start thinking about what you would like to make! Maybe you want to make several different designs of cards so you can have fun making different ones! That’s what I like to do! That way you can use different stamp sets and supplies and see what all you can come up with….and not get tired of making a whole bunch of the same card. Whatever you like!

SHOP STAMPIN’ UP! ONLINE HERE!

Sweet Symmetry Thanks Card

I passed up this new paper in the Stampin’ Up! Annual Catalog at first, but decided that might have been a mistake so I ordered it recently on the Designer Series Paper Sale! Now I can use this cute paper to make cards like this Sweet Symmetry Thanks Card. The designs on the paper are really cute, I think, and fun to make cards and projects with.

The designer series paper is called Sweet Symmetry. It has traditional, symmetrical folk art images and florals in soft colors. One side has bolder floral designs and the other side has more generic designs. You can use them together or separately.

Although it looks black in the photo, the card base is Night of Navy, but you can see the dark blue background in the paper. I added a layer of Bumblebee cardstock underneath the designer paper just for fun. Since Bumblebee is one of the coordinating colors I thought it could add a little something to the card.

For an embellishment, I wrapped a piece of Bumblebee 1/4″ Gingham Ribbon around the designer paper and also adhered the separate bow. Sometimes it is easier to tie a bow separately and adhere it to the ribbon with Mini Glue Dots than to try to tie it to the base ribbon.

The greeting is from the Artistically Inked Stamp Set and stamped in Night of Navy ink. It is cut out with a Stitched Rectangle Die. I was going to cut out a layer of some kind to go underneath it without covering up too much of the paper, but in the end, I decided the greeting looked fine as is, especially with the Bumblebee Ribbon going underneath it. It is popped up with Stampin’ Dimensionals®.

This is such a basic, easy card design! It’s good for beginners as well as experienced stampers. Use just a card base, a layer of designer paper, and a greeting. That’s really all you need, but as you see, I added an extra cardstock layer and the ribbon for the embellishment.

I think the patterns on this Sweet Symmetry Paper just make you feel “happy” whether you are the cardmaker or the recipient! The Designer Series Paper Sale runs through August 2 so stock up or add to your collection of papers!

Encircled in Friendship Birthday Card

Encircled in Friendship Birthday Card

Somewhere recently I saw a card made with the colors blue and yellow or maybe it was blue and orange. I don’t remember, but it popped up in my head when I went to make this Encircled in Friendship Birthday Card. After looking through my designer papers, I chose this Misty Moonlight blue print in the Pattern Party Host Designer Series Paper. I also knew I wanted to use the Encircled in Friendship Bundle with its beautiful dies!

I chose Bumblebee Cardstock, one of last year’s In Colors, for the card base. I could have used another yellow but I’ve been on a Bumblebee kick recently. I used a couple of the dies in the Encircled in Beauty Dies to cut out a large Bumblebee outer die, which also produced the circle I used under the stamped image. I also die cut the white layer and die cut a Basic White circle with the Layering Circles Dies. For my design inspiration (and help!) I was copying my own card from a little while ago which you can see here.

On the white circle, I stamped the flowers in the Encircled in Friendship Stamp Set with Memento Black Ink. It would have been better to stamp first, then die cut, but I got lucky and got the stamp placed just fine! The flowers just barely fit. Then I colored them with Stampin’ Blends. Since we don’t have a Bumblebee color, I used Daffodil Delight for the flowers and Granny Apple Green for the leaves. Even though it is not an exact color match, it is close enough and maybe the Daffodil Delight even provides a little brighter color to the card.

I intended to wrap the Bumblebee Gingham Ribbon around the Misty Moonlight piece of designer paper, but I forgot and glued down the paper to the Bumblebee card base first! It happens! For the greeting, I chose one I had already stamped and die-cut with the Many Messages Bundle. To add some ribbon for embellishment, I just cut a strip and adhered it underneath the greeting, and snipped the ends. Very quick and easy!

The die cut sort of doily-like layers would be easier to adhere to the card if you remembered to use Adhesive Sheets first but I seldom remember! However, I can usually make teeny tiny dots work (and I mean teeny tiny!) of Multipurpose Liquid Glue on the biggest spaces I can find and even the smaller ones on the back of the die-cuts. Just be very careful and squirt out some glue on a piece of scrap paper to avoid an explosion of a blob on your tiny die-cut area!

Don’t forget! Tomorrow, June 24th is FREE SHIPPING at Stampin’ Up! so if you would like this Encircled in Friendship Bundle to make a card like this one, you can save the money you would normally spend on shipping! You must have a $50 order to be eligible for free shipping, and don’t start putting in your order until tomorrow so the computer will take it. Double-check to make sure you don’t get charged for shipping.

ONE DAY ONLY! Thurs. 62421