Tag Archives: Whimsy & Wonder 12" x 12" Specialty Designer Series Paper

Whimsy & Wonder Christmas Thank You Cards

Whimsy & Wonder Christmas Thank You Cards

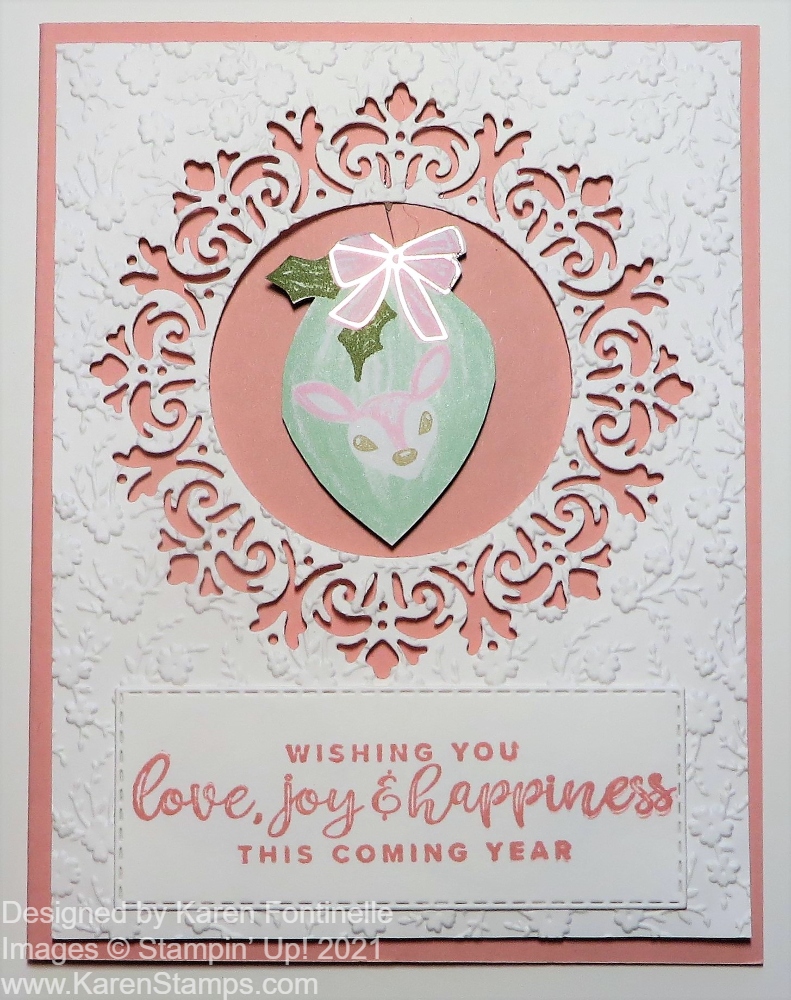
Christmas is over and now it is time to write those thank you notes like these Whimsy & Wonder Christmas Thank You Cards. It may be an old-fashioned thing and email or texting is faster, but a real thank you note is always best! Here are three quick examples!

To keep it simple, I chose the Basic White Note Cards but you could use a regular size card as well. Then I just decorated the cards using the Whimsy & Wonder Specialty Designer Series Paper. This is your chance to use the “other side” of the fancy paper, although I still cut out some images from the fancy side! You could even just use a strip of the designer paper if you wanted to use up your tiny scraps.

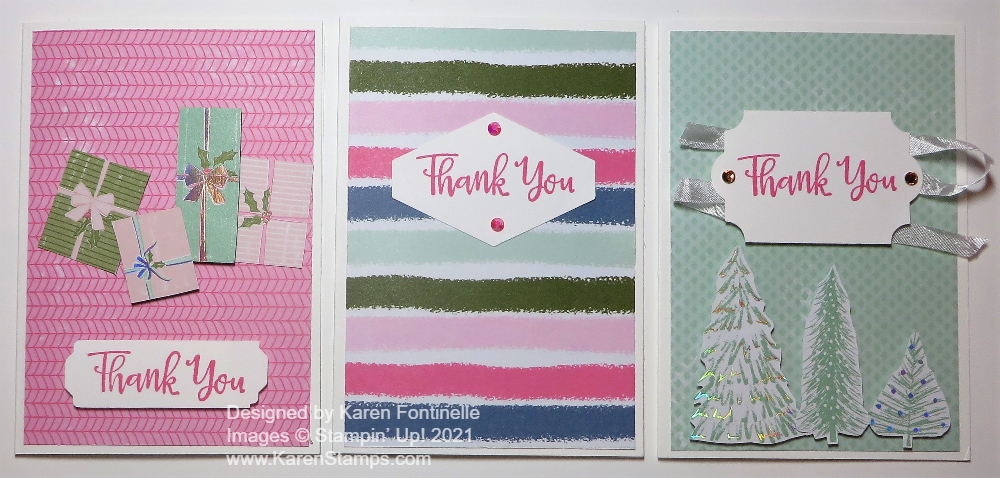
These note cards are 3 1/2″ x 5″, which is a mailable size and they come with envelopes. Therefore, I cut my layer of designer paper at 3 1/4″ x 4 3/4″. The “Thank You” is in the Peaceful Moments Stamp Set. I stamped it with Polished Pink ink just to keep it simple. Then I used different punches for the sentiment.

The first note card uses a pink “other side” of the paper. I cut out some of the packages on another pattern and adhered those to the front of the card, some popped up with Stampin’ Dimensionals, some flat on the card. Then the “Thank You” was stamped and punched out using the Lovely Labels Pick A Punch.

The middle note card is the simplest of all! I just used the striped pattern in the Whimsy & Wonder DSP and added a stamped “Thank You”, punched out with the Tailored Tag Punch. I added a couple of jewels just for a little extra something.

The note card on the right uses a light green layer, plus a few cut out trees from the paper. The Thank You is stamped in Polished Pink and punched out with the Everyday Label Punch. I do have the dies for the trees, but since I had to clean up and put away my die-cutting machine, dies, and mess for Christmas dinner, it was easier to just cut the trees out by hand! Your recipient won’t know, “Gee, she could have die cut these and she didn’t!!” I added a little White Crinkled Seam Binding Ribbon behind the sentiment, just the back and forth underneath the label.

Since these Basic White Note Cards are smaller, they are not necessarily meant to be super-fussy cards so you can go a lot simpler and quicker with these! If you made just one style of Christmas card, it might be fun to use that same paper, even if you only used a strip, to continue with the theme of your Christmas cards! Whatever you do, the gift-giver will appreciate a little note (and the handmade note card!) from you! Or just write a note to those who know your family or couldn’t be with you and tell them about your Christmas, just a post-holiday note! It will ease the withdrawal from Christmas cards in the mail and no Amazon packages at the door! LOL!

And if you used up every bit of your paper and embellishments from the Holiday Mini Catalog, be sure to check out the Last Chance List, ending January 3rd, and the Clearance Rack where you might find some bargains to use now or to save for next year! Be old-fashioned and send a few thank you notes like these easy Whimsy & Wonder Christmas Thank You Cards with whatever paper you have left!

SHOP STAMPIN’ UP!

SHOP THE HOLIDAY MINI LAST CHANCE PRODUCTS!

SHOP THE CLEARANCE RACK!

Encircled in Beauty Christmas Card

Encircled in Beauty Christmas Card

Don’t forget to think of the Encircled in Beauty Dies when it comes to making Christmas cards, as I used in this Encircled in Beauty Christmas Card. We also have the Encircled in Warmth Stamp Set with wonderful greetings for the holidays. There are so many pretty possibilities!

This card is relatively easy to make. The card base is Blushing Bride with a layer of Basic White Cardstock. I used the Encircled in Beauty Die to cut out the doily image but I did not use the outer die to cut out the whole image from the Basic White paper. Instead, I used the “negative” image left in the paper as the focal point, removing the center circle that was die cut. Next, I embossed the paper just for some texture with the Ornate Floral 3D Embossing Folder.

I layered this die-cut and embossed piece of Basic White on the Blushing Bride while I decided how to finish off the card. I decided to use the greeting in the Encircled in Warmth Stamp Set. It is stamped in Blushing Bride ink and die cut with one of the Stitched Rectangle Dies.

While looking at the beautiful Whimsy & Wonder Designer Series Paper I thought of cutting out one of the ornaments on the paper with Paper Snips and using it in the center of the doily image. I used a piece of the silver metallic thread from the Flowers For Every Season Ribbon Combo Pack. You could use any other kind of twine or ribbon. I wanted something very thin.

I popped up the Basic White die cut piece with Stampin’ Dimensionals® and also the ornament to look like it was hanging inside the empty circle. Then the greeting was adhered flat on the card front with Stampin’ Seal.

You will find the Encircled in Beauty Dies in the Stampin’ Up! Annual Catalog and you will find the Encircled in Warmth Stamp Set in the Holiday Mini Catalog. I think it might be easy to forget about these stamps and dies but they will make beautiful and unique cards, for Christmas and other occasions using the Encircled in Friendship Stamp Set also.

It’s time to plan your Christmas cards and gather your supplies to get a start on your holiday preparations! If you already own these Encircled in Beauty Dies, be sure to pull them out and use this Encircled in Beauty Christmas Card for some inspiration.

SHOP STAMPIN’ UP! ONLINE HERE!

Whimsy & Wonder Ornament Christmas Card

Whimsy & Wonder Ornament Christmas Card

This is another card that completely changed from the idea I had in my head and it all came about because I turned the “pretty” side over! I realized I hadn’t used the very pretty ornament print paper in the Whimsy & Wonder Specialty Designer Series Paper so I was going to make a card using that paper. But when I turned the paper over to cut out just a section that I needed for the card, this dark blue print side just jumped out at me and this Whimsy & Wonder Ornament Christmas Card was born! I pictured using a snowflake and one blue ornament plus a greeting somehow, but I couldn’t resist all the other ornaments either!

Just because I’m a Stampin’ Up! Demonstrator, don’t think that card ideas come to me magically. The placement of everything on this card just was not working out, so I finally had to give up, step back, and walk away for a few minutes. I googled this paper and although I wasn’t copying anything, I saw something that sparked the idea to put the snowflake and greeting in the lower right corner instead of the upper left. That seemed to make all the difference and I was able to complete the card design!

The card base is Basic White although you could use Misty Moonlight as the base with a thin margin of Basic White under the Misty Moonlight Designer Paper to help it stand out. I cut out several ornaments from the other side of the paper with my Paper Snips while I watched TV. If you wanted to make it easier, you could just cut out the outline of the ornament and not the ornament hanger portion because if you add a bow later, you can cover up that you cut that part off!

The snowflake is in the Wonderful Snowflakes package. These are quite pretty, plain white on one side and iridescent foil on the other side. I adhered the snowflake with the tinest drops of glue, but you do have some space in the center of the snowflake. Then if you are pasting anything over the snowflake, maybe that will help hold it down also.

The greeting is in the Whimsical Trees Stamp Set. I thought maybe the simple word would go well with the snowflake. I stamped it in Moonlight Mist Ink and die cut it with the small circle in the Tasteful Labels Dies. I played with different dies and cardstock colors on which to layer it and finally settled on this Blushing Bride pink. I used a small die in the Encircled in Beauty Dies. The snowflake is adhered flat to the card and the greeting is popped up on Stampin’ Dimensionals.

The ornaments are all cut out from the opposite side of this paper. I just adhered them with Stampin’ Dimensionals and adhered a little bow on each one with a Mini Glue Dot. The ribbon is the White 1/4″ Crinkled Seam Binding Ribbon. I think a silver trim would also work well. Then for some bling I added some Silver Epoxy Essentials. I think they match well with the paper and look!

After a slow start on this card, I’m really happy with how it turned out. Be sure you check the “other side” of our beautiful designer papers because you just might find something special. And remember, a lot of the “other sides” can be used throughout the year, not just during the season the paper was designed for. This Whimsy & Wonder Ornament Christmas Card even uses both sides of the same paper by cutting out the pretty ornaments! Try it!

Whimsical Tree Happy Holidays Card

Whimsical Tree Happy Holidays Card

This Whimsical Tree Happy Holidays Card came after I made another card for my weekly newsletter to showcase a card that could be made with this beautiful paper. Actually, that card turned out to be monochromatic! If you didn’t receive my stamping newsletter today, please sign up for my Mailing List in the red box on my blog! Then you won’t miss out!

I am in love with the Whimsy & Wonder Suite in the just-released Holiday Mini Catalog! It’s the Whimsy & Wonder Specialty Designer Series Paper that really caught my eye when I started seeing it in videos, rather than online in the catalog. We can say this about most papers, but they almost all look even better in person and this one does that! If you would like a different, soft color scheme for your Christmas cards or projects, this is the paper for you!

This card base is Mint Macaron, one of the coordinating colors of the designer paper. Then I used a layer of the foil-accented holly leaf pattern of the designer paper. It’s so pretty against that Mint Macaron cardstock! Before adhering it to the card base, I wrapped the Blushing Bride 3/8″ Frayed Grosgrain Ribbon around to the back and added a separate bow. This ribbon is so soft and pliable! You might as well get some on your order! You’ll love it!

The Whimsical Tree is stamped on Basic White with Mint Macaron ink. That piece is die-cut with a Scalloped Contours Die. I could have die cut the next larger size of the Scalloped Contours Dies, but I didn’t want to take up too much room and cover up too much of the holly leaves designer paper, so I just made a layer of Blushing Bride Cardstock slightly larger than the stamped tree piece. That whole piece is popped up on Stampin’ Dimensionals. For some extra embellishment, I added some Champagne Rhinestones on the tree and cut out two gifts from the designer paper. If you do that, feel free to cut down the packages to smaller sizes than are printed on the paper. You can make them a lot smaller if you want!

I wanted just a small greeting so I stamped “Happy Holidays” from the Poinsettia Petals Stamp Set in Mint Macaron and layered it on a small rectangle of Blushing Bride.

This card has a few steps, but nothing too difficult. Did I say how much I love the paper and the ribbon?!! I love this card! I might copy it and make some more and then I’ll have some Christmas cards ready to go in December!

Remember, the Holiday Catalog is LIVE as of yesterday PLUS there is a second Sale-A-Bration going on for two months! Spend $50 and get something free in the Sale-A-Bration Brochure! Look back on yesterday’s post for the links to the PDFs of the catalogs and shopping links. If you purchase some of the Whimsy & Wonder Suite products, you can make your own card like my Whimsical Tree Happy Holidays Card!

SHOP STAMPIN’ UP! ONLINE HERE!

Quick & Easy Whimsy & Wonder Christmas Card

Quick & Easy Whimsy & Wonder Christmas Card

If you are looking for a simple card to make for the holidays, look no further than this Quick & Easy Whimsy & Wonder Christmas Card. It probably only took a couple of minutes to make! The paper is so pretty you don’t really need much other than a greeting.

This card starts with a base of Polished Pink, although there are many colors in the packages on the paper that you could also choose. If you were making several cards with this designer paper, you could make each one with a different color card base!

The designer paper is the Whimsy & Wonder Specialty Paper in the Stampin’ Up! Holiday Catalog, coming August 3rd! That’s not far off anymore! When I saw this paper being shown in some videos, it sold me on the whole Suite! Just looking at the catalog online, I completely dismissed this Suite! This paper has beautiful foil accents and is very Christmasy except with non-traditional colors. But I think it might be good to break out of our box and change things up a little. I still will make some red and green cards, the traditional colors of Christmas. This paper is SO pretty that I think it will be a hit as more people see it in person! This paper might even remind some people of the silver aluminum Christmas trees of years ago. I think they’ve even made a nostalgic comeback in recent years. Since you couldn’t put lights on these trees, some people had a multi-colored light that turned to give the tree different colors. Anyway, the silver in this paper reminds me of those vintage trees!

I used the In Color Polished Pink 3/8″ Open Weave Ribbon on the card. Originally, I planned to have it go vertically on the left side of the card with a bow. But after stamping the greeting from the Whimsical Trees Stamp Set in Polished Pink Ink and cutting it out with one of the new Tailor Made Tag Dies, I decided to pull the ribbon through the tag, tie a bow and secure it underneath the designer paper layer. I wish I would have popped up the greeting with Stampin’ Dimensionals, but I just adhered it flat to the card.

If you want a quick and easy card to make in multiples for Christmas, use this very basic card design of designer paper on a card base, a greeting, and a piece of ribbon and a bow for embellishment. You could add a little sparkle and bling, but really the paper with its foil accents can stand on its own. When your Holiday Mini Catalog comes in the mail, give a good look at the Whimsy & Wonder Suite.

SHOP STAMPIN’ UP! ONLINE!

Whimsy & Wonder Christmas Trees Holiday Card

There is a new Suite in the Stampin’ Up! Holiday Mini Catalog called the Whimsy & Wonder Suite which I totally passed over the first time I looked through the catalog online. When I saw some videos of the package of the designer paper and the pink color scheme for the holidays I fell in love with it although the first card I made, this Whimsy & Wonder Christmas Trees Holiday Card, doesn’t even have those colors! Go figure! But this is what I came up with at the time!

The Whimsy & Wonderful Designer Series Paper is so stunning! If you don’t mind using some non-traditional colors for Christmas, even for a few cards and projects, I think you will love the designs and colors on this paper! All the sheets have foil accents on one side of the paper. Along with the pinks, blues, light greens, and images it is beautiful! It’s probably my favorite in the Holiday Catalog and I’m usually pretty traditional.

This card starts with a Mossy Meadow Cardstock base. Then I chose the dark green side of one paper with white dots, like snowflakes. I simply turned the paper over and saw the diagonal silver foil stripes on the other side and used that for the bottom portion of the card layer.

Some of the whimsical trees on another sheet of designer paper can be cut out with the dies in the Christmas Trees Dies. Of course, you can’t run the whole 12″ x 12″ sheet of paper through the Stampin’ Cut & Emboss Machine, so you need to cut out portions of the paper to die-cut. You want to leave a generous enough margin around the tree so the die can cut it correctly without ruining too much of the rest of the paper! On my card, the middle tree in the background was actually at the bottom of the page, not the full image, but I was able to die cut what was there and still use it! Some of my trees were glued directly to the card front and some are popped up on Stampin’ Dimensionals®. Most of the trees have foil accents in tiny dots or garlands.

The greeting is in the Frosted Gingerbread Stamp Set. I either didn’t have space for this card or didn’t care for the greetings in the Whimsical Trees Stamp Set. After looking through all my dies and judging the space on my card, I finally had to just stamp the greeting on a narrow strip of Basic White Cardstock and layered it on Mint Macaron Cardstock which matches the ink color. I used the silver pieces in the Silver & Clear Epoxy Essentials on each end of the greeting.

Maybe I should have stopped myself, but I added some Subtle Shimmer Sequins on page 37 in the Holiday Catalog in the upper background of the card. I couldn’t help myself even though with the accents on the trees and the stripes on the bottom paper, there is pretty much sparkle on the card already. But can we really have too much sparkle??!

The Holiday Catalog will come out on August 3rd! The online catalog will go live on that day for you to view. August is not too soon to begin your holiday cardmaking and crafting! Then you’ll be able to start making Christmas and holiday cards like this Whimsy & Wonder Christmas Trees Holiday Card.