The other day after I made the Easter basket I posted yesterday, I was cleaning up my mess and as I saw the Hand-Penned Designer Series Paper up against the Mint Macaron Cardstock, I loved it and had to make a card with that combination. Since I had made the Easter basket out of Cinnamon Cider and since this paper has some Cinnamon Cider in it, I added a narrow layer underneath the designer paper.
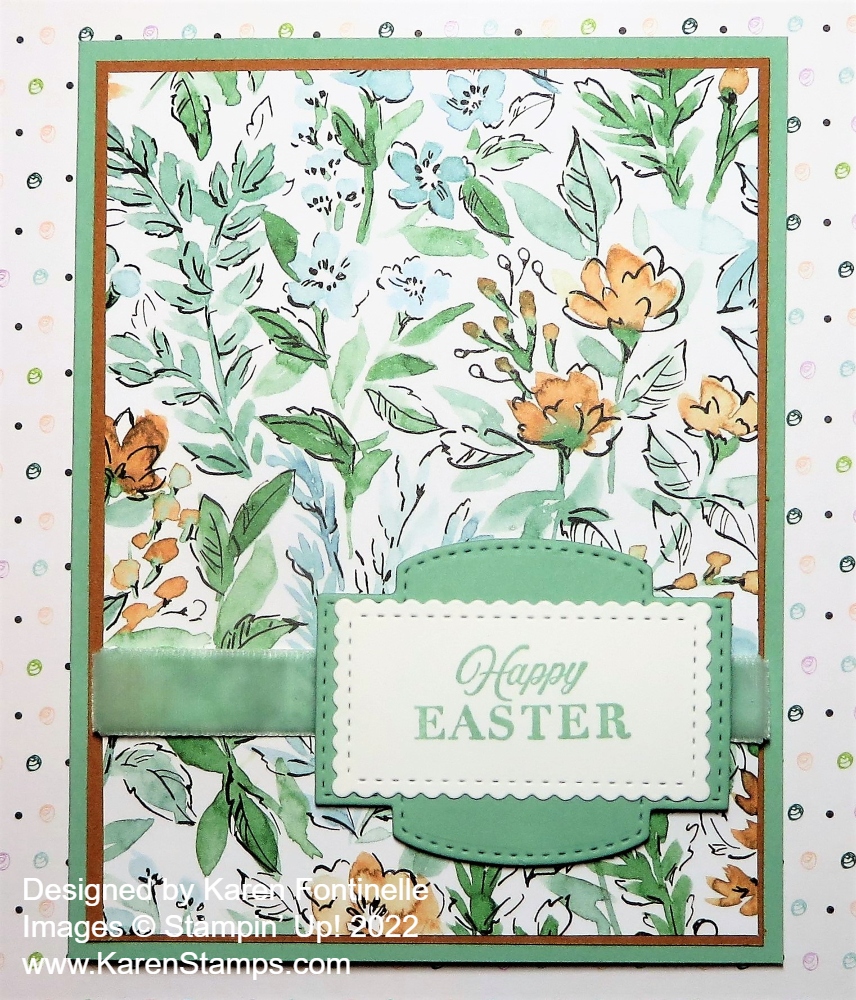
This is a really easy card to make yet looks perfect for a spring or Easter card. The card base is Mint Macaron with a layer of Cinnamon Cider (retiring soon!) and then the Hand-Penned Designer Series Paper. Before adhering the designer paper to the Cinnamon Cider layer, add the ribbon first, if you are using ribbon. I used the wide, velvet Mint Macaron Soft Velvet Ribbon. This ribbon is beautiful but I hadn’t even used it yet and now it is retiring! Since that ribbon is wide, I didn’t try to add a bow, plus the background paper is pretty busy so I wanted to just keep it simple.
The greeting is in the CelebratingYou Stamp Set. I stamped it on Basic White with Mint Macaron Ink and then die cut that piece with one of the Stitched So Sweetly Dies and layered it on a larger die in the same set. These Stitched So Sweetly Dies are retiring soon, which I hate as I have used these dies a lot!! Not that I can’t continue to use them, but of course, once we get new things, we like to use the new things!
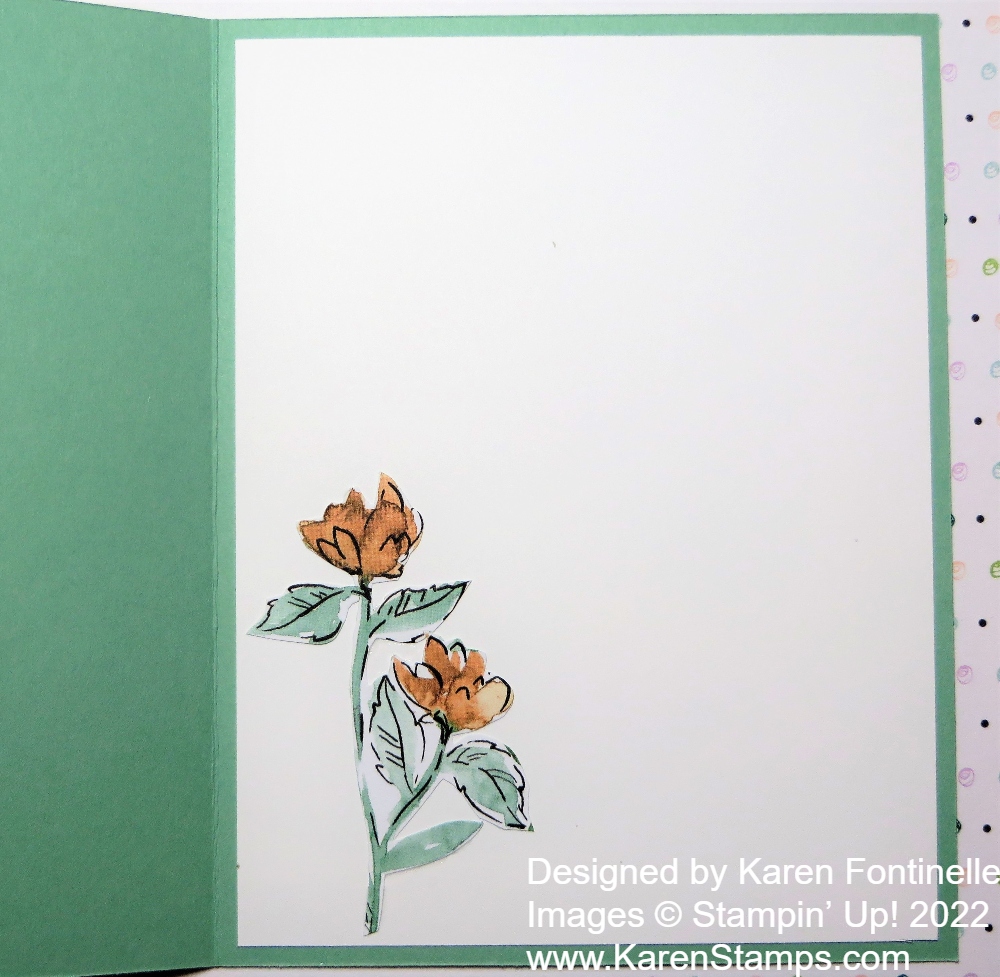
For the inside of the card, I added a layer of Basic White. To decorate it a bit, I cut out two flowers from the designer paper and adhered them inside the card. It’s always fun if you take the time to decorate the inside a little to match the outside of the card. You can take a strip of any designer paper you used on the card and adhere it to the bottom of the inside of the card or along the side or do a little stamping.
I know it’s hard to believe I didn’t add any jewels or gems on this card! I was just keeping it simple, but you could certainly add some sparkle!
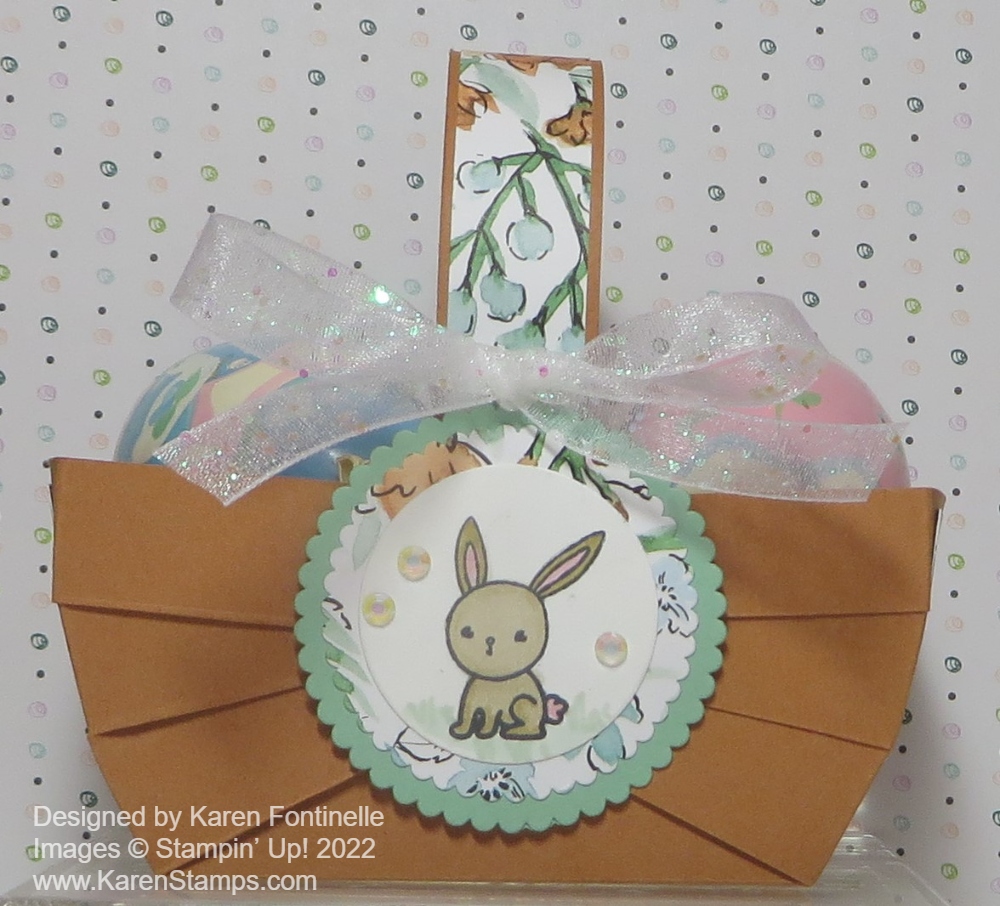
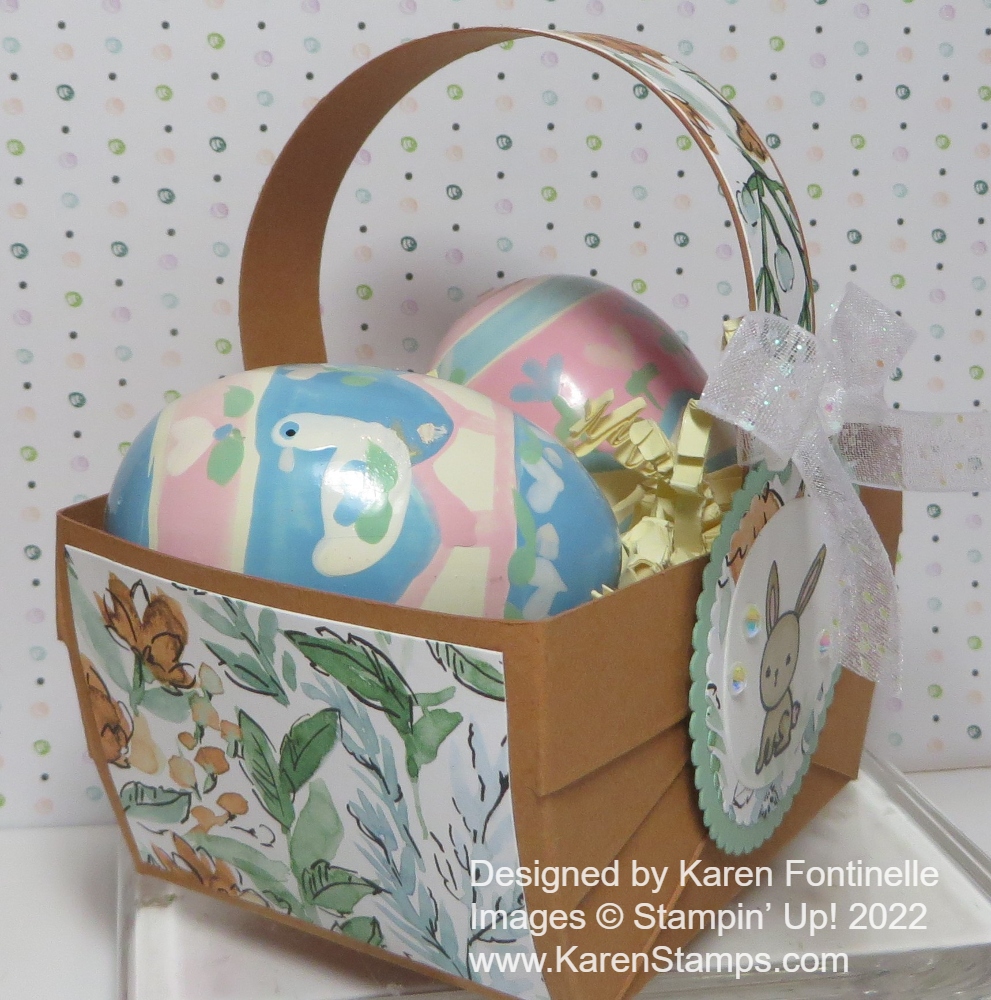
I’ve made a few paper Easter baskets in the past, but I hadn’t tried this fun-looking design. I called this the Woven-Look Easter Basket in Cinnamon Cider to differentiate the kind of basic ones like I made recently in this post. I don’t know what design it would really be called! It is made by cutting strips on parts of the paper and then adhering them one by one, side by side to the front and back of the basket. Somehow it turns out like this! Who thinks of all these ideas?!
I have a lot of photos to hopefully show you how to make one of these baskets!
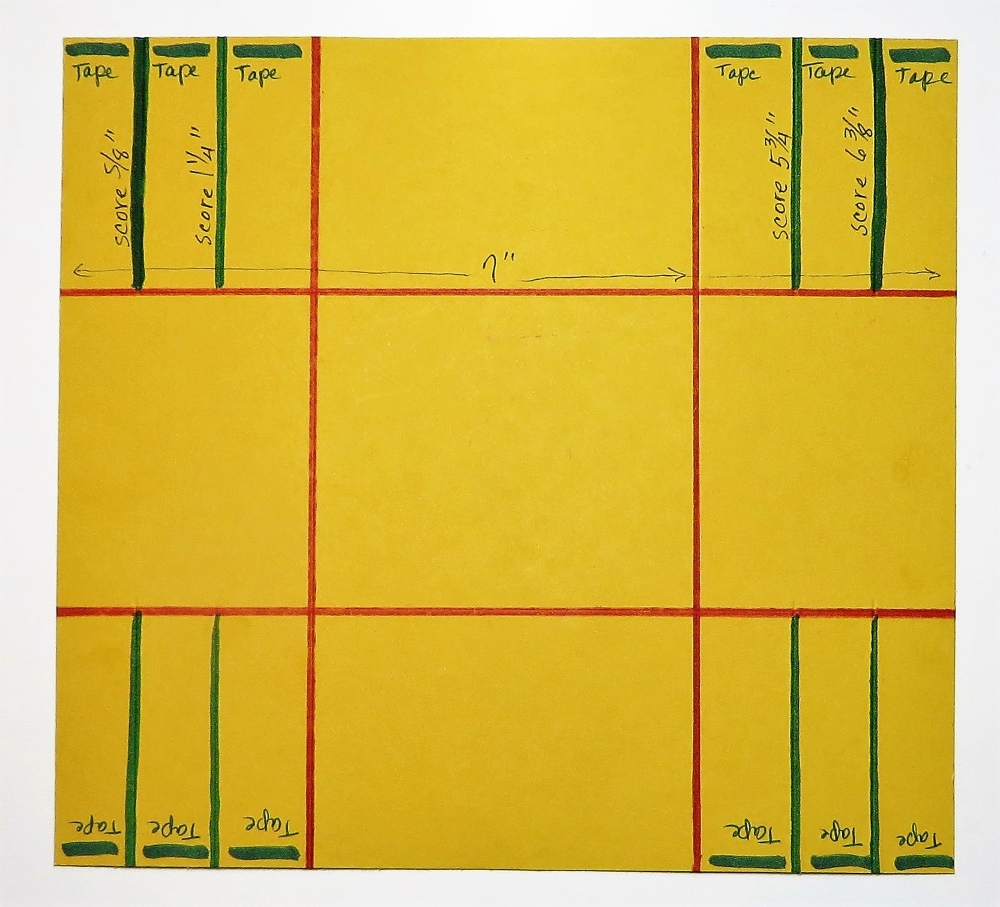
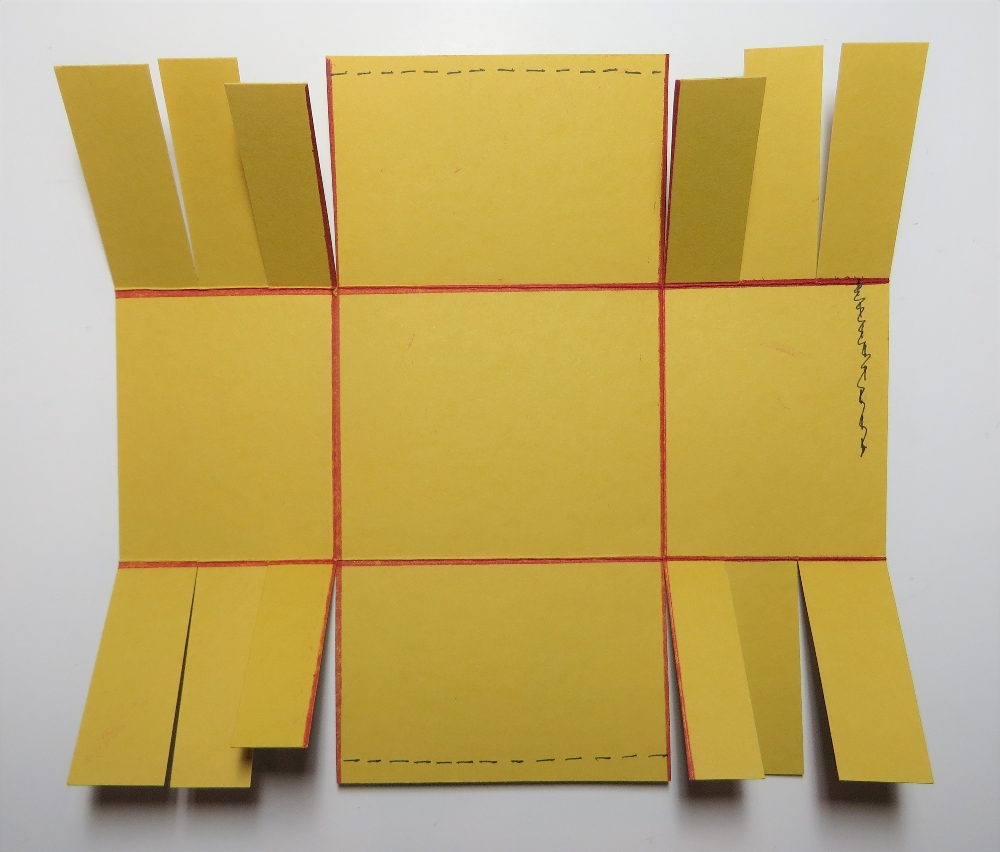
Start with a piece of cardstock cut at 7″ x 6 1/2″. You will also need a basket handle later cut at 3/4″ x 6″ or whatever size you like. If you want to cover it with designer paper, cut it just slightly narrower and just as long. You can also add designer paper to the sides of the basket if you like, or even each strip that we will make. Or just keep it plain and simple!
With the 7″ side at the top of the Simply Scored Scoring Tool or the Paper Trimmer, score each of the four sides at 2″. (See the red lines.) Then with the 7″ side at the top, on the two outer squares, score from the top only down to the horizontal score line. (Green lines.) Score at 5/8″, 1 1/4″, 5 3/4″, and 6 3/8″. Then turn the paper with the other 7″ side at the top and do the same thing.
In preparation for assembly, add pieces of Tear & Tape to each end of those scored strips as you see in the diagram. You could use Multipurpose Liquid Glue but you would have to hold each strip in place for a moment, so Tear & Tape is really easier. You “could” apply the tape across all three strips at once because you are going to cut them apart next anyway.
Next, use scissors to cut on the scored (green) lines just up to the horizontal score line. Also, cut the red line, just up to the red score line, so that you have three “fringe-like” pieces on each side (all four corners).
In that middle section, top and bottom, you see a dotted line. That is where you will fold over just about 1/4″ to the inside of the basket. Score it first if you like. Adhere well. Tear & Tape works best if you make it as wide as the tape. The Liquid Glue you have to hold a few moments. (That squiggle over on the right is a boo-boo! Ignore it!)
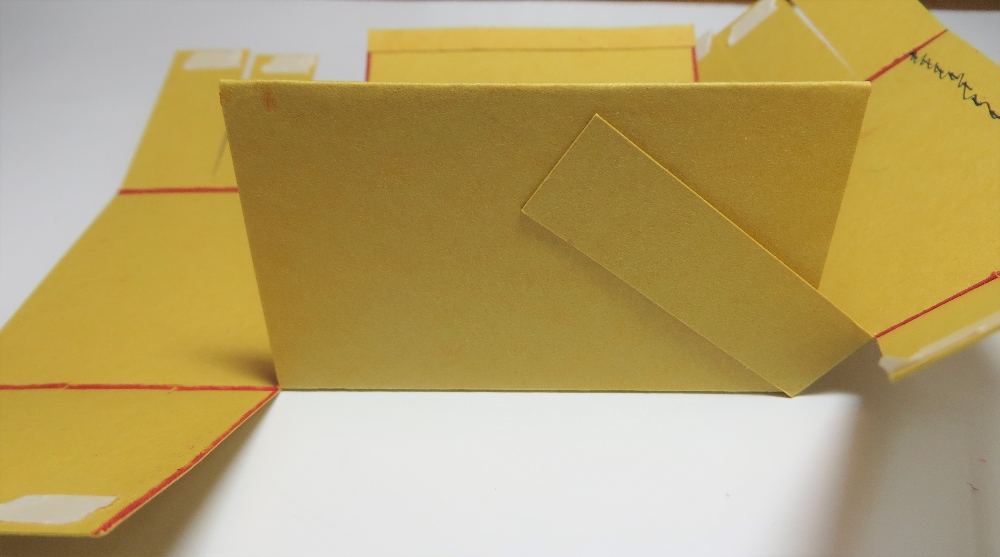
Now you will assemble the basket by removing the Tear & Tape one strip at a time. Pull the inside strip over toward the center of that center section, adhering it about 1/4″ below the top edge. Next do the strip on the left side, also 1/4″ below the top edge.
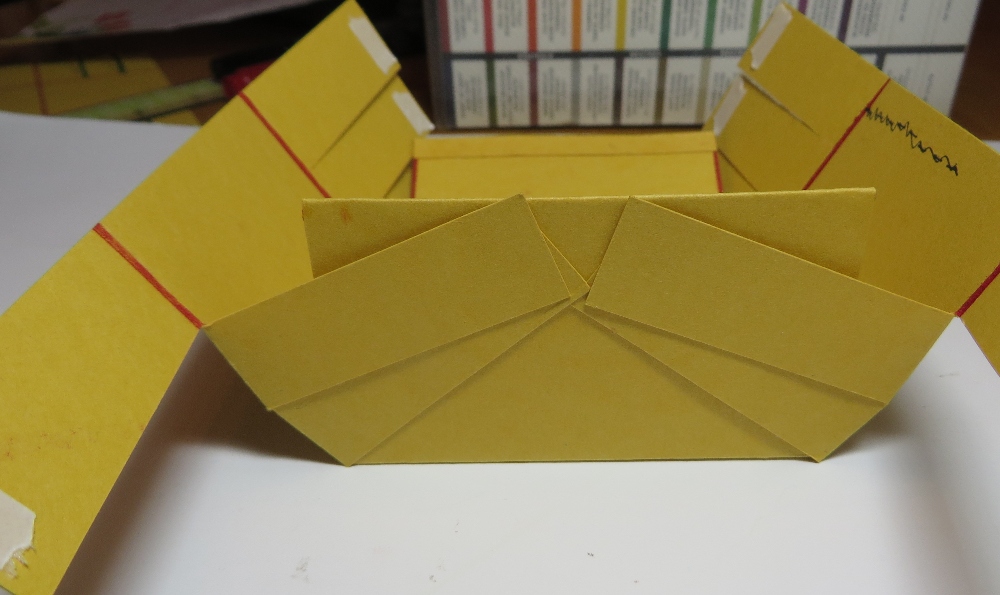
Next, go to the next (middle) strip on the right, remove the tape and pull it over adhering it right about at the top edge of that middle section. Do the same with the one on the left.
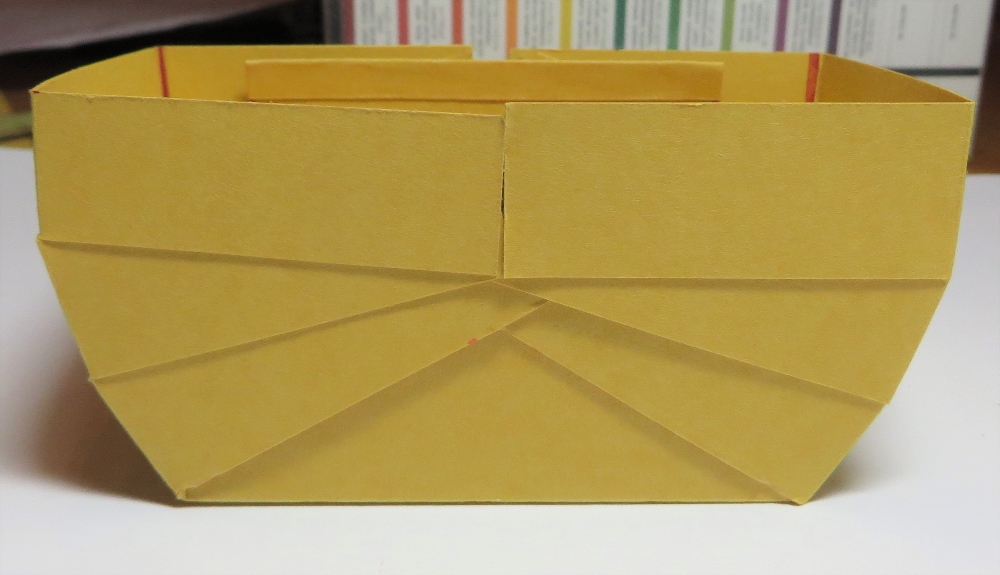
Now you are on the last strip. Pull that over so that it is fairly level and straight with the top of that middle section. Now do the last one on the left, also making it straight with the top. That’s it! As you take a look at the basket, you will see that curve that developed! Don’t worry if everything isn’t lined up perfectly because you are likely to be covering this side (and maybe the back section, too) with a decoration. Do all the same steps on the other side of the basket.
Try to stick the end of the handle down in between the layers of the basket if you can or just adhere wherever you like. Add whatever decoration you want, whether a greeting or some layered circles, punches, rectangles, whatever. Tie on a ribbon if you like. Decorate both sides or just one. Add some small pieces of designer paper on the basket sides if you want. I stamped the little bunny in the Friends of the Forest Stamp Set and layered it on a piece of the Hand-Penned Designer Series Paper on top of Mint Macaron cardstock.
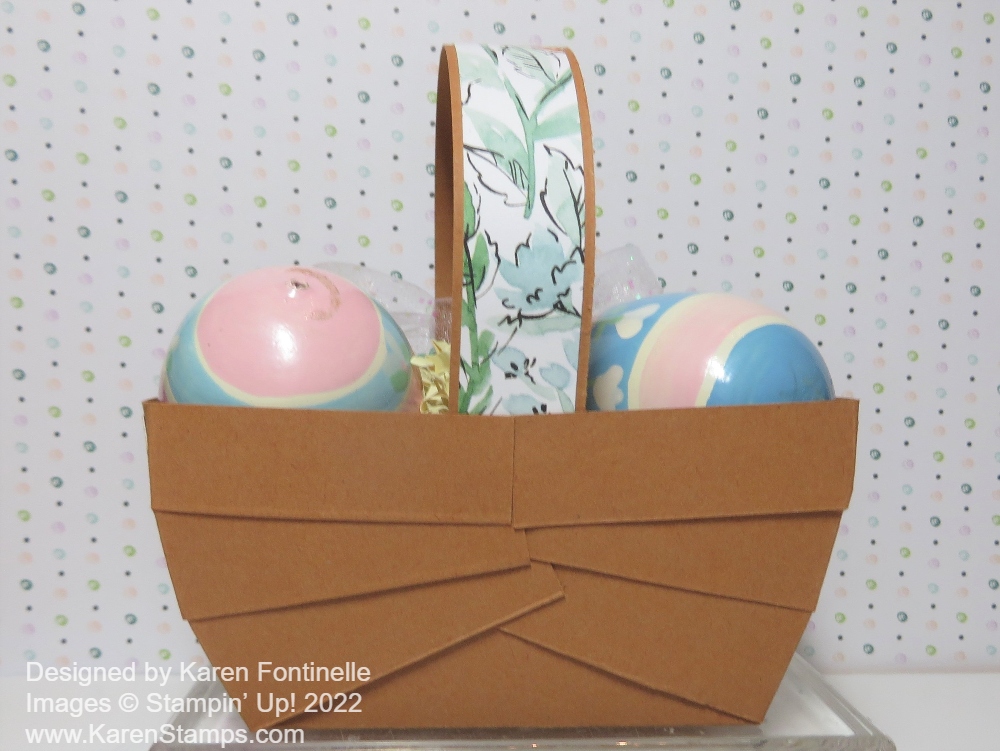
Here is the back side. I almost stamped a “Happy Easter” greeting for the back but I didn’t. I thought just decorating the front was fine!
If you want to decorate the sides of the basket with designer paper, just cut two pieces 2 1/4″ x 1 3/4″. Make sure you have any design going in the correct direction if there is a pattern. This Hand-Penned Designer Series Paper is on the Last-Chance List of retiring products so if you need more, be sure to get it while it is available! And the Cinnamon Cider cardstock is also retiring as it is one of the outgoing In Colors!
Make a few Easter baskets either for your own decoration around the house or as a decoration at each place setting at your Easter dinner table!
Bet you can’t make a card with this Hand-Penned Designer Series Paper, like this Hand-Penned Gatefold Birthday Card, without feeling happy afterward! It’s not about making the card, it’s that designer paper that just is so pleasing to me!
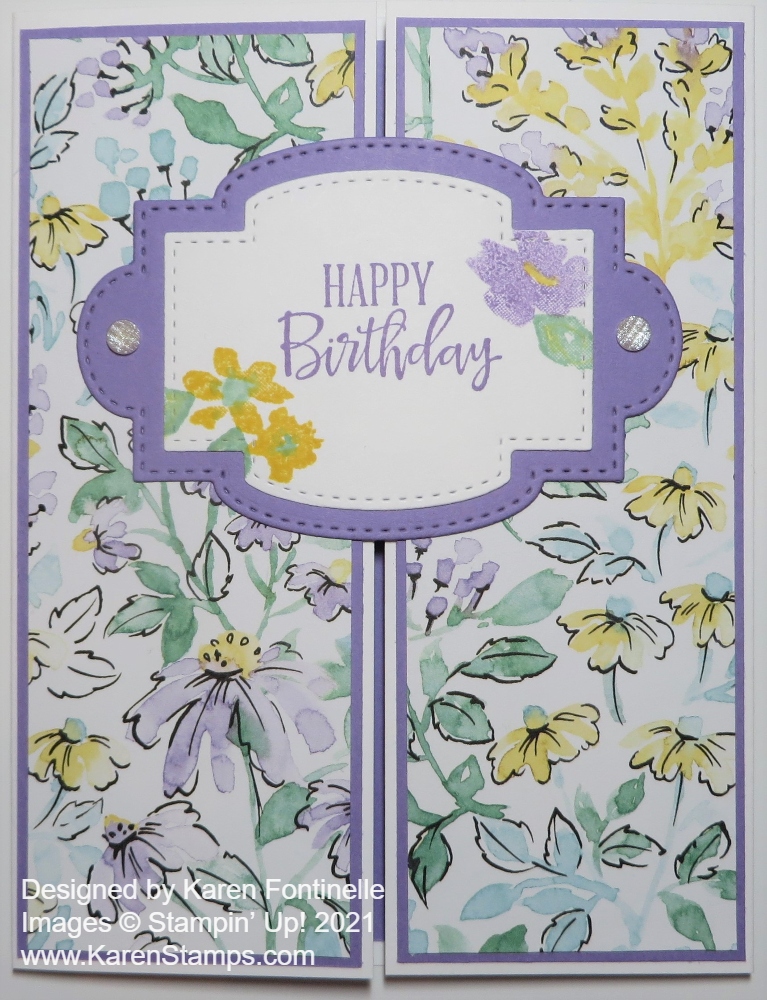
Just to make things a little more interesting, I made this into a gatefold card. Instead of folding the card the normal way, you fold in both sides. The center greeting is just glued on the left side so that it can be opened!
The card base is Basic White. Cut the cardstock in half like usual – 5 1/2″ x 8 1/2″. But don’t score and fold in the middle! Score each end at 2 1/8″. The math is that you want the center of the card to be 5 1/2″ x 4 1/4″. So you divide 4 1/4″ in half, so each side “gate” will fold in to cover the center of the card. That gives you 2 1/8″ on each end. Mine somehow didn’t quite meet in the middle. Maybe I should have folded the sides in from the opposite side. You can try both ways!
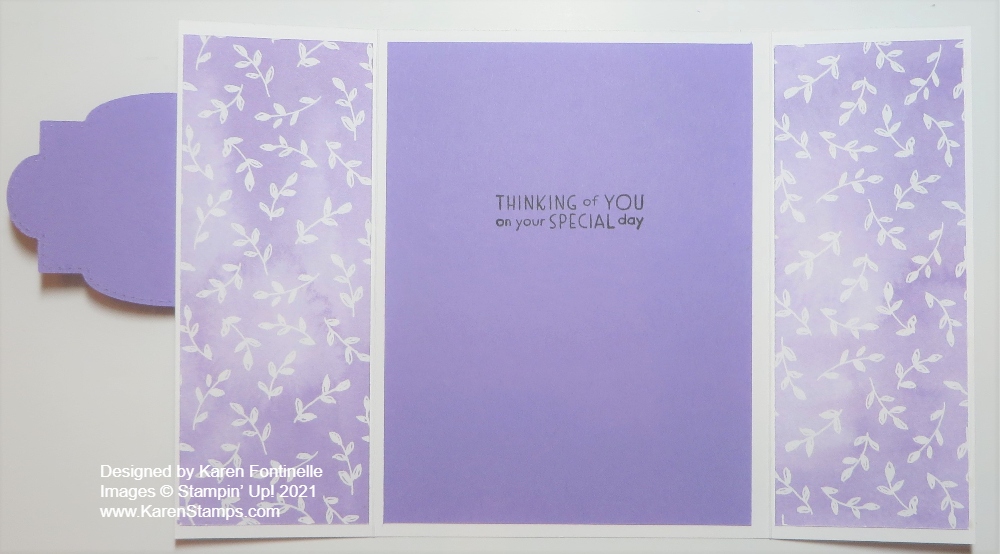
For this card, I cut a Highland Heather piece of cardstock to go on the inside of the card. I made it the usual layer size, 5 1/4″ x 4″. I stamped a greeting on the inside before I adhered it to the center of the card. This greeting is from the Inspired Thoughts Stamp Set.
On the front of the card, I cut a layer of Highland Heather to go behind the Hand-Penned Designer Series Paper. Since the gate-fold panel is already pretty narrow, you have to cut the other layers pretty narrow. The Highland Heather layer is 5 3/8″ x 2″ on each gatefold panel. The designer paper is 5 1/4″ x 1 7/8″.
Now as I was putting glue on the back of this pretty floral designer paper, I also liked the Highland Heather color print on the other side. So I added that side of the designer paper to the inside panels of the card!
For the greeting on the front of the card, you could use a variety of shapes – circles, rectangles, squares, ovals. Use whatever you like or fits the greeting. I used these two die cuts from the Stitched So Sweetly Dies. The Happy Birthday greeting is from the Peaceful Moments Stamp Set. I stamped that in Highland Heather Ink and also stamped a few flowers and leaves in the Hand-Penned Petals Stamp Set. Layer the Basic White stamped piece on top of the Highland Heather piece. Be sure to only apply adhesive to the left side of the greeting from the middle over to the left side. Check the inside to make sure no glue is showing on the inside or it will stick to the other side of the card. I added two Elegant Faceted Gems to each side of the Highland Heather die cut.
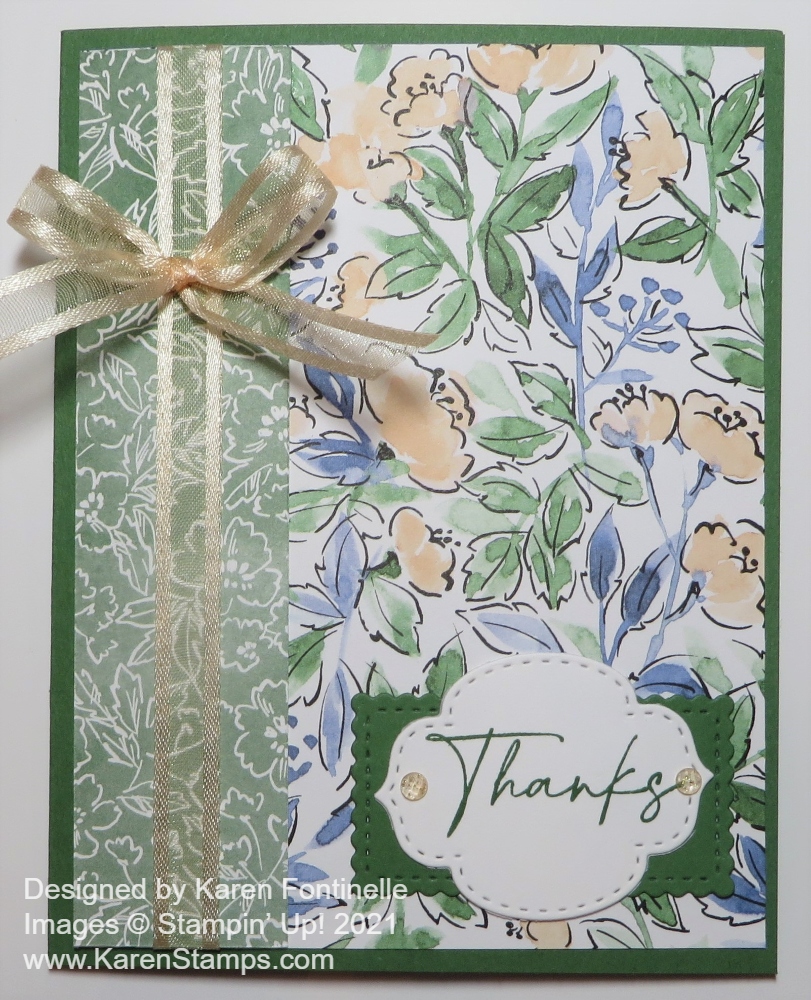
I think there is something about this paper I used on this Hand-Penned Floral Thanks Card that is just enchanting! You can’t really grasp how pretty it is until you see it in person! I know we say that all the time, but I think the catalog doesn’t do it justice. I hope you won’t pass it up! And if you order it today, August 2nd, you can get it at a 15% discount on this the LAST DAY of the Stampin’ Up! Designer Series Paper Sale! Look for the Hand-Penned Designer Series Paper.
To make this card, I used Garden Green for the card base. The sheet of paper I chose is the one on the right side of the card with the Pale Papaya flowers and blue and green leaves. The other side of that paper is the green print you see on the left side of the card! I thought both were pretty and obviously would go perfectly together for a two-paper card! That strip is cut at 1 1/4″ wide but you could make it a little wider or a little narrower if you wanted. I adhered the strip to the side with all the colors and then adhered the ribbon before adhering the whole piece to the card base. I tied the bow separately and attached it with Mini Glue Dots. This beautiful ribbon is one of the new In Color Ribbons, the Pale Papaya 3/8″ Woven Ribbon. All these In Colors ribbons are sheer and beautiful! I love all five of them!
The greeting is in the Hand-Penned Petals Stamp Set. I stamped it on Basic White in Garden Green ink. I found the Garden Green die cut rectangle in the bag with the cardstock so I just found another shape die that I could layer over it. This one in the Stitched So Sweetly Dies worked fine because the die for the Garden Green die-cut is also in that set!
That’s it! Very easy card! Be sure to look at all the papers available on the Designer Paper Sale today and save 15%!
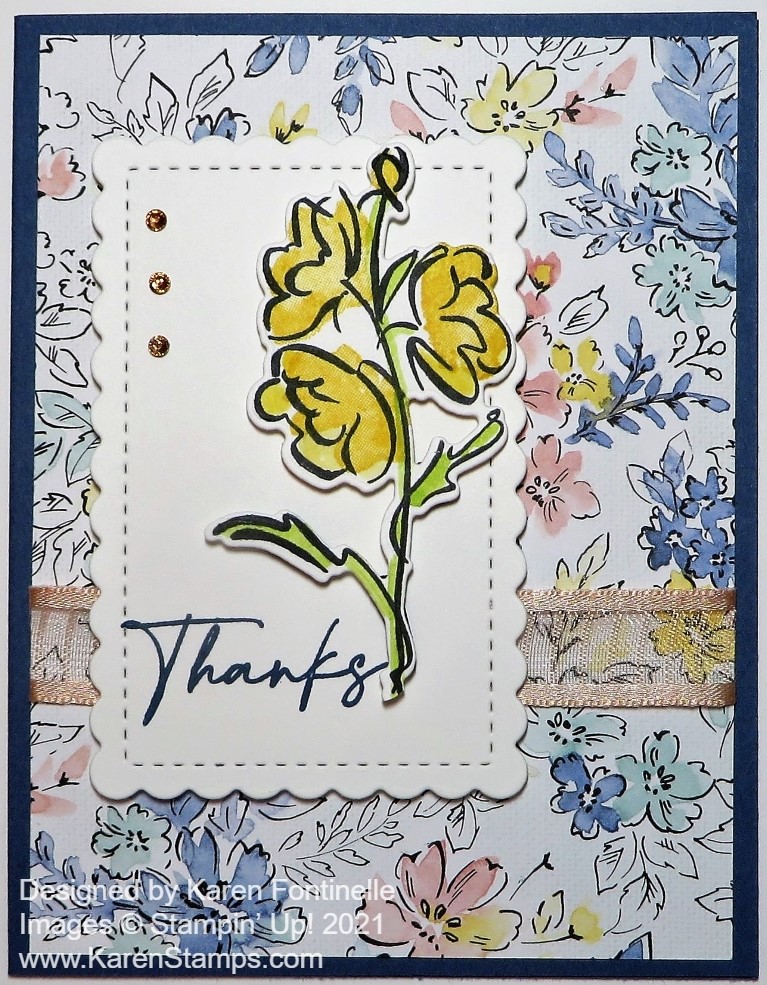
A quick glance in my package of the Hand-Penned Designer Paper led to this Hand-Penned Floral Thank You Card because I loved this floral design and colors. Sometimes you just have to go with what “strikes” you when you are looking at your paper or stamp sets when you get ready to make a card or any project. I was actually hoping the backside of this floral design had some pink generic print because I was planning to use it with the print. However, the other side was a yellow color and I wasn’t in a yellow mood. As you can see, though, I ended up using a yellow flower as the focal point of the card! You never know what you will end up with when you are creating!
You might not be able to tell, but the card base is Misty Moonlight, although it looks darker in this photo. It’s a pretty dark blue but not totally dark. It really went well with this paper, although I thought about pink, too. I used a full layer of the pretty paper in the Hand-Penned Designer Series Paper. I adhered a piece of the Petal Pink 5/8″ Organdy Striped Ribbon around the designer paper. I love this ribbon and I’m so happy it carried over to the new Annual Catalog.
I decided to add this flower from the Color & Contour Stamp Set and then die-cut it with the Scalloped Contours Die. You can save 10% by buying this stamp set and dies in the Color & Contour Bundle. This Bundle, particularly the dies, is one of my favorite and most-used products in the new catalog! Be sure that you check it out! I also die-cut one of the smaller scalloped rectangles to use with my flower.
The flower comes with a stamp that fills in the petals almost like two-step stamping. However, it doesn’t line up exactly so it gives a different look. I actually filled in a little of the white space on the flower petals with the Daffodil Delight Ink and my Water Painter. Or you can color in the whole thing on your own without stamping. I added some Granny Apple Green Ink to the leaves and just drew in a little green along the stem, too.
The greeting is in the Hand-Penned Petals Stamp Set, and I stamped it in Misty Moonlight Ink. Then I adhered the die-cut flower with Stampin’ Dimensionals®. In some cases I had to cut very small pieces of Dimensionals to fit on the narrow spaces of the flower if I wanted support on that area. The whole rectangle is also popped up with Dimensionals. For some bling, I added three Champagne Rhinestone Basic Jewels. I would have liked a bow with that pretty ribbon, but with the busy floral background, I thought it might be too much.
This is a card you could make for a birthday, anniversary, sympathy, thinking of you – lots of occasions. Change up the colors to give a different look to a similar card. Here is another card I made with another pattern of the paper and a larger stamped floral image for the focal point of the card. The Hand-Penned Suite is a beautiful one, I discovered a little later than most people! I also think the Color & Contour Bundle goes well with this Suite as you read above in making this Hand-Penned Floral Thank You Card.