Tag Archives: Beauty of Friendship Stamp Set

Beauty of Friendship Fall Trees Card

Beauty of Friendship Fall Trees

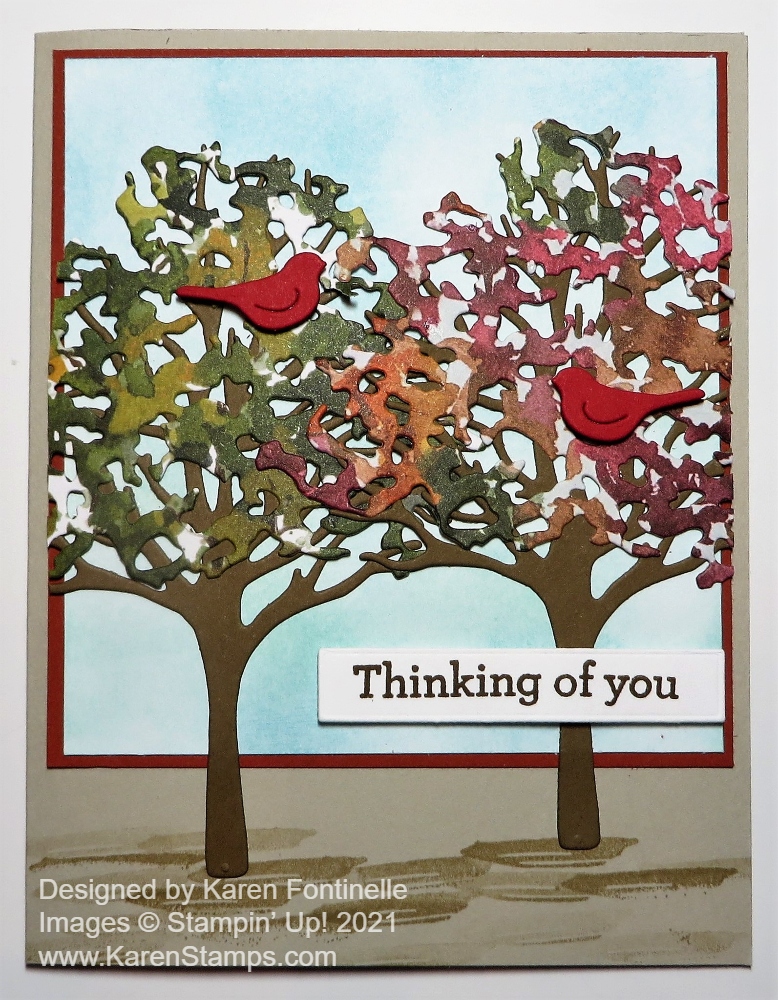
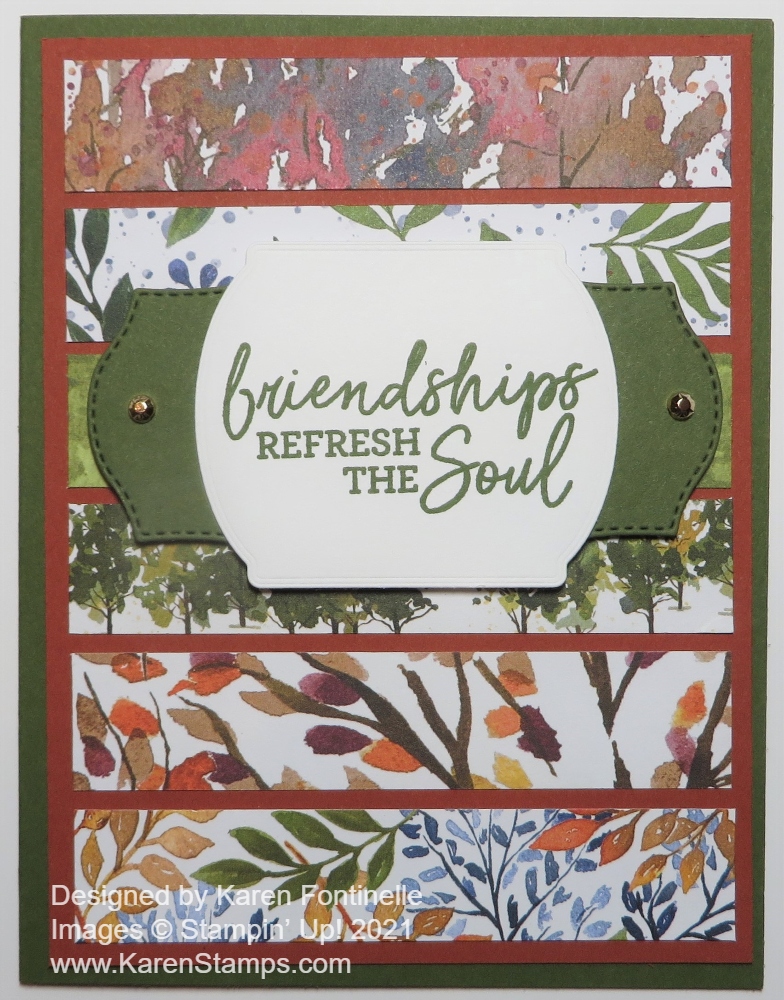
Last night we were out for a walk and the sky inspired me to make this Beauty of Friendship Fall Trees Card. We can’t really see the pretty sunsets very well because we aren’t up high enough and our neighborhood now has lots of big trees in the way. But last night as we were walking back to the house the silhouettes of the trees against the bits of the orange-ish sky we could see in between the trees was really pretty.

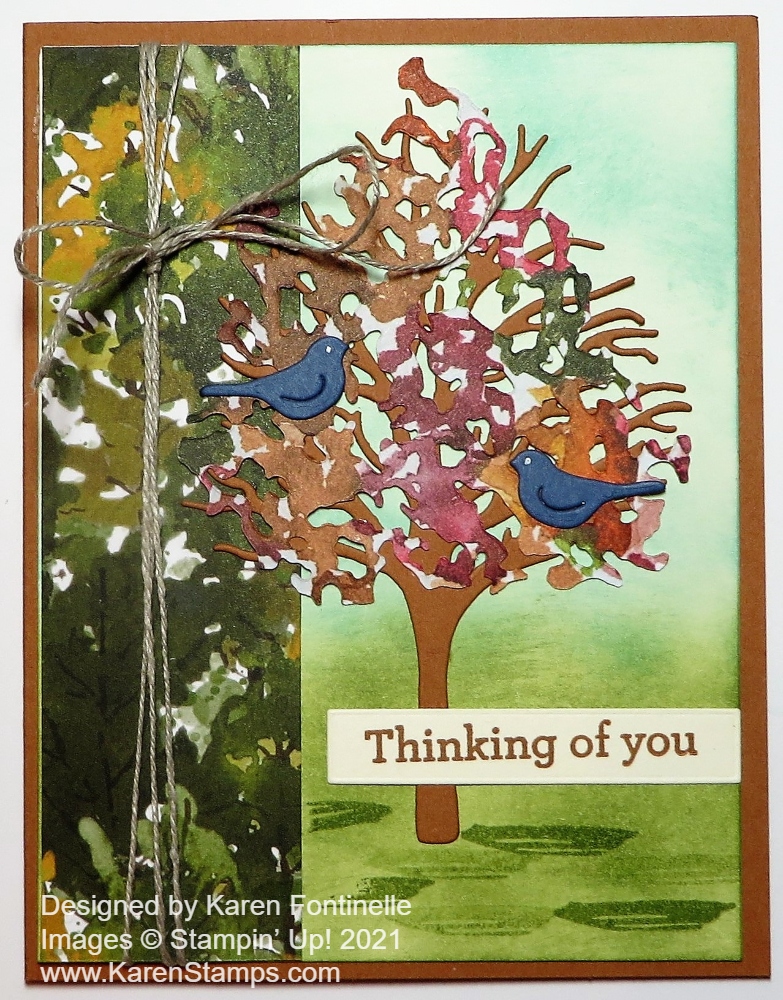
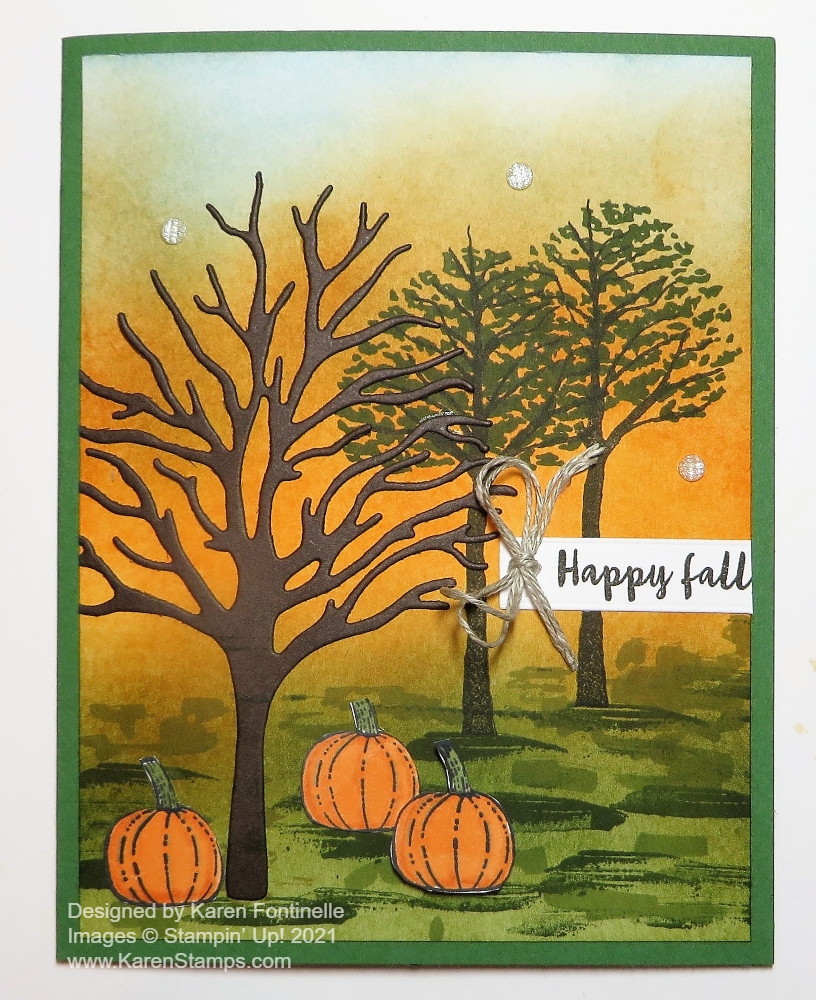
I knew that kind of a “sunset” card would likely turn into a Halloween card, but actually I think being a fall card is just perfect! The greeting is in the Banner Year Stamp Set. The full saying is, “Happy Fall, y’all!” but because of space I just cut off the last word and lined it up with the edge of the front layer of the card. I think it also covered up an ink smudge! And I added a bow with Linen Thread.

The card base is Garden Green. The card layer is Basic White. I used my Blending Brushes to add ink to the Basic White. I would say just pull out a bunch of ink pads you think you might want to use! I started with the sky with a light Balmy Blue but added a bit of Smoky Slate gray. Next I added some yellow below the sky. I used some Crushed Curry as well as Mango Melody. For the grass I used Pear Pizzazz, but then stamped with the little “mound” stamp in the Beauty of Friendship Stamp Set. It could be used for grass or dirt or just a little something when you need some texture or something extra. Some I stamped directly, using Mossy Meadow Ink and some I stamped off. I got a little carried away with the stamping and didn’t notice my block had ink on it and I was getting some smudges everywhere!! But there’s always a way to doctor things up a little bit with more stamping or more color or covering up or something! I decided the orangish sky needed to be a deeper color because when we were out walking it was getting darker outside quickly so I added some Pumpkin Pie ink. There are no right colors and layers, etc. just play and experiment. Just keep going and you’ll get to where you want to be.

I was almost afraid to stamp on my beautiful sunset background and indeed, I did mess up the first tree I stamped! Luckily, I was able to stamp the second tree to covered up some of the branches that didn’t come out! I stamped some green leaves from the stamp set over those two small trees. I used Early Espresso Ink.

However, the large tree is die cut with the Beautiful Trees Dies out of Early Espresso Cardstock. I thought about using Basic Black but used the brown color. I didn’t try to add any leaves to this tree because I wanted the sky to show through (even though leaves are not falling here yet in Houston!).

Of course this fallish looking card just screamed for some pumpkins here in October! I stamped just the smallest pumpkin from Pretty Pumpkins with Memento Ink, cut them out, and colored with Stampin’ Blends. I glued two down directly on the card and one is popped up on Stampin’ Dimensionls®.

To cover up a smudge or two and just because who doesn’t love adding some gems to a card, I added three of the smallest Elegant Faceted Gems in pearlescent white. The other colors in the package are Clear and Petal Pink. I thought about just using one of the largest ones to look a little like the moon coming up, but you know, you can’t resist adding gems once you start so it had to be three!

Here’s a tip: Before cutting out something intricate like the die-cut tree, add Adhesive Sheets to the back of the cardstock so you already have adhesive on the back and don’t have to add tiny dots of Multipurpose Liquid Glue to the back! It never occurs to me until right before I go to adhere it!

You can use a card like this all this month and through November for fall, Halloween, and Thanksgiving! I hope you will get out your Blending Brushes or Stamping Sponge piece and make your own sunset, like on this Beauty of Friendship Fall Trees Card.

Beauty of the Earth Thinking of You Card For Fall

Beauty of the Earth Thinking of You Card For Fall

Somehow I didn’t get around to acknowledging the first day of fall last week, so now I have made a card for the glorious fall season! We were even lucky enough here in Houston to experience some fall weather with cooler temperatures, but not colored leaves yet like this Beauty of the Earth Thinking of You Card For Fall. I actually had a physical reaction the other day when I walked out the back door and my body was stunned to not feel like I had just opened the oven door! It was cool outside!! We won’t get colored leaves here until probably December, but I’m amazed to see photos on the internet of places way north that do have colored leaves already!

This card uses the Beauty of the Earth Designer Series Paper to make a fall card. This paper is really quite interesting, different than what Stampin’ Up! usually has. You can use the paper as is in many ways, or you can even die-cut it to look like the leaves on the trees that you stamp or diecut. You can be very creative with this paper. This Suite also has the Beautiful Trees Dies which I think you really need to get the most use out of this set.

The card base is Cinnamon Cider, one of the In Colors. The layer on the card is Very Vanilla but since I actually covered it with ink it could have been Basic White! My idea was to have a strip of the Beauty of the Earth Designer Paper along the side and a fall tree on the Vanilla overlapping the designer paper. I thought the background needed to be colored in so I used Granny Apple Green ink (I think!) for the grass and Pool Party for the sky. The Beauty of Friendship Stamp Set had a little stamp in it that I used for some splotches of grass or shadows or whatever at the bottom of the card to give it a little texture and look more like a grassy area. I stamped that with Pear Pizzazz I think that I had out.

I adhered a strip of the more greenish designer paper sheet to the inked Very Vanilla piece and wrapped a piece of Linen Thread around the strip. Then I adhered the diecut tree in Cinnamon Cider covered with a diecut piece of the designer paper in the reds and golds. Again, it would have been handy to remember to use Adhesive Sheets before cutting out the tree especially but since the tree was getting mostly covered up anyway, I didn’t have to be super careful with the Multipurpose Liquid Glue because it was going to get covered with the designer paper. The leafy piece was easier to glue down because there were some larger areas to apply the glue.

The greeting is in the Beauty of Friendship Stamp Set. It is stamped in Cinnamon Cider Ink and die cut with the rectangle dies in the Beautiful Trees Dies. And because we have seen some blue jays around here (not to mention hawks!) I added two bluebirds in the tree. I love that little die that cuts out two birds at once! I added just a tiny dot of white for each bird’s eye with a white gel pen that we used to sell. Here’s another card I made in July that is very similar.

With the dies and the designer paper, this is a pretty easy card to make and it looks much more complicated. I don’t think it is going to stay cool here but at least we had a much needed cool break for a few days and will look forward to the next one! In the meantime, I’ll pretend it’s really fall here by making cards like this Beauty of the Earth Thinking of You Card For Fall.

SHOP STAMPIN’ UP! ONLINE HERE!

Don’t forget! Sale-A-Bration ends Thursday, September 30!! Don’t miss it!

Beauty of the Earth Fall Card For a Friend

Beauty of the Earth Fall Card for a Friend

Continuing with a fall card to mitigate the summer heat (!), this Beauty of the Earth Fall Card for a Friend is easy because of the designer paper. The other day when I was making another fall card, I saw this paper in the package and wanted to use it next.

This designer paper, Beauty of the Earth Designer Series Paper, is very interesting and different. You can do so much with it. This particular sheet of paper is like a reflection, with the images strongest at the top and bottom and more white space in between. So I just cut the sheet in half at 6″ x 12″, then at 4″ wide, and then trimmed it down to 5 1/4″ long to fit on my card. You can trim off a little of the white area or a little off the bottom leafy area, depending on the look you want for your card. I trimmed off some of the white at the top. You can see on my card how the coloring fades at the top and is darker at the very bottom. Very interesting to use.

The card base is Merry Merlot. I could have chosen from a lot of colors, but I rarely use Merry Merlot so thought this was a good chance! I just adhered the designer paper to the card base and added the greeting. So easy!

Now I did make a little fancier greeting, but I could have just stamped on a rectangle and been done. The greeting is in the Beauty of Friendship Stamp Set. I stamped on Basic White with Merry Merlot ink and die cut it and a piece of Merry Merlot with dies in the Tasteful Labels Dies and layered them. Just for something different, I took two pieces of the 3/8″ Fine Art Ribbon and frayed them at the ends to put underneath the greeting. And then I couldn’t resist adding some Genial Gems to the greeting.

Here is the card I made the other day with some other paper patterns in this Beauty of the Earth DSP. It didn’t work to cool me off, but I liked it anyway, especially the red birds, just as we were seeing cardinals in our backyard!

Remember that this paper is on sale through Monday, August 2 along with eight other select papers at 15% off in the Stampin’ Up! Designer Series Paper Sale! I hope you will be inspired to make something like my Beauty of the Earth Fall Card For a Friend.

Beauty of the Earth Fall Trees

Beauty of the Earth Fall Trees

It is SO hot here in Houston today, I thought if I made a card with the look of fall, like this Beauty of the Earth Fall Trees card, it would cool me off! No such luck, but I still like the card! This is actually pretty much a copy of a card sample in the Stampin’ Up! Annual Catalog on page 10, showing off the Beauty of the Earth Suite of products.

Another reason for using this beautiful paper on this card was to remind you that the Stampin’ Up! Designer Series Paper Sale is going on just for this week, until August 2. If you want to stock up on papers you love or get some you don’t have yet, be sure to take advantage of the nine select papers discounted 15%. Don’t miss the Christmas paper, the Tidings of Christmas 6″ x 6″ Designer Series Paper if you would like a good Christmas paper pretty quick!

I chose Sahara Sand for the card base just because I don’t use it very much! It’s a great neutral color to use. I just have to think of it more often! The catalog sample probably uses Crumb Cake Cardstock. It’s a little darker. I cut a piece of Basic White at 4 1/4″ x 4″ for the background, although after I decided to use a piece of Cajun Craze underneath as a narrow border, I cut the Cajun Craze at 4 1/4″ x 4″ and cut the White down 1/8″ on two sides.

For the sky background on the Basic White, I used my Blending Brush with Pool Party Ink and also Balmy Blue Ink. I wanted the sky to look a little varied in color and I’m happy with the way it turned out. I didn’t want it too dark. Be sure to blend a little on scrap paper or your Grid Paper just before you apply it to the cardstock.

The two trees are diecut out of Soft Suede Cardstock with the Beautiful Trees Dies. The “leaves” on the trees are cut from two different sheets of the Beauty of the Earth Designer Series Paper. I wanted to use one that was colored leaves and one that was mostly green as if the leaves hadn’t all turned color yet. The die was great for cutting these out!

Since these trees are actually pretty large, I could see on the catalog sample that they would each hang off the side of the card. It’s a little tricky because you want to adhere the tree trunks to the sky background piece but it will also hang off that onto the bottom Sahara Sand card base. So I just saw where I wanted the tree trunk placed on the sky piece and so it would be properly placed on the Sahara Sand and glued it down only to the sky piece (which wasn’t adhered to the card base yet). Then I cut off the overhanging branches on the side. Then I added the leafy piece. Decide which tree you want overlapping the other one so you get them placed properly! This was another time I should have used the Adhesive Sheets so I didn’t have to use teeny tiny drops of Multipurpose Glue carefully on the trees! However, the leafy part has larger areas for applying glue!

I also added a stamped image of dirt or a shadow along the bottom of the card. It’s best to stamp this under each tree before you glue them down, as long as you know where you want the stamping to go. I stamped more than the catalog sample because I liked the look. I used Crumb Cake Ink.

The greeting is in the Beauty of Friendship Stamp Set and was die cut with a die in the Beautiful Trees Dies. It is popped up with Mini Stampin’ Dimensionals. You can purchase the Beauty of Friendship Bundle at a 10% discount if you want the stamp set and dies together!

And to finish off the card, I die cut the two red birds. One die cuts both birds at one time which is great! I think they are the perfect finishing touch for this card! We have some cardinals flying in our backyard. I think they have a nest in the tree in the yard behind us. One was caught in the netting around our tomato plants in the backyard, which is supposed to keep birds and squirrels away from our homegrown tomatoes! My husband lifted up the net and he eventually found his way out!

Remember to check out the Stampin’ Up! Designer Series Paper sale! You may want this paper when fall arrives so you may as well save some money while you can! The sale ends on August 2.

SHOP STAMPIN’ UP! ONLINE!

Beauty of the Earth Friendship Card

Beauty of the Earth Friendship Card

Another beautiful paper on the Stampin’ Up! Designer Series Paper Sale is the Beauty of the Earth Paper as you see in this Beauty of the Earth Friendship Card. You have nine select papers to choose from in this sale, all 15% off! One of the packages is the In Good Taste DSP which has 24 sheets in it! There are two each of twelve designs, all great designs for texture and background for cardmaking and scrapbooking. The rest of the papers are the usual size, 12 sheets, two each of six designs.

For this card, I copied the design I saw on Instagram from an Artisan Design Team member where she used horizontal strips of designer paper for the card front. I used a different paper and greeting, but used the same strip method. This is a great way to use up scraps of designer paper or you can even use regular cardstock too. You can stamp the cardstock first and cut it into strips. Lots of possibilities

I used the Beauty of the Earth Designer Paper, on sale now, for my strips. To match, I used Mossy Meadow Cardstock for the card base and then a layer of Cajun Craze. I tried out several different colors but I liked these the best at the time. I didn’t have measurements for the card so I just played around until I got something that worked. If you want wider strips, just use five strips or even four. Here is a card I made using three vertical panels of designer paper.

My designer paper strips on this card are 3/4″ x 3 3/4″. If you only had the card base, then you might make the length of the strip 4″ wide. I just eyeballed the placement of the strips, no measuring! You could also place them touching each other, not with a space in between. Do what you like!

The greeting is in the Beauty of Friendship Stamp Set. I think it’s a great sentiment and certainly true! I stamped it in Mossy Meadow Ink and die cut with a die in the Tasteful Labels Dies. Then I played around with various dies in the same set and colors of cardstock, finally settling on Mossy Meadow diecut with one of the long dies to go behind the greeting to help it stand out. And a couple of Gilded Gems on each end for a little pizzazz!

Try your hand at this paper technique! It’s fun and easy! Just eyeball everything and make minor adjustments if needed. Have fun!

Beauty of Friendship Trees Thinking of You Card

Beauty of Friendship Trees Thinking of You Card

This is a sneak peek of one of the new stamp sets coming in the next Stampin’ Up! Annual Catalog in May. I made it a simple card because I was really just experimenting with the stamps. I think this set has tremendous potential as we get ideas for stamping the different style trees with different colors of ink for many seasons, occasions, and different looks.

This is the new Beauty of Friendship Stamp Set that will come in a Suite called the Beauty of the Earth. It includes the stamp set of trees and greetings, a set of dies, beautiful watercolor-look designer paper with which to create trees and enhance our cards and projects, and an embossing folder.

For my card, I used two of the new In Colors, Evening Evergreen for the layer and Pale Papaya for the card base. The trees were stamped on Basic White Cardstock using Early Espresso Ink on one tree trunk and Soft Suede on the other two. Then I just chose the leaf stamps for the tree tops, stamping in Granny Apple Green since it is spring. On one I overstamped with a different tree top stamp in Pear Pizzazz. I think you will find the look of these stamps very interesting and fun to experiment with to see what looks you can get. And when fall comes and you want colored leaves, oh my! You will be able to use various techniques for all those fall colors!

The three trees looked a little barren just stamped there so I added some grass for them to be growing in. I simply used one of the tree tops to stamp little blobs of green ink along the bottom edge of the card. Being as they are irregular in shape, I thought this technique worked fine to represent grass without looking like tree tops.

To fill in the background a little to look like sky, I used my new Blending Brush and Balmy Blue Ink to very lightly and softly add some blue color to the background. I love the feel of the Blending Brush. Our Stamping Sponges are retiring so grab some of those if you like (at a little discount!) and/or pick up some of the Blending Brushes (which are currently unavailable until they are back in stock as I write this). These are washable so you can use them over and over again with different colors. After you purchase the first three you can see if you are going to use them so much that you want more to be able to use them without waiting for them to dry between washings. If you begin with lighter colors you may be able to go on with darker colors without washing in between.

The greeting is in the stamp set and actually would fit in one of the dies included in the Suite. I didn’t have my new dies for this set out yet so I just used one of the Rectangle Stitched Dies to cut out the greeting.

Here is a photo of the new style of stamp case you will see. The cover of the stamp set, which is slipped inside the plastic cover over the stamp case now has, on the inside, the images of the stamps printed on it. So when you open the stamp case, you will find the photopolymer stamps still encased in two pieces of plastic as we are used to now, but you will also see all the stamp images over on the right side of the case. Therefore, you can take the stamps off the plastic pieces (as you see on the left of my photo) and place them right over the images printed on the right (as you see I have done with some of the stamps).

Stamp Case Inside

Those of us who have been around Stampin’ Up! for more than a few years recall the love we have had for the Lovely As a Tree Stamp Set. See THIS CARD for an example. When it retired, we thought nothing could replace it. This Beauty of Friendship Stamp Set just might come close, maybe a little more dramatic with its designer paper, but I am guessing this will become a popular stamp set and Suite in the new catalog.

This Suite and its components will be available May 4th in the new Stampin’ Up! Annual Catalog so you will be able to play with the trees and stamping as I did on this Beauty of Friendship Trees Thinking of You Card.