Tag Archives: Christmas Trees Dies

Rainbow Glimmer Christmas Trees Card

Rainbow Glimmer Christmas Trees Card

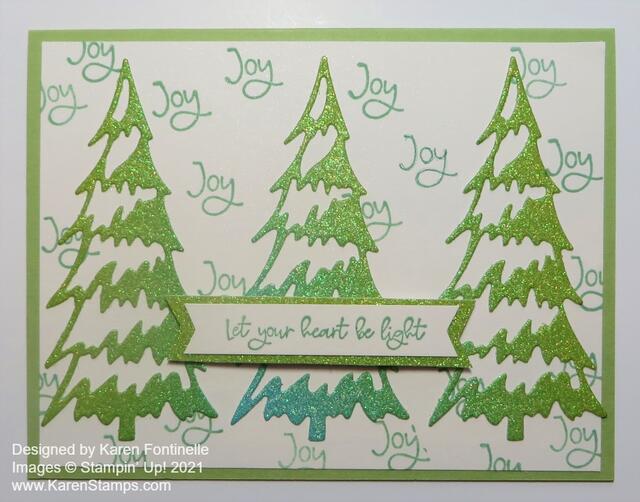
This Rainbow Glimmer Christmas Trees Card was sort of in my head, but then I started on two other projects first before deciding to give this idea a try! I thought it would be fun to use the Rainbow Glimmer Paper and try to get the ombre shades of the green color. The middle tree shows a different color at the base but the other two have slight variations in the green that doesn’t show up in the photo. I think it would be fun if this paper had narrower bands of colors so you could get more of an ombre effect on any projects. But, it is still really pretty and fun paper to use!

The card base is Mint Macaron with a layer of Shimmery White Cardstock. After cutting out and temporarily placing the trees on the card, I decided to try stamping the word “Joy” in the Whimsical Trees Stamp Set around in the background. There wasn’t a lot of empty space on which to do a little stamping so I’m not sure I like what I did. Maybe I do. What do you think??

The greeting is also in the Whimsical Trees Stamp Set and stamped with Mint Macaron. I layered it on a narrow piece of the Rainbow Glimmer Paper. I almost didn’t add a greeting since the card is a little busy already but I did! I really do like the Rainbow Glimmer Paper trees!

If you own the Christmas Trees Dies or will be purchasing them soon on the Last Chance Sale or the Whimsical Trees Bundle, note that there are two “pages” of dies in your package! I guess somehow I was only using what I saw when I pulled the dies out of the package and either forgot or never saw the rest of them! I wondered what happened to the trees that I used on this card that I had seen on other samples! So now I have lots more dies than I thought I had! Duh!

Remember the way these retirements work is that even if Bundles are carried over in the future to another catalog, they won’t still be Bundles. You might still be able to buy the stamp set and dies or whatever the individual components of the Bundle are, but you won’t get the 10% off discounted price. Be sure to check out the Last Chance Sale and the updated Clearance Rack to get the best chance of getting what you want lest anything sell out!

It was a rough morning because my website was not working so I couldn’t post my card until I went through two different Help Chats! Ugh! And even then they said it might work in a few minutes or it could take 24-48 hours globally! Thankfully it started working again after lunch!

Do some Christmas stamping this weekend! I hope to do that AND put up my tree! Wish me luck!

Embossed and Colored Whimsical Trees Christmas Card

Embossed and Colored Whimsical Trees Christmas Card

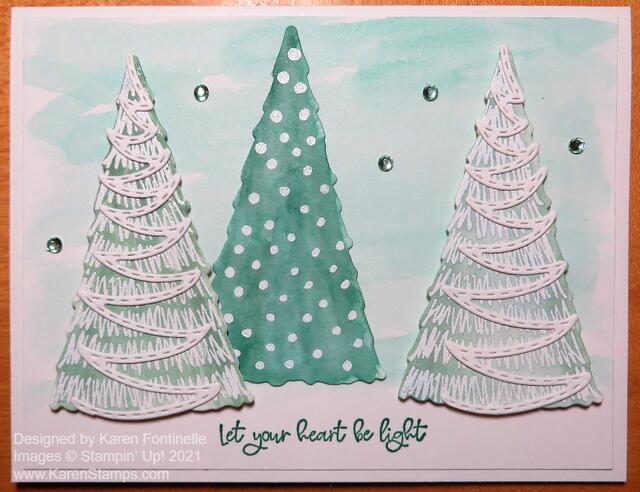
This card started out being an experiment of using white trees on a white layer on a white card, but it turned into this Embossed and Colored Whimsical Trees Christmas Card. That didn’t seem to be going like I imagined so I tried another technique of embossing and coloring the trees.

This white paper I used is my favorite, Shimmery White! If you look closely, in person, you can just barely see a little shimmer on the paper. It also works pretty well for a little watercoloring, as I used on this card. But the paper is so elegant, I think! I love using it.

To make this card, I started with a Shimmery White Cardstock card base with a layer of Shimmery White. On a separate piece of Shimmery White, I stamped two of the same trees and one different using Versamark Ink with the Whimsical Trees Stamp Set. Then I embossed with white embossing powder, which comes in the Basics Embossing Powders of three colors – white, black, and clear. You also need a Heat Tool to do embossing! Just hold the Heat Tool over the powder until you see it change! You will notice and it’s just magical! But it may take a minute until the Heat Tool gets hot enough after you turn it on.

After embossing the trees I die-cut them with the Christmas Trees Dies. I also die-cut the little ribbon decoration you can add to the tree. I cut out two of those for two of the trees. If you can think of it, this would be a good time to use the Adhesive Sheets so you don’t have to use glue.

After I decided the pure white trees on a white card weren’t going to work, I decided to use my Water Painter to add green color using an ink refill in the lid of the ink pad. Use it like a paintbrush except the water is already inside! Love these! I used Pear Pizzazz on two of the trees and Just Jade on the center tree. The embossing resists the ink so it still shows through. You can take a tissue and wipe any excess off the embossing if you need to. You could use any two or three green colors that you like. We have lots of choices!

When the trees were dry, I glued the ribbon piece onto two of the trees with tiny drops of glue.

For the background of the card, I used a watercolor background of Pool Party. I tried to apply it lightly with lots of water squeezed out of the Water Painter and a little bit of ink. I didn’t bring it all the way to the bottom so it would look like snow on the bottom of the card. Then I stamped a greeting with Just Jade ink at the bottom of the card with the Whimsical Trees Stamp Set.

After coloring the background and letting it dry, I adhered the trees, two popped up with Stampin’ Dimensionals and one flat on the card. I usually like to slip one partially underneath another one.

It was absolutely necessary (to me!) to add some bling but you could totally not do this. I added a few of the greenish rhinestones in the Holiday Rhinestones. You could add them to the trees instead if you liked.

So all in all, even though I changed my original idea, I really like this card and maybe I will make extras to send. It’s time to start cranking out those Christmas cards so that you can mail them extra early this year! Have fun!

SHOP STAMPIN’ UP! ONLINE!