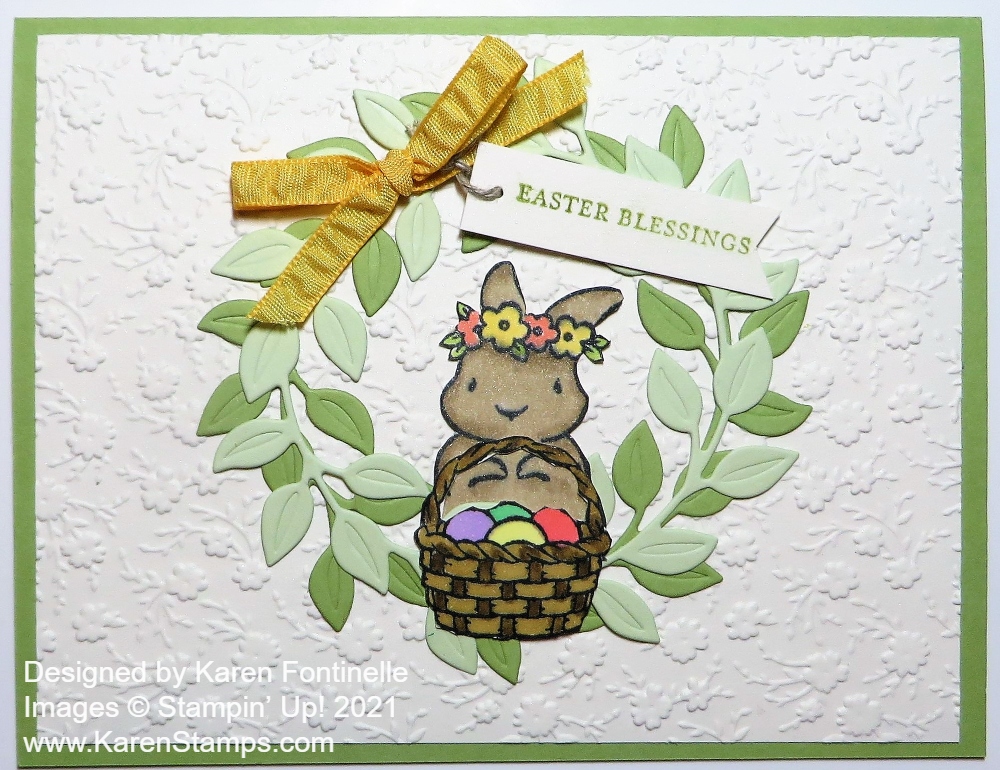
Today is the first day for butterfly lovers to get the Butterfly Bouquet! It’s a sure sign of spring after a hard winter for many, don’t you think?!
Bring in the beauty of nature with the artistic designs of the Butterfly Brilliance Bundle and coordinating designer series paper, along with textured specialty paper that will put a pop of brilliance on every project.
This is an early release of a new product in the upcoming Stampin’ Up! Annual Catalog! Here are the details:
The two papers, the Butterfly Bijou 6″ x 6″ Designer Series Paper and the Natural Touch Specialty Paper are ONLY available now during this promotion until May 3. While supplies last. (That means this paper is not going to be in the new catalog, I imagine, so get it now while you can.) The Natural Touch Paper actually has some texture to it and is something different.
The stamp set is ONE BIG STAMP! It’s even slightly bigger than a regular card size so if you would like to make a larger card, this is a good stamp for that! Use your Stamparatus to get a good image for sure!
One of the dies cuts out all the butterflies on one of the sheets of butterflies on the designer paper! If you order the stamp set and dies, be sure to get the designer paper so you can do this!
Lots of possibilities with this fantastic collection! If you want everything, just order the Butterfly Brilliance Collection and get it all with one number!
Today is the LAST DAY for SALE-A-BRATION and this Sale-A-Bration Darling Donkey is kicking up his heels hoping you will remember to get your order in before Sale-A-Bration comes to a screeching halt tonight!
With every $50 Stampin’ Up! purchase you make, you can earn a FREE product in the Sale-A-Bration Brochure! No limits! Like this Darling Donkeys Stamp Set!
With a $300 order, yours alone or shared with others, you can choose the FREE Punch Party Stamp Set.
And if you want to JOIN Stampin’ Up! as a Demonstrator, with your Starter Kit you will also receive 5 packages of upcoming 6″ x 6″ Designer Series Paper Packs included in your business supplies FREE!
Today is the last day to earn FREE product during Sale-A-Bration!
Think about stocking up on adhesives, cardstock, ink refills…some basics you need to reach your $50 or more!
This easy card is made with a card base of Granny Apple Green to match the leaves on the Flower & Field Designer Series Paper, another one of the Sale-A-Bration choices, by the way! I love this package of paper!
The Darling Donkey is stamped on Basic White Cardstock in Memento Ink and cut out with the Rectangle Stitched Dies. The greeting is also in the Darling Donkeys Stamp Set. I colored in the donkey with Stampin’ Blends in Crumb Cake and Smokey Slate. The bow is tied with the Braided Linen Trim. And I couldn’t resist adding two red Resin Hearts Embellishments!
If you would like this Darling Donkeys Stamp Set or the beautiful Flower & Field Designer Paper, be sure to shop at Stampin’ Up! today!
When I saw this particular strawberry paper in the package, I just fell in love and had to make this Berry Delightful Strawberry Card. It just seems to have a lovely watercolored look to it.
This is the last week to earn free products during Sale-A-Bration at Stampin’ Up! Monday, Feb. 28th is the LAST DAY! With every $50 purchase, you can earn a free product in the Sale-A-Bration Brochure. With a $100 you may choose two of the $50 choices or you may choose one of two $100 level choices, with this Berry Blessings Bundle being one of them! Earn the Berry Blessings Stamp Set and the Berry Delightful Designer Series Paper together in one Bundle!
This card is made with a Poppy Parade Cardstock base, with just a layer of the Berry Delightful Designer Series Paper. If you want something to brighten up these winter days, this paper is it! I also love the other side of this paper, as seen in this card I made for Valentine’s Day.
I used the Just Jade Gingham ribbon in the Flowers For Every Season Ribbon Combo Packaround the designer paper before adhering to the card base. The greeting is stamped in Poppy Parade ink from the Berry Blessings Stamp Set and die cut with a scalloped rectangle in the Stitched So Sweetly Dies. I popped it up with Stampin’ Dimensionals.
Since the strawberries on this paper are so pretty I cut one out with Paper Snips and popped it up on the corner of the greeting. Then I tied a little knot with the gingham ribbon. Very easy card and the paper makes it!
Sale-A-Bration is quickly coming to an end so check your Stampin’ Up! shopping list and see what else you need! Don’t forget to stock up on cardstock, adhesives, ribbons, whatever you need to help earn your free products!
This Love You Always Fancy Heart Card can certainly be for Valentine’s Day tomorrow or it can be for other occasions! I left off a greeting just to show that you can use this card design in multiple ways.
The card base is Blushing Bride because it coordinates with the beautiful designer paper I used on the card. The Love You Always Specialty Designer Series Paper is so pretty on this card. It’s always a little hard to photograph paper that has foil accents as this one does. You always get a little glare! But I think you can see the shine a little bit of the foil.
Can you tell that I used three strips of paper on this card front? I cut two strips from the light Blushing Bride pink paper and then a strip of the Rococo Rose darker pink paper. You can cut the sizes however you like. I have a very narrow margin around the edge of the card. You can cut the strips larger than you want them and then trim down to see what will fit on the card base. These strips were glued right down onto the card base.
The die-cut scalloped heart I just love and is in the Many Hearts Dies. I cut it out of Rococo Rose Cardstock. In the center is a plain die-cut Basic White heart overlaid with the floral heart die in the same set cut out of Blushing Bride. The Basic White behind the floral heart makes it show up against the Rococo Rose heart. I like the way it turned out.
For an embellishment, I tied a bow with the very pretty Blushing Bride 3/8″ Metallic Ribbon and adhered it to the top of the heart with a few Mini Glue Dots. The ribbon has one satin side and one metallic side so you get a little bit of both when you tie a bow!
You can add a greeting to this card, but I thought it looked pretty enough without one. It would make a special Valentine, or a gorgeous engagement, wedding or anniversary card. I always say hearts are for any time so you can get a lot of use out of heart stamps or dies!
If you don’t have contrasting designer paper to use on a card design like this, you can stamp different designs on strips of paper and use it the same way! Maybe this Love You Always Fancy Heart Card will give you an idea of a card to make for Valentine’s Day or some other occasion.
It’s time to make some Valentines and this Lots of Heart Happy Valentine’s Day Card is an easy, traditional one to make! I like Valentines made with other colors, but what says Happy Valentine’s Day better than Real Red?!
The card base is Real Red. I think Stampin’ Up!’s best color is Real Red. There are other “reds” out there in the world but when you compare to Real Red, which is a full, true, “real” red color, you can’t beat Stampin’ Up!
For theBasic Whitelayer, (formerly Whisper White) before I even knew exactly what card I was going to make, I just stamped randomly with the little flowers in the Lots of Heart Stamp Set in Real Red Ink. Certainly don’t put this stamp set away after Valentine’s Day because it’s not just for Valentines! I’m already thinking what a pretty spring card I could make with this little flower stamp!
Coordinating with the Lots of Heart Stamp Set are the Many Hearts Dies. You can purchase both these items in the Lots of Heart Bundle. I just love this scalloped heart die-cut! I cut that out of Real Red and layered with a plain white die-cut heart. I thought about different ideas, but in the end, I just wanted to stamp “Happy Valentine’s Day” on the heart. I found that greeting in my Meant To Be Stamp Set in the Annual Catalog on page 69. You may already have this stamp set! (There are dies to go with this stamp set, too, which you may already have!)
The scalloped heart is popped up with Stampin’ Dimensionals®. For a little bit of bling, I decided to see if the Resin Hearts Embellishments would work. They are very small and I thought that was perfect for this card! Just a little something without being too much around the greeting. I doubt they would show up very well on the background.
So there you have a basic, traditional, easy-to-make Valentine card! We better get busy if we want to have Valentines to mail soon! Have fun making something like this Lots of Heart Happy Valentine’s Day Card.
Today is the day Stampin’ Up! brings back the Hey Chick Stamp Set from Sale-A-Bration 2017 because it was SO popular…plus they added a set of Chick Dies! You can purchase the stamp set or just the dies, or get BOTH in the Hey Chick Bundle! Save 10%! Lots of cute die pieces in this set for creating all kinds of scenes for your Chicks!
If you like chickens and cuteness, you will love these new offerings! Maybe you already have the Hey Chick Stamp Set in your stash from 2017! If you do, just order the dies. If you don’t own it, you can purchase the stamps or Bundle today and catch up!
I know chickens are popular because we could hear a rooster crowing one afternoon out for our walk around the neighborhood! I don’t think it was even from our neighborhood but from a couple streets adjacent to our subdivision. But some people love having chickens! It’s a lot easier just having chicken stamps and dies, so check out the new/not so new Chicks today!
Would you believe this True Love Red Floral Card is made from the True Love Designer Series Paper except for the vellum and the greeting? This black and white designer paper with all sorts of designs give you all sorts of opportunities to be creative!
To make this card, I decided to copy a sample card in the January-June 2021 Mini Catalog on page 10 in the Love You Always Suite. I changed the colors of the flowers and how I arranged them and I put a different greeting on my card. My greeting took up a little extended space since it was longer and narrower than the sample card, so that caused me to move the flowers around a little.
The card base is Thick Whisper White and the striped pattern of the True Love Designer Series Paper covers the whole front of the card base. I didn’t leave any margin. The piece of vellum is 5 1/2″ x 3 1/4″. You could make yours any size. Just don’t glue it down yet because glue and other adhesives show through vellum.
Then I chose another of the patterns in the designer series with these flowers. I decided which ones I wanted as close to the edge of the paper as I could get and cut those out of the sheet. I colored them in with Stampin’ Blends Markers, the Light and Dark Real Red. I wanted my card to be black, white and Real Red! The flower center is just colored with Dark Daffodil Delight. The leaves are Granny Apple Green, Light and Dark, along with a touch of Daffodil Delight. An artist friend I know always said to mix some yellow in with green, so I do!
You can leave the flowers in the group in which they appear on the designer paper or if you need to cut them apart to make them fit on your card you can do that. Some I popped up on Stampin’ Dimensionals and one flower and one leaf is adhered right on the vellum.
The greeting is stamped in Real Red Ink on Whisper White from the Lots of Heart Stamp Set. It is die-cut with a die in the Tasteful Labels Dies as is the Real Red piece behind it.
If you place and adhere everything on to the vellum before you attach it to the card, you can turn the vellum over and apply adhesive on areas that are covered by the greeting and flowers on the front. That will hold it on to the card front without showing the adhesive through the vellum. I used Stampin’ Seal.
When you are looking for card ideas, if you don’t already have one in your head, think about looking at any of your Stampin’ Up! catalogs! You can copy any of the ideas, and most likely you will come up with your own version once you start creating!
Remember, Sale-A-Bration is going on so with every $50 you spend, you earn a free product in the Sale-A-Bration Brochure! No limit!
Be sure to check out the black and white True Love Designer Series Paper so you can have fun either designing with it as is or using different methods of coloring it like on this True Love Red Floral Card.
You get lots of hearts in the stamp set and dies I used to make this easy slim card, Trio of Hearts Valentine Card, for Valentine’s Day or really any time! These hearts are pretty big but they still fit perfectly on this slimline card.
I just got the Lots of Heart Bundle, which has the Lots of Heart Stamp Set and the Many Hearts Dies. And there really are many heart dies in that set! In fact, I recommend making a copy of the sheet with all the dies still adhered with your printer and keep it with your dies so you can see clearly what you are supposed to have! There are 15 different dies in the set!
To make this card, I decided to make pastel-colored hearts so I started with a card base of Pool Party Cardstock. I cut the paper 6″ x 6″ so that when I folded it in half, it would be 3″ x 6″ for a slimline card. The Whisper White layer is just a tiny bit narrower than the card base, 2 7/8″ x 5 7/8″.
I stamped the hearts on another piece of Whisper White and then die cut with one of the heart dies. This heart die also cuts a narrow outline of the heart, which I didn’t notice at first so the excess paper was getting left in the die. If you have this set, make sure you check the underside of your heart die because if you cut several times, that paper still stuck in the die will prevent getting a complete cut after awhile!
The hearts are stamped in Blushing Bride, Mint Macaron, and Pool Party ink. Since the photopolymer stamps are new, even though I wiped them on my Shammy a couple of times, the ink still beaded up a tiny bit when I stamped, but I don’t think it’s anything that’s bad enough to jump out. I adhered the hearts flat on the white card layer, but I could have popped them up on Stampin’ Dimensionals. Either way is fine. I did stamp the greeting in Pool Party Ink and then popped that up on Dimensionals. The greeting is in the Lots of Heart Stamp Set.
I almost left it as is at that point, but I decided to add some Champagne Rhinestone Basic Jewels. Who can resist a few rhinestones?! And for a final touch, I just used a piece of white twine I had to make a little bow on the center heart, adhered with a rolled-up Mini Glue Dot.
This is one example of how you can make an easy Valentine using three hearts in the Lots of Heart Stamp Set in the January-June 2021 Mini Catalog on page 15.
I couldn’t wait to play with the new Gilded Leafing again but I wanted to try something different and I came up with this Art Gallery Floral With Gilded Frame Card.
I’ve loved the little floral stamp in the Art Gallery Stamp Set in the Fine Art Floral Suite. I got the idea to stamp the flower and then make a gilded frame around it. Instead of using Versamark Ink and Heat & Stick Powder before applying the Gilded Leafing, as I did on this card, I simply made the frame with strips of Tear & Tape Adhesive! You can either pick up pieces of the gold leaf and stick it onto the adhesive, which I started doing. But then I just plunged the piece into my container, pulled it out but still held it over the container, and simply rubbed most of the excess off with my fingers. The Gilded Leafing is so soft, you almost want to stick your hands in it! When I had most of it off, I used a soft brush I had from years ago to brush off the last little bits. You can also use one of theStamping Sponges.
The card base is Night of Navy, and I chose that because on another card I made with the Dandy Garden DSP I really liked the yellow flowers and dark blue background of that paper. I started off coloring the stamp with Stampin’ Write Markers but since it was new and I hadn’t prepared the stamp first, the ink from the markers just beaded up. I decided to just skip to a regular ink pad, Mango Melody. I tried to mostly get it on the flowers but I knew that even if I got it on the leaves, that’s okay because they would be covered with green ink. On these I did use the Mossy Meadow Stampin’ Write Marker because it was the darkest green and it would look lighter stamped. What you see on the card is my first attempt, so it worked out great! I layered this on a piece of Mango Melody Cardstock and then added the Gilded Leafing around the sides.
Since I had used the Mango Melody under the flower piece, I decided to use it as a thin layer on top of the Night of Navy card base. The top layer is a piece of the Fine Art Floral Designer Series Paper. Instead of using the floral side, of course, I turned it over and used this light blue with a pattern on it that looks like it was painted with a paint brush! To add to that texture, I embossed the paper with the Painted Texture 3D Embossing Folder.
I adhered the floral piece to the card front with Stampin’ Dimensionals®. For the greeting, I stamped a birthday sentiment from the Art Gallery Stamp Set in Mossy Meadow Ink and then die-cut it with a die in the Floral Gallery dies. I think all of these main products are in the Fine Art Floral Suite! I’m sure it will be one of the most popular Suites in the Spring Mini Catalog! Everything in that Suite is lovely!
If it isn’t on your shopping list yet, be sure to put it on there, at least if you like florals. The paper is gorgeous. The Gilded Leafing is fun and elegant. The Fine Art Ribbon is beautiful and soft. You will want everything!
Remember, with every $50 increment you purchase, you earn a free Sale-A-Bration product! If you spend $100 or more, you can choose one of the special Level 2 products, unless you want two Level 1 products at the $50 level.
Today is maybe a bigger day for stampers than New Year’s Day because Stampin’ Up!’s biggest promotion of the year begins, Sale-A-Bration 2021, as well as the release of the new January-June 2021 Mini Catalog with great new products in it!
When you purchase any of these new products (or Annual Catalog products!) and your order totals $50 or more (before shipping and tax) you earn a FREE product in the Sale-A-Bration Brochure! For every $50 you spend, you earn a free Sale-A-Bration product. If you spend $100, you may choose one of the select higher-level products.
You can mix and match your free products, too. If you spend $100, you can choose two $50 level products OR you can choose one $100 level product. If you spend $150 (you get Stampin’ Rewards of 10% already!), you can choose three $50 level products OR one $100 level product and one $50 product. You get the idea! No limit! Just ask me if you have questions!
Mini Stampin’ Cut & Emboss Available Today!
Finally, this little cutie, the Mini Cut & Emboss Machine is available beginning today!! This cute machine has a compact footprint for easy storage and travel. The 3-1/2″ platform works with many of Stampin’ Up!’s smaller dies and smaller embossing folders. Dies and embossing folders that are compatible with the Mini Stampin’ Cut & Emboss Machine are indicated in the product description in our catalogs and online store. Includes 1 Mini Base Plate (Plate 1), 2 Mini Cutting Plates (Plate 2), 1 Mini Embossing Plate (Plate 3), and 1 Mini 3D Embossing Plate (Plate 4).
If you want to JOIN STAMPIN’ UP! as a Demonstrator, in your Starter Kit you will also receive a free stack of our Regals, Subtles, Neutrals, Brights, and 2020—2022 In Color Designer Series Paper. There couldn’t be a better time to join the Stampin’ Up! family. Think about it and let me know if you have questions! You’re always invited to be a Stampin’ Up! Demonstrator!
If you have a large order yourself or go in together with friends, at a $300 order you will receive an exclusive Punch Party Stamp Set for FREE!
New Mini Catalog Live Today!
The January-June 2021 Mini Catalog is ready for ordering today! You will find fresh, new products for spring. If you have not received your catalog yet from me if you are a regular customer of mine, I still hope it will come soon now that the holidays are over…but remember, you can view it online as well as just viewing the products in the Online Store.
If you are new and interested in purchasing Stampin’ Up! products, I would be happy to be your Demonstrator and send you the catalogs if you would like. Just email me at Karen@Karenstamps.com and send me your contact information.
And one more thing…..new Basic White Cardstock and other products available today! Remember, our Whisper White line was no longer being produced so Stampin’ Up! found an acceptable substitute called Basic White. Just search in the Online Store for Basic White to see all the products!
And remember, for every $50 you spend with Stampin’ Up!, you will earn a FREE Sale-A-Bration product! So when you put those two things together, what can be a better way to start off a New Year!!
I’m finally getting a chance to play with some new things in the upcoming January – June 2021 Mini Catalog, coming January 5th and the result was this Fine Art Floral Thinking of You Card.
As you can imagine, this Fine Art Floral Designer Series Paper is gorgeous! When you get your catalog or look at it online next week, look at the back cover because you will see how the artists created the designs for this paper. One side of every sheet is a floral design and the other side is a more generic, plainer watercolor washed design.
And when you look at the back of the designer paper package, you will be amazed at how many coordinating colors go with this paper! I think there were twelve colors plus white. I always write all the colors with a marker on the back cardboard so I can read them easier than trying to squint and read Stampin’ Up!’s tiny print!
The card base is Flirty Flamingo. I cut a strip of the designer paper thinking I would put it on the side of the card, but as I turned over the floral side, I really liked the other side, too, and ended up with this design I adhered two strips of the “other side” to the sides of the card but leaving 1/4″ of Flirty Flamingo showing, and then adhered the floral side over the top and down the middle. That panel is 2 1/4″ wide. Not what I had planned at all, but it’s what it turned out to be!
For the greeting, I sort of copied a sample in the catalog. I die-cut only the word “just” from a die in the Floral Gallery Dies. The die says “just want to say” but I just laid the Merry Merlot Cardstock over the word “just” and die cut that. Don’t forget to save the dot over the J!
I die cut the label for the greeting from the Tasteful Labels Dies in the Annual Catalog. Then I stamped the “thinking of you” in the new Art Gallery Stamp Set on the label in Merry Merlot ink but did not ink up the “I’m”. I got lucky and did not mess it up! Then the die-cut word “just” is adhered to the label also. I popped this greeting up with Stampin’ Dimensionals. You can purchase the Art Gallery Stamp Set and the Floral Gallery Dies in the Art Gallery Bundle and save 10%.
I thought I was finished and was ready to photograph the card but I thought it still needed “something”. Of course that something was a little bling from the Champagne Rhinestone Jewels.
Once I had the design figured out, it was a pretty easy card to make. This is a beautiful suite that you will be attracted to when you see the new catalog!
The new January-June 2021 Mini Catalog starts Tuesday, January 5th….next week!! That will also be the first day of the biggest promotion of the year, Sale-A-Bration! What a week to look forward to!
It’s going to be time to wrap gifts sooner than we want to realize, so here is an idea – this Gold Mini Pizza Box With Christmas Poinsettia. Just put a treat inside or a small gift and decorate the box exactly how you want!
It’s a good idea to keep a package of these Gold Mini Pizza Boxes on hand. They are pretty already being gold so you can just add a little decoration and you’ll have a gorgeous gift box ready to go. These boxes are food safe so you can add a cookie or two inside, some Christmas fudge or candy, a set of 3″ x 3″ notecards or some other gift. You get 8 mini pizza boxes in a package!
I got the inspiration for this gift box after seeing a Christmas card online (not handmade) although I ended up changing it a little. The card had gold, dark blue, and red poinsettias with gold trim. It also had swirly things in the background in gold. So I thought I would try that red, blue, and gold color scheme as a gift box!
The blue I chose is Night of Navy although I started with Misty Moonlight. Really, either would be fine. I liked the slightly darker shade. The poinsettia is made with Real Red Cardstock and the Poinsettia Dies. I used two layers of the medium size flower and the smallest flower for the center. Just using the largest poinsettia flower in the center of this box would be pretty also, but I wanted room for gold trim of some kind. I ended up using Gold Foil for a few leaves and the sprigs in the die set. The flower is popped up with Stampin’ Dimensionals®. It’s a good idea to use your fingers to sort of fold up the petals and leaves a little bit to give them some dimension.
The greeting is stamped with the Itty Bitty Christmas Stamp Set and cut out with the Classic Label Punch. The greeting is popped up with Mini Stampin’ Dimensionals.
There are so many things you can do with these Gold Mini Pizza Boxes! They can be decorated for any occasion. You can use them for a birthday treat or gift or take a few cookies or candy to your neighbor. You could do some stamping on cardstock for the top and tie a ribbon around the box. Or add a belly band with a greeting.
Order some of these boxes or the plain white Mini Pizza Boxes to have on hand. You will have fun decorating them for many occasions, especially Christmas!
Use the So Many Snowflakes Die to make this So Many Snowflakes Die-Cut Holiday Card and let the sparkles show through the snowflake! I realized I hadn’t used my glimmer paper enough so I tried it out on this card with the see-through die-cut negative.
The card base is Balmy Blue with a layer of Whisper White. I die cut the largest snowflake from the So Many Snowflakes Dies in the Whisper White. Since I didn’t purchase the Snowflake Wishes Stamp Set (even Demonstrators can’t have everything!), I used some snowflakes in the Snowman Season Stamp Set to stamp some random snowflakes in Balmy Blue Ink on the front of the card.
For the sparkle under the die-cut, I adhered a piece of Balmy Blue Glimmer Paper. It’s always difficult to photograph sparkle and shine, but it looks very pretty under there! Then this Whisper White layer with the Balmy Blue Glimmer Paper underneath adhered to the Balmy Blue Cardstock card base.
The greeting is from the Poinsettia Petals Stamp Set. It is stamped in Balmy Blue Ink and punched with the Lovely Labels Pick A Punch. I simply cut a little strip of Balmy Blue Cardstock to layer underneath the greeting to help it stand out a little and popped it up with Stampin’ Dimensionals®. For a final touch, I added two Adhesive-Backed Snowflakes. These are so fun to play with and easy to use with the adhesive already on them!
I think this would actually be an easy Christmas card to duplicate if you wanted several to send. It involves the die-cutting and punching the greeting, but you could make a simpler greeting by cutting a rectangle or using another die rather than the punch. Do it assembly-line fashion like I described yesterday in my blog post!
When you are going to make a batch of Christmas cards, whether it’s a few or a hundred, plan to make them “assembly-line style”. I learned early on not to make one whole card, then another whole card, and then another. Instead, gather all your supplies and do each step for ALL the cards. Whether you are cutting or stamping or adding embellishments, you will do it faster if you do it over and over again. And if you are making a whole pile of cards, you almost get “muscle memory” for doing each step and that makes it even easier!
I am copying a card Snowflake Splendor Merry Christmas Card, I already made awhile back (in August!!) but liked it a lot. Since I like to make a lot of different cards from all the ideas I see in the catalogs and online, I’m making many different designs and maybe five copies of each one. The only problem is that when I go to send them, I have to choose which card to send to which person! You might choose one card design and make 50 cards the same. I’ve done that, also. Then everyone just gets the same card! And your muscle-memory gets really good at making the cards!
The first step, as you see in the top photo is to cut all your paper and score the card base as well. Cut the card base, layers, designer paper, scrap pieces….everything you need to make the card. Make little piles of the same pieces so you don’t get them mixed up.
Now amazingly, this time I remembered to use the Adhesive Sheets before cutting out the snowflakes! This makes it easier to adhere them because they will already have adhesive on all the little areas from the Adhesive Sheets. No need to add tiny drops of glue! The snowflakes are made with the So Many Snowflakes Dies.
For this card, I diecut all the white snowflakes out of the Whisper White layer I was going to use under the designer paper. Shhh! Don’t tell anybody! They’ll never know!
Adhere the Whisper White layer to the Highland Heather card base. And since I used the Adhesive Sheets on the back so I could diecut the snowflakes, I don’t even have to use glue, just adhere the Whisper White to the card. Do all the cards like this.
Adhere all the die-cut snowflakes to all the pieces of the watercolor pattern in the Snowflake Splendor Designer Series Paper. The Take Your Pick tool helps to separate the backing of the adhesive sheets from the snowflake.
When you have stamping to do making Christmas cards, it’s really useful to have the Stamparatus! Get the words or whatever images lined up perfectly and then stamp with the Stamparatus! If the inked image is incomplete, you can just reink the stamp and stamp again as long as you don’t move the paper!
Finish assembling your cards by adding some Holiday Rhinestone Basic Jewels. Inside the card, adhere the smaller designer paper snowflakes you already cut out and stamp the greeting using the Stamparatus on another layer of Whisper White, also from the Poinsettia Petals Stamp Set. Then you have a stack of Christmas cards all finished!! Make them assembly-line style!
I was really happy with the way this Pink Poinsettia Petals Happy Holidays Card turned out. The colors turned out to look pretty nice together with the Plush Poinsettia Specialty Paper in the background.
The card base is just Whisper White with a layer of the Plush Poinsettia Specialty Paper. This paper is beautiful with the flocked poinsettias on white vellum.
The poinsettia petals are all die-cut with the Poinsettia Dies. I used Petal Pink Cardstock and the die-cut leaves are Pear Pizzazz. Each poinsettia and leaf has two pieces – the outline that cuts it out and a separate inside piece that does the embossing of the veins in the leaves and petals. If you have trouble lining them up, just keep turning the inside piece until it fits in the outline die. You might even want to mark one of the lined up points with a Sharpie on both pieces. Those little green sprigs are also a die in the set. I think they add a lot.
The Petal Pink strip along the side was just in my bag of cardstock! It is from the Peony Dies. I think it is accidentally perfect! It adds a little something along the side of the card without taking away from the poinsettia and doesn’t take up any extra space like a ribbon with a bow would.
The greeting is in the Poinsettia Petals Stamp Set as well as a very nice “Merry Christmas” greeting. I stamped it in Petal Pink Ink on Whisper White and die cut with the Layering Ovals die along with a Petal Pink scalloped oval die for the layer. I think it is small enough to not take away from the poinsettia and fits just fine in the space.
For the poinsettia center, I just added some Gold Glitter Enamel Dots. I adhered three of the smallest ones and one the next size up and that looked perfect. As I was cleaning up, I had a Dot stuck on my finger from the package so I stuck that on the flower center too! I thought about using the Gilded Gems but for this card, I liked the Gold Glitter Dots better and they are better for mailing.
This card is a little fussier to make so I don’t know that I would want to make many multiples of it with all the die-cutting, yet now that I have the card design maybe it wouldn’t be too bad – or too bad for you to copy. Click HERE to see another poinsettia Christmas card I made, this time with the traditional red poinsettia.
This Poinsettia Place Suite of products is all so beautiful it’s worth a little extra effort so try your hand at a card something like this Pink Poinsettia Petals Happy Holidays Card.