Tag Archives: Gilded Leafing

4th of July Fireworks USA Birthday Card

4th of July Fireworks USA Birthday Card

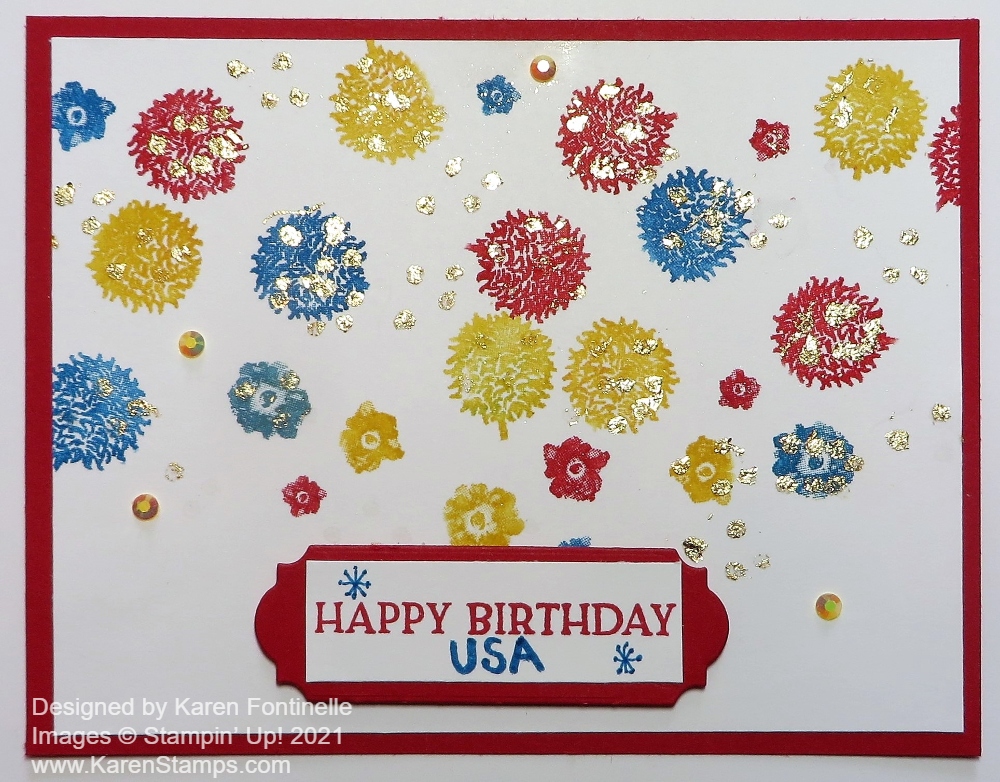
This 4th of July Fireworks USA Birthday Card was made in a rather odd way! The other day I was trying to think what stamp set or dies could be made to look like fireworks on a card for the 4th of July. Then I saw an idea online to use one of the seed pods or whatever it is in the Enjoy The Moment Stamp Set! I got out a piece of scrap paper and experimented! I thought it would work along with some smaller stamps in other stamp sets! And I ended up with a fireworks card for the 4th of July that was fun to make!

The card base is Real Red Cardstock with a Basic White layer. The “balls” on the card are the seed pod. There are two together on the stamp so I colored the stamp with Real Red on one, Pacific Point blue on another, and sometimes Daffodil Delight. I used my Stampin’ Write Markers to do this. Then I found some little flowers on one stamp in the Artistically Inked Stamp Set. Since they have that kind of watercolor look to them, I thought they didn’t necessarily look like flowers, they could look like little fireworks! I colored those with red, blue, and yellow markers.

After I had all the fireworks stamped, I used the tiny dots in the Artistically Inked Stamp Set to stamp on top of the stamped fireworks and even just randomly in the background with Versamark Ink. Next, I dumped on some Heat & Stick Powder and shook off the excess, then heated with my Heat Tool. After that, I dumped the stamped piece into the Gilded Leafing. It had been a while since I had used this technique so I wasn’t sure I remembered how to do it. I rubbed off the excess leafing with my hands and then with a piece of sponge, although I think before I had used an old stencil brush. Whatever is gentle on the leafing that works for you is okay. That gave my fireworks some gold glimmer!

4th of July Fireworks USA Birthday Card Closeup

Here is another card I made using some kind of snowflake stamps to look like fireworks! Look through your stamps, old and new, and see what you can use. Don’t forget stars – stars are great for any celebration!

The greeting is in the Blossoms In Bloom Stamp Set. I used Real Red for the diecut from the Ornate Frames Dies as a layer under the greeting. I originally planned to use the Playful Alphabet Dies to spell out USA but I ran out of room. I just used a Pacific Point Stampin’ Write Marker and wrote in USA at the bottom of the greeting plus added some little blue stars! And for extra bling, besides the Gilded Leafing, I added some In Color Jewels randomly on the card.

I won’t be sending this card since the 4th is tomorrow, but I will set it out somewhere with some 4th of July decorations! I like my little fireworks with the Gilded Leafing to spiff it up!

Have a Happy 4th of July tomorrow and this weekend to celebrate our wonderful country! Hope you get to see some fireworks or stamp your own on a card like my 4th of July Fireworks USA Birthday Card.

True Love Sympathy Card

True Love Sympathy Card

If there is one card we all hate to make, it is a sympathy card such as this True Love Sympathy Card although at the same time we hope it expresses our feelings and sends comfort to the family. I’m pretty sure I got the idea for this card from someone else but I don’t remember where I found it and haven’t been able to find it again. I do think I changed it up at least a little bit. I didn’t originally plan to post it but I came across it in my photos and I think it is a pretty card. Just change the greeting and you can use the same card design for almost anything else.

The card base is Blushing Bride with several layers on top. Let’s start with the flowers. The flowers are from the True Love Designer Series Paper in the Spring Mini Catalog. All the papers are black and white, but if you want to, you can color in the flowers and cut them out. That’s what I did here with the Stampin’ Blends, my favorite way to color. Behind the flowers for an embellishment is a loop of the 3/8″ Fine Art Ribbon, which is a natural-colored ribbon with gold in it. It’s very pretty!

The flowers are layered on a diecut from the Ornate Layers Dies to make a frame. Underneath the frame is another Basic White layer that is edged in the new Gilded Leafing. I applied Tear & Tape on all four sides of the white cardstock and then applied the Gilded Leafing. That stuff is so fun! Then this piece is layered on Basic Black Cardstock to help the gold leafing stand out plus to go with the black and white of the True Love Flowers. And finally all this is on a layer of Basic White adhered to the Blushing Bride pink card base.

The greeting is in the Prized Peony Stamp Set. It is die cut with a circle in the Tasteful Labels Dies. It really didn’t need any layer underneath it on this card.

I think just the True Love Designer Series Paper will be retiring when the Spring Mini retires as usually most designer papers retire, but I think most of the rest of the supplies I used will be sticking around in the new catalog.

SHOP STAMPIN’ UP! ONLINE HERE!

Art Gallery Floral With Gilded Frame Card

Art Gallery Floral With Gilded Frame Card

I couldn’t wait to play with the new Gilded Leafing again but I wanted to try something different and I came up with this Art Gallery Floral With Gilded Frame Card.

I’ve loved the little floral stamp in the Art Gallery Stamp Set in the Fine Art Floral Suite. I got the idea to stamp the flower and then make a gilded frame around it. Instead of using Versamark Ink and Heat & Stick Powder before applying the Gilded Leafing, as I did on this card, I simply made the frame with strips of Tear & Tape Adhesive! You can either pick up pieces of the gold leaf and stick it onto the adhesive, which I started doing. But then I just plunged the piece into my container, pulled it out but still held it over the container, and simply rubbed most of the excess off with my fingers. The Gilded Leafing is so soft, you almost want to stick your hands in it! When I had most of it off, I used a soft brush I had from years ago to brush off the last little bits. You can also use one of the Stamping Sponges.

The card base is Night of Navy, and I chose that because on another card I made with the Dandy Garden DSP I really liked the yellow flowers and dark blue background of that paper. I started off coloring the stamp with Stampin’ Write Markers but since it was new and I hadn’t prepared the stamp first, the ink from the markers just beaded up. I decided to just skip to a regular ink pad, Mango Melody. I tried to mostly get it on the flowers but I knew that even if I got it on the leaves, that’s okay because they would be covered with green ink. On these I did use the Mossy Meadow Stampin’ Write Marker because it was the darkest green and it would look lighter stamped. What you see on the card is my first attempt, so it worked out great! I layered this on a piece of Mango Melody Cardstock and then added the Gilded Leafing around the sides.

Since I had used the Mango Melody under the flower piece, I decided to use it as a thin layer on top of the Night of Navy card base. The top layer is a piece of the Fine Art Floral Designer Series Paper. Instead of using the floral side, of course, I turned it over and used this light blue with a pattern on it that looks like it was painted with a paint brush! To add to that texture, I embossed the paper with the Painted Texture 3D Embossing Folder.

I adhered the floral piece to the card front with Stampin’ Dimensionals®. For the greeting, I stamped a birthday sentiment from the Art Gallery Stamp Set in Mossy Meadow Ink and then die-cut it with a die in the Floral Gallery dies. I think all of these main products are in the Fine Art Floral Suite! I’m sure it will be one of the most popular Suites in the Spring Mini Catalog! Everything in that Suite is lovely!

If it isn’t on your shopping list yet, be sure to put it on there, at least if you like florals. The paper is gorgeous. The Gilded Leafing is fun and elegant. The Fine Art Ribbon is beautiful and soft. You will want everything!

Remember, with every $50 increment you purchase, you earn a free Sale-A-Bration product! If you spend $100 or more, you can choose one of the special Level 2 products, unless you want two Level 1 products at the $50 level.

Art Gallery Floral With Gilded Frame Closeup

SHOP STAMPIN’ UP! ONLINE HERE!

Art Gallery Flowers With Gilded Leafing

Art Gallery Flowers With Gilded Leafing

I finally got a chance to play with some of the new products in the Fine Art Floral Suite in the January-June 2021 Mini Catalog! I almost made a giant mess but I think the card turned out pretty well for my first try!

I started with a card base of Magenta Madness, one of the current In Colors. When I looked for a piece of white cardstock for the layer, I had a shorter piece and decided to just cut it down to 4″ x 4″ instead of covering the whole front of the card.

One of the new products I have been dying to try was the Gilded Leafing! If you get this, it’s a REAL GOOD IDEA to put the whole jar in a large enough container that a card will fit into. That way you can stick the whole card into the gold leafing to apply it. I found a perfect size container in the closet but I still nearly spilled it while making this card when the attached lid pulled it backward! Yikes! What a mess that would have been! The gold leafing is very thin, light, and will go ANYWHERE if you let it! Some pieces are big, some are tiny.

I stamped two flowers with Magenta Madness Ink and then used the two-step stamping smaller image to stamp over the original flower with Versamark Ink. Then I dumped on the Heat & Stick Powder (it’s back!) and embossed it with my Heat Tool. You don’t want to overheat the Heat & Stick Powder. After I heated it, I just plunged the card face down into the Gilded Leafing! It came up looking like a mess like a kindergartner would have made. But I just rubbed off some of the big pieces of leafing and then used a retired stencil brush I had from Stampin’ Up! from many years ago I think. I just brushed and brushed the gold leafing until all the excess came off.

You should really do all your stamping before you add the gold leaf. I added two Mango Melody flowers and got the gold on my stamp where it overlapped. Luckily it did wash off my stamp at the sink.

I adhered a strip of the 3/8″ Fine Art Ribbon that has gold threads in it along the bottom of the stamped panel. I tied a separate small bow and adhered it with several Mini Glue Dots.

For the greeting I stamped the sentiment on a scrap of white cardstock and die cut with the die in the Floral Gallery Dies. You can buy the dies and the Art Gallery Stamp Set together in the Art Gallery Bundle.

To check out all these new products, especially the Gilded Leafing, check out pages 32-34 in the spring Mini and also in the Online Store!