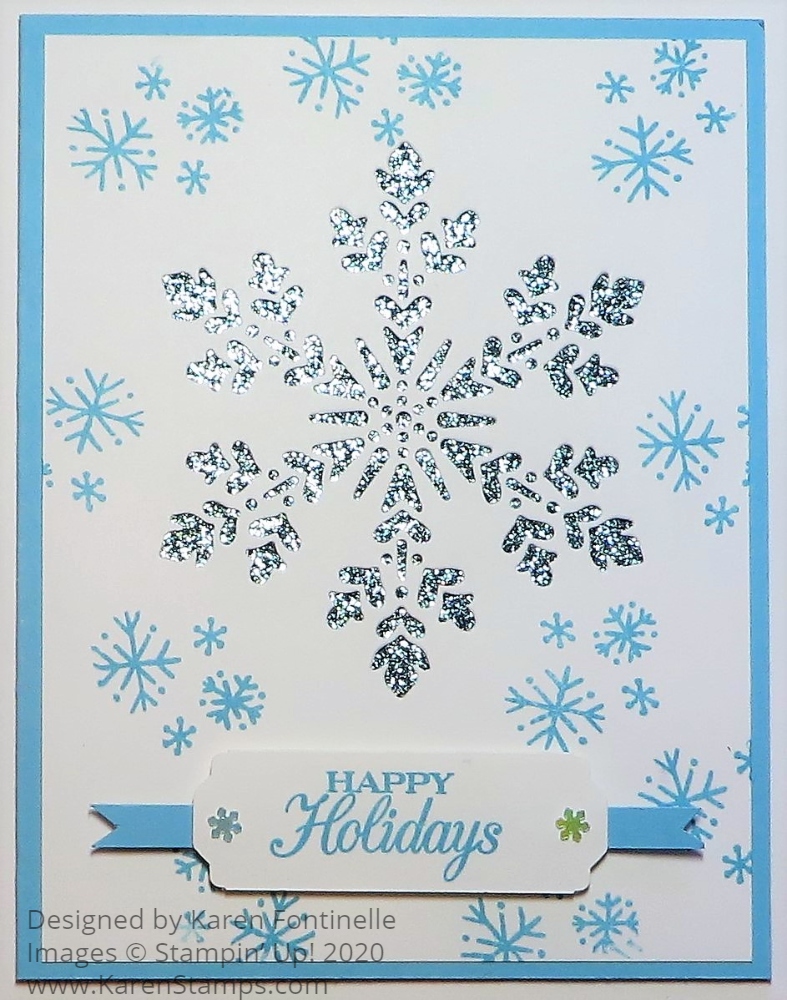
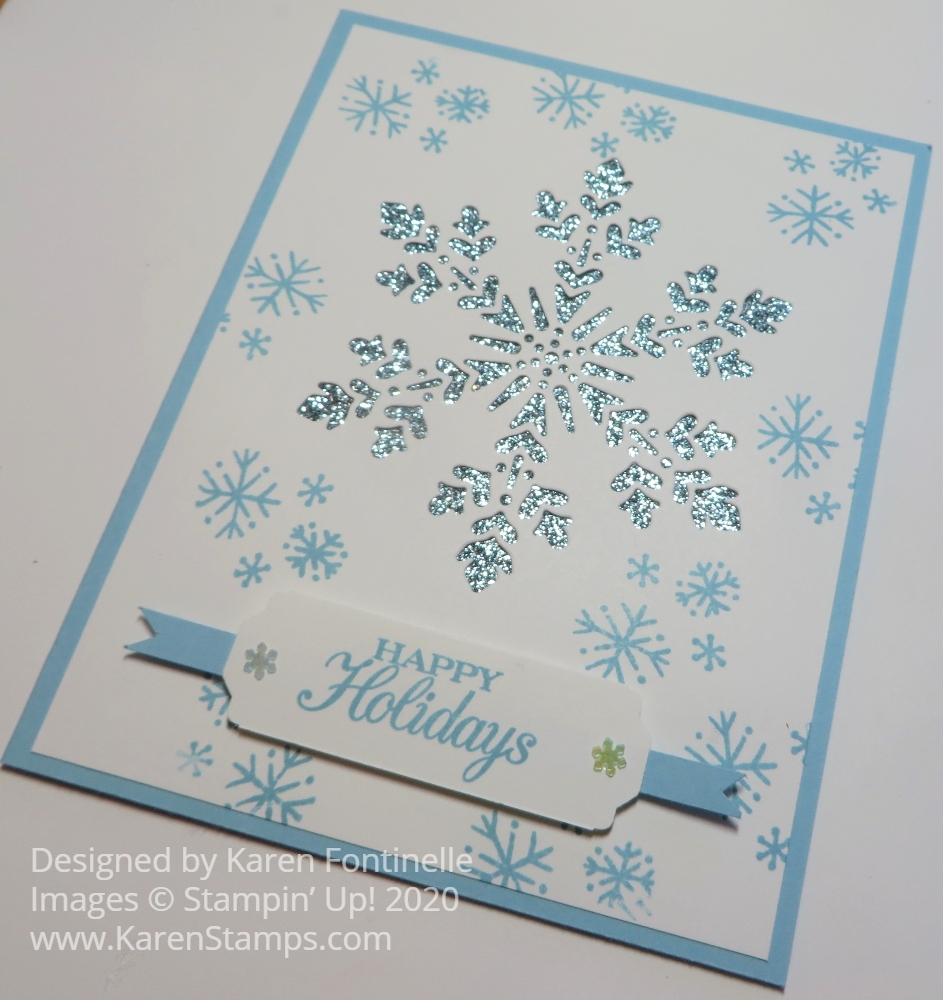
Use the So Many Snowflakes Die to make this So Many Snowflakes Die-Cut Holiday Card and let the sparkles show through the snowflake! I realized I hadn’t used my glimmer paper enough so I tried it out on this card with the see-through die-cut negative.
The card base is Balmy Blue with a layer of Whisper White. I die cut the largest snowflake from the So Many Snowflakes Dies in the Whisper White. Since I didn’t purchase the Snowflake Wishes Stamp Set (even Demonstrators can’t have everything!), I used some snowflakes in the Snowman Season Stamp Set to stamp some random snowflakes in Balmy Blue Ink on the front of the card.
For the sparkle under the die-cut, I adhered a piece of Balmy Blue Glimmer Paper. It’s always difficult to photograph sparkle and shine, but it looks very pretty under there! Then this Whisper White layer with the Balmy Blue Glimmer Paper underneath adhered to the Balmy Blue Cardstock card base.
The greeting is from the Poinsettia Petals Stamp Set. It is stamped in Balmy Blue Ink and punched with the Lovely Labels Pick A Punch. I simply cut a little strip of Balmy Blue Cardstock to layer underneath the greeting to help it stand out a little and popped it up with Stampin’ Dimensionals®. For a final touch, I added two Adhesive-Backed Snowflakes. These are so fun to play with and easy to use with the adhesive already on them!
I think this would actually be an easy Christmas card to duplicate if you wanted several to send. It involves the die-cutting and punching the greeting, but you could make a simpler greeting by cutting a rectangle or using another die rather than the punch. Do it assembly-line fashion like I described yesterday in my blog post!
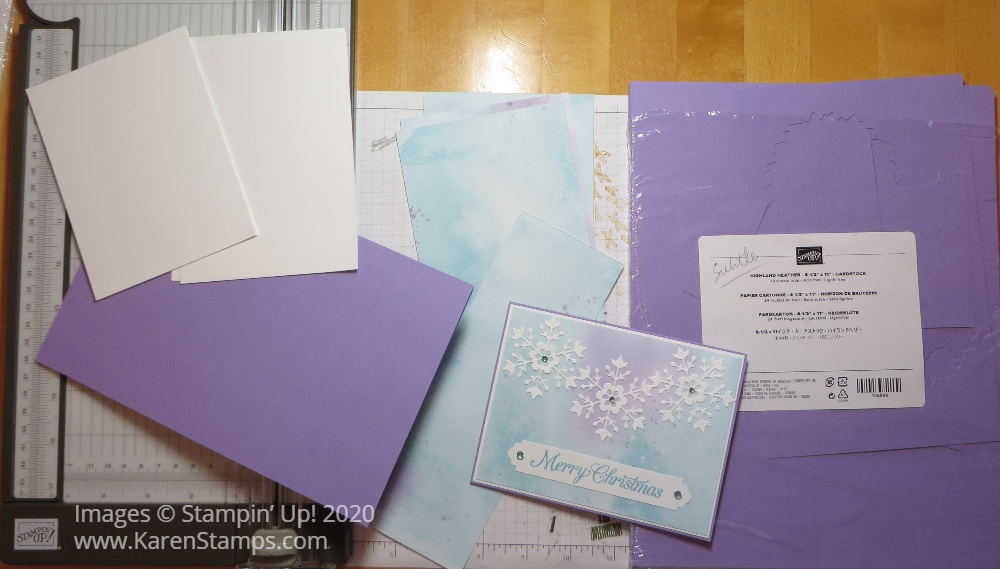
When you are going to make a batch of Christmas cards, whether it’s a few or a hundred, plan to make them “assembly-line style”. I learned early on not to make one whole card, then another whole card, and then another. Instead, gather all your supplies and do each step for ALL the cards. Whether you are cutting or stamping or adding embellishments, you will do it faster if you do it over and over again. And if you are making a whole pile of cards, you almost get “muscle memory” for doing each step and that makes it even easier!
I am copying a card Snowflake Splendor Merry Christmas Card, I already made awhile back (in August!!) but liked it a lot. Since I like to make a lot of different cards from all the ideas I see in the catalogs and online, I’m making many different designs and maybe five copies of each one. The only problem is that when I go to send them, I have to choose which card to send to which person! You might choose one card design and make 50 cards the same. I’ve done that, also. Then everyone just gets the same card! And your muscle-memory gets really good at making the cards!
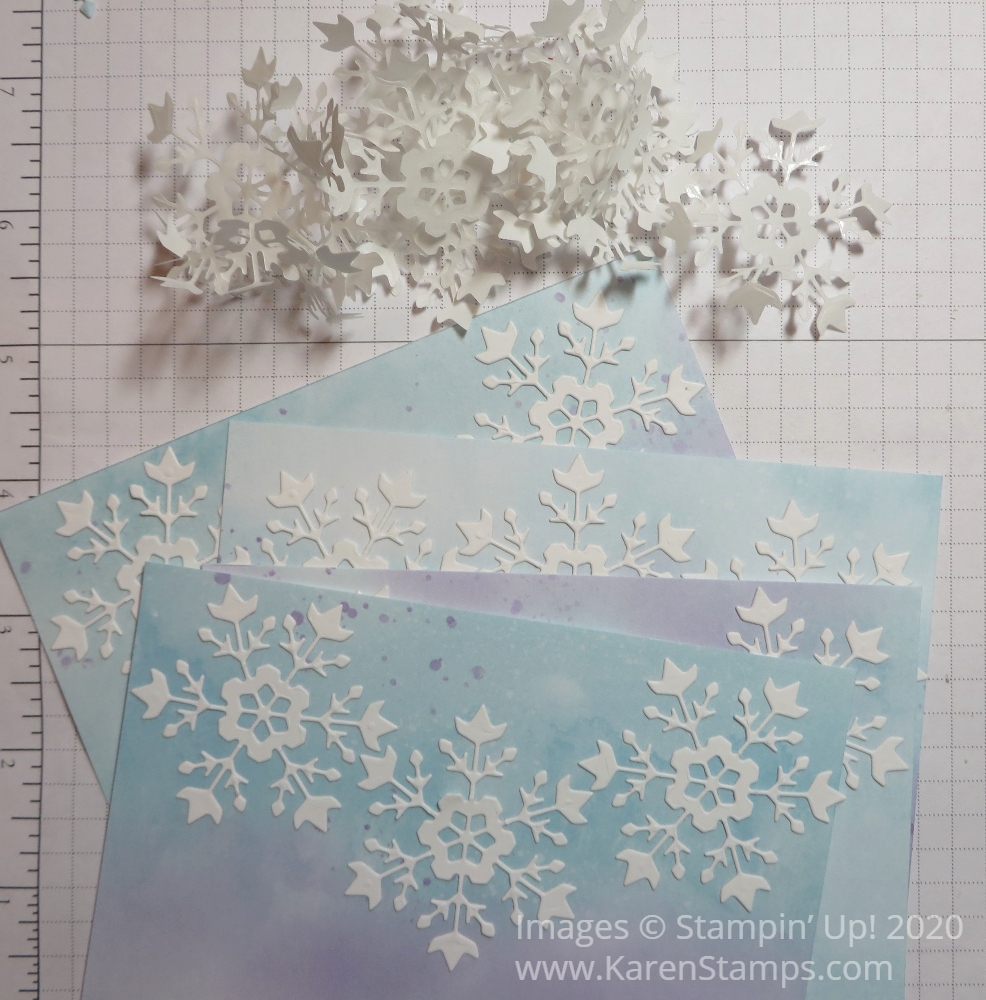
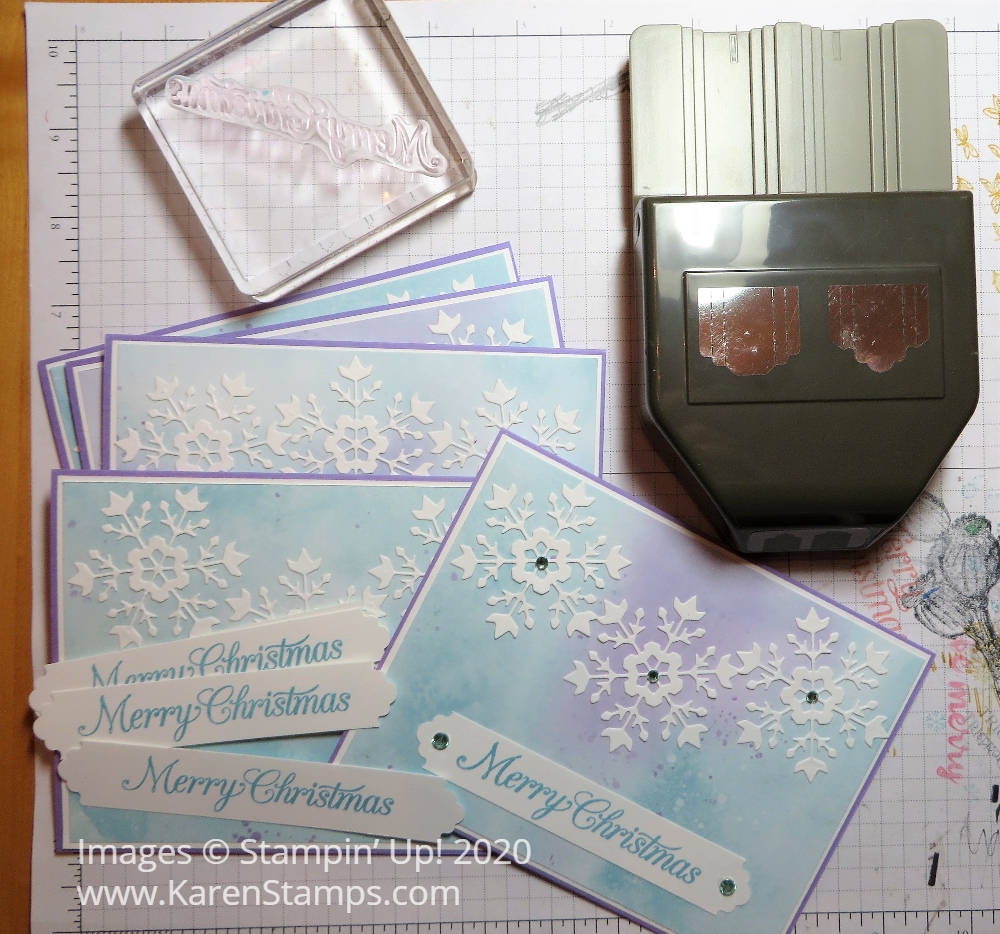
The first step, as you see in the top photo is to cut all your paper and score the card base as well. Cut the card base, layers, designer paper, scrap pieces….everything you need to make the card. Make little piles of the same pieces so you don’t get them mixed up.
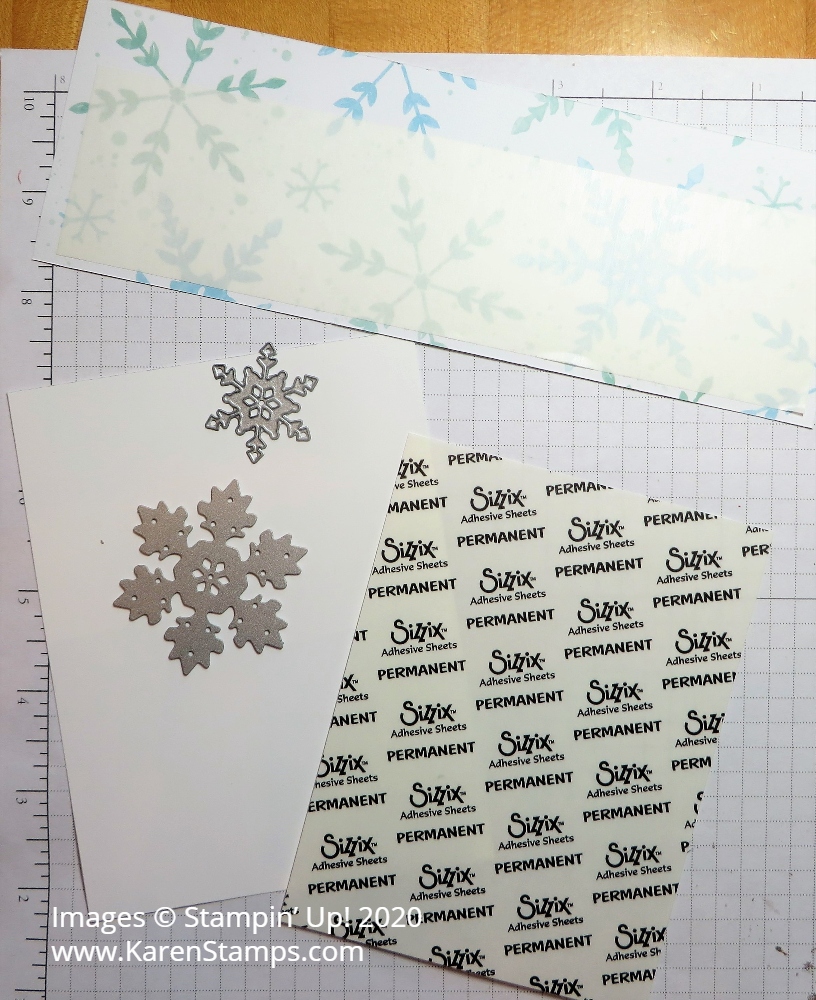
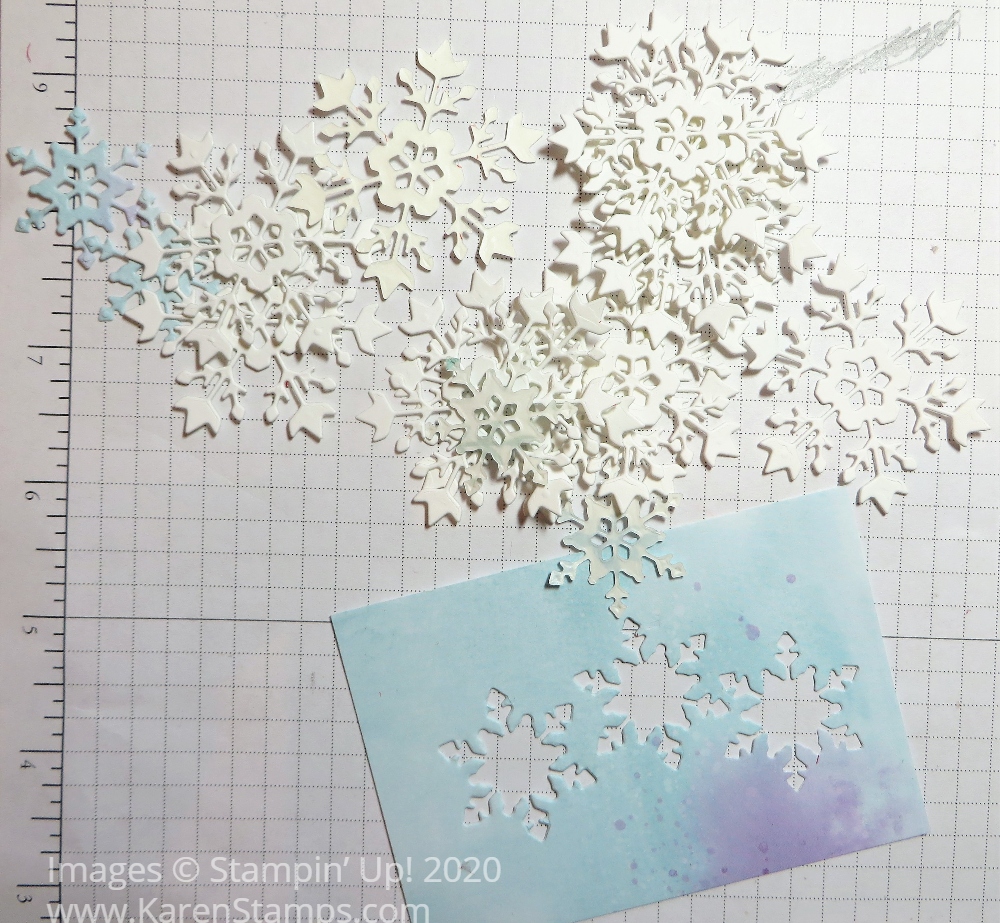
Now amazingly, this time I remembered to use the Adhesive Sheets before cutting out the snowflakes! This makes it easier to adhere them because they will already have adhesive on all the little areas from the Adhesive Sheets. No need to add tiny drops of glue! The snowflakes are made with the So Many Snowflakes Dies.
For this card, I diecut all the white snowflakes out of the Whisper White layer I was going to use under the designer paper. Shhh! Don’t tell anybody! They’ll never know!
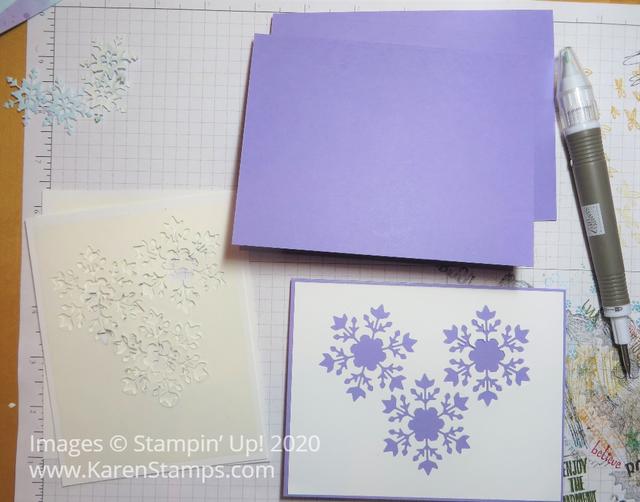
Adhere the Whisper White layer to the Highland Heather card base. And since I used the Adhesive Sheets on the back so I could diecut the snowflakes, I don’t even have to use glue, just adhere the Whisper White to the card. Do all the cards like this.
Adhere all the die-cut snowflakes to all the pieces of the watercolor pattern in the Snowflake Splendor Designer Series Paper. The Take Your Pick tool helps to separate the backing of the adhesive sheets from the snowflake.
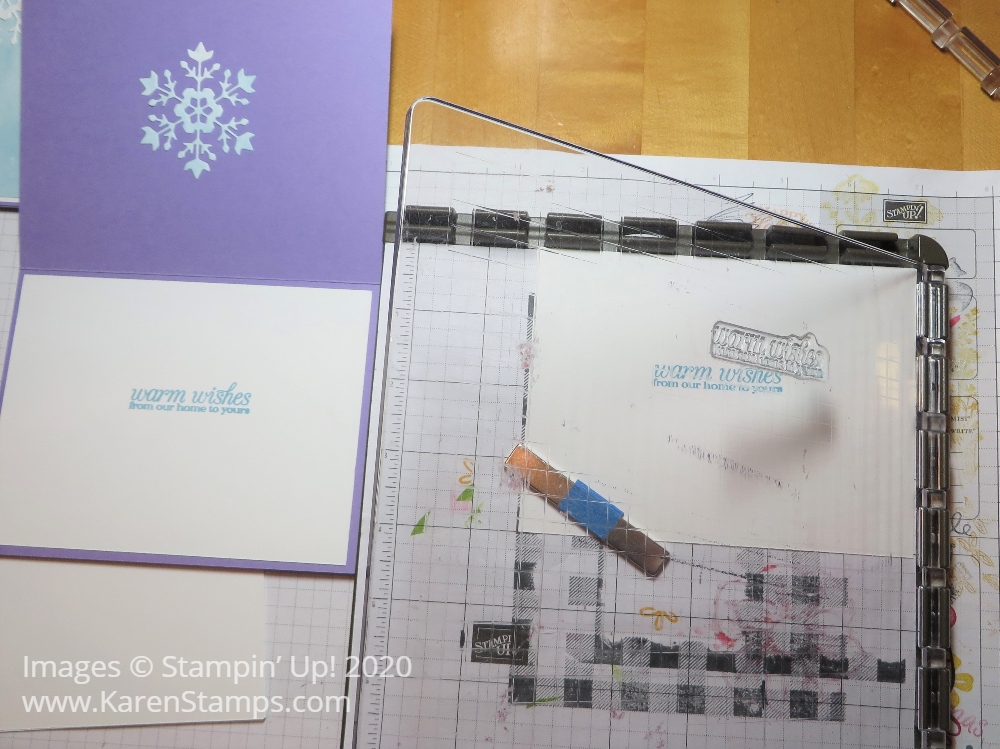
When you have stamping to do making Christmas cards, it’s really useful to have the Stamparatus! Get the words or whatever images lined up perfectly and then stamp with the Stamparatus! If the inked image is incomplete, you can just reink the stamp and stamp again as long as you don’t move the paper!
Finish assembling your cards by adding some Holiday Rhinestone Basic Jewels. Inside the card, adhere the smaller designer paper snowflakes you already cut out and stamp the greeting using the Stamparatus on another layer of Whisper White, also from the Poinsettia Petals Stamp Set. Then you have a stack of Christmas cards all finished!! Make them assembly-line style!
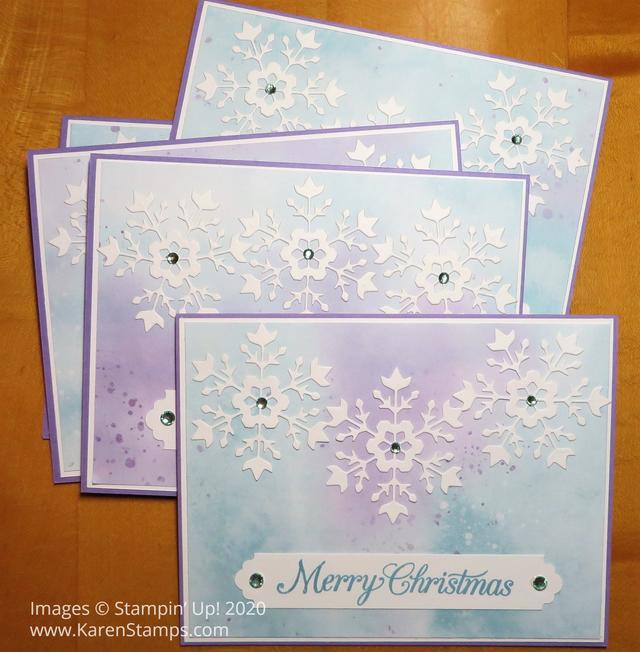
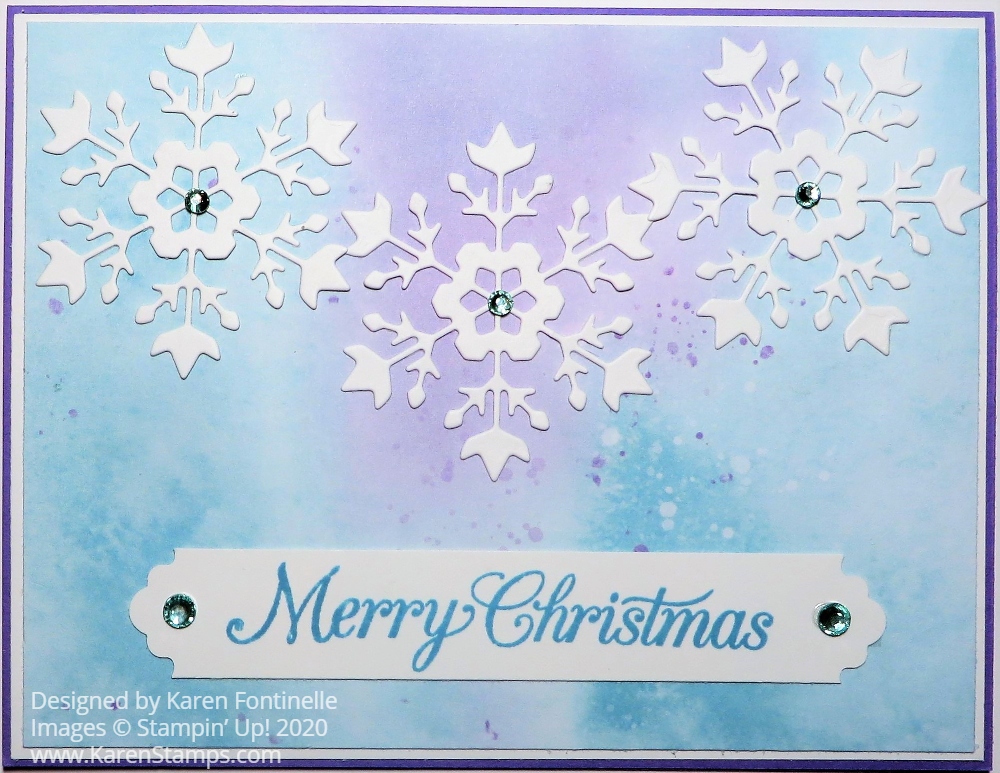
I couldn’t help but carry on with the snowflake theme with this Snowflake Splendor Merry Christmas Card. When I made the snowflake die cuts in the card from yesterday’s post, I had these three beautiful snowflakes I could use on another card.
It might look like I watercolored the background of this card, but it is actually the Snowflake Splendor Designer Series Paper. I chose a portion of the paper that had the colors of blue and also the purple. It’s really a beautiful background and not quite the traditional Christmas colors.
The card base is Highland Heather Cardstock with another layer of Whisper White to help set off the designer paper. These are just 1/16″ margins rather than 1/8″ because I needed the width of the card for the three snowflakes. The snowflakes are die cut with the So Many Snowflakes Dies.
I adhered the three snowflakes to the designer paper with tiny dots of Multipurpose Liquid Glue. The greeting is stamped from the Poinsettia Petals Stamp Set. Then I used the Lovely Labels Pick A Punch to punch each end of the stamped strip. This punch is like two punches in one so it is really fun to use! After I insert the strip, I turn the punch over to make sure the strip is fully inserted and that it is centered. You don’t really have to be this precise, but if I think of it, I like to double-check before punching.
I could have popped up the greeting, but since I thought I would probably put an embellishment at each end, I didn’t want it to be too thick for mailing. I used the lightest color, Coastal Cabana, in the Holiday Rhinestone Basic Jewels in the center of each snowflake and larger ones at each end of the greeting strip.
For the inside of the card, I added a Whisper White layer and stamped a greeting from the Poinsettia Petals Stamp Set. I had also die cut a snowflake, the same as the ones on the front of the card, out of a scrap of the same designer paper, but I thought it took up too much room on the inside Whisper White layer, so I adhered it to the inside of the back of the card front.
That’s all there is to this pretty card! It’s really just the die-cut snowflakes and the watercolor look of the designer paper. If you would like to make this Snowflake Splendor Merry Christmas Card, just visit the Stampin’ Up! Online Store!
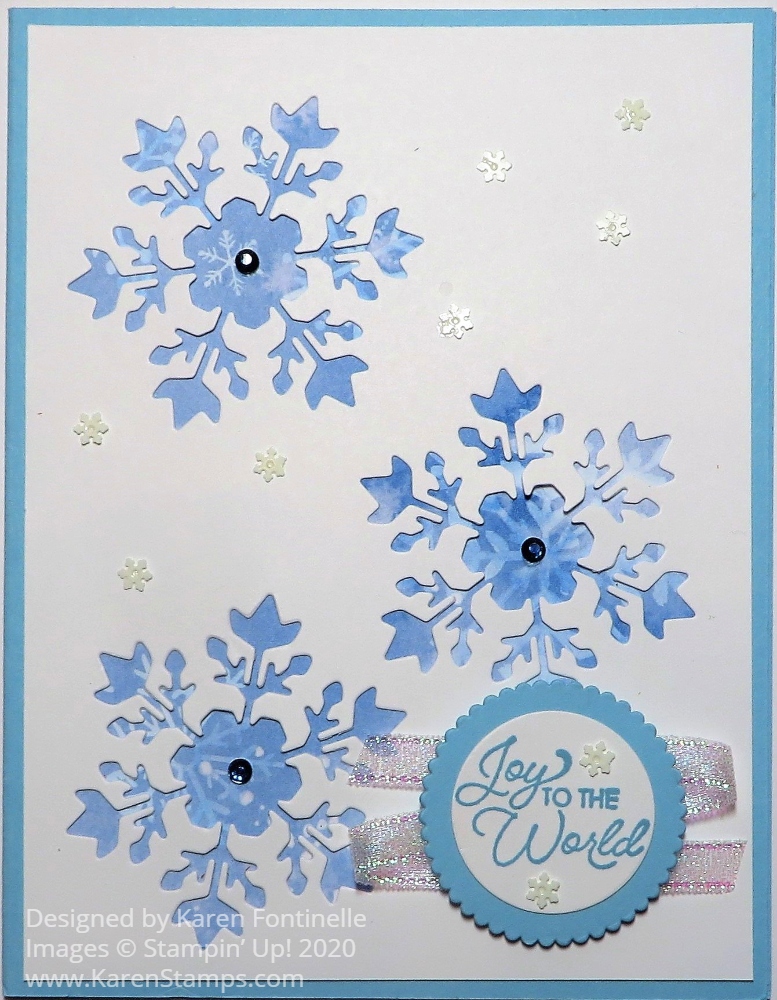
Brand new designer paper, dies, ribbon, and even a new die-cutting machine to make this Snowflake Splendor With Many Snowflakes Dies card for the holidays! Actually, I am hoping the snowflakes will cool me off in this very hot Houston weather!
This card is actually pretty simple! The card base is Balmy Blue Cardstock and I used the new Snowflake Splendor Designer Series Paper as a layer underneath the die-cut snowflakes. The snowflakes are die-cut out of Whisper White Cardstock (Shimmery White Cardstock would be really pretty, too!) using the So Many Snowflakes Dies. As a bonus, I now have three beautifully die-cut snowflakes to use on another card or project!
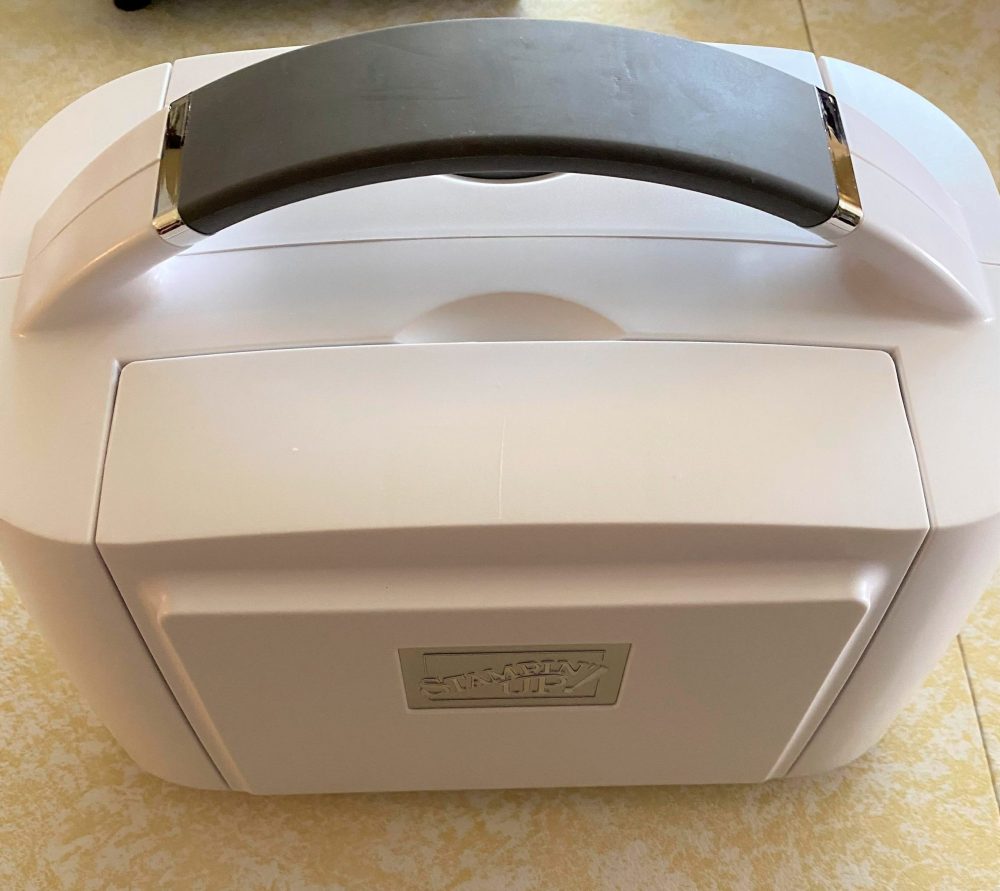
The new Stampin’ Cut & Emboss Machine, pictured in the Stampin’ Up! Annual Catalog is almost available! It will be available to customers on September 1, which is coming up soon! It IS available for preorder for Demonstrators (which is always a good reason to sign up!), but only the large machine. The cute Mini is not available and we don’t have a date yet. Mine just arrived and I’ve only played with it a little bit! I will post some quick photos I took of it, but I didn’t have the handle attached to it yet!
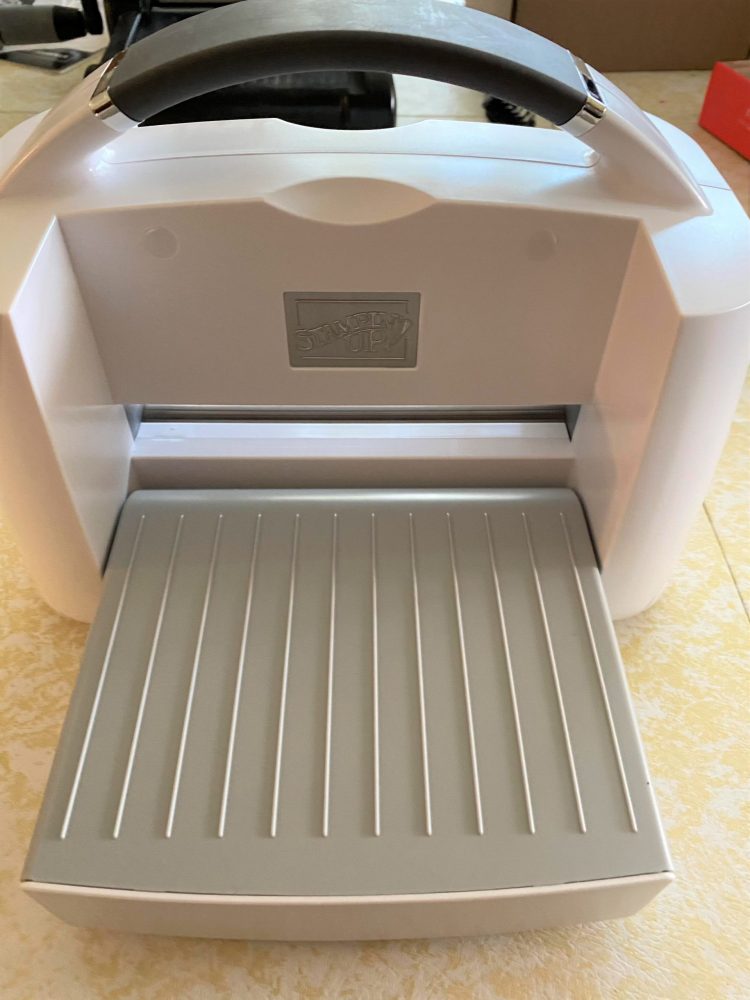
The Stampin’ Cut & Emboss comes separately from any order you also placed with it, in a box of its own, very well packed. There are some instructions and I encourage you to read them. The handle assembly instructions are just drawings, as most manuals are these days, but there is important information in the written information just inside the cover. Please read it so you don’t void your warranty and keep it handy. Be sure to save the little wrench that comes with the machine you need to attach the handle because you may need it in the future possibly.
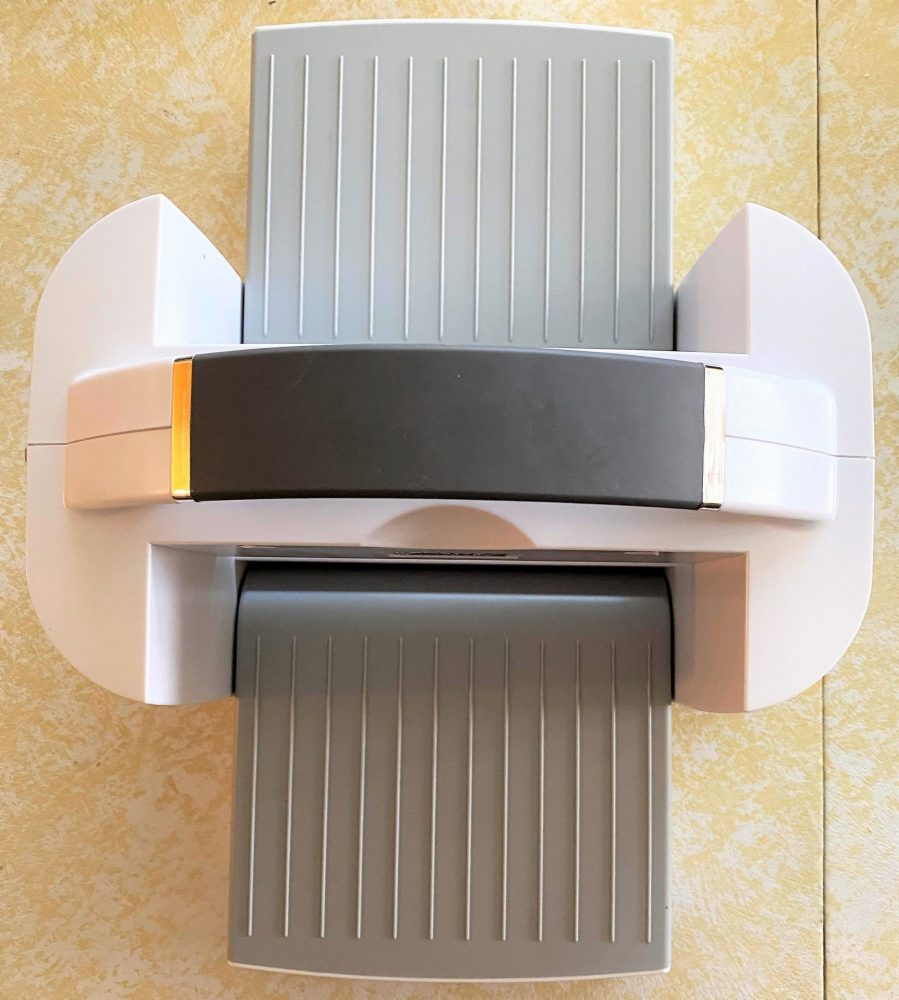
The machine itself is gorgeous, especially the silver embossed Stampin’ Up! logos! It’s so nice the way the platform folds up on each side for storage or just to take up less space wherever you have it. Since mine is always out on the dining room table, this might neaten things up a bit!
The platform and plates are numbered and have directions printed on the platform for the sandwiches to use for dies, thinner embossing folders and the 3D embossing folders. That is so great! Before you start, though, take a good look at your beautiful, new clean clear plates with no marks on them yet!! Just admire the beauty before they get messed up with die-cutting marks! LOL!
I found the machine to work very well and did I mention how pretty it is?! My Big Shot is still working but is ten years old and has been overhauled once by my husband a few years ago so I wonder how much longer until it konks out. I will certainly keep it as it may work for many more years, but I did have to have the new one!!
But back to the card! I die-cut the three snowflakes and then tried various designer papers underneath to see what I liked. If you want to be real persnickety, you can see if you can line up any snowflake designs underneath your die-cuts. I kind of did that and drew a pencil line around the Whisper White die-cut layer on to the designer paper and cut it out by hand, but even that wasn’t perfect so I don’t know that I would bother with that again.
The greeting is stamped in Balmy Blue Ink and die cut, as well as the Balmy Blue Cardstock layer, with the Layering Circles Dies. I was trying to make the whole greeting as small as possible to avoid covering up my die-cut snowflakes, so if you were making this same card, you might try to plan ahead with the greeting and try to arrange your dies so you have the space available that you want for your greeting. It doesn’t hurt, though, if a tiny corner of the snowflake is covered. The greeting is from the Itty Bitty Christmas Stamp Set.
Since I had just received the Snowflake Splendor 1/4″ Ribbon, I wanted to use it and just zig-zagged it behind the greeting before adhering with Stampin’ Dimensionals. The ribbon is a little stiff and is making the greeting pop up so I probably need to work on that a little bit!
For some bling I added some Holiday Rhinestone Basic Jewels in Night of Navy to the center of each snowflake. You could use other things, too. Then I added a few Snowflake Sequins randomly on the card front and on the greeting. The Take Your Pick is handy for picking up these tiny snowflake sequins and placing them on the teeny tiny dot of Multipurpose Liquid Glue. I hope this Snowflake Splendor With Many Snowflakes Dies card has cooled you off from the summer heat and gotten you in the mood for holiday cardmaking!
Shop Stampin’ Up! Online in the New Store! Make sure you see my name as your Demonstrator since this is a new site. If you have questions, just let me know!