Tag Archives: Itty Bitty Greetings Stamp Set

Hydrangea Hill Butterflies

Hydrangea Hill Butterflies

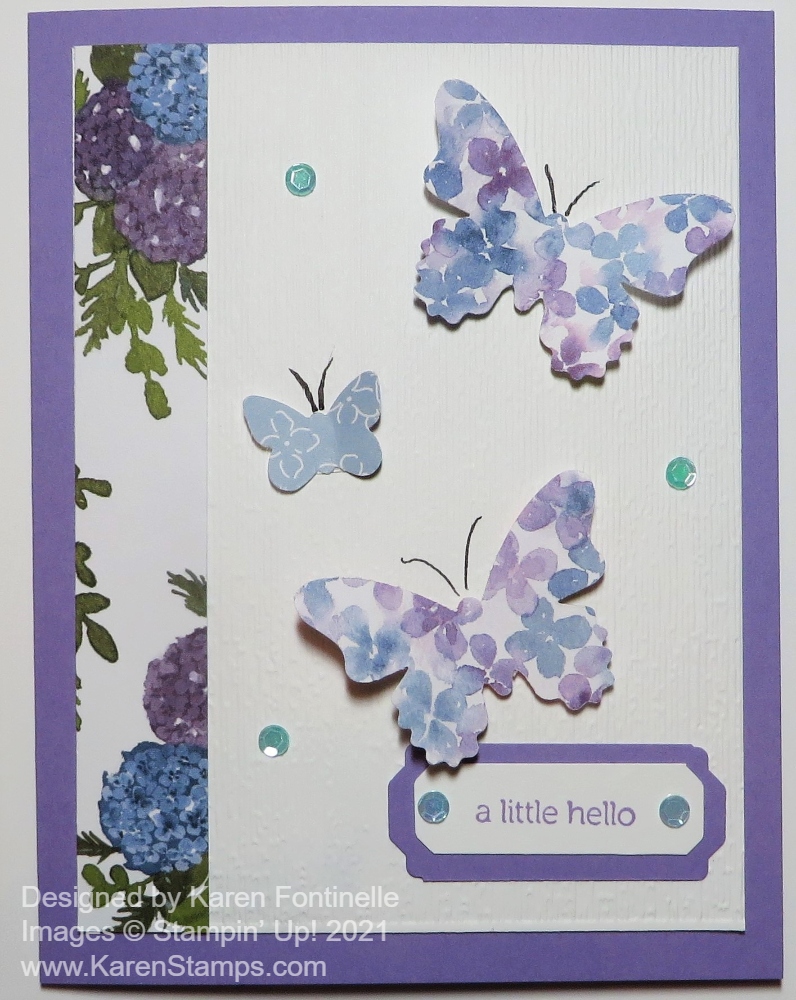
Make some pretty butterflies using pretty designer paper and a punch, like these Hydrangea Hill Butterflies on this card. It’s springtime so it’s time for butterflies and Stampin’ Up! has an assortment of butterflies to choose from. Some are retiring soon and some are new. But paper and a punch help you make a pretty simple, elegant card.

The card base is Highland Heather Cardstock. I started off planning to make a white on white card, but I changed my mind! It’s allowed! The top layer has wider margins than normal. Instead of cutting the layer 5 1/4″ x 4″, I cut it at 5″ x 3 3/4″. I ran the Basic White paper through the Stampin’ Cut & Emboss Machine embossing it with the Subtles Embossing Folder. This folder is difficult to see in a photo but it just puts a “subtle” pattern of lines on the paper so you have some texture but just barely. It’s perfect for when you want something but not a lot. This embossing folder is retiring soon so check it out if you are interested!

I added a narrow strip of Hydrangea Hill Designer Series Paper along the side of the Basic White embossed layer. I used the Butterfly Duet Punch to punch out several butterflies out of another pattern of the same paper. I chose a pattern that had the little floral pattern all over the paper so it would definitely show up inside the punch. Otherwise, you might have to be careful to get a colorful enough pattern inside the punch area. This punch punches out a small and large butterfly so it is very handy. But it is retiring by May 3, so if you don’t have it yet, you might want to see if you need it in your stash! I just drew on the little antennae on each butterfly with a fine tip black marker.

The greeting is from another retiring item, the Itty Bitty Greetings Stamp Set. All the “Itty Bitty” stamp sets are retiring which really makes me sad. I have used all of them a lot. On some cards, you don’t necessarily want the greeting to be the focal point or there just isn’t enough room for larger greetings, so the Itty Bitty series always came in handy! These Itty Bitty Sets are all retiring – Itty Bitty Greetings. Itty Bitty Christmas, and Itty Bitty Birthdays. Check them out. I used the Lovely You Punch for both the Highland Heather layer and the greeting.

The two large butterflies are popped up with Mini Stampin’ Dimensionals and the wings are folded up a little bit to add some dimension. For a little bling, I added some Artistry Blooms Adhesive-Backed Sequins scattered around and on the greeting. These are Coastal Cabana in color but go fine with the blues in the designer paper.

This is an easy card to make and easy to change up according to what supplies and punches you have. You could also punch out flowers and make the card in the same design. Try making a card with what you have today similar to this Hydrangea Hill Butterflies card and see what you come up with!

Arrange a Wreath Easter Card

Arrange a Wreath Easter Card

This Arrange A Wreath Easter Card uses several products, unfortunately, from the Stampin’ Up! Last-Chance List. Every year we go through this with a bit of excitement and a bit of nostalgia. We wonder what will be retiring and then we groan when our favorites are on the list! It’s really kind of funny after you have been through it many times! And then when the new Stampin’ Up! Catalog comes out we’re all excited about the new products and almost forget about what retired! Yet there are always those products that we each must have in our stash, whether they have been around for awhile or maybe only a year or two.

Easter is coming next weekend so be sure you are ready for the Easter Bunny! Make some Easter cards to send and get them in the mail! If you already have the Arrange a Wreath Bundle, you can make some very pretty cards for Spring and Easter. This Bundle is good for all seasons, actually. I really wish it was not retiring yet! However, on this card, I just used the Wreath Builder Dies. The stamp set, dies, and Bundle are all backordered as I write this. Hopefully, they will be back in stock soon!

Another product retiring, that I just purchased, is the Playing With Patterns Designer Series Paper. These are 6″ x 6″ papers with such colorful and happy colors and patterns! I can’t believe I didn’t have it before now. There were several papers that I could have used for a background for this Easter card, but I chose this Calypso Coral paper with white dots and layered it on top of Basic White cardstock to brighten it up. The card base is Calypso Coral.

The wreath is one of two choices in leafy wreaths in the die set. And then you get all kinds of dies to add elements to your wreath. I chose the wreath with the small sprigs of leaves and decorated it with colored die-cut eggs and flowers along with the die-cut bow in the Wreath Builder Dies. For flower centers, I used the Gold Glitter Enamel Dots. I have used these a lot because Gold Glitter goes with a lot of things especially since they come in different sizes of dots. These dots are also retiring soon so get them while you can!

I actually forgot about the matching Arrange a Wreath Stamp Set, so I used the Easter greeting in the Itty Bitty Greetings Stamp Set. ALL the Itty Bitty Stamp sets are retiring, which really upsets me because I used all the Itty Bitty stamp sets a lot. You can find just about any greeting you could need in one of these sets! If you don’t have them, be sure to check them out in case you “need” them! The greeting is stamped in Calypso Coral Ink and punched out with the Classic Label Punch. Can we really live without this basic punch??! It was just perfect with the Itty Bitty greetings and many others.

Check out the Last-Chance Products List and Sale. The Classic Label Punch is even on sale, but is backordered. All of these products are available while supplies last.

The easiest way to see what is still available is just to go to the Stampin’ Up! Online Store and shop there. If you already have the Arrange a Wreath Bundle or dies, make a card for a friend or neighbor for Easter like this Arrange A Wreath Easter Card. You can even add a bunny if you want!

SHOP STAMPIN’ UP! ONLINE HERE!

Easter Bunny Wreath Easter Card

Easter Bunny Wreath Easter Card

There are so many pretty cards you can make with this die-cut wreath including a card like this Easter Bunny Wreath Easter Card. You can use this wreath and the other design that comes in the set as well to make all kinds of cards for many occasions. I love adding the Easter bunny and his basket of eggs to the wreath!

The die-cut wreath is made with the Wreath Builder Dies. I die cut two wreaths, one out of Pear Pizzazz and one out of Soft Sea Foam for a lighter color. You can use just one wreath but I think two look more interesting. Just glue one on top of the other, however you would like to place it, and then adhere to the card front.

The card base is Pear Pizzazz with a layer of Shimmery White Cardstock. I thought the background needed a little something, so I embossed it with the Ornate 3D Floral Embossing Folder. I think it adds a nice background without being too much.

The Easter bunny and basket, from the Springtime Joy Stamp Set, are stamped on Shimmery White with Memento Ink and colored in with Stampin’ Blends. I then cut out each by hand. To get your scissors inside the handle of the basket, you can punch a hole or maybe a couple of holes carefully which might work better than trying to stab the point of your scissors into the cardstock! I just used Multipurpose Liquid Glue for everything, although you could pop some things up with Stampin’ Dimensionals if you wanted to.

I also added a bow with the Daffodil Delight 1/4″ Ruched Ribbon and adhered it with Mini Glue Dots. There is also a die for a bow to hang on the wreath, but I preferred a real bow. For the greeting, I stamped one in the Itty Bitty Greetings Stamp Set and made a tiny tag out of it to tie on behind the bow. You can even cheat and add Glue Dots behind a little tag like this to hold it in exactly the position you want it or even behind ribbon tails or bow loops to keep them where you want them!

Here is another card I made for fall die-cutting one each of both the wreath designs on one card!

Easter is in two weeks from yesterday so it’s time to make Easter and Spring cards if you want to send them.

Shop the Last-Chance Products Sale March 24 – May 3 on select, retiring Annual Catalog products! Be ready!

(Sale probably begins at 1:00 PM Mountain Time, 2:00 PM Central Time when the Retiring List is released. Stay tuned!)

Trio of Bunnies Easter Card

Trio of Bunnies Easter Card

Here’s a Trio of Bunnies Easter Card, three little bunnies just waiting for Easter! They are just waiting in the grass, next to some tulips, thinking about spring!

The card base is Pool Party Cardstock with a layer of Blushing Bride Cardstock. I like these two colors together for spring, for softness, and for prettiness! The top layer is Basic White Cardstock, stamped with the bunnies from the Springtime Joy Stamp Set, a couple of tulips, and a small butterfly all in Memento Black Ink.

The bunnies, tulips, and butterfly were colored in with Stampin’ Blends alcohol markers. I had colored in some grass and even some sprigs of grass, but then I got the idea to cut a piece of green designer paper of some sort for the bottom border of the card to look like grass. I looked through my designer papers and ended up choosing this pattern from the Artistry Blooms Designer Series Paper. There are several you could choose from. I also colored in the background of the sky behind the bunnies with the Light Pool Party Stampin’ Blend.

I usually like to cover a “seam” or where a piece of designer paper ends on a piece of cardstock with a piece of ribbon or another strip of paper. On this card, I used a piece of Mossy Meadow 3/16″ Braided Linen Trim across the top of the designer paper and tied two knots along the trim.

The greeting is from the Itty Bitty Greetings Stamp Set. You can find almost anything you need in all of the “Itty Bitty” stamp sets! I love them! I punched it out with the Classic Label Punch. It was a good size for this card! It is popped up with a small Foam Adhesive Strip. These are just like Stampin’ Dimensionals except they are strips. Sometimes you use them in the same way as Dimensionals and sometimes they are used for special projects like shaker cards.

For one more little touch, I added some Artistry Blooms Adhesive-Backed Sequins in the background. I could have added an Easter Basket for at least one bunny to hold, but I wasn’t thinking about that when I made the card so I think it is fine the way it is. I could have also used the “Welcome Spring” greeting in the stamp set.

You will find a lot of uses for this cute Springtime Joy Stamp Set!

PS: Today is the last day to subscribe to Paper Pumpkin to get the March 2021 Kit!

CLICK HERE TO JOIN PAPER PUMPKIN!

Gilded Autumn 2-4-6-8 Fall Treat Bag

Gilded Autumn 2-4-6-8 Fall Treat Bag

If you want a little autumn treat for someone or maybe for Thanksgiving dinner favors, this little Gilded Autumn 2-4-6-8 Fall Treat Bag would meet your needs! These little 2-4-6-8 bags, as we like to call them, are really easy to make out of cardstock or designer paper and then you can decorate them for any occasion. You can make them taller too with a larger piece of paper.

For this treat bag, you just need half a sheet of paper, 5 1/2″ x 8 1/2″ if using cardstock or cut designer paper to this size. I used the pretty Gilded Autumn Specialty Designer Series Paper with gold and copper foil accents, which makes it extra special. If you want a taller bag, then cut it more than 5 1/2″.

Score at 2″, 4″, 6″ and 8″. Turn and score at 1 1/2″ (or 2″). These will be the bottom flaps so pay attention to the pattern on your paper, watching which way it is going so it doesn’t end up upside down. Cut the bottom flaps up to the score line. Cut off that very small 1/2″ piece on the end. See the photo below. (This isn’t the paper I used, and it is taller, but you can get the scoring and cutting idea.)

2 4 6 8 Box Inside Scoring

Assemble the box, putting adhesive on that 1/2″ piece on the side. Then pay attention to where the seam is and try to have that face the back. Fold in the bottom flaps, trying to make the front of the bag look nice with a flap fold, not the edge.

Now all you have to do is decorate the front of the bag. You can even leave it open at the top if you prefer or if you want to put maybe a cello bag of treats inside. But if you want to close the top, just pinch in the sides of the bag and push the top together. Punch holes for ribbon or add a clip of some kind to keep it closed. Be sure to put the treat in first!

For this little Gilded Autumn bag, I die cut a piece of Gold Foil using the Tasteful Labels Dies. Out of the designer paper with pumpkins and gourds all over it, I cut out a pumpkin, a gourd, and a teeny tiny pumpkin! I love that paper! I adhered the large pumpkin and gourd onto the Gold Foil circle with Stampin’ Seal+. After stamping and cutting out the greeting, from the Itty Bitty Greetings Stamp Set, I adhered that at the bottom of the pumpkin and gourd, then popped up the tiny pumpkin with a Mini Dimensional just at the very top so that it would partially layer over the greeting.

To finish off the treat bag, I used my old Cropodile to punch two small holes in the top of the bag and I tied a piece of Braided Linen Trim at the top. You could use some other ribbon as well.

This 2-4-6-8 pattern is so versatile and so easy to make! Try it for whatever occasion you want. Halloween is coming up so that would be fun!

SHOP STAMPIN’ UP! ONLINE HERE!

Easy Easter Candy Treats

Easy Easter Candy Treats

If you want to make some last-minute Easy Easter Candy Treats, these will work! These are quick and simple and you can vary the size according to the candy treat you have to put inside. You could even not cut an opening in the front and just decorate the front for the occasion and tuck your candy treat inside. You can make these taller or wider.

These candy treat holders are 2″ x 8 1/2″ to start with but depending on your candy, you can cut them down a little shorter. The 2″ width is so the piece of cardstock will fit into the Scalloped Tag Topper Punch. Cut the 2″ x 8 1/2″ strip of cardstock and punch each end in the Scalloped Tag Topper Punch. Then place one end at the 3 3/4″ inch mark on the Paper Trimmer and score, then turn and place the other end at the 3 3/4″ mark and score. That gives you the little space in which to place your candy treat.

Before you put the candy inside, decide if you want a different color background inside. The Daffodil Yellow treat holder has a Whisper White piece stamped with the little green leaves in Welcome Easter, although you really can’t see them! The Melon Mambo treat holder doesn’t have an inside layer. However, on that one, I stamped the little flowers in the Welcome Easter Stamp Set on the front. The greeting is stamped from the Itty Bitty Greetings Stamp Set and punched out with the handy dandy Classic Label Punch. To decorate the Daffodil Delight holder, I just added some small Rhinestone Jewels.

I didn’t have any exciting Easter candy but these little chocolate bunnies which are pretty flat fit in just fine. So if you had a larger chocolate bunny, for example, you probably would need to make the base wider and therefore the strip longer in the beginning. Then you can die-cut or punch some kind of opening in the front. Just add a ribbon to tie the top together and you’re done!

Sometimes you need to give credit where credit is due so I must give credit to myself! I made a similar Easter treat last year but I had a cuter piece of candy to put inside! You can see that post HERE.

None of us will be having big family Easter dinners this year, so it would be easy to make one of these Easter candy treats to put at each place at the table for you and your spouse, or children, or whoever you are living with during this quarantine time.

St. Patrick’s Day Shamrock Card

St. Patrick's Day Shamrock Card

Get those heart stamps out again and let’s stamp a St. Patrick’s Day Shamrock Card! Heart stamps are good for lots of things besides Valentine’s Day and now you see how you can use them for St. Patrick’s Day. You can use any heart stamps you have for different looking shamrocks.

For this shamrock card, I started with a base of Call Me Clover Cardstock. This cardstock is one of the current In Colors that will be retiring in May before the new In Colors come in. These In Colors have had their two-year run. If you need any of them, refills, ribbons, anything with these In Colors, it would be smart to order them now before people rush to get them at retirement time. And if you order in March, you can take advantage of Sale-A-Bration.

It was fun to basically “just stamp” on this card! I used the Heartfelt Stamp Set in the Occasions Mini Catalog. Just stamp four of the hearts to make a shamrock, or I have seen just 3 heart leaves to make a shamrock also. It’s easier than it used to be now that we have photopolymer stamps that you can see through. For the stem, I simply used a Blender Pen and picked up some of the Call Me Clover ink in the lid of the ink pad and drew on the stem. You could use a marker or just cut a thin stem.

Instead of just stamping a greeting on some kind of layer, I decided to just stamp the sentiment randomly in between the shamrocks on the card front. The “Have a Lucky Day” phrase is from the Itty Bitty Greetings Stamp Set. That’s such a great set to own because you can almost always find a good sentiment to use for your card.

Of course, I wanted to have a little gold on my card for St. Patrick’s Day so I chose the Gold Glitter Enamel Dots. You will find these in the Stampin’ Up! Annual Catalog back in the Embellishments section. First I just put small dots around randomly on the card, but then I also thought the center of each shamrock could use a larger gold one. You could also color a dot with a marker to match the shamrock, but I liked the gold in this case.

This card was very simple to make, quick and easy. Plus a good way to use our heart stamps! Don’t think of your heart stamp sets for just Valentine’s Day, keep them handy for other occasions like this St. Patrick’s Day Shamrock Card with St. Patrick’s Day coming up on March 17th!

Clear Tiny Treat Box with Pressed Petals

Clear Tiny Treat Box with Pressed Petals

I wanted a little thank you gift for someone and one of the easiest things to make is a Clear Tiny Treat Box filled with candy! Chocolate of course! This is one of the things that I LOVE to make since years ago when I saw the idea. That is, covering candy nuggets with a 1″ x 3″ strip of designer paper (being careful not to get adhesive on the actual candy, only the paper!). We used to put them in tins that had to be specially ordered, but now we have the Clear Tiny Treat Boxes that work!

The Clear Tiny Treat Boxes come sixteen to a package and come flat, so storage is no problem. They come wrapped in some plastic to protect from scratches. Just open and crease all the flaps, then assemble and decorate! These boxes are food safe and acid free. They are sized 2″ x 2″ x 2″. Perfect for a candy treat or small gift.

The fun way to decorate candy pieces like these chocolate nuggets is to cut a strip of designer paper (or stamped or decorated cardstock, but designer paper is easiest) that is 1″ x 3″. Just wrap around the candy and apply adhesive to the overlap. I like to use the Multipurpose Liquid Glue, carefully. Keep any adhesive off the candy.

To decorate this Tiny Treat Box, I wrapped a piece of Pressed Petals Specialty Designer Series Paper around the box. Make it as narrow or wide as you want, but you won’t need the full 12″ strip. Start by just wrapping around, creasing on the corners, then cut off the excess and adhere. Depending on your design, if you are putting something on the front of the box like this box, start the end on the front of the box and that junction will be covered by the flower. Otherwise, put the ends on the back of the box.

To decorate the front of the box I made a washi tape flower as I described in THIS POST. The new Pressed Petals Specialty Washi Tape comes with a roll of individual flower petals that you can peel and stick however you like or make a flower like this one! I added a few small rhinestones to the flower center. You can add one of the Perennial Essence Flower Centers if you have them.

The ribbon wrapped around the box is the Gold 3/8″ Metallic-Edge Ribbon, one of my favorites because it is so versatile. The little greeting is stamped with the Itty Bitty Greetings Stamp Set on Very Vanilla and partially layered over a piece of Merry Merlot Cardstock. You can use the Tailored Tag Punch to punch the flagged ends. Just adhere with Mini Glue Dots.

This is a fun and easy thank you gift to personalize for someone! Put the Clear Tiny Treat Boxes on your next order and keep them on hand for when you need to give a little gift like this Clear Tiny Treat Box with Pressed Petals.