Altered Spring Lamb Gift Bag

Altered Spring Lamb Gift Bag

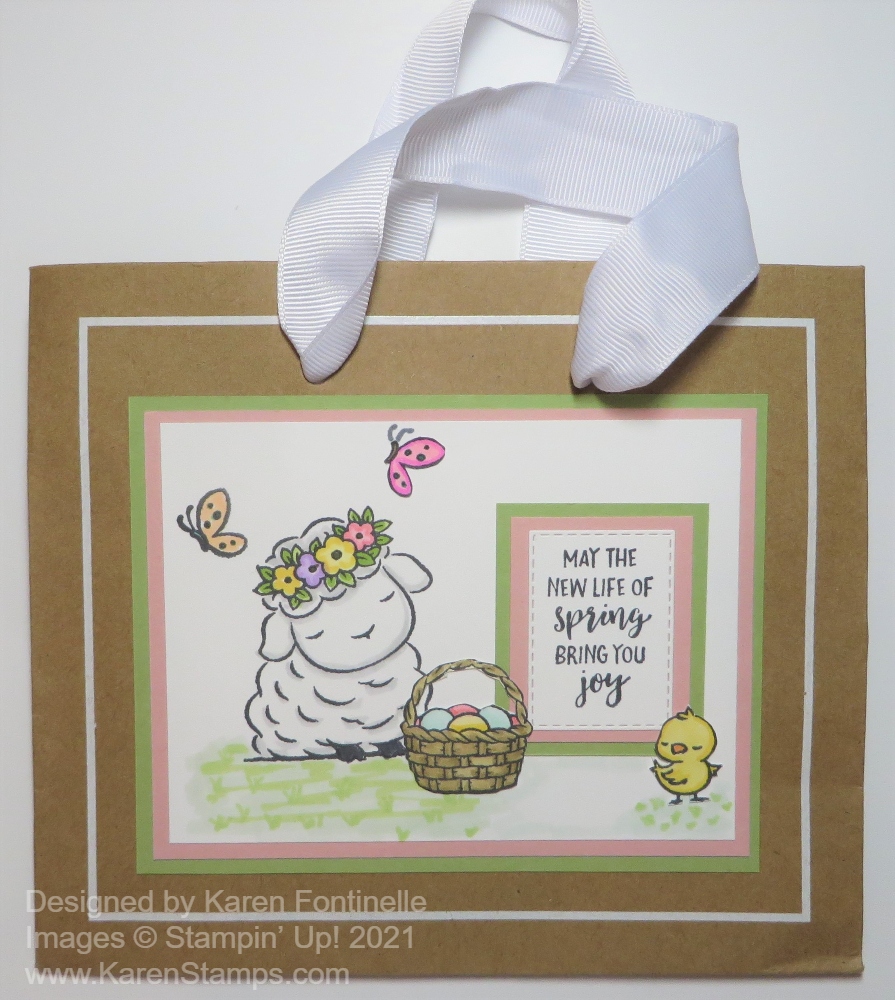
Something I think is fun to do is to take a shopping bag you got at a store and turn it into a gift bag, like this Altered Spring Lamb Gift Bag. The other day when I was cleaning out my “bag of bags”, I came across this small kraft shopping bag I got at one of my favorite gift shops. This bag is about 6″ x 7″ which was perfect for adding this stamped panel to the front of the bag! Even if the bag has printing, such as the name of the store or company, just cover it up with your stamping elements.

This bag already had the white border line around the bag with the store name printed in the middle. This was the perfect size to add my stamped decoration for the front of the bag and turn it into a spring gift bag, maybe for Easter

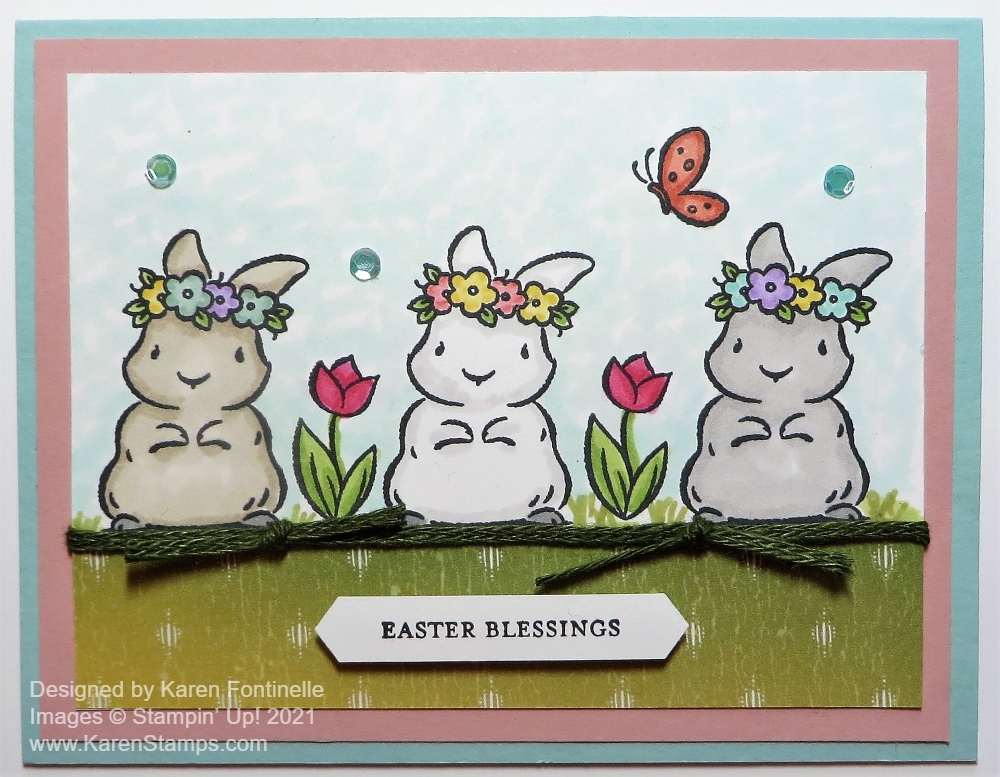
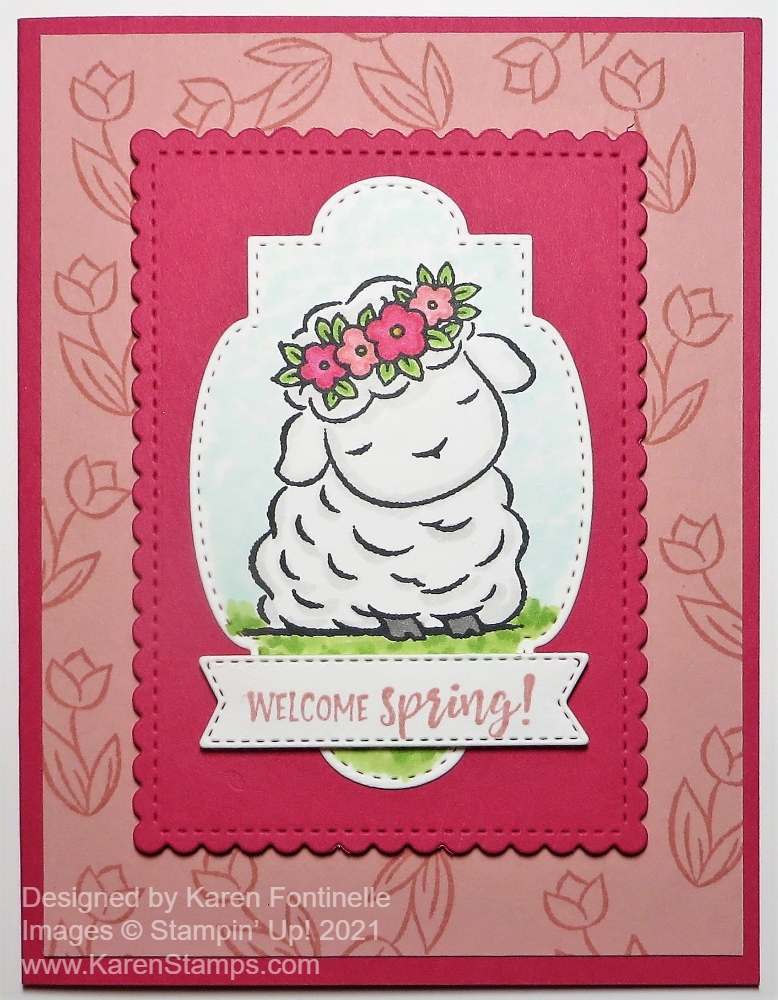
It was really like making a card, I just made the piece to fit the front area of the bag. The lamb is from the Springtime Joy Stamp Set, very popular right now with Easter coming up soon! The lamb is stamped in Memento Black Ink so I could color him with Stampin’ Blends Markers.

When I looked at the greetings in the stamp set, it seemed I should place the lamb off to the side and put the greeting, layered, right there on the other side. I wanted the lamb to be white, but I used the Light Smoky Slate Stampin’ Blend to just add a bit of color by the fluffs of wool and here and there. Then I also colored the flowers and leaves.

The greeting is stamped and then die-cut with a die in the Stitched So Sweetly Dies. For the layers underneath I just cut out rectangles with my Paper Trimmer.

For embellishments, I stamped a butterfly off to the side of the lamb and colored it with Stampin’ Blends. I also stamped the basket of eggs, colored it, and then cut out with Paper Snips. I decided not to pop it up with Dimensionals and just glued it down flat next to the lamb. Also, that little chick is so cute, I stamped, colored and cut him out and glued him down at the corner of the greeting. Now after all this, if you get a smudge of ink on your work, just add another butterfly to cover it up!

The whole decorative piece is layered on Blushing Bride and then Pear Pizzazz Cardstock. It is centered inside that white border line and looks perfect on this shopping bag turned into a gift bag! You can do this for any occasion! If you don’t have a cute little shopping bag, you can purchase plain bags at the craft store and decorate those. This is especially fun (and useful!) to do before Christmas so you have plenty of gift bags ready for gift wrapping like this Christmas bag.

Look through your bags and see if you have some shopping bags you can alter for whatever occasion you need like this Altered Spring Lamb Gift Bag I did using the Springtime Joy Stamp Set, perfect for a small Easter treat or gift!

So Cool Paper Pumpkin For April!

Paper Pumpkin is the papercrafting kit that comes to you in the mail once a month! I like to say it’s a present you give yourself! Or you can give it as a gift!

This kit is a little extra-special! It was designed with children in mind! Something to spark their imagination and creativity and introduce them to our wonderful papercrafting hobby! But it doesn’t have to only be for kids! Once you get a glimpse of this kit, you will want it for yourself whether you have little ones around to share it with or not!

The So Cool Paper Pumpkin Kit is a little taste of summer fun, with enough supplies to make 12 colorful, shaped cards with coordinating envelopes. Six card bases are popsicle-shaped, the other six are semicircles: three watermelons and three rainbows. All of the cards are splashed with cheerful, vivid watercolor images. The kit also includes two full-size, matching sticker sheets, die-cut accents, fun embellishments, and more.

The kit’s exclusive So Cool Stamp Set is versatile, offering sentiments that can be used for multiple occasions such as birthdays, congrats, cheer, and more! It’s a great addition to any crafter’s collection.

Watch the video below to get a feel for the So Cool Paper Pumpkin Kit and then sign up to make sure you are on the list when April 10th rolls around so your kit will be shipped out to you!

Fine Art Floral Birthday Card

Fine Art Floral Birthday Card

If you want to make a very quick and easy card, this Fine Art Floral Birthday Card is it! After hours of designing this card….I mean, when I pulled out the package of designer paper and saw this already cut strip of floral paper, I thought it would make a beautiful card! That’s how easy it is sometimes! Maybe sometimes you can spend hours working on one card, but it really isn’t necessary!

One of the many coordinating colors of the Fine Art Floral Designer Series Paper is Flirty Flamingo so I chose that color for the card base. I almost just glued on the designer paper, but I decided to try some strips of another color on each side. Old Olive won.

And as luck would have it, there was already a die-cut scalloped oval in the bag of cardstock so I just used that for the greeting. I stamped the birthday greeting from the Art Gallery Stamp Set on Basic White and die cut that with a plain oval in the Layering Oval Dies. I popped up the greeting with Stampin’ Dimensionals. As usual, I couldn’t resist adding a few Champagne Rhinestone Basic Jewels for some bling!

You could put an Easter greeting on this card and it would be beautiful to send, also! You just can’t go wrong with this beautiful Fine Art Floral Designer Series Paper for birthday cards or any other cards as well.

Trio of Bunnies Easter Card

Trio of Bunnies Easter Card

Here’s a Trio of Bunnies Easter Card, three little bunnies just waiting for Easter! They are just waiting in the grass, next to some tulips, thinking about spring!

The card base is Pool Party Cardstock with a layer of Blushing Bride Cardstock. I like these two colors together for spring, for softness, and for prettiness! The top layer is Basic White Cardstock, stamped with the bunnies from the Springtime Joy Stamp Set, a couple of tulips, and a small butterfly all in Memento Black Ink.

The bunnies, tulips, and butterfly were colored in with Stampin’ Blends alcohol markers. I had colored in some grass and even some sprigs of grass, but then I got the idea to cut a piece of green designer paper of some sort for the bottom border of the card to look like grass. I looked through my designer papers and ended up choosing this pattern from the Artistry Blooms Designer Series Paper. There are several you could choose from. I also colored in the background of the sky behind the bunnies with the Light Pool Party Stampin’ Blend.

I usually like to cover a “seam” or where a piece of designer paper ends on a piece of cardstock with a piece of ribbon or another strip of paper. On this card, I used a piece of Mossy Meadow 3/16″ Braided Linen Trim across the top of the designer paper and tied two knots along the trim.

The greeting is from the Itty Bitty Greetings Stamp Set. You can find almost anything you need in all of the “Itty Bitty” stamp sets! I love them! I punched it out with the Classic Label Punch. It was a good size for this card! It is popped up with a small Foam Adhesive Strip. These are just like Stampin’ Dimensionals except they are strips. Sometimes you use them in the same way as Dimensionals and sometimes they are used for special projects like shaker cards.

For one more little touch, I added some Artistry Blooms Adhesive-Backed Sequins in the background. I could have added an Easter Basket for at least one bunny to hold, but I wasn’t thinking about that when I made the card so I think it is fine the way it is. I could have also used the “Welcome Spring” greeting in the stamp set.

You will find a lot of uses for this cute Springtime Joy Stamp Set!

PS: Today is the last day to subscribe to Paper Pumpkin to get the March 2021 Kit!

CLICK HERE TO JOIN PAPER PUMPKIN!

Last Two Days! Get The March 2021 Paper Pumpkin Kit!

You only have today and tomorrow to sign up for the Paper Pumpkin Kit for March 2021! Sign up now so you won’t miss out!

This one is really different! It’s not more florals or a holiday theme, this kit has cards with a theme of hills and mountains to celebrate life’s milestones.

Three cheers for mountain air, a sky filled with sunshine, and finding joy in life’s journey! Adventure awaits inside this month’s majestic, mountain-themed kit. With enough elements and embellishments to create eight cards and coordinating envelopes, the Here’s to You Paper Pumpkin Kit is the perfect pick for celebrating life’s little moments and mountain-high milestones!

What makes March’s kit one-of-a-kind? The spectacular set of four free stencils—and a stamping sponge—that you’ll find inside! Pair this pack of stunning stencils with the kit’s contents to stamp a springtime scene, then store the set to stamp for any season in the future. Clean up your binoculars and dust off your hiking boots—the Here’s to You Paper Pumpkin Kit is ready to lead you on an excursion to explore your creativity!

ABOUT THE MARCH KIT
The Here’s to You Kit contains enough supplies to create 8 cards—4 each of 2 designs—and coordinating envelopes.

The kit’s contents include printed card bases, die-cut paper pieces, embellishments, adhesive, and more!
Card size: 4-1/4″ x 5-1/2″
Envelope size: 4-1/2″ x 5-3/4″
Coordinating colors: Bumblebee, Calypso Coral, Old Olive, Petal Pink, Pretty Peacock, Seaside Spray
Includes four free stencils and a stamping sponge!
Arrives in a cute and collectible box.

Don’t miss out on getting the four FREE stencils and stamping sponge! We always like “free”!! Plus, you deserve a package in the mail every month!

JOIN PAPER PUMPKIN!

Sand & Sea Embossed Friends Card

Sand & Sea Embossed Friends Card

This Sand & Sea Embossed Friends Card is one I received as a thank you card from my very dear friend who introduced me to Stampin’ Up! many years ago now! I still think she makes the most beautiful cards and this is certainly one of them! I couldn’t resist posting it to show it to you!

This card is made with the Sand & Sea Suite in the January-June 2021 Mini Catalog, otherwise known as the Spring Mini. From the samples I have seen online, I would guess that this was one of the most popular suites in the Spring Mini.

I did some sleuthing and I think my friend used our retired Bashful Blue Cardstock as a layer on a Basic White card base. It fits on the full front of the card base. She embossed it with the Seashells 3D Embossing Folder. This folder is just stunning! She even said in her note she really liked the embossing folder. The embossed top layer is also shiny so I think maybe she used Frost White Shimmer Paint just sponged on the paper! That way you can have any color paper with that pearlized finish!

She used a Rectangle Stitched Die as the base for the focal point of the card. The paper is in the Suite, the Sand & Sea Designer Series Paper. This sheet has the sand image on one side and a multitude of colored seashells on the other side. The greeting is in the Friends Are Like Seashells Stamp Set. She also stamped several seashells in the stamp set and arranged them around the greeting.

For extra embellishment, she tied a piece of Linen Thread around the embossed layer under the greeting piece. And she added a few sequins from the Whale of a Time Sequins. One type of sequin in the mix looks like a tiny seashell!

If this card doesn’t make you fall in love with the Sand & Sea Suite in the Spring Mini, I don’t know what would! Almost everyone loves the ocean and seashells so you can make lots of cards with this set that everyone will enjoy and appreciate.

SHOP STAMPIN’ UP! ONLINE HERE!

Springtime Joy Lamb Easter Card

Springtime Joy Lamb Easter Card

I am really falling in love with this spring stamp set and enjoyed this making this Springtime Joy Lamb Easter Card. Yes, Easter is right around the corner so it’s time to make cards!

Be sure to check out this Springtime Joy Stamp Set in the January-June 2021 Mini Catalog (Spring Mini)! You might miss it because it’s “just” a stamp set! No Suite, no Bundle, no dies, no embellishments, just a stamp set! Like in the olden days! You’ll find it on page 22.

I wanted to make a card with the lamb in the stamp set and this is what I came up with! The card base is Melon Mambo, a color I haven’t used in awhile somehow. It has a layer of Blushing Bride Cardstock on which I stamped tulips in the same color ink, Blushing Bride.

The lamb is stamped with Memento Ink on Basic White Cardstock. I die-cut the lamb with this die in the Stitched So Sweetly Dies. I started off just coloring the lamb image with Stampin’ Blends, using the lightest gray just around the lamb for a little definition around the flowers, around her face, and around the fluffs of wool on the body. The crown of flowers is colored with Melon Mambo and Flirty Flamingo and the leaves with Granny Apple Green. But I couldn’t stop! I added some grass under the lamb and then, of course, I had to have some sky with Pool Party! Just kind of scribble little scribbles if you are coloring in a larger area.

This lamb piece is layered on a scalloped rectangle of Melon Mambo, also die-cut from the Stitched So Sweetly Dies. I popped this up with Stampin’ Dimensionals.

The greeting is also in the Springtime Joy Stamp Set. It is stamped in Blushing Bride Ink and die-cut with a banner in the Tasteful Labels Dies. It is popped up on Dimensionals, too.

For the inside of the card, I adhered a layer of Basic White since the Melon Mambo is a little dark. It is stamped with the Easter greeting in the stamp set and a little tulip in the lower right corner.

For another idea, here is a card I made with the cute bunny in the Springtime Joy Stamp Set. Oddly enough, I also stamped the tulips in the background on that card, too! I was almost copying myself and didn’t know it!

If you plan to make spring and Easter cards, consider the Springtime Joy Stamp Set and make a card like my Springtime Joy Lamb Easter Card.

SHOP STAMPIN’ UP! ONLINE HERE!

Get the Butterfly Bouquet For Butterfly Lovers!

Today is the first day for butterfly lovers to get the Butterfly Bouquet! It’s a sure sign of spring after a hard winter for many, don’t you think?!

Bring in the beauty of nature with the artistic designs of the Butterfly Brilliance Bundle and coordinating designer series paper, along with textured specialty paper that will put a pop of brilliance on every project.

This is an early release of a new product in the upcoming Stampin’ Up! Annual Catalog! Here are the details:

  • The Butterfly Brilliance Stamp Set and Brilliant Wings Dies are available NOW, either separately or in the Butterfly Brilliance Bundle. These will be in the new catalog, too.
  • The two papers, the Butterfly Bijou 6″ x 6″ Designer Series Paper and the Natural Touch Specialty Paper are ONLY available now during this promotion until May 3. While supplies last. (That means this paper is not going to be in the new catalog, I imagine, so get it now while you can.) The Natural Touch Paper actually has some texture to it and is something different.

Get the Flyer PDF Here!

The stamp set is ONE BIG STAMP! It’s even slightly bigger than a regular card size so if you would like to make a larger card, this is a good stamp for that! Use your Stamparatus to get a good image for sure!

One of the dies cuts out all the butterflies on one of the sheets of butterflies on the designer paper! If you order the stamp set and dies, be sure to get the designer paper so you can do this!

Lots of possibilities with this fantastic collection! If you want everything, just order the Butterfly Brilliance Collection and get it all with one number!

Shop For Butterflies at Stampin’ Up! Today!

Hydrangea Hill Z-Fold Thank You Card

Hydrangea Hill Z-Fold Thank You Card

You can’t really get enough of this gorgeous designer paper that I used on this Hydrangea Hill Z-Fold Thank You Card. I decided to make a Z-fold card because that makes the card a little extra-special anyway, plus I could show off two patterns of the paper on the front of the card.

As you have seen on several of my other z-fold cards, it really just means the card front is folded back on itself in half. So after you make the card base, just score the card front at 2 1/8″ (half of 4 1/4″) and then fold that edge back to the card fold. Here is a card and photos where you can see exactly how the z-fold looks.

On the folded back part of the card, I chose the very full hydrangea print pattern in the Hydrangea Hill Designer Series Paper. I cut it so there would be a very narrow margin around the edge so the paper is cut at 2″ x 5 3/8″. The inside striped piece is cut at 5 3/8″ x 4 1/8″.

The greeting is stamped with the word “Thanks” from the Good Morning Magnolia Stamp Set. I used Highland Heather Ink to match the Highland Heather Cardstock. This greeting was die cut with a rectangle die from the Rectangle Stitched Dies and adhered to an Ornate Frames Diecut.

When you adhere the greeting on to the front of a z-fold card be careful that you only put adhesive on that area that will adhere to the folded front of the card. Otherwise, it may stick to the other side of the card as well! You can kind of eyeball it or maybe you would want to make a pencil mark to indicate exactly where you want the glue to go (and not go!). If you are putting a smaller greeting inside the card, make sure the front section covers the inside greeting. That can be a little tricky but it is something to think about as you assemble your card.

You will find the Hydrangea Hill Designer Series Paper in the January-June 2021 Mini Catalog. If you like hydrangeas, you must have this paper! They are beautiful flowers and so is this paper on this Hydrangea Hill Z-Fold Thank You Card.

Last Day! Sale-A-Bration Darling Donkey

Sale-A-Bration Darling Donkey

Today is the LAST DAY for SALE-A-BRATION and this Sale-A-Bration Darling Donkey is kicking up his heels hoping you will remember to get your order in before Sale-A-Bration comes to a screeching halt tonight!

With every $50 Stampin’ Up! purchase you make, you can earn a FREE product in the Sale-A-Bration Brochure! No limits! Like this Darling Donkeys Stamp Set!

With a $100 purchase, you can earn one of two special products: the Berry Blessings Bundle or the A Touch of Ink Stamp Set. Or chose two of the Level 1 products.

With a $300 order, yours alone or shared with others, you can choose the FREE Punch Party Stamp Set.

And if you want to JOIN Stampin’ Up! as a Demonstrator, with your Starter Kit you will also receive 5 packages of upcoming 6″ x 6″ Designer Series Paper Packs included in your business supplies FREE!

Today is the last day to earn FREE product during Sale-A-Bration!

Think about stocking up on adhesives, cardstock, ink refills…some basics you need to reach your $50 or more!

OR purchase a Prepaid Paper Pumpkin subscription (or add on to your order!) to reach the sales amount you want!

This easy card is made with a card base of Granny Apple Green to match the leaves on the Flower & Field Designer Series Paper, another one of the Sale-A-Bration choices, by the way! I love this package of paper!

The Darling Donkey is stamped on Basic White Cardstock in Memento Ink and cut out with the Rectangle Stitched Dies. The greeting is also in the Darling Donkeys Stamp Set. I colored in the donkey with Stampin’ Blends in Crumb Cake and Smokey Slate. The bow is tied with the Braided Linen Trim. And I couldn’t resist adding two red Resin Hearts Embellishments!

If you would like this Darling Donkeys Stamp Set or the beautiful Flower & Field Designer Paper, be sure to shop at Stampin’ Up! today!

SHOP STAMPIN’ UP! ONLINE!

Flower & Field All-Occasion Card

Flower & Field All-Occasion Card

This Flower & Field All-Occasion Card was supposed to look exactly like a sample in the Sale-A-Bration Brochure, but this shows what can happen when you start copying something! Sometimes you change things a little or a lot!

I wanted to make a card with the Flower & Field Designer Series Paper and looked in the Sale-A-Bration Brochure for ideas. Right away the card in the bottom right of page 11 caught my eye. But when I looked through the package of paper, this black background with the Just Jade polka dots is the one that caught my eye!

As I toyed with maybe adding strips of Just Jade Cardstock as a layer under the top and bottom of the polka dot piece, somehow I came up with strips of this flowered pattern instead. I fiddled with the paper sizes until I had about 1 /4″ top and bottom margins on the Basic White Cardstock card base.

The greeting is stamped from the Lovely You Stamp Set. I wanted a greeting that was long in length. I used the same Bumblebee yellow polka dot scrap of designer paper that the brochure sample used to layer underneath the greeting. I used the Lovely Labels Pick a Punch to punch each end of the yellow polka dot layer.

Then for fun, unless you hate cutting with scissors, I cut out several white daisies from another pattern of the Flower & Field Designer Paper to adhere around the greeting. It was a little tedious, but not too bad! You can even consider cutting with Paper Snips relaxing! I popped up a couple of the daisies with Stampin’ Dimensionals.

For a finishing touch, I added a bow of Bumblebee 1/4″ Gingham Ribbon. You could also add some rhinestones or gem embellishments of any kind.

I absolutely love this Flower & Field Paper! If you do too, you can get it FREE during Sale-A-Bration with a $50 Stampin’ Up! purchase. But you have to hurry, because Sunday, February 28 is the last day of Sale-A-Bration! You don’t want to miss out on FREE products!

SHOP STAMPIN’ UP! ONLINE HERE!

Hydrangea Hill Floral Hello Card

Hydrangea Hill Floral Hello Card

I needed a “happy” card and when I looked through the Hydrangea Hill paper, this sheet of small bouquets and this other sheet with a more generic pattern of little white flowers caught my eye. Even my husband commented as he walked by that those were pretty colors! And that’s how this Hydrangea Hill Floral Hello Card was born!

The card base is Seaside Spray, one of the 2019-2021 In Colors. Not a color I have used much, I don’t think, but it’s pretty with this Hydrangea Hill Designer Series Paper.

Sometimes when I am using two designer papers together, I like to adhere them to another piece of cardstock just to make it easier for me to get them glued together and then be able to tie a piece of ribbon across the seam where the two papers meet. In this case, I adhered them to a piece of Basic White Cardstock with a 1/16″ margin on all sides rather than 1/8″. Then I added a piece of Seaside Spray 1/4″ Metallic Ribbon across the seam. I tied a separate bow and adhered it with Mini Glue Dots. You could also tie it right onto the base ribbon if you wanted or tie on a knot.

The greeting is stamped in Seaside Spray Ink on Basic White Cardstock. The greeting is from the Good Morning Magnolia Stamp Set. I didn’t want something too big to cover the flower bouquets so I chose a small greeting. It is die-cut from the Ornate Frames Dies. I cut another one in Seaside Spray for a little layer. It’s the same size so I just cut it in half horizontally and then let each half layer underneath a little bit at the top and bottom.

Here’s another card I made with the Hydrangea Hill DSP in much the same design. Put this paper on your Stampin’ Up! order along with some other things total $50 or more and take advantage of Sale-A-Bration before it ends Feb. 28!

This Hydrangea Hill Floral Hello Card is an easy one to make to showcase the pretty Hydrangea Hill Designer Series Paper!

SHOP STAMPIN’ UP! ONLINE HERE!

Easy Sale-A-Bration Paper Blooms Gift Bag

Easy Sale-A-Bration Paper Blooms Gift Bag

I like to recommend that stampers and papercrafters make some gift bags to have on hand like this Easy Sale-A-Bration Paper Blooms Gift Bag. It just might save you a last minute trip to the store when you want a cute gift wrap for a small gift or treat! It probably only takes about 5 minutes to make an easy gift bag and you can personalize it for the recipient or for the occasion.

When I looked through the Paper Blooms Designer Series Paper in the Sale-A-Bration Brochure, I assumed it would be all florals with some plain designs on the back. But this sheet of paper really caught my eye with these big circles of various colors all over the sheet! It looked so fun and I thought making a gift bag would be a good way to use it.

To make this gift bag, start with half a sheet of designer paper, 12″ x 6″. Using your Paper Trimmer or Simply Scored scoring board, score the paper going across at 3 1/2″, 5 1/2″, 9″ and 11″. Then turn the paper and score at 1 1/4″ and 5 1/2″. Pay attention to the design on your paper so it doesn’t come out upside down. If you are planning to turn that narrow scored area at 5 1/2″ (which leaves 1/2″ to turn down for the top edge and reveal the paper design on the inside), make sure that pattern is also going to work and go in the proper direction.

After scoring, cut on the score lines at the bottom up to the score lines going across. Cut off the smallest little area on the bottom of the bag flaps. You’ll see which part it is. That will leave a 1/2″ edge to adhere to the other side of the bag. Assemble the bag. I used Multipurpose Liquid Glue for that “wiggle room” it gives you but the Stampin’ Seal+ would also be good.

If you like, punch holes in the top edge and tie some ribbon through for little handles. I used the Seaside Spray 1/4″ Metallic Ribbon.

Here’s another gift bag I made a couple of years ago, decorated a little differently to give you another idea.

To decorate the bag a little bit, although it was cute as it was, I cut out some flowers from another sheet of the Paper Blooms Paper. These were easy flowers to cut out and I only needed these two!

If you like this paper, you can get it free with a $50 Stampin’ Up! purchase if you choose it for your Sale-A-Bration FREE product. Be sure to shop by Sunday, February 28th!

This is a quick and easy project to make with this paper. Follow these directions for this Easy Sale-A-Bration Paper Blooms Gift Bag and then you can make even more gift bags with other paper in your stash!

Oh So Ombre Strawberry Z-Fold Card

Oh So Ombre Strawberry Z-Fold Card

One week from today Sale-A-Bration 2021 will be over! Can you believe it! Your last day to earn any FREE Sale-A-Bration products is Sunday, February 28. Every year, while we really have fun with the Holiday Catalog, once the holidays are over, we look forward to the Spring Mini Catalog and Sale-A-Bration, Stampin’ Up!’s biggest promotion! It has been held every year since the early days of Stampin’ Up! The January-June Mini Catalog continues on, but Sale-A-Bration comes to an end on Sunday! Be sure to place your Stampin’ Up! orders as soon as possible to avoid the last minute rush and get your free stuff!

This card showcases one of the Sale-A-Bration options. It’s a Z-fold card in Granny Apple Green, which means half of the front of the card is just folded back to form a z-shape. I used the Oh So Ombre 6″ x 6″ Designer Series Paper on the card, free with a $50 Stampin’ Up! purchase. On the front panel, I used the design with the circles, and for the inside of the card, I used another sheet that just has solid ombre colors with no pattern. This way I can stamp a greeting or write a note inside on the plainer ombre paper.

Now if you spend $100, you can choose the Berry Blessings Bundle in the Sale-A-Bration Brochure for strawberry and berry patterned paper plus a berry stamp set. This Sweet Strawberry Stamp Set used on this card is in the January-June Mini Catalog but it coordinates with the set in the Sale-A-Bration Brochure. You can also purchase the Sweet Strawberry Bundle which includes the Sweet Strawberry Stamp Set and the Strawberry Punch, which is really fun! (As I write this, the Strawberry Punch is not available until the week of March 1, therefore the Bundle can’t be ordered until then!)

It was fun decorating the front of the card! The rectangle is die-cut from the Stitched So Sweetly Dies in Basic White. I stamped the image in the Sweet Strawberry Stamp Set of the strawberry plant leaves and blooms as the background on this die-cut piece. It is inked up in Granny Apple Green and stamped off, although it wasn’t all that faint. Then I stamped and punched a strawberry, some leaves and some Daffodil Delight blossoms and placed them over this image of the strawberry plant. Some are glued down flat and some are popped up on Stampin’ Dimensionals. The greeting is also from the same stamp set.

The leaf at the top over the greeting might not have been there except that I dropped one of the flower stamps with yellow ink on it right at the top of the die-cut piece. I knew I would figure out a way to cover it up and I liked adding the stamped and punched strawberry leaf up there! As we say, “There are no mistakes in stamping!”

This Oh So Ombre Strawberry Z-Fold Card turned out well, I think, in spite of no real plan when I sat down to stamp and has a bright, happy look to it because of the colors!

Don’t Miss Out on Stampin’ Up! Sale-A-Bration!

Berry Delightful Strawberry Card

Berry Delightful Strawberry Card

When I saw this particular strawberry paper in the package, I just fell in love and had to make this Berry Delightful Strawberry Card. It just seems to have a lovely watercolored look to it.

This is the last week to earn free products during Sale-A-Bration at Stampin’ Up! Monday, Feb. 28th is the LAST DAY! With every $50 purchase, you can earn a free product in the Sale-A-Bration Brochure. With a $100 you may choose two of the $50 choices or you may choose one of two $100 level choices, with this Berry Blessings Bundle being one of them! Earn the Berry Blessings Stamp Set and the Berry Delightful Designer Series Paper together in one Bundle!

This card is made with a Poppy Parade Cardstock base, with just a layer of the Berry Delightful Designer Series Paper. If you want something to brighten up these winter days, this paper is it! I also love the other side of this paper, as seen in this card I made for Valentine’s Day.

I used the Just Jade Gingham ribbon in the Flowers For Every Season Ribbon Combo Pack around the designer paper before adhering to the card base. The greeting is stamped in Poppy Parade ink from the Berry Blessings Stamp Set and die cut with a scalloped rectangle in the Stitched So Sweetly Dies. I popped it up with Stampin’ Dimensionals.

Since the strawberries on this paper are so pretty I cut one out with Paper Snips and popped it up on the corner of the greeting. Then I tied a little knot with the gingham ribbon. Very easy card and the paper makes it!

Sale-A-Bration is quickly coming to an end so check your Stampin’ Up! shopping list and see what else you need! Don’t forget to stock up on cardstock, adhesives, ribbons, whatever you need to help earn your free products!

SHOP STAMPIN’ UP! ONLINE HERE!