Tag Archives: Good Morning Magnolia Stamp Set

Good Morning Magnolia Soft Subtles Thinking of You Card

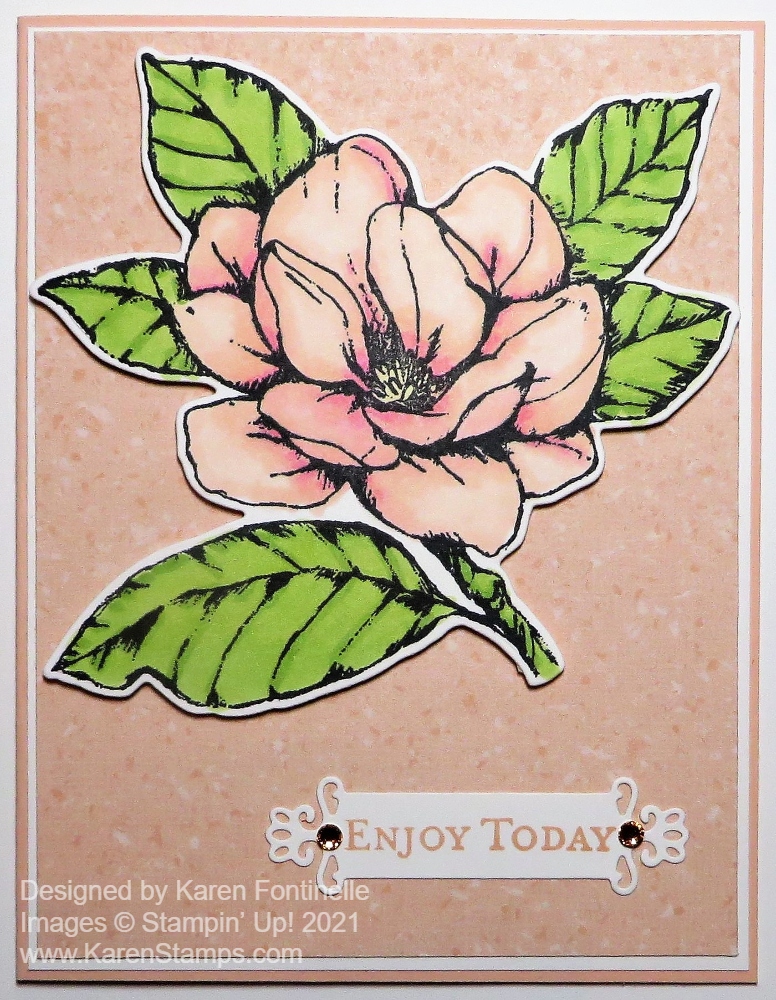
The other day I had another blog post about the Good Morning Magnolia Stamp Set and that I was surprised it was retiring because the magnolia stamp is so striking and dramatic in its size and beauty as you can see on this card, Good Morning Magnolia Soft Subtles Thinking of You Card. You don’t really need much else when you have this beautiful magnolia on the front of a card!

The card base is Soft Sea Foam, a color I haven’t really used that much. It is a very soft, light green, and perfect for this card. The magnolia in the Good Morning Magnolia Stamp Set is stamped in Memento Ink and colored with the Petal Pink Stampin’ Blends Combo. I left some areas whitish on the petals so it wasn’t all colored in solid. The leaves are colored with Soft Sea Foam Stampin’ Blends with a tiny bit of yellow thrown in.

The greeting is stamped in Petal Pink and die cut with a die from the Ornate Frames Dies. For a little layer underneath, I cut another die from the same set, but since it is small, I cut it in half so an end could stick out from each side of the greeting. The stamped layer of the card, instead of just layering on a pink cardstock, is layered on a pinkish pattern in the Peony Garden Designer Series Paper. Actually, on this card I made recently, you can see the same designer paper that I used behind the Basic White stamped layer, used as a layer behind the die-cut magnolia.

For a little pizzazz and sparkle on my card, I used the Elegant Faceted Gems, three in the smallest size and two in the larger size. I think they add a little extra to a very pastel card.

The Good Morning Magnolia Stamp Set and Magnolia Memory Dies are retiring on May 3. The Dies are SERIOUSLY reduced in price! They were originally $35.00 and are now discounted to $8.75!! If you already have the stamp set, it would be a good time to pick up the dies! They weren’t sold in a Bundle, just separately, so check that out!

SHOP LAST-CHANCE RETIRING PRODUCTS HERE!

Good Morning Magnolia Enjoy Today Card

Good Morning Magnolia Enjoy Today Card

This Good Morning Magnolia Enjoy Today Card is one I had to make before this beautiful stamp set retires soon! I can’t believe they are taking away this beautiful, dramatic flower, but I think it has been around for two years. However, I haven’t had enough opportunity to play with it!

The Good Morning Magnolia Stamp Set is on the Last-Chance List for the Stampin’ Up! Annual Catalog. It is easiest to see what is retiring and still available by going to the Stampin Up! Store. There are also coordinating dies, the Magnolia Memory Dies, that are retiring along with the stamp set. You can get these dies for the low, low, ridiculously low price of $8.75!! Be sure to check these out!

To make this card, I started with a card base of Petal Pink. I stamped the large magnolia using my Stamparatus because with a very large stamp like this one, it could be that one area of the stamp might not stamp as well. If you are using the Stamparatus, you can simply reink the stamp, still attached to the Stamparatus, and stamp again focusing on the area that needs more pressure or more ink. The Stamparatus is so great for things like this! The Stamparatus even has its own Craft & Carry Stamparatus Bag that is on sale for only $11.60 after being reduced from $29.00. This is a great bag, actually, even if you don’t own a Stamparatus. Even if you do, you can use the bag for other things. There are nice pockets inside for holding all kinds of things, crafting or otherwise.

After stamping the magnolia on Basic White Cardstock, I colored it with Stampin’ Blends. You can use various methods of coloring but I love using the Stampin’ Blends. I used the Petal Pink Combo on the flower and then for some crazy reason added tiny bits of Melon Mambo. It really was a strong color on the flower and I figured I had ruined it! BUT, I kept blending with my Petal Pink colors and I think it all worked out! I die cut it with the Magnolia Memory die. As I got ready to layer the flower on the card, I saw a piece of designer paper from the Peony Garden Designer Series Paper and thought this Petal Pink pattern would look good behind the flower. (Honestly, I had looked all over for the Magnolia DSP I thought I had and had loved, but I guess that was from the year before!)

Because the die cut had a bit of white showing on it, I decided to put a layer of Basic White with a very narrow margin underneath the pink designer paper, which helped it stand out a little from the Petal Pink cardstock base. The magnolia is popped up with Stampin’ Dimensionals®. I chose a greeting in the stamp set and stamped it in Petal Pink Ink and die cut it with a frame in the Ornate Frames Dies. To finish off the card, I added two Champagne Rhinestone Basic Jewels to the Ornate Frame.

Here is a similar card I made with the Good Morning Magnolia Stamp Set and the designer paper almost two years ago. Really, this Good Morning Magnolia Enjoy Today Card is an easy card to make so check out the stamp set and dies if you don’t already own them on the Stampin’ Up! Retiring List.

Hydrangea Hill Z-Fold Thank You Card

Hydrangea Hill Z-Fold Thank You Card

You can’t really get enough of this gorgeous designer paper that I used on this Hydrangea Hill Z-Fold Thank You Card. I decided to make a Z-fold card because that makes the card a little extra-special anyway, plus I could show off two patterns of the paper on the front of the card.

As you have seen on several of my other z-fold cards, it really just means the card front is folded back on itself in half. So after you make the card base, just score the card front at 2 1/8″ (half of 4 1/4″) and then fold that edge back to the card fold. Here is a card and photos where you can see exactly how the z-fold looks.

On the folded back part of the card, I chose the very full hydrangea print pattern in the Hydrangea Hill Designer Series Paper. I cut it so there would be a very narrow margin around the edge so the paper is cut at 2″ x 5 3/8″. The inside striped piece is cut at 5 3/8″ x 4 1/8″.

The greeting is stamped with the word “Thanks” from the Good Morning Magnolia Stamp Set. I used Highland Heather Ink to match the Highland Heather Cardstock. This greeting was die cut with a rectangle die from the Rectangle Stitched Dies and adhered to an Ornate Frames Diecut.

When you adhere the greeting on to the front of a z-fold card be careful that you only put adhesive on that area that will adhere to the folded front of the card. Otherwise, it may stick to the other side of the card as well! You can kind of eyeball it or maybe you would want to make a pencil mark to indicate exactly where you want the glue to go (and not go!). If you are putting a smaller greeting inside the card, make sure the front section covers the inside greeting. That can be a little tricky but it is something to think about as you assemble your card.

You will find the Hydrangea Hill Designer Series Paper in the January-June 2021 Mini Catalog. If you like hydrangeas, you must have this paper! They are beautiful flowers and so is this paper on this Hydrangea Hill Z-Fold Thank You Card.

Hydrangea Hills Thank You Card

Hydrangea Hills Thank You Card

Do you love the look of this Hydrangea Hills Thank You Card as much as I do? I’m not bragging about my own work….it’s the PAPER!! Oh my gosh! I just got it, opened the package, didn’t even look at ALL the paper, just grabbed the top sheet, and went to work!

It was late and I just wanted to make an easy card and this card was certainly it! When I flipped the hydrangea side of the Hydrangea Hill Designer Series Paper over, I saw this green plaid on the other side and thought it would work perfectly with this card design. With the way the hydrangeas are printed on the paper, I knew a horizontal layout on the card would show the hydrangeas the best.

The mistake I made was cutting the designer paper exactly the size for a layer on the front of the card. Since I wanted to wrap some ribbon around the layer, I needed to overlap the flower part of the paper and the green plaid portion. (I could have cut out another strip of paper but I didn’t). The way to get around this is to glue the two designer paper pieces to another piece of cardstock, either covering it entirely or leaving just a tiny margin around the edge (1/8″) like I did on the white cardstock. Sometimes an extra layer like this under the designer paper helps the colors in the designer paper stand out.

Once I had the two pieces of the Hydrangea Hill DSP adhered to a piece of white cardstock, I wrapped a piece of ribbon across the front. While this Blackberry Bliss 3/8″ Striped Ribbon is a little dark, since it’s sheer I think it still works fine on this card. I tied a bow separately and adhered it with a Mini Glue Dot or two.

This whole card front is then adhered to a card base of Highland Heather. There are a lot of colors that coordinate with this designer paper so you can have lots of different looks depending on which colors you use with which papers.

For the greeting, I chose the “Thanks” from the Good Morning Magnolia Stamp Set. The font is so elegant in that set and I thought worked well on this card. The greeting is stamped in Highland Heather Ink, die-cut with the Layering Oval Dies as is the Highland Heather layer. I popped it up over the ribbon with Stampin’ Dimensionals®.

Actually, I only ordered the designer paper in the Hydrangea Hill Suite (because I can’t have everything I want!), but now that I see how pretty the Hydrangea Hill Paper is, I don’t know if I have the will power not to order more things!

I have to say just this one sheet of designer paper I have looked at is SO pretty, so be sure to check out the Hydrangea Hill Suite of products starting on page 18 of the January-June 2021 Mini Catalog. While you might want everything, you can make cards with just the paper and maybe some matching ribbon as I did with this Hydrangea Hill Thank You Card.

Dragonfly Garden Thinking of You Card

Dragonfly Garden Thinking of You Card

You may think this Dragonfly Garden Thinking of You Card would be difficult to make, coloring those tiny areas, but it is still relatively easy. Since the areas you probably want to color are so small, you can’t really fuss over it very much!

Just to use a color I don’t usually use, I chose Blackberry Bliss for the card base. And because I had thought about using Melon Mambo as the card base I used it as a layer underneath the Whisper White card front.

The reason I used this collection of flowers in the Dragonfly Garden Stamp Set was to see what it would be like to color and make into a card. I stamped it with Memento Ink and then colored in with Stampin’ Blends. I used some Daffodil Delight on the top flower, Melon Mambo on the next group of daisies or whatever kind of flower that is! The other flowers I used a purple color. The leaves and stems are colored with Granny Apple Green.

Most of these images are so small and tiny that you can only use the pen tip of the marker, not the brush tip. And even then, you mostly barely dot the color in, not really “color in”.

The greeting is the pretty font from the Good Morning Magnolia Stamp Set. If you aren’t sure what you will use a card for that you make, usually the “Thinking of You” sentiment is a versatile one to choose. You may be thinking of that person for many occasions!

The flowers looked a little bare over there by themselves, so to kind of ground them a bit, I colored around them with a Light Pool Party Stampin’ Blend marker. I only barely wanted it to be seen. It was nothing artistic, just some scribbling and coloring lightly with the brush tip. Nothing is right or wrong.

Since the cardstock is so dark, I adhered a layer of white cardstock on the inside to stamp or write a message. And for a little decoration, I adhered a strip of Dandy Garden Designer Paper across the bottom.

Basically, this is an easy card to make to send to someone. Just some stamping and a little bit of coloring! And if you don’t want to do the coloring, make a monochromatic card stamping the flowers in a color, and then there is no need to color the design like this card HERE that I previously made.

If you like various kinds of plants and dragonflies, you should really check out this Dragonfly Garden Suite Collection in the new January-June 2021 Mini Catalog. Then you will have everything in this theme to make lots of beautiful cards and projects.

Make Your Own Magnolia Designer Paper

Make Your Own Magnolia Designer Paper

When I was making a card with my Magnolia Lane Designer Series Paper and the Good Morning Magnolia Stamp Set, I decided it might be fun to just stamp a bunch of flowers on a card front. This is how I ended up making my own magnolia designer paper!

I’ve always found just doing random stamping all over a piece of paper to be a very relaxing and therapeutic experience! The block and stamp just feels good in my hand and doing the repetitive motion is calming. Then it is fun to go back over and color in the images unless you are doing just a colored outline and not coloring in.

This card wasn’t even planned! I just thought of it as I was making another card and had stamped some extra images on some scrap cardstock in case I wanted to use them somewhere somehow. I decided to stamp the flower images in Memento Ink randomly over a card front layer of Whisper White. Sometimes you have extra white space when you do random stamping as I did on this card. Since there was a single leaf in the stamp set, I just used the stamp to fill in some space in between the flowers.

To color in my card, I used my Stampin’ Blends, my favorite method of coloring right now! I used Light and Dark Petal Pink for the flower buds and Light and Dark Mossy Meadow for the leaves. The greeting is from the Good Morning Magnolia Stamp Set, stamped in Petal Pink, and then die-cut with the Stitched Nested Labels Dies. The ribbon I used across the front of the card is Old Olive and comes in the Ornate Garden Ribbon Combo Pack. It’s not a perfect match, of course, to the Mossy Meadow leaves, but I think it looks fine. It’s a pretty ribbon and makes the card look a little bit elegant.

This is basically an easy card but of course it does take time to color in the flowers. If you aren’t crazy about coloring, this might not be the card for you! But I enjoy it and love using my Stampin’ Blends.

You will see the Good Morning Magnolia Bundle on the Last-Chance retiring list but the stamp set and dies will be in the new catalog. If you want this Bundle and want to save 10%, order it now to save that 10%, otherwise in the new catalog you will purchase each for full price.

I love the Magnolia Lane Designer Series Paper and have made many cards with it. But if you want to do some random stamping and get the feel of that stamp in your hand and like the repetitiveness of stamping for a card front, try making your own “designer paper” with stamping!

Peaceful Poppies Thinking of You Card

Peaceful Poppies Thinking of You Card

Wouldn’t someone you know just love to receive this Peaceful Poppies Thinking of You Card? I think these two patterns of paper in the Peaceful Poppies Designer Series Paper really make for a springy, happy card! The bright, colorful flowers and the light polka dot tulle ribbon just really catch my eye!

The card base is Poppy Parade, which is one of the many coordinating colors for the Peaceful Poppies DSP. I cut the two pieces of DSP to fit how I wanted them, overlapping about half an inch. Just to cover up the seam, I added a half-inch piece of Old Olive Cardstock across the card.

Before you adhere this designer paper piece to the card base, be sure to wrap the ribbon around the Old Olive strip first! I just love this Whisper White 5/8″ Polka Dot Tulle Ribbon in the Annual Catalog! Just wrap it around and then make a separate bow. Adhere the bow with a couple of Mini Glue Dots. The greeting is stamped from Magnolia Blooms. I really liked the font and thought it would go with the flowers. I punched it out first with the 1 1/2″ Circle Punch, not yet knowing exactly what I would layer it on, but opted to go with the scalloped circle in Layering Circles Dies. Since I stamped the greeting in Poppy Parade Ink I layered it on a piece of Poppy Parade Cardstock. Then it is popped up on Stampin’ Dimensionals over the ribbon.

The Peaceful Poppies Designer Series Paper has handpainted blooms and watercolor washes. Each paper is beautiful and I think you’ll want to have that package in your collection!

Remember that today is the LAST DAY to subscribe to Paper Pumpkin to get the January kit! Read all about it on my post HERE.

Paper Pumpkin Banner Jan 2020

Buy Peaceful Poppies Designer Paper HERE!

Good Morning Magnolia Z-Fold Sympathy Card

Good Morning Magnolia Z-Fold Sympathy Card

None of us want to have to make a sympathy card or send one, but this Good Morning Magnolia Z-Fold Sympathy Card seemed like the right one for this friend. I’m sure I got the idea from someone else. Maybe I changed some things about it a little but I don’t remember! It is a z-fold card which means the front of the card is folded back, essentially in half. Then you can either leave that front portion folded but not adhered, or you can adhere that folded back piece so the front underneath it.

The card base is Petal Pink with Whisper White layers. I stamped the very large magnolia from the Good Morning Magnolia Stamp Set with Memento Ink and colored in with Stampin’ Blends Markers. I used the Petal Pink markers, plus two greens on the leaves with just a touch of yellow. Then this large magnolia can be die-cut with the Magnolia Memory Dies. The other two smaller flowers are just stamped on the card and colored in. I had to play with the die-cut magnolia to get it in just the right place to fit on the card and line up with the other two flowers.

As you can see below, the edge of the flower hangs over the edge of the card.

Good Morning Magnolia Z-Fold Sympathy Card Inside

You can still stamp something on the inside or just write a note. Just be cautious to have it hidden under the closed front of the card. You might want to make light pencil marks where the card front comes to when closed.

I love z-fold cards! I think they add some extra interest without being very difficult to make!

Good Morning Magnolia Z-Fold Sympathy Card Open

The greeting for this sympathy card comes from the Flourishing Phrases Stamp Set. I love that stamp set and have used it a lot.

You could change this card for another occasion by obviously changing the greeting. It would make a beautiful birthday card, Mother’s Day card, even anniversary, engagement, or wedding card.

If you haven’t ordered this Magnolia stamp and dies yet (or paper!), you probably want to put it on your next order! And when you do, if you have coupon codes from July, be sure to use them before the end of the month!

Only a few more days to sign up for the August Paper Pumpkin Kit so don’t delay if you are interested in a taste of fall! I need this kit to arrive soon!

Even though we hate to think about it, it would be a good idea to make a few different sympathy cards to have on hand like this Good Morning Magnolia Z-Fold Sympathy Card in case the need arises and you want a card to send quickly.

Shop Stampin’ Up! Online!

Magnolia Thinking of You Card

Magnolia Thinking of You Card

This Magnolia Thinking of You Card is easy to make and so fun to do the coloring on the magnolia! The best thing is I found my missing Magnolia Memory Dies finally! Since I was keeping “new stuff” separate from my current, at the time, products the dies didn’t make it into the other room by my Big Shot. Instead, I kept them on a desk and they got covered by a stack of cards! Who would have thought to look under the stack of cards when a couple of loose dies from the set that I had used after getting my preorder were laying uncovered in another spot?! Anyway, I found them and was able to die-cut this gorgeous magnolia after stamping it.

The magnolia is stamped in Memento Ink and then colored with Stampin’ Blends. I used the Petal Pink colors on the flower and Granny Apple Green with a touch of yellow on the leaves. I just love coloring with these alcohol markers!

The greeting is from the Good Morning Magnolia Cling Stamp Set and is stamped in Petal Pink Ink. I also thought about using Early Espresso Ink so either would work! I die cut the greeting with one of the Stitched Nested Labels Dies. I think it looks pretty as is and stands out on the white so doesn’t need any layer.

The card base is Early Espresso and the designer paper is Magnolia Lane DSP. I added a Whisper White layer underneath the designer paper to make it stand out against the Early Espresso. In fact, I die cut the greeting out of the same Whisper White piece because it is hidden underneath the designer paper! I don’t always do this but sometimes I think about it ahead of time!

The beautiful magnolia is popped up with a bunch of Stampin’ Dimensionals® and the greeting is adhered flat on the card front. Since the Early Espresso is so dark for the card base, on the inside of the card I will add a layer of Whisper White Cardstock so I can stamp a sentiment or write a note inside. I can also stamp one of the flowers in the Good Morning Magnolia stamp set on that Whisper White layer or add a piece of the beautiful Magnolia Lane Designer Paper.

Here is the first card I made with the Magnolia Lane Designer Paper and a greeting. In this case, I cut out a flower from the designer paper!

Copy this Magnolia Thinking of You Card when you get your Good Morning Magnolia Bundle. You can change the designer paper and greeting but at least you have an easy design to use!

SHOP STAMPIN’ UP! ONLINE HERE!

First Day of the New Stampin’ Up! Catalog!

Good Morning Magnolia Hello Card

Today is the first day of the new 2019-2020 Stampin’ Up! Annual Catalog with new stamps, dies, embellishments and accessories! It’s the day we have been waiting for and the new catalog will be here this afternoon! This morning Stampin’ Up! is working to get the Online Store ready with the new products. It should be ready no later than Noon MT (1:00 PM CT).

I decided to make this card with the Good Morning Magnolia stamp on the front to celebrate the new catalog! I think this suite of products will be a big seller!

The card base is Mossy Meadow with a layer of Magnolia Lane Designer Series Paper. I think this package of paper is just gorgeous! I thought I was going to use two patterns on this card but once I laid this pink layer down I loved the way it looked and that was it! I used the really pretty 5/8″ Organdy Striped Ribbon across the card and under the flower. I may have gotten the last roll of it during our preorder! I was moving my products back and forth between my “order” and my “Stampin’ Rewards” and suddenly it wasn’t available! But I still had it listed on one of those places so I guess it was okay and I got it in my order! It is indeed backordered but they should have more available around June 24th.

I stamped the large magnolia flowers on Whisper White with the Memento Ink and colored it in with Stampin’ Blends. It was nearly dinner time and I was afraid it was going to take me a long time to color in this big flower and leaves, but it went very quickly! You don’t need to be real fussy about it or worry if it is absolutely correct. I think mine turned out fine! I started to cut it out with my Paper Snips when I remembered that there were dies! But I couldn’t find my Magnolia Memory dies, except for a few loose ones! So I obviously own them, I just have to find the rest of the package! In the interest of time and disorganization, I just went ahead and cut it out by hand. Easy enough!

I knew the large magnolia wasn’t going to show up extremely well against the patterned paper, but I liked the look anyway. I added a die cut large circle of Vellum Cardstock to put behind the flower. The magnolia is popped up on LOTS of Stampin’ Dimensionals!

The greeting is also in the Good Morning Magnolia Stamp Set and I die cut that with the new Stitched Nested Labels Dies. I was going to layer it on Mossy Meadow but there wasn’t much space and really, I just liked the greeting by itself. Funny how you don’t always know what card design you are going to come up with until you do!

Happy New Catalog Day (or afternoon!)! Check out the Online Store although expect there to be crowds of people there! Sometimes the website acts up on days like this! Once the Online Store is back up and running today, you can place an order!

Happy Shopping!